
We've done pretty well with just a single template, but we will need multiple templates to build a complete website in TYPO3. Bosses and content editors are not going to be that impressed that we've effectively given them only one editable content area in the entire template; we are going to need some diversity in our internal pages for multiple columns or sidebars if we want to make a professional website. It's our job to make sure that the editors have options for the layout when they are adding new pages or sections or updating current ones, so we're going to start adding new layouts into the mix.
In this chapter you will:
- Create multiple templates for different page layouts
- Add a sidebar to the list of possible content areas in the backend
- Assign specific templates to pages and subpages
- Create icons for our templates to make it easier to choose the right layout for a page
- Update the icon and timestamp fields for just one section of the website
- Create a printable template with CSS
- Create a new printable subtemplate for the main template
- Create a dynamic link to a print-friendly template on each page
We know that we need more templates, but we can't spend too much time on each one or make updating more confusing for editors. Of course, we could go through all the work of creating multiple new data structures and template objects just to add some sidebars, but we would end up repeating a lot of work needlessly. Instead of creating a set of complete templates with new data structures, we can just create a handful of template objects in TemplaVoila that can share one data structure and one new HTML file. We already have one main data structure that we are using, and TemplaVoila allows multiple template objects to be mapped to a single data structure. Essentially, each template object is just a unique mapping of the fields in the data structure to an HTML file. As long as we are using most of the same data fields, we will just keep creating new template objects for the existing data structure. We can even add a few fields like sidebars to the main structure; we don't have to map them in template objects that don't need them.
Our boss really loves sidebars, so we can impress everyone with a few choices of templates with sidebars. We could create just one, but we can create three new templates with almost the same amount of work. We'll create one with a sidebar on the right, one with a sidebar on the left, and one with sidebars on both sides.
Our mapping will help us define the final layout of each template object, but we don't need to create a new HTML file for each object. We can re-use the same HTML file for multiple templates by creating a new HTML file with div areas for left and right sidebars. We'll just map them or ignore them in each template object depending on what we need. Technically, this template will be exactly like the current HTML template except for the sidebars, so we can even copy template.html to start with. We could actually modify the main HTML template, but we're still experimenting. There's no point in breaking the current template by accident. For now, we can just create a file named template_sidebar.html in the templates directory (fileadmin/templates/) that looks just like the main template with two div tags added for sidebars:
<!DOCTYPE HTML>
<html>
<head>
<meta charset="utf-8" />
</head>
<body>
<div id="logo"></div>
<div id="timestamp" style="float: right;"></div>
<ul id="menu-area"><li class="menu-item"><a href="">Menu Item #1</a></li></ul>
<ul id="submenu-area"><li class="submenu-item"><a href="">Submenu Item #1</a></li></ul>
<div id="banner_image"></div>
<div id="left_sidebar" class="sidebar"></div>
<div id="right_sidebar" class="sidebar"></div>
<div id="content">This is our content</div>
</body>
</html>
With the new HTML in place, we can update our stylesheet to arrange our templates correctly. We're going to keep this pretty simple. For our site, all sidebars can be exactly 200 pixels wide, and we'll put a 30 pixel margin between the sidebar content and the main content area next to it. We can add the following code to our main stylesheet (fileadmin/templates/style.css) to set the width, margins, and appropriate floats:
.sidebar {
width: 200px;
}
#left_sidebar {
float: left;
margin-right: 30px;
}
#right_sidebar {
float: right;
margin-left: 30px;
}
Before we create the new template objects, we need to make sure that we have data fields available for mapping. Just like when we added the banner, logo, and other fields in Chapter 3, Adding Custom Template Fields, we are going to modify the data structure.
Just to refresh, we get into the data structure modification page through the TemplaVoila view in the backend. Next to the main template, just click on the Update mapping button. In the Information tab, we can get access to add columns to the data structure by clicking on the button labeled Modify DS/TO. We have already done this a few times, so we can confidently click on OK on the warning pop up and proceed into the editing page for the data structure.
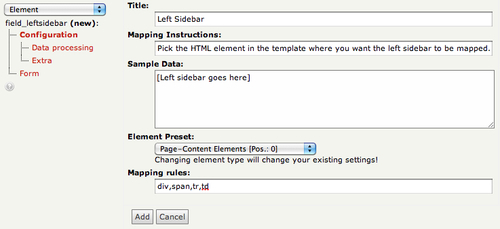
At the bottom of the page, we can add a new field called field_leftsidebar:
We are going to use the Page-Content Elements element preset so that our editors will see our new sidebar field in their TemplaVoila page view. Other than that, it's a basic element like the ones we've been creating, so we can configure it with the following settings:
- Field:
field_leftsidebar - Title:
Left Sidebar - Mapping Instructions:
Pick the HTML element in the template where you want the left sidebar to be mapped. - Sample Data:
[Left sidebar goes here] - Element Preset:
Page-Content Elements - Mapping rules:
div,span,tr,td
Our screen should look like this:
We can save and update the left sidebar and create a new right sidebar with a similar configuration:
- Field:
field_rightsidebar - Title:
Right Sidebar - Mapping Instructions:
Pick the HTML element in the template where you want the right sidebar to be mapped. - Sample Data:
[Right sidebar goes here] - Element Preset:
Page-Content Elements - Mapping rules:
div,span,tr,td

Once we've created both fields, we can save our changes by clicking on Save and Exit.
Now that we have a new HTML file, updated CSS, and new fields available to us in the data structure, we can create our new template objects. There are three steps we need to go through to create each new template:
- At the bottom of the main TemplaVoila page, click on the link labeled Create new Template Object.
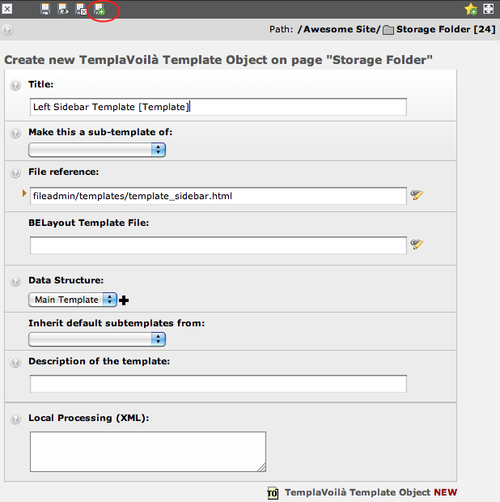
- This brings up a configuration page for the new template. We are not dealing with subtemplates or special local processing yet, so we only need to fill out the title, choose a file reference (our HTML file) and select our data structure from the drop-down. Here are the values we will use for our example site:
- Title:
Left Sidebar Template [Template] - File reference:
fileadmin/templates/template_sidebar.html - Data Structure:
Main Template
- Title:
- If our configuration looks like the following screenshot, we can save it. As we need to create two more templates, we'll click on the "Save and create new icon" (circled in the following screenshot) to save our current template object and create a new one.
After we choose to save and create a new object, we can immediately start configuring our new one to show a sidebar on the right. Our settings will be exactly the same as Left Sidebar Template [Template], but we will name it Right Sidebar Template [Template]. As an aside, it is important that we name our templates clearly for any site we are working on. Except for the possible icons that we can add later, this name will be the only thing an editor sees when they are trying to choose the right template for a page.
With the new title, this should be our configuration screen for the new template object:

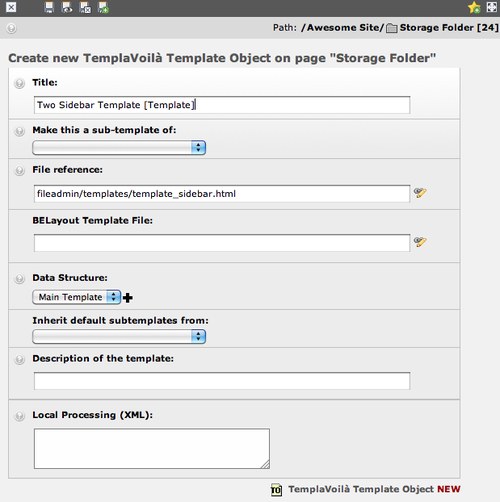
If our configuration looks correct, we choose to save and create another document again. This time, we'll create our final template for now to show two sidebars. Once again, we will choose the same file reference and data structure; our only change will be naming our template Two Sidebar Template [Template]:
We do not have any more templates to create right now, so we can choose to save and close the document to be returned to the main TemplaVoila Control Center.
Mapping the new template objects will be just like mapping our main template, so we can click on the Remap button on the main TemplaVoila page next to the new template object Left Sidebar Template [Template]. On the mapping page, we will map all of the elements to our new object as we have done for the main template:
- Map Root to the
bodytag. - Map Main Content Area to the
divwith the IDcontent. - Map Main Menu to the
listtag with the IDmenu-area. - Map Sub menu to the
listtag with the IDsubmenu-area. - Map Banner Image to the
divwith the IDbanner_image. - Map Timestamp to the
divwith the IDtimestamp. - Map Logo to the
divwith the IDlogo.
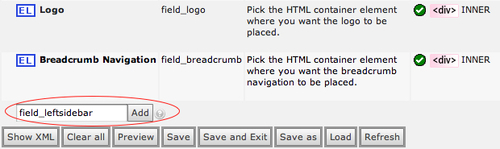
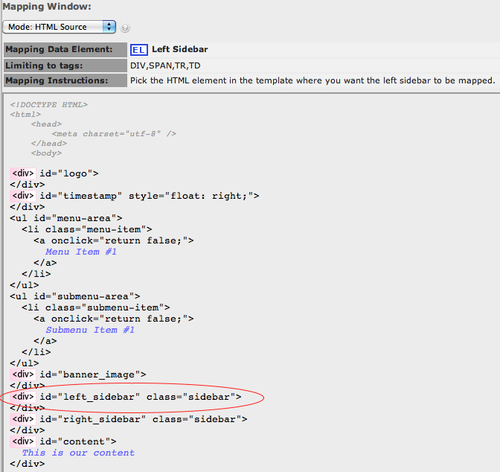
The only additional mapping will be the new field labeled Left Sidebar, which we can map to the div with the identifier left_sidebar that we have circled in the following screenshot:
With our updated mapping, we can click on the Save and Return button to save all of our changes to the database and go back to the TemplaVoila Control Center to map the next templates.
From the main TemplaVoila page, we will click on the button to update the mapping of the Right Sidebar Template [Template]. Once again, we'll map everything like the earlier template objects with two obvious changes: we do not map the Left Sidebar element, and we map the Right Sidebar element to the div with the identifier right_sidebar. Once we have mapped everything, we save our changes and return to the main TemplaVoila page again.
Now we can map our last template object, Two Sidebar Template [Template]. Again, we choose to update the mapping of our template object and map all of our elements almost exactly like our other template objects. The only difference this time is that we want to map both the Left Sidebar and Right Sidebar elements in this template object. Once we have clicked on Save and Return we have officially created and mapped three new templates for our editors to use. Of course, we'll need to tests them first.