
Now that we are done customizing the RTE, we can work on the main module that editors will be looking at day after day, the Page module. The look of the Page module in TemplaVoila has improved, but it does not give our editors a good idea of how pages will look in the frontend. It's also based entirely on columns, so it can get too wide for easy editing. Like all things in TYPO3, we can adjust it and customize it to our needs. We can use an HTML file like we use for TemplaVoila template objects to make the backend look more like the frontend with headers, footers, and sidebars.
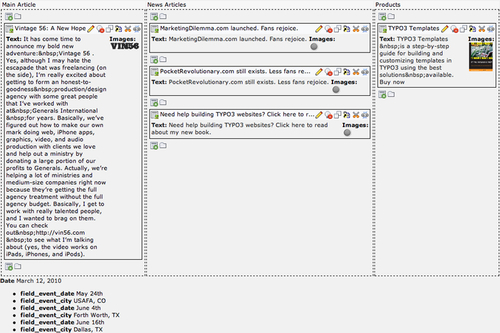
We're going to update the backend layout (commonly called BELayout in TYPO3) for the newsletter template by creating a new HTML file and assigning it to the template. As you can see, our default backend layout for the newsletter shows three columns, and there is no real indication of where things will appear in the frontend view:
Now we can create our own backend layout to replace the default for any pages with the newsletter template:
- We are going to make the backend layout look as much like the frontend template as possible, so we can start by copying the current newsletter HTML template,
template_newsletter.html, to a new file,belayout_newsletter.html, inside thefileadmin/templates/directory. - After you have created the new HTML file, open it up in a text editor so we can make some changes to adapt it to the backend better.
- Remove the style section in the head of the HTML document. We will add CSS later, but the CSS in the head section will not affect what we want right now.
- Let's change the main table tag to work better with the backend. We don't need to use tables in backend layouts, but we are using a table here to match what is seen on the frontend. We want our width to be fluid, so we'll remove the
widthproperty. We also don't need another border in addition to the one the Page module already provides, so we'll remove the border and replace it with a plain white background color:<table align="center" style="background-color: #ffffff;">
- We want the banner to show up. As this is loading in the backend, TypoScript objects will not be loaded. Instead, we'll add the image as an HTML tag in the layout file:
<td id="banner_image" colspan="2" align="center"><img src="/fileadmin/templates/newsletter_banner.png" alt=""></td>
- As we are not using pixels to constrain the width of our table, we need to change the main content column:
<td id="main_content" width="64%" valign="top">
- Inside our HTML, we can use markers to load content fields. The markers are simply the name of the field from the data structure (field_main_article, for example) surrounded by hash tags:
###field_main_article###. TemplaVoila will replace this marker with an area for our different content elements such as the Main Article column in the default layout. So, we can use these markers in our HTML file to add the content fields to our main content column:<table> <tr> <td id="main_article" style="padding-bottom: 15px;">###field_main_article###</td> </tr> <tr> <td id="news" style="padding-bottom: 15px;"> <div class="news_item">###field_news###</div> </td> </tr> </table>
- Next, we can update the width of the sidebar:
<td id="sidebar" width="36%" valign="top">
- TemplaVoila only lets us use markers for the fields of type "Content Elements", which are the fields that normally show up as columns in the Page module. Any of the other fields like TypoScript objects or fields that are set in the page properties cannot be part of the layout. The fields from our page properties, like our event fields in the newsletter, will still be automatically shown at the bottom of the page. So, we can't add the events fields to our layout, but we can add a placeholder section with a note for the editors so they still have a better preview of the frontend page:
<td style="padding-bottom: 15px;">
<h3 id="event_list_title">Upcoming Dates</h3>
<p>(Edit events in page properties)</p>
</td>
We can use markers for the products section, though:
<td id="product_list" style="padding-bottom: 15px;">
<div class="product">###field_products###</div>
</td>
- We can use example data for the contact section. As editors will not be editing our TypoScript values, we don't need to tell them where to go to change the values. We can just show them some sample data based on the current TypoScript values so that they remember the contact information needs to fit into the column:
<td id="contact_info_section" style="padding-bottom: 15px;">
<h3 id="contact_info_title">Contact Us</h3>
<div id="contact_info">
<p>Suite 850</p>
<p>1214 Rebekah Ave.</p>
<p>Dallas, TX 75154 USA</p>
<p><a href="mailto:[email protected]">[email protected]</a></p>
<p><a href="http://www.example.com">www.example.com</a></p>
</div>
</td>
- Finally, we will add some example data for the footer as well:
<div id="footer" align="center">Copyright Example.com 2010</div>
- After we have saved our changes to
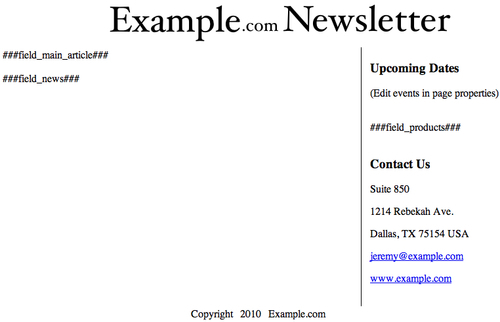
belayout_newsletter.html, we can open it in a browser to see that it structurally matches the newsletter template we are showing to visitors:
Now that we have an HTML file, we can assign it to the newsletter template data structure in the TemplaVoila module:
- Go to the TemplaVoila module, and click on the pencil icon next to the Newsletter data structure:
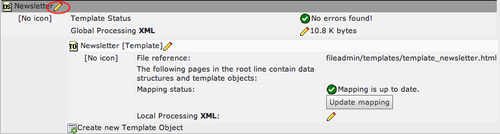
- Select our new HTML file,
fileadmin/templates/belayout_newsletter.html, in the BELayout Template File field using the link icon on the right of the text field.
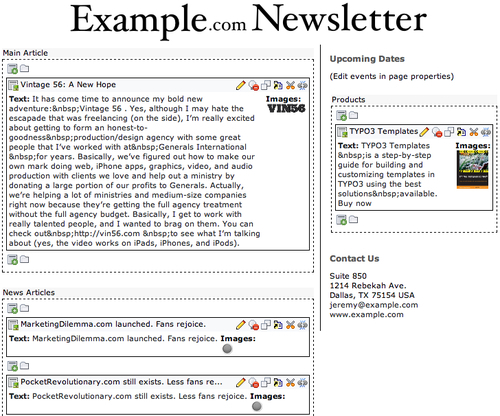
- Refresh the cache, and go to our newsletter page in the backend Page module. You will see a page that looks much more like the frontend view, has a cleaner layout overall, and will be easier for our editors to use:
Our new backend layout is almost perfect, but it would be nice if the titles of each content section were a little clearer. We are allowed to use stylesheet links in our HTML head, so we'll take advantage of that right now. Let's add a link to our HTML file right now:
<head>
<meta charset="utf-8" />
<link rel="stylesheet" type="text/css" href="http:///fileadmin/templates/css/belayout.css">
</head>
Now, we just need to create a minimal stylesheet for our newsletter template's Page module with some updated font sizes that might stand out a little better for our editors. Lets create the blank file belayout.css in our templates CSS directory (/fileadmin/templates/css/) right now. We'll update the size of the content element titles and previews using the built-in classes. TemplaVoila uses a class called tpm-preview around each content element in the backend, so we can update the font sizes to make it easier to read. The Page module also uses a class called tpm-title-cell for the title of each section like Main Article or Products, so we can use that class to make our titles clearer:
.tpm-title-cell {
font-size: 14px;
color: #555;
font-weight: bold;
}
.tpm-preview {
font-size: 12px;
line-height: 16px;
}
If you would like to know what classes are used for the rest of the elements in the Page module, the easiest way to find them is by viewing the source code when you are looking at the Page module in your browser. If you want an easy way to scan through the entire HTML output that TYPO3 is using, I recommend Firebug (http://getfirebug.com/) for the Firefox browser or the Web Inspector in Safari (http://www.apple.com/safari/features.html#developer).