
Note Your Thoughts
A photo of a band flyer. The packing list. Books friends recommend. A solution that came to you in a dream. Plenty of apps can gather all these bits of information together, and plenty do a great job. But, most likely, only one is already on your iPhone, iPad, and Mac: Apple’s Notes. In High Sierra, Apple continues to beef up this app, this time adding tables as well as pinned notes that stay within easy reach.
Sync Notes with All Your Devices
Since Notes syncs through iCloud and is a default app on all iOS 11 and High Sierra devices, it can be a great way to move information around. Work on your meeting agenda on the bus and then, when you get to work, proof it on a bigger screen and print it or paste it into an email message. Or, take notes on your MacBook during a meeting and check them on your iPhone at the hotel.
Setting up a Notes Account
To make sure you can see Notes on all your iOS devices and Macs, go to System Preferences > Internet Accounts. Select your iCloud account in the list to the left and then make sure that the Notes checkbox is selected.
In Notes, an iCloud header appears in the Folders sidebar—everything under the iCloud header syncs through iCloud.
As long as your Mac is signed in to iCloud with Notes enabled for iCloud, by default, Siri creates your new notes within your iCloud account.
Removing a Notes Account
You may see other types of accounts in the Folders sidebar under their own headers—such as Gmail. If you don’t want these on your Mac, Go to System Preferences > Internet Accounts. Select the account at the left and then make sure the Notes checkbox is not selected.
Stay Organized with Folders
Within each account, Notes organizes your notes in folders. For instance, you can create a folder for a trip you’re planning or a project you’re working on. (Can’t see any folders? Click the Folders ![]() button or choose View > Show Folders.)
button or choose View > Show Folders.)
To create a new folder in the currently selected account:
- Click the New Folder button at the bottom of the Folders sidebar, choose File > New Folder, or press Command-Shift-N.
- The new folder appears in the sidebar with its name selected.
- Type a name for the new folder.
Create a Note
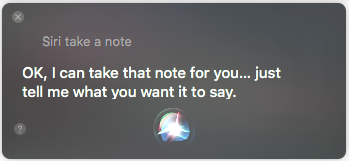
To start a new note in the currently selected folder, click the New Note ![]() button, choose File > New Note, or press Command-N. You can also start a new note using Siri (Figure 64). (See Say Hello to Siri to learn how to activate Apple’s digital assistant on your Mac.)
button, choose File > New Note, or press Command-N. You can also start a new note using Siri (Figure 64). (See Say Hello to Siri to learn how to activate Apple’s digital assistant on your Mac.)
A New Note entry appears in the Notes list, and a blank note appears at the right.
Start typing in the blank note. The first paragraph you type appears both in the note and in the note’s entry in the Notes list.
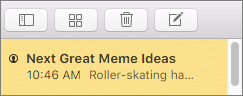
New! Pin a Note
Notes stack up by default in chronological order, with the notes you most recently edited rising to the top. If you’re a prolific notetaker, that may mean you have to scan or search for that important note you regularly need to reference.
High Sierra lets you pin a note to ensure it stays at the top of the list, both in the folder where it lives, and in the All iCloud (or All On My Mac) folder. Just select a note in a list and choose File > Pin Note (Figure 65).
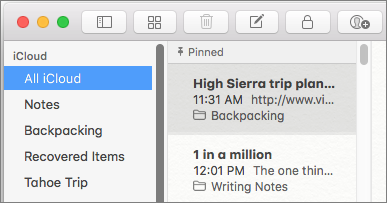
If you pin multiple notes, they stack up in reverse date order with the note you pinned first at the top. Unfortunately, you can’t drag and drop them into a different order that makes sense to you.
To un-pin a note, select it and choose File > Unpin Note.
Format Text
How your thoughts appear is up to you as Notes supports a number of formatting options.
Choosing a Font
Choose from any of your Mac’s fonts in the Font palette. To reveal it, choose Format > Font > Show Fonts or press Command-T. You can specify a font size here, too.
Making Text Colorful
Select text, and then choose Format > Font > Show Colors (or press Command-Shift-C) to reveal the macOS Color Picker. Click a color in the palette to apply it to your text.
Indenting Text
Scoot text in from the left margin with an indent:
- Indent: Choose Format > Indentation > Increase (or press Command-]).
- Un-indent: Choose Format > Indentation > Decrease (or press Command-[)
Applying a Style
Notes comes stocked with predefined paragraph styles, character formatting tools, and alignment controls:
-
Paragraph style: Click in a paragraph (or select text in it), click the Style
 button, and choose from Title, Heading, Body, Bulleted List, Dashed List, Numbered List, or the new Monospaced option (Figure 66).
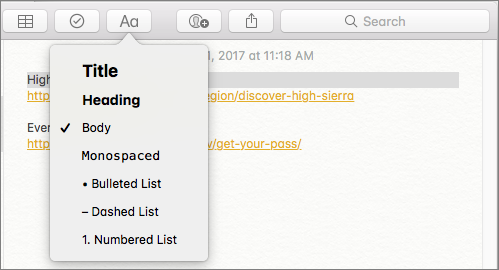
Figure 66: Apply styles using Notes’ Style button. - Character format: Select the text and choose an option in the Format > Font submenu. Common keyboard shortcuts apply: Command-B for bold, Command-I for italic, Command-U for underline, and so on.
- Alignment: Go to Format > Text and choose from Align Left, Center, Justify, or Align Right.
New! Add a Table
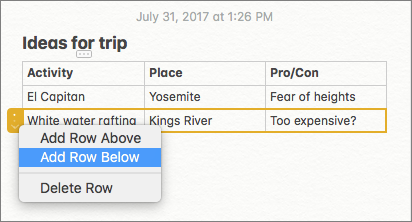
Whether you’re keeping track of charitable donations for tax time or you want to know who’s bringing what to an event, it’s handy to be able to organize everything in a nice, neat table. High Sierra adds this feature to Notes. Just choose Format > Table, or press Command-Option-T, and a four-cell table appears.
To add or delete a column or row, click inside any cell and then click the ellipse at the top of the table for column options or to the side of the table for row options. Click the arrow ![]() and choose an option, for example Add Row Below (Figure 68).
and choose an option, for example Add Row Below (Figure 68).
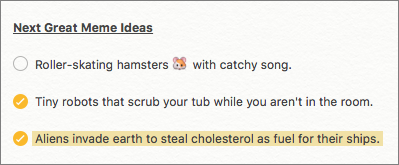
Make a Checklist
It’s easy to make a quick checklist in Notes. Select a list in a note and then click the Checklist ![]() button, choose Format > Checklist, or press Command-Shift-L.
button, choose Format > Checklist, or press Command-Shift-L.
Round circles appear next to each item. Click one to check it off (Figure 69). These checklists just tell you what you need to know: did you do this task, or did you not?

Attach Photos and More
Notes isn’t limited to plain text and simple attachments. Collect all sorts of items that catch your attention. Add sketches, voice memos, webpages, photos, videos, documents, and map locations.
Adding a Photo or Video
Perhaps you like to take a picture of the sunset every night, or you frequently snap shots of flyers and other things you want to remember later. It’s easy to add images and videos to notes and the app can display many different image file formats, including GIF, JPEG, PNG, TIFF, MOV, and Photoshop (PSD).
Here are a few methods for adding a photo or video to a note:
-
From your library: Choose Window > Photo Browser to look through your Photos and Photo Booth images and videos (Figure 70). Drag and drop one from the palette to insert it in a note. If the image is a video, you can click the palette’s Play
 button to preview it.
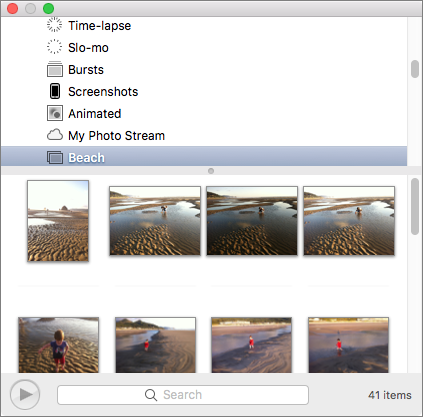
Figure 70: Use the Photo Browser to look through images and videos in your Photos library. Drag and drop images from the palette to a note. - From another window: Drag and drop an image onto a note, say from the Finder, an email message, or a document.
- From the Finder: Choose Edit > Attach File (or press Command-Shift-A), navigate to one in the Finder, and click Attach.
- From a device: Control-click a note and choose Import Image to capture an image from an attached camera or scanner. (Note that an iPhone connected to the Mac shows up as a camera, but the Mac’s built-in camera does not.)
-
From your current app: When you’re in an app—for example, Preview or Photos—click the Share
 button and choose Notes to send an image or video to Notes. If you’d rather append it to a note you’ve already made, click the Choose Note pop-up menu and select the note you want from the list (Figure 71).

Figure 71: Use the Share button to send an image or video to Notes. To add the image to the end of a preexisting note, click the Choose Note pop-up menu and select the note from the list.
Adding a File
Sometimes it helps to gather the files for a project—PDFs, documents, spreadsheets, you name it. Notes can display PDFs and include links to most other file types. To add a file:
- From another window: Drag and drop a file on your note.
- From the Finder: Choose Edit > Attach File (or press Command-Shift-A), navigate to one in the Finder, and click Attach.
If the file is a PDF, its first page will preview in your note (Figure 72). Otherwise, its name will appear along with its file size and icon. Double-click the preview or link to open the file in its parent app.

Adding a Web Link
You can use Notes to keep track of online research, too. Here’s how:
- Type the URL (web address) and press Return. It automatically becomes a clickable link.
- To add a link to a page you see in Safari, click the Share button, choose Notes, and click Save. A note appears with a short description, the link, and, in most cases, a thumbnail representing the story or website.
Adding a Map
Keeping track of dream destinations? Or all of the coffee shops you’ve tried in the neighborhood? Include links to their locations:
- In Maps, pull up the map that location you want to add to a note, click the Share button, and choose Notes.
- In the Save dialog, leave the Choose Note menu set to New Note or choose a note to append the map to.
- Optionally, enter text. For a new note, the first paragraph of text that you enter appears as a title in the Notes list.
- Click Save.
In Notes, the map appears as a thumbnail. Double-click this to jump back to the directions or location in the Maps app (Figure 73).

Lock a Note
Whether you use Notes as a diary or simply store tidbits there you’d rather keep to yourself, you’ll be happy to hear that Notes lets you lock notes for privacy. Use a single password for private notes on all of your devices. (Or, if your iOS device has Touch ID, unlock your notes there with your fingerprint.)
Password-protecting a Note
To lock down a sensitive note:
- Select a note. As of High Sierra, a password-protected note can’t contain video, audio, PDF, or file attachments.
- Choose File > Lock Note or click the Lock
 button on the Notes toolbar and choose Lock Note (Figure 74).

Figure 74: To protect a note against prying eyes, click the Lock button on the toolbar and choose Lock This Note. If you’ve already set up a Notes password, enter it at the prompt. If not, go on to step 3.
- In the dialog that appears, type a password in the Password field and then type it again in the Verify field. (This will be the password for all your locked notes on all your iCloud-enabled devices. )
- Leave yourself a helpful clue in the Password Hint field. It will appear if you mess up your password three times in a row.
- Click Set Password.
Locking Your Notes
To lock all password-protected notes, click the Lock button and choose Close All Locked Notes.
Unlocking Your Notes
Select any locked note and enter your password. Once you’ve entered the password, all notes stay unlocked until:
- You’ve been idle in Notes for a period of time. (Apple says 3 minutes, but in my testing, notes stayed open as long as 13 minutes.)
- You close the Notes app.
- You lock your notes by clicking the Lock button and choosing Close All Locked Notes.
If you decide you don’t want to lock a particular note any longer, select it, click the Lock ![]() button, enter your password, and choose Remove Lock.
button, enter your password, and choose Remove Lock.
Share Notes with Others
Whether you need to coordinate a shopping list or brainstorm a project, you can do it in Notes.
Sharing a Note
To give someone else access to a note:
- Start a note—or view an existing note.
- Click the Add People
 button on the Notes toolbar.
In the dialog that appears, choose how to invite people—via Mail, Messages, Twitter, Facebook, AirDrop, LinkedIn, or by copying a link and pasting it into something else.
- Make your choice and click Share.
You can tell which notes are shared by looking for the Sharing ![]() symbol next to their names in the Notes list (Figure 76).
symbol next to their names in the Notes list (Figure 76).
Collaborating in Real-time
Once the person accepts your invitation, they can open the note on their iOS 10, Sierra, or later device and get cracking. You’ll see edits highlight briefly as contributors work in the note (Figure 77).
Stopping Sharing
Select the note, click the People ![]() button, click the More
button, click the More ![]() button that appears to the right of a contributor’s name when you hover over it, and choose Remove Access Figure 78.
button that appears to the right of a contributor’s name when you hover over it, and choose Remove Access Figure 78.
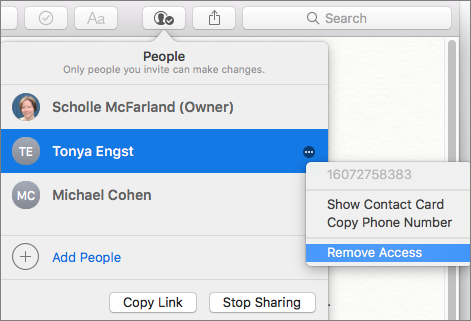
To stop sharing the note altogether, click the People ![]() button and then click Stop Sharing.
button and then click Stop Sharing.
Search for Notes
To find a particular note, type a descriptive term in the search field in the upper-right corner. (There’s no natural-language search capability in Notes.)
To limit your search to the account that’s selected in the sidebar, click the downward arrow that appears next to the magnifying glass when the search field is active and choose Current Account. Choose All Accounts (the default) to search all your notes.
Browse Your Attachments
The Attachment Browser gives you a visual way to rummage through the files you’ve attached to notes, organized by category: Photos & Videos, Sketches (from Notes in iOS 9 or later), Maps, Websites, Audio, and Documents.
To open the browser, choose View > Show Attachments Browser, click the Attachments Browser ![]() button, or press Command-1.
button, or press Command-1.
Click a category name to see the attachments shown there (Figure 79).

You can’t change or delete an item in the Attachment Browser. But, you can double-click a thumbnail to open it in its default application. For example, images and sketches will open in Preview, map information in Maps, and so on. You can also play a voice memo or video.
To jump to the note that contains a selected attachment, control-click an attachment in the Attachment Browser and choose Show in Note from the contextual menu.
The Quick Look command, also on the contextual menu, can be a handy way to see more of an attachment, but you can also trigger Quick Look by selecting an attachment and pressing the Space bar.
To exit the browser, choose View > Hide Attachments Browser, click the Attachments Browser ![]() button again, or press Command-1 again.
button again, or press Command-1 again.
Export and Share Notes
It’s possible to export a note as a PDF. To do so, choose File > Export as PDF.
Share a note with another app by clicking the Share ![]() button and choosing the app’s name. For instance, click the Share
button and choosing the app’s name. For instance, click the Share ![]() button and then choose Mail to create a new email message that includes the contents of your note.
button and then choose Mail to create a new email message that includes the contents of your note.
Delete a Note
To remove a note, select it and then press Delete or click the Delete ![]() button. Notes has got your back: if you delete a note and change your mind, chances are that you’ll find it in the Recently Deleted folder (in the left-hand Folders sidebar
button. Notes has got your back: if you delete a note and change your mind, chances are that you’ll find it in the Recently Deleted folder (in the left-hand Folders sidebar ![]() ). Drag it into another folder to restore it.
). Drag it into another folder to restore it.
Notes are permanently deleted after 30 days unless you delete them from the Recently Deleted folder first—then, they’re gone.