
Move Easily between Devices
Many of the improvements Apple has made to macOS in recent years have aimed to make it easier to move between (they hope) your many, many beloved Apple devices. Yosemite introduced Handoff, which lets you start a task on one device and then pick up where you left off on another. It also made it possible to answer and place iPhone calls on your Mac. Sierra made it possible for Apple Watch users to skip typing in their passwords and instead unlock their Macs with an Apple Watch. It also added Universal Clipboard, which lets you copy something on your iOS device and then paste it to your Mac (or vice versa).
As of High Sierra, Universal Clipboard now works Mac-to-Mac as well as iOS-to-Mac. We’ll take a look at how to use all these features to seamlessly stitch together your Apple universe.
Check the Requirements
Now that some incompatible hardware has aged out of the market, more people can take advantage of Continuity features like Handoff, Universal Clipboard, and iPhone cellular calls on the Mac.
What You Need to Use Handoff
According to Apple, you need one of these devices to use Handoff:
- Apple Watch: All models
- iOS: iPhone 5 or newer; iPad Pro; iPad (4th generation); iPad Air or newer; iPad mini 2 or newer; iPod touch (6th generation) or newer
- MacBook Air: 2012 or newer
- MacBook: 2015 or newer
- MacBook Pro: 2012 or newer
- Mac mini: Late 2012 or newer
- iMac: Late 2012 or newer
- Mac Pro: Late 2013 or newer
To confirm whether your Mac can use Handoff, choose Apple > System Preferences > General and look for the Allow Handoff between This Mac and Your iCloud Devices checkbox (Figure 80). If you don’t see this box, you’re out of luck.

Macs must be running OS X 10.10 Yosemite or later and iOS devices must be running iOS 8 or later.
What You Need to Use Universal Clipboard
Universal Clipboard has the same hardware requirements as Handoff, but doesn’t include the Apple Watch. To access iOS-to-Mac Universal Clipboard features, Macs must be running Sierra or newer and iOS devices must be running iOS 10 or newer. To use Mac-to-Mac Universal Clipboard features, both Macs must be running High Sierra.
What You Need to Make iPhone Cellular Calls
If you want to make and take phone calls on your Mac via your iPhone, you must have a Mac (with a microphone) using OS X Yosemite or newer and an iPhone running iOS 8.1 or newer.
What You Need to Unlock a Mac with a Watch
According to Apple, you must meet these requirements to unlock your Mac with your Apple Watch:
- Apple Watch: All models
- MacBook Air: Mid-2013 or newer
- MacBook: 2015 or newer
- MacBook Pro: Late 2013 or newer
- Mac mini: Late 2014 or newer
- iMac: Late 2013 or newer
- Mac Pro: Late 2013 or newer
The Watch must be running watchOS 3 or newer; the Mac must be using macOS Sierra or newer.
Switch between Devices with Handoff
When does Handoff come in handy? Say you start to write an email message on your Mac and then have to rush out the door for work. With Handoff’s help, you can finish composing the message on your iPhone while you wait at the train station. Handoff lets you pick up where you left off when using Calendar, Contacts, Keynote, Mail, Maps, Messages, Notes, Numbers, Pages, Reminders, Safari, and some third-party apps.
Set Up Handoff
Before your devices can finish each other’s thoughts, you may need to adjust a few settings:
- On your Mac(s), go to System Preferences > Bluetooth and click the Turn Bluetooth On button. (Or, invoke Siri and say “Turn on Bluetooth.”)
- On your iOS device(s), open the Settings app, tap Bluetooth, and turn on the Bluetooth switch.
- Make sure that your Macs and iOS devices are all signed in to iCloud with the same Apple ID. On the Mac, you can check this in System Preferences > iCloud. On an iOS device, tap Settings and then your name at the top of the screen.
- Activate Handoff on the Mac by going to System Preferences > General and selecting the Allow Handoff between This Mac and Your iCloud Devices box.
- Activate Handoff on an iOS device by tapping Settings > General > Handoff and turning on the Handoff switch (Figure 81). If you don’t see this switch, the device isn’t compatible with Handoff.
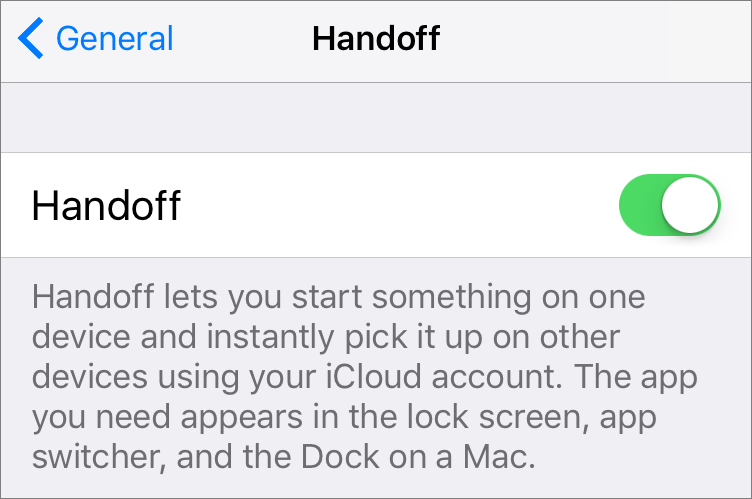
Figure 81: Turn on the Handoff switch on your iOS device. - Make sure both devices are on the same Wi-Fi network:
- On the Mac, go to System Preferences > Network and, if needed, click the Turn Wi-Fi On button. Then check the network name.
- In iOS, tap Settings > Wi-Fi and, if needed, turn on Wi-Fi. Make sure the device is connected to the same network as your Mac.
Move Between Devices with Handoff
When you’re ready to move from one device to another, leave the app you’re using in the foreground. Then:
- Check that your Mac and iOS device (or two Macs) are within Bluetooth range of each another—no more than 33 feet (roughly 10 meters) apart. It shouldn’t matter if your iPhone or iPad is inside a pocket, purse, or backpack.
- If you’re moving to an iPad, iPhone, or iPod touch, you won’t see an activity icon for the app you were working at the bottom-left edge of the Lock screen as in the past. Instead, unlock your iOS device and double-press the Home button to bring up the App Switcher. You’ll see a Handoff icon at the bottom of the screen there. Tap this icon to pick up where you left off (Figure 82).

Figure 82: You won’t find a Handoff icon at the bottom of your device’s Lock Screen anymore. Instead, look for one in the iOS App Switcher. - If you’re moving to a Mac, an activity icon for the app (with a tiny device icon on it) appears in the Dock. Click this to jump to your spot.
Or, if you like to keep your hands on the keyboard, when the activity icon appears in the Dock, press Command-Tab to reveal the Application Switcher (Figure 83). Hold the Command key and press Tab until the activity icon highlights. Release the keys to jump to your spot.

Figure 83: Press Command-Tab to access the Application Switcher. Hold the Command key and press Tab to move through the icons. Once you reach the Handoff icon, release the keys.
Troubleshoot Handoff
Handoff works like magic, unless it doesn’t. If nothing happens, here’s what to do next:
- Double-check settings: Go back to Set Up Handoff and make sure you didn’t miss something.
- Check the app: The app you’re using may not be compatible with Handoff. Apple apps that work on both the Mac and iOS include Calendar, Contacts, Mail, Maps, Messages, Notes, and Safari. On the Mac, you can also use Keynote 6.5 and newer, Numbers 3.5 and newer, and Pages 5.5 and newer. In iOS, you can also use Phone, as well as Keynote, Numbers, and Pages (versions 2.5 and newer).
- Sign out and back in to iCloud: On the Mac, go to System Preferences > iCloud, and click Sign Out. Once you’ve signed out, go back to System Preferences and sign back in. In iOS, go to Settings > iCloud, scroll down and then tap Sign Out. Follow the instructions, and then enter your password and tap Turn Off. Once the process is done, go back to iCloud settings and sign back in.
Copy and Paste between Devices with Universal Clipboard
For those times when even Handoff seems like a hassle, you can use Universal Clipboard to copy and paste between a Handoff-capable Mac and iOS device or, as of High Sierra, between two Macs.
Set Up Universal Clipboard
Universal Clipboard has the same set up as Handoff. You must have Wi-Fi, Bluetooth, and Handoff turned on in System Preferences on Macs and in Settings on iOS devices. All devices must be signed into the same iCloud account (see Set Up Handoff).
What Works
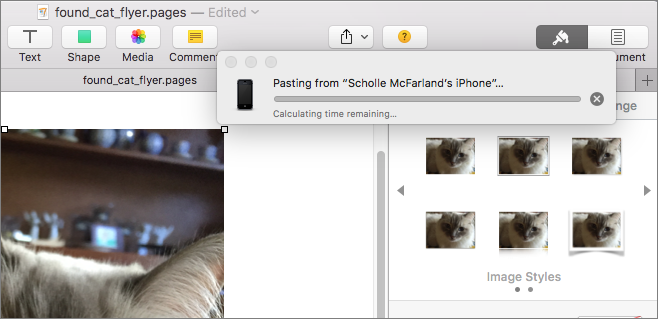
Use Universal Clipboard to copy and paste text; images, including JPEG, PNG, TIFF, GIF, and BMP file formats; the contents of a PDF, including images and text; and video files in common file formats like M4V (Figure 84).
You must copy from a file that is open in an app. You can’t select a file in the Finder and copy it. (At best, you’ll copy its name instead.)
What Happens
The contents of the clipboard transfers when you paste. If you wait longer than 2 minutes between copying and pasting, sharing expires and, instead of getting the information from the other device, you’ll paste in whatever was previously on the target device’s clipboard.
Tips for Copying and Pasting Images
Copying text with Universal Clipboard is simple, but copying images sometimes requires an extra bit of know-how:
- Avoid copying URLs instead of images (on your Mac): When you want to copy an image from a webpage, Control-click the image and then choose Copy Image from the contextual menu.
- Copy an image from a webpage (on your iOS device): Touch and hold the image to see options. If you see Copy, tap that. If not, tap Share, and then tap Copy.
-
Copy an image from Photos (on your iOS device): Select the photo you want, tap the Share
 button, and then tap Copy.
If you’ve stored your photos in iCloud (see Manage Your Storage), your image may already be available on the target device in the Photos app. Copying and pasting it from the device you’re on, however, may require fewer steps than opening Photos on the target device and copying it from there. Use your judgment.
- Paste into Preview (on your Mac): If you’re just trying to get an image you’ve copied from here to there, open Preview and choose File > New from Clipboard. The image you’ve copied is pasted into a new Preview document, which you can now save on the target Mac.
Turn Your Mac into a Speakerphone
It’s probably happened to you before: You hear your iPhone’s muffled ringing, but whether it’s buried deep in a coat pocket or purse, you won’t find it in time to answer the call. Your Mac offers a simple fix for this daily aggravation: answer the call on your Mac. Need to make a call? You can do that from your Mac, too.
Set Up Calling
To use High Sierra’s iPhone cellular call features, you must also have an iPhone running iOS 8.1 or newer.
Take these steps:
- Make sure the Mac and iPhone are on the same Wi-Fi network.
On your Mac, go to System Preferences > Network, click Wi-Fi, and check the network name. On your phone, tap Settings > Wi-Fi to see the name of the network.
- Double-check that your Mac and iPhone are signed in to FaceTime with the same Apple ID.
On your Mac, go to FaceTime > Preferences to check the ID. On your iPhone, tap Settings > FaceTime, make sure that the FaceTime switch is on, and then check the ID.
- If you see a Use Apple ID for FaceTime link on your phone, tap that. On your Mac, you will see a dialog asking if you want to add your phone number to iMessage and FaceTime. Click Yes. This lets you make and receive calls on devices (your Mac or iPad) that are signed in to the same iCloud account and on the same Wi-Fi network.
- In the FaceTime preference pane on your Mac, select Calls from iPhone (If this checkbox doesn’t appear initially, try restarting your Mac).
Receive a Call on Your Mac
When a call comes in for your iPhone, your Mac will chime. A notification shows the caller’s name (if they are listed in Contacts) or number.
You can:
-
Take the call: Click Accept. When you’re connected, the notification becomes a small window with phone controls (Figure 85). Click Video to start a FaceTime session. (This only works if the other person is calling from a Mac or iOS device and signed in to FaceTime.) Click Mute to mute audio during the call—for instance, to discreetly ask someone else in the room a question. Click End to hang up.
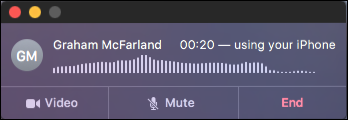
Figure 85: When you answer a call, the notification becomes a small window with phone controls. - Decline the call: Either click Decline or click the arrow next to Decline to choose an option, including Remind Me in 5 Minutes.
- Ignore the call: If you miss a call, a notification lingers on your screen to let you know when you return.
Make a Call from Your Mac
To “dial” a number:
- In an app: Click a phone number in an app like Contacts, Maps, Spotlight, or FaceTime. You can also select a number on a webpage or in an email message, click the triangle that appears to its right, and then choose “Call phone number Using iPhone.”
-
From a recent call: Open FaceTime, click the Audio button, and then click the phone
 button in the call’s listing. Or, click and hold FaceTime’s Dock icon to see a list of recent calls. Choose one to call back.
 - Enter a number: Open FaceTime and type the number directly into the field under the Video and Audio buttons.
FaceTime places your call. There’s no video involved.
Navigate Automated Phone Systems
If you hear the fateful words “Press 2 for…” during a call, you don’t need to scramble madly for your iPhone. Click the phone call notification to make sure the focus is on it. Then, use your Mac’s keyboard to navigate automated phone systems by pressing the numbers required.
Hold All Your Calls
Big meeting, tight deadline—sometimes you don’t want to be disturbed: Option-click the Notification Center ![]() icon in the menu bar to turn off all notifications, including incoming calls. (Your iPhone will still ring, just not your Mac.) When you finish, Option-click the icon again. Or, click it to reveal Notification Center and turn off the Do Not Disturb switch.
icon in the menu bar to turn off all notifications, including incoming calls. (Your iPhone will still ring, just not your Mac.) When you finish, Option-click the icon again. Or, click it to reveal Notification Center and turn off the Do Not Disturb switch.
Adjust Where Calls Go
When you turn on iPhone cellular calls, all devices that share your Apple ID will ring when calls come in, as long as they’re on the same network. This might not be ideal if your iPad, for instance, is shared by all the family and usually in the hands of the kids.
In that case, on the iOS device where you don’t want to receive calls, tap Settings > FaceTime and then turn off the Calls from iPhone switch.
Turn Phone Features Off
Whether you’ve decided that you don’t like your Mac ringing at all or you just want to take a short break from the phone features, but not other notifications, you can turn off phone calls on your Mac.
Open FaceTime and go to FaceTime > Preferences. Click Settings and deselect the Calls from iPhone checkbox.
Unlock Your Mac with Your Apple Watch
It’s wise to password-protect your Mac whenever you step away from it, especially if you lug your laptop around with you everywhere, but entering your password repeatedly is a pain. If you have an Apple Watch and a Mac (running watchOS 3 and Sierra or newer) you can use an extremely cool shortcut: Raise your watch and voilà! Your Mac unlocks automatically (Figure 86).

Here’s how to set up Auto Unlock on your Mac:
- Go to System Preferences > Security & Privacy > General and select the Allow Your Apple Watch to Unlock Your Mac box. This box is visible only if you have a watch. If you see a Disable Automatic Login box here, uncheck it.
- If you aren’t using two-factor authentication (2FA) for your Apple ID, you’ll see an error. Turn this security feature on by going to the Apple ID account page, logging in, clicking Edit next to the Security header, and then clicking Turn On Two-Factor Authentication.
- When prompted, enter the password for your user account on the Mac.
- Close your laptop or put your desktop Mac to sleep. (If you don’t want to wait, choose Apple > Sleep.)
- Wake your Mac by pressing a key or by opening it if it’s a laptop.
If your watch is on your wrist and you’re within a foot or so of the Mac, you’ll see an unlock notification on the Mac. You’ll also see a notification on your Apple Watch.
Note that your watch can unlock only a sleeping Mac; it can’t automatically unlock a Mac that’s been rebooted. Your watch must have a passcode, but you don’t need to enter the passcode every time you use Auto Unlock. (That wouldn’t save any time!) Also, your watch locks automatically whenever you take it off, so it wouldn’t be possible for someone to pick your watch up off your desk and use it to access your Mac