
Manage Your Storage
The multiple-terabyte hard drives of today may seem to have solved all our storage problems, but that doesn’t mean we can’t find ways to fill up every bit of the storage we have. And while desktop Macs have bulked up their storage space over the years, laptop Macs actually have less storage than models from six or seven years ago, as Apple has transitioned from mechanical hard drives to solid-state storage (the MacBook Air has at most 512 GB of flash storage).
High Sierra’s new file system and space-saving improvements to apps like Mail will help with this problem. But you can also use built-in tools to help you wrangle your bytes. To find them, choose Apple > About this Mac > Storage and click the Manage button (Figure 98). (Make sure Recommendations is selected in the list to the left.)
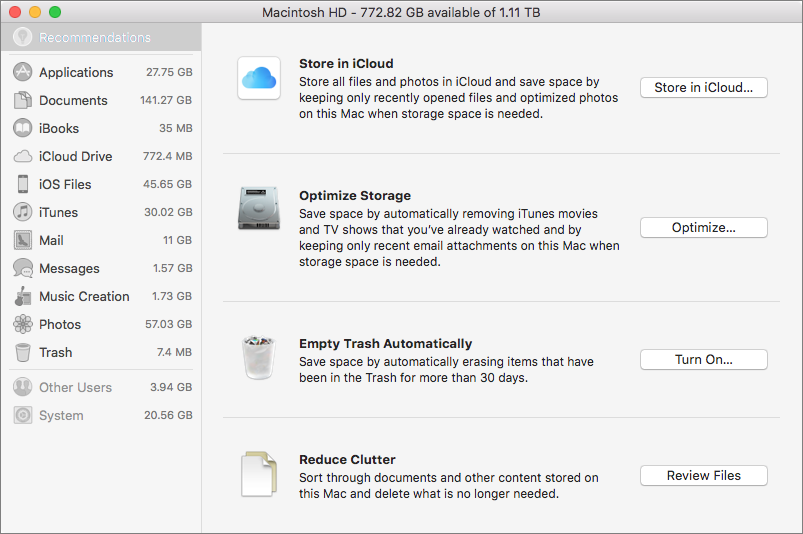
In this chapter, we’ll look at each of these options, starting with Store in iCloud and continuing with Optimize Storage, Empty Trash Automatically, and Reduce Clutter.
Store in iCloud
Instead of keeping all your files on your drive, this option stores the contents of your Desktop, Documents, and Photos library in iCloud Drive. If storage is scarce, only recently opened files and low-resolution photos will stay on your Mac. The result is not only storage savings, but also the ability to access these items from any of your Macs or iOS devices that have iCloud Drive turned on and are signed in with the same Apple ID.
Click the Store in iCloud button to see two checkboxes (Figure 99). I recommend that you read about what they do, below, before selecting either of them. With that done, you can select one or both and then click Store in iCloud.

Desktop and Documents
Once you’ve turned on this feature, here’s where you can find your folders:
-
From a Finder window: In the Finder window sidebar, the Desktop and Documents folders appear under a new iCloud header (Figure 100).

Figure 100: The Documents and Desktop folders appear under the iCloud header in the Finder window sidebar. - From the Finder: Choose Go > Desktop (Command-Shift-D) or Go > Documents (Command-Shift-O)
-
From the web: Go to iCloud.com, and sign in with your Apple ID and password. Click iCloud Drive. You see the Desktop and Documents folders alongside app folders and any files you’ve stored directly in iCloud (Figure 101).
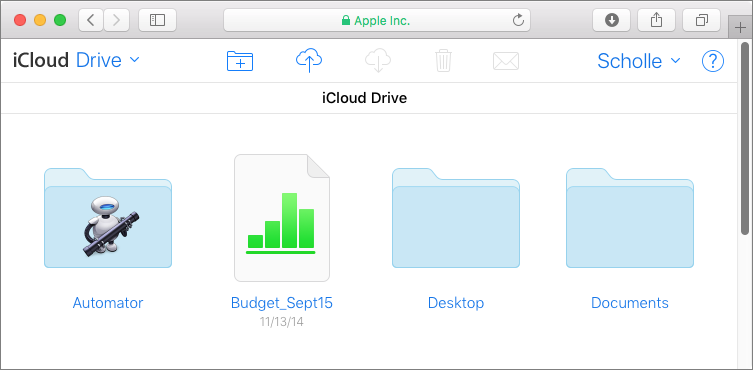
Figure 101: Access your Desktop and Documents folder on the web through iCloud.com. - From your iOS device: If you’re running iOS 9 or 10, you can access your Mac’s Desktop and Documents folders by opening the iCloud Drive app on your device and tapping the folder you want. On an iOS 11 device, you’ll find the Desktop and Documents folders inside the new Files app.
-
From another Sierra or High Sierra Mac: According to Apple, when you add another Mac’s Desktop and Documents folders to the same iCloud account, they will appear as subfolders labeled with the Mac’s name. For instance, the second Mac’s Desktop folder will appear inside the primary Mac’s Desktop folder in iCloud Drive with the name Desktop - Mac Name. Likewise, the second Mac’s Documents folder will appear inside the primary Mac’s Documents folder in iCloud Drive with the name Documents - Mac Name.
With that in mind, make sure to turn on this feature for your primary Mac first to avoid having to root through subfolders more than necessary.
Various Take Control authors and editors saw inconsistent behavior from this feature. Sometimes the two Macs’ folders merge—we saw the contents of both Documents folders, for instance, when we clicked Documents in the Finder window sidebar. The effect is as if you have One Mac that you can reach from multiple devices.
If you like that approach, you can set it up manually if you’ve ended up with subfolders for the second Mac. Move the contents of a subfolder into its parent Desktop or Documents folder and then delete the subfolder. (You can do this for either or both of the Desktop and Documents folders.)
- From an older Mac: From a Mac that’s running 10.10 Yosemite or 10.11 El Capitan, you can access your High Sierra Mac’s Desktop and Documents folders through iCloud Drive (in the Finder window sidebar).
Working with iCloud Files
With iCloud storage enabled, if you add a file to your Documents folder—whether you do so in the Finder on your Mac, from the iCloud website, or on an iOS device—it will appear everywhere in the Documents folder.
Likewise, if you delete a file from the Documents folder, it disappears from the Documents folder in all views and on all devices—the same is true for the Desktop folder.
If you’re worried about deleting a file from iCloud Drive (and, by association, all your devices) by accident, choose Finder > Preferences > Advanced and make sure that Show Warning before Removing from iCloud Drive is selected.
If you plan to work on something away from an internet connection—say, on an airplane—you’ll want a local copy of the file. To see what’s stored where, click the Documents folder in the Finder window sidebar and look for a Download ![]() icon next to an item’s name. That indicates that the file is located online only. Click the Download
icon next to an item’s name. That indicates that the file is located online only. Click the Download ![]() icon and you’ll see a progress bar as the file copies to your Mac’s drive.
icon and you’ll see a progress bar as the file copies to your Mac’s drive.
Turning off Desktop & Documents
Go to System Preferences > iCloud, click the Options button next to iCloud Drive, and deselect the Desktop & Documents Folders checkbox. Click the Turn Off button to proceed.
The contents of your Desktop and Documents folders remain in iCloud, so you’ll have to copy them back to your Mac’s normal (local) Desktop and Documents folders manually if you want them there.
Note that if you turn the feature back on later, new folders will be created, leaving the old ones in place. For example, “Desktop - High Sierra iMac” and “Desktop - High Sierra iMac - 1” both will be in iCloud Drive inside the “Desktop” folder. This can get confusing.
Photos
The other option you see when you click the Store in iCloud button is Photos. This box gives you another way to turn on iCloud Photo Library, a feature that has been available since 2014. When you select it, Sierra uploads to iCloud full-resolution versions of all the photos and videos in your main (“System”) Photos library, defaulting to the Optimize Mac Storage setting that generally keeps “optimized” (a.k.a. lower-resolution) versions on your drive.
The benefits of this are two-fold: you not only save space on your Mac, but also can access your photos from all your Apple devices and from the web. Changes made to a photo on one device reflect across all your devices.
Here’s where to find your photos:
- From the Photos app on the Mac: When you open this app on the Mac, photos should appear as usual.
- From the web: Go to iCloud.com, and sign in with your Apple ID and password. Click the Photos icon. You see photos organized by Moments and Albums.
- From the Photos app in iOS: On a device running iOS 11, tap Settings > Photos, and then turn on the iCloud Photo Library switch. Now you should be able to see photos from your High Sierra Mac by opening the Photos app on your iOS device.
- From the Apple TV: Sign in to a fourth-generation or newer Apple TV with the same iCloud Apple ID and look in the Photos app.
This feature is ideal on a laptop or a secondary Mac where space is at a premium. If you have sufficient space, however, consider leaving the Optimize Mac Storage setting turned off for better performance. You will be able to see images on all your devices, but you will not have to wait for originals to download when you need them.
To disable Optimize Mac Storage so that full-resolution photos appear on your Mac, open the Photos app and choose Photos > Preferences > iCloud. Select the iCloud Photo Library checkbox and then select the Download Originals to This Mac radio button. The Optimize Mac Storage button toggles off.
If you ever decide you don’t want to store your photos in the Cloud at all, open the Photos app and choose Photos > Preferences > iCloud and deselect iCloud Photo Library (Figure 103).

Be aware that if you decide to turn this setting back on later, uploading your photos may take days.
Optimize Storage
When you choose Apple > About This Mac > Storage and click the Manage button, the second category is Optimize Storage. By default, this category has an Optimize button that you can click to see as many as two choices (Figure 105). Select one or both and then click Optimize to start. (This category looks somewhat different if you’ve already turned on either of these optimization possibilities.)

Automatically Remove Watched iTunes Movies and TV shows
The first checkbox under Optimize Storage is an easy win—few of us need those video files after the fact, and boy, do they take up loads of space! Leave this checkbox selected and choose Optimize and High Sierra updates your iTunes settings for you.
To revert your iTunes settings later, open iTunes, choose iTunes > Preferences > Advanced, and deselect Automatically Delete Watched Movies and TV Shows.
To download a video you’ve already watched (and that has therefore been deleted), go to iTunes and choose Movies or TV Shows from the Media Picker pop-up menu near the left of the navigation bar. Click the Library button in the navigation bar and then click the Download ![]() icon above the show’s name (Figure 106).
icon above the show’s name (Figure 106).
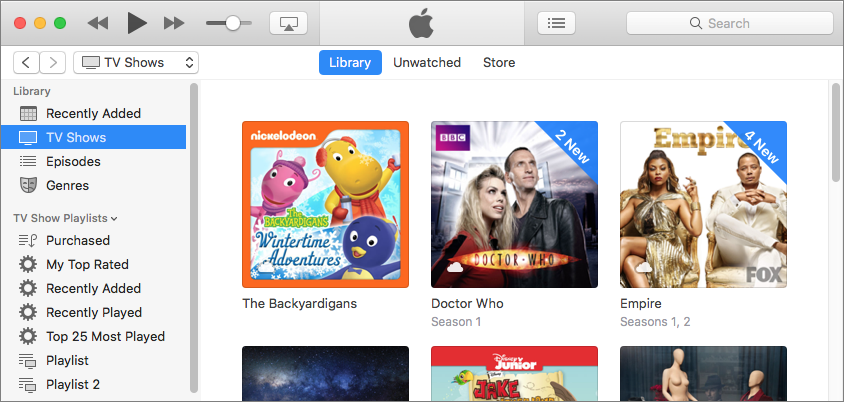
It can be difficult to see the Download ![]() icon on top of the video’s thumbnail image. To avoid that problem, choose View > View As > List.
icon on top of the video’s thumbnail image. To avoid that problem, choose View > View As > List.
Download Only Recent Attachments
The second choice under Optimize Storage affects your email attachments in the Mail app. Click the pop-up menu and choose either Download Only Recent Attachments or Don’t Automatically Download Attachments.
You’ve long been able to choose to not download attachments automatically in Mail; the ability to limit downloads to “recent” attachments was new in Sierra. The significance of this Optimize Storage option, however, is that it saves you the trouble of choosing this download setting manually for each of your email accounts in the Mail app.
It’s a cinch to access an email attachment later, no matter what you choose (as long as you’re online). Just go to Mail and find the message in question. Hover your pointer over the line right below the message header to reveal a line of buttons (Figure 107), and then click the arrow next to the Attachments ![]() icon. Choose the attachment you want and then choose where to save it in the dialog that appears.
icon. Choose the attachment you want and then choose where to save it in the dialog that appears.

Empty Trash Automatically
It’s easy to dump files in the Trash and forgot all about them, but they add up, one by one, sometimes taking up loads of drive space. One small, but helpful, option for managing your Mac’s storage is the ability to automatically empty your Trash after 30 days.
Choose Apple > About This Mac > Storage and click the Manage button. Next to Empty Trash Automatically, click the Turn On button. Read the warning and then click Turn On.
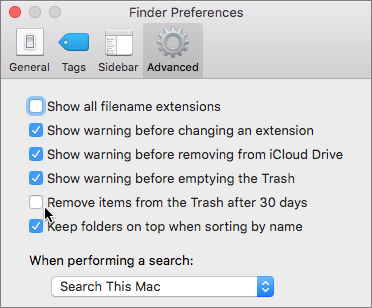
If you want to turn this setting off later, in the Finder, choose Finder > Preferences > Advanced and deselect the “Remove items from the Trash after 30 days” checkbox (Figure 108).
Reduce Clutter
When running out of drive space, most people’s first impulse is to start deleting files. But which files? You can use a built-in feature to take a closer look at what’s hogging your disk.
In the Finder, choose Apple > About This Mac > Storage and click the Manage button. Then next to Reduce Clutter, click the Review Files button.
You can filter the list that appears by clicking Large Files, Downloads, or File Browser. By default, each view is displayed with the biggest files on top.
If you see a file you want to delete, in Large Files or Downloads view hover your pointer over it to show a Remove ![]() icon and a Reveal
icon and a Reveal ![]() icon. Click the Reveal
icon. Click the Reveal ![]() icon to see the file’s location in the Finder—always a good idea if you’re unsure whether this is a duplicate file or an important file. Click the Remove
icon to see the file’s location in the Finder—always a good idea if you’re unsure whether this is a duplicate file or an important file. Click the Remove ![]() icon and you’ll see a warning. Click the Remove button to proceed. In the File Browser view, Control-click or right click and choose Show In Finder to double-check a location.
icon and you’ll see a warning. Click the Remove button to proceed. In the File Browser view, Control-click or right click and choose Show In Finder to double-check a location.
To delete multiple files at once, Shift-click to select consecutive files, Command-click to select non-contiguous files, or just press Command-A to select them all. When you’ve got what you want, Control-click (or right-click) and choose Delete.
A warning will ask “Remove X items from disk?” (It will also let you know how much storage you’ll be freeing, which can be quite cheering.) Click Remove to delete them all. They do not appear in the Trash—they’re gone. I’ve found this technique to be especially helpful in the Downloads view (Figure 109).
