
Troubleshoot Mac Problems
Maybe the heartache begins with errors when you try to save or open a file. Or, you find yourself staring at an unchanging gray screen. High Sierra comes equipped with the tools you need to face everyday troubleshooting problems. Better yet, the new macOS file system (if you have a Mac that’s converted to it) has been designed to make your Mac less likely to lose data in the event of a crash. Here’s the least you need to know.
Zap a Frozen App
Is your problem an endlessly spinning beach ball? Try these tricks first:
-
Force Quit: First see if the problem is limited to one app. Try to switch to another by clicking its Dock icon or pressing Command-Tab to use the Application Switcher.
If other apps respond, you’ll want to force the offending one to quit. Choose Apple > Force Quit (or press Command-Option-Esc). Select the bad app in the list (Figure 129), and then click Force Quit. Often, an app behaves once relaunched.

Figure 129: Stalled app? Press Command-Option-Esc, select the offender, and then click Force Quit (or in the case of the Finder, Relaunch). Another way to quit the currently active app is to press Command-Shift-Option-Esc to skip the dialog and Force Quit it immediately.
- Restart your Mac: If you can’t force-quit the app, or if the problem seems to be affecting more than one app, choose Apple > Restart. If the Restart command fails, hold down the Command and Control keys while pressing the Power button to force a restart (with a chance that the Mac will let you save unsaved work first). If that doesn’t work, press and hold your Mac’s Power button until the Mac shuts down (unfortunately, losing any unsaved work), and then press it again to start it up again.
- Log in with your troubleshooting account: Still having trouble? Log out of your current account, if you are logged in, and then log in to your troubleshooting account to find out whether the problem is limited to your normal user account. (See Create a Troubleshooting Account, in the previous chapter, for details.) If it is, something in your user’s folder is likely the culprit, so you can start narrowing it down from there.
Solve Slowdowns
If force-quitting apps and restarting your Mac doesn’t fix a slowdown problem, you might need to do more:
- Update your software: If the problem is a software bug, a software update may help. Choose Apple > App Store and click Updates to check for, and then install, new versions of software from the App Store—this includes any updates to macOS. (If you don’t see an update you expect, select Store > Reload Page (or press Command-R) to refresh the view. Check vendor websites for apps you got elsewhere.
-
Free up disk space: If your disk is nearly full, your Mac may run slowly—and apps may even crash. High Sierra’s Reduce Clutter tool lets you drill down to find files that are hogging your megabytes (Figure 130).
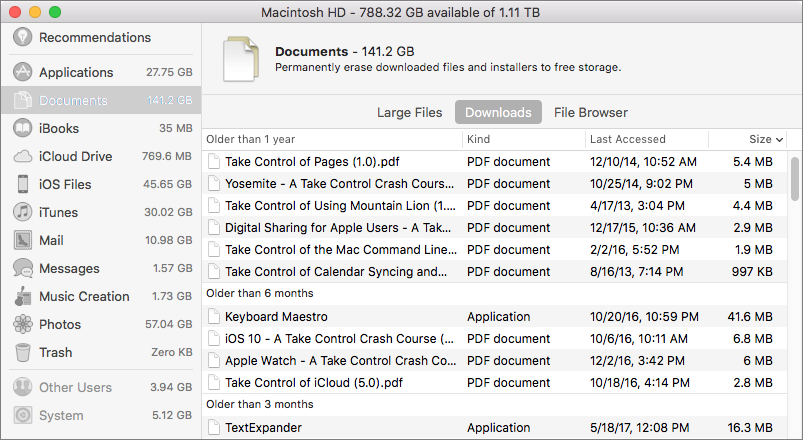
Figure 130: Short on disk space? Use High Sierra’s storage management tool to home in on large files you don’t need anymore. -
Add RAM: High Sierra and your apps can use a lot of RAM; if everything is running slowly, and it’s not due to a full drive, you might need more.
To see how much you have, choose Apple > About This Mac and click Memory (Figure 131). (You won’t see a Memory button if it’s impossible to upgrade the Mac’s RAM, which is the case with Apple’s recent laptops and the 2014 iMac.) If it’s possible to add more RAM, click Memory Upgrade Instructions. Or, see Crucial’s step-by-step guides.

Tame Troubled Startups
For problems at startup—say, your Mac gets stuck on the gray startup screen or you hear the boot up chime again and again, but your Mac doesn’t boot up—try these tricks first:
-
Unplug peripherals: Sometimes peripherals like keyboards, trackpads, webcams, or microphones (particularly those with wires) are to blame. Unplug everything and restart.
If your Mac starts up without a problem, test peripherals one by one. If the evidence points to a device, check its cables, update its software, or contact the manufacturer for help.
-
Try Safe Mode: Some problems can be solved with Safe Mode. Restart your Mac and immediately press and hold the Shift key until you see the grey Apple logo. The startup process may take a while; once it’s done, the words “Safe Boot” should appear in red at the upper-right corner of the screen.
High Sierra runs diagnostics and clean-up processes. (It also disables software that loads at startup and login.) If the problem goes away, restart again normally. The problem is most likely due to third-party software (especially things bought outside the App Store) that was disabled in Safe Mode. Look for updates on the App Store or the company’s website.
Try Disk Utility’s First Aid
If none of the tricks so far work, turn to Disk Utility’s First Aid. Launch Disk Utility (in /Applications/Utilities), select your startup drive in the list on the left, click First Aid, and click Run. A dialog appears, warning that you will not be able to use your Mac while First Aid is running. Click Continue and First Aid gets to work.
When Disk Utility finishes, select Show Details to see a report of what it did and then click Done (Figure 132).

If Disk Utility repairs your drive—or can’t find problems to repair—but the problem still occurs, try reinstalling High Sierra using macOS Recovery (discussed next) or using a bootable installer disk.
If Disk Utility can’t repair the drive:
- You might need a better repair utility (see Joe Kissell’s Macworld article Do you need a third-party disk utility?).
- You might need to reformat the drive and reinstall High Sierra using a bootable installer disk or macOS Recovery. (Make sure you’ve backed up your data first, and have a plan for restoring it!).
- You might need to replace the drive and then restore your data from a Time Machine backup using macOS Recovery (or from another type of backup, during the first startup after reinstalling High Sierra).
- It may be time to visit the Genius Bar.
Turn to macOS Recovery
When you install High Sierra, it creates a hidden partition (or updates the existing hidden partition) to help you in times of woe. Hold down Command-R at startup until the Apple logo appears to see this emergency mode.
macOS Recovery gives you four choices; here’s where to start and how to proceed.
Get Help Online
If you’re not sure what to do after reading the rest of this chapter, start here.
First, make sure you’re connected to the internet. If you’re using Ethernet, you’re likely good to go. If you’re using Wi-Fi, make sure you’re connected by clicking the Wi-Fi icon in the top-right corner of the screen and choosing a network. Enter the network’s password, if necessary.
Next, from the macOS Utilities window, choose Get Help Online and click Continue. Safari opens to a description of how to use macOS Recovery. For additional help, you can click the link to the Apple Support site, click the Mac category, and then browse help topics. Or, click the search icon and type a description of your problem to see if fixes turn up. You may also want to do a more general Google search.
Repair with Disk Utility
If you’re in Recovery mode because of disk problems, Disk Utility is the option you’ll choose first. Select it in the macOS Utilities window and click Continue. For more on using Disk Utility, flip back a page or so in this chapter to Try Disk Utility’s First Aid.
Reinstall macOS
If High Sierra itself is the problem, you’ll need to install it anew. You can do this without affecting your files and settings.
For this to work in macOS Recovery, you must be connected to the internet. Click the Wi-Fi icon in the top-right corner of the screen and choose a network. Enter the network’s password, if necessary.
Select Reinstall macOS, and then click the Continue button. The High Sierra installer data—roughly 5 GB worth—downloads over the internet from Apple’s servers; once the download is finished, installation proceeds. Be prepared for the download to take anywhere from 20 minutes to several hours, depending on your connection; installation will then take another 15 to 30 minutes.
Restore from a Time Machine Backup
Say the worst has happened and you must wipe your drive and start fresh (or install a new drive). If you’ve backed up your data using High Sierra’s Time Machine feature, you can restore your system—files, settings, and all—using the Restore from Time Machine option.
If you have a complete Time Machine backup (see warning), and you want to wipe your drive clean and restore your backup to that drive, select Restore from Time Machine Backup and then click Continue. On the next screen, select your Time Machine drive, the particular backup you want to restore from, and the destination drive.
Erase and Reinstall High Sierra
If you’re sure that you don’t need a new drive, but you want to start from scratch, you can erase the disk and reinstall a fresh copy of High Sierra. (Make sure you’ve backed up your data and you know how to restore it!)
Boot into macOS Recovery, select Disk Utility, and click Continue.
After the utility launches, select your startup drive’s name in the list on the left. Click the Erase button. In the Format pop-up menu, choose your file system—for instance, APFS if you have a solid state drive—rename your disk if you like, and click…(you’re sure, right?)… Erase.
Once this process is done, go back to Reinstall macOS, earlier in this chapter, and follow the directions there—or, if you have a bootable installer disk available, now is the time to use it.