
Navigate iCloud Drive
When you’re on the move—from home to office, classroom to dorm room—it’s not always possible to work on the same device. So how do you make sure you always have access to the files you need? Much like Dropbox and Google Drive, Apple’s iCloud Drive stores your files in the Cloud, making it easy to access them on any of your Apple devices (or a Windows PC)—so long as the device has a fast enough internet connection. Drag files to and from the iCloud Drive folder in your Mac’s Finder, and iCloud Drive syncs them across your devices so they’re always up to date.
High Sierra adds a new twist: now you can use iCloud Drive to work on a file with others, making collaboration much easier.
Work with iCloud
Use iCloud Drive to store documents, presentations, spreadsheets, PDFs, images, you name it, on Apple’s servers. Everything you save here is immediately synced and available on other compatible Apple devices you’ve set up (as long as you have an internet connection). That means you can work on a document on your iPad and then open it later on your Mac. In many cases, you can also work with it on the iCloud.com website.
Get Started
If you bought a Mac that came with Sierra or High Sierra, iCloud Drive is turned on automatically.
If iCloud Drive isn’t activated on your Mac yet, follow these steps:
- Go to System Preferences > iCloud and, if you aren’t already signed in to iCloud, sign in with your Apple ID.
- Select the iCloud Drive box (Figure 92).
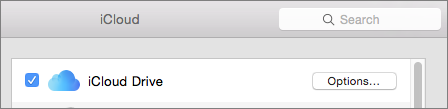
Figure 92: To activate iCloud Drive on your Mac, go to System Preferences > iCloud and check the iCloud Drive box. - Click the Options button to the right to see which apps store files and data in iCloud. Uncheck the box next to one to prevent it from doing so (Figure 93). Click Done.
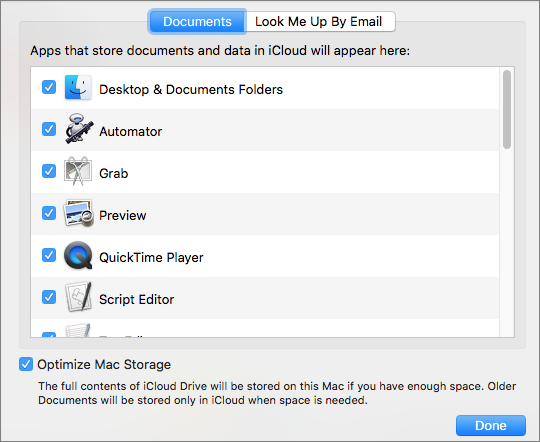
Figure 93: Uncheck an app here to stop it from storing documents and data in iCloud.
Size Up Your Storage
The more you store in iCloud—especially if you keep your Desktop and Documents folders in the Cloud and use iCloud Photo Library (see Manage Your Storage)—the more storage you’ll need. Currently, in the United States, you get 5 GB of storage free per Apple ID, and you can purchase 50 GB for $0.99/month, 200 GB for $2.99/month, and 2 TB for $9.99/month. (See this Apple page for pricing by country.)
If you need more storage:
- Go to > System Preferences > iCloud.
- Click Manage and then click Change Storage Plan.
- The Upgrade iCloud Storage window appears with your current plan highlighted. Click a plan that offers more storage to upgrade and then click Next.
- Enter your Apple ID password at the prompt and then click Buy.
If you decide later that you need less storage, go to the Upgrade iCloud Storage window and click the Downgrade Options button. iCloud tells you how to delete files, if you choose.
Save a File to iCloud Drive
For a new, unsaved document, choose File > Save (Command-S) or click the down arrow ![]() next to the file’s name in the title bar. Choose AppName — iCloud from the Where pop-up menu to save the file in the app’s iCloud Drive folder (Keynote, for example).
next to the file’s name in the title bar. Choose AppName — iCloud from the Where pop-up menu to save the file in the app’s iCloud Drive folder (Keynote, for example).
Saving into the app’s folder will simplify opening the file from within that app. Or, choose iCloud Drive to save it at the root level of iCloud Drive.
Access iCloud Drive Files
Here are a few techniques.
Mac
To access your cloud-based files:
- Go to iCloud.com in a web browser and click iCloud Drive. A list of files and folders appears; upload and download from here.
- Open a new Finder window by choosing File > New Finder Window (Command-N). Click iCloud Drive in the Finder window’s sidebar (Figure 94). Drag and drop a file to move it to or from here. You’ll see a warning if you try to move a file off of iCloud Drive. To copy it instead, Option-drag the file.
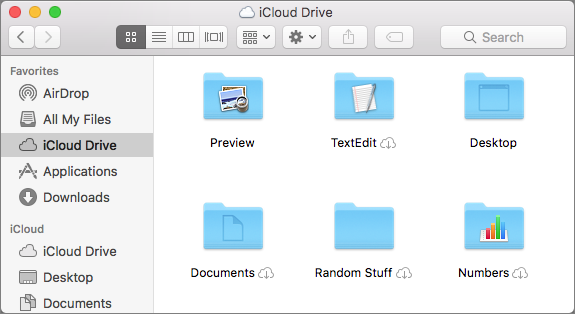
Figure 94: Click iCloud Drive in the sidebar to browse files and folders stored there. - In the Finder, choose Go > iCloud Drive (Command-Shift-I).
Windows
Use the latest iCloud for Windows app to see your iCloud Drive folder in the Windows File Explorer.
iOS
Depending on your set up, do one of the following:
- If you’re using iOS 8 through 10, use the iCloud Drive app to browse and download files in your iCloud Drive folder.
- If you’re using iOS 11, launch the new Files app and tap the iCloud folder to access your files.
- Open a file from within an iCloud Drive-compatible app—for example, Apple’s Keynote, if the file is in the Keynote folder on iCloud Drive.
Turn Off iCloud Drive
Decide you’d rather not use iCloud Drive? To make sure you can work with your documents offline, you will need to save copies of the ones you need to your Mac:
- On your Mac, navigate to iCloud Drive in the Finder, select a file, and press Command-C to copy. Navigate to the location in the Finder where you want to save the copy, and press Command-V to paste.
- Alternatively, select multiple files in the Finder by Shift-clicking them (for contiguous files) or Command-clicking them (for non-contiguous files). Then, press Option while dragging and dropping them to another location.
Once that’s done, on your Mac, go to System Preferences > iCloud and uncheck the iCloud Drive box. When you do, your Mac apps will no longer be able to access documents stored in iCloud.
New! Share Files Using iCloud Drive
As of High Sierra, iCloud Drive lets you share files with other iCloud users, making it easier to collaborate without having to email different versions of a file back and forth.
Start Sharing
Share a file either of these ways:
- From the Finder: If you’re in the Finder, Control-click a file in iCloud Drive and choose Share > Add People in the contextual menu.
- From inside an app: If you have a document stored in iCloud Drive open, share by choosing File > Share > Add People. You’ll find the Share menu in most Apple apps, such as Text Edit and Preview.
Then, follow these steps:
- In the dialog that appears, choose whether you’d like to send an invitation via Mail or Messages to collaborate. Although other share options, like AirDrop and Facebook, appear here, the Share button becomes inactive if you choose one of them.
- Click Share Options to fine-tune permissions. Your options include:
- Who Can Access: In this popup menu, choose either Only People You Invite or Anyone With the Link.
- Permission: In this popup menu, choose either Can Make Changes or View Only.
Say, if you have a document you want a team to work on, you might choose Only People You Invite and Can Make Changes (Figure 95).
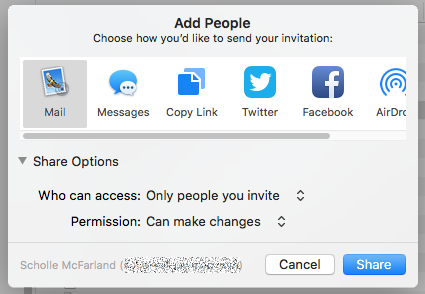
Figure 95: Fine-tune permissions for a shared file by adjusting the Share Options popup menus. - Click the Share button. In the window that appears—a Mail message window or a Messages new message window, for instance—enter contact information and a note for the recipient(s). Click Send.
The recipient receives your note with a link to the file. If they’re using High Sierra, when they click the link the file is added to their iCloud Drive and opens in its parent app.
It’s easy to tell which files you’ve shared. You’ll see them marked in the Finder (Figure 96).

Make Changes (But Not at the Same Time)
iCloud file sharing works best when you and another person need to work on the same file, but not at exactly the same time.
If you and another person edit simultaneously, you won’t see changes happening in real-time like you would in Google Docs or Notes. Instead, the file will update every few moments as the document auto-saves. You’ll get into trouble if two or more people make lots of changes at the same time. Eventually, you’ll see a warning telling you that modifications aren’t in sync and asking you to choose a version (Figure 97).
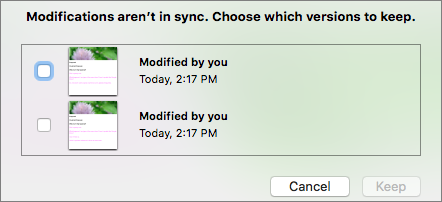
At this point you’re going to lose someone’s work; one choice will keep your last changes and the other will keep your partner’s…or other changes made by you. Often you won’t be able to tell at a glance from the thumbnail which version is which. The options are likely to have the same date stamp, too.
The moral of this story is: Don’t do that. Think of this feature as a way to share files easily, like you can with Dropbox, rather than a way to collaborate in real-time, like you can with Google’s Gsuite or Apple’s iWork apps.
Change Sharing Options
It’s easy to change sharing options after the fact, say when you think editing is done and want to change the group’s editing privileges to viewing only:
- Control-click the file in the Finder and choose Share > Show People in the contextual menu. Or, from within an app, choose Share > Show People.
- In the dialog that appears, click Share Options and then adjust the Who Can Access and Permission pop-up menus as you like.
Stop Sharing
To stop sharing a file, follow these steps:
- Control-click the file in the Finder and choose Share > Show People in the contextual menu. Or, from within an app, choose File > Share > Show People.
- Select the person’s name and then click the More
 icon that appears to the right. Choose Remove Access in the contextual menu.
 - Click Done.
People you’re sharing with do not receive a notification when you stop sharing, but the file vanishes from their iCloud Drive.