
5
Creating Beautiful Custom Materials
Knowing how to use SketchUp to create geometry is important. But knowing how to use stock and custom materials to take your models to the next level is essential as well. In this chapter, we will dive into how good materials help to make a great model and some of the best practices for creating and working with custom materials.
In this chapter, we will cover the following:
- Importing images for custom materials
- Organizing and applying custom materials
- Deforming textures
- Applying materials to curves
- Avoiding common mistakes with materials
Technical requirements
In this chapter, it is assumed that you have access to SketchUp Pro, any image file, and the Taking SketchUp to the Next Level – Chapter 5.skp file:
Importing images for custom materials
You have probably noticed that SketchUp comes with a few dozen assorted materials that you can use as you learn the basics of modeling. You have probably also learned that these materials are fairly limited and not very high quality. The intention of these stock materials is just to get you started. Once you have the basics of things such as using the Paint Bucket tool figured out, it is time for you to start creating your own materials.
Any image, assuming it is in the correct file format, can be SketchUp material. Materials are images that are saved in SketchUp and can be applied to any face using the Paint Bucket tool. In this section, we will talk about what sorts of images make good materials, and then how to import, save, and edit materials.
Materials, Textures, or Colors
These three terms seem to be somewhat interchangeable in the SketchUp user interface (UI). While they generally mean the same thing, I will try to refer to the image swatches or colors that are applied to models as materials. There are, however, portions of the UI that refer to textures or colors. For our purposes, these terms are interchangeable with materials.
What makes a good material?
Before you do any importing of imagery, you should spend a minute or two thinking about what sort of image you want to import to make a material. There are a few things that you should consider when you look at an image to see whether it will make a good material in SketchUp:
- File size/resolution
- Image orientation/distortion
- Repeatability/seamless imagery
We have already mentioned that big files can bloat your model file size in Chapter 2, Organizing Your 3D Model, so it should go without saying that when considering an image for use as a SketchUp material, you want to be conscious of file size. As we saw, there is no reason to import a 4K image when we know that SketchUp will be displaying it at a lower resolution. It does pay to remember that the opposite can be an issue as well. Make sure that the image you are considering is not too small, either. Consider this example:

Figure 5.1 – The image on the left is a too low resolution
When thinking about an image that is going to be imported into your model, file size is important but it does also have to look good. Those of us who are super conscious of file size may be tempted to import a very low-resolution image. But if that image does not serve to make our model better, is it worth saving a few KB of disk space?
While the image on the left in Figure 5.1 looks blurry at the size it is at, it could be used assuming it was small enough. While it would look terrible and out of focus if you tried to use it as a material for a bedspread, it may work as a small pillow. In most cases though, the image on the right would be preferable as a SketchUp material.
Another important aspect to think about when importing an image for use as a material is the orientation or distortion of the image. We will be talking about tools that can be used to manipulate imported images later in the Deforming textures section. So, keep in mind that we can make changes to rectify small issues with images. However, when choosing which image to import, consider using the one that will require the least correction. Here are a few images considered for importing for use as a wood grain material:
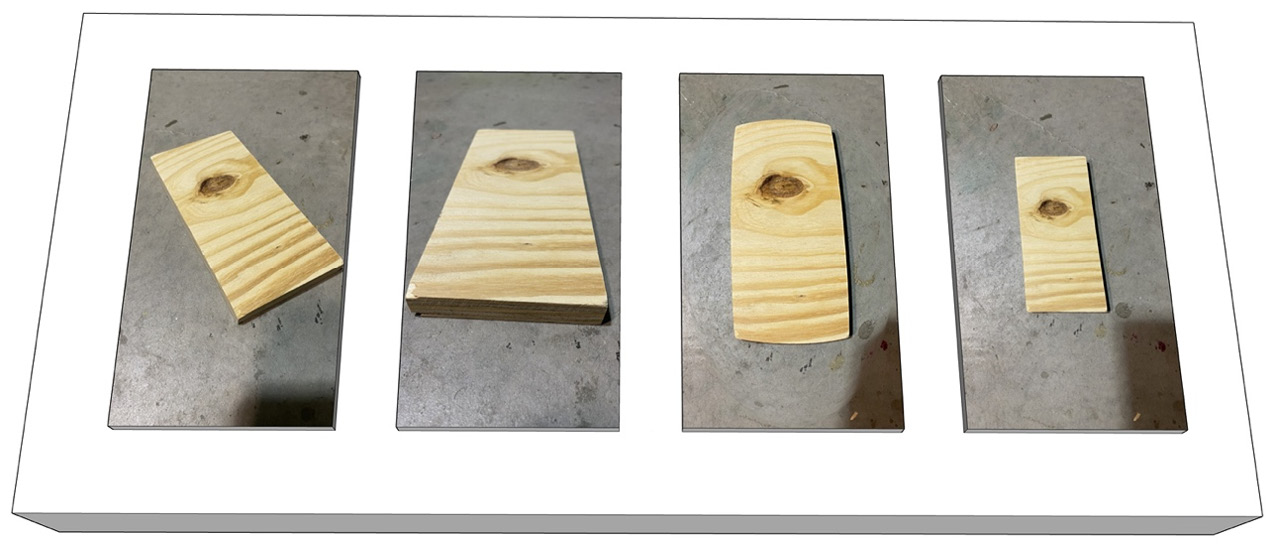
Figure 5.2 – Given the choice, the image on the far right would make the best material
The first image, while not ideal, could work in a pinch. Later, in the Deforming textures section, we will talk about editing materials using the Position Texture command, which could help this image. But, whenever possible, it is better to have a material that is not at an angle. Ideal images for use as materials squarely face the camera.
The second image in Figure 5.2 is probably the worst option. The main subject of the image is in focus at the bottom and slightly out of focus at the far end of the block of wood. While we could probably use Position Texture to get this image to a rectangular shape, the top would still be blurry. Ideal images for use as materials are in even focus and evenly lit throughout.
The third image in Figure 5.2 was taken with a fisheye lens or adjusted in an image editing software or something similar. Regardless of how the warped perspective was added to this image, this makes it a problem for use as a material. Ideal images for materials are not distorted or corrected from their actual shape.
The final image in Figure 5.2 is the ideal image for use as a material in SketchUp. It is small, as it does not take up the whole image, but the texture of the wood can clearly be seen, it is in focus, and not distorted from its original shape (which happens to be a rectangle and is perfect for a material).
Seamless images
Seamless images are images that have been edited so that the opposite sides connect seamlessly to each other. Seamless images can be tiled from end to end and side to side, and look like one big continuous image. Nowadays, seamless images are fairly easy to find online, and there are many online tutorials that show you how to use your favorite image editor to make your own seamless images. In fact, there are even a few online tools that will allow you to upload an image and it will make a seamless image for you!
When it comes to using seamless images, there are certain cases where you do want to consider using them. The perfect case for considering a seamless image is a floor or wall covering. Situations in which you have large surfaces that the material needs to cover are ideal for seamless materials, as shown here:
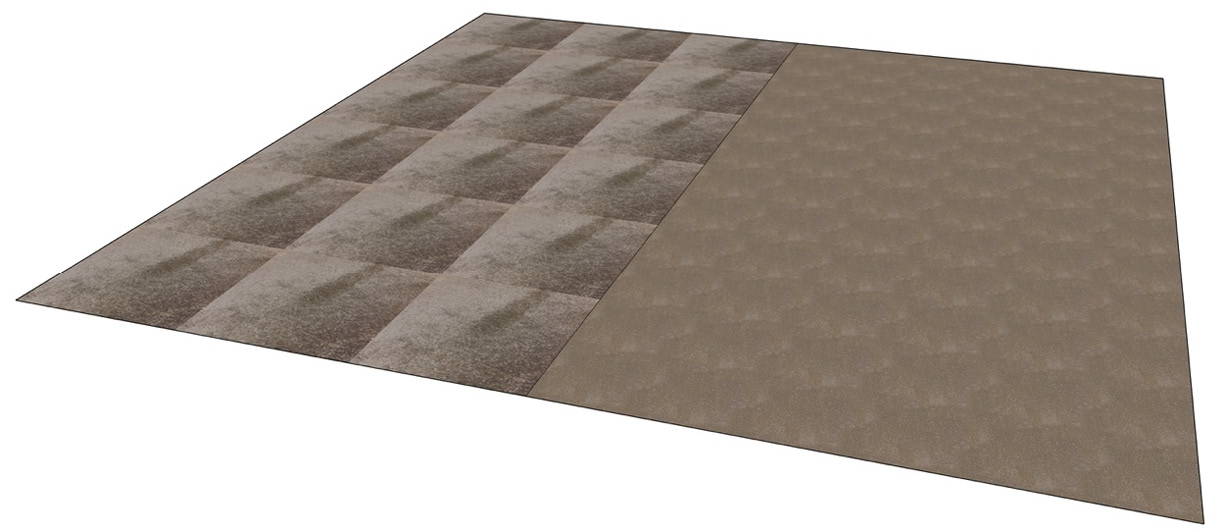
Figure 5.3 – Seamless texture on the right
Not every image should be seamless, though. The process of making a texture seamless can reduce the quality and detail of the image. When you don’t need to have an image that seamlessly tiles, it is often better to stick with a regular image. Tiling a seamless material makes sense on carpet, but not on a wood board, as seen in the following:
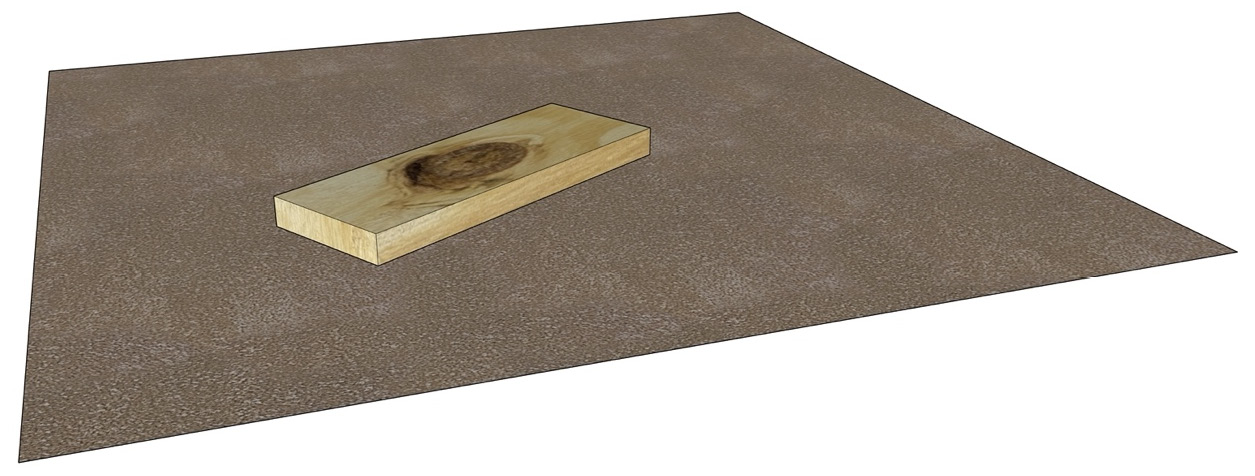
Figure 5.4 – Seamless material only on carpet
Using Your Own Pictures as Materials
Seamless or not, many people enjoy finding images online or downloading textures from websites for use as materials. Remember, you can always take your own photos and import them for use as materials.
Now that we have established what makes a good image for use as a SketchUp material, let’s dive into the process of importing these files.
Importing files as textures
Regardless of where you get image files from – downloaded, purchased, or taken yourself – at some point, you will need to import the files into SketchUp before you can use them as materials. This is done using the import command.
Importing an image file to use as a material will require you to bring the file into SketchUp and place it on a face. This face can be a part of the model you are working on, or it can be a “throwaway” rectangle. As soon as an image is loaded into the model, it is saved as a material, so the geometry it was placed upon on import can be removed and the material will still exist. Let’s walk through this, step by step.
First, you will need your own image file to import. This can be an image of anything for this example and can be downloaded or an image that you have taken yourself on your phone. The important part is that it is in a format that SketchUp can import. SketchUp can import any of these file formats:
- Bitmap (.bmp)
- JPEG (.jpg or .jpeg)
- Portable Network Graphics (.png)
- Photoshop (.psd)
- Tagged Image File (.tif or .tiff)
- Targa file (.tga)
For this example, the file needs to be somewhere that you can find on your computer.
Importing images in Windows
Let’s first look at the process to import an image for use as a texture for those of you running SketchUp on a Windows computer:
- Open Taking SketchUp to the Next Level – Chapter 5.skp.
- Choose Import from the File menu.
- Navigate to your image file.
- To limit the selectable files to only images, select All Supported Image Types from the dropdown to the right of the File name field:
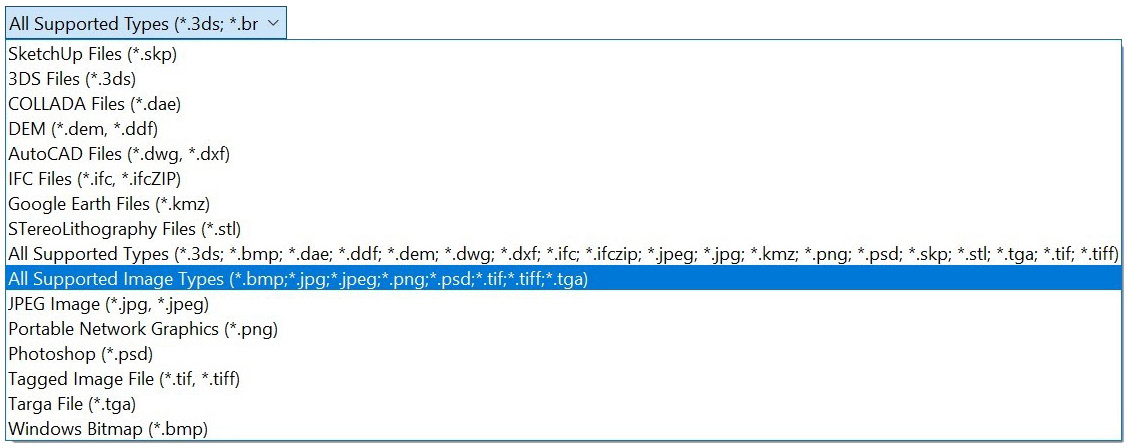
Figure 5.5 – All Supported Image Types
- Click on the file you want to import.
- To ensure that this file will be imported as a material, select Texture from the Use Image As list (notice that this list appears after you have selected a valid image file):
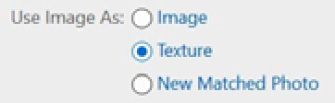
Figure 5.6 – Use as Texture
- Click the Import button.
At this point, the image is ready to be placed in your model. The initial placement will require a face to apply to (the square on the ground). This initial placement will also set the scale of the image as it will be used as a material.
The material is attached to your cursor by the lower-left corner of the rectangular image. Start placing by clicking on a face in the model. For this example, we will use the square in the first scene.
- Click on the lower-left corner of the square (the corner nearest to the origin).
SketchUp now wants you to choose the top-right corner of the image. Defining this rectangle will set the scale at which the image will be used as a material. For our example, we will stretch it to the square.
- Move your cursor so that it snaps to the right edge of the rectangle and click again.
At this point, you have created a brand-new material with your image. If you look at the Colors in Model list in the Materials window, you should see your image:
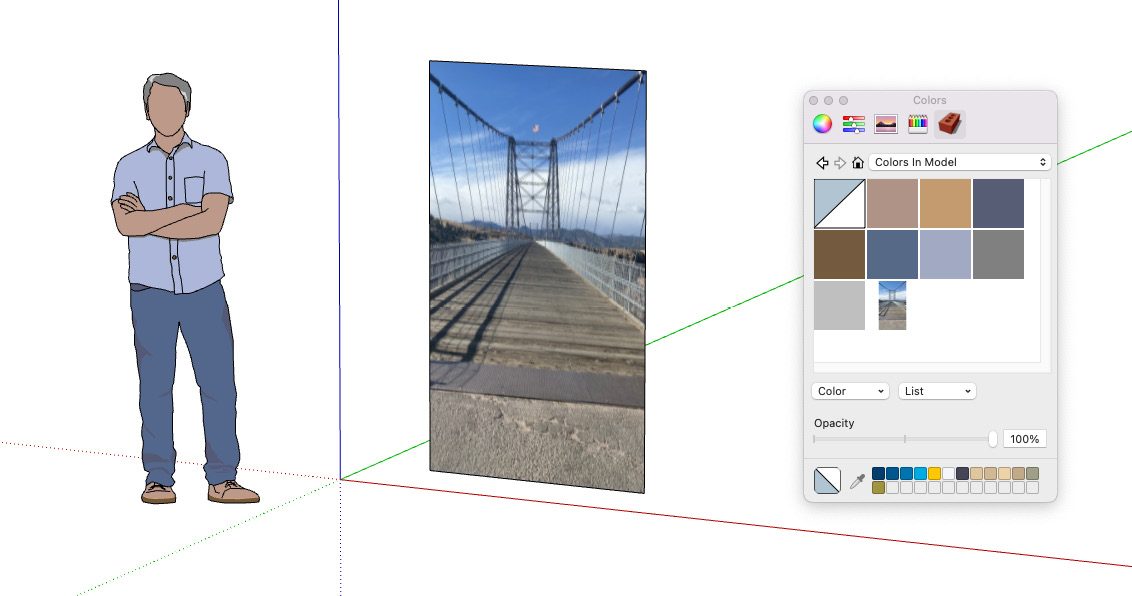
Figure 5.7 – The imported image in the model, and in the Colors window
Let’s drop this new material onto a few more faces really quickly:
- Start the Paint Bucket command and use the Sample Material modifier (Alt) to sample your new material, then click on the APPLYING scene.
- Click on the shapes in the next scene to apply your new material.
Importing images in macOS
Now let’s see what the process to import an image for use as a texture looks like for those of you running SketchUp on a Mac:
- Open Taking SketchUp to the Next Level – Chapter 5.skp.
- Choose Import from the File menu.
- Navigate to your image file.
- To limit the selectable files to only images, click on the Format drop-down menu, and select All Supported Image Types:
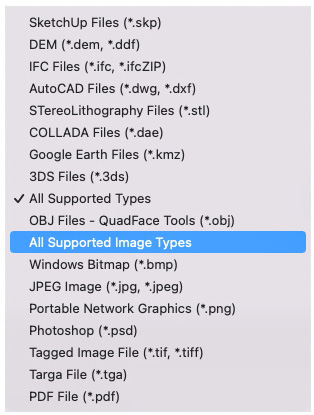
Figure 5.8 – All Supported Image Types
- Click on the file you want to import.
- To ensure that this file will be imported as a material, select Use As Texture from the drop-down format (notice that this dropdown only becomes available after you have selected a valid image file):
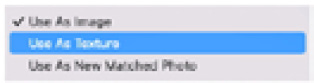
Figure 5.9 – Use As Texture
- Repeat Steps 7 to 9 for the image import process for Windows users.
- Start the Paint Bucket command and use the Sample Material modifier (Command) to sample your new material, then click on the APPLYING scene.
- Click on the shapes in the next scene to apply your new material.
Modifying Texture Placement
We spent all of Chapter 3, Modifying Native Commands, talking about how to use modifier keys. Notice that you have access to modifiers when placing a new texture, as well. Double-clicking on a surface will place the image at full size. After placing the first corner, tapping Ctrl/Option will size the image about the center point, while holding down Shift will allow you to distort the image with non-uniform placement.
Importing an image for use as a material is not just a good skill to have, but an essential skill for anyone hoping to move beyond basic modeling. You simply cannot make properly detailed models without knowing how to bring images into SketchUp for use as custom materials. Something else you will need to know is what to do with those materials once they are created. Let’s cover that in the next section!
Organizing and applying custom materials
At this point, you have seen how to import images and how they show up as SketchUp materials. You have even sampled those materials and applied them to a face or two. What you may not have noticed, though, is that the image you imported into the practice file only existed in that practice file. If you look at the Colors In Model list in the Colors window right now, you will see your imported image. If you start a new file though, you will not see that imported image anywhere in the Colors window.
.smk Files
When an image is imported into SketchUp and a new material is created, that material exists as a .smk file. This is a proprietary file that includes everything that SketchUp needs to use the image as a material.
Custom materials exist in the model where the image was imported. To have those new materials show up in other models, we must tell SketchUp we want to use them outside of just this model. There are three ways to bring custom materials into other models:
- Apply the new material to a component, save the component as its own .skp file, then import it into a new model. The new material will then show up as a Color In Model item in the new model.
- Save the model with the new material as a template. When starting a new model and using this template, the new material will show up as a Color In Model item.
- Add this new material to a new or existing color list in SketchUp’s material library.
The first option is not really a way to load materials as much as it is a side effect of loading components into an existing model. The second is a viable option but will only work for new models and only for a single template. Of these three options, the last one is ideal for a material that we will want to use regularly in the future or we would want to use in existing, as well as new, models. Let’s look at the process of making a custom material list, loading it with custom materials, and saving it as a part of the material library.
Creating custom material lists
Let’s create a list of materials that can be used in any model we open or create in SketchUp:
- In Taking SketchUp to the Next Level – Chapter 5.skp, click on the scene called IMPORTED.
- Bring up Paint Bucket and bring up the In Model materials in the Color window.
This scene shows you eight tiles with custom materials applied to them. These materials are saved to this model as materials in the In Model list. They do not, however, exist anywhere else in the library. Let’s create a custom list called Level Up and put all these materials in there.
Lists or Collections
On macOS, the term list is used as a name for a group of materials shown in the Colors window. On Windows, the term collection is what the groups of materials in the Materials window are called. For our intents, they are the same thing.
Since the UI for adding lists is different depending on your operating system, we will go through this twice, once for Windows, and then again for macOS.
Creating a custom material list on Windows
Let’s create a custom material list in SketchUp for Windows:
- In the Materials dialog in the default tray, click the Details icon (the icon just below the eyedropper icon) and choose Open or create a collection… as shown here:
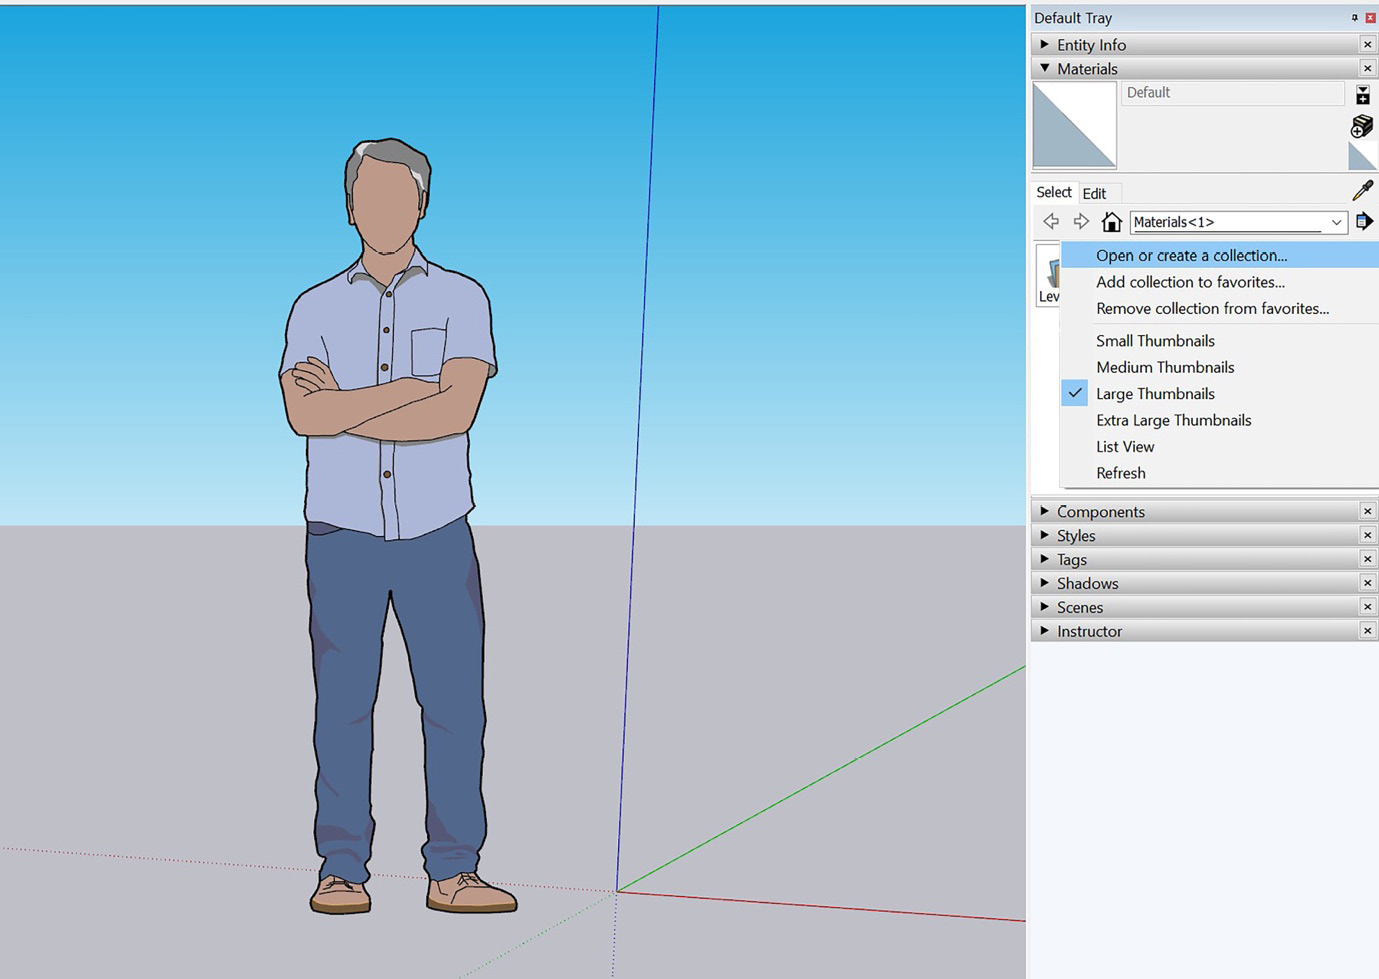
Figure 5.10 – Windows Materials window details
This will launch a File Explorer window showing the contents of the Materials folder as defined in your Preferences.
- To create a new collection, right-click in the window, select New, then select Folder. Name the new folder Level Up, then select it, and click Select Folder.
With that, you have created an empty collection of materials. On Windows, material files are simply saved into folders. SketchUp knows to look for folders at this location, and any folders will be shown as collections. On Windows, this means you can very easily create or move collections around outside of SketchUp, since they are just folders. Now that we have a new collection created, let’s load it up with custom materials.
- Click the Display the secondary selection pane icon at the very top-right corner of the Materials dialog.
This will open a second pane containing a copy of the material collections in the Materials dialog.
- In the second pane (the lower one) click the Home icon to bring up the In Model collection of materials.
- Click and drag the first material (Blue Curtain) from the bottom pane to the top.
All Materials Have Names
Even though they may not be on the screen when you pick them, every single color, stock material, or custom material has a name. If you are seeing your materials as tiles, hovering your cursor over a tile for half of a second will show you the name in a tooltip.
You have now added a single material to your custom collection:
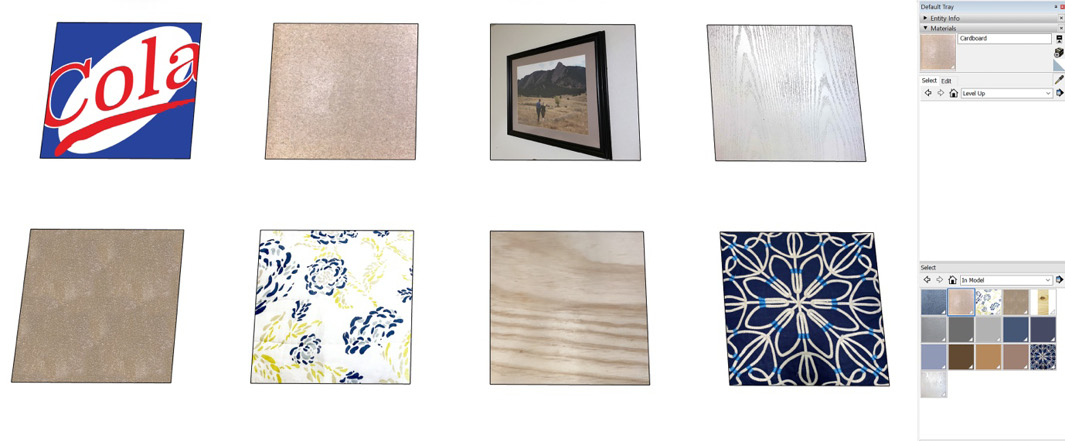
Figure 5.11 – The Materials dialog with two panes
- Click and drag the other eight custom materials (they should be the top six materials and the last two) into the Level Up collection.
With that, you have created a collection of eight custom materials that will show up any time you run this installation of SketchUp:
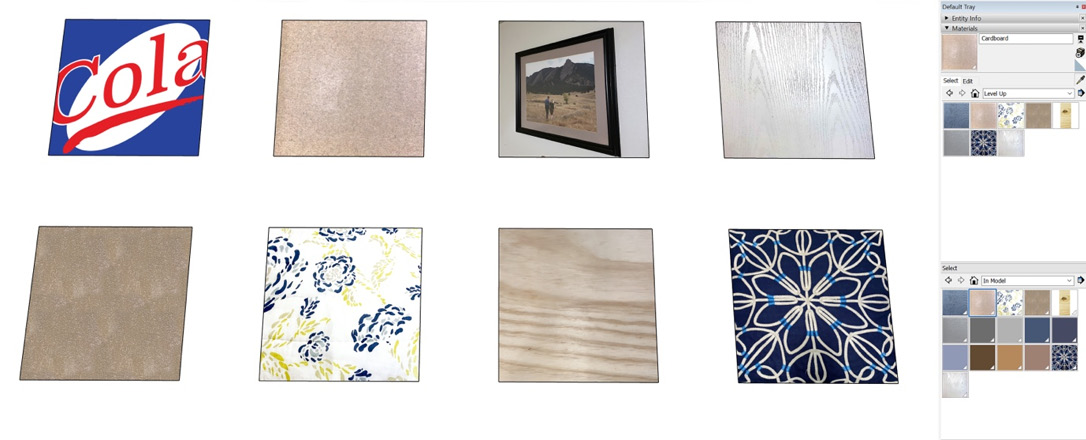
Figure 5.12 – The Level Up material list with eight custom materials
You can see that adding a material collection on Windows is not a difficult process, especially once you have seen how it is done.
Creating a custom material list on macOS
Now, let’s see how we would go about the same process on macOS:
- In the Colors window, click the List drop-down menu and choose New….
- Type Level Up into the text field, then click OK.
Believe it or not, that is all there is to creating a custom material list on macOS. There is, however, the process of getting materials into the list. Since macOS does not have the ability to open two material lists at once like on Windows, this can take a little bit more time. We will look at a couple of different ways to get some materials into our list.
- Click the Home icon to bring up the In Model materials.
- Double-click the Pillow material (the one that looks like a white star on a blue background).
Double-clicking on a material will bring up the editing screen for that material. While this screen is up, you can change material lists while keeping the material visible in the editor:

Figure 5.13 – The Color window is split between the editor and material lists
- Change to our new Level Up material list.
- Now, click on the material tile in the editor and drag it up and drop it into the top of the window (the empty list of materials in the Level Up list):
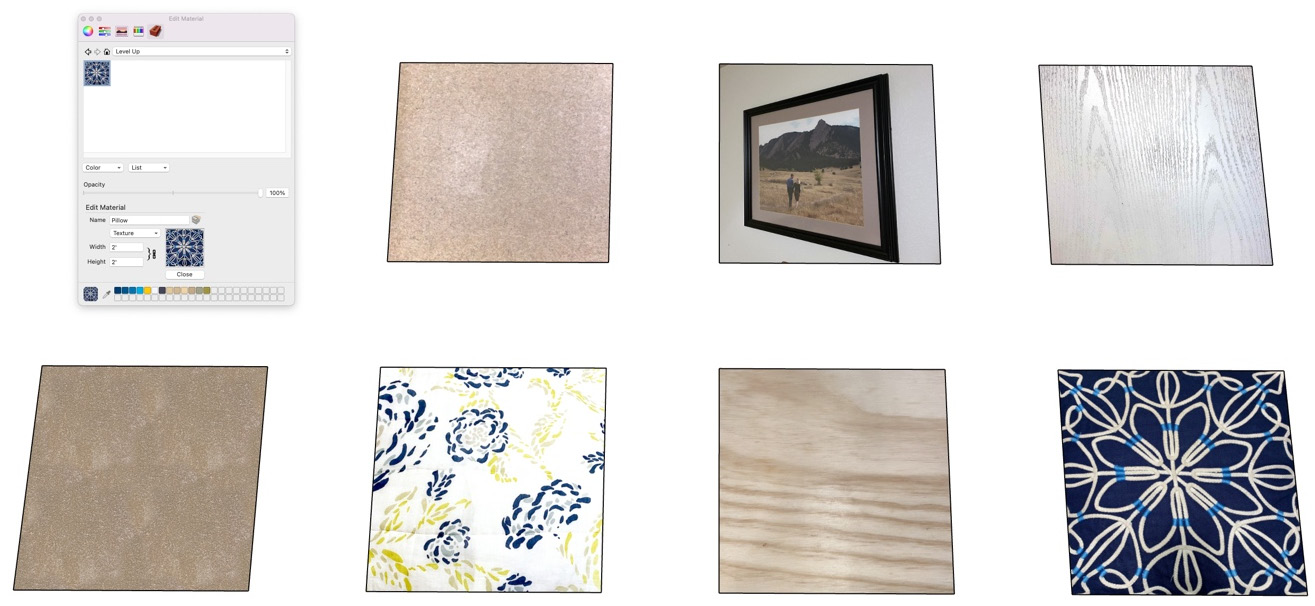
Figure 5.14 – The Level Up material list now has a single material
That material is now a part of our custom material list. To add more materials from the In Model list, we would need to switch back to that list. Double-click the next material to bring it up in an editor, then switch back to our custom list to add it. Let’s look at a way to add these materials with fewer clicks!
- While still in Paint Bucket, tap the Command modifier key to bring up the eyedropper cursor.
- Click on one of the tiles in the model (not the Pillow material).
Notice that selecting a material from the modeling screen automatically loads it into the editor. You now have that material loaded into the editor while still in the Level Up material list.
- Click and drag the material into the Level Up material list.
- Repeat the process for all the tiles.
At this point, you have created a list of materials that will be available any time you open a model on this installation of SketchUp Pro:
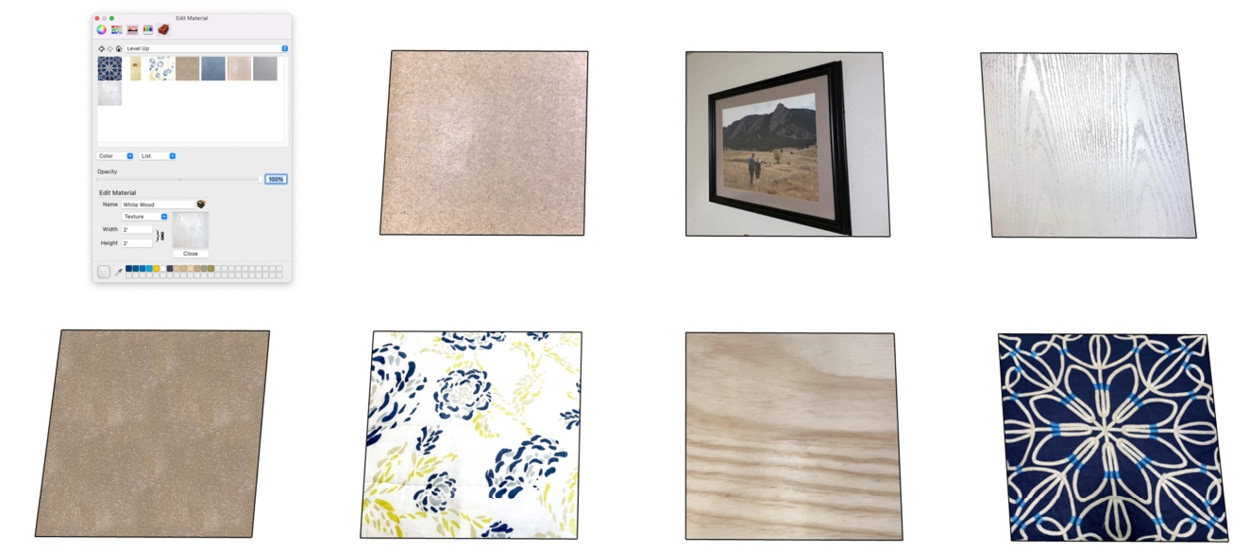
Figure 5.15 – Your custom material list with eight custom materials
At this point, we have seen how to create custom material lists on both Windows and macOS. In both cases, the lists live in the SketchUp Pro installation in which they are created. Let’s check out how to move one or more material lists into another installation. This could mean moving a material list from one computer to another, or from one version of SketchUp to another.
Moving custom materials
Since moving these files from one location to another will require you to get to files on your computer, it will be different based on the computer that you are using. Unlike creating material lists, moving custom-made material lists is the same, regardless of the operating system. The fact is it is just as simple as copying a folder from one location to another. The trick (if there is one) is in getting to the folder.
The easiest way to do this is through Preferences. The Preferences window can be accessed through the Windows menu on Windows, and the SketchUp menu on macOS. Let’s run through the steps to copy a material list from one copy of SketchUp to another:
- In the installation of SketchUp that you are copying from, open the Preferences window and click the Files tab.
- To the right of Materials in the list is a file folder icon. Click this icon to launch File Explorer/Finder.
- Select and copy any custom material lists you want to copy.
- Open the installation of SketchUp you want to copy to and perform Steps 1 and 2 to open the Materials folder.
- Paste the folder from the first installation into the Materials folder.
- Close and restart SketchUp for it to find the new Materials folder.
If you are moving these folders from one computer to another, you may have to include a step where you paste the copied files onto a flash drive or via a network folder. The important part to note is that copying the folder full of material files can be done across any recent version of SketchUp and is even the same across operating systems!
What about Stock Materials?
You may have noticed that the only custom material lists were in the Materials folder, but you have access to hundreds of other materials through the Paint Bucket tool. Where do those come from? Stock materials are installed as part of the SketchUp installation and exist as program files. It is possible to modify or remove these stock materials. But, as they are considered program files, they will reinstall any time your installation is reinstalled or repaired. For this reason, it is best to leave them alone and focus your material customization on the files in the Materials folder.
With that, you not only know how to create custom materials, but also how to organize them and move them from one instance of SketchUp to another. Up until now, we have assumed that materials were as good as they were when imported. What happens when we need to change the orientation, angle, or scale of a material? Fortunately, that is exactly what the next section is all about!
Deforming textures
There are a lot of great places to get images for use as materials out there. There are free and paid sites where you can download high-resolution, seamless-tiling images of just about anything. There is also a chance that you are an expert photographer who can perfectly square up a texture in the real world, take a picture, and have it applied as a perfect material once it is imported into SketchUp. There are also a lot of good-looking images that will need a little bit of editing once they get imported. This section is for those.
Modifying textures
To modify a texture, it must be in the model space. It cannot simply be saved somewhere in the model but must actually be visible on the screen. To edit the material, select and right-click the face that it is on. If the face you need to edit is in a container, you may have to double-click to enter the container before you can get to the face with the material. Let’s hop into our practice model and modify a few materials using the Texture Editor and fixed pins:
- Click the FIXED PINS scene.
- Select the top surface, right-click, then click Texture.
- From the pop-up menu, select Position.
This will bring up the texture editor with the custom material tiled at its initially imported size and orientation. Notice the four pins at each corner of the center tile:
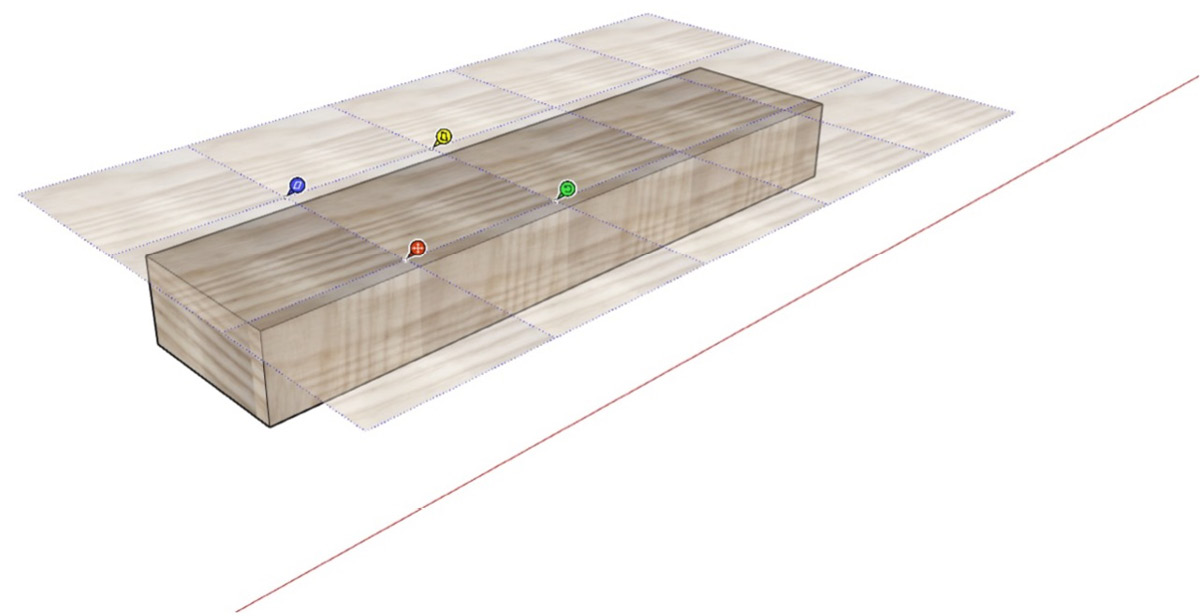
Figure 5.16 – A different colored pin on each corner of the material
These pins will allow you to distort the image. Each color has a different function:
- Red pin – This handle will allow you to move the material and the tiled copies along the plane of the face. Note that clicking and dragging any place on the face of the image will allow you to move the material.
- Blue pin – This handle will allow you to shear the material. Clicking and dragging this handle will bring up a compass showing the angle of the shear. Note that the shearing is uniform, in that the opposite side and all copies of the material shear the same.
- Yellow pin – The yellow pin is the distortion pin. Clicking and dragging the yellow pin will allow you to stretch the entire tiled grid.
- Green pin – The green pin will allow you to rotate and scale the center material. Clicking and dragging the pin will bring up a compass that will allow you to specify exact rotation by moving around the pin. Pulling the pin away from its origin will allow you to scale the material.
For this example, we need to scale up the material to cover the block. Since the grain of the wood is already running in the direction of the block, there is no need to rotate.
- Click and drag the green pin down the board (along the red axis) until the center tile is longer than the board:

Figure 5.17 – Using the green pin to scale up the wood material
Now that the material is big enough, we just need to move it so that we do not see the seam at the edges of the image.
- Click on the material (or the red pin, if you prefer) and drag it back up the red axis until the center tile covers the top face of the block. If you did not make the material large enough in the last step, use the green pin to scale up again:
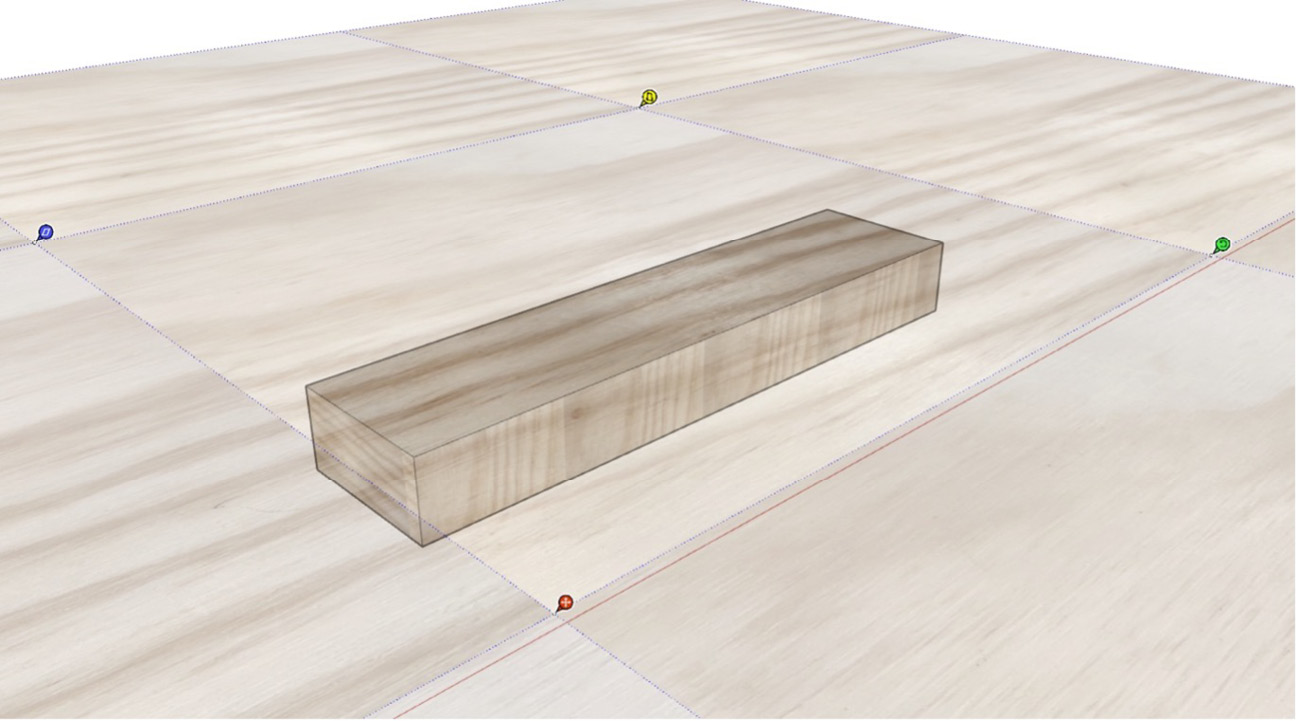
Figure 5.18 – Dragging the material so that it covers the top face
- Once the material covers the top face, click anywhere outside of the material tiles to place the material.
- Select the side of the board, right-click, then choose Texture, and then Position.
- This time, start by grabbing the green handle and turning it around the compass as shown here:
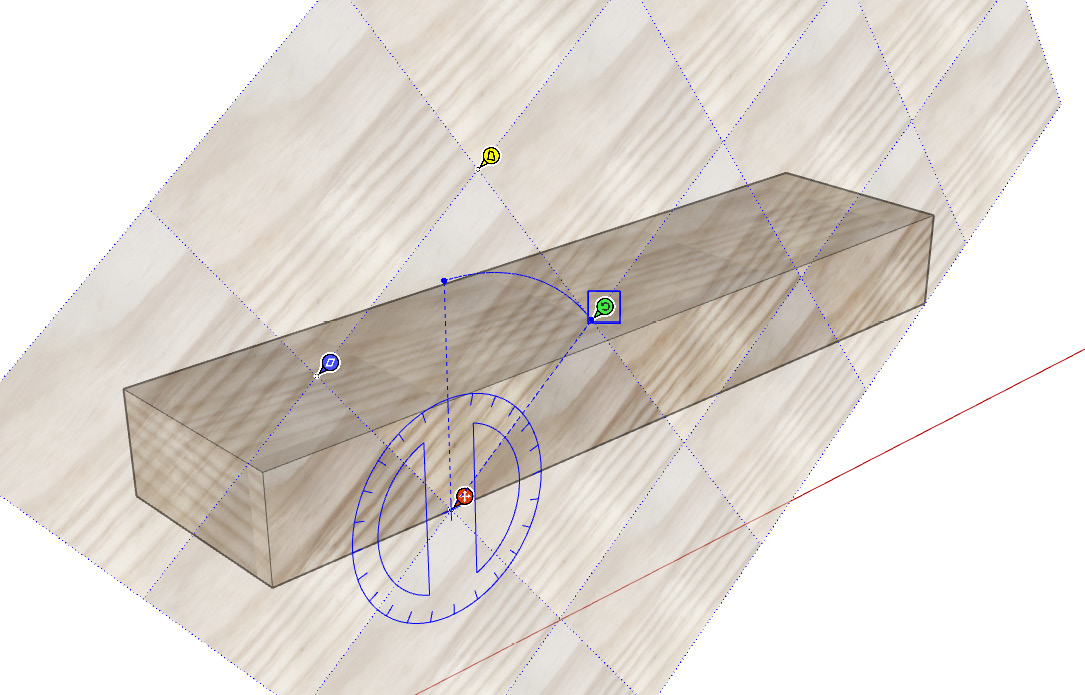
Figure 5.19 – Rotating while maintaining scale
- Rotate the material 90 degrees (so that the grain runs in the same direction as the board).
- Use the green handle to scale up the material, then move it as needed.
- Click outside of the material grid to close the texture editor.
The last material that needs to be edited is the end. Normally, if I were to texture a board like this, I would have a separate material just for the end. In this case, we can use the material we have, and we just need to be creative. In this case, you can use the green pin to rotate and scale the material until the grain is fairly large, and rotate it so that it does not run perfectly parallel to the edges of the face, similar to the following:
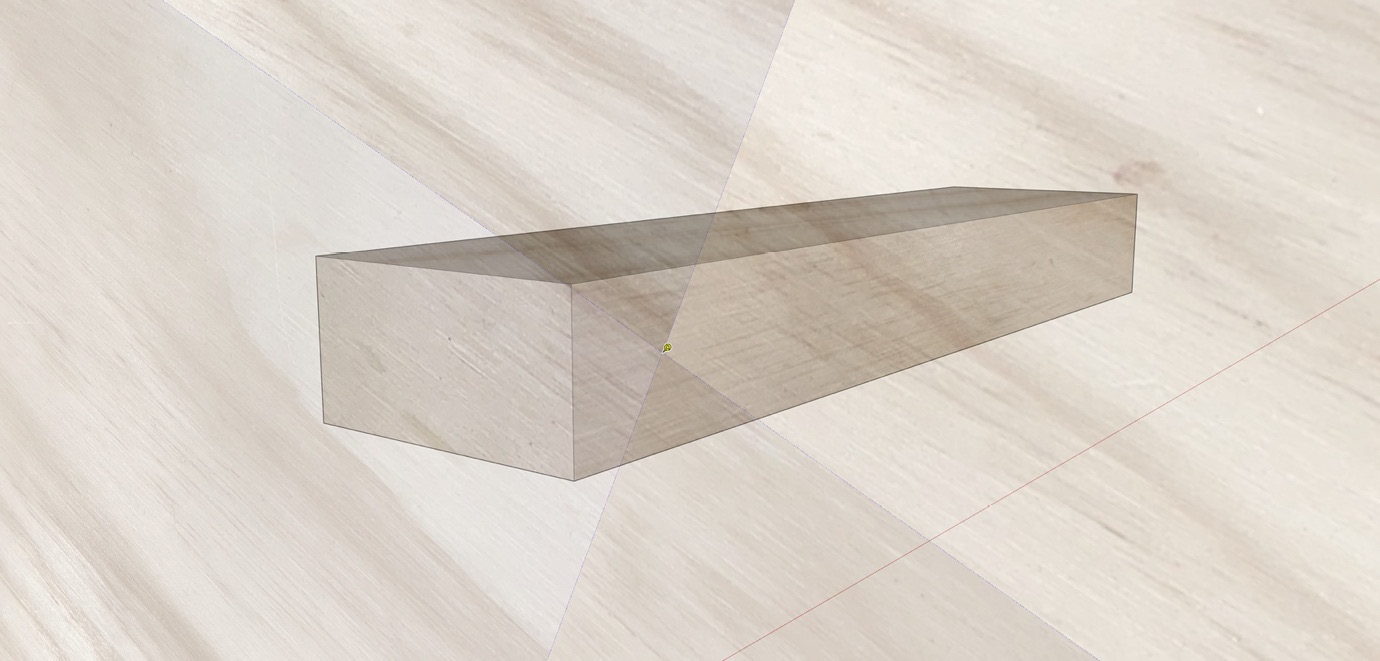
Figure 5.20 – The same material rotated and scaled for use as end grain
- Use the texture editor and the green pin to scale and rotate the material until you have a material like the one in Figure 5.20.
The last step is to copy the edited materials from the three sides to their opposite faces.
- With the Paint Bucket tool, use the Alt/Command modifier to sample the top material, then orbit under the board and apply it to the bottom. If needed, right-click and move the materials to prevent the material edge from showing up.
- Do the same for the side and end faces.
With that, you have successfully used the texture editor to apply a single material to six sides of a model. Some of you are probably asking, “What about the yellow and blue pins? When are we going to try them out?” My answer would be to go ahead and play with them. To be totally honest, I have used the blue pin once on an odd material and have never used the yellow pin on a model. If I ever have a material that needs to be edited, I use white pins.
For this example, we are going to take an image and use the white pins to stretch it, so that it fits into a totally new shape:
- In your practice model, click the WHITE PINS scene.
In this example, we have a wall and a picture hanging on it. Notice that the picture has an image of a framed artwork that was taken at an angle. What we want to do is use the white pins to stretch the image inside the frame so that it aligns with the geometry in the model.
- Select the face with the image on it, right-click, then choose Texture, and then choose Position.
- Right-click again and click on Fixed Pins.
This will toggle fixed pins (the colored pins) off. Notice that the colored pins are replaced by white pins:

Figure 5.21 – White pins at each corner of the material
We will use these pins to stretch our image to match the geometry. What we want to do is move the four pins so that they are on the four corners of the photo in the image.
- Select the lower-right pin by clicking on it once (click and release).
This will attach the pin to your cursor. Now, you will need to place it in the lower-right corner of the photo.
- Move the pin and place it so that the tip of the pin is at the lower-right corner of the photo.
- Repeat Steps 4 and 5 with the lower-left and upper pins.
At this point, you should have a pin in each corner of the photo in the image:
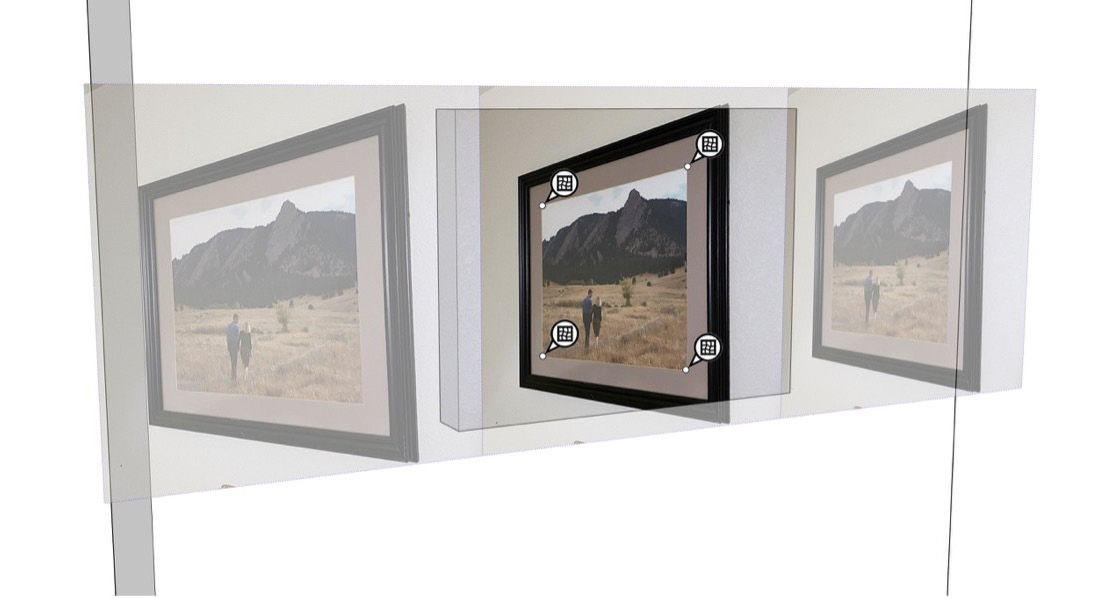
Figure 5.22 – Pins aligned with the four corners of the photo
Now comes the fun part. Next, we will use the pins to stretch the image so that the corners of the photo align with the corners of the geometry in the model.
- Click and drag the lower-right pin to the lower-right corner of the rectangle.
Notice how the geometry stretches when you move the pin? This can be a little bit disorienting, but when we get all four pins aligned, it will look perfect.
- Click and drag the remaining pins to their respective corners.
With that, you have stretched the material so that the orientation of the photo is back to a rectangle:
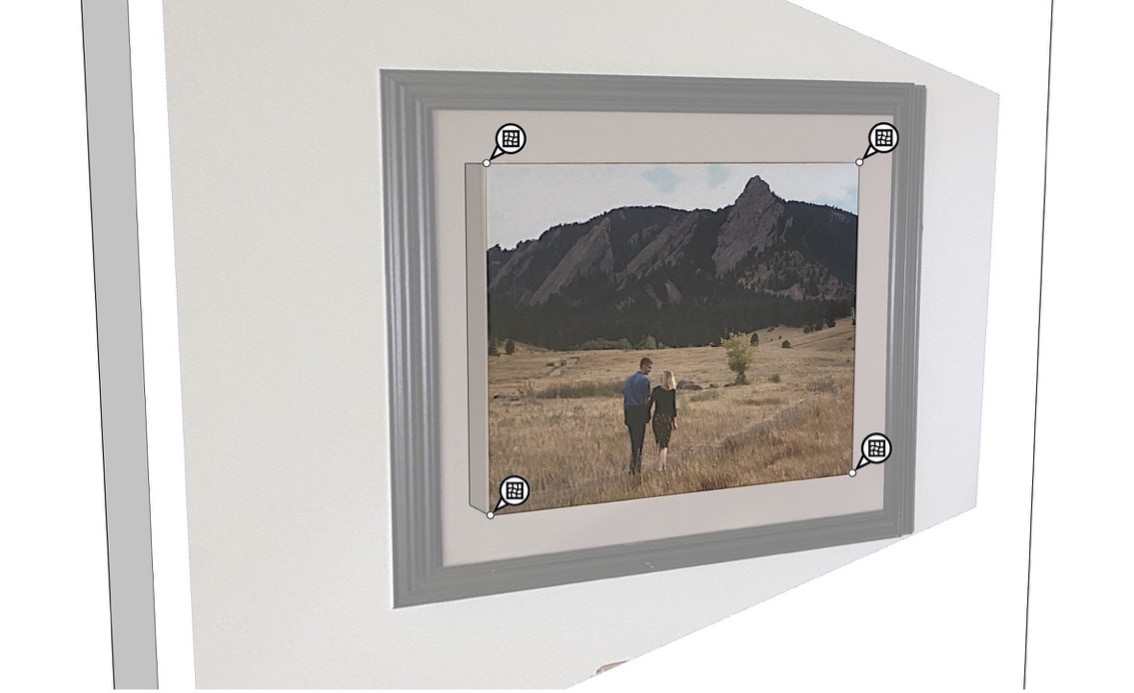
Figure 5.23 – Rectangular image aligned to rectangular geometry
- Click outside of the material tile to close the texture editor.
The white pins are amazing tools to make images that are not perfectly aligned to your model fit where you need them. Obviously, this works great for something such as artwork, but can also be used to align facades on the front of buildings, or even stretch landscape imagery.
At this point, you have seen how to import, organize, and modify materials. Up next, let’s take a look at a couple of different ways to apply materials when your geometry is more than a single face.
Applying materials to curves
In SketchUp, there is a one-to-one relationship between a face and its material. Any given face will have one material applied to it, and how the material falls on that face is relative to just that face. This is different from processes such as UV mapping, where materials are applied to a model as a whole.
This is not a big deal when you are applying colors or when custom materials are going on flat surfaces but can become a bit of an issue when the faces you are applying materials to are more complex, such as rounded shapes or wavy meshes. Fortunately, there are a few tools and techniques in SketchUp that can help you to apply materials to these sorts of geometries.
Projecting materials
One method to apply materials to curved or wavy surfaces is to use projected textures. When you apply a material to a face, that face applies normally to the face. This means that the material is aligned so that it is in the same orientation as the face and then lies flat on that face.
A projected material, on the other hand, is applied flat to one surface and is then projected onto other faces. This can cause a bit of distortion to the material but will allow for materials to flow across curving or wavy meshes. Let’s practice this in an example:
- In your practice file, click the PROJECTED scene and bring up the Paint Bucket tool.
- Sample the blue material on the left and apply it to the wavy mesh in front of it.
That is a mess. When you apply a material to a mesh like this, you are not applying it flat to a single face, but you are applying it flat on each face that makes up the mesh. Let’s look at exactly what is happening here.
- Click the View menu and toggle Hidden Geometry on.
See all those dotted lines? Each of the faces created between those dotted lines has the material applied to it. You can see that SketchUp tries to connect the material when faces are edge to edge, but it cannot connect the material across all the faces:
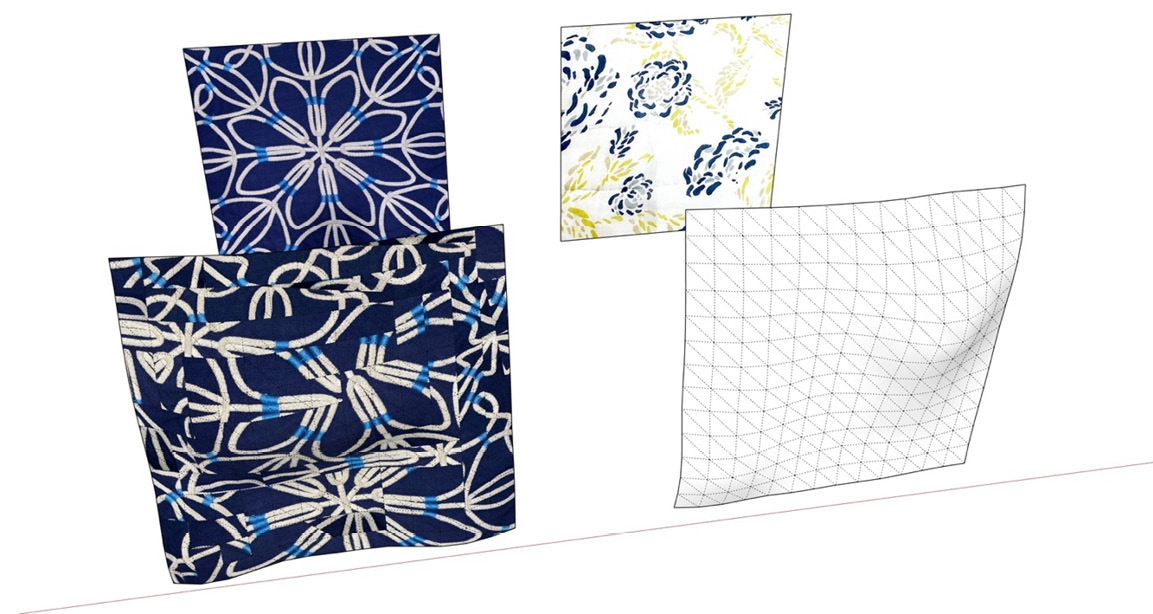
Figure 5.24 – A material applied directly to a wavy mesh
This is where projected textures come into play. Let’s try applying the material on the right using a projected texture. First, we need to turn that Hidden Geometry off.
- Click the View menu and toggle Hidden Geometry off.
This step is taken not just because it will be easier to see, but also to show the wavy mesh as a single surface. When applying materials with Paint Bucket, it will apply to the face that is clicked on. This means if Hidden Geometry is turned on, Paint Bucket will apply materials to faces one at a time, rather than the whole surface.
- Right-click on the material on the right, click Texture, then select Projected from the popup.
- Sample this material, then apply it to the wavy surface in front of it.
Notice how the material flows evenly all across the wavy surface? This is what a projected material will do. It will slightly deform the material on each face so that all faces on the surface appear to be connected:
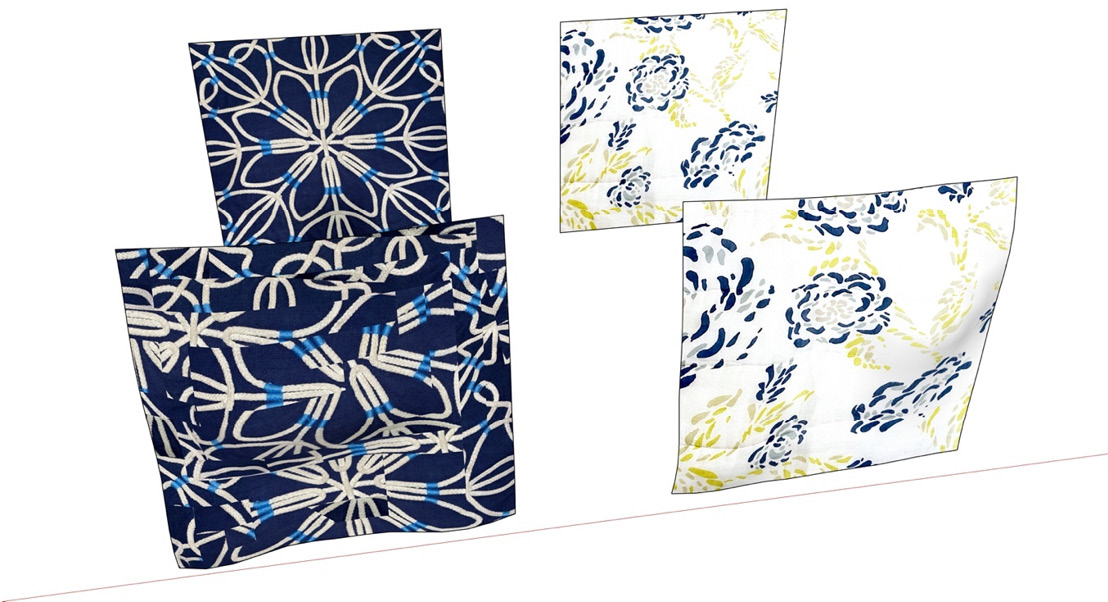
Figure 5.25 – Project texture applied to wavy surface
This is the method to use when you are placing a material on a curved or wavy surface like this. There are some cases, though, where you may want the material to wrap around a surface, rather than project onto it.
Wrapping with a material
In this example, we will wrap a rectangular material around a cylinder. Just applying it will result in something like the blue material in the previous example, and projecting will end up stretching the materials at the sides:

Figure 5.26 – Can 1 – Material applied directly, can 2 – Projected material applied, and can 3 – What we want
To get a material to wrap, we will sample the material and apply one face at a time in sequence, so that the result is the appearance of the material wrapping around the geometry:
- In your practice file, click the WRAPPING scene and start up the Paint Bucket tool.
- Sample the Cola material to the right of the can.
At this point, applying it directly to the can will result in the material being all messed up like can 1 in Figure 5.26. We need to apply it directly to the faces that make up the surface. To do this, we need to see the hidden geometry.
- Toggle Hidden Edges on in the View menu.
- Click on one of the faces in the middle of the can to apply the material:
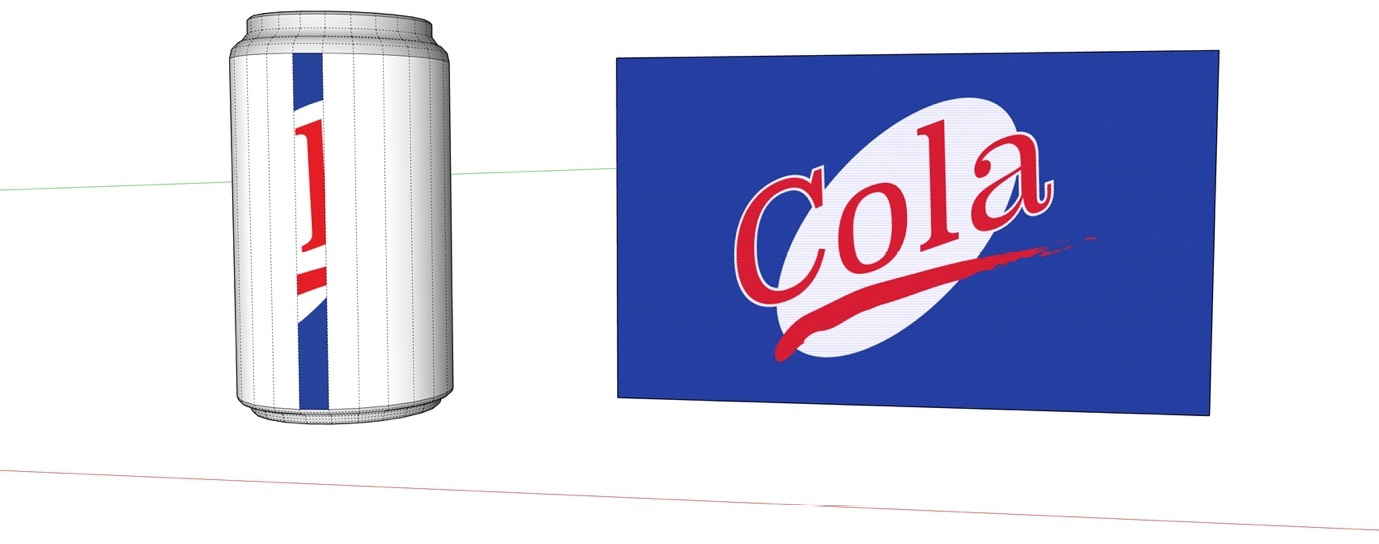
Figure 5.27 – Material applied to a single face of the can surface
- Click on the face directly to the right of that face. Continue to click on faces to the right until you are only applying blue (half of the Cola logo is finished):
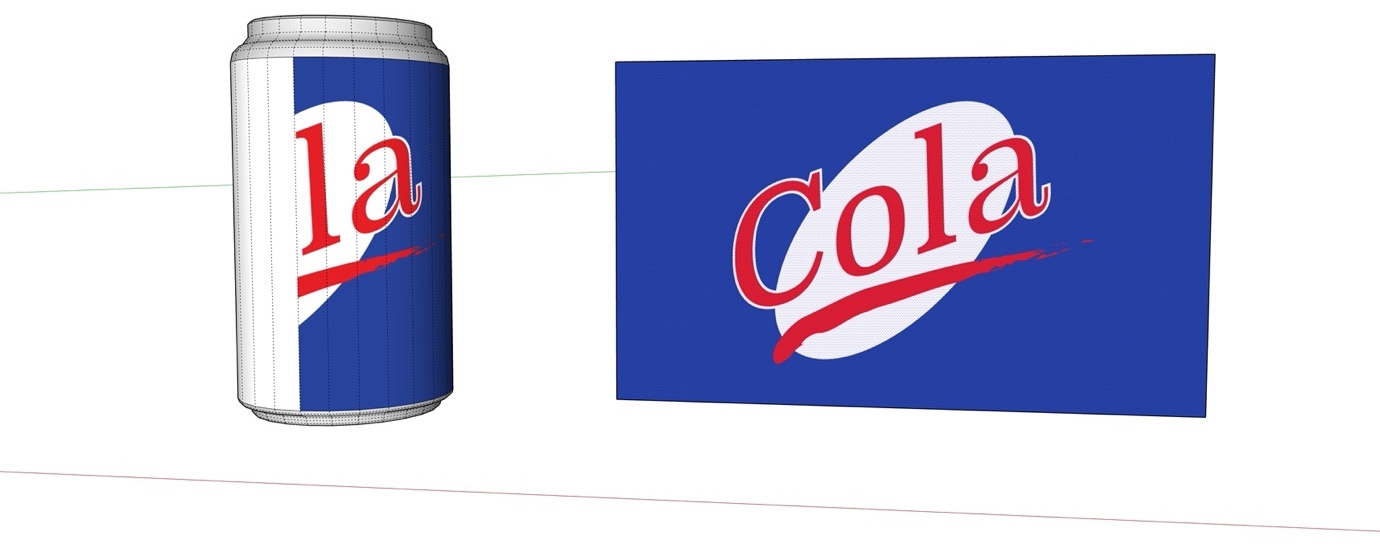
Figure 5.28 – Half of the can wrapped in the material
- Now, go back to the center and start applying to the faces to the left of the center.
- You will have to orbit as you go, but you should be able to click faces until the image wraps completely around the can:
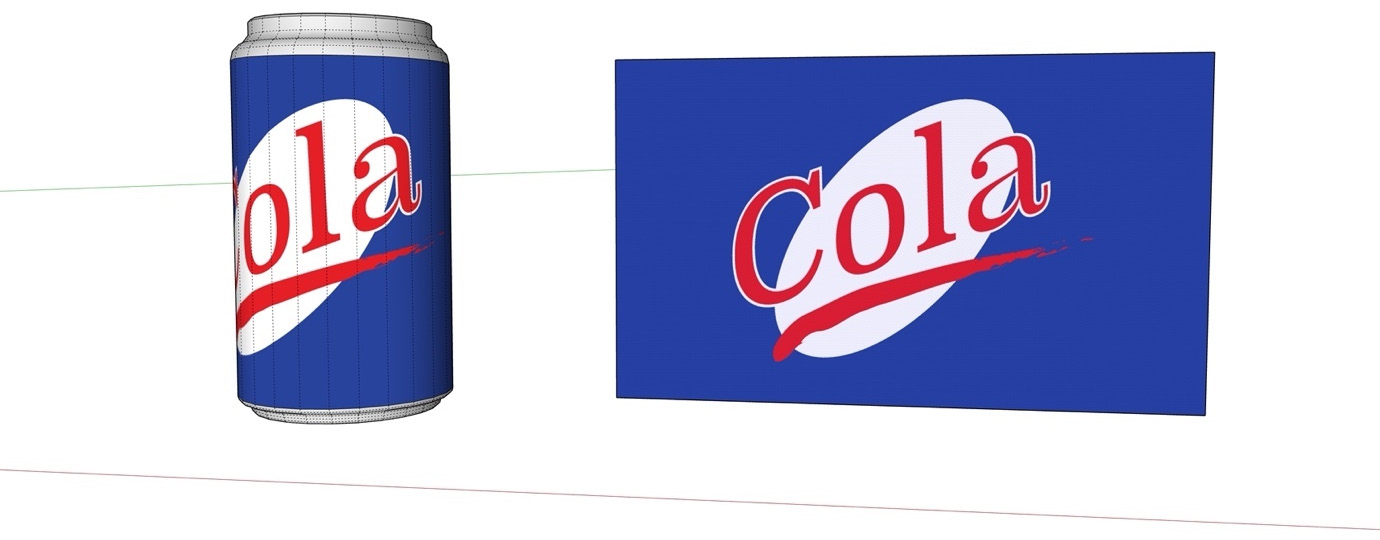
Figure 5.29 – The can with the sampled material wrapped all the way around
In this case, the image used was long enough to completely wrap around the can. If the image were shorter, you would have had to re-sample the material as you apply or restart the image partway through.
With that, we have learned how to use native tools to apply materials to curved or wavy surfaces. If this is something that you do a lot, you may benefit from a UV mapping extension or another painting tool (we will talk about extensions in Chapter 11, What Are Extensions?).
Up next, let’s take a look at some of the most common mistakes when it comes to creating and using custom materials.
Avoiding common mistakes with materials
We have learned a whole lot about creating and using materials in our model. I figured it was worth mentioning a handful of issues that people run into when using materials in SketchUp. Some of these are improper processes or assumptions, but most power users have run into these mistakes on the road to leveling up their SketchUp skills.
Relying on materials to add all the details
I see this all the time. Modelers want to cut corners or save time, so they apply a photo texture to the front of a building instead of modeling details. Now, this can work in some cases, but a lot of times, this will end up giving you a flat-looking model that cannot be used out of a single context.
Take this model, for example:

Figure 5.30 – The left house has modeled details and the right house is mostly materials
In this example, the house on the right was a 2D cutout of an image that was extruded. It looks OK in the current view. In fact, some might even prefer the way it looks to the flat colors used in the model on the left. However, the appearance starts to fall apart when the camera moves, or shadows are applied:
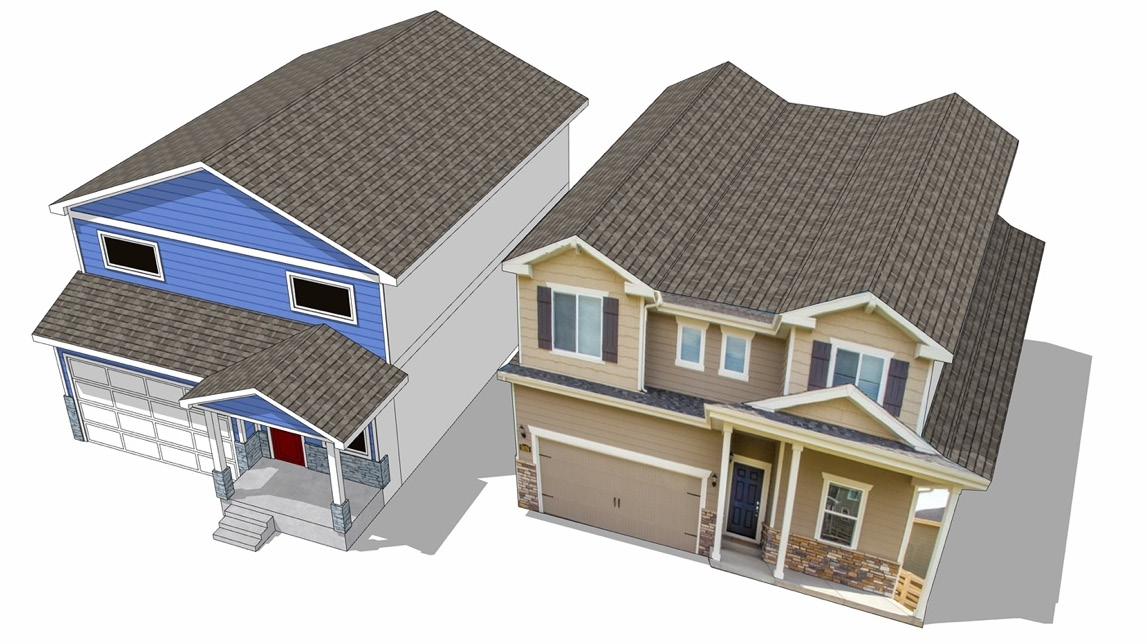
Figure 5.31 – The material façade looks less impressive from this angle
While the model on the right took a fraction of the time to model, if it is used for anything other than background geometry, it just does not look very good.
Import as a texture
OK, I know this one sounds a little ridiculous, but I have made this mistake and I have seen newer users asking about this. When you are importing, make sure you have Use As Texture selected. I would venture to say that all SketchUp users have, at one point or another, imported an image as a material, then been confused when it shows up and cannot be loaded into Paint Bucket.
Import proper-sized files
One of the tricks of mastering SketchUp is understanding when and where to add detail. Adding too much detail can slow down a model, and adding too little can make your model look bland or boring. The same goes for imported imagery. We have seen that we can use the texture editor to move, scale, rotate, or stretch out images, but it is important to be conscious of the intended use of a material before it is imported.
Look at this house model with a gingerbread house material added to it:
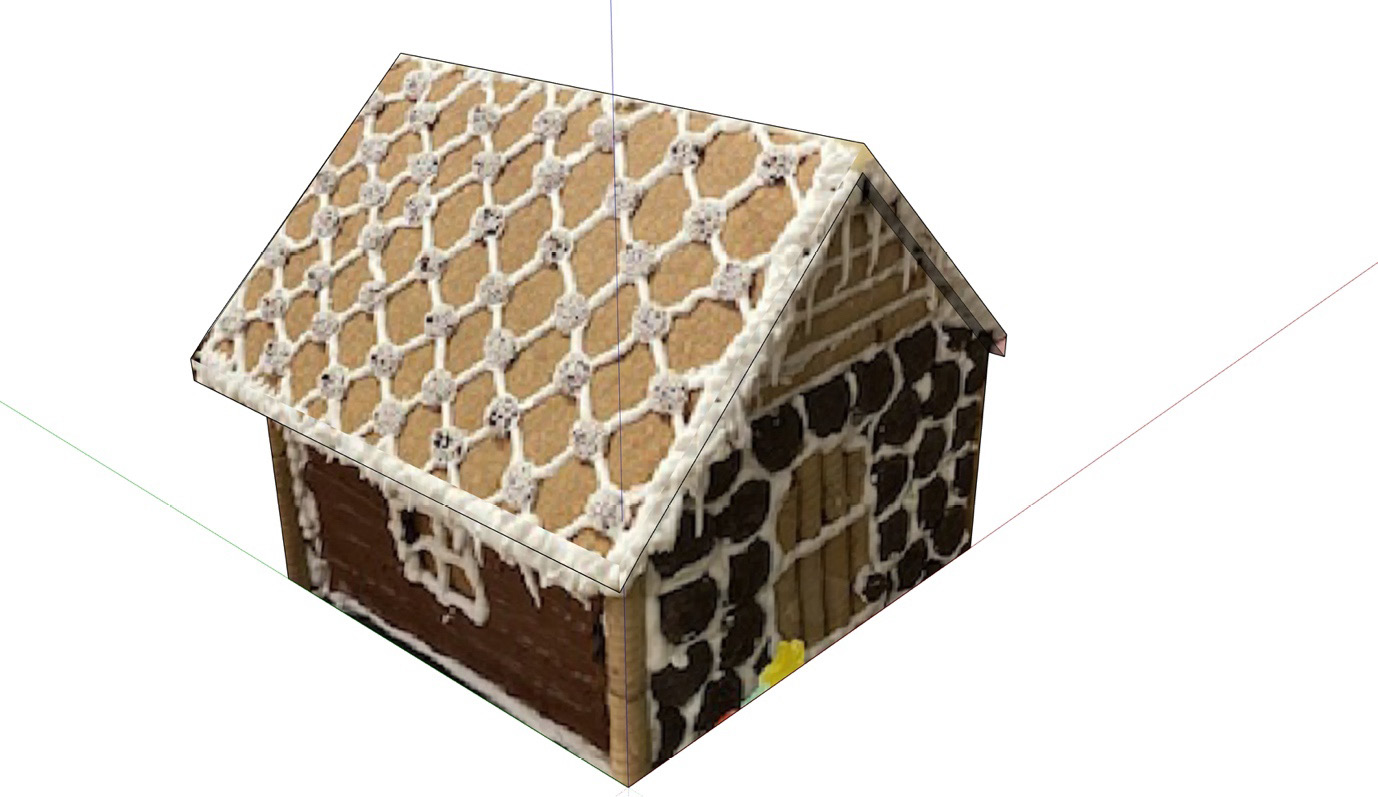
Figure 5.32 – A simple model with a simple material applied
The level of detail on this model seems OK, but getting even slightly closer shows how low quality the image used is:
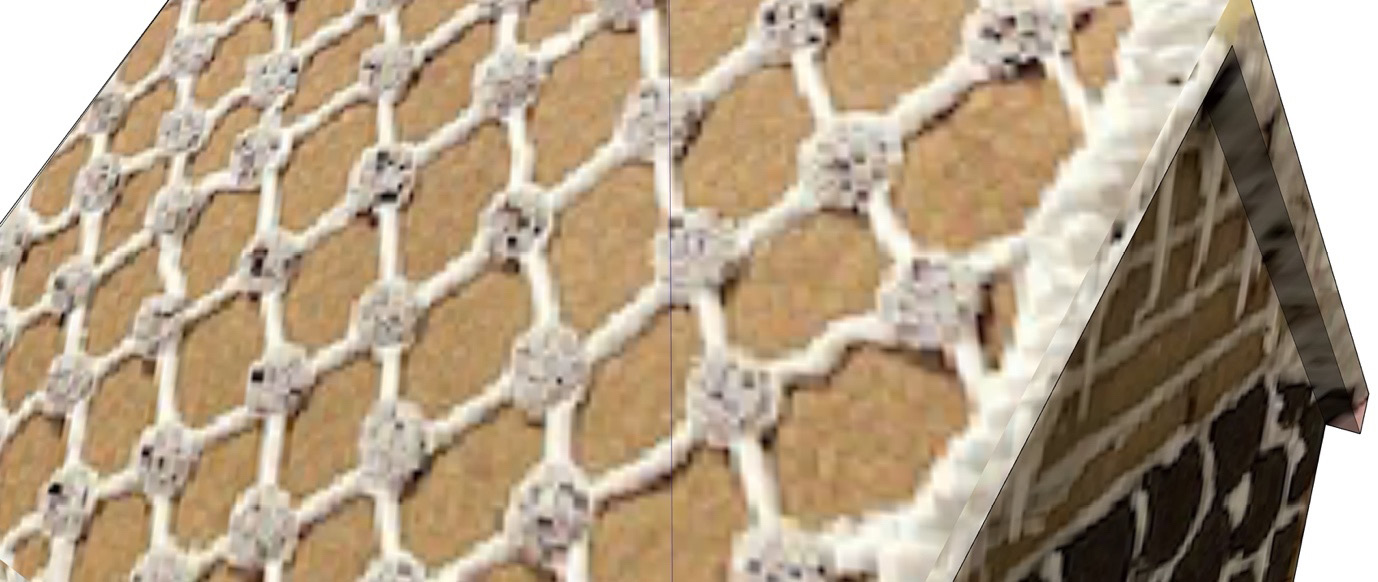
Figure 5.33 – Zooming in shows the lack of quality in the image
Does that make this material unusable? Of course not. Low-quality images can be used in items that do not need to stand up to up-close scrutiny. This model would work just fine as a model of an actual gingerbread house sitting on a kitchen counter. If Hansel and Gretel were visiting, and the model had to be life-size, it would probably be a good idea to get some higher-quality images.
Apply to the outside
One of the keys to leveling up your SketchUp skills is learning to model for a specific purpose. All models are made for a reason, and the reason you are creating a model should help you to make decisions on how your model is built. A lot of models end up in layout and as construction drawings. Some models are exported directly from SketchUp for use in game engines. Many models head out to rendering engines. If your model is being exported for use in another software or rendering, it is important to make sure that you are not hiding reversed faces with your materials.
When you create your geometry in SketchUp, you see front and back faces (white and gray, respectively). Beginner users will model without concern about what a front face is and what a back face is, then cover the whole thing up with materials and never think about it again.
In this example, the reversed faces (seen on the right) are hidden by the material applied on the left:
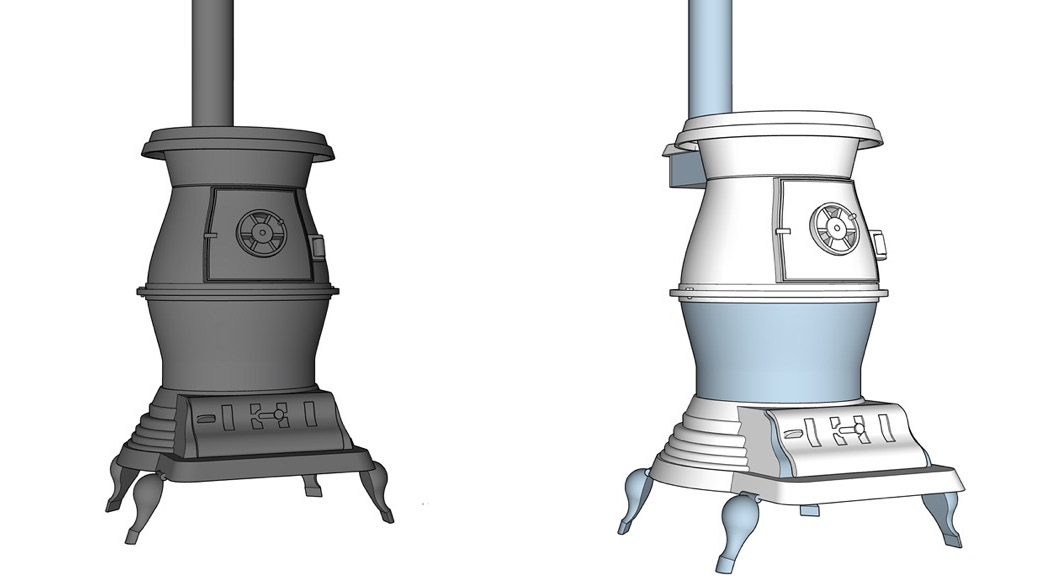
Figure 5.34 – The materials are covering up the reversed faces in this model
This can cause some real issues when your model leaves SketchUp. Reversed faces may not get rendered by your rendering engine or your model may not be accepted as a solid if you hope to have it 3D-printed.
Orient materials
It can be very tempting to slap a material onto a face and call it good, but leveling up means raising the bar for what makes a good model. In this case, it may mean modifying materials on each face as you apply them. Consider the wood materials added to this model of some wall framing:
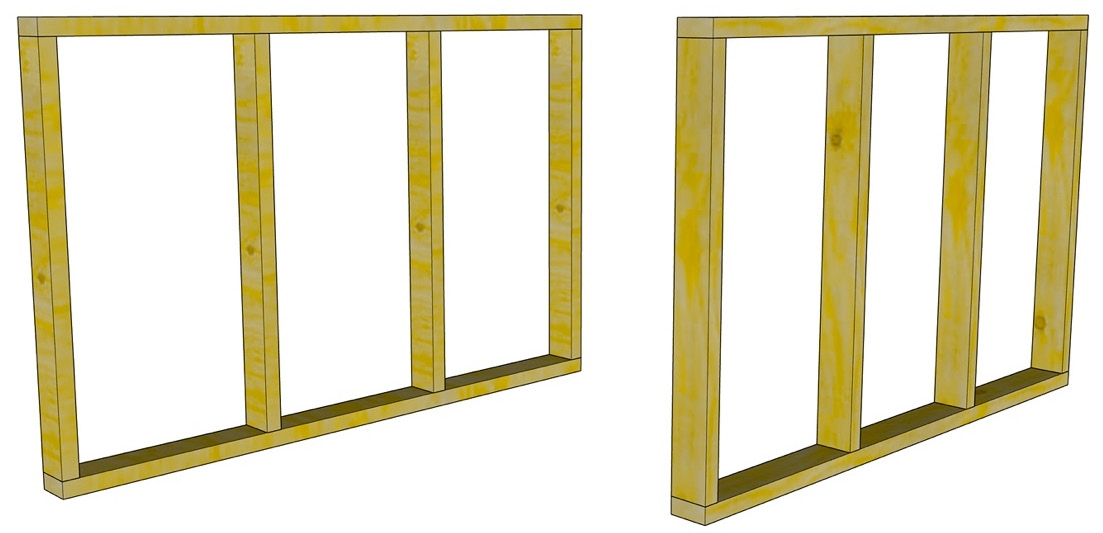
Figure 5.35 – The left wall has the same texture on every piece, and the right has textures that have been edited
In this example, you can see that the wood grain runs in the wrong direction on the studs in the example on the left. Additionally, notice that the knot in the wood is the same on every piece. In the example on the right, the wood grain runs in the direction of the studs and has also been shifted on a few pieces to give a little visual variety.
Take a picture
This was mentioned in the Importing images for custom materials section but bears repeating. If you need a specific material in your model and cannot find a good image, take a picture yourself. Nowadays, most phones have cameras that are more than capable of taking pictures that are great for use as materials. Yes, it may be a few extra steps, but if you start taking pictures of good-looking materials and save them in custom lists, over time, your collection will grow, and eventually, you will be filling your models with beautiful custom materials without having to leave your computer.
Don’t use materials at all
This seems a little weird as a tip at the end of a chapter dedicated to materials, but not every face of every model requires a material. In some cases, applying a color will work just fine. For example, take this model of a mini steam engine:
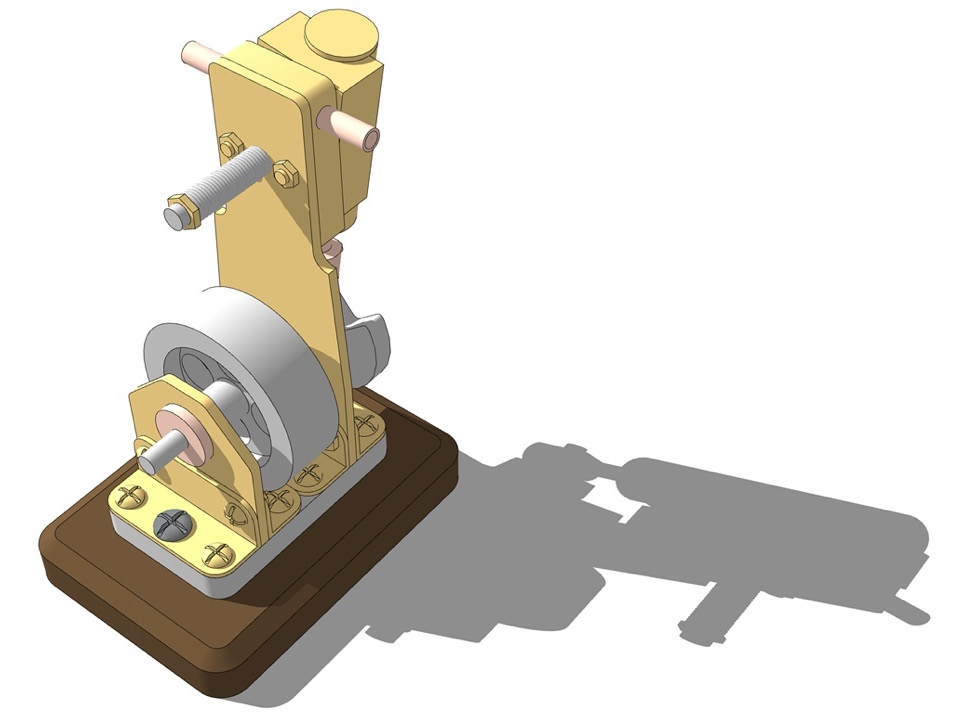
Figure 5.36 – This entire model has only colors
Again, modeling for purpose means that this model looks just fine using colors alone since its purpose is to demonstrate how a steam engine works. Adding images of reflective metals may look good at one angle, but as the viewer moves around the model, the images will look odd and out of place. In this case, colors are the better choice.
If you have already stumbled on one or more of these mistakes, know that you are in good company. Well, you are in my company at least. This list comes from specific examples that I have made over the years in an effort to get the most out of materials. Remember, it’s OK to make mistakes, as long as you learn from them!
Summary
Materials are a great way to make a good model great, and a great model amazing. You have now seen how to import your own images for use as custom images and how to organize them into custom material lists. We also covered how you can edit your materials using the texture editor and covered how to put materials onto wavy or curved surfaces. With these skills, your models should be looking better than ever before!
In Chapter 6, Knowing What You Need Out of SketchUp, we will be looking at your specific needs, and how you can develop your own custom workflows tailored to those needs.