
7
Creating Custom Shortcuts
A question that most SketchUp modelers with a desire to level up their skill will ask is, “How do I model faster?” We have covered a few concepts that can speed up modeling, but a definite solution is by mastering the use of shortcuts. Shortcuts can save you time and energy if you learn how to set them up and get committed to using them.
In this chapter, we will be doing the following:
- Discovering shortcuts
- Learning how to create custom shortcuts
- Identifying which commands need shortcuts
- Figuring out what keys to use for shortcuts
Technical requirements
In this chapter, you will just need access to SketchUp Pro.
Discovering shortcuts
People like toolbars. They like to set up their programs, especially 3D modeling programs, with all of their toolbars out on display.
It makes it easier to click on a button if the toolbar is visible at all times. It also looks nice! It is usually colorful and reminds you of all the power you have available to you at the tip of your finger.
But it is also a waste of space and an inefficient way to call up commands.
If you want to be a master modeler, you need to be able to jump from one command to the next, taking only a fraction of a second to change commands. Relying on finding a button for a command on a toolbar takes too long for a SketchUp ninja, and adding a bunch of toolbars to the screen shrinks your usable modeling area. Look at this SketchUp workspace:
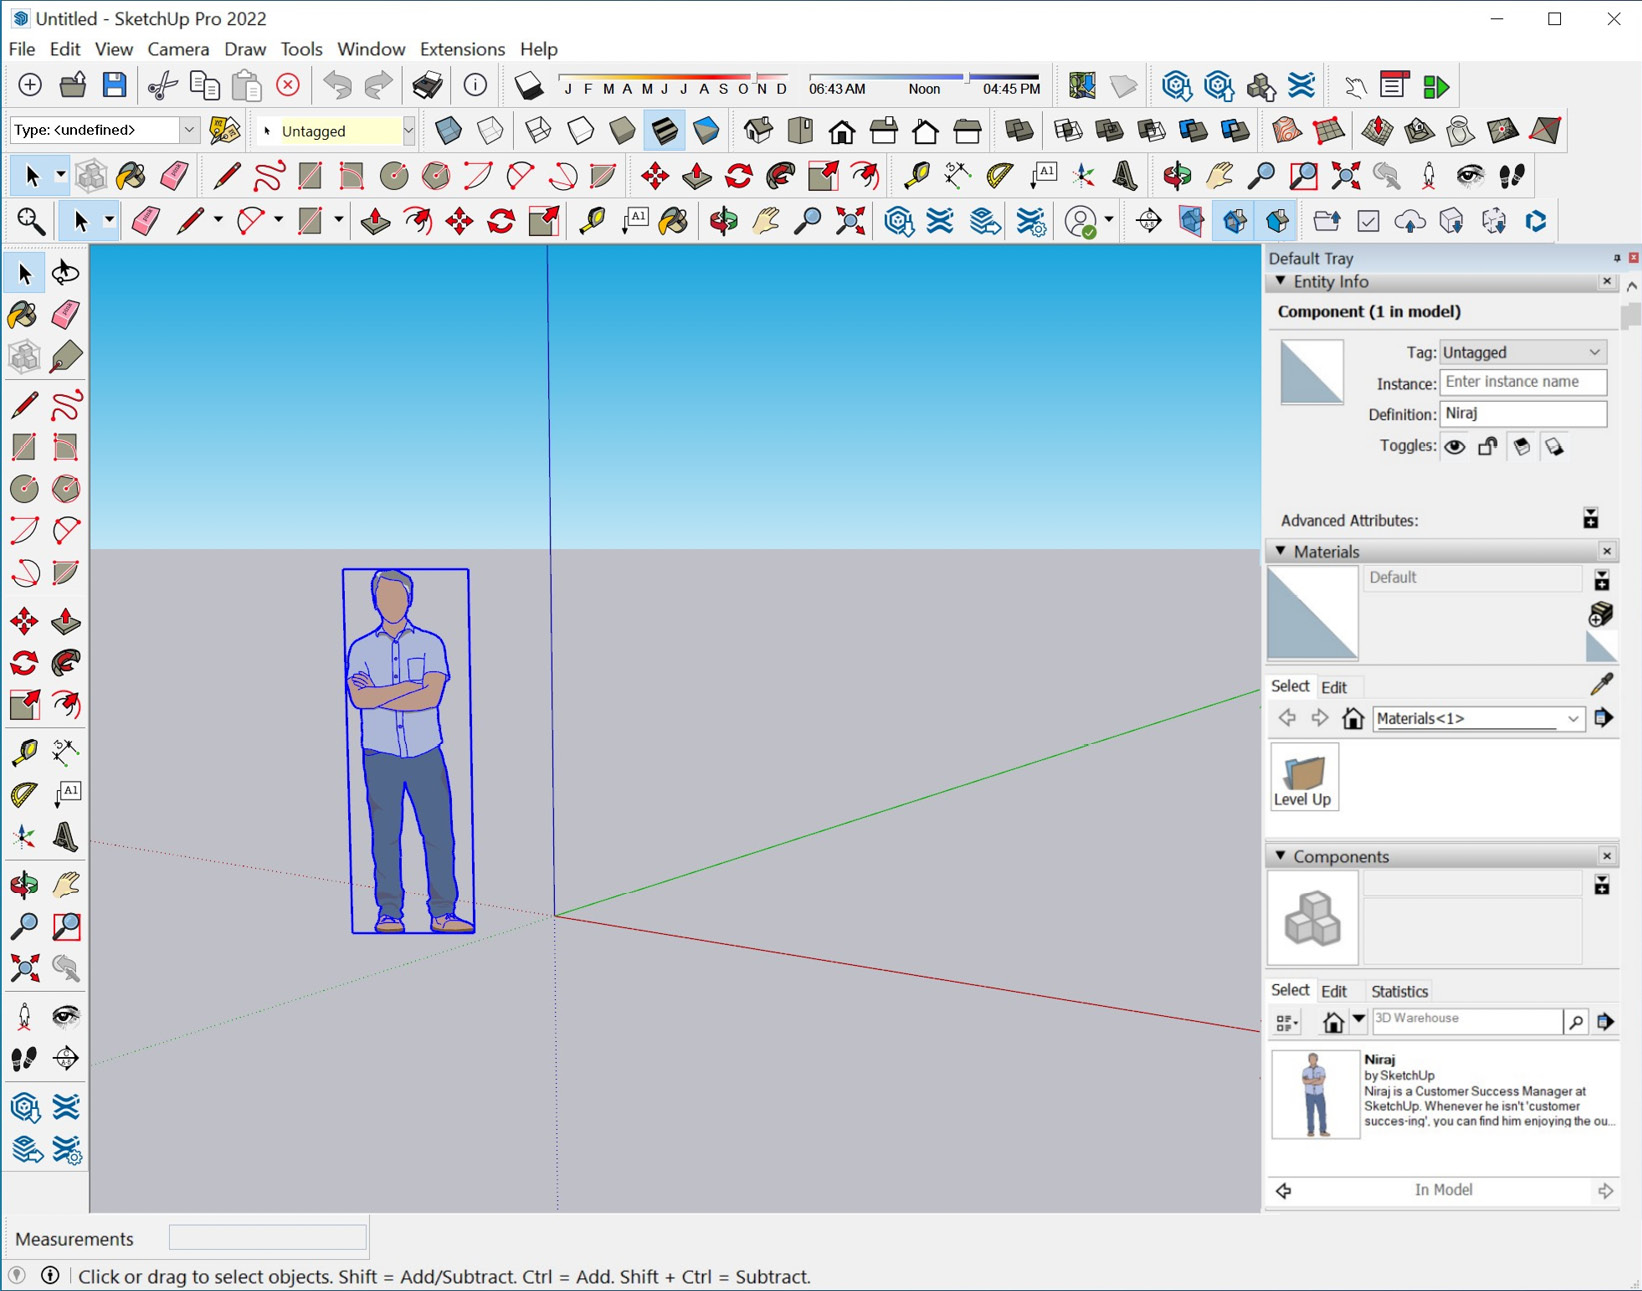
Figure 7.1 – SketchUp for Windows with every native toolbar enabled (and Default Tray pinned)
Not only does it eat up my usable space in SketchUp – it also creates a quilt of icons that are distracting (especially if you like pretty colors as I do), and with so many visible at one time, it is hard to find the one for the command you need. Now, compare that to this workspace:
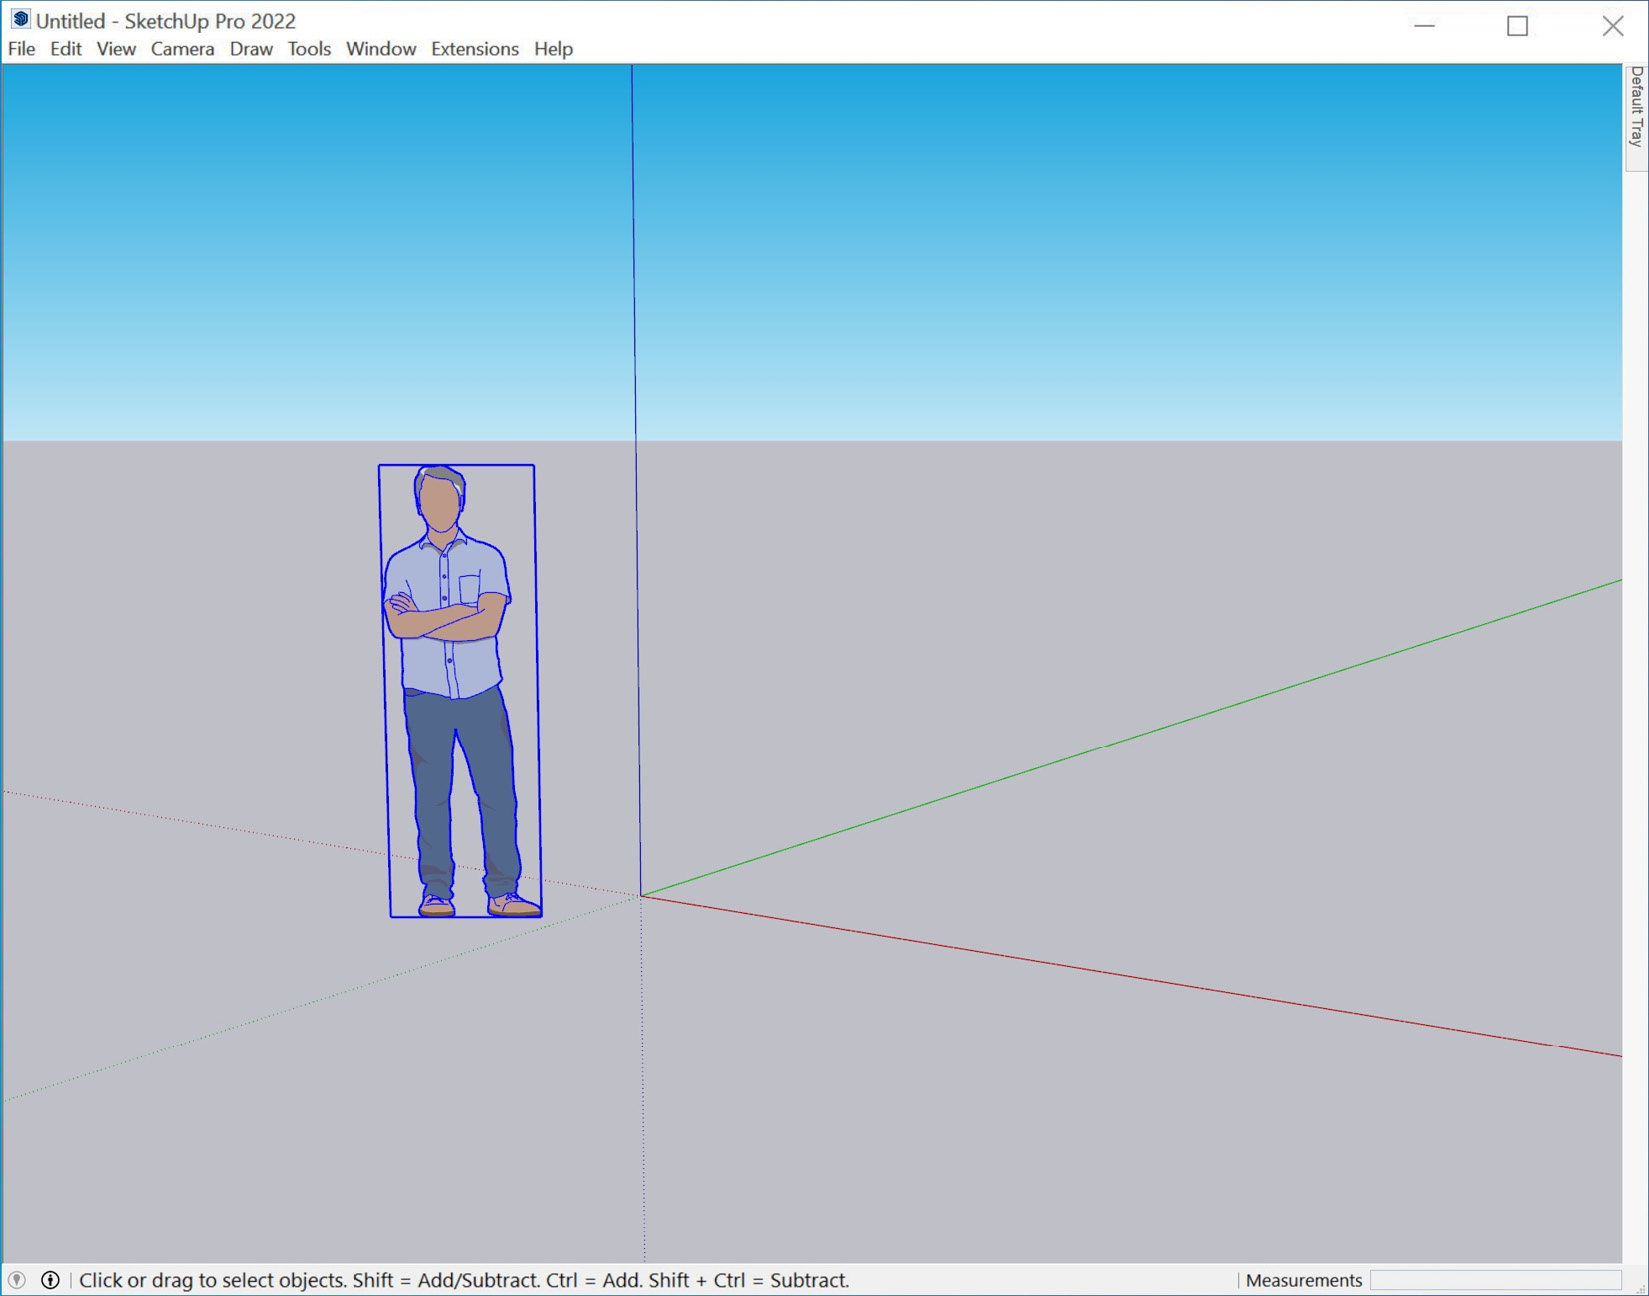
Figure 7.2 – SketchUp for Windows with all the toolbars disabled
Look how the whole screen is available for modeling rather than full of icons! Some of you reading this are shifting uncomfortably in your seat right now. “Without those buttons, how will I use SketchUp? Do I need to go into the menus for everything?” You have, of course, already figured out that the answer to that question is, “No, you will learn to use shortcuts!”
When we say shortcuts, we are referring to keyboard shortcuts. These are amazing time-saving macros that allow us to call up a command from anywhere in SketchUp by pressing a single key. Rather than hunting through a sea of toolbars or pulling down menu after menu to find your command, you can simply tap a key to get into a drawing command or trigger a tool.
“Wait, a single key? There are only 40-something keys on my keyboard! I use more commands than that!” Yes, there are more commands in SketchUp than there are keys on the keyboard, and adding in extensions, you are looking at even more. Fortunately, you can use the same keys you use to modify SketchUp commands to multiply the number of shortcut keys you use.
This means that a single key (let’s use the Z key as an example) can trigger more than one command. Pressing the Z key can trigger one command, while holding down Shift and tapping Z can trigger a totally different command. Plus, you can stack modifier keys, meaning that Control + Shift + Z can trigger a third command.
Let’s do some quick math on the number of shortcut keys we have available to us. On my keyboard, I have 26 letter keys that I can use for shortcuts. I am on a Mac, so I have three modifier keys available to me (Shift, Control, and Option; the Command key cannot be used in shortcuts). If I was to look at all the combinations I can make with the Z key, I would get the following:
- Z
- Shift + Z
- Control + Z
- Option + Z
- Control + Shift + Z
- Option + Shift + Z
- Control + Option + Z
- Control + Option + Shift + Z
That is eight possible shortcuts assigned to a single key. That is a total of 208 shortcuts, just using the alphabet keys! Additionally, if that was not enough, there are another seven keys on the keyboard that are available as well (/ ; ‘ [ ] `) and could be used. With modifiers, that is another 56 shortcuts, giving us a grand total of 264 potential shortcuts.
Now, do I recommend assigning every single command to a shortcut? No, I do not. In fact, I would recommend against using triple modifier keys in shortcuts. There is no point in requiring hand yoga to activate a command, as these are supposed to be time-saving steps after all. The main point here is that there is more than enough room on your keyboard for all the important commands you use in SketchUp.
We will talk more about using those 264 shortcuts later when we discuss creating custom shortcuts. For now, let’s take a look at the shortcuts that are mapped by default in SketchUp.
Discovering the defaults
When you first install SketchUp, on Windows or Mac, you will have a set of default shortcuts. There is a set of system commands that use the same default shortcuts used by other software on your operating system. These commands are hardcoded and cannot be changed (we will learn that many other commands can be customized when we talk about customizing shortcuts in the Learning how to create custom shortcuts section):
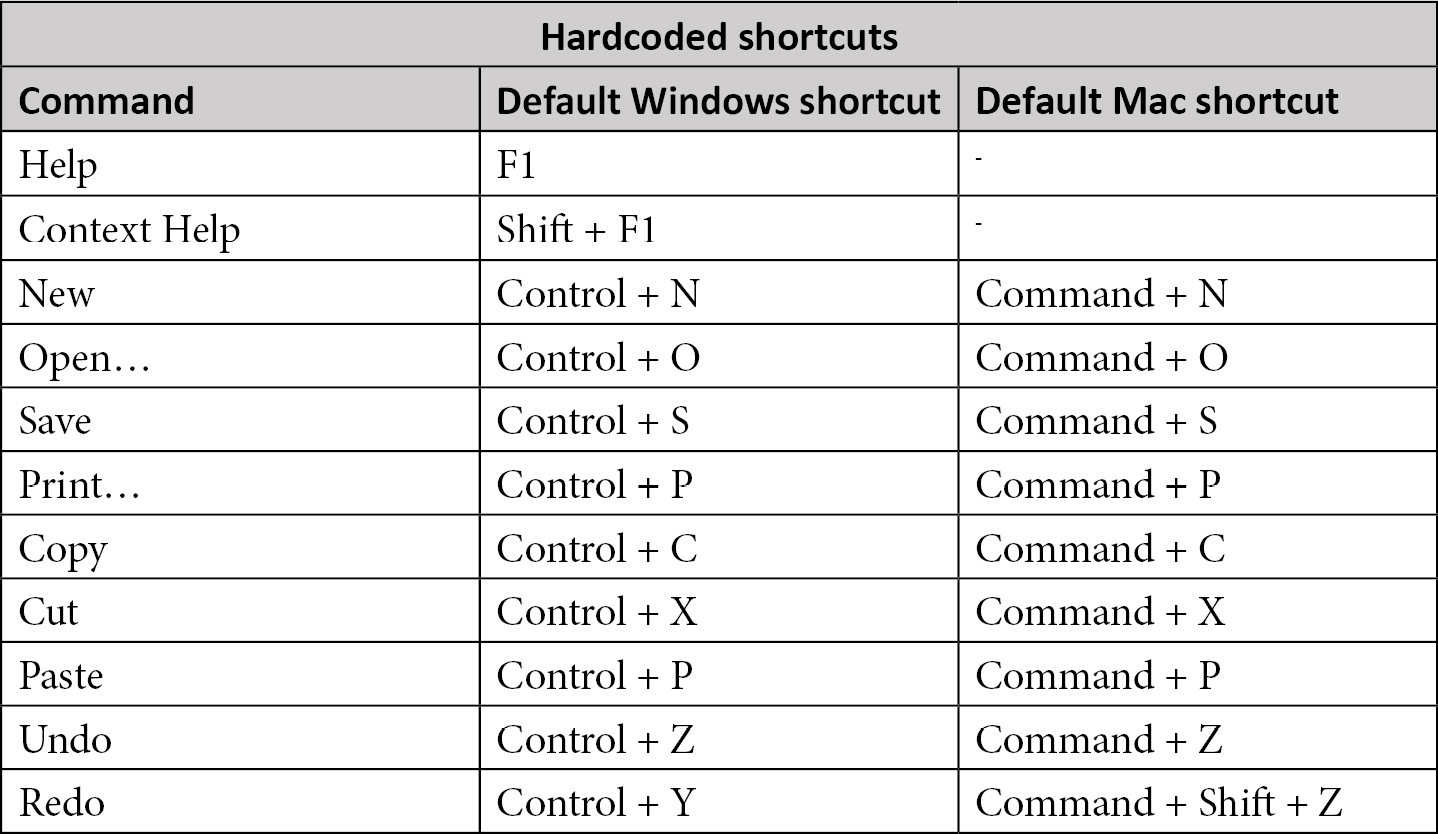
Figure 7.3 – Hardcoded system shortcuts
The nice thing about these system shortcuts is that there is a good chance that you already know them or use them. While they are not specific to SketchUp or drawing commands or tools, using these keys instead of hunting for an icon or menu item will save you time and energy as you model.
Up next are the SketchUp-specific shortcuts. These shortcut keys relate specifically to SketchUp commands and can be modified or reassigned (which will be discussed in the Learning how to create custom shortcuts section) as needed. Many of these shortcuts are mapped to keys that make them easy to learn (C for Circle, M for Move, Z for Zoom), while others are assigned due to the ease of access to a specific key (Spacebar for Select). While not every command gets a shortcut key (in fact, there are only 29 commands on this list), many of the most commonly used commands receive default shortcuts:
.jpg)
.jpg)
Figure 7.4 – The default SketchUp shortcut keys
If you have, up to this point, been using toolbar buttons or grabbing commands from the menus, then learning these standard shortcuts will be time-saving, for sure. If you already know about and use these default shortcuts and are looking for a way to speed up your modeling process even more, then read on and learn about setting custom shortcuts!
Learning how to create custom shortcuts
In this section, we will take a look at the process of connecting a command to a key (or keys). The good news is this is the easiest part of the process! Shortcuts have their own tab in the Preferences window. For this example, let’s create a shortcut together for Follow Me:
- Open the Preferences window (the Windows menu on Windows or the SketchUp menu on Mac).
- Click the Shortcuts tab. This will display a list of every command that can have a shortcut applied to it:
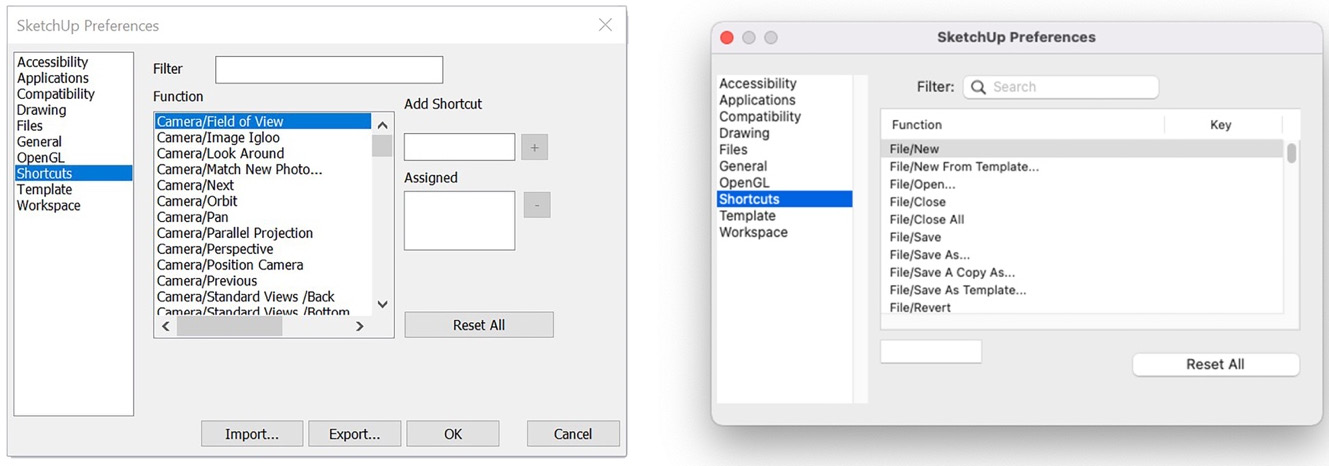
Figure 7.5 – The Windows shortcuts (left) and the macOS shortcuts (right)
As you explore this list, you may find that, while you can apply shortcuts to most commands, there are some functions in SketchUp that do not show up here. These may be fields in the tab bar or context-sensitive commands, but there are a few functions that cannot have shortcuts assigned to them.
Context-Sensitive Commands
Before SketchUp Pro 2020, the list of commands shown in the Shortcuts tab was context-sensitive, meaning that you would only see commands that could be run in the current model in the current state. Since that version, all commands are available in the list.
Seeing that this is a big list of commands, you may want to narrow it down using the Search command.
- Type follow into the search bar. Since there is only one command in SketchUp that contains the word follow, only one command shows up in the list. Let’s assign a shortcut to this command.
- Select Tools/Follow Me from the list.
- Click on the shortcut key field:
- On Windows, this is the field directly to the right of the list.
- On Mac, this is the field below the list.
- Hold down the Shift key and press F.
Note that, in the list, the Shift + F shortcut showed up to the right of Follow Me. At this point, you have successfully assigned a shortcut for that command! Any time you are in SketchUp and type Shift + F, it will be the same as if you had selected Follow Me from the Tools menu.
The list of shortcuts includes all commands and shows which ones have shortcuts assigned to them. If you have never edited your shortcuts, then you will be able to see only the default shortcuts.
No Changing Hardcoded Shortcuts
What you will not see in the list are the hardcoded or “system” shortcuts, as mentioned in the Discovering the defaults section. These commands, often reserved at an operating system level, cannot be edited, and thus are not available through the Shortcuts tab. There are, however, commands that can have both hardcoded and custom shortcuts applied. If you don’t like using Control + S to save and you want to use the D key instead, you can create that custom shortcut, which will function alongside the hardcoded shortcut.
The Shortcuts tab in the Preferences window will show you every shortcut you have set and allow you to modify them as needed. If you upgrade from your current version of SketchUp to a new version, your shortcuts will automatically show up in your new version as long as you are upgrading on the same computer. How much work it is to transfer your shortcuts depends on what operating system you are using. If you are using Windows, the process is pretty easy:
- On the Windows computer that you want to copy shortcuts from, click the Export button in the Shortcuts tab of the Preferences window.
- Enter the name and location of the file you want to export, then click Export. The default file is named Preferences.dat, which is saved to your desktop. If you are going to transfer this file via a USB drive or network folder, you can navigate there to save yourself the bother of moving the file later.
- On the Windows computer that you are moving shortcuts to, click the Import button in the Shortcuts tab of the Preferences window.
- Navigate to the file saved in Step 2, select it, and click Import.
With that, both computers should have the same shortcuts. If you want to move your shortcuts from one Mac computer to another, you will need to manually transfer the file. The SharedPreferences.json file can be copied from one Mac computer to another to move all your shortcuts (and a few other presets).
On Mac, find your presets at this path: Users/Username/Library/Application Support/SketchUp####/SketchUp/SharedPreferences.json.
Folder Names
Note that the Username folder is the name of the user account that you are using; most likely, this is the account that you log into your computer with. The SketchUp#### folder is the version that you are copying to or from (SketchUp version 2022 is in the folder named SketchUp2022). SketchUp folders will always contain the name SketchUp followed by the year of release.
At this point, you should have a good idea of what shortcuts are, what the default shortcuts are, and how to create your own shortcuts. The question now is, what commands should you set shortcuts for? Read on because that is exactly what we will be covering in the next section!
Identifying which commands need shortcuts
Obviously, you can set shortcuts for whatever commands you want. In fact, you could probably create a shortcut for every single command you use. This might now, however, be the ideal way to spend your time in SketchUp and probably would be difficult to remember. Shortcuts that you cannot remember will not get used and not end up helping you to be better at SketchUp.
What you need to do at this point is identify the commands that you use most often and make sure that they have shortcuts assigned to them. After that, we need to look at the commands that you plan to learn and hope to use more often and get some shortcuts applied to them.
Assuming that you are reading this book chronologically and not skipping anything, you should have a pretty good idea of what those commands are from Chapter 6, Knowing What You Need Out of SketchUp. If you skipped that chapter or were just so excited about shortcuts that you jumped right to this chapter, you should probably go back and read it (my editor, Rashi, told me it was really well written).
In Chapter 6, Knowing What You Need Out of SketchUp, we went through and listed all of the commands you are currently using and labeled the list Current. In that list, you wrote down the commands that were most used in your models. If I were to pull the commands from the example list that I made, I would end up with the following list:
- Rectangle
- Eraser
- Sandbox Tools
- Import
- Push/Pull
- Eraser (Smooth)
- Follow Me
- Circle
- Move (Array)
- 3D Warehouse
- Paint Bucket
- Dimensions
- Arc
- Weld
- Line
- Polygon
- SubD
- Artisan
- Rotate
The next step is to identify the commands that do not already have shortcuts applied to them. If I remove all of the commands that have default shortcuts, my list gets a lot shorter:
- Sandbox Tools
- Import
- Follow Me
- Eraser (Smooth)
- Move (Array)
- 3D Warehouse
- Dimensions
- Weld
- SubD
- Artisan
Modifying Default Shortcuts
You may have a desire to modify existing shortcuts, and that is perfectly fine. We will be talking about optimizing shortcuts based on a key’s location on a keyboard in the next section, Figuring out what keys to use for shortcuts.
Looking at this list, there are three things listed – groups of commands, modified commands, and standard commands. Not everything listed here would benefit from a shortcut. Let’s look at why these groups are different from one another, as it relates to assigning shortcuts.
Groups of commands
In my list, Sandbox Tools, 3D Warehouse, SubD, and Artisan are not individual commands but suites of tools or commands. Shortcuts are applied to individual commands, so I cannot apply them to a group of related commands. What I want to do in this case is dive into the groups and see whether there is a specific command in the group that it would make sense to apply a shortcut to.
In Sandbox Tools, maybe I use the From Scratch command and Smoove the most often, so they would be candidates for shortcuts. Artisan and SubD are extensions, each of which has multiple commands. Maybe the command I use the most is Toggle Subdivision from SubD, so that may be the command that should get a shortcut. Finally, there are a handful of commands that relate to 3D Warehouse in SketchUp. If I look back at my workflow from Chapter 6, Knowing What You Need Out of SketchUp, I can see that I was importing models from 3D Warehouse. A great step to add to certain workflows, but defining a shortcut for this command will not likely make me a more efficient modeler.
Commands That Do Not Need Shortcuts
The main point of setting shortcuts for commands is that it reduces the amount of time you have to spend moving your mouse to a menu or toolbar to activate a command. This works great for commands that you can switch between while in the midst of geometry creation or manipulation. Certain commands break you out of the modeling flow, no matter what. Opening 3D Warehouse, for example, does not benefit from a shortcut because, as soon as it is open, you need to stop modeling and use your mouse to navigate the warehouse.
Focusing on individual commands that are or can be a part of a modeling workflow will help reduce our list of potential shortcuts.
Modified commands
Way back in Chapter 1, Reviewing the Basics, we looked at how many different ways there are to use the Move tool. In Chapter 3, Modifying Native Commands, we saw that modifiers can be used on almost all SketchUp commands. Modifiers add a lot of additional functionality to commands and are essential in most workflows. Modified states of commands, however, cannot have separate shortcuts applied to them.
This means that Move can have a shortcut, but modifying Move to copy will not. A shortcut is responsible for activating a command initially, while modifying is something that happens while you are in the command. For this reason, two of the commands that are on our list (Eraser (Smooth)) and Move (Array)) are redundant, as Move and Eraser already have shortcuts applied to them.
Commands ready for shortcuts
When we refine our list, we end up with the following commands:
- From Scratch
- Smoove
- Import
- Follow Me
- Dimensions
- Weld
- Toggle Subdivision
This is a solid-looking list! I know it is not huge, but it is a start. Creating shortcuts is, for many, an ongoing process. Even now, after more than a decade of using SketchUp, I will occasionally add a shortcut to a command that I start using more or to a tool in an extension. This list is a list of tools that will save time and energy given the right shortcut keys.
Speaking of shortcut keys, choosing the right key as a shortcut for a command is an important step and something we will be exploring in the next section.
Figuring out what keys to use for shortcuts
We have a list of commands that we know we want shortcuts for, and we know how to apply shortcuts to commands. At this point, it seems like we should just hop in and set the shortcuts! Yes, that is an option, but I would recommend taking just a minute or two to think about what keys you actually want to use for these shortcuts.
In setting your shortcuts, there are basically two schools of thought – mnemonics or location. Let’s look at how each works and what your keyboard might look like for each.
Assigning shortcuts based on mnemonics
Simply put, mnemonics is a system that helps you to remember. In the case of keyboard shortcuts for SketchUp, this means choosing keys that will help you to remember which key command they are connected to. This is the way that most of the default shortcuts are assigned.
In the default shortcuts, the M key is the shortcut for the Move command because it is easy to remember that the word move starts with M. If you look at the list of default shortcuts, you will see that most of them are letters in the actual command, with a few exceptions.
The exceptions, though, are mnemonic in their own way. The Pan command has H as the shortcut because the cursor for Pan is a hand, and hand starts with the letter H. The Rotate command could not use R because that was already assigned to Rectangle. The shortcut key for Rotate is Q because the letter Q looks like the compass that is used on screen to rotate geometry.
Mnemonics are a great way to learn shortcuts and were used when the default shortcuts were assigned. For most users, having a device that helps them to remember a few dozen shortcuts is a good thing. There are, however, downsides to this method.
Not enough keys
The first issue is that we can only assign one command to a key, so certain letters can get crowded. Let’s consider the S key. Tapping the S key, by default, will bring up the Scale command because that is one of the most common commands that starts with the letter S. But what about the Section command? If we use that command a lot, we can assign that to Shift + S. Perfect! Now, what about the Shadows command? That can be Option + S! Then, we can use Command + Shift + S for Send to LayOut, then Command + Option + S for Subtract, and Shift + Option + Command + S for Soften Edges. Okay, now what about Save As?...
Yes, this is a bit of an extreme example, but remember that there are many more commands than there are keys on the keyboard, and we have seen how the modifier keys can help. But eventually, it ruins the mnemonic device, for I have to remember which S command I activate if I hold down Option and Command or Option and Shift.
Shortcuts everywhere
The second issue you can run into when using mnemonic keys is the location of the key on the keyboard. The main goal of using shortcuts is that it is quicker to tap a key on the keyboard than it is to use your mouse to find a command. If you end up having to hunt for the key associated with the command you need, it can reduce the benefit of the shortcut.
Now, odds are good that, even if you have to look across your keyboard for the key and you need to move your hand slightly to get to the key you need, it is still going to be quicker than clicking on a menu to start a command. But it can be a minor inconvenience to some, especially those who are not master typists.
To see what I mean, let’s take a look at a keyboard with the default keys highlighted:
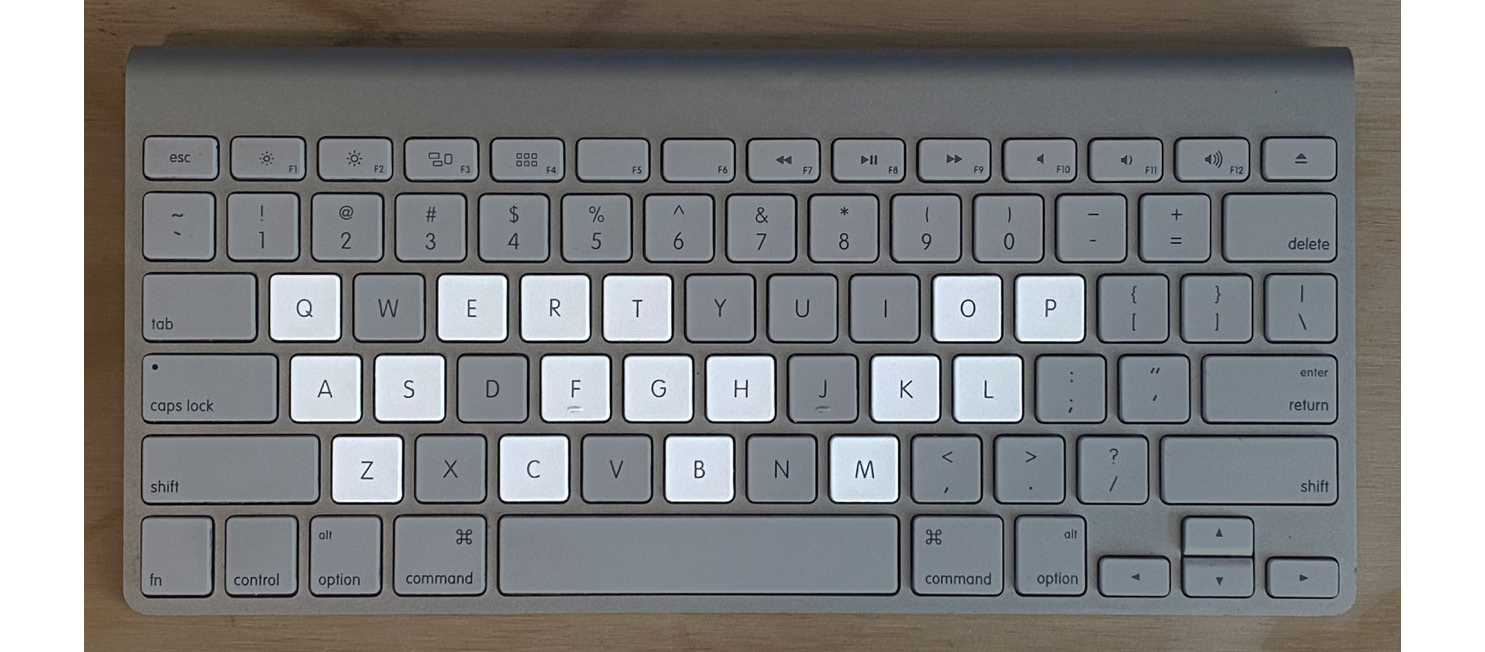
Figure 7.6 – The default shortcut keys on a keyboard
Additionally, some keys are easier to use with modifier keys than others. It is pretty easy to hold down the Shift key and tap S with your left hand, keeping your right hand on your mouse. Conversely, it may be a stretch, depending on the size of your hand and your keyboard, to hold down Shift and get to the G key.
Mnemonics are great and make shortcuts even more friendly and easy to remember, but let’s look at another way to assign keys to your commands.
Assigning shortcuts based on location
The biggest benefit of using shortcuts is that you limit the amount of time you stop your modeling flow to change commands. No matter what key you use or how many modifier keys you add, a keyboard shortcut is almost always faster than finding a command in a menu and usually quicker than moving your mouse off the model to click on an icon.
One of the only default shortcut keys is Select being assigned to the spacebar. There is no mnemonic association between spaces and Select. The spacebar is simply the biggest key on the keyboard, and Select is the most commonly used command by far in SketchUp. Plus, the spacebar is centered on the keyboard, making it equally easy to get to for right-handed and left-handed modelers.
Some users have taken this concept even further by moving their shortcuts to one side of their keyboard, meaning they have to spend little to no time moving their keyboard hand to find a shortcut. If you are thinking about assigning shortcuts based on location, you need to first look at where you keep your hands when using SketchUp.
Looking at where your hands are
Most users have their dominant hand on their mouse and their non-dominant hand on the keyboard. Generally, the non-dominant hand resets on the associated side of the keyboard. A right-hand dominant user would most likely look like this:
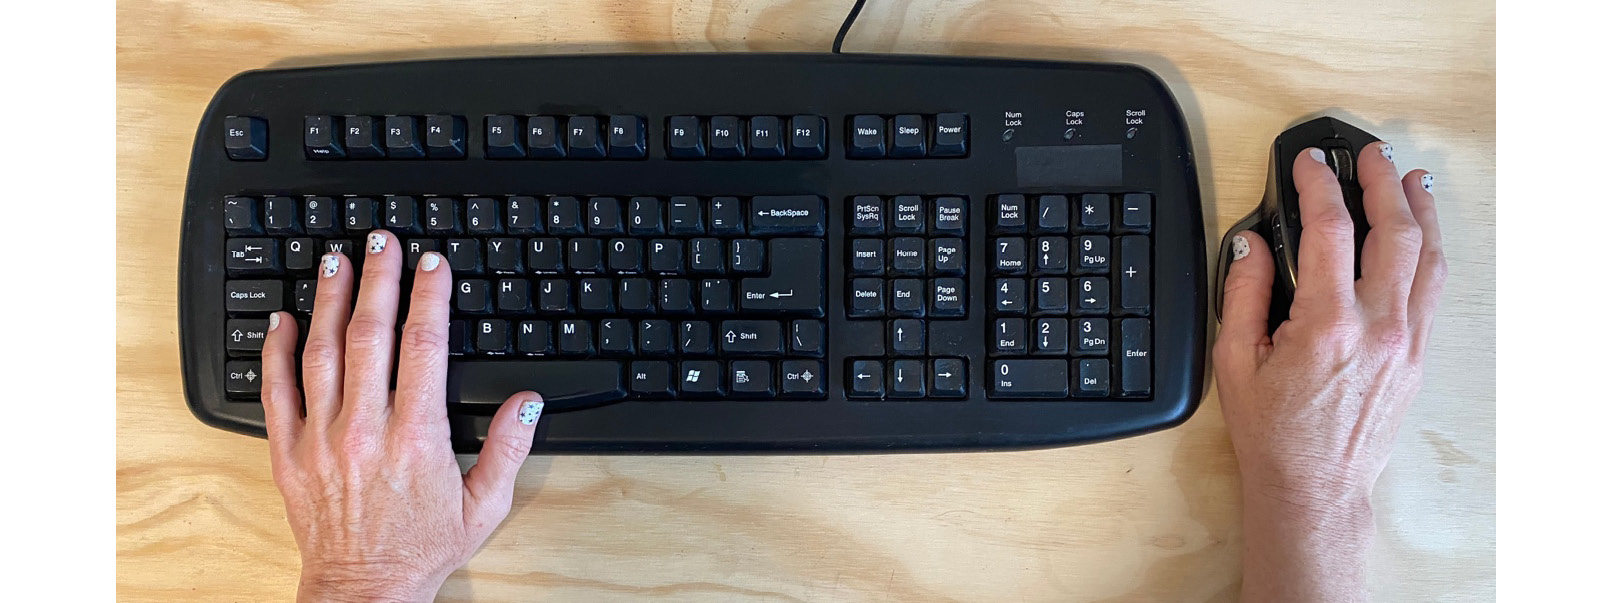
Figure 7.7 – A dominant right hand on the mouse and a left hand on the left side of the keyboard
Conversely, a left-handed user would likely use SketchUp like this:
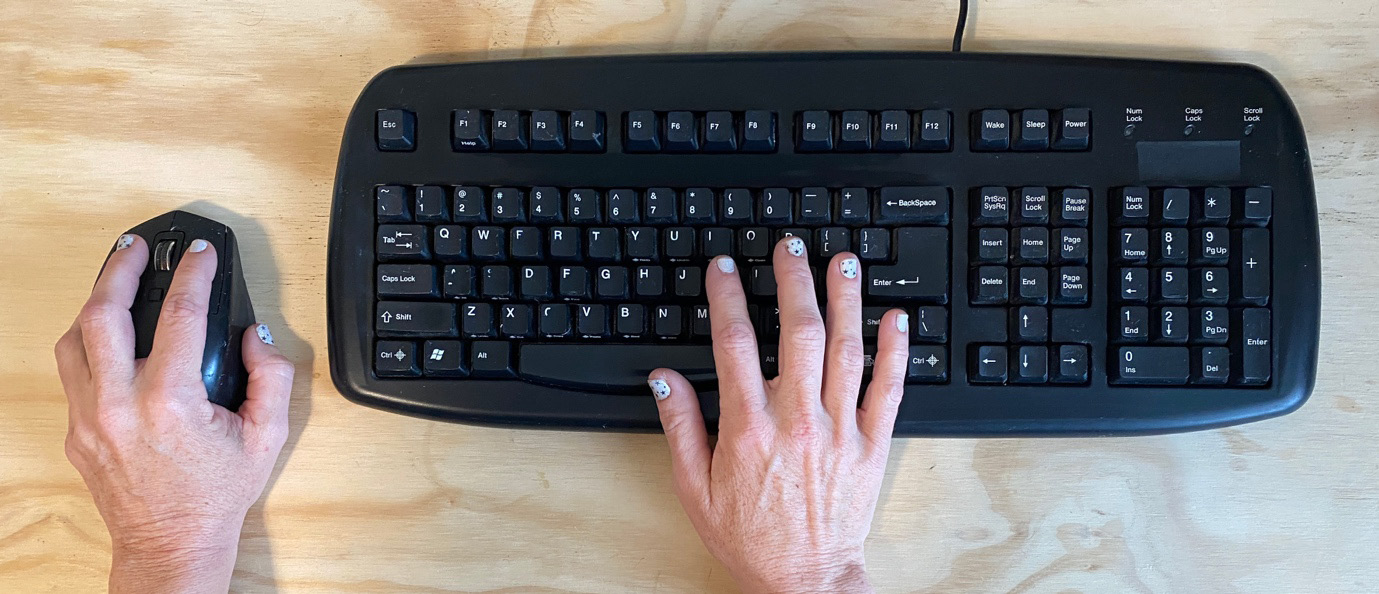
Figure 7.8 – A dominant left hand on the mouse and a right hand on the right side of the keyboard
In some cases, users may prefer to slide their non-dominant hand to the opposite side of the keyboard. This might happen, for example, if you are right-handed and using a keyboard with a 10-key pad on the left side. To have quick access to the ten-key pad for inputting measurements, you may choose to slide your left hand to the right side of the keyboard:
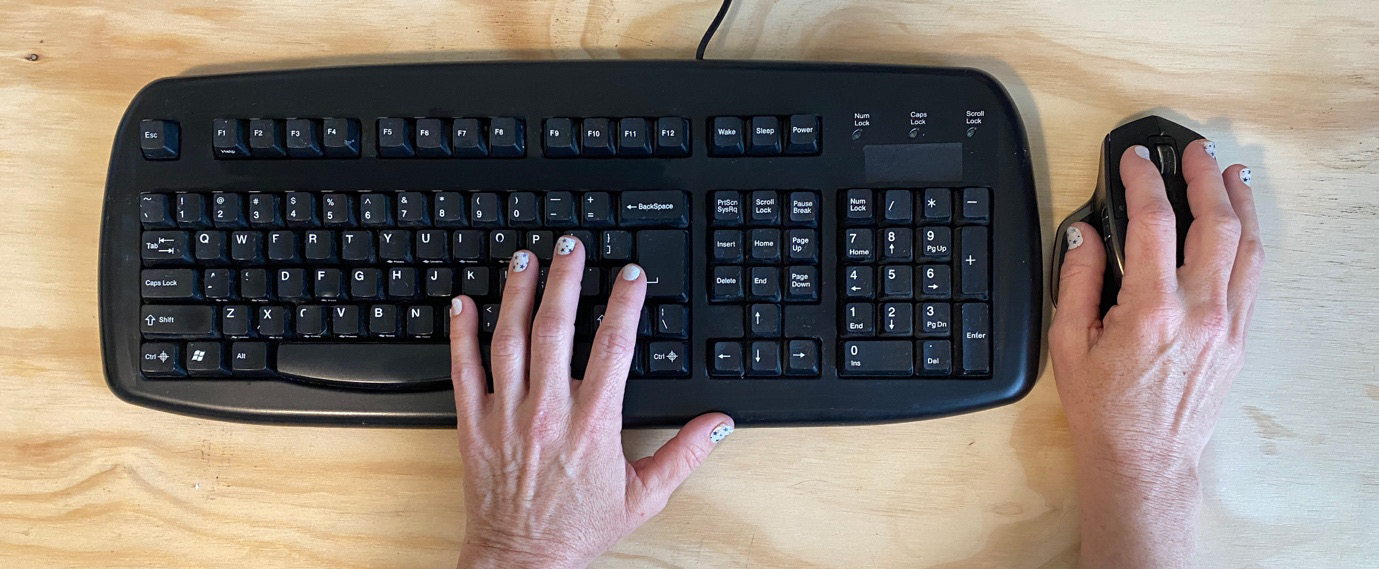
Figure 7.9 – A dominant right hand on the mouse and a left hand on the right side of the keyboard
One more setup to consider is those who use a touchpad. In this case, your dominant hand is likely to be on the touchpad while your non-dominant hand will be on the keyboard:
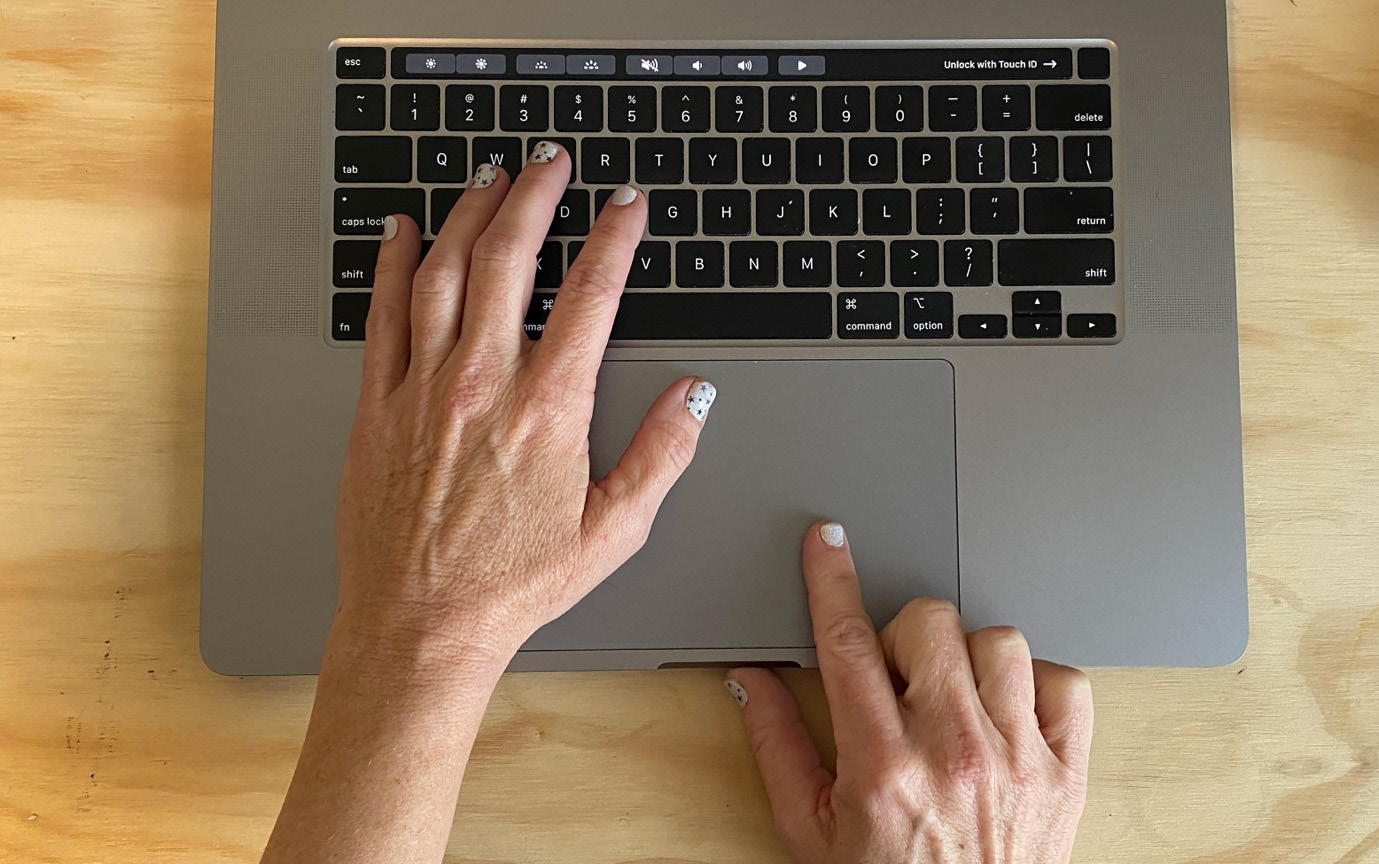
Figure 7.10 – A dominant right hand on the touchpad and a left hand on the keyboard
3D Mice, Tablets, and More
Yes, there are additional input devices besides the keyboard and mouse, and we will talk about how to add them to your setup in Chapter 10, Hardware to Make You a More Efficient Modeler. These additional setups can affect how you set up shortcuts, but we will touch on that later.
None of these setups are any better than another, but it is important to know where you prefer to keep your hands while using SketchUp before you start assigning shortcuts.
Picking keys for shortcuts
Once you know where your hands rest while using SketchUp, you can consider where you want to place your shortcut keys. For this example, let’s assume you are right-handed, with your left hand resting on the left side of your keyboard.
With your non-mouse hand on the left side of the keyboard, you may want to consider keys that fall on the left side for your most common shortcuts. Ideal keys for this setup may be these keys:
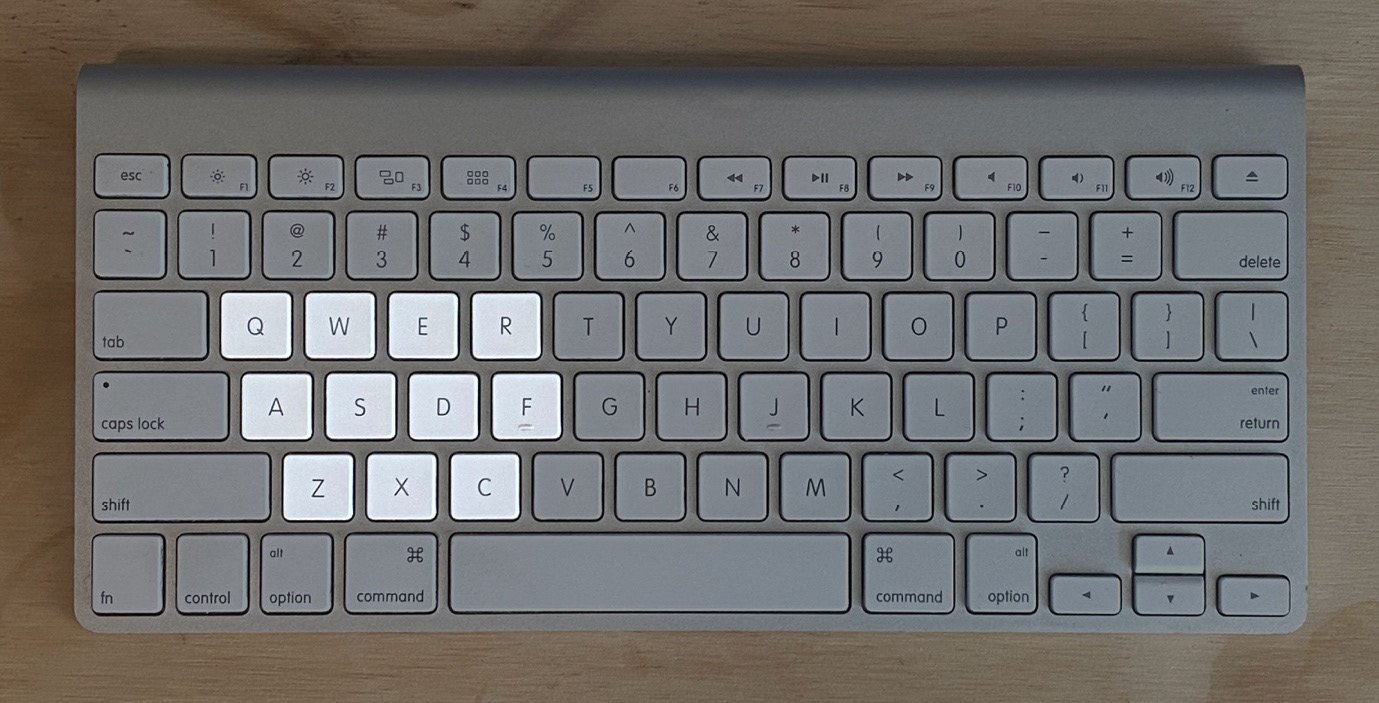
Figure 7.11 – Ideal keys for the left side of the keyboard
This gives us 11 keys for shortcuts. As we add modifier keys and combinations, this ends up being 88 shortcuts. If you have larger hands, you can even add the T, G, and V keys into the mix; with modifiers, that could be an extra 32 shortcuts!
The downside of clustering shortcut keys
If you are the type that looks for every optimization that you can possibly take advantage of, locating your shortcuts together like this may sound great, but know that, just as with mnemonics, there is a downside to this method as well.
The first issue is that it may not be super-easy to remember your shortcuts. Having to remember that Shift + D is Move may be more difficult than remembering M. Using non-mnemonic shortcuts may even require you to write down your shortcuts so that you can refer to them until you have them firmly implanted in your memory.
The second downside will only be an issue for some people. Having a non-standard shortcut setup like this will make it more difficult for others to use your installation of SketchUp, or for you to teach others to use it. If you are a heads-down production modeler, this will likely not be an issue for you.
Which is the best?
The best solution is the one that works for you! Like all things, you may have to try and fail before you find the perfect solution. For many people, like myself, a combination of these methods is best.
I personally still have all of the defaults in place. I have added a few mnemonic shortcuts added for extensions that I use, and a few shortcuts assigned to empty keys on the left side of the keyboard because I am right-handed.
To find your perfect setup, assign a few shortcuts and try them out. If you are struggling, go in and change them. Remember that you can assign and reassign shortcuts as many times as you need. The important part is that, in the end, you have a set of tools that help you to become a better SketchUp user.
Summary
Shortcuts are amazing time-saving tools that you can customize in any way that you need. The important thing to remember is not to attempt to get every single command assigned to a key (the commands that you don’t use often will still be safe and sound in their menu or toolbar, ready for occasional use), and be considerate about what keys you use for your shortcuts. Getting a good set of shortcuts can knock a lot of time off of your modeling time and help you to level up your SketchUp skills!
In Chapter 8, Customizing Your User Interface, we will look at how you have SketchUp set up and see whether there are any efficiencies to be gained by rearranging what tools you have on screen.