
15
Leveraging the SketchUp Ecosystem
As the title of this book is Taking SketchUp Pro to the Next Level, we have, understandably, spent a lot of time talking about how to best use SketchUp Pro. Yeah, we dabbled a little bit in LayOut, but most of this book has been about leveling up your modeling ability using the desktop version of SketchUp.
In this final chapter, we will learn how to take full advantage of everything available to you, as a SketchUp user. This chapter will assume that, since you have access to SketchUp Pro, you have a SketchUp Pro subscription. We will spend much of this chapter looking at exactly what comes with that subscription, as well as some great tools that are available to continue your quest to reach the next level (and the level after that).
The goal of this chapter is to expose you to some of the software and tools that are already available to you as a SketchUp Pro subscriber. The intention here is not to try to sell you a subscription (the assumption is that you already have everything listed) and we won’t be doing full step-by-step walkthroughs. By the end of this chapter, I am hoping that you realize how many tools you already have in your toolbox in the hope you will start thinking about how you may use them to take your workflows to an even higher level.
In this chapter, we will cover the following topics:
- Using SketchUp viewers
- Trying Trimble Connect
- Exploring SketchUp online
- Using SketchUp on an iPad
- Finding additional resources
Technical requirements
You do not need anything to complete this chapter. If you want to check out any of the software included with the SketchUp Pro subscription, you will need an active SketchUp Pro subscription and, for some features, internet access.
A Note about SketchUp Subscriptions
At the time of writing this book, there are three levels of SketchUp subscription: SketchUp Go, SketchUp Pro, and SketchUp Studio. SketchUp Go does not include the desktop software and is sort of irrelevant to almost everything we have covered in this book. SketchUp Pro is the subscription most often used by SketchUp desktop users and is the target of this chapter. SketchUp Studio includes everything in SketchUp Pro, plus some additional software that we will not specifically cover in this chapter. While the subscription offerings may change after the printing of this book, I will assume that something similar to the SketchUp Pro subscription will be available, as well as what is being used as you work through this book.
Using SketchUp viewers
SketchUp is a great way to explore ideas and bring them to life in the form of 3D models. It is a great way for you, the originator of the idea, to realize your vision, and a great way for you to share it with others. This is great if the person you want to share it with is already a SketchUp user! You can simply email them an SKP file and they will see what you are seeing. However, sharing your vision with someone who is not a SketchUp user can be a little more difficult. This is where the SketchUp Viewer family comes into play! With a SketchUp Pro subscription, you have access to three different SketchUp viewers!
SketchUp Viewer for Windows or macOS
A quick and easy way to view a SketchUp model is by using the SketchUp Viewer on a PC or Mac computer. SketchUp Viewer for Windows or macOS can be downloaded and run by anyone, even those without a SketchUp subscription. This means that if you need a client or collaborator to see your model, you can send them a download link and a copy of your model. They will install the app on their computer, which means they can open your SketchUp file.
This version of Viewer acts like a stripped-down version of SketchUp. In this version of SketchUp Viewer, you can move through the model with the same tools that are available in SketchUp, but you cannot make any changes or create any new models. As shown in the following screenshot, SketchUp Viewer looks a lot like SketchUp Pro, but with fewer options:
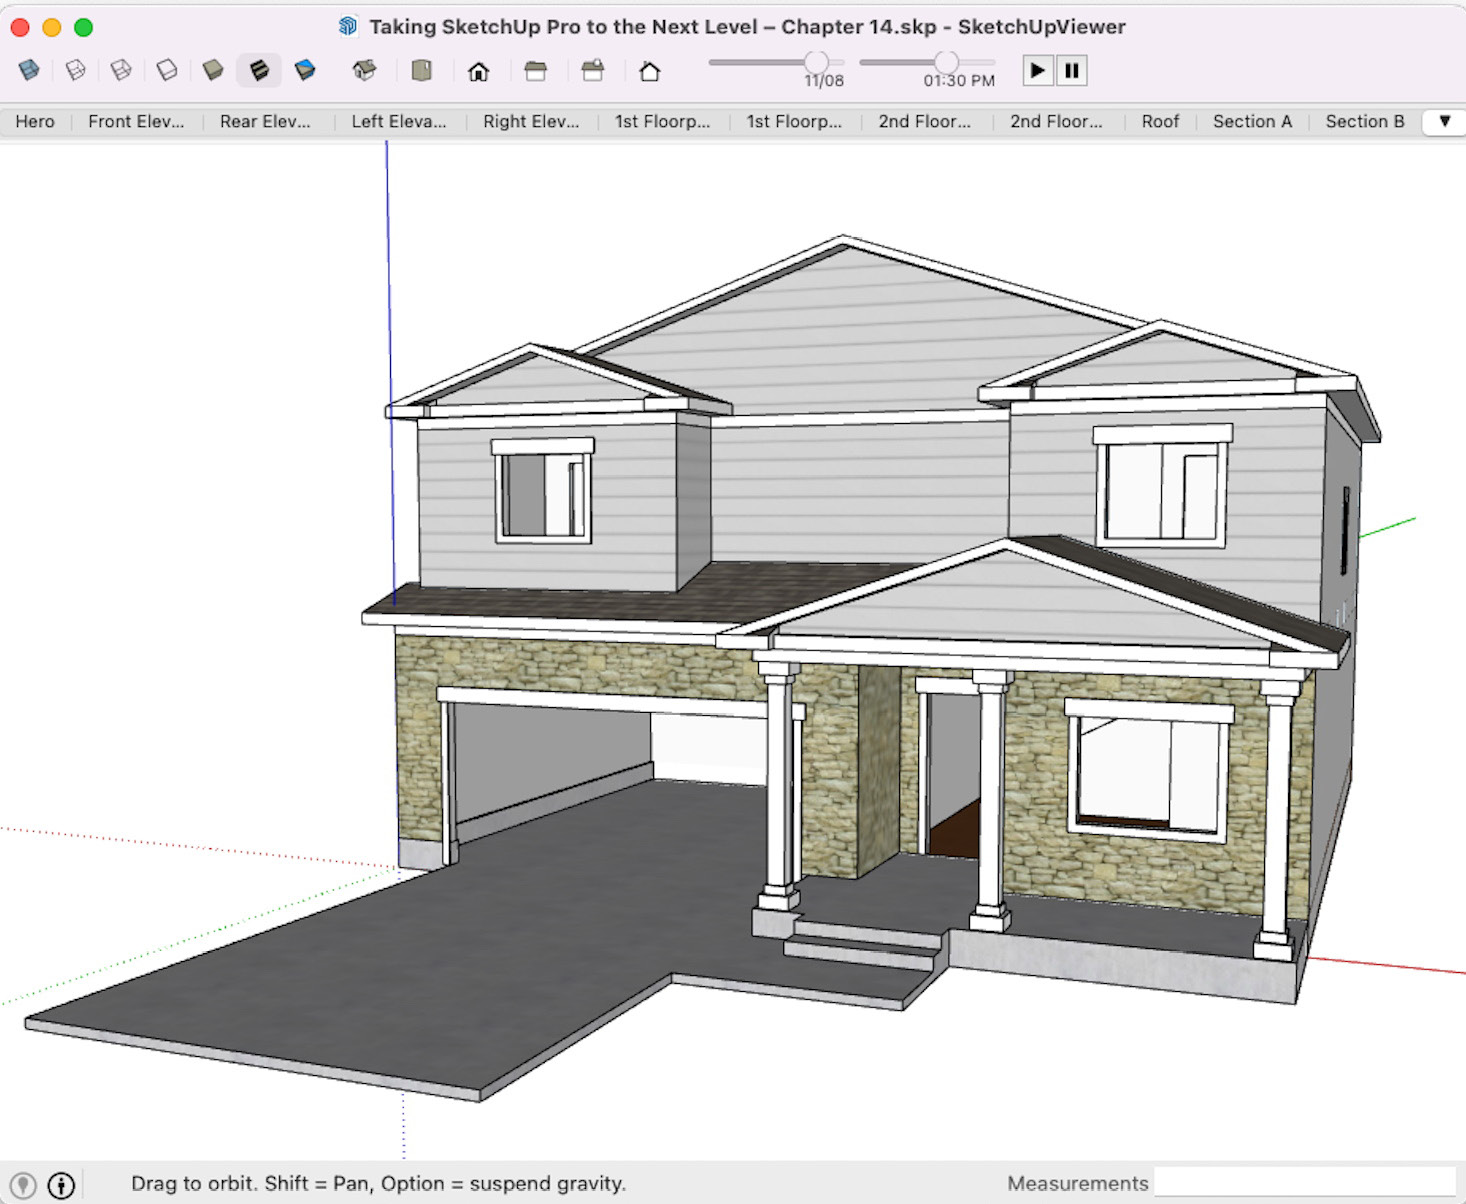
Figure 15.1 – SketchUp Viewer on macOS
As you can see, it looks a lot like SketchUp and has controls at the top to change the face style, jump to standard views, or animate the scenes. Since the scenes are listed, a user can simply click through the scenes to see them. This is a great way to help a non-SketchUp user navigate the model. If you were to click into the model, you would be able to orbit, zoom, and pan using your three-button mouse, just like in SketchUp Pro, but users of Viewer will not always understand that. If you, the SketchUp Pro pro, present them with a SketchUp model with scenes created and tell them, “Just click through the scenes at the top of the window,” you can help guide their experience and ensure that they are seeing the model as you intended.
Since anyone can download and run this viewer, this is a great way to allow someone to see your model. It is easier than having a client subscribe to SketchUp Pro and try to learn how to navigate in a 3D model. Of course, this means they can still orbit and zoom and get themselves “stuck” inside the model or orbit away from what they should be seeing. Fortunately, clicking back to an existing scene will make it easy to get back to where they need to be.
SketchUp Viewer for iOS and Android
Even easier than looking through a 3D model on your computer is looking through a 3D model on your phone or tablet. I know – there are those out there who will try to argue with this, reminding me that phone screens are much smaller than any computer monitor or laptop display. I agree that using SketchUp Viewer on your computer will give you a larger view of your model. However, as we touched on previously, learning to move through a model using the SketchUp Viewer tools can take a little bit of time. Looking at a 3M model on a tablet or phone is far more intuitive and is a great way for someone with no SketchUp experience to look through your creation.
When viewing a model in the SketchUp Viewer app on iOS or Android, users can intuitively move their model around with their finger and zoom in and out using pinch gestures that they are used to using on their device. Additionally, the app offers them basic control over the model, such as access to Scenes, Tags, Styles, and Shadows. Due to the limited screen space on your phone, the user interface is severely slimmed down, as shown here:
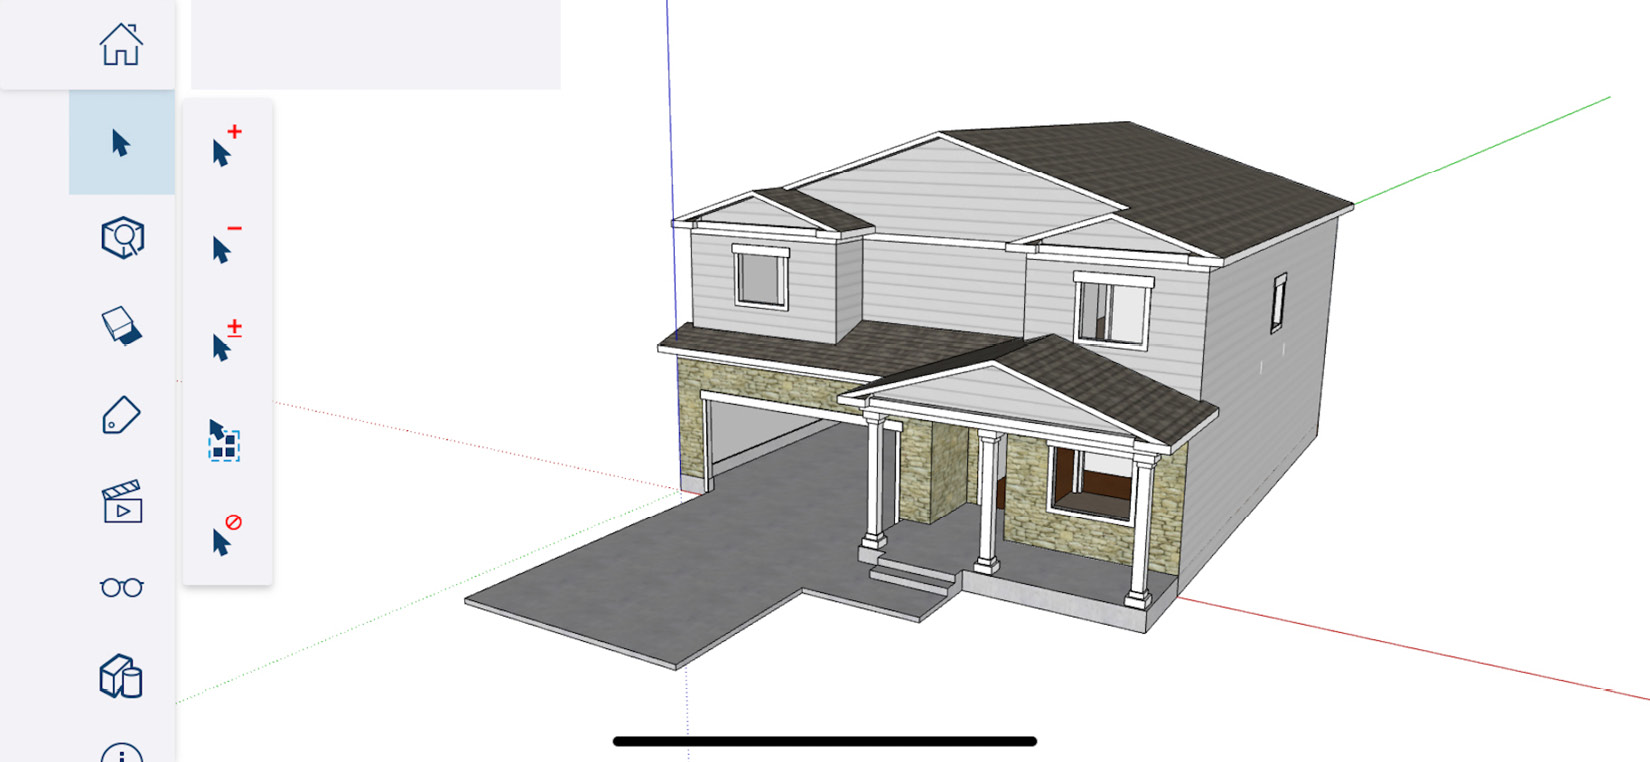
Figure 15.2 – SketchUp Viewer as seen on an iPhone
Additionally, unlike SketchUp Viewer for Windows or macOS, the mobile version allows users to select entities and view basic information about them. While you cannot do any editing, this makes it easy to pull up a wall, for example, and see its total square footage. If additional information has been added to groups or components, such as a part number of a window, Entity Info can be displayed when the item is selected.
With this additional level of information available, SketchUp Viewer for mobile devices is not only an easy way for your customer, co-worker, or stakeholder to view and experience your work, but it is also a good way for you to have information about your project with you when you are away from SketchUp Pro.
SketchUp Viewer for VR/AR headsets
The final viewer is SketchUp Viewer for Augmented Reality (AR). This viewer is currently available for Oculus Rift, Oculus Quest, HTC Vive, SteamVR, and Hololens. If you have any of these devices and a SketchUp Pro subscription, you can download the app and experience your SketchUp models in scaled or full-sized virtual or augmented reality:
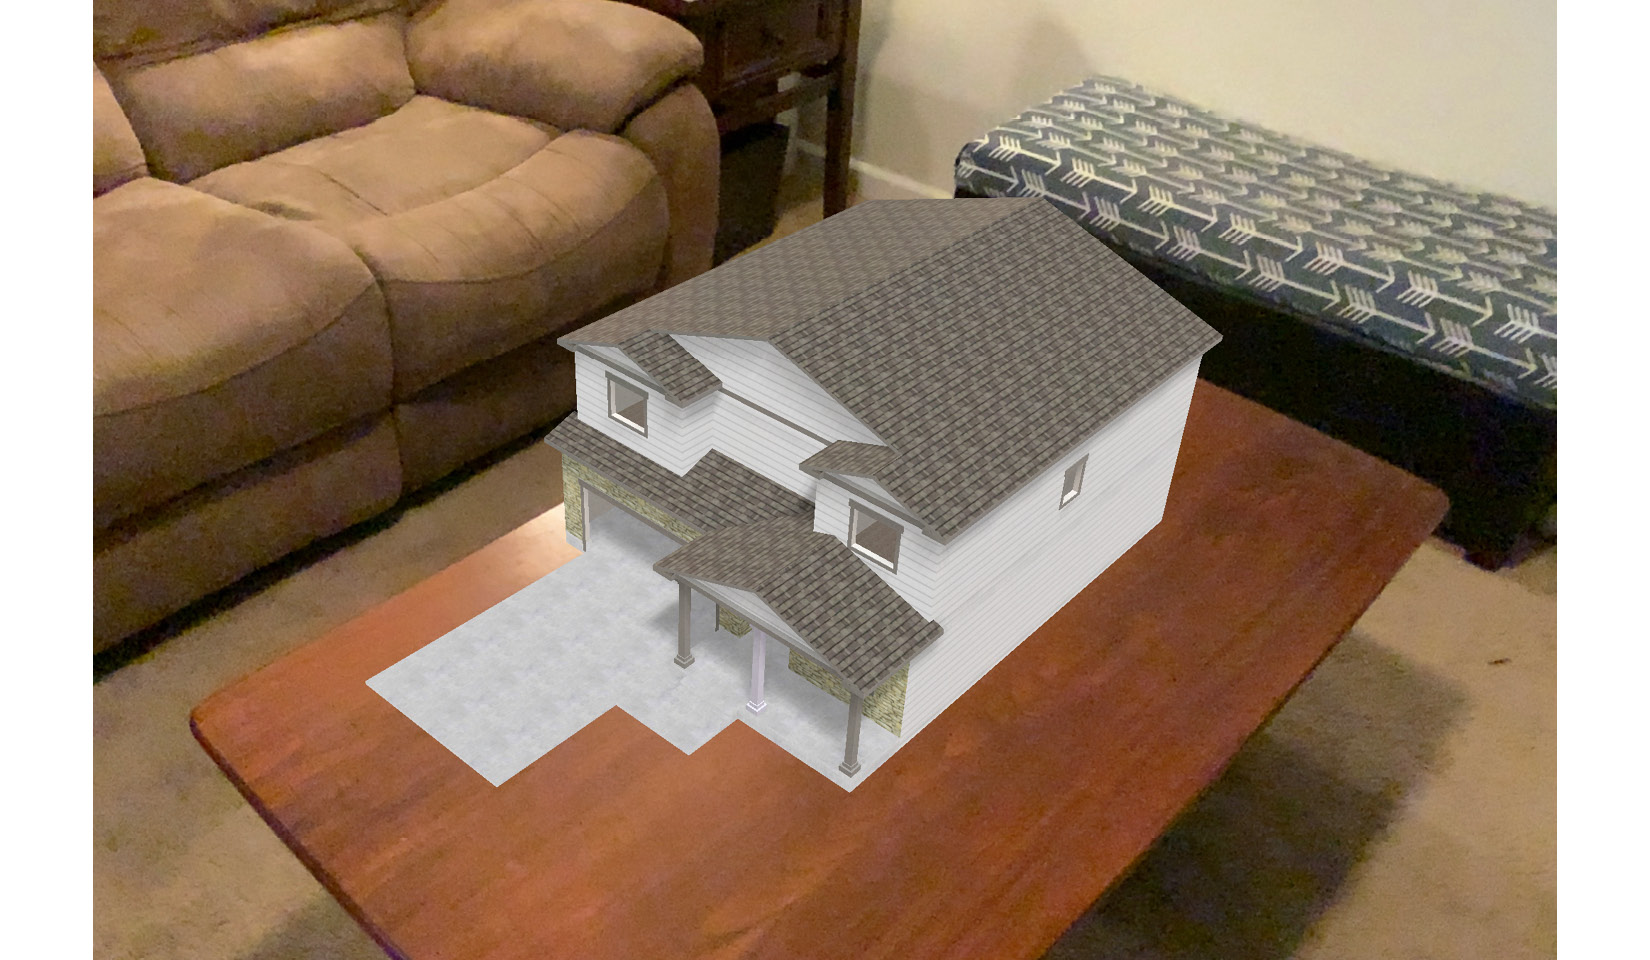
Figure 15.3 – A SketchUp model as viewed in augmented reality
As we have discussed, viewing a 3D model means understanding the interface and tools available to move through 3D space. The great thing about viewing a model in a headset is that there is very little to learn. If you want to walk around a scaled model to see its side, you simply walk around the model and look at its side. If you want to look up at the ceiling of a full-size model, you just look up.
Not only is this an easy way for non-SketchUp users to experience your 3D models with no training, but it is also a great way for non-designers to understand things, such as how large a space is or how an item will look if it were to exist in reality. As a designer, you can look at what you have created in SketchUp and understand how it will translate to the real world. Your client/spouse/stakeholder may not have that ability. Giving them access to your design in a headset that allows them to experience it in full size, immersive 3D will make it easier for them to catch your vision.
Viewing your SketchUp models is a great way to share your work with non-designers, but what about when you want to work collaboratively with others? That is where Trimble Connect comes in!
Trying Trimble Connect
There are more than a few reasons that you may want to share your SketchUp model. You may be working collaboratively and need to pass it off to a co-worker. You may be the one generating the initial geometry, but at some point, need to pass the model to a subcontractor for material information or pricing. You may even need to share a model with yourself! In some cases, you may be moving between computers or devices and need a way to make sure that you are always working with the most recent version of your design. Trimble Connect can help you with all these scenarios and more.
Trimble Connect is an online tool that allows you to store and collaborate on designs with coworkers, subcontractors, or even clients. While Trimble Connect is a very robust tool with many capabilities, we will be looking at a few pieces that make it relative to us, as SketchUp designers, on our path to leveling up our skills. We will look at using Trimble Connect to share files and collaborate on designs, as well as how to leverage Trimble Connect’s ability to read multiple file formats to import data from software that is not supported through SketchUp Pro’s native import options.
While I hate not being able to go into everything Trimble Connect has to offer, let’s spend a few minutes looking at these major features.
File sharing
Working with others is not a rarity nowadays. It is pretty common to have multiple people involved in your design process and to make that work, you need an easy way to pass files back and forth.
For years, designers working in groups have come up with solutions to pass files back and forth (with mixed success). I regularly hear about companies storing their SketchUp files on Google Drive or Microsoft Cloud. Going back to the ancient times before shared web-based storage solutions, companies would stand up dedicated servers to share their working files! While keeping files on a website such as Drive can work very well, there are some downsides.
First off, when storing on a shared site, you will have to manually track revisions and updates by creating folders or renaming files before they are updated. With Trimble Connect, revisions to files are tracked as you upload new versions. This means you can jump back to an older version of a SketchUp file by simply selecting it from a list of revisions. Additionally, Trimble Connect will not only keep track of versions of a SketchUp file as it is uploaded but also note who uploaded each revision!
Another reason to use Trimble Connect to store your files is the native integration into SketchUp itself. Regardless of the version of SketchUp that you use or what device you are using (more on SketchUp on an iPad and SketchUp on the web will be covered later in this chapter), the option to save or open a model directly from inside any version of SketchUp is a huge time saver.
One of the issues that will cause a problem in SketchUp for you is opening a file from anything other than your local storage. If you do try to open a file from a USB drive, Google Drive, a server, or any other cloud-based storage, you may run into corruption issues upon opening or saving the file. The ideal way to open a file from a remote drive is to download it locally, and then open it. When it is time to save, save it locally, then exit SketchUp and upload the finished file back to the cloud/external storage. With Trimble Connect, you cut this process in half. From inside SketchUp, you can download your file and save it locally and send it right back up to Trimble Connect when you finish without ever leaving SketchUp.
Finally, this is a great solution, even if you are not sharing files with anyone else. Even if you are doing all the work yourself, you can use Trimble Connect just to pass versions of design files from one device to another. How cool would it be to create a custom house design in SketchUp on your desktop PC, then walk out the door and show it to someone on your iPhone in SketchUp Viewer? The answer: very cool!
Collaborative design
If you are designing with a group, however small or large, Trimble Connect allows you to do much more than just share files. When you use Trimble Connect, you can create groups of people to include in your project. These could be designers who will be working in SketchUp on the actual models, subcontractors who will be responsible for supplying information about labor or materials, or even clients who will want to look at the 3D model as it is being developed. Having multiple members in a project is a great way to keep everyone involved in the process up to date on what is happening, and make sure that they are working with the most up-to-date version of the design information possible.
Design teams can be created and saved so that you can share projects with the same people on projects. Each member of a team can have a specific role and right within the project. This means not every member of a team can see all the information about a project, only the information that is pertinent to the role they play.
Plus, when you set up a project, you can assign tasks to the members of the project in the form of ToDos. With a ToDo, you can let a collaborator know that you or someone else on the project is expecting work from them. If you set up notifications, these ToDos will be emailed to them as soon as they are created. This is a great way to make sure that everyone knows what is expected of them and when they need to finish their tasks.
File conversion
Finally, Trimble Connect is a great solution for working with different file types. You have probably seen by now that, with SketchUp Pro, you can import and export several file types. While it is great to be able to work with these file types, there are plenty more out there that cannot be directly imported with SketchUp Pro. With Trimble Connect, you can import even more file types.
While different platforms support different files (Trimble Connect can be run from a web browser, on your mobile device with an app, or through a Windows desktop version), the number of file formats supported is impressive:
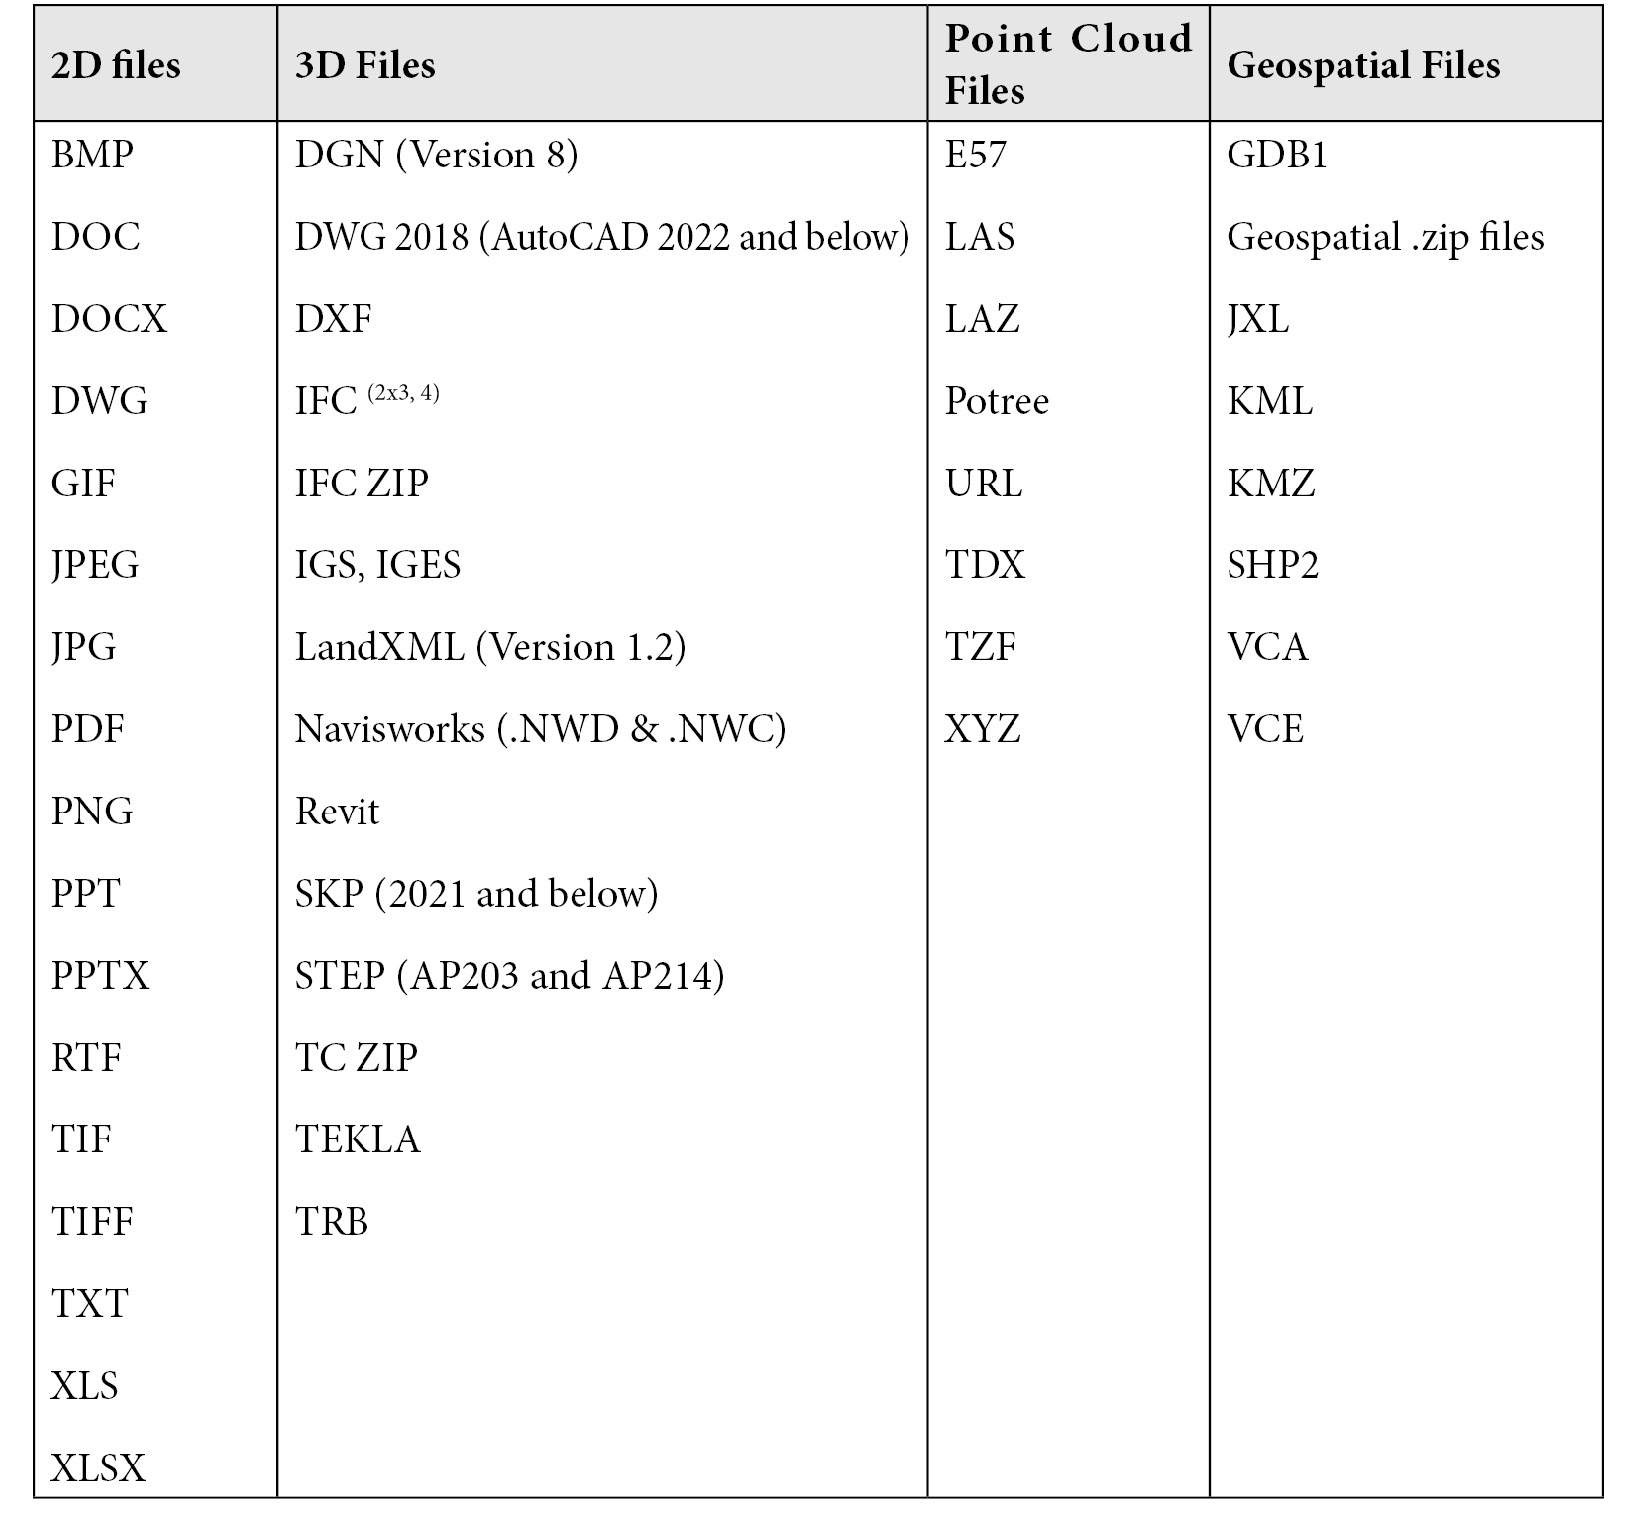
Figure 15.4 – Supported Trimble Connect file types
This is a great tool to have if you need to import and view files that you do not have software for! Once the files have been uploaded, Trimble Connect gives you the option to view the files and, in some cases, download alternative versions.
The simple fact is that most building or design processes do not happen in a single piece of software. With Trimble Connect, you are more likely to have a solution for working with other files without having to multiply the number of applications you must have up and running!
Trimble Connect is a great way to keep connected and leverage cloud-based applications as part of your design workflow. Another great piece of web-based software is SketchUp for the web!
Exploring SketchUp online
While it may not happen very often, there may be a point in the future where you need to get into SketchUp to model something or make a change to a model while you are away from your computer. Maybe you are working from a customer’s office or using a loner laptop because yours is in the shop. Whatever the reason, there may be a point where you need to get some modeling done and do not have access to your copy of SketchUp Pro.
In some cases, such as this, SketchUp Viewer may be enough for you. If all you need to do is look at or show a model, you may have everything you need right on your phone. If you need to get in and modify or start up a new model, however, you may want to take advantage of SketchUp for the web.
There are multiple versions of SketchUp available online. If you have a SketchUp Pro subscription, then you have access to all the functionality of SketchUp for the web that’s available to you right now. All you need do to access it is to go to https://app.sketchup.com and log in with your Trimble ID and password.
Once logged in, you can open any SketchUp files you have saved on Trimble Connect or start a new model from scratch. Even though SketchUp is running in a browser window, you still have the option to open a model that is saved on your computer!
Although SketchUp for the web does have a slightly different look and feel from SketchUp Pro on your computer, it is fairly easy to adapt and get modeling done when you need to.
This is what SketchUp for the web looks like:
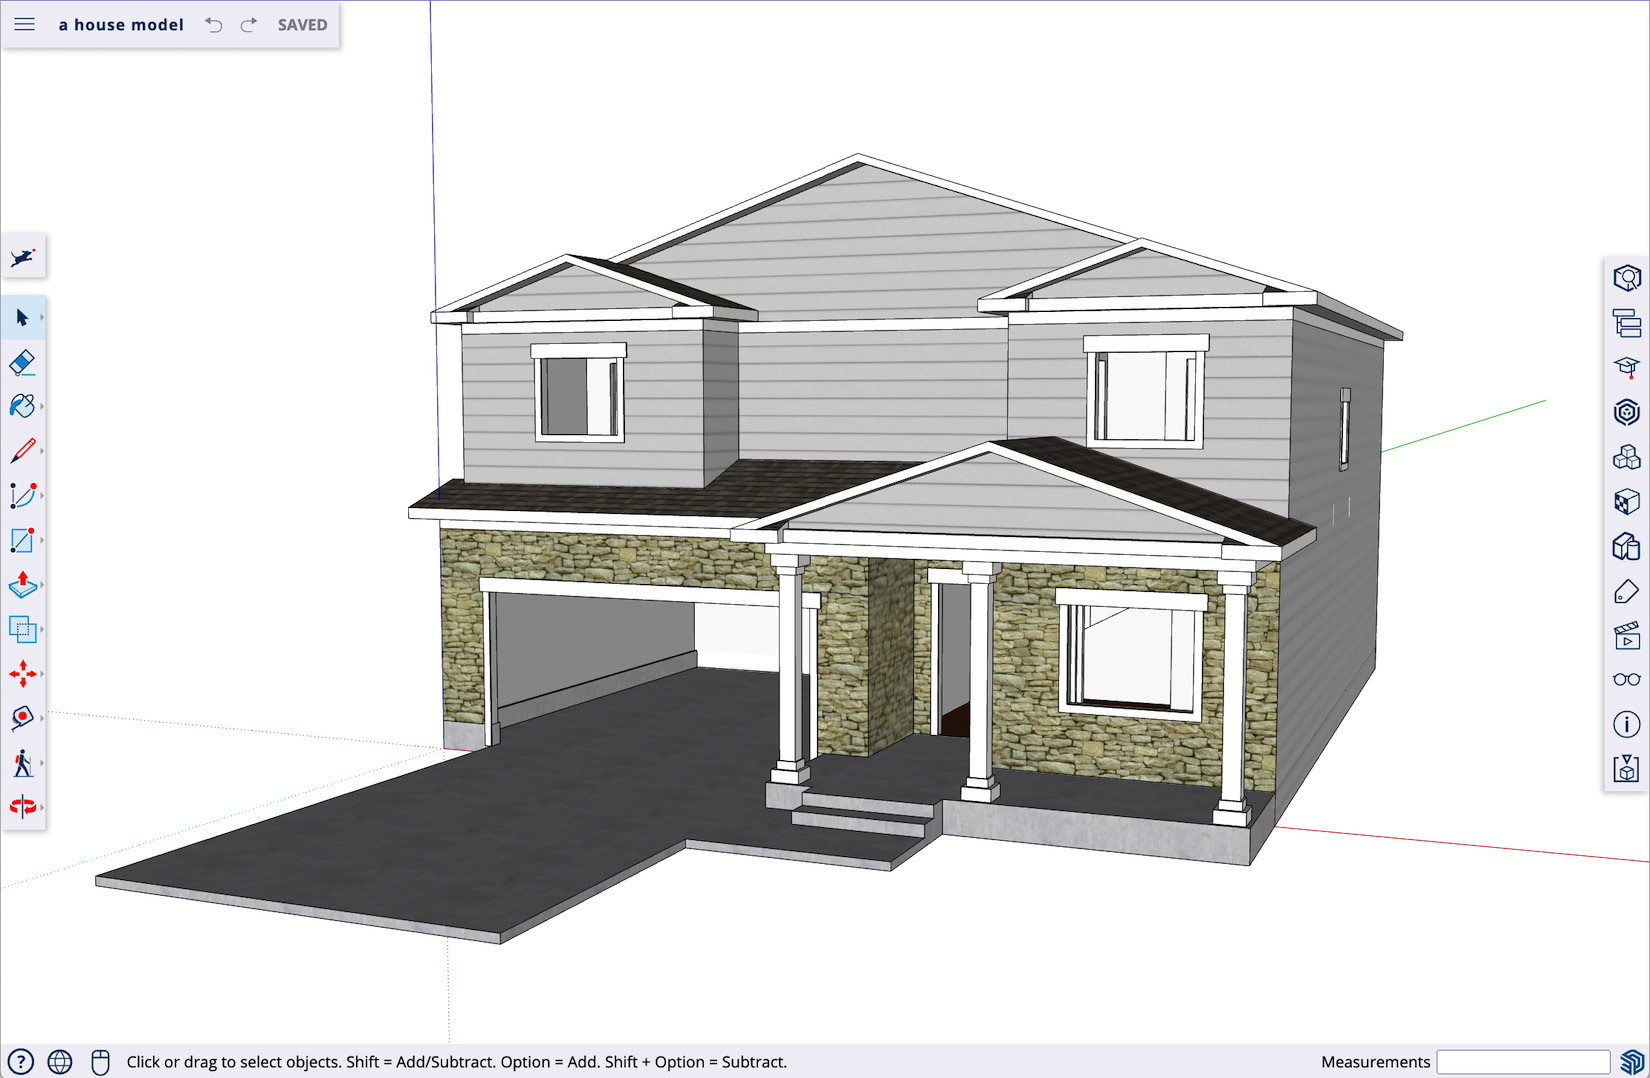
Figure 15.5 – SketchUp for the web
The key to learning SketchUp for the web (which we will only get to review at a high level in this section) is to learn about the main differences between it and SketchUp Pro.
SketchUp for the web toolbar
Unlike the toolbars in SketchUp Pro, the toolbar in SketchUp for the web is not customizable. You cannot move it, you cannot change what commands it presents, and you cannot disable it. Since the user interface must all reside inside the browser window, the toolbar was designed to always bind to the left-hand side of the window. However, almost every native command that is in SketchUp Pro is available through the SketchUp for the web toolbar.
This seems a little crazy, right? There are far more commands in SketchUp Pro than are displayed on the toolbar in the preceding screenshot! How is that possible? The secret is in grouping commands. In the toolbar of SketchUp for the web, many of the icons have a small arrow to the right of them. Clicking on one of these icons will fly out a series of related icons that can then be clicked so that you can start using that tool. In this example, I have moved the cursor over the Rectangle icon and clicked to bring up icons for Rectangle, Rotated Rectangle, Circle, Polygon, and 3D Text:
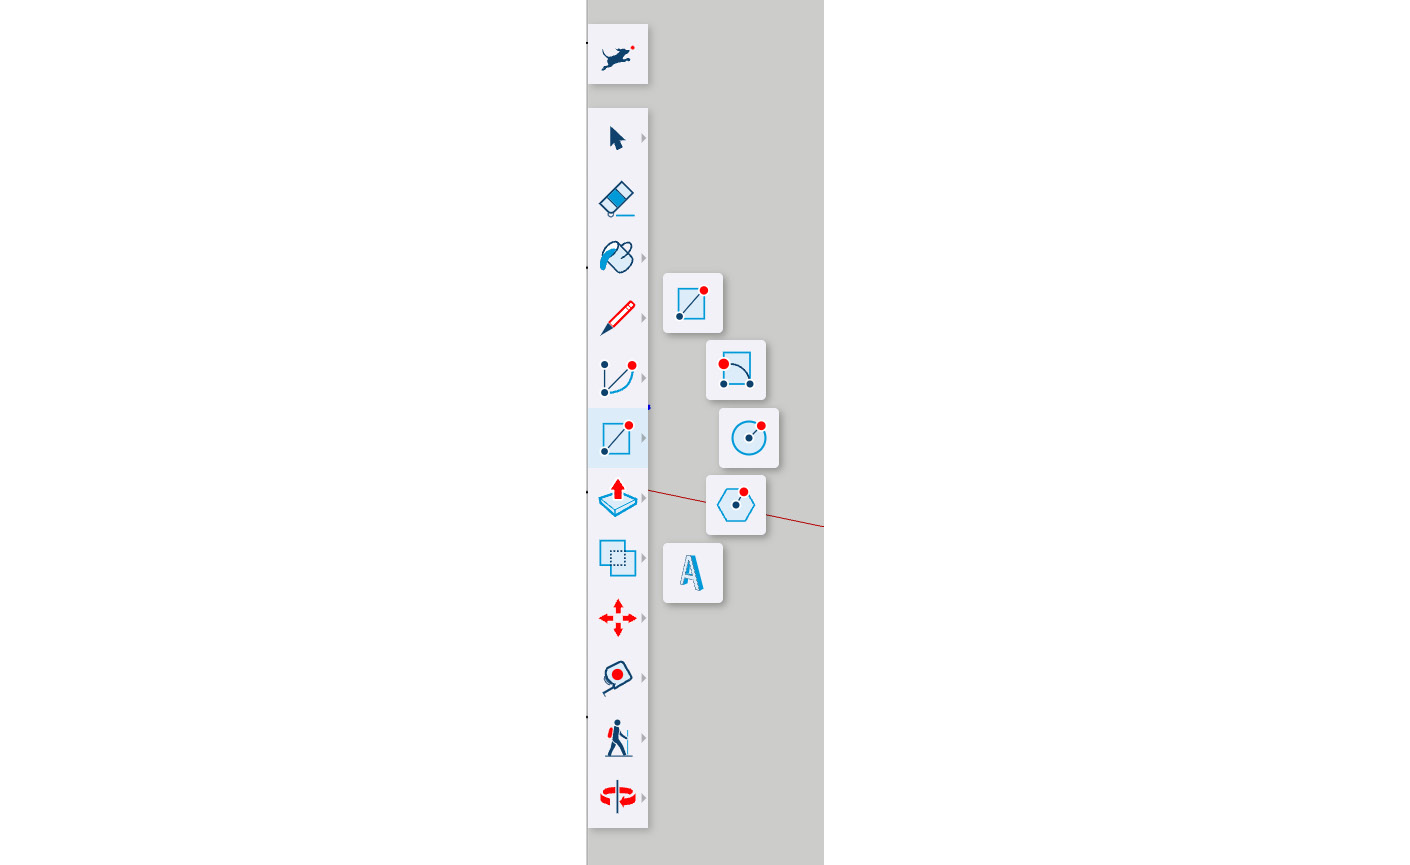
Figure 15.6 – Example of grouped tools
While this does take a little bit of getting used to (especially if you are someone who uses a lot of toolbars), it can become a habit fairly quickly. All you have to do is practice!
SketchUp for the web menu
One of the biggest difficulties I had when teaching myself SketchUp for the web was getting used to the lack of menus at the top of the screen. In SketchUp Pro, if I ever forgot a shortcut or could not find a floating toolbar, I knew that I could always head up to the menus and track down the tools I was looking for. Not so in SketchUp for the web.
Like the toolbar, the need to keep things compact and anchored meant reimagining what was needed in the menu. Any command that has an icon on the toolbar does not need to take up space in the menu. The only things in the menu are the commands that did not fit anywhere else. In addition to Undo and Redo, the menu in the top left includes the filename, save status (as a cloud-based app, SketchUp for the web is constantly saving your model, so you don’t have to worry about clicking a Save button), and a small drop-down menu with the standard File menu commands, as well as Add Location.
Again, this is a bit of a change from what you may be used to in SketchUp Pro, but (unless you are like me and run to the menu anytime you cannot find the command you are looking for) this is a pretty easy change to adapt to.
SketchUp for the web panels
The vertical stack of icons on the right-hand side of the screen house all of the panels that would show up in the tab bars (on Windows) or floating panels (on macOS) in SketchUp Pro. Clicking any one of these icons will fly out a stack of panels. Each panel can be toggled on and off by clicking its associated icon.
While all the functionality you expect from panels is there (things such as Entity Info, Tags, Styles, and Scenes), there are also a few familiar SketchUp Pro commands that have moved into the panels, such as 3D Warehouse and Model Info. There are also a few new icons, such as the ones for Display and Solid Inspector.
While the UI for these tools is easy to get the hang of, you may find yourself occasionally hunting for functionality in these panels. However, since there are only a dozen options, it is not too difficult to remember what options are there and the tools that each contains.
No extensions
OK, this is a big one. We spent a lot of time in this book talking about extensions and the role that they play in taking your SketchUp skills to the next level. Since there is no API or process to download and install third-party software into SketchUp for the web (since it is software running off a server and not your computer), there are no extensions. While this should not be discouraging to you (we have spent a lot of time talking about how to get the most out of the native commands), it may be harder on some workflows than on others.
To get over this potential hurdle you just have to… get over it! There is no softening the blow here. If you model in SketchUp for the web, you are only going to be modeling with native tools.
How is SketchUp for the web similar to SketchUp Pro?
That was a lot of explaining what makes SketchUp for the web different from SketchUp Pro, and it may have felt like everything is different! Fortunately, despite the big change to the user interface, there is a whole lot about SketchUp for the web that is just like what you are used to in SketchUp Pro.
First off, you are working in the same files that you would if you were modeling on your desktop. Even though you may not choose to download the file you are creating in SketchUp for the web, be assured that the file that is being created and auto-saved to your Trimble Connect account is a .SKP file, just like the one you would be saving in SketchUp Pro.
Second, the process of modeling is the same in SketchUp for the web as it is in SketchUp Pro. Your workflows (except for those that depend on extensions) will remain the same as they ever were. SketchUp for the web uses the same tools to create the same geometry as SketchUp Pro.
Navigation is another thing that works the same on either version of SketchUp. This is great because you have probably spent quite a bit of time getting used to how to use your three-button mouse to zoom, pan, and orbit! If you can connect that mouse to the computer you are using, you can navigate in SketchUp for the web just like you are used to.
Finally, default shortcuts are the same. OK, this one is a bit of a double-edged sword. Yes, the default commands come from SketchUp Pro and work for many of the tools as they do by default. If you have left these default shortcuts as they were in SketchUp Pro, then you will be able to use them in SketchUp for the web! However, if you have remapped them and rely on a completely custom version of shortcut keys to model, then you may feel the sting of these hardcoded shortcuts when you model from the web-based version.
Should you use SketchUp for the web?
In summary, SketchUp for the web is a version of SketchUp that is available to you as a part of your SketchUp Pro subscription. If you are in a situation where you do not have access to SketchUp Pro, it is a great tool to get you by. There are limitations to the size of a file that will run smoothly in SketchUp for the web and you cannot take advantage of peripherals such as a 3D mouse when you use it, but if you need SketchUp, it is a great solution to have.
One of the best things about SketchUp for the web is that you can use it on any computer, which makes it a great option if you are away from your home computer. However, if you want the full power of SketchUp with you at all times, you may want to try out SketchUp for iPad.
Using SketchUp on an iPad
If you are an iPad user, SketchUp for iPad is something you may not know that you need. SketchUp for iPad reimagines the functionality of SketchUp Pro while taking advantage of the input methods only available with the iPad. This means you can take your modeling projects with you, wherever you want, and you can work on them in SketchUp whenever you want. Boasting a custom user interface designed specifically for iPad, this version of SketchUp looks different, but feels familiar at the same time:
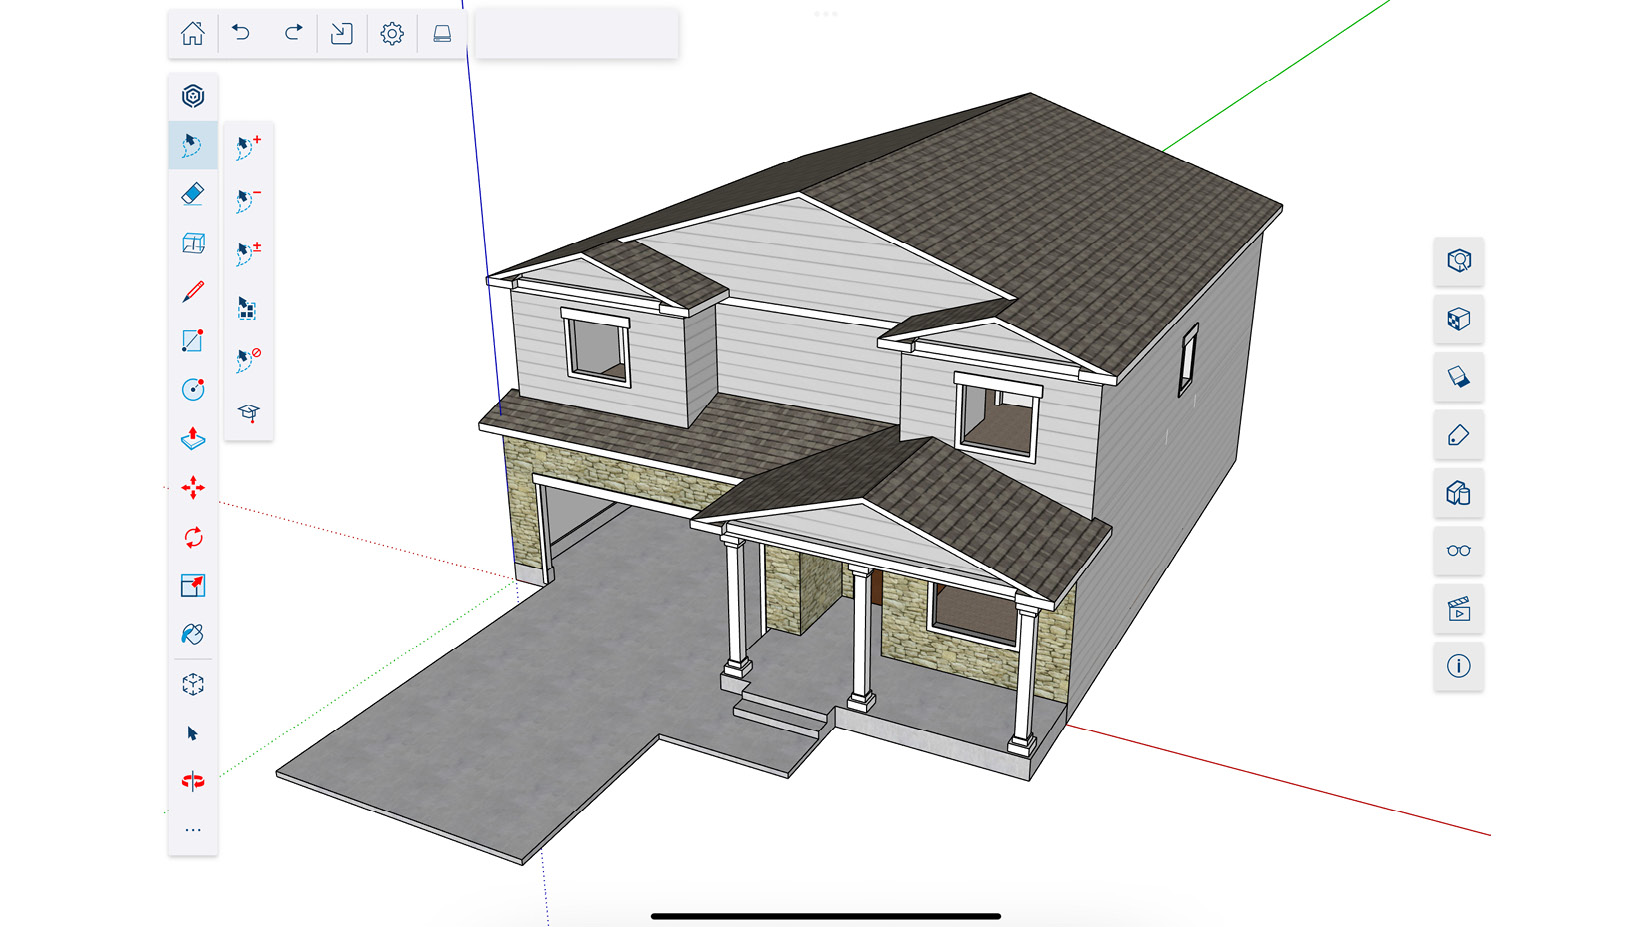
Figure 15.7 – SketchUp for iPad
I know, I already hear the pushback, “I can already take SketchUp with me because I model on a laptop!” Yes, having SketchUp Pro installed on a laptop is great (it is the main way I use SketchUp daily), but modeling on an iPad is different. We will get into the specific differences between SketchUp Pro and SketchUp for iPad in this section, but before that, I want to mention the advantages of working on an iPad versus a laptop.
First off, an iPad is smaller and lighter. There are some small laptops out there, sure, but few that I have held in my hand are as easy to carry around as my iPad. It is also smaller than my laptop. I am a larger human (over 6 feet tall) and I travel fairly regularly. I have spent more than a few hours sitting on trains, buses, and airplanes with my laptop open, modeling with the trackpad. Not to brag, but I have gotten to be pretty good at modeling with this setup, but it has never felt good or been nearly as effective as sitting at a desk with my three-button mouse. With an iPad, however, it is so much easier to model with the much smaller device and Apple Pencil. I can rotate the screen to whatever angle works best; I can cradle it in my arm or stand it up on my lap. It just makes for a far more pleasurable experience using SketchUp on the go.
I Am Not Here to Sell You an iPad
Before I go any further into this section, I want to point out that I honestly do not care whether you have an iPad or not. I do not want you to buy an iPad just because I enjoy using one. All I am going to show you is what using SketchUp for iPad is like. If you own an iPad and a SketchUp subscription, then you already have access to the software! If you have a SketchUp subscription and have been considering getting an iPad, then this may just be the app that pushed you over the edge!
Just as with SketchUp for the web, there are a few things that are different about using SketchUp for iPad as opposed to SketchUp Pro.
SketchUp for iPad toolbar
Just as with SketchUp for the web, SketchUp for iPad cannot rely on standard UI options that are available in SketchUp Pro. This means the toolbar must function differently. In addition to having slightly larger icons (which are easier to tap on), the toolbar is always on the left-hand side of your modeling screen. Rather than using grouped tools like SketchUp for the web does, SketchUp for iPad limits the number of visible icons. You have the option to lock your favorite commands in at the top of the toolbar, but can bring up the less commonly used commands from a complete list of commands at any point, as shown here:
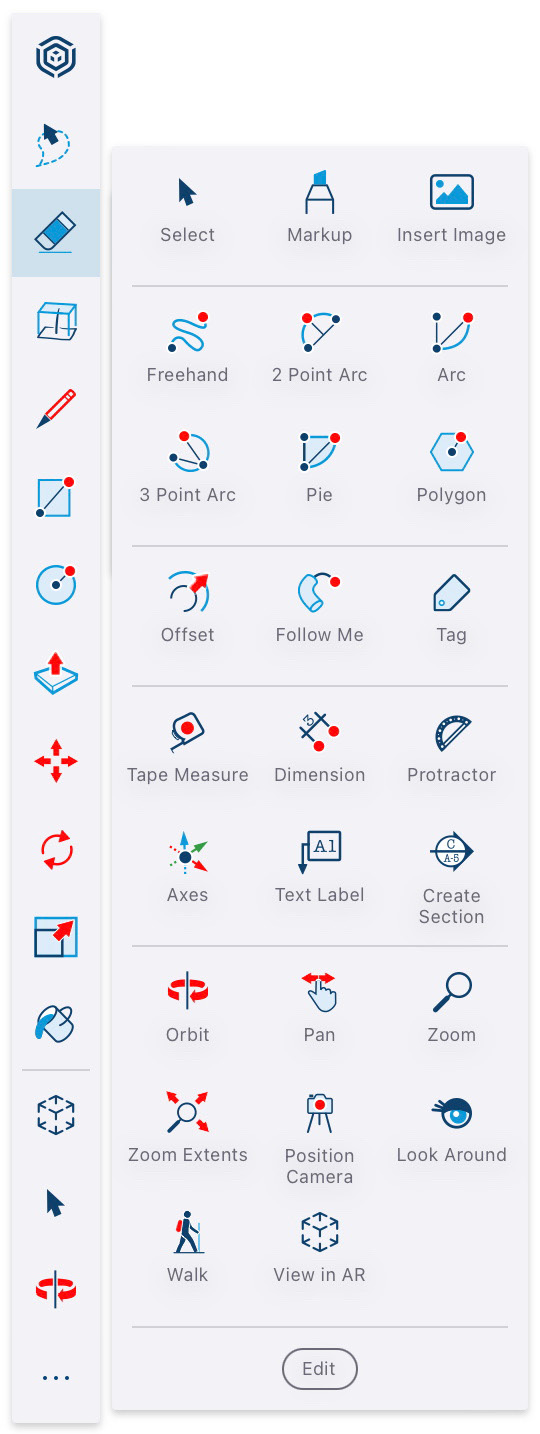
Figure 15.8 – A complete list of tools on SketchUp for iPad
Since you have the option to customize your toolbar by reordering and choosing which tools are permanent, this ends up being a great way to minimize the UI, since screen space is limited.
Additionally, options for the selected tools (things such as modifiers or inference locks) are shown to the side of the selected tool in a smaller fly-out toolbar:
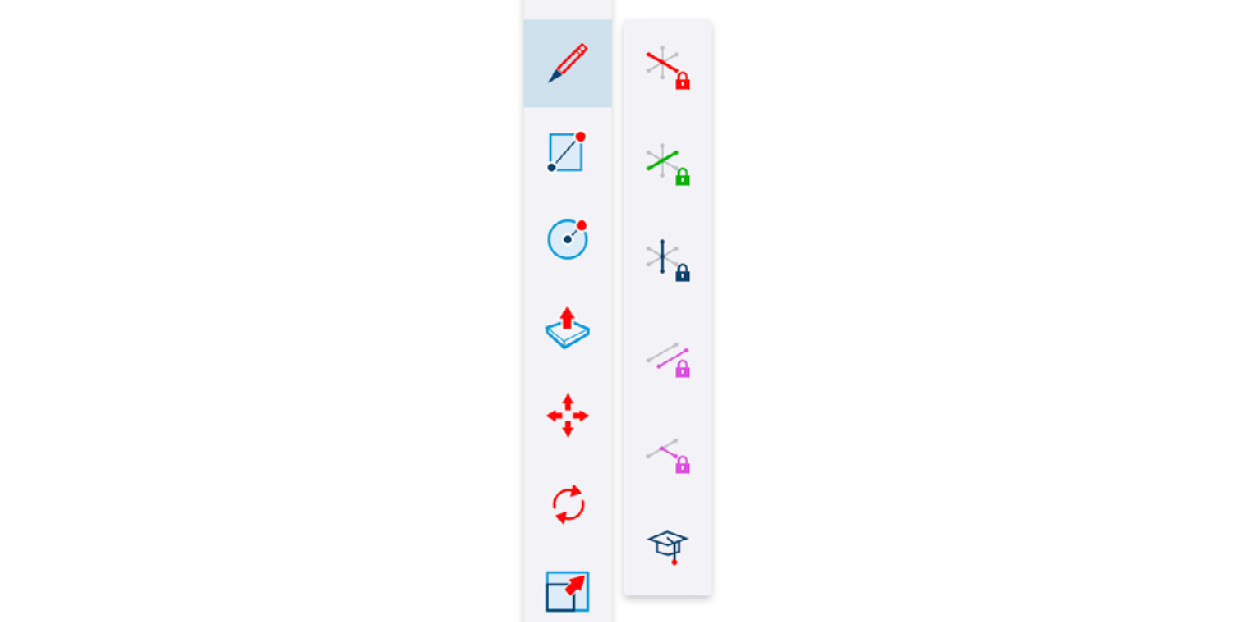
Figure 15.9 – The Line tool’s flyout toolbar
This brings up another slight change when using SketchUp for iPad. While SketchUp for iPad can be used with a keyboard, it is designed to be fully functional, even if you are working without one. This means doing certain things in a slightly different order. For example, if you are drawing a line in SketchUp Pro and want to have it snap to the red axis, you would just tap the Right Arrow key after selecting a start point. In SketchUp for iPad, options such as modifiers or inferencing snaps must be activated before you can start using the tool, in many cases. This means clicking the Line command, then clicking the Lock X icon, and then picking the start point of the line.
The good news about this different toolbar is that you should recognize almost every single icon on the toolbar since they are based on the icons in SketchUp Pro!
SketchUp for iPad menu
Just like in SketchUp for the web, there is not a proper set of menus in SketchUp for iPad. The menu bar at the top right of the screen is very similar to SketchUp for the web. Undo, Redo, Download, Options, and Save have icons in the menu, and you can also go to the home screen (where you can open other models or start something new). Since all the tools and information are available through the toolbar or panels, there is no need for additional menus.
SketchUp for iPad panels
Also, very similar to SketchUp for the web, the panels on the right-hand side contain most of the information and control for working with your model. Just like SketchUp for the web, you can choose to expand or collapse them as needed.
SketchUp for iPad input methods
The input options available on SketchUp for iPad are one of the things that set this version of SketchUp apart from all the rest. Unlike SketchUp Pro or SketchUp for the web, where you can provide input with a mouse or trackpad, SketchUp for iPad will allow you to input using an Apple Pencil, your finger, or a Bluetooth mouse/trackpad.
While it is great to have options, there is usually a best way to use a tool. In my own humble opinion, if you are going to model in SketchUp for iPad, you will want to use an Apple Pencil. The Apple Pencil makes it easy to perform precision selections and makes it easy to snap to points and use inferencing. Plus, there are two different modes for using the Apple Pencil (Click-Move-Click or Just Draw) that give you options for modeling the way that feels most comfortable to you.
If you are ever caught without your Apple Pencil, you can use every tool with your finger (or Touch mode, as the iPad crowd likes to say). While touch will get the job done, the simple fact that your fingertip will cover up more of the screen than the tip of your Apple Pencil does make this a less than ideal input method, and more of an “in a pinch” sort of solution.
Finally, you can input using a Bluetooth mouse or trackpad. When you do this, SketchUp for iPad functions very much like SketchUp Pro. While this works perfectly well, it feels a little weird to be hunching over the smaller screen of my iPad to do input and editing with a mouse, when I could be using the same device and taking advantage of the screen and power of my laptop. Using a mouse is nice, but again, it does not take advantage of the form factor of the iPad as an Apple Pencil does.
Features only available on SketchUp for iPad
While the bulk of the tools available in SketchUp for iPad is the same across the other versions of SketchUp, there are a few that can only be used when you are modeling on iPad. Let’s take a look.
Auto Shape
SketchUp for iPad has a special mode that allows you to draw gestures that are instantly transformed into SketchUp geometry. Simple shapes such as squares, circles, or solids such as boxes or spheres can be created with a quick gesture of your Apple Pencil. More complex geometry such as doors or windows can even be drawn in with the correct gesture.
Markup Mode
With SketchUp for iPad, you can draw an overlay onto any model. Using the Apple Pencil, you can sketch lines or write over the top of a model and have it saved as a scene in your model (which means you can open it and see your notes in any version of SketchUp)!
AR viewing
When you have a model open in SketchUp for iPad, you can tap the View in AR icon to turn on the camera of your iPad and experience your model in scaled or full-size augmented reality.
Is there a downside to SketchUp for iPad?
Ok, it may be a little extreme to say that there is a downside, but in the interest of full honesty, there are a few factors that send me back to SketchUp Pro when I need to do any serious modeling. For one thing, the hardware in my iPad is less powerful than what is in my laptop. I love my iPad, but when it comes time to work on a huge model, the RAM and processor on my laptop make working with large SketchUp models a much easier process. Additionally, working on a larger screen with my three-button mouse is more comfortable for me than holding my iPad and using the Apple Pencil when I have hours of modeling work to do.
Hopefully, at this point, you understand how much more there is to your SketchUp Pro subscription than just SketchUp and LayOut. While reviewing these additional applications is one of the big parts of what we needed to review in this chapter, there are a few resources out there that are not directly tied to your subscription.
Finding additional resources
At this point in this book (this point being the end), you have refreshed yourself on the basics of SketchUp, have come up with a game plan to take your skills and workflows to the next level, and have reviewed all of the tools that you have available to you as a SketchUp Pro subscriber. Now, what’s next?
In this final section of this final chapter, I would like to attempt to equip you with as many tools as possible so that you can continue your journey of growth as a SketchUp modeler. Everything covered in this chapter is available free of charge and available to you right now. In some cases, a service or resource may be available at an additional charge. In this case, I will mention that there is a charge, but I will not dive into the specifics of pricing (primarily in the interest of making this list as timeless as possible).
Forums
I am going to start with one of my favorite learning resources available: online forums. I know that forums do not offer the structured learning that a lot of people are looking for (if that’s you, feel free to skip to the Online training section), but for me, they offer a wealth of knowledge brought by the diverse members and the opportunity to join a community. I have said this previously but it bears repeating: not all software forums are the same. There are many forums out there for other software packages and applications that are lackluster, at best. SketchUp users are lucky in that they have access to not one but two vibrant user forums where they can get questions answered and learn about all the new things that they are not aware of!
SketchUp Community (the official SketchUp forum)
This is the forum (https://forums.sketchup.com) that is hosted by Trimble and a place where many of the SketchUp team staff members hang out to answer questions and hear from the SketchUp user community:
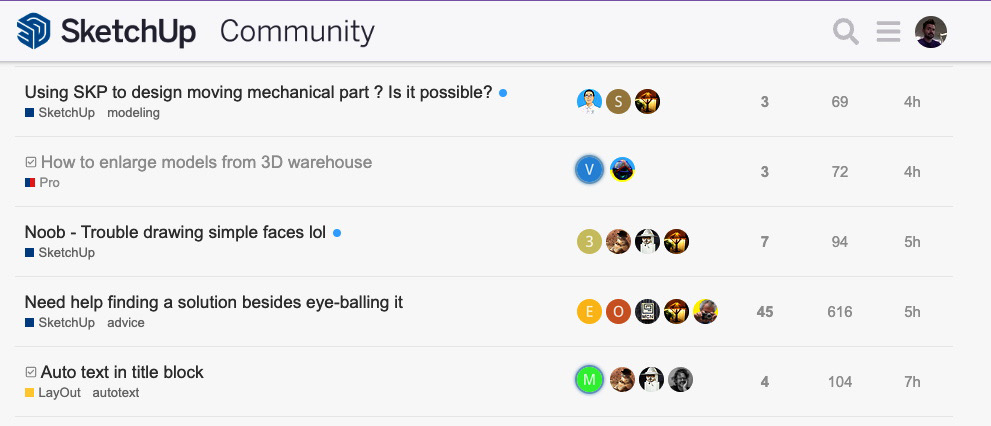
Figure 15.10 – SketchUp Community
The forum is moderated by a combination of Trimble staff and community members (experts known as SketchUp Sages). While you do need a free account to post, you can freely browse the topics and look for answers to your questions in the years of posts. Additionally, once you sign up, you can direct message any forum user, upload images or SketchUp files, and even bookmark topics or follow specific users. Not only is it a great place to get questions you have answered (and possibly answer someone else’s), but it is a very active community with a Gallery where you can share your work and a Corner Bar where you can just share thoughts about anything going on that is not SketchUp-related.
SketchUcation
The SketchUcation forum (https://sketchucation.com) has been around longer and boasts a larger user list than SketchUp Community. Started and run completely by SketchUp users, it is a great place to find answers and talk about SketchUp:

Figure 15.11 – SketchUcation
Similar to SketchUp Community, you will have to create an account to post at SketchUcation. Unlike SketchUp Community, when you sign up, you have the option to pick a paid membership. Since SketchUcation is run and supported completely by community members, paid memberships help them keep the lights on. SketchUcation offers many of the same abilities as SketchUp Community, but it also includes access to exclusive resources and services. Additionally, there are quite a few extension developers who run their beta testing and development through the forum, so you may have the opportunity to interact with the creator of your favorite extensions!
SketchUp User Group on Facebook
While not technically a forum, the SketchUp User Group on Facebook contains a lot of information on SketchUp and is a great place to show off your work, find resources, and get answers to your SketchUp questions. If you are a regular Facebook user, this is worth joining. You will have to join the group and have your application reviewed before you can get in, but it is worth it!
YouTube channels
When it comes to the best way to learn more about SketchUp, it is hard to think of a better platform than video. Don’t get me wrong (he said as he wrote a 15-chapter book), I truly love books. I think that there is something great about having teaching information on a page that you can refer to time and time again or something that you can open and read while lying in bed or on the train. If you need a quick run-through of a specific SketchUp tool or wish to review a specific extension, YouTube probably has a channel that can help you out!
SketchUp
The official SketchUp channel (https://www.youtube.com/c/SketchUp) on YouTube hosts over 1,000 videos about SketchUp. These range from short, simple weekly training videos (called Skill Builders) to user case studies, to weekly live streams:
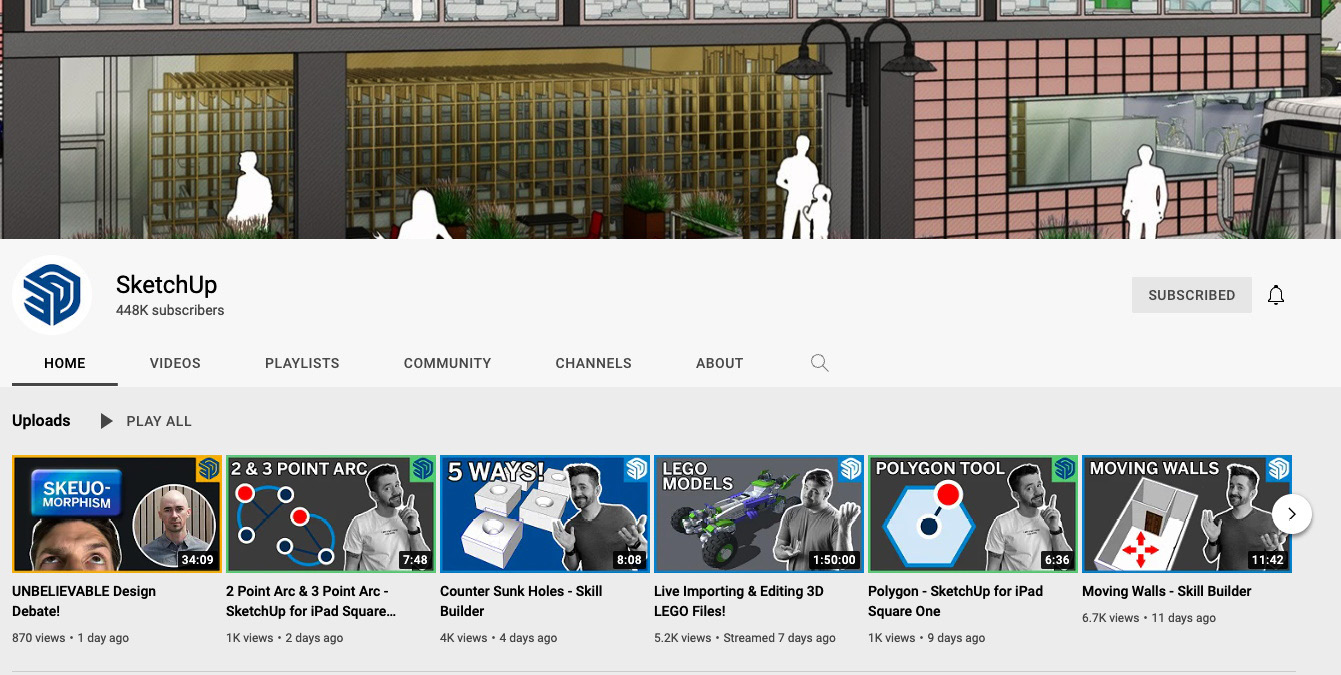
Figure 15.12 – The official SketchUp YouTube channel
Now, I do have to admit to a little bit of bias (I am the guy responsible for the majority of the content on this channel), but I will say that this is a YouTube channel worth following if you have any interest in SketchUp. The content is always fresh (at least two videos are uploaded each week and usually a video podcast and a 2-hour live modeling session), and the videos are high quality. Even if you do not subscribe for the recurring content, it is worth bookmarking so that you can run back there next time you have a question about a specific tool or workflow.
The SketchUp Essentials
My friend Justin Geis runs a channel called The SketchUp Essentials (https://www.youtube.com/c/Thesketchupessentials) and I love it. Justin is always upbeat and excited to talk about SketchUp and has some content that you just cannot find anywhere else:
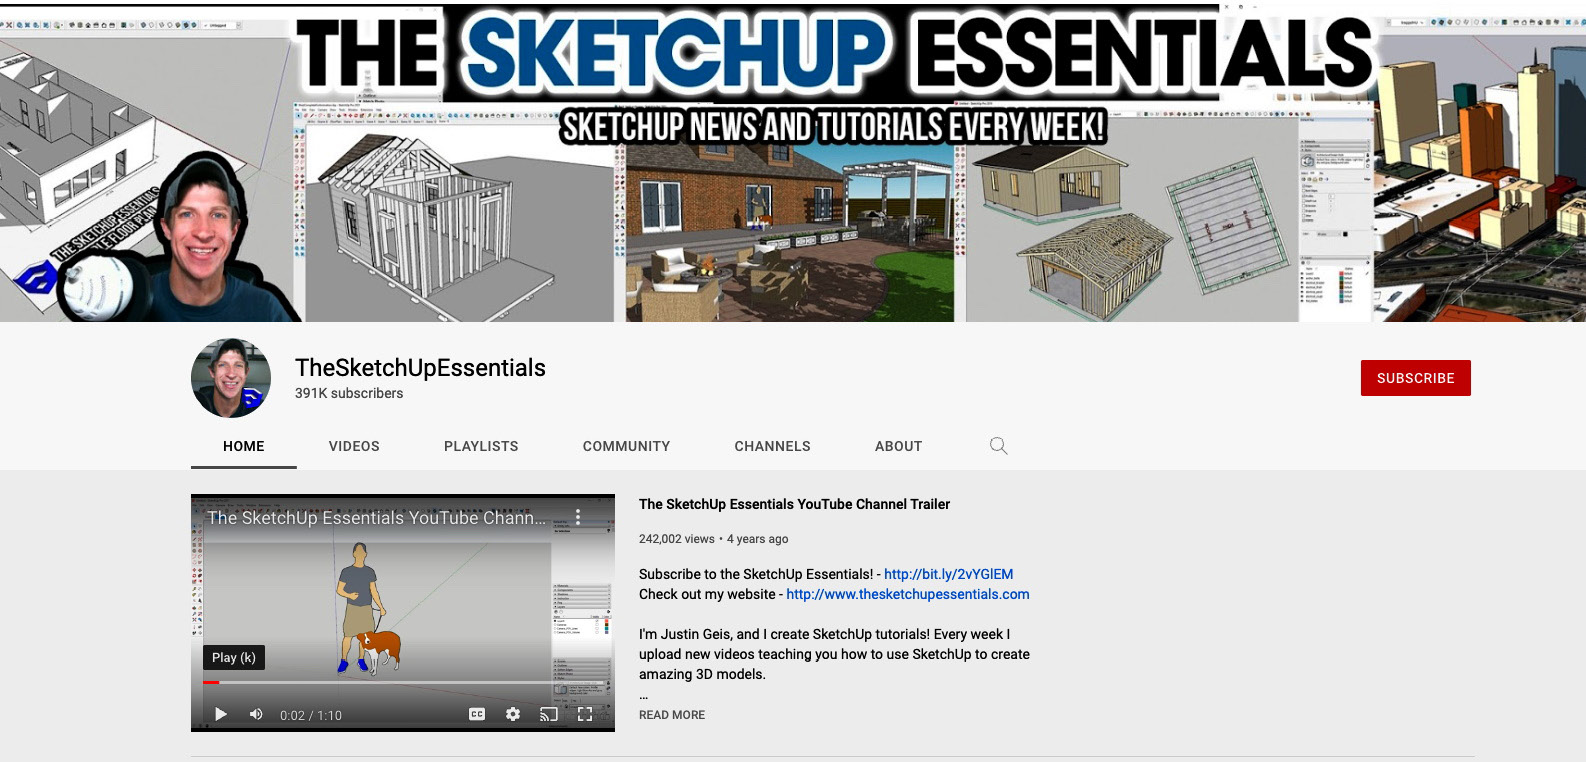
Figure 15.13 – The SketchUp Essentials YouTube channel
Justin posts videos on how to use SketchUp and the process he goes through to model certain items and shapes. The true gold on this channel, in my opinion, is the extension reviews. Justin knows how to use SketchUp and can model like a master with native tools, but the content he creates that I appreciate the most is when he installs an extension and goes through every facet to show you exactly how it works. Once again, this channel is more than worth a subscription as a SketchUp user.
Online training
If you are the type who wants a more structured approach to learning about SketchUp, here are a few resources that are worth checking out.
SketchUp Campus
SketchUp Campus (https://learn.sketchup.com/) is the official learning resource from Trimble. SketchUp Campus offers many multi-hour courses that can be taken all at once, or parted out, allowing you to learn over time. Since SketchUp Campus is a part of Trimble, you can use your Trimble ID and password to log in and access every course for free.
SketchUp School
Alex Olivier at SketchUp School (https://www.sketchupschool.com/) does an amazing job creating online learning materials for SketchUp. SketchUp School offers a huge backlog of training courses that cover all sorts of workflows. While you do have to create a paid subscription to take the courses, you can check out the quality of their work on their YouTube channel (https://www.youtube.com/c/sketchupschool).
Master SketchUp
Matt Donley at Master SketchUp (https://mastersketchup.com/) has created a site that can cover you no matter how you prefer to learn. Master SketchUp offers books, video tutorials, and online training courses. You will need to create an account to get access to the content at Master SketchUp, but you will find it well worth the effort!
I should wrap this up by stating that there are even more resources out there than I could list here. The SketchUp community is an amazing place with people constantly churning out new learning content daily. If you are a creator and I have missed you, I apologize for missing you!
Summary
Having a SketchUp Pro subscription does not just mean you can install and run SketchUp Pro on your computer. The subscription offers many tools, such as the viewers and Trimble Connect, as well as the ability to run SketchUp in a browser window or on an iPad. Outside of the subscription, remember that, as a SketchUp user, you are a part of a vibrant community of like-minded 3D modelers that are ready to share their thoughts and experiences with you whenever you are ready.
Well, that brings us to the end of this book. I truly hope that reading this book was worth your time. I did my best to try to hand you the tools that you need to take your SketchUp journey to the next level. Remember, not everyone uses SketchUp the same way. Your process and your workflows are specific to you. While this means you will not find a document that tells you step by step how to model exactly what you need to model, it does mean that you get to create your own path. In the end, like the models you create, your SketchUp workflow has been created by you.
Now, go do some 3D modeling!