
13
Must-Have Extensions for Any Workflow
In Chapter 11, What Are Extensions?, we talked about what extensions are, how they are made, and how to install them. Then, Chapter 12, Using 3D Warehouse and Extension Warehouse, showed us how to look for extensions in Extension Warehouse. Throughout these chapters, we looked at a couple of extensions, but they were just tools to help show you how the extension system works. In this chapter, we will look at a handful of specific extensions and how they function. We will be downloading these extensions and walking through how to use them in some step-by-step examples.
As we’ve already discussed, the world of extensions is a big one with hundreds of extensions created for all kinds of workflows. For the examples in this chapter, I have presented a few extensions that should be useful to anyone using SketchUp, regardless of the workflow. Additionally, the extension that we walk through is (at the time of writing) completely free to download and use.
The final section of this chapter includes a list of extensions that I believe will be useful for a lot of SketchUp users, but not everyone. Additionally, some of the extensions in the final section are not free to use. Many have free trials, so you can try them out before buying them, but I did not want to list step-by-step demonstrations of any extension unless I was sure that everyone could follow along.
In this chapter, we will cover the following topics:
- Selection Toys from Thomthom
- Bezier Curve Tool from the SketchUp team
- Curic Mirror from Curic
- adebeo_pushline from Denis B
- Exploring additional extensions
Technical requirements
For this chapter, you will need SketchUp Pro, a connection to the internet, and the Taking SketchUp Pro to the Next Level – Chapter 13.skp file, which is available at https://3dwarehouse.sketchup.com/model/7ca74523-9566-45c2-b9f5-761f4630de52/Taking-SketchUp-Pro-to-the-Next-Level-Chapter-13.
Selection Toys from Thomthom
Every once in a while, I will install an extension that becomes deeply entrenched in my SketchUp workflows. I am talking about the sort of commands that I use regularly. These are the kinds of commands that I end up feeling a little bit lost without. These are the kinds of commands that are designed to look and feel so much like SketchUp that I forget that they are even extensions!
This is the case when it comes to Selection Toys from Thomthom. There are times when I will try to use SketchUp on someone else’s computer or work on a new installation and look for Selection Toys commands, thinking that they are a part of standard SketchUp!
Hopefully, you are intrigued at this point and want to learn more about this extension! Let’s provide an overview of Selection Toys’ capabilities, then try it out!
Selection Toys overview
Selection Toys adds an array of selection modifiers and filters to SketchUp. I know – way back at the beginning of this book, I said that every SketchUp model is made up of only edges and faces. If there are only two things, how can an extension with selection filters be useful?
Yes, there are only two “pieces” that make up SketchUp models, but those two pieces get added to other objects in SketchUp. When all is said and done, we have edges and faces in a model, but we can also put those edges and faces into groups and components. Additionally, we can add materials to those edges and faces. We can also organize the groups and components by assigning them to tags. Plus, we can weld edges into curves, or add things such as guides, sections, or images to the model!
In the end, if you were to take a working model and select everything on the screen, you may end up with the need to modify your selection with a filter – something such as, “deselect all guides and dimension lines.” This is what Selection Toys does. It does not take long to use Selection Toys before you realize the power a simple selection filter can have.
I use the term “simple filter,” but the fact is, Selection Toys has a lot of options. The toolbar for version 2.4.0 has up to 45 different icons on it! I say “up to 45 buttons” because Selection Toys allows you to customize its toolbar so that you can see the icons for the commands you use, rather than everything all at once. To that end, it is this sort of function that makes Selection Toys so usable and functional. Everything from the icons to the way they are presented is well thought out and quick and easy to use.
Selection Toys has two groups of commands: Select Only filters and Deselect filters. You run Selection Toys commands by first selecting some portion of your model, then choosing to keep only certain items selected, or removing certain items from the selection.
Selected items can be filtered by the following:
- Edges: Toggle the lines in the selection on or off
- Faces: Toggle the surfaces that make up the selection on or off
- Groups: Toggle any groups in the selection on or off
- Components: Toggle any components in the selection on or off
- Guide Lines: Toggle any guidelines (created by the Tape Measure tool) in the selection on or off
- Guide Points: Toggle any guide points (zero length guides) in the selection on or off
- Text: Toggle any text (screen text or leader text) in the selection on or off
- Images: Toggle any imported images (not textures) in the selection on or off
- Sections: Toggle any sections in the selection on or off
- 3D Polylines: Toggle any polylines (geometry created by certain extensions) in the selection on or off
- Curves: Toggle any curves (created by welding multiple edges together) in the selection on or off
- Arcs: Toggle any arcs (created by the arc tool or by breaking circles) in the selection on or off
- Circles: Toggle any circles in the selection on or off
- Polygons: Toggle any polygons (shapes created using the Polygon tool) in the selection on or off
- n-Gons: Toggle any n-Gons (these are polygons, including polygons that have been broken) in the selection on or off
- Linear Dimensions: Toggle dimension lines connected to edges in the selection on or off
- Radial Dimensions: Toggle dimension lines connected to arcs in the selection on or off
- Front Default Material: Toggle faces that have the default front material applied in the selection on or off
- Back Default Material: Toggle faces that have the default back material applied in the selection on or off
- Hidden Edges: Toggle edges marked as hidden (either by the Eraser tool or by using the Soften/Smooth window) in the selection on or off
- Soft Edges: Toggle edges marked as soft (either by the Eraser tool or by using the Soften/Smooth window) in the selection on or off
- Smooth Edges: Toggle edges marked as smooth (either by the Eraser tool or by using the Soften/Smooth window) in the selection on or off
You can imagine how helpful this can be when you are working on a model that is made up of all different kinds of items. Rather than having to spend time zooming and highlighting items using the Shift key and the Select command, you can do a quick window select, then use Selection Toys filters to modify the selection with one or two clicks. Plus, the filters can be run one after another! You can select everything, then deselect Groups, and deselect Polygons.
Selection Toys can also automatically find and select items that are similar to a single selected item. After selecting a single item, you can right-click the item, then choose Select from the context menu, and then select items that share the same materials or are in the same group! If that was not enough, there are also a bunch of selection options so that you can select copies of groups or components, or even convert group copies into copies of components!
So, overall, this is an incredibly helpful extension and I tend to use it, one way or another, almost every time I model. So, now, let’s get Selection Toys installed and give it a try!
Installing Selection Toys
Since we have already covered the step-by-step process of installing extensions, I will not run through all of that again (this can be found in Chapter 11, What Are Extensions?, if you want to review it). Instead, I will let you grab the file and get it installed.
Selection Toys can be found in Extension Warehouse:
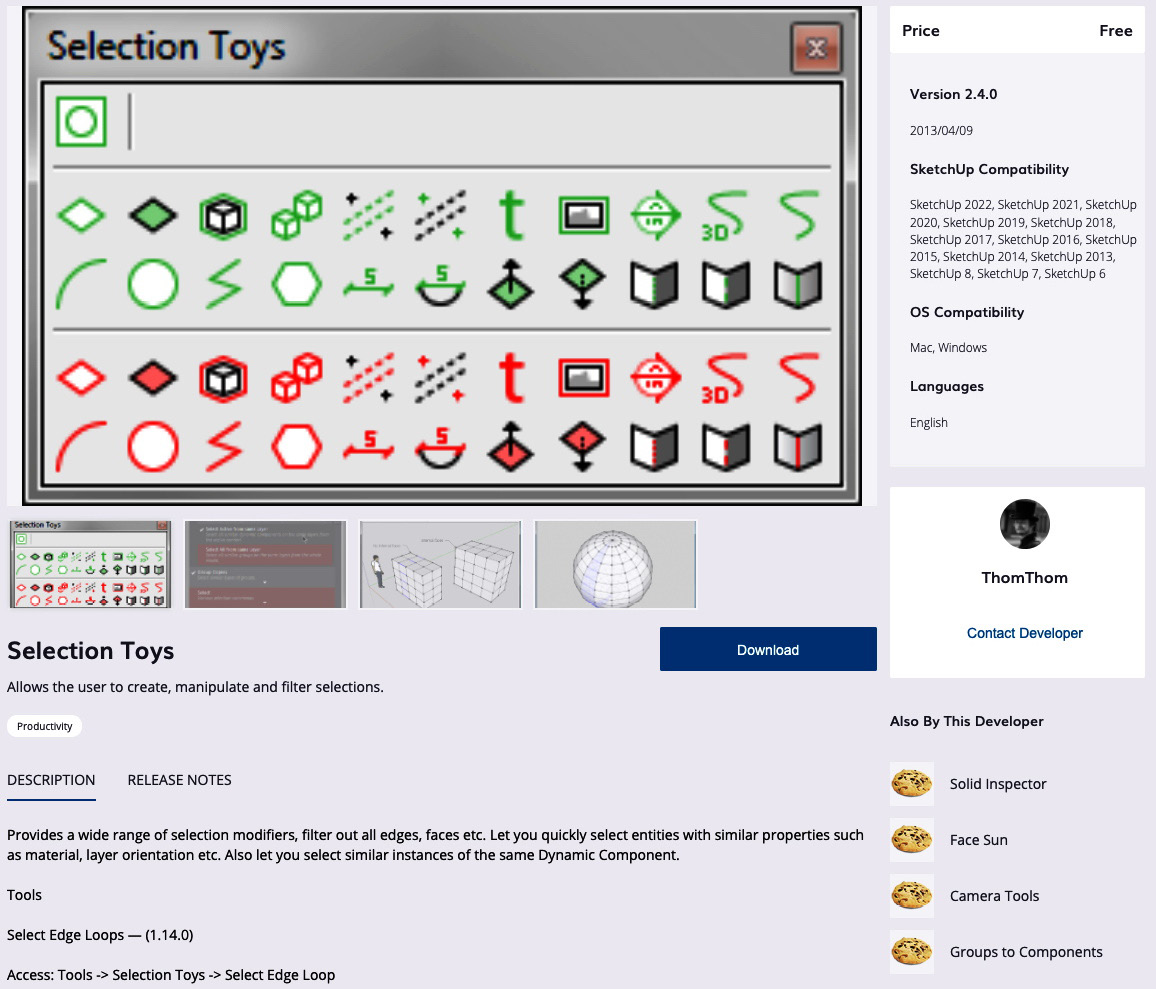
Figure 13.1 – Selection Toys version 2.4.0, as seen in Extension Warehouse
Download it using the following link or search for Selection Toys in Extension Warehouse: https://extensions.sketchup.com/extension/c9266b2c-0b55-4d21-a0a4-72e23b8a0fb4/selection-toys.
Once you have installed Selection Toys, we can try it out! We’ll practice using it in the next section.
Using Selection Toys
Now that Selection Toys has been installed, let’s try it out! The nice thing about this particular extension is that you can use it anytime you need to select or modify a selection, so you can use it on any model you are working on. Just to have something to play with though, let’s open the Taking SketchUp Pro to the Next Level – Chapter 13.skp file mentioned in the Technical requirements section at the beginning of this chapter.
Let’s hop in and start using Selection Toys:
- Open the View menu and click either Toolbar or Tool Palettes and turn on the toolbar for Selection Toys.
This will turn on a big toolbar. The default Selection Toys toolbar contains 45 buttons. Fortunately, this can be edited to show just the commands you want to see (more on that later in this section). Let’s try a few of these buttons out.
- Use the Select command to drag a window to select everything on the screen:

Figure 13.2 – The full Selection Toys toolbar
- Click on the second button on the Selection Toys toolbar (Select Only Edges). Notice that everything except for edges is deselected.
This command alone is worth installing Selection Toys for! Just think for a second how many clicks it would take to go through and pick out all of the edges in this model. The opposite command (Deselect Edges) is just as useful.
- Use Select to highlight everything in the model again. This time, move to the middle of the bar and choose the Deselect Edges button (it is the first red icon on the toolbar):

Figure 13.3 – The Deselect Edges button
Again, a super helpful command that will allow you to fine-tune your selection without spending a ton of time selecting items while holding down a modifier key.
At this point, go ahead and play around with the Selection Toys toolbar. Select everything and click on a filter or two to modify the selection.
The Select All Shortcut
Rather than dragging a select window to highlight everything, you can press Ctrl + A (on Windows) or Command + A (on macOS) to highlight everything in the model.
At this point, I would imagine that you get why I think that the functionality of this extension is something that any SketchUp user would value. Its toolbar, however, is a bit much. Let’s take a look at how we can customize the Selection Toys toolbar:
- From the Tools menu, click on Selection Toys, and then UI Settings. Scroll down to the section labeled Toolbar.
Here, you will find a list of every single button on the toolbar and can toggle them on or off. This is a great way to turn that unwieldy toolbar into something that you can justify dedicating some screen space to! Plus, it is a great way to see and understand what each icon represents. I like the commands that allow me to turn Edges, Faces, Groups, Components, Text, and Dimensions on or off.
- Turn off (uncheck) every command except for Edges, Faces, Groups, Components, Linear Dimensions, and Text.
- Click the Save button.
Since the UI for Selection Toys is loaded when you first start SketchUp, these changes will not be applied until you restart SketchUp.
- Quit and restart SketchUp.
Upon restarting, you should be greeted by a new, truncated version of the Selection Toys toolbar:

Figure 13.4 – Customized Selection Toys toolbar
What could be better than an extension toolbar that only contains the icons for the commands you want? How about running Selection Toys without any toolbar at all? Selection Toys offers something that few extensions do – the ability to run from either the toolbar or the context menu. Let’s try doing a little more filtering without using the toolbar at all:
- Select everything in the model one more time.
- Right-click on any selected item on the screen.
At the very bottom of the context menu, you will see options for Instances, Group Copies, Select, Select Only, and Deselect.
- Click on Select Only, and then Curves.
The selection filter turned off everything that was not a curve, even though we hid the Curves icon in the toolbar!
Personally, this is how I prefer to use Selection Toys (I never turn on the toolbar at all). Plus, not only can you run the selection filters, but there are a bunch of additional commands in there. The ability to select copies of a selected group or component, or use the command to convert selected copies of a group into components, can all be run from the context menu.
This section was intended to serve as an introduction to Selection Toys (I really cannot do an extension with over 60 commands justice in just a few pages). Hopefully, you have seen the value in this free extension and are willing to try it out. It is a great way to help you reach the next level with your SketchUp skills.
While Selection Toys is a great set of tools to help modify existing geometry, the next extension we are going to try out is all about creating geometry in new ways.
Bezier Curve Tool from the SketchUp Team
A Bezier curve is a parametric curve that’s created by defining a set of control points to define a smooth curve. Unlike traditional SketchUp curves, which are always created as a portion of a full circle, a Bezier curve can have a non-symmetric curve or curve in more than one direction, based on the number and location of the control points.
Some curves can be quickly created with native tools, while others require a tool such as Bezier Curve Tool:
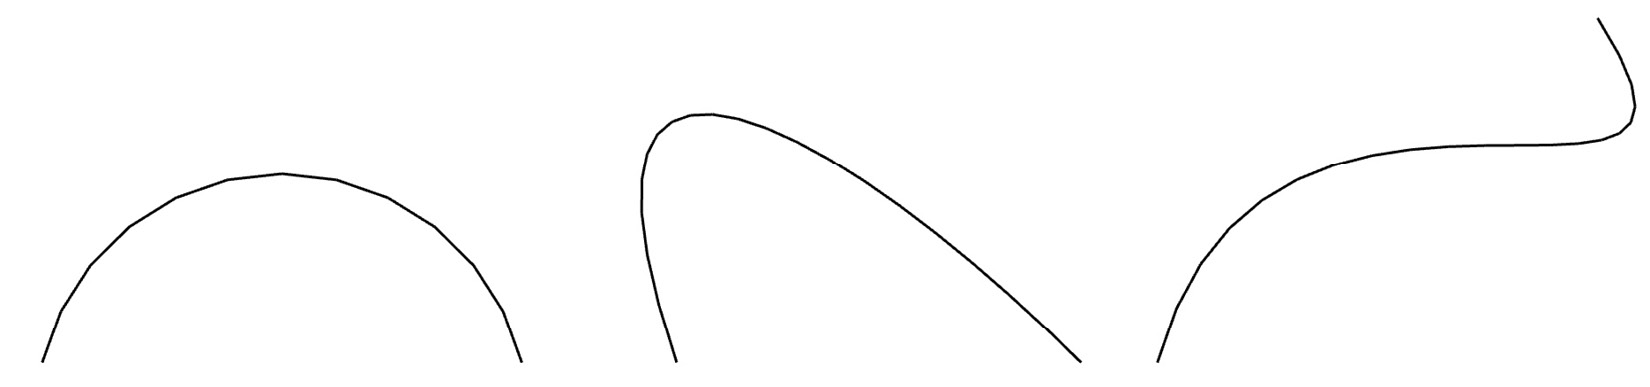
Figure 13.5 – The curve on the left is a standard arc, while the two on the right are Bezier curves
Having the ability to control the curve of a line like this opens up SketchUp models for creating new shapes and geometry that would be very difficult to achieve with just the standard Line or Arc command (or even Freehand).
Now that we have a basic understanding of the idea behind creating curves in this manner, let’s dive into what this extension does.
Bezier Curve Tool overview
It is completely possible to create almost any geometry using the native commands in SketchUp. Possible, but not necessarily enjoyable. You can create lines, distort them, weld them, and create whatever curves you want. However, drawing them initially is much easier if you have the right tool. In the case of drawing arcs, Bezier Curve Tool is the right tool.
As an example, let’s say that I have a simple kidney-shaped swimming pool that I want to model. Step one is drawing the footprint – a top-down outline of a shape that looks something like this:
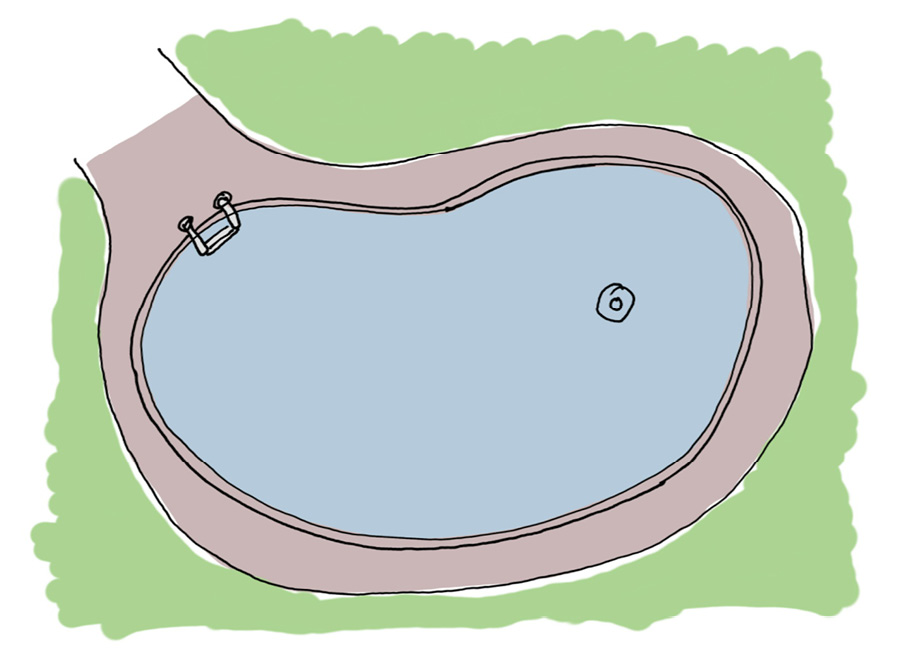
Figure 13.6 – The swimming pool that I want to create
Now, let’s look at two different ways to create this shape. First, I can use a combination of 2-point Arcs and edges drawn with the Line command to trace around this shape. In the end, I wind up with something like this (endpoints have been turned on so that you can see how many pieces were needed to create this shape):
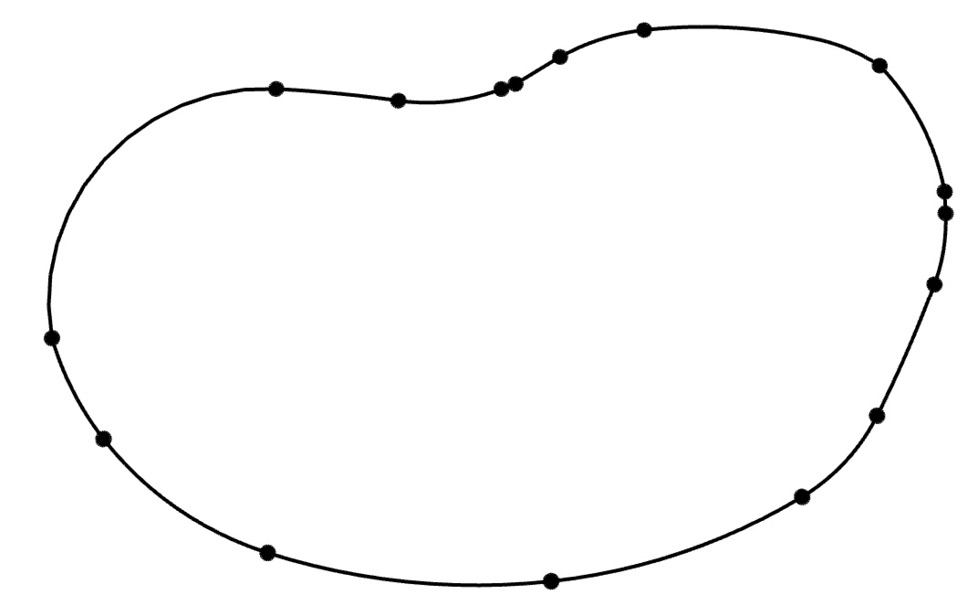
Figure 13.7 – Pool drawn with native SketchUp tools
Now, using Bezier Curve Tool, I can draw the same outline with just a few lines. Here is the same outline (with endpoints turned on again). You can see that far fewer steps were needed to create the footprint of the pool:
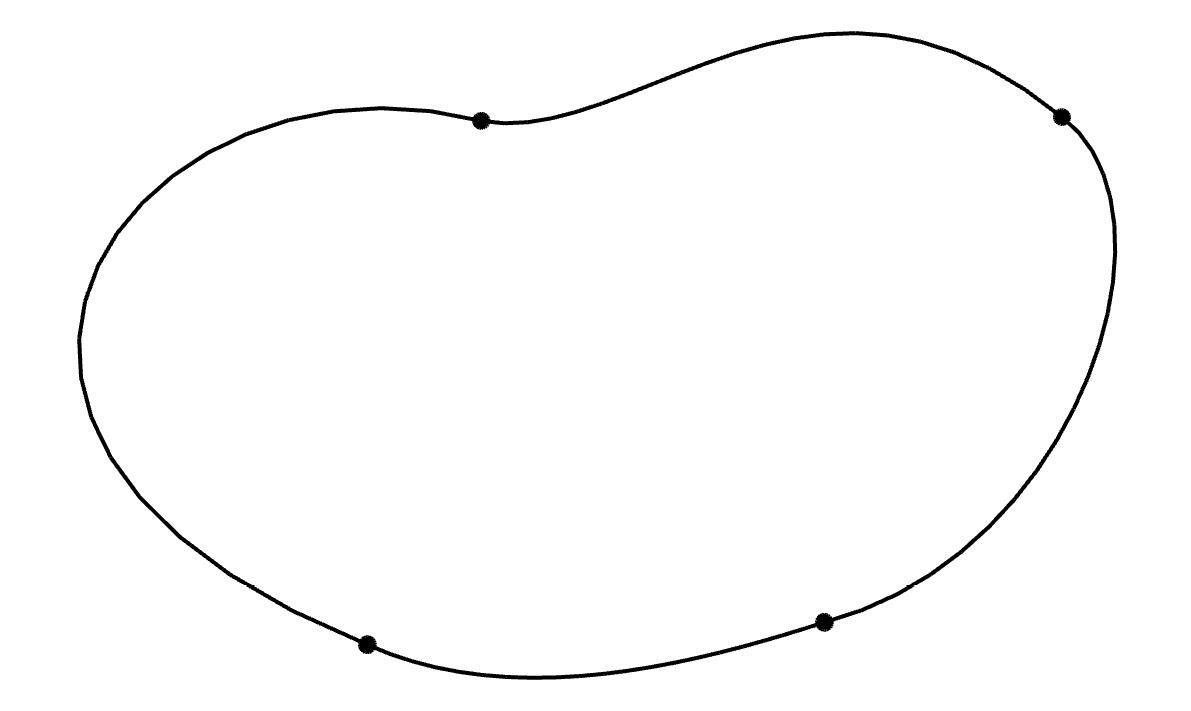
Figure 13.8 – Pool drawn using the Bezier Curve Tool extension
Bezier Curve Tool allows you to easily draw curving lines with much more control than you have with native tools, allowing you to create smoother geometry than can be achieved using only arcs.
Installing Bezier Curve Tool
Now that you understand the advantage of this extension, let’s get it installed! As with Selection Toys, you should be able to install this extension by finding it in Extension Warehouse and clicking the Install button. Note that if you search Extension Warehouse for Bezier Curve, several extensions will come up. For this walkthrough, we will be using the extension called Bezier Curve Tool from the SketchUp team.
Here is a direct link to the page on Extension Warehouse: https://extensions.sketchup.com/extension/8b58920d-0923-42f8-9c72-e09f2bba125e/bezier-curve-tool.
Once Bezier Curve Tool has been installed, it can be found in the Draw menu. This particular extension does not have a toolbar or button that can be added to a custom toolbar, though you can assign a shortcut key to it.
Using Bezier Curve Tool
Let’s try using Bezier Curve Tool to draw a couple of curves in the practice file. Open the Taking SketchUp Pro to the Next Level – Chapter 13.skp file and select the Bezier Curve Tool scene. This scene has three curves at the top that we will recreate. We will start by recreating the curve on the left:
- Choose Bezier Curves from the Draw menu.
This first curve will be drawn with four clicks. The first two will define the beginning and end of the line. The third and fourth clicks will pull the line out to define the arc. These clicks will be at these points:
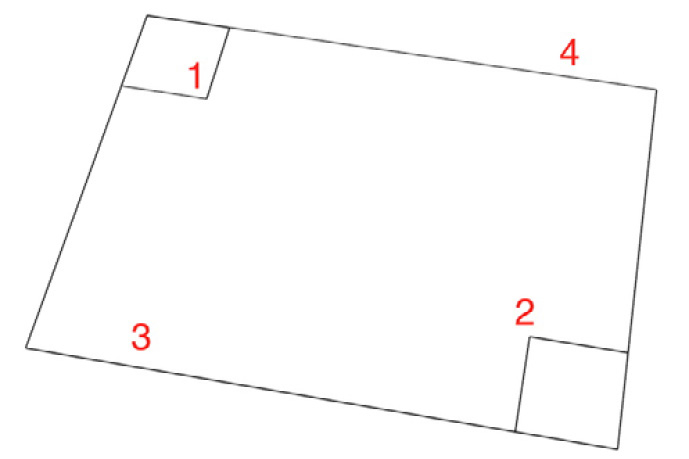
Figure 13.9 – Points used to recreate the first Bezier curve
- Click point 1 (the inside corner of the top-left square) and then point 2 (the inside corner of the lower-right square).
This will establish the start and end of the curve. Now, use two more clicks to set the curve of the line.
- Click point 3 (the inferenced edge of the rectangle down the green axis from point 1) and then point 4 (the inferenced edge of the rectangle up the green axis from point 2).
As you move the cursor to define points 3 and 4, notice how the curve changes and stretches to have the line follow. Upon selecting the fourth point, the curve will be created:
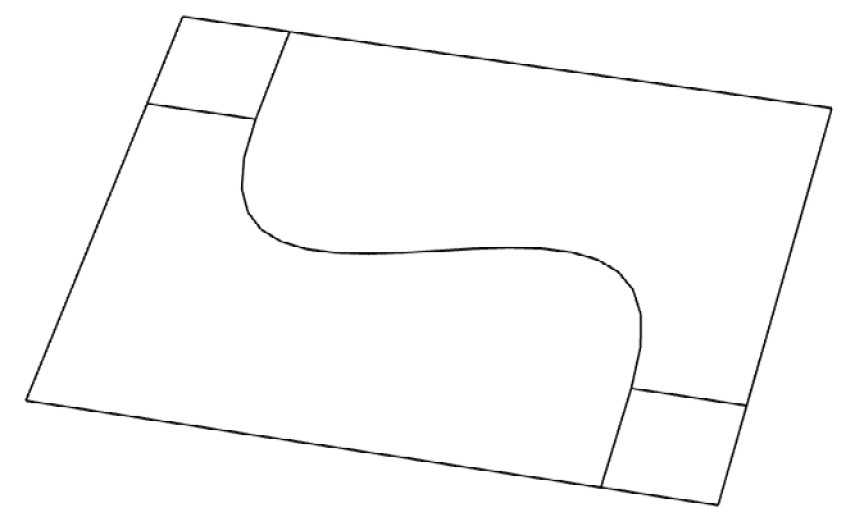
Figure 13.10 – Completed first curve
Let’s do the same to create the next two curves. For the second curve, we will click four times, but at different locations:
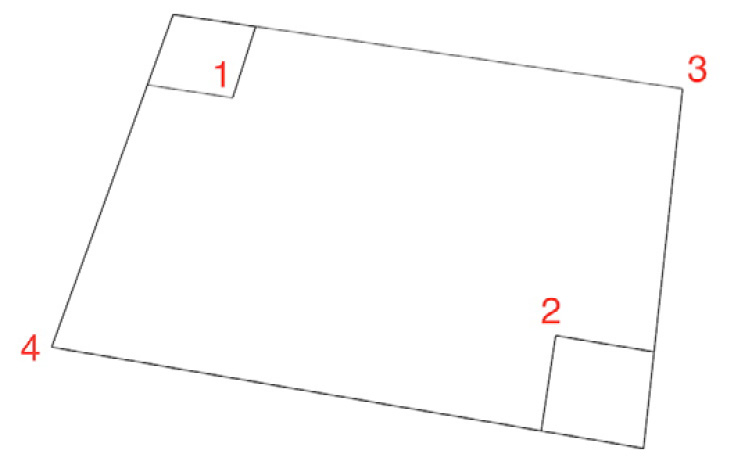
Figure 13.11 - Points used to recreate the second Bezier curve
- Click points 1 and 2 the same way you did in the first example.
- For point 3, click the top-right corner of the rectangle.
- For point 4, click on the lower-left corner of the rectangle.
By moving the last two points, the resulting curve is significantly different:
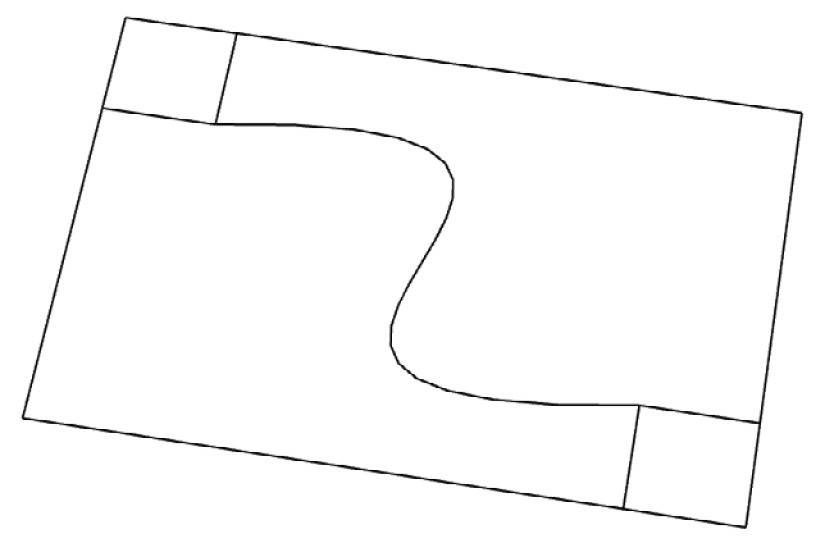
Figure 13.12 – Completed second curve
The past two curves have been created using two additional clicks. Bezier Curve Tool allows you to specify additional points, giving you even more control over the final curve. Let’s tell the extension that we want more control points and create the final example.
- Click Bezier Curve from the Draw menu and immediately type 5 and press Enter.
Notice that the Degree field in the lower left changes from a 3 to a 5. Bumping this number will increase the number of control points that will be used to create the curve. Initially, we were defining three (the original line, plus two control points). This time, we will use five (the line, plus four control points). We will be clicking at these points:
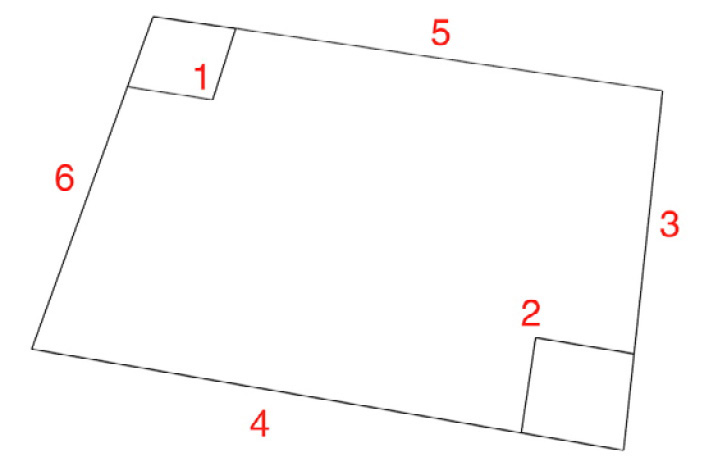
Figure 13.13 – The final curve will be created using these points
- Start by clicking the same points for 1 and 2.
- For point 3, inference the middle of the right-hand side of the rectangle.
- For point 4, inference the middle of the bottom of the rectangle.
- For point 5, inference the middle of the top of the rectangle.
- For point 6, inference the middle of the left-hand side of the rectangle.
Despite some crazy geometry while you were placing the control points, you should end up with a curve that looks like this:
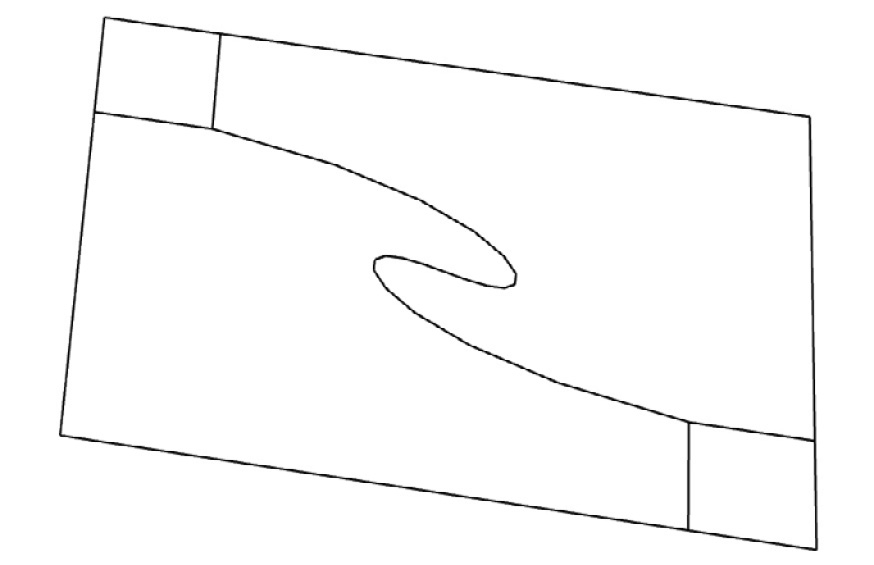
Figure 13.14 – Final curve
3D Bezier Curves
In the examples in this chapter, we drew curves that were constrained to a 2D surface. This was a “crawl before you walk” mentality since this section was only supposed to serve as an introduction to this extension. Do note that, using Bezier Curve Tool, you can draw curves that exist in 3D space the same way you can in 2D by choosing points that are at different heights. Remember, this was just an introduction. If you play with this extension, you will quickly see how much more can be done than what we were able to cover here!
Bezier Curve Tool allows you to create smooth arcing lines that can be pulled and stretched in any direction you like. This extension can become an essential piece of many workflows once you get the hang of using it and is a “must have” for many users.
Up next, let’s take a look at an extension that is easy to use and learn and fills a gap in the standard SketchUp toolset.
Curic Mirror from Curic
Some users are quick to point out the lack of a mirror function in the native set of SketchUp tools. There are ways to mirror selected geometry, but not using a command that acts like the mirror commands seen in other drawing software. With the Scale tool, selected geometry can be scaled along any axis to -1 to effectively mirror it. You can use the Flip Along command found in the context menu to quickly flip selected geometry. While these commands do work, they require geometry to be squared up to a specific axis and can only mirror in a single direction.
This is where Curic Mirror comes in. Using Curic Mirror, you can mirror your selection along any geometry in the model. You also have the option to keep or replace the existing geometry, meaning that duplicating half a model is a single step!
Let’s take a look at some specifics of how Curic Mirror can be used in your workflow.
Curic Mirror overview
Curic Mirror is the epitome of a simple extension. Once installed, a single button can be pressed to activate the tool (just like the native SketchUp commands). All you have to do to use the command is select the geometry you want to mirror (faces, edges, groups, components… really anything in the model) and click on the Curic Mirror button. The extension will allow you to move your cursor over any surface in your model. As you do, you will see a preview of what your selected geometry would look like if you selected that surface to mirror across. Clicking on a face will apply the mirror and you are done!
Much like a native SketchUp command, the base functionality is only the beginning! Just like native modification commands, Curic Mirror has a few modifier keys that can be used. If you press Ctrl (on Windows) or Option (on macOS), a little + will appear next to the cursor. Now, when you select your mirroring face, Curic Mirror will copy the selected geometry when it mirrors! This is a great tool to have when you are modeling symmetric geometry. Rather than modeling both halves of an item, you can model one half as a component, and use Curic Mirror to finish the model:
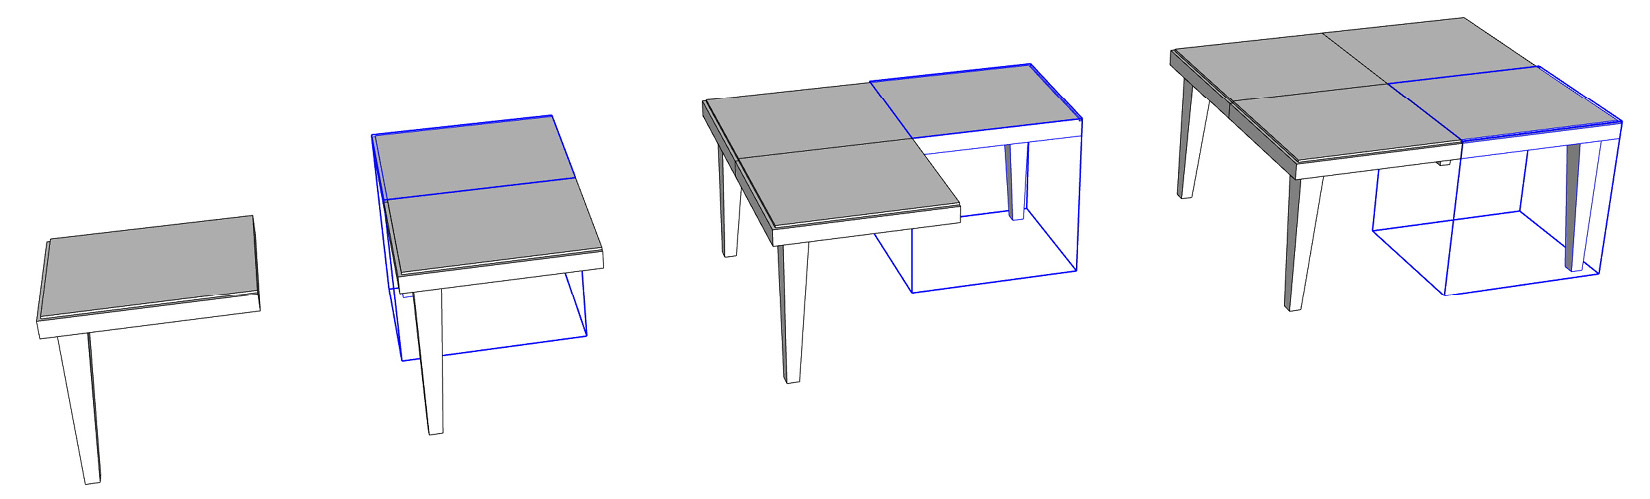
Figure 13.15 – A quarter of this table was modeled as a component and then mirrored three times
Additionally, Curic can mirror along the axes if you simply tap the arrow key associated with the axis color:
- Right Arrow to mirror along the red axis
- Left Arrow to mirror along the green axis
- Up Arrow to mirror along the blue axis
This is a great feature, especially if the model you are working on is aligned with the axis. It means that with a quick tap, you have mirrored your geometry. In the case that you have modeled geometry that had been rotated away from the axis, you can tap Alt (Windows) or Command (macOS) to toggle between using the world axis or the selected component or group axis to mirror along:
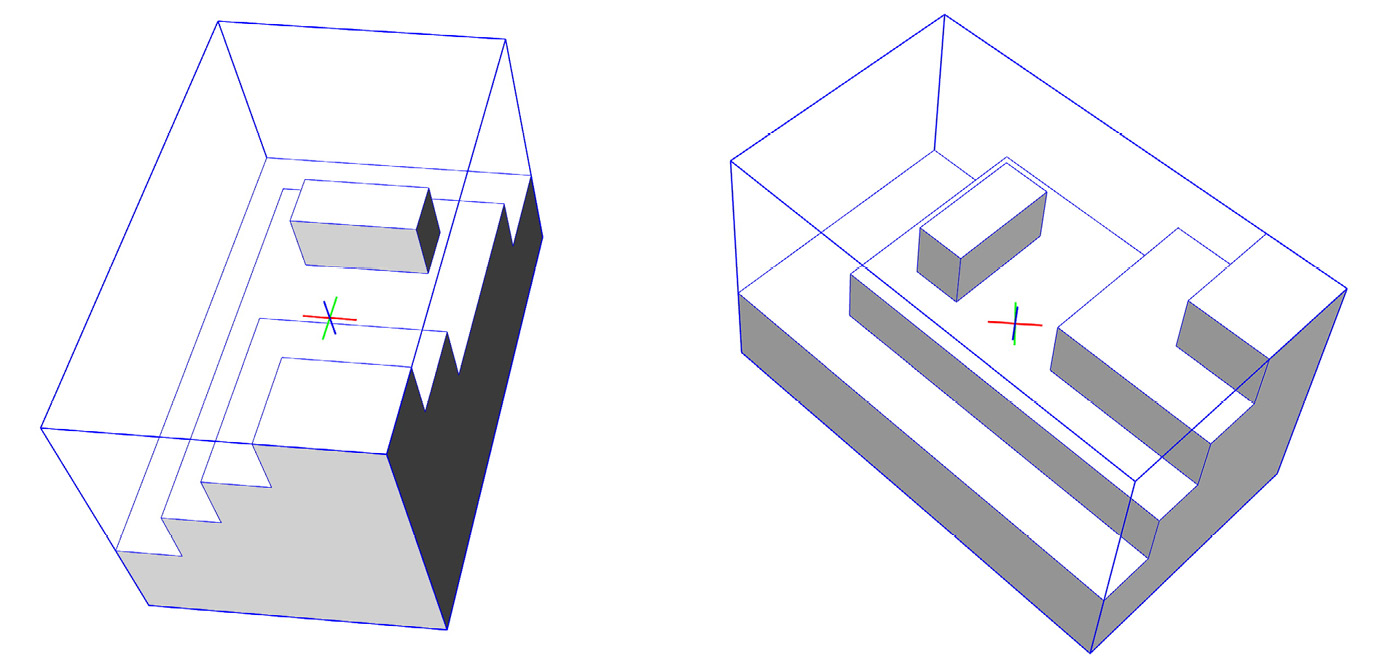
Figure 13.16 – The group on the left aligns with the world axis, while the group on the right has a rotated axis
Having the ability to mirror across either the work axis or the object axis helps address the issue of using SketchUp native tools to mirror. Unlike using Flip Along, which will only use the world axis, with Curic Mirror, you get to choose which axes you would like to use.
Unlike the previous extensions in this chapter, Curic Mirror is one that you can learn and start using to its fullest potential with just a few exercises. Before that though, we will need to get it installed!
Installing Curic Mirror
In Extension Warehouse, you can search for curic mirror to find the extension. At the time of writing this book, only a single extension shows up when you search for that term. Go ahead and get it installed by searching for it or by going to https://extensions.sketchup.com/extension/72c3aa60-da8e-4a56-9f70-ab4bc706060c/curic-mirror.
Using Curic Mirror
To see how this extension operates, let’s jump to the next scene and mirror some geometry! Open the Taking SketchUp Pro to the Next Level – Chapter 13.skp file and click on the Curic Mirror scene.
This example contains four different sets of geometry. The two chunks of geometry on the left are made of loose geometry, while the two on the right are both groups. We will see how Curic Mirror copies along a face or the axes, as well as try out copying versus just mirroring selected geometry. Let’s start by simply mirroring some geometry along a face:
- With the Select tool, highlight the geometry in the lower right of the screen by either dragging a select window or triple-clicking to highlight all connected geometry.
- Activate Curic Mirror by clicking the Tools menu, then Curic, then Mirror, and then Mirror Tool. Alternatively, you can click the Curic Mirror icon (this icon should be on your screen immediately after installing Curic Mirror).
- Hover your cursor over the blue face.
Hovering your mouse over a face will show a preview of what the mirror will look like. You can move your mouse around to different faces to get a preview of different mirroring options. Note that the mirroring face does not even have to be a part of the selected geometry (you can mirror across any visible face anywhere in the model):
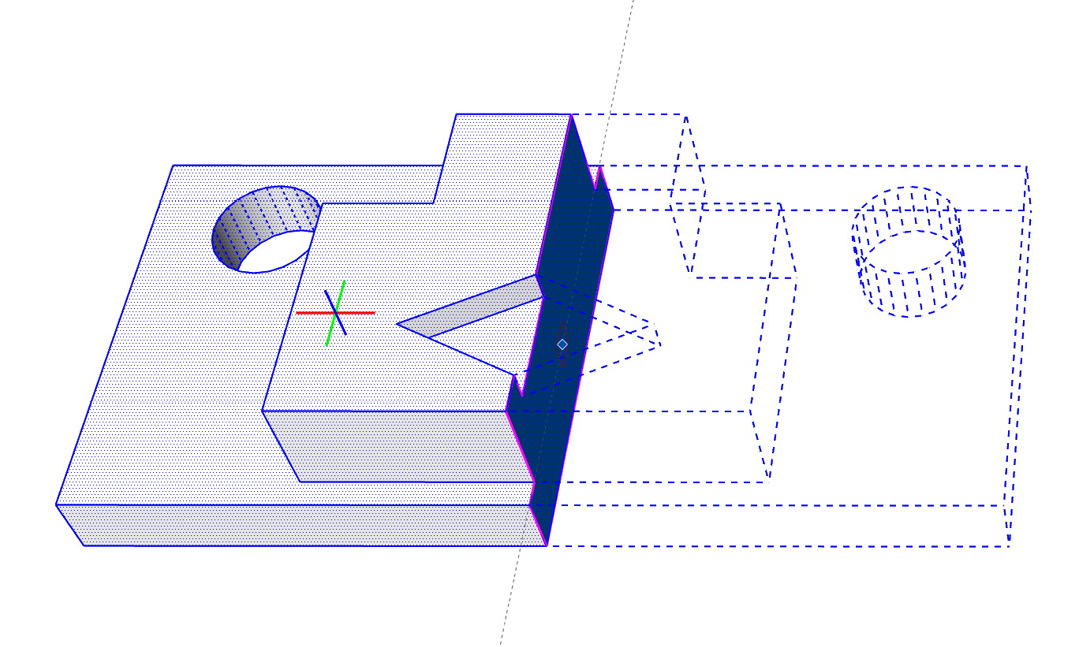
Figure 13.17 – Curic Mirror previewing the final mirror
- Click on the blue face.
Notice that the geometry has moved from its original position to where the preview lines were. This is how Curic Mirror will affect geometry, by default.
Let’s move to another section and this time, copy the selected geometry.
- Use Select to select the geometry with the green face.
- Activate Curic Mirror.
- Hover over the green face.
Before clicking on the green face to create mirrored geometry, tap the modifier key to toggle copy on (the modifier key is displayed in the status bar at the bottom of the screen). Tapping the correct modifier will display a small + next to your cursor.
- Click on the green face.
This creates a brand new geometry and places it next to the selected geometry. In this case, normal SketchUp rules apply, and the new geometry has been fused with the initial geometry:
Figure 13.18 – Copied and mirrored geometry connected to the original geometry
Next, let’s learn how to mirror geometry along the axes rather than a selected face.
- Use Select to select the group with the yellow face.
- Activate Curic Mirror.
- Tap the Right Arrow key on your keyboard.
Notice that the geometry immediately reverses. There are no confirmations or previews with this functionality, but since you are still in the Curic Mirror command, you are just a keystroke away from putting it back how it was.
- Tap the Right Arrow key again to mirror the group back to where it was.
Since you stay in Curic Mirror until you intentionally leave, it makes it very easy to apply multiple mirrors to selected items or geometry.
- Tap the Right Arrow key, then the Left Arrow key, and then the Up Arrow key.
Now, the group is mirrored along all three axes:
Figure 13.19 – Group mirrored along all three axes
Here, you can see how easy it is to try to mirror geometry and, if everything is not perfect, put the geometry back. This works great when the geometry is aligned with the global axis.
Finally, let’s see what you can do when you are working with a group that has been rotated away from the global axis.
- Use Select to select the group with the red face.
- Activate Curic Mirror.
- Tap the Right Arrow key on your keyboard.
This causes the geometry to mirror along the global red axis. The result kind of looks like it rotated a little way around. While there are some cases where this might generate the desired result, it is more likely that you will want to mirror along the axes of the group or components instead.
- Tap the Right Arrow key again to mirror the group back.
Notice the little red/green/blue axis in the middle of the selected group? You can see that it is oriented to follow the world axis right now:
Figure 13.20 – Angled group mirrored along the world axis
- Tap the Object Axes modifier key listed in the status bar (Alt on Windows or Command on macOS).
Notice that the red/green/blue axes in the middle of the group changes to align with the geometry in the group! Now, if you tap any arrow key, the geometry will mirror along the axes that are inside the group rather than the world axis.
- Tap the Right Arrow key on your keyboard.
The group will mirror in the same manner as the group with the yellow face. This is a great option to have if you ever have to mirror geometry that does not align with the world axis.
With that, you have seen everything that this extension can do for you. Of course, knowing how a tool works and having mastery over the tool are two different things. Fortunately, Curic Mirror is a well-designed extension that will fit into many workflows. If you try using it a few times, I am sure you can pick up how to get the most out of it.
Now, let’s move on to our final extension that is sure to fit into most workflows: adebeo_pushline!
adebeo_pushline from Denis B
The first three extensions we looked at in this chapter served as functions that could be seen as missing from SketchUp. While it is possible to run SketchUp without these (or any) extensions, they help make SketchUp feel more complete when they are added into the mix. The fourth extension that we are going to look at, adebeo_pushline, is one that I would place into a different category.
This extension adds functionality to SketchUp that I, personally, never thought I needed. Once I started using it, however, I immediately saw its value. adebeo_pushline allows you to interact with edges and arcs in the same way that you can use Push/Pull to interact with faces.
It seems like a great addition to SketchUp’s basic tools, right? Let’s dive a little deeper and take a look at how this extension functions.
adebeo_pushline overview
In general, if you have a line in SketchUp and you want to make it into a plane, there are two approaches. The first is to use the Line tool to add lines to the model and “draw” the sides of the face you want:

Figure 13.21 – Changing an edge into a face with three additional edges
This works great until you want to turn something such as a curve into a surface. With a curve, it is not as simple as drawing lines perpendicular to the initial edge. In a case like this, I would (before adebeo_pushline) add edges with the Line tool to make the arc into a face, then use Push/Pull to pull it up, and then use Erase to get rid of the extra geometry:
Figure 13.22 – Six steps to pull a 2D arc into a curved surface
Now, it is not hard to see these steps as fairly simple. If you had a good set of shortcuts and were focused, you are probably looking at 10 seconds or so to perform these steps. However, we are on a quest to take our SketchUp skills to the next level! We are not OK with spending 10 seconds performing six steps that could be done in just two clicks!
With adebeo_pushline, you can simply click on the geometry you want to extrude, then click again where you want it to extrude to! It literally works just like the native Push/Pull tool (with a few notable exceptions):
Figure 13.23 – Pulling a line up with two clicks using adebeo_pushline
With adebeo_pushline, you can specify an exact distance for the extrusion, use the arrow keys to lock to an axis, and use inferencing to help set the extrude length.
As for the exceptions I mentioned, two things are different from using the native Push/Pull tool:
- The first is that adebeo_pushline does not allow you to double-click on an edge to repeat the same extrusion length as the last time.
- The second difference from the native tool is that, with adebeo_pushline, you can preselect as many edges as you want and extrude them all at the same time!
This second difference more or less negates the first. Rather than having to double-click to repeat an extrusion on one face after another, you can just preselect all of the edges you want to extrude, then pull them all up into 3D at the same time:
Figure 13.24 – Pulling multiple edges up at the same time
So, no, adebeo_pushline does not feel like it is completing the toolset offered by the native tools – it does feel like something extra. This does not, however, take away from the fact that it allows me to generate geometry quicker than I could without it, which is key to speeding up my drawing process and taking my SketchUp skills to the next level!
Installing adebeo_pushline
Like the previous extensions, adebeo_pushline can be directly installed in SketchUp from Extension Warehouse. To find it, you can search for pushline (at the time of writing, it is the only search result) or you can use the following link: https://extensions.sketchup.com/extension/19789f54-7cc9-4ba1-a20a-3ccc642eae98/adebeo-pushline.
Once installed, you can activate adebeo_pushline through the Extensions menu or by turning on a one-button toolbar.
Using adebeo_pushline
Let’s practice using adebeo_pushline! Much like the previous extension, once you have practiced using it a few times, you will see just how simple it is to use. I would say that the only challenge I have with using adebeo_pushline is remembering to use it when I need to create faces from 2D geometry!
In the example Taking SketchUp Pro to the Next Level – Chapter 13.skp file, we can practice using the extension on a few different sets of geometry. Once we run through a few examples, you should start to see how you may add it to one or more of your workflows:
- Click on the adebeo_pushline scene.
- Start the extension by selecting the Extensions menu, then Adebeo, and then PushLine. Alternatively, you can click the icon on the Adebeo toolbar.
- Click on the line on the left and move your cursor around.
Notice that the line pulls up to follow your cursor, wherever it moves. This is great if your goal is to stretch a line into a surface from one point to another. In an example like this, you may want to simply pull it vertically into a face. If we want to pull the line, which is currently flat on the ground, up into a vertical face, we will want to constrain it to the vertical axis.
- Press the Up Arrow key on your keyboard.
Notice that the edges of the preview have turned blue, and as you move the cursor, the line only pulls straight up. Let’s make a vertical face with this line, then pull out a few more.
- Click to finish pulling the line up a little way above the ground so that it looks similar to the following:
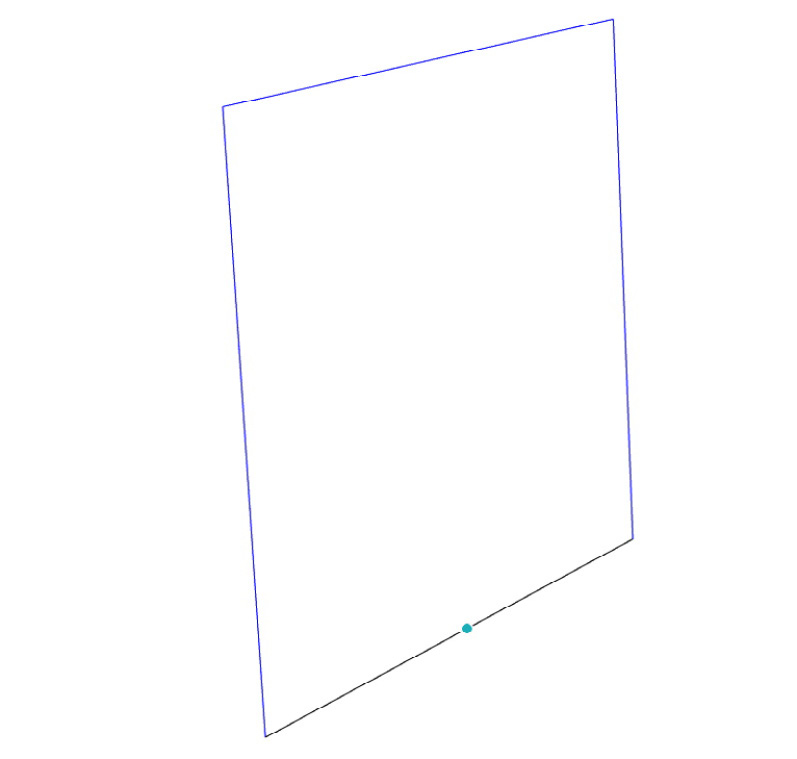
Figure 13.25 – Pulling a line vertically into a face
Inference locking can work in other axes as well. Let’s try pulling the left edge of the new plane along the red axis.
- Click on the left edge of the plane, then press the Right Arrow key, and move the edge to the left and click.
- Click on the right edge of the original face, then press the Left Arrow key, and move the edge to the right and click.
You should end up with a series of faces that look like this:
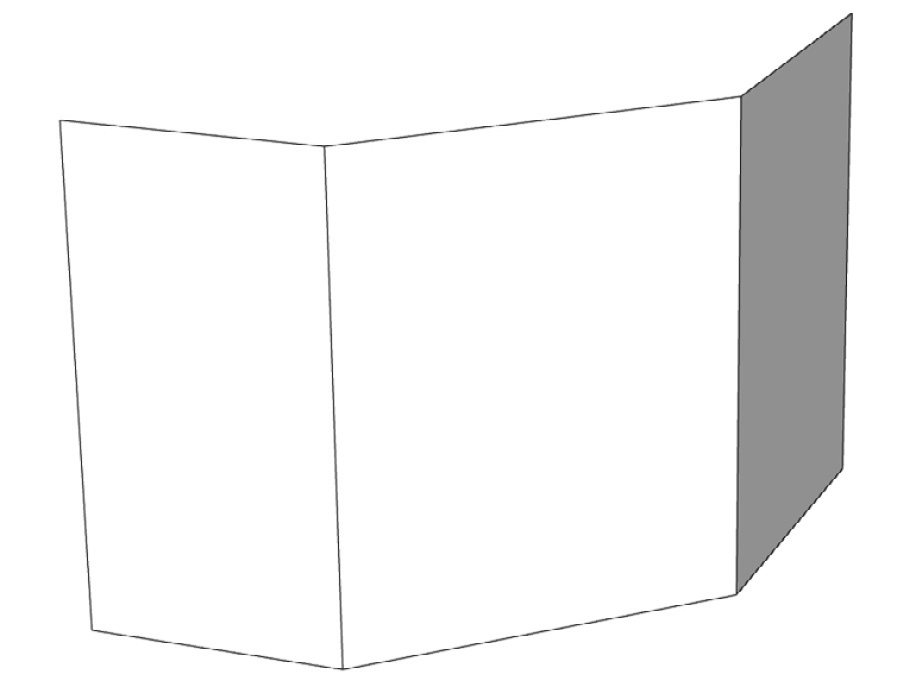
Figure 13.26 – Faces created from a single line with adebeo_pushline
So, that was pretty cool and a definite time saver, but let’s take a look at how we can create more complex geometry.
- Click on the leftmost edge of the curved line and pull it up (use the Up Arrow if you need to).
Notice that only a section of the curved line pulled up. This curve is made up of multiple arcs. Clicking on one curve to start pulling it up will require you to repeat the action for each section of the curve. If you wish to pull the entire curve up into a surface, you can weld the edges before you start.
- Undo the previous step (either using Replace with Ctrl/Command + Z or the Undo command in the Edit menu).
- Use Select to highlight all of the pieces of the curve.
- Right-click and choose Weld Edges from the context menu.
- Use adebeo_pushline to pull all of the connected edges up vertically:
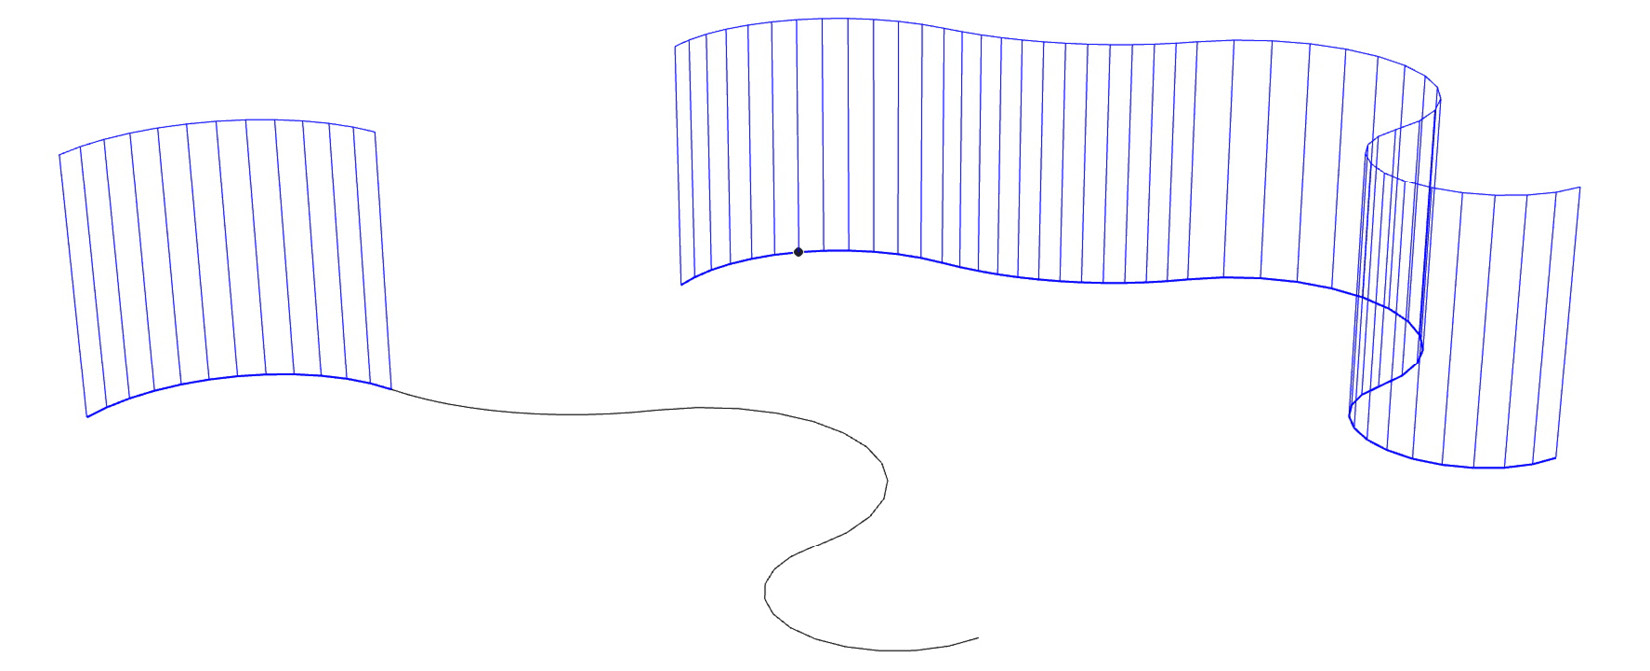
Figure 13.27– Pulling a single arc versus an entire curve
Welding edges is a great way to simplify pulling edges into surfaces, but it is not always the ideal solution. In Figure 13.27 in the example on the right, let’s say we want to pull out the top, left, and right edges that surround the “door” shape. If were to weld them into a single curve, we could pull them all out in a single step, but the result would be a weird, smoothed geometry that would not work when the faces meet at a right angle. Instead, adebeo_pushline allows us to preselect the geometry we want to pull out.
- Use Select to select the left, right, and top edges that create the door shape from the box on the right.
- Use adebeo_pushline to pull the edges out to the right (use the Left Arrow key if you want to lock to the axis). You should get something like this:
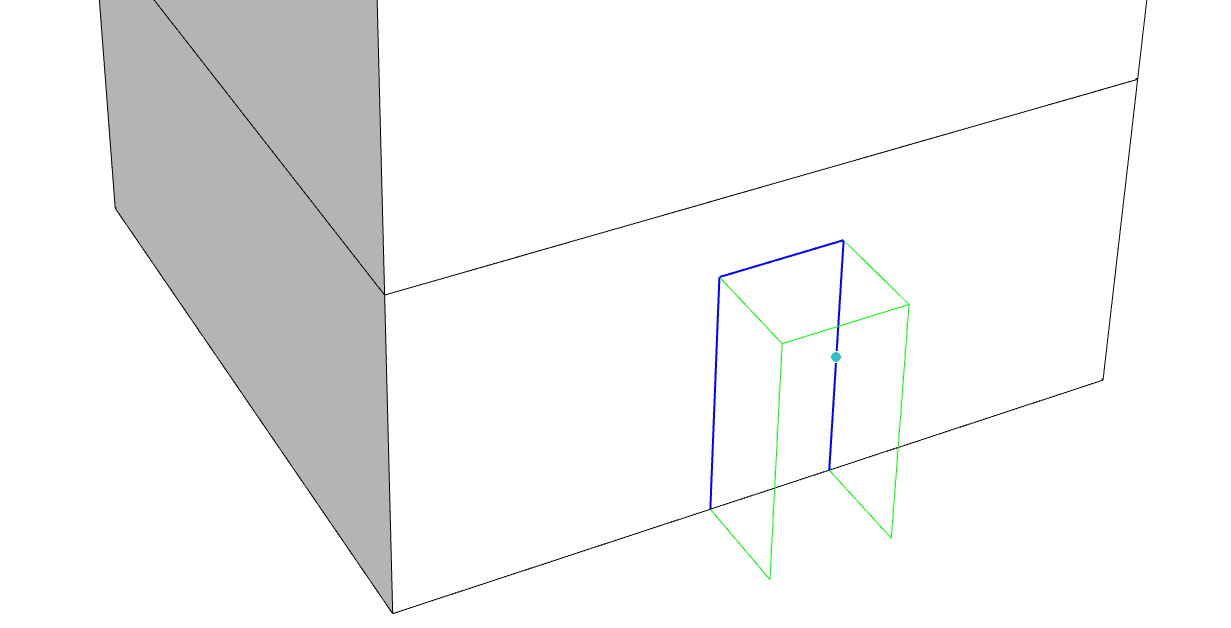
Figure 13.28 – Three preselected edges being pulled together
Preselecting geometry and welding are great tools to use alongside this extension, but there are some cases where you just have to perform multiple actions. For example, let’s say that we want to pull that line above the door out to create a horizontal face that wraps around the building (maybe it will end up being an awning). Because this requires edges to be pulled in different directions, you cannot weld or preselect multiple edges to pull out together. In this case, you would have to pull out one side, and then the other:
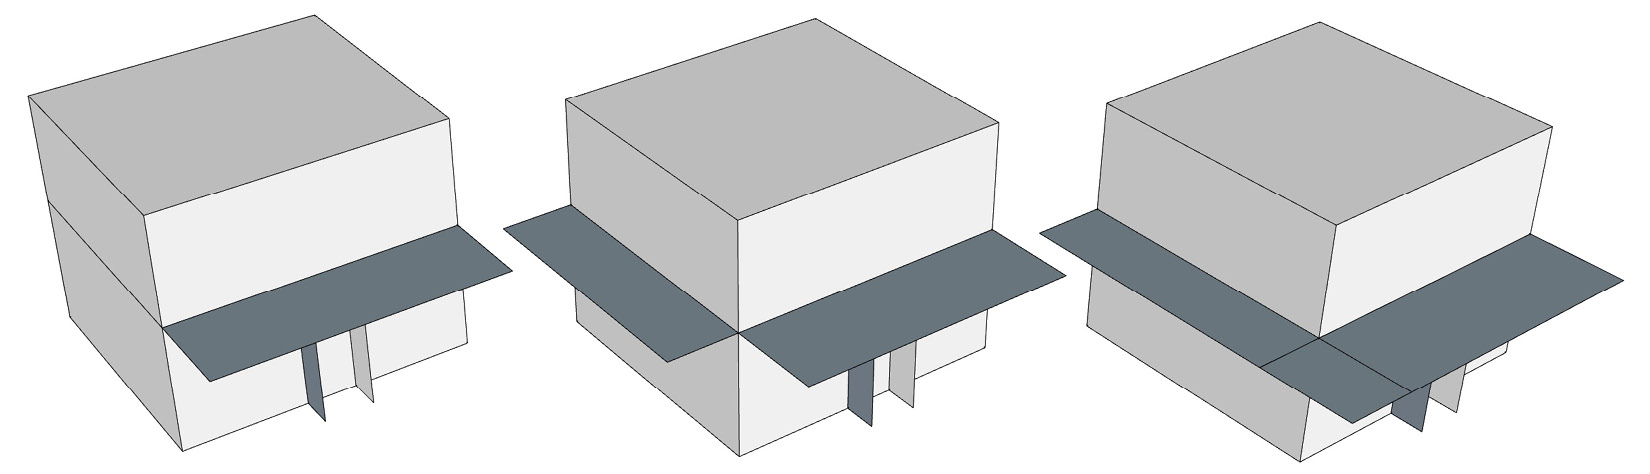
Figure 13.29 – To create this awning geometry, adebeo_pushline would have to be run three times
There may be cases where you can pull geometry out together and preselecting will be helpful, but because adebeo_pushline only allows you to move in one direction at a time, there will always be cases like this where multiple steps will be necessary.
2D Is Just the Start
I do want to point out that the geometry we are creating in this final example should be seen as the starting point. In general, it is not a good idea to leave 2D faces in a final model. For this reason, adebeo_pushline is a great extension to use in conceptual modeling or to try out ideas in a 3D “sketch.” Of course, you can always use it to create preliminary geometry as we did with the door and awning, then come back afterward and use a command such as Push/Pull to add depth to the surfaces.
That was a pretty solid run-through of adebeo_pushline. Once you have used it a few times and are thinking about things such as how you should select geometry to pull into faces, you can see how it can be a real time saver.
Now that we have run through four of the (in my opinion) best free, general-purpose extensions that anyone could use, let’s take a quick look at some of the other amazing extensions that are out there.
Exploring additional extensions
The previous sections of this chapter focused on extensions that most, if not all, SketchUp users would benefit from using. In this last section, I wanted to shine the spotlight on a few more extensions that I think are impressive. This is not an exhaustive list, as there are more extensions out there that do work great, but these are extensions that I have tried and can say are excellent.
There are a couple of things about these extensions that set them apart from the previously mentioned extensions. First, not every extension listed in this section will have a place in everyone’s workflow. If any of the extensions here are of interest to you, I recommend checking them out and, where possible, trialing them. This brings me to the second difference; most of the extensions mentioned in this section do cost some money. Some can be purchased outright, while others require a subscription to function. All I can say is that if their capabilities add to your SketchUp modeling process, they are all well worth the money that they cost.
The goal here is to provide a brief overview of the extensions and the developer and license types and to let you know where you can get them. Wherever possible, I will share websites where you can learn more.
A Note About the Prices
While I would love to quote the prices of these extensions, I do not want to publish numbers that I cannot control and may change in the future. Prices often change over time and many developers will offer discounts or bundles of their software. Instead, I will let you know the license type and recommend that you follow the links listed to find the current price.
With that, let’s take a look at some more extensions!
Solid Inspector from Thomthom
Solid Inspector (or Solid Inspector2) is an extension from the developer Thomthom. This is a quick and easy extension that can be run on a group or component to identify whether it is a solid or not. If it is not a solid, Solid Inspector will tell you why it is not a solid. Additionally, it will, in some cases, offer to fix the problem and turn your group or components into a solid. If it cannot fix the problem (in some cases, the issues that prevent geometry from being solid are too complex for software to solve), it will highlight the issue so that it is easier for you to find and repair it manually.
This is a great extension for anyone doing their best to model solid geometry. While solid geometry is not a requirement in SketchUp, there are more than a few experienced modelers who will argue the benefits of keeping everything solid.
Here are some details about the extension:
- Developer: Thomthom
- License: Free
- Extension Warehouse page: https://extensions.sketchup.com/extension/aad4e5d9-7115-4cac-9b75-750ed0902732/solid-inspector
- Developer website: https://evilsoftwareempire.com/
If you do any 3D printing, then I would call this extension a must-have!
FredoScale from Fredo6
FredoScale is an extension from developer Fredo6 that will allow you to distort SketchUp geometry as if it was made of rubber. FredoScale is a suite of commands that will allow you to do things such as bend, twist, shear, or scale selected geometry. While you do have access to the Scale tool in the native set of tools, FredoScale gives you additional control and the ability to scale portions of selected geometry, rather than the entire selection, uniformly.
FredoScale is a great extension for anyone who needs to create geometry that is made up of distorted or bent shapes.
Here are some details about the extension:
- Developer: Fredo6
- License: Perpetual license (3 seats)
- SketchUcation PluginStore page: https://sketchucation.com/plugin/1169-fredoscale
- List of all Fredo6 extensions: https://sketchucation.com/pluginstore?pauthor=fredo6
If the Scale and Follow Me commands are not getting you the level of bending or sweeping geometry you need, you should probably check out FredoScale.
Artisan from mind.sight.studio
Speaking of smooth geometry, Artisan from mind.sight.studio is a toolset that allows you to create organic geometry from within SketchUp. Artisan transforms SketchUp into an organic modeling software with tools for subdividing and smoothing geometry. With this extension, you can create smooth geometry such as terrain, plants, soft furniture, or even character or animal models!
This is an amazing set of tools that will give you a whole new set of modeling abilities.
Here are some details about the extension:
- Developer: mind.sight.studio
- License: Permanent license (single seat)
- Artisan website: https://artisan4sketchup.com/
- Developer website: https://mindsightstudios.com/
If you have seen other modeling tools that brag about organic modeling or digital sculpting and wanted to see what they were like, give Artisan a try!
Skatter from Lindale
Skatter is an amazing tool from Lindale that allows you to add things such as vegetation or hair to your model. Skatter has some great tools for literally scattering items anywhere in your model you like. While the primary use of this extension is to spread vegetation around the model (Skatter comes with a library of grass, shrubbery, or even a forest full of trees), it can be used to “sprinkle” any components throughout your model. There are even tools that allow you to randomize the components as they are placed so that they don’t look like a single model being repeated over and over.
Often, if you were to create a model full of vegetation, the goal would be to render it. Adding a full landscape of high-polygon, render-ready vegetation models can cause SketchUp to slow down or even lock up. Skatter provides the option to place special “render-only” components through the model that can be seen as low-polygon representations of the final rendered geometry. Skatter then sends the detailed geometry to your rendering engine in the place of the low-poly representation.
Here are some details about the extension:
- Developer: Lindale
- License: Permanent license (single seat) or subscription (single seat or floating seat)
- Website: https://lindale.io/skatter
- Developer website: https://lindale.io/
If you are someone who creates landscape models and does any level of rendering, you need to get a copy of Skatter. Quite frankly, it is a tool that anyone who is modeling any level of the landscape at a professional level must have in their toolbox.
Medeek Wall from Medeek
Medeek Wall is an extension from developer Medeek that is part of a larger set of extensions that will allow you to model and frame a structure inside SketchUp. Medeek Wall allows you to quickly generate framing for walls, including framing for openings (doors and windows), shear wall elements, columns, and blocking for things such as stairs. Medeek Wall even allows you to add electrical elements and generate material lists.
Here are some details about the extension:
- Developer: Medeek
- License: Permanent license or subscription
- Website: http://design.medeek.com/resources/medeekwallplugin.pl
- Developer website: http://design.medeek.com/
Medeek Wall is a powerful extension that will be of immediate value to anyone who is professionally designing or framing conventional structures. If this is you, I recommend trying out Medeek Wall and the rest of the Medeek extensions.
Architextures from Architextures
Architextures is an online repository of editable seamless textures. With the Architextures extension for SketchUp, you gain the ability to customize and apply them directly from within SketchUp. Before Architextures, I would have said that the only way to get really good-looking custom materials into your SketchUp model would be to take your own pictures and import them into your model. With Architextures, you can create perfect photo-realistic materials without ever taking a single picture!
Here are some details about the extension:
- Developer: Architextures
- License: Monthly or annual subscription
- Extension Warehouse page: https://extensions.sketchup.com/extension/1a0e0f80-7186-48da-8dd4-f6337dac0873/architextures-for-sketch-up
- Developer website: https://architextures.org/
Architextures is perfect for anyone creating a model with realistic-looking textures. If you do any level of interior design or even architecture modeling, Architextures is worth taking a look at.
Eneroth Auto Weld from Eneroth3
Eneroth Auto Weld from Eneroth3 allows you to select geometry and weld edges together where appropriate. Rather than having to precisely select the edges that need welding before running the native Weld command, Eneroth Auto Weld will find the edges that are appropriate to weld together and do it for you. Additionally, when installed, Eneroth Auto Weld will run automatically when Follow Me is run and will attempt to replace welded edge with true arcs or circles, where possible (as opposed to the generic curves created by the native weld).
Here are some details about the extension:
- Developer: Eneroth3
- License: Permanent license
- Extension Warehouse page: https://extensions.sketchup.com/extension/16cd999d-050e-4910-b0a4-699f83decd75/eneroth-auto-weld
- List of developer extensions: https://extensions.sketchup.com/user/extensions/1438951607944306779129789/Eneroth3
This is a simple yet powerful extension to have installed if you model curves or use Follow Me regularly. This is an extension that I wanted to dive into with a step-by-step walkthrough, but as it is a paid extension, I had to settle for telling you about it. If you find yourself regularly selecting and welding or smoothing geometry, Eneroth Auto Weld may well be worth the purchase price.
Transmutr from Lindale
Transmutr from Lindale is an importer of sorts. With Transmutr, rather than importing a file with 3D geometry and getting whatever the file gives you, you can finetune the imported geometry before it is dropped into SketchUp. This means that you can do things such as controlling the number of polygons in a model or converting materials as they come in with imported files. This can be a huge time and energy saver if you work with 3D geometry files regularly.
Here are some details about the extension:
- Developer: Lindale
- License: Permanent license (single seat) or subscription (single seat or floating seat)
- Website: https://lindale.io/transmutr
- Developer website: https://lindale.io/
Transmutr is an extension I would recommend anyone who imports files to check out. If you work with .fbx, .obj, .3ds, .dae, or .stl files and ever had issues with crazy geometry or materials making the imports cause problems in SketchUp, you should give Transmutr a try.
Vertex Tools from Thomthom
Vertex Tools from Thomthom turns SketchUp into a whole model modeling software. With Vertex Tools, you end up not editing edges and faces, but the vertices that define them! This method of modeling allows you to create and manipulate geometry in a way that can be subdivided (smoothed) systematically. It also allows you to stretch and shape geometry, which is limited when you are dealing with rigid faces. Vertex Tools is a set of commands that are intended to work alongside Thomthom’s SubD extension but makes for a powerful editing suite all on its own. This process is not for everyone, and you may have workflows created around traditional SketchUp modeling.
Here are some details about the extension:
- Developer: Thomthom
- License: Permanent license
- Extension Warehouse page: https://extensions.sketchup.com/extension/0d87cf96-04c1-4bbc-85d4-066491b69b60/vertex-tools-2
- Developer website: https://evilsoftwareempire.com/
If you are familiar with other modeling methods (subdivision modeling or nurbs), then you may want to check out Vertex Tools.
Profile Builder 3 from mind.sight.studio
The final (I do wish there was room for more) extension on this list is Profile Builder 3 from mind.sight.studio. This is an impressive extension that allows you to create array geometry that will follow your cursor as you draw. Imagine the simplicity of pulling a rectangle into a wall. Now, imagine that wall has drywall and baseboard on the inside and sheathing and siding on the other. Imagine pulling a single line up an incline and having a fully detailed railing show up in that line’s place! This is what Profile Builder 3 does. It creates a library of detailed entities, then uses them to create intricate models in just a few clicks.
I recommend Profile Builder 3 to anyone creating architectural models of any kind, but it can be useful to just about any SketchUp modeler.
Here are some details about the extension:
- Developer: mind.sight.studio
- License: Permanent license (single seat)
- Artisan website: https://profilebuilder4sketchup.com/
- Developer website: https://mindsightstudios.com/
Once again, I want to express that I have only had a chance to look at some of the available extensions, so I urge you to spend time looking into extensions that can help you take your SketchUp workflows to the next level.
Summary
This chapter was a little different from the others. I did not want to sound too much like an infomercial, but I wanted to get a little deeper into the world of extensions so that you might truly grasp how important extensions can be to you and your SketchUp workflow. If you followed along, you should already have four extensions installed (Selection Toys, Bezier Curve Tool, Curic Mirror, and adebeo_pushline) and ready to use. Additionally, you have seen my list of extensions that I think might be worth looking at for one or more of your workflows.
In the next chapter, we’ll look at SketchUp’s companion application, LayOut. There, we will provide an overview and get hands-on with LayOut.