
CHAPTER 19
BUILDING AIR APPLICATIONS WITH FLASH CS4
The Adobe Integrated Runtime (AIR) is to the desktop what the Flash Player is to the browser. You could say that Adobe AIR is a like a plug-in for your operating system, but what it really does is give you the benefits of being connected to the Internet while at the same time being a first-class citizen on the host computer, breaking the constraints of living within the web browser!
So what does the runtime integrate exactly? At the heart of AIR are three big pillars:
- The WebKit Hypertext Markup Language (HTML) rendering engine
- The Flash Player
- SQLite as a database engine
Because of these three core parts, you can build desktop applications with web technologies like JavaScript, HTML, and Flash or Flex. Unlike in Silverlight (which is limited to the web browser and more akin to the Flash Player plug-in), building applications in AIR gives you the ability to add real desktop functionality like file system access and drag-and-drop while using the web technologies you may already be familiar with.
In this chapter we're going to talk about
- Using AIR application programming interfaces (APIs)
- The Windowing API
- The Menu API
- The Network Detection API
- The File System API
- Configuring the application using the
AIR–Application&Installer Settingsdialog - Deploying and packaging the application for distribution
Later in this chapter, we'll show you how to build a working AIR application, but before we do that, it is important that you learn about some of the AIR APIs.
Using AIR APIs
In order to create applications that behave like first-class citizens, AIR provides extra APIs for you to call and use. Before you start building your first application, it may be a good idea to learn about these APIs as you will need them in most of your applications. In this section, we'll cover the Windowing API, Menu API, Network Detection API, and File System API. These are the APIs you'll use in the sample application.
Windowing API
Your first application window is created automatically, but in some cases one window is not enough. In a chat application, for instance, you may want to open up the conversation in a different window or pop up a small window when one of your friends signs on. The AIR Windowing API allows you to do just that.
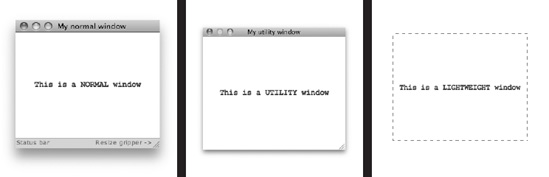
The normal window
The normal window, as shown in Figure 19-1, looks and behaves just like a typical application window on your operating system. It has all the standard features like Close, Minimize, and Maximize buttons, a title bar, and a status bar. The status bar is shown by default. You can remove the status bar by setting the showStatusBar property to false. The title bar in the main application window will display the application name if no other title is specified. You can specify a different title by setting the title property for your window.
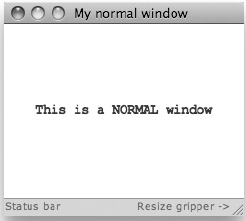
Figure 19-1. A normal window
The utility window
The utility window, as shown in Figure 19-2, almost looks the same as the normal window with the exception of a smaller title bar and no status bar. This type of window is typically used to display notifications—for example, when a friend logs on to an instant messaging server or when you received a new e-mail.
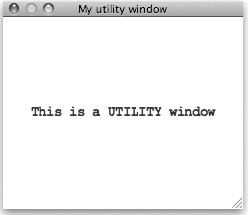
Figure 19-2. The utility window
For both these windows, the resize gripper is optional. When you set the window's-resizable property to false, the resize gripper will not appear. Alternatively, you can set the showGripper property to false, which results in the default resize gripper not being shown. This can be used to create your own resize icon.
The lightweight window
The last option is the lightweight window, as shown in Figure 19-3. This option does not have any system chrome and is perfect for creating your own custom chrome. Because no chrome is available, you must create the standard window functionality, such as closing and resizing, yourself. When creating a new window, you can also set the chrome options that are shown in Figure 19-4.
Figure 19-3. A lightweight window does not have any system chrome.
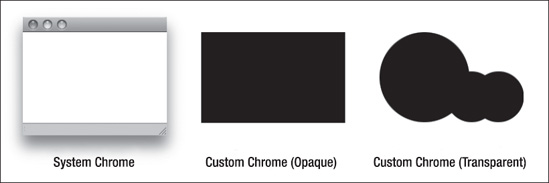
Figure 19-4. Chrome options available in the AIR Windowing API
If you want to create custom chrome, you have two options available to you—Custom Chrome (opaque) and Custom Chrome (transparent). With Custom Chrome (transparent), your window chrome can be a free-form shape. If you want your custom chrome to have an irregular shape (as is the chrome on the far right in Figure 19-4), this option allows you to do that. A click anywhere in the black area shown in Figure 19-4 will register in the application. A click anywhere outside this black area will register on the desktop or the application behind your application.
Creating windows with the NativeWindow class
The NativeWindow class allows you to create new windows with ActionScript. The options for this window are declared in an instance of the NativeWindowInitOptions class, as shown here:
// create an instance of the NativeWindowInitOptions

// and set all the options for your window

var myWindowOptions:NativeWindowInitOptions =

 new NativeWindowInitOptions();

myWindowOptions.transparent = false;

myWindowOptions.systemChrome = NativeWindowSystemChrome.STANDARD;

myWindowOptions.type = NativeWindowType.UTILITY;


// create the actual window

var myWindow:NativeWindow = new NativeWindow(myWindowOptions);

myWindow.title = "My Utility Window";

myWindow.width = 200;

myWindow.height = 100;


// activate and show the new window

myWindow.activate();
In this case we created a utility window that has standard system chrome, is 200 by 100 pixels big, and has the title set to My Utility Window, as shown in Figure 19-5.

Figure 19-5. The result from the NativeWindowInitOptions class code example
Windowing API methods
Since you are working with windows, you obviously also need a number of methods to interact with those windows. Here are a few examples of methods that you might find useful:
NativeWindow.activate() and NativeWindow.close(): Opens and closes the newly created windowNativeWindow.maximize() and NativeWindow.minimize(): Maximizes and minimizes your windowNativeWindow.orderInBackOf(NativeWindow) and NativeWindow.orderInFrontOf (NativeWindow): Sends the window directly in the back or the front of the specified windowNativeWindow.orderToBack() and NativeWindow.orderToFront(): Sends your window behind or in front of any other visible windows
Windowing API events
When your users interact with your application windows, you also need to be able to listen to specific events. These are the event listeners available in the flash.events.Event class:
Event.activate:Dispatches after the window has been activatedEvent.deactivate:Dispatches when the window has been deactivatedEvent.closing:Dispatches immediately before the window is about to be closed (for instance, when your user clicks theClosebutton of your windowEvent.close:Dispatches after the window has been closed
The following event listeners are available in the flash.events.NativeBoundsEvent class:
NativeBoundsEvent.moving:Dispatches immediately before the window is about to be movedNativeBoundsEvent.move:Dispatches after the window has been movedNativeBoundsEvent.resizing:Dispatches immediately before the window is about to be resizedNativeBoundsEvent.resize:Dispatches after the window has been resized
Finally, here are the event listeners in the flash.events.NativeWindowDisplayStateEvent class:
NativeWindowDisplayStateEvent.display_state_changing:Dispatches immediately before the window changes its display state (for instance, from regular view to full-screen mode)NativeWindowDisplayStateEvent.display_state_change:Dispatches after the window's displayState property is changed
Using these events is as simple as adding an event listener to your window. For instance:
myWindow.addEventListener(NativeBoundsEvent.moving, WinMoving);

function WinMoving(evt:Event)

{

    trace("MyWindow is moving");

}
Menu API
Various operating systems have very different menu options. For this reason, you need to add some OS-specific code to make sure that your menus work across all the operating systems supported by AIR. This section will discuss the following types of menus:
- Window menu
- Application menu
- System tray menu
- Dock menu
Window menu
The window menu, shown in Figure 19-6, is always associated with a single window and is always displayed below the title bar. Different windows can also have different menus. The window menu is only available on Windows operating systems, not on OS X systems. You create a window menu by using the following code:
var myMenu:NativeMenu = new NativeMenu();

myWindow.menu = myMenu;
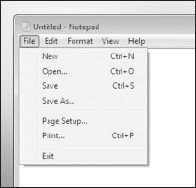
Figure 19-6. Example of a window menu
Application menu
An application menu (see Figure 19-7) applies to the whole application. Application menus are supported on OS X but not on Windows systems. On OS X, the application is always in the global menu bar. To create an application menu, use this code:
var myMenu:NativeMenu = new NativeMenu();

NativeApplication.NativeApplication.menu = myMenu;
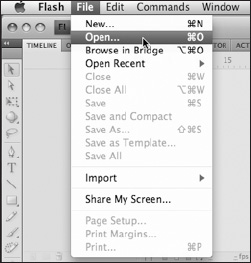
Figure 19-7. Example of an application menu
In most cases your application will have only one global menu. Since your AIR application can run on a variety of Windows, OS X, or Linux operating systems, you need to perform a quick check to see whether window menus or application menus are supported on the system the user is running your application on. The following code should be all you need to do this:
if (NativeApplication.supportsMenu)

{

  // for OSX

  NativeApplication.nativeApplication.menu.addItem(myMenuItem);

}

else if (NativeWindow.supportsMenu)

{

  // for Windows

  var myWindowMenu:NativeMenu = new NativeMenu();

  this.stage.nativeWindow.menu = myWindowMenu;

  myWindowMenu.addItem(myMenuItem);

}
This code snippet will check whether the operating system supports application menus (NativeApplication.supportsMenu) or window menus (NativeWindow.supportMenu) and set up your menu accordingly.
System tray menu
An AIR application can run in the background. On a Windows machine, you can opt to show an icon in the system tray to let the user know that this application is still running. When the user right-clicks a system tray icon, a menu can appear, as shown in Figure 19-8. To add a system tray menu, you use this code:
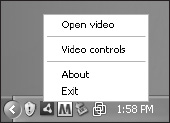
Figure 19-8. Example of a system tray menu
SystemTrayIcon(NativeApplication.nativeApplication.icon).menu = myMenu;
Dock menu
OS X doesn't have a system tray but does have a dock. The Mac operating system allows you to add menus to dock icons. They appear when the user right-clicks the dock icon (see Figure 19-9). To add a menu to the dock icon, use this code:
DockIcon(NativeApplication.nativeApplication.icon).menu = myMenu;
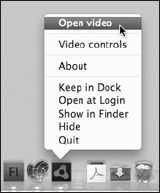
Figure 19-9. Example of a dock menu
Handling menu events
Handling menu events is as easy as listening for a specific event. The select event will be dispatched every time the user clicks one of your menu items. All you have to do is add an event listener to your menu that fires off the correct function as shown in this code:
myWindowMenu.addEventListener(Event.SELECT, menuSelection);


function menuSelection(event:Event):void

{

  var menuItem:NativeMenuItem = event.target as NativeMenuItem;

  trace(menuItem.label + " has been selected");

}
Network Detection API
As AIR applications can run both on- or offline, it may be a good idea to check whether or not a network connection is available. You may also check to see whether a certain service is available or not, such as the Flash Media Server your application uses. When your application does not have access to the network or service, your application can display a message to the user and/or behave differently. Your application can, for instance, have a limited feature set when it is not connected to the network.
There are two ways of detecting whether or not a network and service is available: you can use either a URL Monitor or a SocketMonitor.
URLMonitor
The URLMonitor allows you to check whether or not a specific URL is available. In this code snippet, we set up a URLMonitor that checks for the URL www.adobe.com:
var myMonitor:URLMonitor;

myMonitor = new URLMonitor(new URLRequest('http://www.adobe.com'));
The URL Monitor triggers events that will tell you the availability of the specified URL. Just add an event listener to listen to the StatusEvent.STATUS event. In the following code, we added the event listener that will trigger the statusChange function. After we added the event listener, we also start the monitor by calling myMonitor.start().
myMonitor.addEventListener(StatusEvent.STATUS, statusChange);

myMonitor.start();

function statusChange(e:StatusEvent):void

{

  trace("URLMonitor status change. Current status: "

  + myMonitor.available);

}
SocketMonitor
The Socket Monitor is almost identical to the URL Monitor. The only difference is that instead of specifying a URL to check, you check for a specific server (either by URL or IP address) and a specific network port. The following code will check whether port 1935 on IP address 127.0.0.1 is accepting connections:
var myMonitor:SocketMonitor;

myMonitor = new SocketMonitor('127.0.0.1', 1935);
The SocketMonitor also triggers events in exactly the same way as the URL Monitor. So listening to these events and firing off the correct function is exactly the same as for the URL Monitor:
myMonitor.addEventListener(StatusEvent.STATUS, statusChange);

myMonitor.start();

function statusChange(e:StatusEvent):void

{

  trace("URLMonitor status change. Current status: "

  + myMonitor.available);

}
File System API
Your AIR application behaves just like any other desktop application and therefore also has access to the file system to read files from and write files to.
Common file paths
File paths are very different across platforms. On Mac OS X, the path for my document folder is /Users/Serge/Documents, while on Windows XP the paths are C:Documents and SettingsSergeMy Documents and C:UsersSergeDocuments. This is exactly why these common file paths can be called using a method of the File class in AIR so you don't have to worry about this. The following file paths exist on all the platforms that AIR supports—Mac, Windows, and Linux. These methods are available to point to the associated directories:
File.applicationDirectory: The folder containing the application's installed filesFile.applicationStorageDirectory: The private storage available to this applicationFile.desktopDirectory: The user's desktop directoryFile.documentsDirectory: The user's document folderFile.userDirectory: The user's personal directory
Reading and writing files
Reading files from and writing files to the file system is actually pretty straightforward. First, you create a File object, which represents the path to a file or a directory. The File class has all the properties and methods for interacting with the File object. The FileStream class can be used to read and write files. Before you can use these classes, you'll need to import them to your project by adding the following import statement:
import flash.filesystem.*
Before you can read or write a file, you need to create a reference to its file path. You do this by creating a new File object. In this case, you create a File object that points to a particular file, named test.txt in this example:
var myFile:File = File.desktopDirectory.resolvePath("test.txt");
Now, to read the content of this file, you create a new FileStream object and open up the file you just specified in the File object:
var myFileStream:FileStream = new FileStream();

myFileStream.open(myFile, FileMode.READ);
Next, you read the content of that file. Since this is a simple text file, you know that whatever comes back is going to be a string. The following code reads the content of the text file and assigns it to a string variable:
var myString:String = myFileStream.readMultiByte(myFile.size,
File.systemCharset);

trace(myString);

fileStream.close();
Writing files is almost identical. Instead of using FileMode.READ, you use FileMode.WRITE, and instead of reading bytes, you are writing them. In this example, we will be writing a text file in the documents directory.
var myFile:File = File.documentsDirectory.resolvePath("test.txt");
The only difference with reading a file is that the file specified here does not exist. The file will be automatically created once we write to it. You do this in mostly the same way as when you're reading files.
var myFileStream:FileStream = new FileStream();

myFileStream.open( myFile, FileMode.WRITE );

myFileStream.writeUTF( "Hello World!" );

myFileStream.close();
The result from this code is a text file in the documents directory with the file name test.txt. The contents of the file is the text "Hello World!"
The Windowing, Menu, Network Detection, and File System APIs are the most commonly used APIs in AIR applications. If you want to find out more about all available APIs, a lot of information is available in Flash's documentation. Alternatively, you should check out The Essential Guide to Flash CS4 AIR Development (friends of ED, 2008), which provides more details on the APIs and how to use them.
Now that you've learned about these common APIs, it's time to build your first-application.
Building your first AIR application with Flash CS4
When you launch Flash CS4, you will see that the splash screen now allows you to create a new Flash file with the Adobe AIR profile (see Figure 19-10). As soon as you select this option, Flash CS4 will open up a new document and automatically make sure that all the settings are correct.
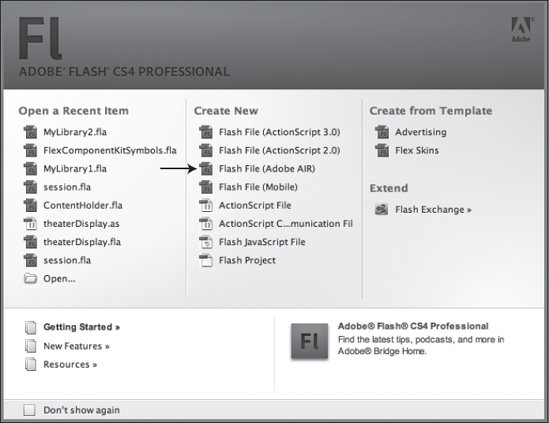
Figure 19-10. The Flash CS4 Professional splash screen
When you create a new Flash file using the Adobe AIR profile, the targeted player in the document's Property inspector (see Figure 19-11) is set to Adobe AIR 1.5 and the script is set to ActionScript 3.0. Since all AIR APIs are written in ActionScript 3.0, this is the only option if you want to use these APIs.
Because the targeted player is now the Adobe AIR runtime, the AIR Debug Launcher (ADL) will automatically be used when you test your project. ADL is exactly the same as AIR, but it is only used to test and debug your applications without having to install them. So instead of launching your application in the browser, it will open it in ADL.
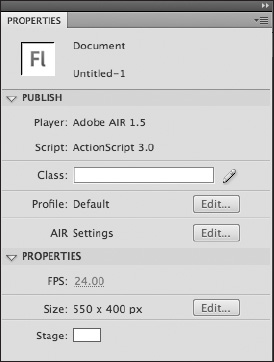
Figure 19-11. The Property inspector
Creating your AIR application
Right, now that you have the basics down, go ahead and create your AIR application. We'll quickly write a simple program to show you all the fundamentals of creating AIR applications in Flash CS4.
- Set up your document so that it's 200 pixels wide and 200 pixels tall.
- Draw what is going to be your main application window. You can choose the
Rectangle Primitivetool to draw this background shape that uses the total available application size (see Figure 19-12).
Figure 19-12. The shape of the application window
- Set the stroke to 2 pixels.
- Set the fill color to 80% black.
- Convert this shape into a movie clip and name it
windowbackground. - Test your application by clicking the
Test Movieoption in theControlmenu. The application will launch in the ADL.
Note that your AIR application now runs as a separate application. Your application now has its own icon in your OS X dock or Windows taskbar. You should also see that your application is now surrounded by system chrome. It looks exactly like any other application window (see Figure 19-13).
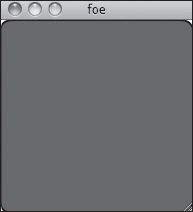
Figure 19-13. Your application running in ADL
- Select the transparent window chrome by clicking the Edit button next to
AIR Settingsin theProperty inspector. This pops up theAIR–Application&Installer Settingsdialog, as shown in Figure 19-14.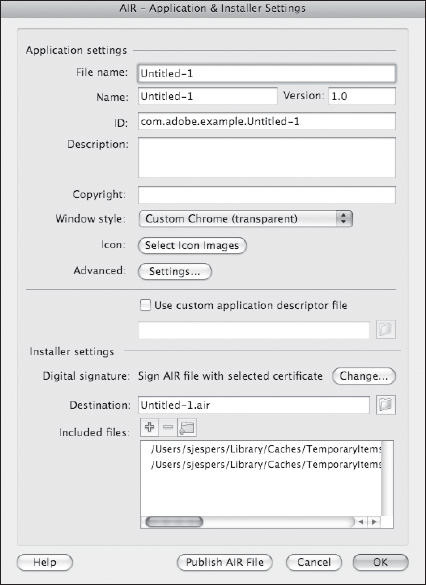
Figure 19-14.
AIR – Application & Installer Settingsdialog
The AIR – Application & Installer Settings dialog
The AIR – Application & Installer Settings dialog is where you specify items like the name of your application, what is displayed in the installer window, the application icon, and also the chrome settings for your application window. The settings are as follows:
File name: This is the name of the AIR file you are going to create once your application is ready.Name: This is the name that will be shown in the installer and in the title bar of your initial window.Version: This setting is used to determine which version of your application you have installed on your system.ID: The value for this setting needs to be unique. It is used to detect whether or not the application is already installed and then launch it from the browser or another AIR application.Description: The text specified here will be used to give a more detailed description of the application in the installer window.Copyright: This text is used to add an application's copyright information in the installer window.Window style: Here you set the window type of your application.Icon: This option allows you to specify your application icon. Note that the icon does not show up in ADL. You have to install the application to see the application icon.Advanced: This pops up an additional dialog (see Figure 19-15) that allows you to set even more options for your application and your initial-window.Use custom application descriptor file: Instead of filling out this dialog box, you could also write an XML file with all these settings. This is where you specify the application descriptor file you want to use.Digital signature: All AIR applications must be signed with a code signing certificate. Here you can specify the location of your certificate.Destination: This is the destination where you want to save your AIR file once you publish it.Included files: Here you can specify additional files that will be included in your AIR package. These files will be installed in the application directory. You can use this to add any files your application depends on.
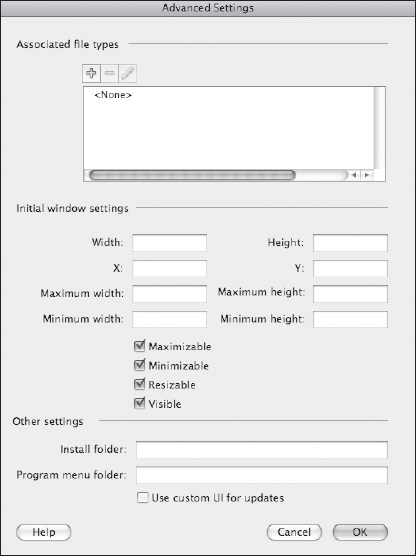
Figure 19-15. Advanced settings
The Advanced Settings dialog
When you click the Settings button next to Advanced in the AIR – Application & Installer Settings dialog, the Advanced Settings dialog pops up. This dialog box allows you to associate a file type with your application and set the position, width, and height for your initial window. You can also define whether or not your initial window is maximizable, minimizable, resizable, and visible. You can even define in which folder you want to install your application and specify a name for the program menu folder. The settings are as follows:
Associated file types: Your AIR application can be associated with a specific file type. For instance, if you want your application to accept SERGE files, this is where you specify that file type.Width and Height: This is where you specify the width and height of your initial window. These will override the document's width and height. If these are not specified, the application will use the document's width and height.XandY: These fields allow you to specify the x and y coordinates of your initial window.Maximum width and Maximum height: If your application is resizable, this is where you specify the maximum width and height.Minimum widthandMinimum height: If your application is resizable, this is where you set the minimum values for width and height.Maximizable: If selected, your initial application window is maximizable.Minimizable: If selected, your initial application window is minimizable.Resizable: If selected, your initial application window is resizable.Visible: if selected, your initial application window is visible.Install folder: Here you specify the folder where you would like to install the application on the user's machine. Note that the user can still select a different folder to install your application to.Program menu folder: If this is specified, the AIR Application Installer will create a folder in Windows'Programmenu.
Creating applications with custom chrome
Now, for our demo application, setting the window type to Custom Chrome (transparent) in the AIR – Application & Installer Settings dialog (as shown earlier in Figure 19-14) is all you have to do. Then click OK and test your application again. You should now see the same application without the system chrome, as shown in Figure 19-16.
You'll immediately notice that because you didn't add any window functionality, you can't close, resize, or move the window. When you create applications with custom chrome, you need to add that functionality yourself. When you've verified that your application looks like Figure 19-16, you can close the application by pressing Alt+F4 or Cmd+Q on a Mac.

Figure 19-16. Your application is no longer surrounded by system chrome.
Enabling dragging
The first thing you want to add is a little bit of code that will enable you to drag your window around the screen. In your Actions panel, add the following code:
stage.addEventListener(MouseEvent.MOUSE_DOWN, startMove )


function startMove(event:MouseEvent):void

{

  stage.nativeWindow.startMove();

}
This will listen for the MOUSE_DOWN event and call the startMove() method of the main window, allowing you to move the window around your screen. You can also draw a title bar and add the event listener to that instead of adding it to the entire stage.
Adding Close and Minimize buttons
Next we want to add the Close and Minimize buttons shown in Figure 19-17. Just create two simple buttons like the ones in the figure and give them instance names of btn_close for the red one and btn_minimize for the yellow one.

Figure 19-17. Creating Close and Minimize buttons
In your Actions panel, add the following lines to the code that is already there. This bit of code will listen for the CLICK event on both your Minimize and Close buttons and will fire off the associated code.
btn_minimize.addEventListener(MouseEvent.CLICK, minimize_CLICK);

function minimize_CLICK(e:MouseEvent):void

{

     stage.nativeWindow.minimize();

}

btn_close.addEventListener(MouseEvent.CLICK,closeButton_CLICK);

function closeButton_CLICK(e:MouseEvent):void

{

    NativeApplication.nativeApplication.exit();

}
Go ahead and test your application. Try dragging the application around your screen. Then press the Minimize button, and try the Close button last.
Adding functionality
Now that we created the application chrome, it's time to add some functionality. We want this application to periodically check whether a certain server is available or not and alert us when it's not.
Creating a three-state icon
We'll need some sort of easy-to-understand icon to tell the user when there's something wrong or when everything is fine. We'll create a very simple three-state icon with a gray, red, and green oval. We'll use the gray icon when the application is launching, the red icon when the specified server is not available, and the green icon when the server is available.
First, create a new symbol and draw a gray oval on the first keyframe. Now create a new keyframe on the second and third frame and draw a red and green oval on each of those (see Figure 19-18).

Figure 19-18. Timeline for our icon
Next, give each keyframe a different name. Name the keyframe with the gray icon default, the keyframe with the red icon error, and the keyframe with the green icon ok. Put a stop() action on the first frame so the icon stays in the first frame (the gray icon) when it launches.
Checking server and service availability
In order to check whether or not a server is available, we're going to use the service monitoring API we discussed earlier.
Before you can use the service monitoring API, you need to add the servicemonitor.swc file to your library. Follow these steps to do so:
- In the
Property inspector, click theEditbutton in theProfilearea. - Click the
Settingsbutton for ActionScript 3.0 and select theLibrary Pathtab. - Click the
Browse to SWCbutton and browse to your Flash CS4[install-directory] /AIK1.5/frameworks/libs/air/servicemonitor.swc(see Figure 19-19). - Click the OK button.
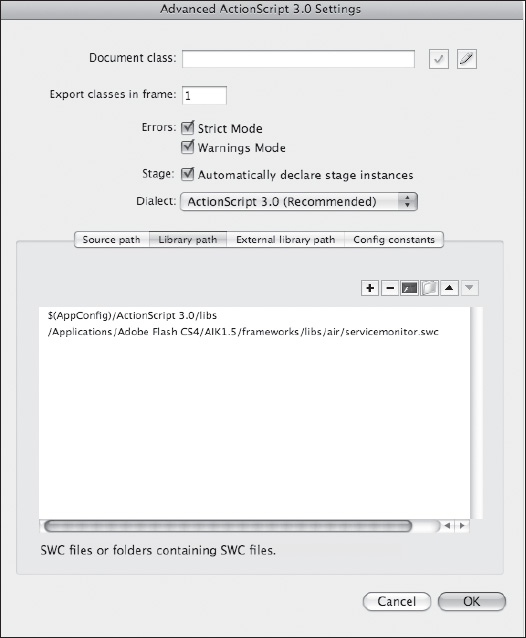
Figure 19-19. Adding the
servicemonitor.swcfile
Now go back to your Actions panel and add the following import statements to your code. You need to import these to actually use the classes in your project.
import air.net.URLMonitor;

import flash.net.URLRequest;

import flash.events.StatusEvent;
Using the URLMonitor class
For this example, we will be using the URLMonitor class to check whether an HTTP request can be made to the specified address, which is also why the URLRequest class needs to be added. Whenever the URLMonitor's status changes, it's going to fire off a StatusEvent, which is why we also need to import that class.
Add the URLMonitor by including the following code in your Actions panel:
var myMonitor:URLMonitor;

myMonitor = new URLMonitor(new URLRequest('http://www.adobe.com'));

myMonitor.addEventListener(StatusEvent.STATUS, statusChange);

myMonitor.start();

function statusChange(e:StatusEvent):void

{

  trace("URLMonitor status change. Current status: "

  + myMonitor.available);

}
After making a new instance of the URLMonitor, we specify which address it should check. In this case, we're going to check whether www.adobe.com is available or not. By adding an event listener to the instance of the URLMonitor, we can check when the network status has changed and call a function to warn the user of this change.
If you test this application, your Output panel should show the message, "URLMonitor status change. Current status: true."
When myMonitor.available returns true, we want to display the green icon. When it returns false, we should display the red icon. In order to display the correct icon, you'll need to change the statusChange function by adding this simple if...else statement:
function statusChange(e:StatusEvent):void

{

    if (myMonitor.available)

    {

      mc_statusIcon.gotoAndStop("ok");

    } else {

      mc_statusIcon.gotoAndStop("error");

    }

}
Now, whenever the network status changes, it will display the correct icon. Go ahead and test your application again. It should now show the green icon when you launch it. It may take a few seconds to get the response back from the server. To test the red icon, you can simply disable or unplug your network.
Saving the last server
While this is already pretty cool, we actually want to be able to save the last server we checked. If we add that functionality, the application will read the last saved address when we launch the application.
Let's change the code a little bit so it starts the URLMonitor on demand. We'll just wrap that code in a new function called startMonitoring and pass the address to check as a variable for this function:
var myMonitor:URLMonitor;

function startMonitoring(myAddress:String):void

{

  myMonitor = new URLMonitor(new URLRequest(myAddress));

  myMonitor.addEventListener(StatusEvent.STATUS, statusChange);

  myMonitor.start();

}
It's important to keep the myMonitor declaration outside of this function. The URLMonitor will be out of scope if you add it to this function.
On a new layer, add a TextInput and a Button component from your component library to the stage (see Figure 19-20). This will enable the user of this application to simply enter an address and start the monitor when he or she wants to. Remember to set the instance names for these components—inp_address for the TextInput component and btn_go for the Button component. Also add http:// as the default text for the TextInput component to easily show the user that a URL is expected here. You can specify that in the Component inspector.
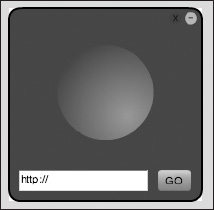
Figure 19-20. Adding a TextInput and a Button component
Whenever the user clicks the GO button, the URLMonitor should start checking the specified address. Add the following code to the code you already have to enable this functionality:
btn_go.addEventListener(MouseEvent.CLICK, saveAndStart);


function saveAndStart(event:MouseEvent):void

{

  mc_statusIcon.gotoAndStop("default");

  startMonitoring(inp_address.text);

}
Whenever the user clicks the GO button now, it's going to trigger the saveAndStart function. When that function is called, the status icon is reset, and then the startMonitoring function we created earlier is called. The URLMonitor will now check the URL we entered in the TextInput component.
The user may want to use this little application to check whether his or her web server is still running or not. To increase the user experience, we're going to save the last address the user entered. Whenever the user launches the application, we're going to automatically show the last entered address.
The first thing we need to add is a function to write the last entered address to a text file.
Writing and reading files
Because the user doesn't really need to open the saved file in another application, we're going to save the last entered address in a text file located in the applicationStorage-Directory. The applicationStorageDirectory is a private storage directory for your application.
Like we discussed in the section "Using AIR APIs," you first need to import the file system classes to your project before you can start using them. So the first thing you need to add is this import statement:
import flash.filesystem.*
To save the last entered address to a text file in the applicationStorageDirectory, add the following code to the saveAndStart function we created earlier:
var myFile:File =

File.applicationStorageDirectory.resolvePath("last.txt");


var myFileStream:FileStream = new FileStream();

myFileStream.open(myFile, FileMode.WRITE);

myFileStream.writeUTF( inp_address.text );

myFileStream.close();
Like we discussed before, you first create a new File object. The File object points to the path of a file or a directory. The File object can also be a file or directory that doesn't exist yet. In this case we are writing the file and thus we use FileMode.WRITE. Next we save the address the user entered in the TextInput component in Unicode Transform Format (UTF), after which we close the FileStream. We then write the address typed into the TextInput field in UTF and close off the FileStream after that. To make it easier to test your application, you could temporarily change the file path to File.desktopDirectory.resolvePath("last.txt"). By saving the file on your desktop, it's very easy to quickly check whether your function is working.
When we launch the application, we'll also need to read the value we saved in the text file. To do that, we are going to add an init() function that will be launched when we start the application.
var mySavedAddress:String;

function init():void

{

  var myFile:File =

File.applicationStorageDirectory.resolvePath("last.txt");

  if (myFile.exists)

{

    var myFileStream:FileStream = new FileStream();

    myFileStream.open(myFile, FileMode.READ);

    mySavedAddress = myFileStream.readUTF();

    inp_address.text = mySavedAddress;

    startMonitoring(inp_address.text);

    myFileStream.close();

  }

}

init();
First of all, we declare the mySavedAddress variable outside the function to make it a public variable. In the init() function, we create a file object that points to the location we saved our text file to. If the file exists, it is going to read it by creating a new FileStream object. That allows us to open the file (in this case with FileMode.READ) and read the text in this file. We then set the text of our input field and call the startMonitoring() function, passing the address we just read from our text file. You shouldn't forget to also call the init() function somewhere. If you forget to call the init() function, the last saved value will not be read and thus will not be shown in your application.
This is what the completed code should look like:
import air.net.URLMonitor;

import flash.net.URLRequest;

import flash.events.StatusEvent;

import flash.filesystem.*;


var myMonitor:URLMonitor;

var mySavedAddress:String;


stage.addEventListener(MouseEvent.MOUSE_DOWN, startMove);

btn_go.addEventListener(MouseEvent.CLICK, saveAndStart);

btn_minimize.addEventListener(MouseEvent.CLICK, minimize_CLICK);

btn_close.addEventListener(MouseEvent.CLICK, closeButton_CLICK);


function init():void

{

  var file:File =

File. applicationStorageDirectory.resolvePath("last.txt");


  if (file.exists)

  {

   var fileStream:FileStream = new FileStream();

   fileStream.open(file, FileMode.READ);

   mySavedAddress = fileStream.readUTF();

   inp_address.text = mySavedAddress;

   startMonitoring(inp_address.text);

   fileStream.close();

  }

}

function saveAndStart(event:MouseEvent):void

{

  mc_statusIcon.gotoAndStop("default");

  startMonitoring(inp_address.text);

  var myFile:File =

File. applicationStorageDirectory.resolvePath("last.txt");

  var myFileStream:FileStream = new FileStream();

  myFileStream.open(myFile, FileMode.WRITE);

  myFileStream.writeUTF(inp_address.text);

  myFileStream.close();

}

function startMonitoring(myAddress:String):void

{

  myMonitor = new URLMonitor(new URLRequest(myAddress));

  myMonitor.addEventListener(StatusEvent.STATUS, statusChange);

  myMonitor.start();

}


function statusChange(e:StatusEvent):void

{

  if (myMonitor.available)

  {

    mc_statusIcon.gotoAndStop("ok");

  } else {

    mc_statusIcon.gotoAndStop("error");

  }

}


function startMove(event:MouseEvent):void

{

  stage.nativeWindow.startMove();

}

function minimize_CLICK(e:MouseEvent):void

{

  stage.nativeWindow.minimize();

}

function closeButton_CLICK(e:MouseEvent):void

{

  NativeApplication.nativeApplication.exit();

}


init();
Your application is now ready. When you've thoroughly tested and verified the application, the next thing to do is build an AIR package to distribute to your users.
Creating your AIR package
Before you can create your AIR package, you need to sign the application with a digital certificate. AIR applications can be signed either by linking a certificate from an external certificate authority (CA) such as Thawte or Chosen Security or by creating your own certificate. It is important to note that self-signed certificates do not provide any assurance to the end user that the named publisher has genuinely created the application, and as such self-signed applications represent a security risk. The AIR installer will also tell the user that the publisher's identity is unknown (see Figure 19-21).
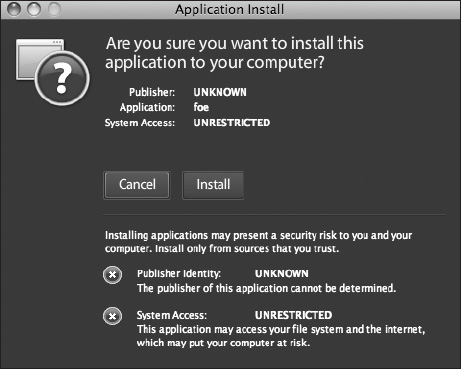
Figure 19-21. Self-signed AIR applications will alert the user that the publisher's identity is unknown.
When you want to use a self-signed certificate during testing and development, you only need to create it once. Follow these steps to do so:
- Click the
Editbutton next toAIR Settingsin yourProperty inspector. This will open up theAIR–Application&Installer Settingsdialog we discussed earlier. - Click the
Changebutton to create a new self-signed certificate or select an existing certificate (see Figure 19-22).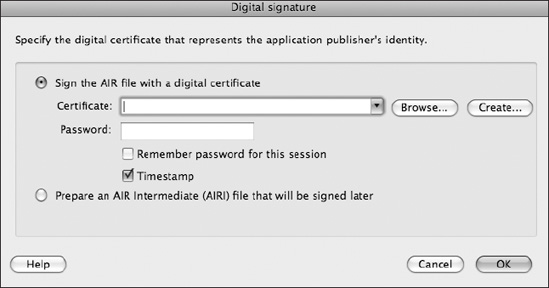
Figure 19-22. Browse to an existing certificate or create a new certificate to sign your application.
- Click the
Createbutton. - Enter information for the publisher name, organization unit, and organization name.
- Select your country and then enter a password of your choice.
- Select a location on your system to save the certificate.
- Click
OKto create the self-signed digital certificate (see Figure 19-23).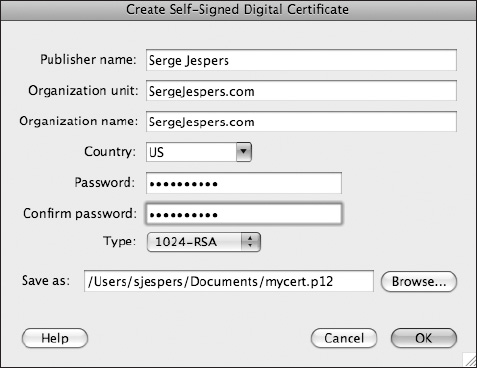
Figure 19-23. Creating a new self-signed certificate. Note that all fields are required!
- Save the certificate to the specified location.
- Enter the password you selected and press
OK. - Finally, specify the location where you want to save your AIR file and click the
Publish AIR Filebutton.
Now that we created our AIR file, we'll also need to distribute it. In the next section, you'll see how to this.
Deploying your AIR application
The easiest thing to do with your application at this point would be to upload the AIR file to your server and put a link to it on your web site. But this is not very user friendly for whomever is going to download and install your application. In some cases, when your server isn't configured to handle AIR files, it may even fail altogether. That's why Adobe created the concept of install badges. Install badges are basically a small Flash application that handles download and installation in such a way that it becomes very easy for the end user to install your application.
The install badge (see Figure 19-24) is part of the AIR SDK. You can download the AIR SDK from the Adobe web site at www.adobe.com/products/air/tools/sdk/. If you download and extract that ZIP file, there's a folder called samples that includes a ready-to-go example. Just change the parameters in the source of the HTML, upload the files and your AIR file to your server, and you're done.
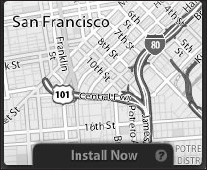
Figure 19-24. An install badge
This install badge also has a bunch of extra features that need a bit of extra coding. For one, the install badge can determine whether the application is already installed and then prompt the user to launch the application right from within the browser. It also detects whether the user has the correct version of the runtime installed; if not, it will offer to download it. This badge also allows you to add a little bit of support information when the user clicks the question mark icon.
The second option would be to build your own install badge. Don't worry . . . you don't have to start from scratch. The source files for the install badge are available in the SDK downloads so you can use these as the basis for your own. You could literally just change the graphics and publish it. It's as simple as that. The great thing is that this can be anything you want to it to be and can have all the features you want it to have because, well, you are building it. If you want to ping your server whenever someone starts the install of your application, for instance, that is absolutely possible.
Summary
AIR is not just another runtime; it combines the rich interactive capabilities of Flash with the power of the desktop and freedom from the web browser to allow us to create rich, connected, desktop applications using the web-centric languages we already know like ActionScript, HTML, and JavaScript.
Building applications for AIR can be very fulfilling and rewarding, and if you build a useful application, you might even see some financial appreciation for your efforts! To see what other people are building with AIR, have a look at the AIR marketplace (www.adobe.com/go/marketplace) where you will find a broad variety of AIR applications.
You've now been introduced to all of the basics needed to start building your own AIR applications. In this chapter we talked about the following:
- Understanding what makes AIR different from the Flash Player and Silverlight runtimes
- Understanding the most common APIs and how to use them
- Customizing and configuring the installer for an AIR application
- Reading files from, and writing files to, the host system with an AIR application
- Publishing and deploying your AIR application