
CHAPTER 11
MANAGING EXTERNAL ASSETS AND COMMUNICATION
The original intent of Flash (not SmartSketch) was to aid in the delivery of animation over the Internet. As its popularity grew, more and more designers and developers were using Flash for robust deliverables. And as the applications began to grow in complexity, the resulting SWF files began to increase in size. Once the fever spread from industry to industry, Flash started being used for a multitude of applications such as web intros, entire web sites, e-learning solutions, and later Rich Internet Applications. As a result, Flash was soon given the ability to manage external assets, like images and data, dynamically.
One of the biggest early contributors to the popularity of Flash, in addition to its ability to create vibrant content, was the fact that the files that it produced were so small. In addition to the need to alleviate size issues, Flash, in becoming a native web technology, was also rapidly developing the need to communicate with various web-based data sources. As Flash evolved from iteration to iteration, it gradually was granted more and more ability to manage content externally, as well as communicate with several standard web-based technologies. And though the content covered in this chapter is relatively brief, it is no doubt pivotal in the development of rich, data-driven applications.
Subsequently, this chapter will discuss the various capacities in which Flash communicates with external pieces of data. Whether it be loading a simple JPG image or a complex conversation with a server-side web script, Flash handles this communication in a very similar manner.
Working with external data
When a developer refers to external data in Flash, that data can represent any number of information types including sound, video, text, other SWF files, images, XML data, and much more. As you may have guessed, there are potentially a multitude of avenues for getting this data in and out of Flash. As with many other ActionScript features covered in this book, ActionScript 3.0 has taken the process of managing external data and streamlined it into a few easy-to-use classes. Therefore, unlike previous versions of Flash, all external data can be handled in one place. In this chapter we will take a look at the following data loaders and managers:
URLRequestURLLoaderURLVariablesLoaderLocalConnectionSharedObject
URLRequest—go get it pup!
Much like the Labrador or Golden Retriever is responsible for fetching ducks or the morning paper, ActionScript has a best friend that is responsible for going out and getting information about a specific URL. The term "URL," short for Uniform Resource Locator, is nothing more than a technical way of describing the location of a piece of information that is available over the Internet. For all intents and purposes, all external assets that are loaded at runtime are going to be classified as URLs. Whether it is a JPEG, video, or sound file found in a local directory or an XML file coming from halfway around the world, the first step in bringing that information into ActionScript is to go out and get it. For this very special task, ActionScript offers the URLRequest class.
The URLRequest class is used to retrieve all information about a given HTTP request and subsequent URL. Once the URLRequest has retrieved the desired URL, it can then be passed to any of the classes responsible for loading content. It is important to understand that depending on the kind of information that is retrieved by the URLRequest, ActionScript will use a class that has been specifically designed for handling that type of information. If the URL happens to represent a sound, the sound is then loaded via the Sound class. If the information happens to be textual, the URL is loaded via an instance of the URLLoader class. Though this may seem a bit complicated at first, it is actually very efficient. There are only a few ways in which you can load information into Flash. As you become more familiar with the types of data that can be loaded into Flash, these methods will seem as second nature.
In addition to capturing information to be loaded, the URLRequest can be set up to pass information to server-side programming such as PHP and ASP by packaging it with variables. This will be discussed more thoroughly later in this chapter.
By now you should be all too familiar with the way in which functionality is implemented in ActionScript. To use the URLRequest class, you simply create a new variable reference and instantiate it with the new keyword. The constructor of the new URLRequest accepts a single parameter. As shown in the following examples, this parameter is a literal string value representing the URL to be captured.
The URLRequest can be used to call a relative local URL, such as the name of a graphic residing in the same folder as your SWF file, as demonstrated here:
var req:URLRequest = new URLRequest("my.jpg");
It can also be used to call an absolute URL from a remote server:
var req:URLRequest = new URLRequest("http://www.anyurl.com");
Using the URLLoader
If the URLRequest is used to retrieve the URL, the URLLoader is the primary class for loading URL requests that are of a textual nature. That is, the URLLoader is responsible for loading items like TXT files, XML files, and external Cascading Style Sheets. Because of this versatility, the URLLoader becomes an integral part of many Flash applications.
Loading a simple data file
In the example in this section, you will see how the URLLoader is used in tandem with the URLRequests to load information into Flash dynamically. Using ch11_01_start.fla as reference, you will notice that the stage contains a simple TextArea component with the name ta. As you may have guessed, we will be loading a snippet of content into the text area by way of the URLLoader.
- The first line of code, shown here, is used to instantiate the
URLRequestobject:
var req:URLRequest = new URLRequest("loaderinfo.txt");

var infoLoader:URLLoader = new URLLoader();

infoLoader.load(req);


ta.text = infoLoader.data;
Notice in the constructor function that the URLRequest is accepting the string parameter loaderinfo.txt. This value represents the name of a file that is located in the same directory as the ch11_01_start.fla file. Therefore, we will use the URLRequest to fetch the information about this file.
- The second line of code defines the
URLLoaderobject,infoLoader.
With the infoLoader we then have the ability to load the information that has been gathered by the URLRequest. To do this we use the load method of the URLLoader and pass it a single parameter, which is a reference to the URLRequest.
- Finally, we can assign the
textproperty of the text area the value ofinfoLoader.data.
The data property of any URLLoader, by default, is set as text. Therefore, we are simply assigning the information stored in the loaderinfo.txt file to the text property of the TextArea component.
Waiting for the data to arrive
At this point, if you test the previous file, you will notice that nothing loads within the text area, and you may also notice that an error is thrown in the Output window. The reason for this is that the data property of any loader is not set until the load method has completely finished with the loading of the URLRequest. Because loading external data in ActionScript works in the same manner as you may expect any form of data to load, it will then take an undetermined amount of time for the computer to parse the information. Granted, even though this example is taking nanoseconds to load, it is still loading. And because this example is executing sequentially, the fourth line of code will more than likely execute before the loader has finished loading. Because the computer can execute its code faster than the data will load, the previous example is trying to assign the loaderInfo.data information into the text area before that information has finished loading into ActionScript.
This is more or less the method of operations for the loading of external objects in Flash. To work around the previously mentioned execution problem, ActionScript allows for the listening of events on loading content. Therefore, whenever an object has finished loading in ActionScript, the COMPLETE event is dispatched. We then have the ability to assign a listener to the loader to detect this event. As shown in the following code, we can then place the ta.text = infoLoader.data line within the event handler, allowing us to wait for the URLRequest to fully load before ActionScript tries to use its information.
var req:URLRequest = new URLRequest("loaderinfo.txt");

var infoLoader:URLLoader = new URLLoader();


infoLoader.load(req);

infoLoader.addEventListener(Event.COMPLETE, loadText);


function loadText (e:Event)

{

  ta.text = infoLoader.data;

}
Finally, when the movie is tested now, the information from the loaderinfo.txt file is displayed in the text area as shown in Figure 11-1.
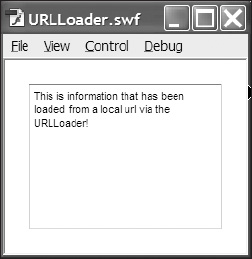
Figure 11-1. Data from an external TXT file being loaded into a TextArea via ActionScript
Sending data to external places
When building web applications, it would be fairly ineffective to only be able to receive information from a given data source. Fortunately the URLLoader and URLRequest classes allow a developer the ability to pass information out to external sources using popular server-side languages like PHP, ASP.NET, and ColdFusion.
GET and POST methods
If you have ever worked with front-end HTML before, you will no doubt be familiar with the concepts of name-value pairs and the GET and POST methods of HTTP. If you are not yet familiar with these concepts, don't worry—they are not very difficult to understand.
The GET method sends its information by way of a query string stuck on the end of a URL. Though you may not be familiar with this, you may have noticed once upon a time information stuck on the end of a web page request. The following web request, www.webpage.com?name=value, demonstrates the sending of a variable in the form of a name-value pair, using the GET method.
The POST method also sends the same type of data in the form of name-value pairs. However, rather than send this information as part of the URL request, the POST method sends its information within the body of the request. Therefore, this information is actually hidden to the untrained eye.
It is often said that the difference between these two methods is a more secure transmission of information. The reality is that neither is really more secure than the other. And though both methods have the ability to send and receive information, it was originally intended that GET be used to get information from the server and POST be used to post information back to the server. At this point, however, it does not make much of a-difference.
For the scope of this book it will be sufficient to know that the GET and POST methods are the way by which standard HTML sends variable data from page to server and back again. There are several other methods available, but these are the most commonly used.
Name-Value pairs
As mentioned previously, the standard method for passing variables from page to page on the Internet is in the form of name-value pairs. The name value pair is nothing more than a convention now used to describe the way variables are packaged. As the name would suggest, variables are sent as a variable name and a variable value that are paired together. So, name is the name of the variable and value is the value of the variable. Table 11-1 lists a few possible name-value pairs.
Table11-1. A Series of Name-Value Pairs
| Name | Value |
| Name | John Smith |
| [email protected] | |
| City | Annapolis |
| State | MD |
The concept may also be described using a standard contact form found on a number of web sites. Using Table 11-1 as reference, as a person fills out information on a web form, he or she is supplying the value for a number of predetermined variables, typically name, e-mail, etc. When that person clicks a Submit button, usually found at the end of the form, his or her information is collected and sent across the galaxy in the form of name-value pairs. If the GET method was used, the values would be arranged something like this:
http://www.apage.com/program.php?name=John%20Smith&email=KMR

[email protected]&city=Annapolis&state=MD
The page www.apage.com/program.php would then more than likely be set up to receive those variables and process them in some manner.
URLVariables
For the packaging, and possible unpackaging, of variables, ActionScript 3.0 introduces the URLVariables class. Like its previously discussed counterparts, URLLoader and URLRequest, the URLVariables class is incredibly intuitive and far superior to its AS2 counterpart. To create variables using the URLVariables class, you only need to create the object and start assigning variables to it in the form of properties. Here's an example:
- The variable vars is created and typed as a new
URLVariablesobject (as shown in the code example after the next step). - The name variable is then created as a property of the vars object and given the string value of John Doe.
var vars:URLVariables = new URLVariables();

vars.name = "John Doe";
Keep in mind the properties are arbitrary and thus able to be whatever you would like them to be.
The previous two lines of code could have just as easily been written like the following:
var vars:URLVariables = new URLVariables();

vars.firstName = "John ";

vars.lastName = "Doe";
It is also possible to pass the name-value variable as a parameter of the constructor function, in the form of a string.
var vars:URLVariables = new URLVariables("firstName=John");
Now that you are familiar with the way ActionScript packages variables, you have the ability to use this method in tandem with URLLoader and URLRequest to send those variables out of Flash.
There and back again: A variable's tale
In the file ch11_02.fla, we will take a look at how Flash has the ability to take a variable, send it to a remote location, and have that variable returned for further use. At first this task might seem a bit complicated. However, looking back on what you have learned so far, it is easy to break this down into four manageable parts.
- Define your variables.
The first step to sending out variables is to actually define the variables. For this example, we are going to send a single variable out to an external location and hopefully get it back again. As shown here, we use the code from earlier and instantiate the URLVariables object. We then create an arbitrary property called name and assign it a value of John Doe.
var vars:URLVariables = new URLVariables();

vars.name = "John Doe";
The next thing that needs to happen is the creation of the URLVariables object. Remember, the URLVariables object is going to go out and collect information about a URL much like a probe that NASA would send into outer space. In order for the request to complete its work successfully, we need to make sure that it is properly configured.
The next four lines show you what you need to get the URLRequest ready to deliver and collect information to a specific URL. As usual, the first step is to create the object. We then define the destination URL. In the previous example of the URLRequest, we were passing the URLs as parameters of the constructor functions. However, URLRequest objects also give us the ability to set this using the url property of the object. In this example we will be communicating with a remote script that is hosted on this book's companion web site.
var req:URLRequest = new URLRequest();

req.url = "http://www.friendsofed.com/EssGuideFlashCS4/vars.php";

req.method = URLRequestMethod.GET;

req.data = vars;
The third line will define how the URLRequest will format the sending of its variables. As discussed earlier, the standard methods are GET and POST. For this example, we will be using the GET method, which will simply add the variables as name-value pairs to the end of the URL.
Finally, we assign, or package, information for the URLRequest using the data property of the URLRequest object. To this property we assign the vars object, which is the name of the URLVariables object that was created earlier.
- Get the
URLLoaderready.
Once the URLRequest has been properly established and has the URLVariables package with it, the next step is to create the URLLoader. The URLLoader used in this example is actually not that different from the example that was discussed earlier in this chapter. An object, ul, is created. An event listener is assigned to allow the information to load. And the load method of the ul object is used to load the URLRequest req. What is different is the existence of the second line. The dataFormat property of the URLLoader class is used to aid in the receiving of external information. It allows us to tell the URLLoader what kind of information to expect and how to deal with that information. In this example we are using the URLLoaderDataFormat.VARIABLES property to let the loader know that the information will be coming in via URL query string and that it should be ready to decode it.
var ul:URLLoader = new URLLoader();

ul.dataFormat = URLLoaderDataFormat.VARIABLES;

ul.addEventListener(Event.COMPLETE, loadComplete);

ul.load(req);
- Define the handler.
Finally, the handler is created to coincide with the event listener that was attached to the URLLoader object. As you previously learned, this is used to allow external data sufficient time to load before it is used. The program is then notified using an event, and the external data can be manipulated.
In this case, the original variable, name, which was given the value of John Doe, has been sent to an external PHP script using the GET method. The PHP script performed a transformation on the variable and sent it back to Flash. The URLLoader then received that information and began loading it. When the loading had completed, the loadComplete handler is triggered by the dispatching of the Event.Complete event. The transformed variable can then be traced to the Output panel in Flash.
function loadComplete(event:Event):void

{

  trace(event.target.data.returningVariables);

}
Checking for program errors
Though we would like to tell you that the loading of external information into Flash is foolproof, we simply cannot. When dealing with the Internet, if something needs to be fetched and returned to a client's machine, there is still a strong possibility that many things can go wrong in the process. Though error handling quickly crosses over into the realm of advanced ActionScript development, it is definitely worth mentioning so that its presence is known.
For the handling of errors Flash incorporates the try...catch statements. In the following sample, we take the ul.load(req) statement, as used in the previous example, and set it up to handle possible errors. There are quite a few errors that can occur and ActionScript lets you test for them individually. For now, however, it will be sufficient for the program to check for all errors generically.
- The first step in error handling is to create the
trystatement.
...

var ul:URLLoader = new URLLoader();

ul.dataFormat = URLLoaderDataFormat.VARIABLES;

ul.addEventListener(Event.COMPLETE, loadComplete);


try

{

  ul.load(req);

}

catch (er:Error)

{

  trace("There was a problem loading your URL");

}

...
The try statement does exactly as its name suggests: it tries to execute a specific code statement. In this case we will be trying to execute the ul.load(req) statement to load our URLRequest.
The catch statement will listen for specific errors and then allow the program to reroute or execute alternative code if an error occurs. The catch statement actually accepts a parameter, which is an error object to be detected. Similar to events, you have the ability to select different kinds of errors to handle such as I/O errors and security errors. In this example we used er:Error, which will check for all errors.
- Finally, if an error is detected, the code statements contained within the catch statement will be executed. Therefore, if this program detects an error while trying to load the
URLRequest, it will send us a notification in theOutputpanel:There was a problem loading yourURL.
Loading external display objects
In Parts 4 and 5 of this book, we will take a look at loading various types of other information in ActionScript including the following:
- XML
- CSS
- Sound
- Video
For this chapter, we will take a look at one final type of loader, which is used for loading external display objects like bitmaps and SWF files. The Loader object is actually a type of display object container, like the Stage, Sprite, and MovieClip objects, which is used for containing externally loaded display objects.
The file ch11_03.fla demonstrates the difference between how the Loader and the URLLoader classes are used to load their respective content. Actually, the file demonstrates how similar the classes are when used to load such different content. When you first open the file, you will no doubt notice the blank white stage. There are no images on the stage or in the Library panel.
Here is the sequence for loading external display objects:
- We start with the following two lines, which are virtually identical to those used earlier to load the
loaderinfo.txtfile:
var req:URLRequest = new URLRequest("flower.jpg");

var imgLoader:Loader = new Loader();
The only significant differences are that the URLRequest's parameter has changed to locate a graphic file and we are now using the Loader class instead of the URLLoader class. Other than that, the instantiation of these objects occurs the exact same way as before.
- We then include the next two lines, which are also extremely similar to those found in the previous file:
imgLoader.load(req);

imgLoader.contentLoaderInfo.addEventListener(Event.COMPLETE, loadImg);
The first of these uses the load method of the loading object, in this case imgLoader. The second is a standard event listener. The only difference here is that instead of adding the listener directly to the loading object, the listener is added to the contentLoadInfo of the Loader class.
- Finally, we use the event handler to add the image to the stage.
function loadImg(e:Event)

{

  addChild(imgLoader.content);

}
And though the nomenclature is a bit different from that used earlier, the concept is exactly the same. This time, instead of using the data property as we did in the previous example, we employ the Loader class to store the display information in the content property. Therefore, by using the content property of the imgLoader, we can effectively add the image to the stage.
When you finally test the movie, you will see a familiar image from Chapter 4 as shown in Figure 11-2.

Figure 11-2. An external graphic being loaded into Flash using ActionScript
Now, let's discuss communication between two SWF files.
Communicating: SWF to SWF
One of the most commonly overlooked aspects of ActionScript development is the ability to have multiple independent SWF files on a client's machine communicate with one another. This option is so powerful that the SWF files do not even need to be located in the same parent application. For example, if you happen to be the kind of person who runs several different browsers on your computer, you could have two different SWF files running in two different browsers, passing information between each other. Further, this functionality can be extended to communicate with SWF files being run as Flash Projectors and Adobe AIR applications.
LocalConnection class
The communication between SWF instances, or SWF to SWF, is achieved through the use of the LocalConnection class. To properly use the LocalConnection class, you must first create an instance of the class in each SWF that will be used during the communication. Typically, the connection is established as one-way between two files. In order to complete the passing of data, one SWF will need to be set up to send information, and the other will need to be set up to receive it.
Send method
The send method is used to allow a SWF to send information to another SWF by means of a local connection. To set up the sender of a local connection, you first need to define an instance of the LocalConnection class. You can then call the send method of that object to establish the connection.
The send method has the ability to accept three types of parameters:
- Connection name
- Method name
- Optional parameters
In the following code example, connection_name is used as the first parameter, which also represents the name of the local connection. This name will be used by the receiving SWF as a means of detection for this connection. The second parameter, method_name, is the name of a method or function that exists in the receiving SWF that will be called once the connection is received. Finally, the send method can accept any number of optional parameters that can be used in the receiving SWF. Here is an example that uses these parameters:
var sender:LocalConnection = new LocalConnection();

sender.send("connection_name", "method_name", optional_parameters);
Connect method
The connect method is a type of listener that waits to hear from the sending SWF. As demonstrated in the following example, the receiving object of the local connection is set up in a similar fashion to the sending object. That is, both objects are instances of the LocalConnection class. The receiver, however, uses the connect method rather than the send method. In both cases the parameter, or name of the connection, will need to be the same.
var receiver:LocalConnection = new LocalConnection();

receiver.connect("connection_name");
Once the connection has been established, it is necessary for the receiver to have a function that corresponds to the second parameter of the send method. Remember, the sender is trying to execute a function that is contained within the receiver. Therefore, the second requirement of the receiving object is to have a function.
var receiver:LocalConnection = new LocalConnection();

receiver.connect("connection_name");


function method_name():void

{

  //function statements

}
Finally, as a measure of security, the client property of the LocalConnection object is used to assign which SWF contains the executable code. In this example, since the receiver does contain the function, the client property will be set to this, ultimately determining that this SWF contains the function.
var receiver:LocalConnection = new LocalConnection();

receiver.connect("connection_name");


function method_name():void

{

  //function statements

}

receiver.client = this;
SWF to SWF
Now let's take a look at actually getting two SWF files to communicate with one another. Figure 11-3 illustrates the concept that two independently running SWF files have the ability to pass information back and forth to one another over a simple local connection.
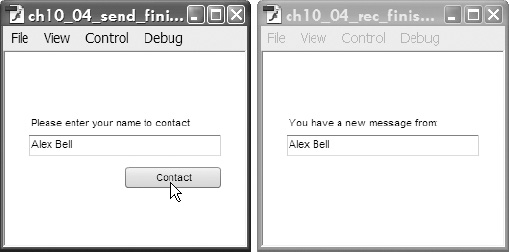
Figure 11-3. Information is being sent from one SWF to another using the LocalConnection class.
Setting up the sender
First thing that we will want to take care of in the creation of a SWF-to-SWF local connection is the creation of the sender SWF. For this example, we have supplied you with a base file, ch11_04_send_start.fla, for the benefit of focusing only on the ActionScript aspect of this exercise.
In this file you will find two primary elements that will be accessed via ActionScript. The first of these is a TextField, which has been given an instance name of nameText in the Property inspector. As shown in Figure 11-3, we will send information entered in this field to another SWF file. The second element is the Contact button. This button has also been given an instance name, contact_btn, so it can be referenced for use in ActionScript.
- With frame 1 of the timeline selected, open the
Actionspanel by pressing F9 and enter the following code:
var sender:LocalConnection = new LocalConnection();
You first need to create an instance of the LocalConnection object to be used in this SWF. You can do this using standard protocol as demonstrated in previous examples in this book.
- Create an event listener and assign it to the
contact_btnbutton.
contact_btn.addEventListener(MouseEvent.CLICK, makeContact); - Create the event handler for the
contact_btnlistener.
Within this handler you will be evoking the send method of the sender object. As the first parameter of this method you will pass the string connection, which is used as the name of the local connection. Again, the first parameter is used as an identifier between the two SWF files so they are able to communicate with one another.
- Pass the name of a method contained in the receiving SWF.
Though this method is not yet created, you can plan preemptively and give it an arbitrary name of ringRing.
- Finally, pass a third parameter.
Now pay close attention here. This third parameter is actually going to be passed as a parameter of the ringRing function as well. For this value, use the text property of the nameText text field. This will allow you to send whatever text is present in the nameText text field as a parameter to the receiving SWF.
function makeContact(e:MouseEvent):void

{

  sender.send("connection", "ringRing", nameText.text);

}
Setting up the receiver
Once the sending SWF file has been configured, you then need to create a file that will be capable of receiving information. For this part of the exercise, you will be using the ch11_04_rec_start.fla. In a similar manner to the way the sender was set up, the receiving SWF file also has the needed visual components already in place.
For this segment, the important element to focus on is the TextField, which has been given the instance name callerId.
- Select frame 1 of the timeline.
The Actions panel should already be open from the previous example. In the event that it is not, you can open it by pressing F9. In the Actions panel, create a new LocalConnection object. Notice that the LocalConnection object in this example is now called receiver.
var receiver:LocalConnection = new LocalConnection();
- Next, create a connection to the
LocalConnectionobject by using theconnect()method of thereceiverobject.
For this method, you need to pass the name of an active LocalConnection. Since we already defined the name of the connection as the first parameter of the sender.send method in the ch11_04_send_start.fla file, you know that the name of this LocalConnection is-connection. Therefore, you can pass that as the parameter of the receiver.connect() method.
receiver.connect("connection");
- Define a function that will be executed. In the sending SWF file you created a reference to an undefined function
ringRing. You now need to create that function in your receiving SWF. Enter the following code into theActionspanel:
function ringRing(caller:String):void

{

  callerId.text = caller;

}
When this function is created, you also set it up to receive a single parameter, which was also defined in the sender.send method of the ch11_04_send_start.fla file. This will allow the ability to pass the text from the name Text text field into the ringRing function as the variable caller.
Then, you can assign the value of caller, which was originally the value of nameText.text, to the text property of the callerId text field. Or, simply put, you can take the value of one text field and assign it to the value of another.
- Finally, you need to set the client for the
LocalConnection. Enter the following code in theActions Panel:
receiver.client = this;
Remember, for security purposes you have to let the LocalConnection know which SWF file contains the method that will be executed. The this keyword is used to let the connection know that this SWF does indeed contain the method to be executed.
At this point, you may now test both SWF files at the same time. Enter some text into the text field of the sending SWF file and click the Contact button. As shown in Figure 11-3, your text should automatically appear in the text field of the receiving SWF.
Now that we have discussed sending information to remote locations, let's discuss storing information to a user's local machine.
Storing data to a local machine
In many web applications it becomes necessary for an application to be able to store data about session states and user information. Similar to an application written in any standard web technology, much of the heavy lifting can be handled by the application itself. Flash is certainly no exception. It does have the ability to communicate with various standard web technologies and store information in databases. But, as with other types of web programming methods that utilize cookies, you may need to store small amounts of information about applications on the user's machine.
The SharedObject in ActionScript is a special type of object that actually works in a similar manner as the standard web cookie. If you think about the commonly used "remember me on this machine" convention, a user has the ability to store small amounts of information about himself or herself to be used for the next time he or she arrives at that same web page. What the user does not typically notice is that information is stored on his or her local machine and not in a remote database. So, when the user returns to that page, the page automatically looks to see whether the cookie exists and uses that information to recall the user's information.
Similarly to the way web applications use these cookies, Flash has the ability to store various amounts of information to the local machine for later use through SharedObjects. And because browser-based Flash applications are set up to operate within a sandbox, SharedObjects cannot directly interact with the user's computer outside of the Flash Player. So, there is no threat of malicious activity.
Taking a closer look at local shared objects
The file ch11_05.fla is aimed at helping you get a little familiar with the way that shared objects work. The trick with shared objects is that they typically don't save information until an application is closed. So, in order to examine the use of SharedObjects on your local machine or in the Flash IDE, you will need to test your Flash movie repeatedly to see the effects of those SharedObjects. By this, we mean that you will need to test your movie, close it, and then test it again.
As shown in Figure 11-4, the file ch11_05.fla logs the date every time the movie is tested. Therefore, whenever the movie is opened, the date is stored in a local shared object on the user's machine.
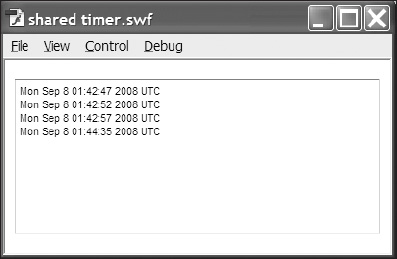
Figure 11-4. Data being stored repeatedly over time to a SharedObject
Using shared objects is actually a rather easy thing to do. As shown in the next example, the most complicated part of the entire program is formatting the string that stores the date. Like every other data type you have experienced in ActionScript, the first thing to do is instantiate a variable that will store and reference your shared object.
- In this example we start by using the variable
shared.
var shared:SharedObject = SharedObject.getLocal("counter");
In the previous example we make use of the method getlocal. The getLocal method requires one parameter, which is the name of the shared object that is stored on the local machine. In the current example, the parameter counter directly refers to the file counter.sol, which is stored on the client computer. If the file does not yet exist, such as when you first test this sample program, the instantiation process will automatically create this file.
- Next we add the following line of
code, which simply creates a newdateobject, cleverly calleddate:
var date:Date = new Date();
The date object will be used to retrieve the current date and time to be used to store the time in which this movie was tested.
- We then use an
ifstatement to check and see whether the shared object exists:
if (shared.size == 0)

{

  shared.data.opened = date.toUTCString();

}

else

{

  shared.data.opened += "
" + date.toUTCString();

}
This can easily be done by checking the size property of the object itself. The size property will return the size of the file in terms of bytes.
Keep in mind that when we originally instantiate a shared object, it does the following:
- Checks to see whether the data file exists
- Creates a file if one does not exist
In either case, the file will exist by the time you try to determine its size.
- Therefore, we check to see whether the file size is equal to zero.
If the file size is zero, we know that it contains no information. As a result we can use the if statement to either write new information or simply add to information that already exists.
- When adding information to the shared object, if we want that information to be saved, we always want to use the
dataproperty.
Once the data property is accessed, we can then create an arbitrary property name that will be used to label the information that will be stored in the shared object. In the following example, we use the property opened.
ta.text = shared.data.opened;
Once we have determined the existence of the shared object, we can either write the current date or add the new date string to the information that already exists.
- In this case, we use the
toUTCStringmethod of the date object to retrieve the currentdateand convert it to a string that is easily recognizable by human eyes.
The UTC date is actually the absolute date at the prime meridian, so if you are following along, don't be alarmed if the date and time do not match your location.
- If the shared object does exist, we use the
elseclause and simply add, or concatenate, the new date string to the old one.
As you can see, we also use the
character string in the expression to add a carriage return before adding the new date string.
- Finally, once we have determined the existence of the shared object's data and properly adjusted its value, we write that value to the
TextAreacomponent ta, which is located on the stage.
The greatest thing about shared objects is that they are automatic. Though you can have the ability to save, or flush, data to the shared object file, simply closing the program will do this for you.
Examining the .SOL file
To help you better understand the naming that is used and exactly what is involved in the creation of the shared object, let's take a brief sidestep and examine the inner workings of the shared object file that is stored on a user's local machine.
As shown in Figure 11-5, there is actually not much information stored in an SOL file. Using the previous example, remember during the instantiation process that we used the string value of counter as the parameter in the getLocal method. As you can see here, counter was used to name the file that is created to store the information. We also showed you that shared objects have many properties such as size and data. The data property is what is used to store and generate all the information you see in this file. This information can be broken into the following distinct parts:
- Header
- opened arbitrary property value
- Stored dates
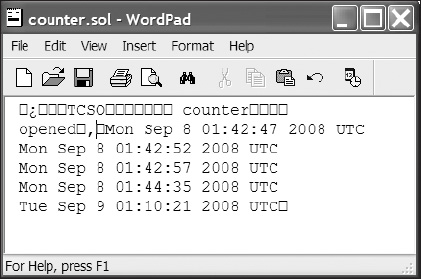
Figure 11-5. How data is saved in a local SharedObject
The first of these, which is of no particular consequence, is the header. The header is the first line in this file and is used to define the file in terms of type, size, and name. You should notice the object name counter, but the rest is illegible for a simple text reader. Not to worry, these other characters are used only for formatting and processing. They are not really meant to be read by humans.
The second item that you should immediately notice is the word opened. As you may recall, opened is the arbitrary property value that was created to store the date information in the ch11_05.fla file. Shared objects automatically take that property name and create a reference to it in the SOL file.
The final thing that should jump out at you is the list of dates that have been stored from the continuous testing of the SWF file. Shared objects store the information with the property names as comma-separated name-value pairs: "name" refers to the name of the property, in this case opened, and "value" is the date string created in the file.
Understanding how the information is stored in SOL files is a great start in understanding how to properly use them. You can see now that shared objects can be used to store much information about a specific user. For example, you could create a shared object called userinfo that could be used to store billing information about a user. You could then store all relevant information about the user in various properties of that shared object such as name, John; cardNumber, 1234; and address, anyplace. The best part about shared objects is that all information is stored locally on the client's machine, alleviating any concern of security issues during transfer or remote storage.
Creating a simple shared object
In the following example, you are going to take a crack at creating a shared object that will be used to store some basic form information. Storing form information is probably the most common use for basic shared object usage.
- First thing you'll need to do is open
ch11_06_start.fla.
As shown in Figure 11-6, the file contains a very simple form that will be used to store information about an individual on his or her local machine. Once you have examined the file and its graphical elements, you can proceed with the following steps to create the shared object.
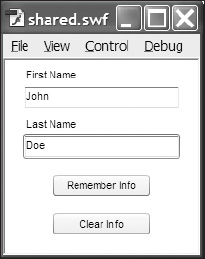
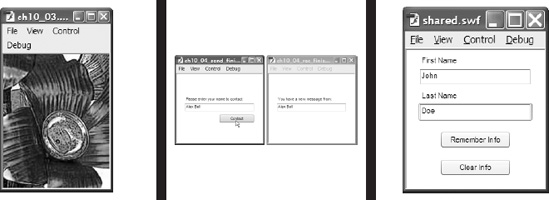
Figure 11-6. Storing of form data to a local SharedObject
- With the timeline open, select frame 1 of the
actionslayer and open theActionspanel (press F9). - Enter the following line of code in the script pane of the
actionslayer:
var shared:SharedObject = SharedObject.getLocal("userInfo");
As you are now fully aware, this line declares the variable that will be used to reference the shared object. The object is also instantiated using the SharedObject.getLocal method. You then need to pass it the parameter, which is the name of the shared object. For the purposes of this example we used userInfo, but this is an arbitrary value and can be whatever you like.
- Next, define event listeners for the
Remember InfoandClear Infobuttons.
The two buttons on the stage have been prenamed for you in the ch11_06_start.fla file.
For the button labeled Remember Info, which is also named rememberInfo in the Property inspector, you need to create an event listener for the MouseEvent.CLICK event. This listener will also be set up to trigger the handler storeInfo. Similarly, the Clear Info, or clearInfo, button will also be set to listen for the MouseEvent.CLICK event. However, it will trigger the deleteInfo handler.
rememberInfo.addEventListener(MouseEvent.CLICK, storeInfo);

clearInfo.addEventListener(MouseEvent.CLICK, deleteInfo);
- Now define the
storeInfofunction.
function storeInfo(e:MouseEvent)

{

 shared.data.firstName = firstText.text;

 shared.data.lastName = lastText.text;

 shared.flush();

}
The storeInfo() function is the listener for the remember Info button. This function is responsible for collecting the text data from the two text fields (first Text and last Text) and writing this data to the shared objects. You use this function to create two variables to be stored in your SharedObject.
The stage contains the firstText and last Text text fields. You then use the text property of these fields to retrieve whatever text is currently typed in those text fields. As demonstrated in previous examples, the text data can then be assigned to the appropriate shared.data variable using the assignment operator (=).
- Finally, introduce the
flush()method of thesharedobject.
The flush() method is used to force-save data to the SharedObject. As mentioned earlier, shared objects are automatically saved when a SWF file is closed. However, if need be, the flush() method gives developers the ability to save data instantly.
Creating the handler for the clearInfo button is much simpler than that used to save the data to the SharedObject.
- Create the
deleteInfofunction and pass it the e event object, as the use of an event handler would dictate.
function deleteInfo(e:MouseEvent)

{

  shared.clear();

}
This function then contains one simple statement.
- To remove information, or delete it, use the
clear()method of theSharedObjectclass.
As its name dictates, the clear method is used to clear the shared object of any data. We can use this method to remove any previously stored form information that is associated with this application.
Lastly, you need to give the form the ability to repopulate the firstText and lastText fields when a user returns to your application. Once again, reflecting on previous sections of this chapter, you learned that it is possible to check the existence of a SharedObject's data by checking the size of that SharedObject. You know that, no matter what, the object exists.
- Add the following code, the first line of which is responsible for either creating a new shared object or retrieving the object if it already exists:
if (shared.size != 0)

{

  firstText.text = shared.data.firstName;

  lastText.text = shared.data.lastName;

}
Therefore, the size property of the SharedObject must return a numeric value. If the size is zero, you know that there is no information stored in the object. If it happens to be something other than zero, you know there is information that can be retrieved.
To accomplish this check, you will need to create an if statement that will check to see whether the value of the shared.size property is zero. Actually, you will be using the logical NOT operator (!=) to determine whether the value of shared.size is not equal to zero. You do this because you want code to execute only if shared.size is not equal to zero. If it is equal to zero, this means you have no data. And, if there is no data, there is nothing to load.
- Finally, once you have determined the existence of information in the
SharedObject, load that data into the text fields. - In more or less a backward fashion to the
storeInfo()event handler, take the value of thefirstNameandlastNameproperties of theshared.dataobject and assign those values to the text properties of thefirstTextandlastText textfields.
Once everything is in place, you can go ahead and test your movie as follows:
- Fill out the form information and click the
Save Infobutton. - Now close the movie and retest it.
Your information should automatically repopulate itself to the text fields.
- Now click the
Clear Infobutton and close the movie again.
When you test the movie a third time, you should notice that your information has been cleared; thus it is not loaded into the text fields.
Summary
In this chapter we took a brief look at the primary methods in which ActionScript communicates with the outside world. By using the URLLoader and URLVariables classes, you can effectively access any asset that is externally accessible to a Flash movie. In the upcoming chapters we will take a more in-depth look at specific types of data including sound, video, and XML.
The important classes covered in this chapter were
URLRequestURLLoaderURLVariablesLoaderLocalConnectionSharedObjects