CHAPTER 10
LEARNING THE DISPLAY MODEL AND BRINGING IT ALL TOGETHER
Working with visual elements in ActionScript 3.0 has become incredibly more efficient. This efficiency is due largely to the new way Flash handles visual elements at runtime. If you ever had the pleasure of working in previous versions of Flash and ActionScript, you would no doubt remember the complex way that Flash handled adding various objects to the stage. This complicated process involved several methods of actually adding elements to the stage. It was difficult to manage these graphics and keep track of layer depths.
The new display list model makes working with visual elements a whole lot simpler. By organizing elements in a hierarchical structure and using a few basic, streamlined methods, developers are no longer faced with the convoluted task of figuring out the best way to add items to the stage.
In the first part of this chapter we will be examining the way in which ActionScript now handles visual elements in Flash. Once you have learned how to manage visual elements with ActionScript, you will then apply this new knowledge to what you have learned in previous chapters and create the multiclass interactive game Germaphobe.
Let's begin by gaining mastery over display objects.
Working with display objects
Display objects represent everything that is associated with visual elements in Flash. Visual elements in Flash can be any kind of asset that has a graphical representation or is used as a container for graphical elements. As you have learned in previous chapters, these graphical elements can be vector shapes, bitmaps, or symbols.
Though it is possible to have visual objects that are not on the display list, the display list is responsible for governing all elements in Flash that have the capability of either being visible or containing visible objects. Visual objects are then organized hierarchically into the display list for that application. In Figure 10-1, you can see various elements arranged on the stage of a Flash movie.
When working with display lists, the stage always represents the topmost, or parent, container for the entire application. The stage is a representation of the main Flash Player that is responsible for displaying all other visual elements. Figure 10-2 demonstrates the display list hierarchy for the same group of images demonstrated in Figure 10-1.
The next element in the display list is the main timeline of the application. All Flash applications must contain a timeline. Even if the application is of the sprite type (one frame), it still contains a timeline. Therefore, if you were to publish a movie clip with nothing on the stage, you would still have at least two objects in the display list—the stage and the main timeline.
Figure 10-1. The arrangement of graphics on the Flash stage
Figure 10-2. The display list hierarchy of a sample Flash file
When you begin adding items to the stage, you are adding children to the timeline of the display list. In the examples shown in Figures 10-1 and 10-2, three children have been added to the main timeline:
- The text field
- The orange rectangular shape (Shape 1)
- The movie clip containing the photograph (bitmap)
The movie clip contains two children itself, the bitmap photograph and a blue rectangular shape. The fact that this movie clip contains children, or child display objects, automatically classifies it as a display object container.
Traversing the display list
The Flash online help documentation (http://help.adobe.com/en_US/ActionScript/3.0_ProgrammingAS3/) offers an extremely helpful way of tracing out the entire display list. In this section we will be discussing a loose adaptation of this function that we will call the listChildren() function. By using listChildren(), shown in the following code, you can get an accurate listing of all display objects that are available in the visible display list. In addition, this function introduces the concept of display list containers. Display list containers are a type of display list object that is capable of containing other display list objects.
The following example file, ch10_01.fla, corresponds to the graphics portrayed in Figure 10-1:
function listChildren

(cont:DisplayObjectContainer, tab:String = ""):void

{

  var child:DisplayObject;

  for (var i:uint=0; i < cont.numChildren; i++)

  {

    child = cont.getChildAt(i);

    trace(tab, child, child.name);


    if (cont.getChildAt(i) is DisplayObjectContainer)

    {

      listChildren(DisplayObjectContainer(child), "    " + tab)

    }

  }

}


listChildren(stage, "|----");
On the AS layer of that file, you will also notice the preceding code segment. As mentioned, this function is used to trace the existing elements from the stage to the Output window in order of their hierarchical structure.
The first line of code defines the function listChildren(). This function accepts two parameters. The cont parameter represents the parent container, the children of which we will display. The second parameter (tab) represents a string variable that will be used to indent the list to give it better readability in terms of its structure.
Once the function is declared, we then create the variable child, which will serve as a reference for the child objects of the parent; in this case, the parent will be the stage. The for loop, shown next, is then used to loop through all the children contained within the parent display object.
for (var i:uint=0; i < cont.numChildren; i++)

{ ...
In this for loop we declare an incrementing variable, i, to serve as the counter and set its initial value to 0. The second statement of the loop then determines the maximum count for the loop. For this we are using the property numChildren. numChildren is a special type of property used by all display object containers. In this case our display object container is the cont object that was passed as the first parameter in the listChildren() function. Therefore, this number will resolve to the total number of child display objects that are contained in the cont display object container. The i variable is then incremented until the loop has reached the predetermined maximum value, cont.numChildren.
The next two lines of code set the value of the child variable to the current child of the cont container using the getChildAt method. Like the numChildren property, all display object containers also have the method getChildAt to reference a child container based on its index. When children are added to display object containers, they are indexed numerically based on when and how they were added to that container. Therefore, we have the ability to reference these child items based on that numerical index.
As the loop iterates and cycles through the code, we can use the i variable to determine each child located at that particular index. Once the reference is established, we then trace out information about the child object, as shown here:
child = cont.getChildAt(i);

   trace(tab, child, child.name);
In the preceding trace statement, we first trace out the tab string. Remember the tab string will be used to indent the children of containers to aid in readability. Secondly, we trace the child itself. Then we trace out the type of object the child is. Finally, we trace the child name.
There are several elements in Flash that you can name using the Property inspector. However, there are many objects, like shapes, that you do not have the ability to name. If an object does not have a name when the program is instantiated, Flash will automatically name that object. Therefore, many of your objects will have generic names such as instance2.
The first pass through this loop will detect the main timeline and trace out something like this:
|---- [object MainTimeline] root1
Here |---- is the indent string, [object MainTimeline] is the child, and root1 is the name of the child. So MainTimeline is the first child of the stage.
The remaining lines in the listChildren() function are used to determine whether the child object is a display object container itself. The is keyword is a type of operator used to determine whether an object is a specific type of object. In this case we are checking to see if the objects are of the DisplayObjectContainer type. If a display object has children, it is most certainly a display object container. Therefore, this statement will evaluate to either true or false:
if (child is DisplayObjectContainer)

{...
If the preceding statement does evaluate to true, we enter a rather interesting situation. You may have noticed that the code located in the if statement is actually another call to the listChildren() function. Essentially, we have a function calling itself from within itself. This phenomenon is known as recursion, or recursive execution. If the child object is indeed a display object container, we would want it to list its children as well. Subsequently, we can then call the listChildren() function within itself and pass it child as the container parameter. We also add more space to the front of the indent string to create further indenting of the child elements. This is demonstrated in the following statement:
listChildren(DisplayObjectContainer(child), " " + tab)
Finally, we call the listChildren() function and pass it the initial variable for the container and the tab string. In this case, we want to determine all visual assets of the ch10_01.fla movie, so we pass stage as the topmost cont parameter. We also pass the |---- string to help aid in the readability of the traced output, as shown here:
listChildren(stage, "|----");
If you test the movie, you will see a list of all visible display objects being traced to the Output window.
Examining display object containers
As you just learned, display object containers are special types of display objects that are capable of containing other display objects. In ActionScript, there are four primary types of display object containers:
You should now be fairly familiar with all types of containers with the exception of the loader type. You will be introduced to the loader in Chapter 11.
Display object containers give you the ability to manipulate their children in a number of different ways, as you'll find out shortly. Because the display model in ActionScript 3.0 has been completely rearchitected, those migrating from earlier versions of ActionScript should find these methods a lot more efficient to work with. Additionally, this change will also give you a tremendous amount of control both inserting and changing the stacking order of your visual elements.
Adding children
Adding a child object to the stage is one of the easier things that you can accomplished in ActionScript. As demonstrated in ch10_02.fla, the only thing that is required is a variable for reference. Using the addChild method, you can then easily add an item to the display list using the variable reference.
As shown next, a new shape is created and given the reference name of shape1. We then use the addChild(shape1) statement to add the new shape to the stage. If you tested this movie, you may be wondering where the shape is. Well, there are no visible aspects to the shape at this point. However, if you were to trace the shape using its index in the display list, you would notice that the trace statement does in fact return an object of the Shape type.
var shape1:Shape = new Shape();


addChild(shape1);


trace(this.getChildAt(0)); //[object Shape]
In order to have a visible shape, we will now use some basic ActionScript to draw the red rectangle as demonstrated in ch10_03.fla. At this point, these new lines of code are of no tremendous consequence. They have simply been added to help you see what we are doing. Testing the movie will render a red rectangle in the upper-left corner of the SWF.
var shape1:Shape = new Shape();


shape1.graphics.beginFill(0xff0000);

shape1.graphics.drawRect(0, 0, 200, 100);

shape1.graphics.endFill();


addChild(shape1);
Adding shapes to the stage is just as easy. In the following example, you can see that when adding a second green rectangle to the stage, Flash automatically stacks display elements as they are added. Notice that shape2 is added to the stage on top of shape1.
var shape1:Shape = new Shape();

var shape2:Shape = new Shape();


shape1.graphics.beginFill(0xff0000);

shape1.graphics.drawRect(0, 0, 200, 100);

shape1.graphics.endFill();


shape2.graphics.beginFill(0x00ff00);

shape2.graphics.drawRect(100, 0, 200, 100);

shape2.graphics.endFill();


addChild(shape1);

addChild(shape2);
Inserting display objects at different depths
In many cases, you will want to insert display objects at different depths in your movie. ActionScript gives you complete control over this functionality as well. Using the addChildAt() method, you have the ability to add a child at whatever depth, or index, of the display list you would like. Using the previous example, also found in ch10_04.fla, you can now see that when using the addChildAt() method, you have the ability to place the green rectangle below the red rectangle. Unlike the addChild() method, the addChildAt() method accepts a second parameter in addition to the object name. This second parameter represents the index at which you would like to insert your object.
The following code demonstrates how the previous example can be changed to switch the depths of the red and green rectangles:
var shape1:Shape = new Shape();

var shape2:Shape = new Shape();


shape1.graphics.beginFill(0xff0000);

shape1.graphics.drawRect(0, 0, 200, 100);

shape1.graphics.endFill();

shape2.graphics.beginFill(0x00ff00);

shape2.graphics.drawRect(100, 0, 200, 100);

shape2.graphics.endFill();


addChild(shape1);

addChildAt(shape2, 0);
In this example you can see now that the green rectangle is inserted below the red rectangle by using the index position of 0.
Removing children
In much the same manner that you add children to the display list, you have the ability to remove them. In ch10_05.fla, you'll find an example that is very similar to the previous one. The primary difference is that we have changed the shapes to movie clips for the benefit of interactivity. As shown next, there are also two sets of event listeners and handlers to toggle between whether mc2 is on or off the display list. Using the removeChild() method, we can then effectively make the green rectangle disappear.
...

addChild(mc1);

addChild(mc2);


mc1.addEventListener(MouseEvent.MOUSE_OVER, over);

mc1.addEventListener(MouseEvent.MOUSE_OUT, out);


function over(e:MouseEvent)

{

  removeChild(mc2);

}


function out(e:MouseEvent)

{

  addChild(mc2);

}
Similarly, we also have the ability remove children at certain positions using the removeChildAt() method. By changing the removeChild() statement in the over event handler to removeChildAt(0), we can now target the child object that is located at the 0 index of this display list. When testing the movie, you should now see the blue rectangle disappear when you mouse over the red rectangle.
function over(e:MouseEvent)

{

  removeChildAt(0);

}
Swapping depths
Finally, developers have the ability to change the position of child objects by also referencing either the child name or the index position of the child. In ch10_06.fla, we again take the previous example and alter the statements within the event handlers to control the changing of depths between the green rectangle (mc2) and the blue rectangle (mc3).
function over(e:MouseEvent)

{

  swapChildren(mc2, mc3);

}


function out(e:MouseEvent)

{

  swapChildrenAt(0, 2);

}
In the over event handler, we are swapping positions based on the child names using the swapChildren() method. With the swapChildrenAt() method, we can reference the display list index for the same particular objects. In this case because we know mc3 is originally at index 0 and mc2 is originally at index 2, we can set this up so that these two objects toggle positions when the red rectangle is moused over.
By now you should have the necessary understanding to begin putting together basic ActionScript applications. What you have learned in the last three chapters has more or less been laying the foundation for everything else that you will learn in ActionScript. You have been exposed to the core tools for development. The rest of the book can therefore be thought of as various extensions of this basic foundation. You will certainly learn a tremendous amount of new material in the upcoming chapters, but the basic theory and manner in which you engage these elements will remain the same.
Germaphobe
The Germaphobe application, as far as computer programs go, is relatively simple. In this game a player will be responsible for clicking germs that appear on the stage. The game grows increasingly difficult as more germs are added to the stage over time. The game is over when the game board becomes overrun by germs, causing a total infestation. Therefore, a player will need to click as many germs as possible before the game board becomes infested. As an intended side effect, developing this game will allow you to bring your current ActionScript knowledge together in one place. Leaning heavily on the previous three chapters, you will gain a working understanding of the total sum of ActionScript's basic working parts.
The Hello World application you built in Chapter 8 showed you how to construct a simple one-class application but no doubt gave you very little insight into a real-world application or its theory. In Germaphobe we will take a look at a simple two-class application that deals with user interaction, multiple graphics, and plenty of moving parts.
Finally, we are going to leave this application a little open-ended to allow you to further modify the game with enhancements as you learn new tricks throughout the book. It is always good to continually remold an application to help you understand why something is done a certain way and how you may be able to make it more efficient.
Setting up the game
It is fairly common for production houses to be split into two sides, design and development. And as a developer, it is not uncommon to have graphical elements done for you. Before we ever wrote one lick of code for this example, we started with an FLA file that had four colored dots in its Library panel. Obviously, the dots were later changed to graphics of germs, but there was without question a clear definition between design and development.
To get started with the Germaphobe application, you will first need to open the Germaphobe.fla file from the sample files. This file is pretty bare bones. With the exception of containing four graphics in the Library panel, it has no ActionScript of any kind. In the general scope of things, this is about where a typical developer will begin the process of coding.
Assigning the document class
Once you have acclimated to Germaphobe.fla, what is the next course of action? If you said create a document class for the application, you are absolutely correct. The document class is the primary class in our application, and it is responsible for managing everything that will be used in the application. As the foundation for our application, it is the best place to start.
To create the document class for the application, you will need to do the following:
- Create a new ActionScript file by selecting
File New. Then select
 ActionScript Filefrom theNew Documentdialog window. - Save the new ActionScript file as
Germaphobe.asin the same directory asGermaphobe.fla. - In the
Property inspector, assign the document class by typingGermaphobein theClassfield as shown in Figure 10-3.
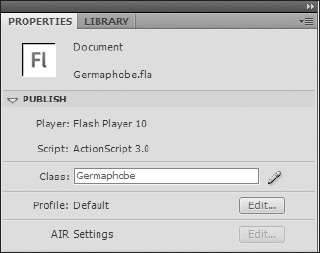
Figure 10-3. Defining the document class in the Property inspector
Defining the Germophobe class
The proper definition of a class is pretty straightforward. Recall from Chapter 8, where you defined your first class, that three main components are required for class definitions:
- Package: A package is a collection of classes that reside in the same directory because they share related functionality. Because this class is defined in the same directory as
Germaphobe.fla, a package name is not required. - Class definition: The class definition encapsulates all functionality of the class. It must have the exact same name as the AS file that it is defined in.
- Constructor function: The constructor function is the main method of the class. All functionality that resides within this function is executed when the class is instantiated. The constructor function must have the exact same name as the class it represents and the AS file it is defined in.
To define the Germaphobe class, enter the following code into the Germaphobe.as file:
package

{

  import flash.display.Sprite;


  public class Germaphobe extends Sprite //Class Definition

  {

    public function Germaphobe () //Constructor Function

    {


    }

  }

}
An additional element to take note of in the class definition is the use of import statements. The import statement is used to import functionality from other classes and packages. By default all document classes must import either the MovieClip or Sprite class. In this case, because the Germaphobe timeline will not have more than one frame, it is best to import the Sprite class.
We then use the extends keyword to allow the Germaphobe class to behave like a Sprite. Where the import statement allows a program to access certain functionality, the extends keyword makes that functionality an innate ability of the class. Therefore, all properties, methods, and events of the Sprite class are now active members of the Germaphobe class.
The ability of a class to inherit functionality from another class is known as inheritance—go figure.
Class and property attributes
As a developer, you will often want to control the level of access other developers and other elements in the program may have when dealing with a specific class. For this reason ActionScript 3.0 offers several modifiers that are used to control this level of access. For example, you may have noticed the modifying word public in the class definition. Table 10-1 gives the appropriate use for attributes that are employed for modifying class declarations.
Table 10-1. The modifying attributes for class definition
| Attribute | Definition |
dynamic |
Allows a programmer to create and add custom properties to an object at runtime |
final |
Prohibits the class from being extended |
internal (default) |
Indicates the class can be referenced by other classes within the package |
public |
Indicates the class can be referenced anywhere in a program |
It is also necessary to have the ability to modify the various members of classes. The primary function is to limit accessibility from outside programming. The best way to think of this is to consider many modern mechanisms or appliances. For example, a television has public functionality. The on/off button allows a person to switch the television on or off. However, the TV also performs functions that are not directly accessible to the viewer, like converting a signal into a picture. Rightfully so, this kind of functionality should stay out of the hands of the average viewer. The use of class and property attributes is established for exactly this reason.
Table 10-2 gives a list of the various class property definitions and their uses.
Table 10-2. The modifying attributes of class members
Setting up the germs
Now that the main class of the game has been created, it's time to start to add the bits and pieces that actually define the purpose of the game. The germs constitute the primary component, and are thus the namesake of the game. The primary purpose of the game is to try to stop the infestation of the game board from occurring. Before we can include our germs in the game, they will need to be created.
Defining the class
As you may have guessed, the first thing that needs to occur for the creation of germs is the defining of the Germ class. Creating a class for a germ is no different from creating a class for the Germaphobe game. It will involve all the usual suspects for class construction and follow the same rules.
Follow these steps to create the Germ class:
- Create a new ActionScript file by selecting
File Newand choosingActionScript Filefrom theNew Documentdialog. - Save the file as
Germ.asin the same directory asGermaphobe.flaandGermaphobe.as. Remember, naming is extremely important and so is letter case. - Create the class definition by entering the following code into the script pane of the
Germ.asfile.
The creation of the Germ class is going to follow the exact same procedure as the Germaphobe class with the exception of a few minor tweaks.
package

{

  import flash.display.MovieClip;


  public class Germ extends MovieClip

  {

    public function Germ ()

    {


    }

  }

}
The most obvious difference between this class and the Germaphobe class is the use of an appropriate name. Therefore, because we are working in the Germ.as file and defining a new classification of object, the name of the class and the constructor function should both be Germ.
The second, and not so obvious, change is the use of the MovieClip keyword as the imported class and class extension. Remember, the primary difference between the movie clip and the sprite is the existence of a multiframed timeline. The main application is only going to reside on one frame of the main stage, so Sprite is sufficient for the document class. However, as you will find shortly, the Germ class is going to be linked to a library asset. This symbol contains multiple frames, which we will need to access later. Therefore, we will need access to timeline functionality, which will require the use of Movie Clip as the parent class instead of Sprite.
Linking to a graphic symbol
In Chapter 9, we briefly discussed the concept of creating new symbols as being similar to creating new classes. At this point, now that you've attained a general knowledge of inheritance, we are going to revisit and wrap up that concept.
When a symbol is created and added to the library, in this case the symbol Germ, you are basically extending the MovieClip class with the new class Germ (Germ extends MovieClip, right). Though adding ActionScript to the timeline of the Germ symbol would not really be best practice in this case, if you were to add a function to the timeline of that symbol, you would indeed be creating a method of Germ.
You then have the ability to add instances of Germ to the stage of your Flash movie at either runtime or author time. Therefore, the concept for creating new library symbols is similar to creating new classes. You also have the ability to link an external class to various library symbols. In this case, the creation of the library symbol is in fact actually the same as creating a new class.
To link the Germ.as class file to the Germ library symbol, do the following:
- Right-click the
Germsymbol in theGermaphobe.fla Librarypanel to open theSymbol Propertiesdialog. - Check the box next to
Export for ActionScript, as shown in Figure 10-4. TheClassfield should automatically fill in with the valueGerm, which is based on the name of the symbol. This also represents the name of the AS file that you want to link to the symbol. It is required that this field and the AS file have the same name. It is also excellent practice to plan ahead to make sure your symbol will also have this name. - Select
Export in frame 1and clickOK.
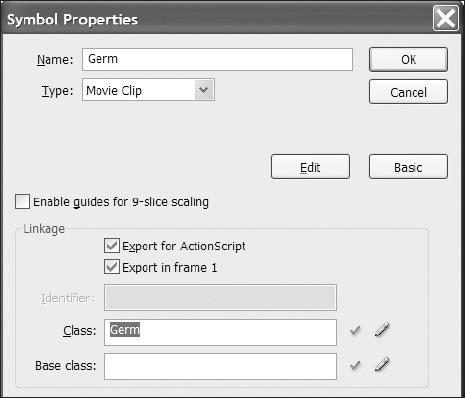
Figure 10-4. Class linkage for a library symbol to be used in ActionScript
Initializing the game
The initialization of your Flash application is always going to occur in the constructor function of your application's document class. In this case, the Germaphobe function of the Germaphobe class is going to be that point of initialization. The constructor function of your document class can always be thought of as the first domino. Therefore, as soon as the application is run, the document class will fire, and whatever is located in the document class's constructor function will fire.
A cleaner point of entry
As you will find, the first stages of an application such as a game can be a bit miscellaneous. They typically involve the creation of a few various tidbits that are responsible for getting the entire big picture rolling. As a personal convention, we usually don't like a lot of initial garbage in the constructor function of our applications. For this reason, we like to create a second function right off the bat. This method will handle all the initial functionality used to set up our application.
Directly below the constructor function in the next example, we will set up the private function init(). We set this to private because we want this function to be accessible only from our Germaphobe class. We then call this function in the constructor with the init(); statement.
package

{

  import flash.display.Sprite;


  public class Germaphobe extends Sprite

  {

    public function Germaphobe ()

    {

      init();

    }


    private function init():void

    {


    }
Randomly adding germs to the stage
To add germs randomly to the stage, we simply need to instantiate the Germ class and add it to the stage using the addChild() method of the DisplayObjectContainer class. As an added bonus, we will start scratching the surface of the Math class to help us further manipulate the position of our first germ.
Add the following code to the init() function of the Germaphobe class:
public function Germaphobe ()

{

  init();

}


private function init():void

{

  var germ:Germ = new Germ();


      germ.x = Math.random() * stage.stageWidth;

      germ.y = Math.random() * stage.stageHeight;


      addChild(germ);

}
The first line is the basic declaration and instantiation of the germ variable. Because the Germ class extends the MovieClip class, which is itself a distant descendant of the DisplayObject class, it has all the properties you would expect to find in a display object, notably the x and y properties. With these two properties, we will have the ability to position the germs anywhere we like on the stage.
To give the game a more organic feel, we are going to randomly position germs on the stage as they are created. To do this we are going to use a simple statement involving the Math class. The Math class contains methods for performing basic numeric operations such as the elementary exponential, logarithm, square root, and trigonometric functions. It also contains several commonly used mathematic constants such as pi and Euler's e. In Flash, one of the most commonly used methods of the Math class is the random() method. The random() method generates a random decimal number between 0 and 1, but not including 1.
In the next code sample, we are taking this randomly generated number and multiplying it by the height and width properties of the stage. We know that the stageWidth property is 550 because we can check it in the Property inspector of the Germaphobe.fla file. We know that zero times any number is zero. We also know that one multiplied by any number is that number. Therefore, by multiplying the stage width (550) by a randomly generated number between 0 and .99, we can effectively position the germ at any point from 0 to approximately 550. This holds true for the height (or y property) of the stage as well.
Math.random() * stage.stageWidth // is the same as (0 to 0.99) * 550
Finally, we use the addChild() method to place the movie clip on the stage. If you test your movie a couple of times, you should see that the germ appears in different places every time.
On a side note, the Target drop-down menu is used for targeting an FLA when working in external AS files. This is used to allow you to test an FLA directly from the AS file by selecting the file that you would like associated with the AS file. As shown in Figure 10-5, the target for the Germ and Germaphobe AS files is set to Germaphobe.fla.
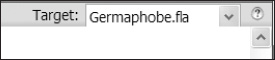
Figure 10-5. The Target drop-down for AS files
Picking the germ's face
You may have also noticed that when you tested the movie, the germ was changing all different shades of the color spectrum. This is because the germ image is comprised of a four-frame movie clip. You can see from Figure 10-6 that each frame of the Germ movie clip contains its own image of a different-colored germ. We can use these images to add a little variety in our game.
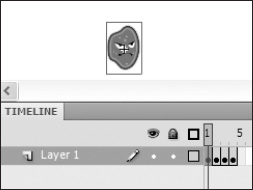
Figure 10-6. The timeline of the Germ movie clip
At the moment the issue we have with the Germ movie clip is that its timeline plays and continues to loop while the game is playing. What we need to have happen is to have the timeline of the Germ movie clip stop on a frame to display a different-colored germ, seemingly at random.
To accomplish this, we are going to add a simple statement to the constructor function of the Germ class. Using the gotoAndStop() method, we can tell the timeline to jump to a specific frame in the germ's timeline and stop at that frame. The keyword this then targets the timeline of this germ.
public function Germ()

{

  this.gotoAndStop();

}
The gotoAndStop() method accepts one parameter, the frame. It can be either a string value that represents a frame label or a numeric value that represents the frame number. In this case, because we are not using frame labels, we will opt for the use of a numeric value. Once again, this puts us in the position to select the number at random.
To achieve the random number of the frame, we will again use the Math.random() method and multiply it by the total number of frames in the Germ timeline, 4, as shown here:
this.gotoAndStop(Math.random() * 4);
You may have been clever enough to pick up on the fact that this is not quite going to give us the values we need to select frames 1 through 4. Remember that the Math.random() method returns a decimal number ranging from 0 to 1, but not equaling 1. Therefore, this will never return a value of 4. The highest value we could ever hope to achieve from this statement is 3.999999999999999.
To get around this slight technicality, we will introduce the following method from the Math class, Math.ceil() (where ceil stands for ceiling). This method rounds any given decimal value up to the next whole number. Unlike standard mathematical rounding, which rounds up or down, the Math.ceil() method will round up no matter what the decimal value is. So, if the number happens to be 3.001, Math.ceil() will round it up to 4. Therefore, all numbers greater than zero will round to 1, all numbers greater than 1 will round to 2, all numbers greater than 2 will round to 3, and all numbers greater than 3 will round to 4.
public function Germ()

    {

      this.gotoAndStop(Math.ceil(Math.random() * 4));

    }
Test the movie a couple of times. You should notice that now when the first germ is placed on the stage, it is no longer flickering, but is a different color.
Making the germ scurry
Now that the germ is in our game, it is more than likely that we are going to want to get rid of it. Germs are bad, right? The unfortunate reality is that before we can kill the germ, we have to catch it. You're probably wondering what the difficulty will be in catching something that just sits in the same position. Well, before we can catch it, we have to make it scurry.
Creating random motion with the scurry event
Well, we have a germ. And, as exciting as that is, it is often said that "The fun is in the chase." Therefore, we need to give the germ the ability to try to escape its impending destruction.
Thinking back to Chapter 9, we discussed several ways to create animation using the help of events and event listeners. To create the motion for the germ, we will be using the ENTER_FRAME event, which will fire based on the frame rate of the main document. Because Germaphobe.fla has a frame rate of 24 fps, we should expect this to execute approximately 24 times every second.
In the following code we add the necessary framework for including an event in the Germ class. To use events we first import the events package using the import flash.events.* statement. By using an asterisk after the dot operator in this statement, we can import all classes in this package.
In the constructor function, we add the ENTER_FRAME event listener, setting the handler name to scurry. We then create the scurry() method of the Germ class to handle the movement of the germ.
package

{

  import flash.display.MovieClip;

  import flash.events.*;


  public dynamic class Germ extends MovieClip

  {

    public function Germ()

    {

      this.gotoAndStop(Math.ceil(Math.random() * 4));

      this.addEventListener(Event.ENTER_FRAME, scurry);

    }


    public function scurry (e:Event)

    {


    }

  }

}
Having set up the framework for the handling of the scurry event, we can now define exactly what it is for our Germ to scurry.
In my (Paul's) experience as an ActionScript instructor, the most common difficulty faced by new programmers is trying to translate complex human concepts into the programming realm. When we define a method such as scurry(), because the human thought process is so complex, it can conjure up a million different thoughts about what it means for something to scurry. In all actuality, scurrying in the Germaphobe world is nothing more than the germ moving around the board, trying to elude eminent doom. Therefore, scurrying is simply movement. And as you learned Chapter 9, you can create the illusion of movement simply by updating the position of an object at a regular interval. So scurrying is nothing more than regularly updating the x and y property of our germ.
In the upcoming code sample, we add four new lines to the Germ class. The first two lines are responsible for defining variables for xSpeed and ySpeed properties of our germ. When creating properties in a class, it is a common convention that all properties be defined first in the class before the constructor function.
We first create the dx and dy properties to control how fast the germ will move in any given direction. Speed, by definition, is the total change of distance over a certain interval of time. For our germ, the time is going to be handled by the ENTER_FRAME event. Therefore, the change in distance will be determined by the dx and dy properties.
We again use the Math.random() method to add a more dynamic feel to the end product: every germ that is added to the stage will have the illusion of moving at a different speeds. We then multiply Math.random() by an arbitrary number, 10, to make the movement more significant.
The next two lines are added to the scurry function. The scurry function is the handler for the ENTER_FRAME event in the Germ constructor function. So, to give the illusion of motion, as we did in Chapter 9, we will increment the x and y properties of the Germ using the dx and dy properties. Therefore, every time the ENTER_FRAME event is fired, the scurry function will add the value of dx and dy to the current values of x and y, respectively.
public dynamic class Germ extends MovieClip

{


  private var dx:Number = Math.random() * 10;

  private var dy:Number = Math.random() * 10;


  public function Germ()

  {

    this.gotoAndStop(Math.ceil(Math.random()*4));

    this.addEventListener(Event.ENTER_FRAME, scurry);

  }


  public function scurry (e:Event)

  {

    this.x += this.dx;

    this.y += this.dy;

  }

}
Checking for walls
You may now notice that when you test your program, the germ does indeed move. And, as exciting as this may be, you will also no doubt notice that the germ eventually scurries off the screen, never to return. This of course would be the desired result if we did have an infestation of germs. Unfortunately, it doesn't make for a very exciting game. To avoid the problem of the ever-running germ, it becomes necessary for us to check the bounds of the stage to determine whether the germ has reached an edge.
To accomplish this, we add two very simple if statements to the scurry function. The first of these will check the horizontal bound of the germ's movement and then change the sign of dx. For a beginning programmer, this may look a bit complicated at first. However, reading it in layman's language, it becomes a little less sinister. The first line basically says, "If this (germ) x is less than 0 or this (germ) x is greater than 550 . . . " Logically, this is doing nothing more than determining whether the x position of the germ is less than zero (off the stage to the left) or greater than 550 (off the stage to the right). The second if statement in this code block works in the same manner as the first, only it governs the y property (vertical movement) of the germ.
public function scurry (e:Event)

{

  if (this.x < 0 || this.x > 550)

  {

    this.dx *= −1;

  }


  if (this.y < 0 || this.y > 400)

  {

    this.dv *= −1;

  }


  this.x += this.xSpeed;

  this.y += this.ySpeed;

}
Killing germs
The killing of germs is probably the most complicated part of the entire Germaphobe program. The reason for this is that it involves the authoring of code in both the Germ class and the Germaphobe class.
Setting up the kill
The first step to eradicating germs from the game is to create the mouse event. In the game, if you want to kill the germ, you simply need to catch it and click it. As you learned in Chapter 9, if you have many items within a display container, you can control targeted events to those items by applying the event listener to the parent object. In the Germaphobe game, the stage is going to serve as the parent container. Eventually, there will be hundreds of germs on the stage that you are going to have to try to catch and kill. Therefore, if we add the listener to the stage, all of the germs will receive the event through event propagation.
We add the listener for clicking germs in the init function of the Germaphobe class. The handler for this event will be the function kill, which is also going to be added to the Germaphobe class.
stage.addEventListener(MouseEvent.MOUSE_DOWN, kill);
The kill function does become a bit tricky because we must use the is operator to determine the type of object that is clicked. The first thing that needs to occur here is the filtering of target objects. When using event propagation, any interactive object that is a child of the container can be the target of the click. Since we are using the stage as the parent object, and it is the topmost container, all objects that are visible on the stage will be targets of the CLICK event and receive the event through propagation. Therefore, all Germs will receive the CLICK event. Because all display objects on the stage will receive this event, we will need to determine whether the item clicked is actually a germ.
The first line of the kill function is an if statement that is going to evaluate whether the target of the mouse click is in fact a germ. We can accomplish this using the is keyword, which is used to check the data type of any given object. The if statement then determines whether the item that was clicked is of the Germ data type. If the event target does happen to be a germ, or more specifically of the Germ data type, the if statement will be true. This then causes the if statement to execute its code block.
private function kill (e:MouseEvent):void

{

  if(e.target is Germ)

  {

    e.target.die();

  }

}
Within this code block we can then call the die method of e.target, which is really calling the die method of a Germ (the Germ that was clicked).
Things are killed, and then they die
The die() function is added to the Germ class and handles the germ being removed from existence and the memory of the game. In this function, we first remove the event listener for the scurry ENTER_FRAME event. Good garbage collecting dictates that when events are no longer needed, it's best to get rid of them.
The second thing this function does is remove the visual representation of the germ from the display list. We use parent to target the stage. We can then use removeChild() and pass the this keyword to target the germ. Therefore, the stage can remove its child, which is this particular germ.
public function die()

{

  this.removeEventListener(Event.ENTER_FRAME, scurry);

  parent.removeChild(this);

}
Allowing germs to reproduce
Alright, you are making excellent progress. When testing the game, you will now have a germ that scurries around the stage, is unable to escape the stage, and can be killed upon clicking. The next thing that we'll need to do is try to make it gradually more challenging for players. The best way to do this is to add more germs!
Adding by intervals
In games it is natural for the progression of the game to increase in difficulty. This increasing difficulty is usually managed with countdowns, new levels, or increases based on a player's score. Because this is your first attempt at making a Flash game, we will use a simple timer to add additional germs to the stage on a given interval. This will continually add germs to the stage until it becomes too much to handle.
The first step in adding a timer to the Germaphobe class is to import the Timer class from the flash.utils package.
package

{

  import flash.display.Sprite;

  import flash.events.*;

  import flash.utils.Timer;
Next, we will add three properties to the Germaphobe class. The first property will be a simple reference name for the timer object that will be used to add more germs to the stage. The second two properties, count and prevCount, will be used to store variables that will keep track of the number of germs that have been added to the stage.
public class Germaphobe extends Sprite

{

  private var timer:Timer;

  private var count:uint;

  private var prevCount:uint;
Once the properties have been added, we can then create a new timer object in the init function of the Germaphobe class. You should notice that we have set the required parameter of the timer to 5000 milliseconds, or 5 seconds. We also have the event listener set to trigger the addGerms() function when the event is detected. It is then required that the timer be started. This should give us a fresh set of germs every 5 seconds.
private function init():void

{

  var germ:Germ = new Germ();

  germ.x = Math.random() * stage.stageWidth;

  germ.y = Math.random() * stage.stageHeight;

  addChild(germ);


  stage.addEventListener(MouseEvent.MOUSE_DOWN, kill);


  timer = new Timer(5000);

  timer.addEventListener(TimerEvent.TIMER, addGerms);

  timer.start();

}
The addGerms function
The addGerms function is more or less the meat and potatoes of the Germaphobe game. As stated earlier, it is what controls the leveling in terms of difficulty. For the most part, implementing this function is not really any more complicated than when you added your first germ to the stage.
The first two lines are going to be responsible for managing the number of germs that will be placed on the stage. When we declared the count property, we set its initial value to 1. This represents the first germ added to the stage in the init function. When we enter the addGerms function, the first thing that happens is prevCount will be set to the value of count. The variable count is then added to itself. Therefore, the first time the timer fires and we enter this function, prevCount will be 1 and count will be 2. The second time through prevCount will be 2 and count will be 4. What is happening here is that we are defining a range that doubles every time addGerms is called by the timer listener. This will then set up the for loop to not only double every time the function is called, but also increment the number of germs based on the previous number of germs.
private function addGerms(e:TimerEvent)

{

  prevCount = count;

  count += count;


  for (var i:uint = prevCount; i < count; i++)

  {

    var germ:Germ = new Germ();

    germ.name = "germ" + i;

    germ.x = Math.random() * stage.width;

    germ.y = Math.random() * stage.height;

    addChild(germ);

  }

}
Keeping score
To keep track of how many germs we have killed, we will add a small scorekeeping scheme to the Germaphobe class. Though this is a relatively simple addition, there will be adjustments in four areas of the game code.
First off, we need to add the import statement to allow us to use the functionality for displaying text.
package

{

  import flash.display.Sprite;

  import flash.events.*;

  import flash.utils.Timer;

  import flash.text.*;
Next, we add two properties to the Germaphobe class. The scoreText variable will be used to control the actual text field that will display the text. And the score variable will be used to mathematically increment the value of the score before it is displayed.
public class Germaphobe extends Sprite

{

  private var timer:Timer;

  private var count:uint;

  private var prevCount:uint;

  private var scoreText:TextField;

  private var score:uint;
In the init function, we then set up the text field and its properties. We first define the appropriate position and width of the text field and add it to the stage.
private function init():void

{

  ...

  scoreText = new TextField();

  scoreText.x = 500;

  scoreText.y = 10;

  scoreText.width = 20;

  addChild(scoreText);

}
Finally, in the if statement of the kill function, we award points for killing the germ. The first line simply takes the current value of score and adds 10 to it. The second line then sets the text value of the scoreText text field to the value of the score variable. Because the text field's text is a string and score is a uint, we will need to convert the values of score from a uint to a String. To accomplish this, we use the toString method. This will effectively convert the value of score to a data type that is acceptable to the text property.
if(e.target is Germ)

{

        e.target.die();


        score += 10;

        scoreText.text = score.toString();

}
Ending the game by infestation
Finally, we need to determine when the game should end. By nature this is a casual game, and therefore there is no definitive purpose in actually winning the game. It is basically a situation where you play the game until the game beats you. How do we determine when the game has won? Well, in the case of this game, the game will need to win before there are so many germs on the stage that it causes the Flash Player to crash. We have determined that the safe number is at about 250 germs. So, we can use the numChildren property of display list containers to evaluate when the timeline has more than 250 children. At that point, we can say that a player has lost by infestation.
Checking for infestation
As it turns out, checking for an infestation is actually relatively simple. We can perform a check every time new germs are added to the stage. So, in the addGerms method, at the very end just before the closing curly brace, we will want to add a function call to the infested method. We add this function call here because it will allow the addGerms method to complete the process of adding new germs to the game. Once that process has completed, we can check the number of germs on the stage. If there are too many, we then end the game.
private function addGerms(e:TimerEvent)

{

  ...

  infested();

}
Removing leftover germs
The final method for the Germaphobe game is actually a bit simpler than it may look. In the Germaphobe class, as the last method, you should add the following code:
private function infested()

{

  if (this.numChildren > 250)

  {

    timer.stop();


    var i:int = this.numChildren

    while(i--)

    {

      removeChildAt(i);

    }

  }

}
The first line of this method opens with an if statement that immediately determines whether the main timeline has more than 250 children. As you know, this will evaluate to true or false. If it evaluates to false, nothing will happen. Should the statement evaluate to true, the end of the game is inevitable.
Immediately, the timer is stopped to prevent any more germs from being added to the stage. Next, an incrementing variable is established and set to the value of the total number of children on the stage. We then use that variable in a while loop that will decrement the i variable until it has reached 0. Within the while loop, we use the removeChildAt() method to remove all children on the stage. Keep in mind that the number of children in a display list is equivalent to the total number of indexes used to assign object depths. Therefore, as the while loop decrements, the display object at that index is also removed.
The final score
One unfortunate side effect of the previous effort to remove all the children from the timeline is that the text field used to display the score is actually a child of the timeline as well. This means that the score is also removed during this process. There is a quick solution to this problem: simply re-add the score as a child of the stage.
In the infested method, just after the while loop, simply add the scoreText text field back on the stage using the addChild method, as shown here:
private function infested()

    {

      ...

        while(i--)

        {

          removeChildAt(i);

        }


        addChild(scoreText);

      }

    }
Summary
A lot of ground was covered in this chapter. You are now familiar with the construction of a working example of a multiclass application. From this basic foundation, you should now begin to see how the creation of objects and modular organization begin to benefit the efficiency of programming.
As mentioned at the onset of this chapter, everything you learn after this will be an enhancement to this basic foundation. Though many of the concepts to come will seem abstract at times, you should always revert to this foundation. Always remember to take it one section at a time.
Following are some of the important topics covered in this chapter:
- Display objects and display object containers
- The display list
- Adding and removing display objects
- Multiclass interaction and simple application development