CHAPTER 13
WORKING WITH TEXT AND STRINGS

Text helped lift the popularity of Flash early on in its existence. Though it may not seem like much of a reason for anyone to consider Flash the conquistador of multimedia web development, using decorative text in the early days of web development was a luxury that was not easily achieved. Back then, developers were limited to standard system fonts for rendering textual data, and in some instances, this is still the case.
In order for a computer to display a certain font, the font must be installed on that computer. If a design required the use of an abstract font, the common solution would be to render special text as a bitmap graphic to be displayed as a picture on web sites. This solution was both time-consuming for the web developer and impractical when considering the loading differential between text and images.
Furthermore, if web developers used abstract or copywritten fonts, the likelihood of that font being installed on a visitor's computer was not very good. Therefore, web developers started using web-safe fonts, which are the fonts that are considered most likely to be installed on the majority of computers accessing the Internet. In the event the font does not exist, the browser would replace it with its own default font. You can see where this quickly became a point of degradation for web designers. There was simply no way to guarantee that the web site would render as designed by the web developer.
Flash, on the other hand, allowed designers to use text as they wanted. They had the ability to use whichever font they wanted, wherever they wanted. And because fonts are embedded in the Flash application, they would translate perfectly to any computer on any platform, through any browser. Designers were assured that users would see the text exactly as they designed it. And because Flash is using the actual font file and not an image generated from the font, this proved to be more efficient in terms of the end product's file size.
In this chapter we are going to explore the many subtleties of working with text in Flash. Conceptually, this chapter will be a bit less complex than the most recent ones. However, its content is no less relevant to the power of modern-day Flash design.
Let's first take a look at implementing text at author time.
Creating text with the Text tool
In Flash there are three primary types of text that can be used in any given Flash project. Each of these types of text is designed for a specific purpose, which means that they behave in different manners. These types are as follows:
- Static text is used primarily for text that does not change. This text makes it much simpler to work with complex fonts containing decorative aspects like cursive or handwriting. This type cannot be created or manipulated with ActionScript.
- Dynamic text is presentation text that is accessible using ActionScript. Its value can be manipulated and changed as required by the application. An excellent example of dynamic text is a player's score in a video game where text is constantly updated.
- Input text, as its name indicates, is text that allows for user input. Though typically used in contact forms, input text is very useful in an application's communication with a user. This type of text is also able to be manipulated using ActionScript.
Having a good understanding of these types of text, and when best to use them, is extremely advantageous for any project. In the next several sections, we will be constructing a simple contact form that utilizes all of the previously mentioned text types.
Revisiting the Property inspector
As you have learned in several of the preceding chapters in this book, one of the best allies for manipulating elements at author time is the Property inspector. As it turns out, the Property inspector is the primary method for manipulating text fields that have been created with the Text tool. When a text field is selected on the stage, the Property inspector is populated with an abundant amount of editable information ranging from the text paragraph settings to how the text will be rendered at runtime. You can also change properties like color and size.
Starting a simple contact form
In this chapter we will build a simple contact form to help you get acclimated to the various aspects of working with the text options in Flash. Different variations of web forms are the primary methods to capture a user's information in Flash. To get started we will place a few text fields on the stage and manipulate those using the Property inspector. Once the interface for our form is complete, we will then manipulate these text fields further using ActionScript.
- Open Flash and choose
Flash File (ActionScript 3)to create a new Flash file. If theProperty inspectoris not yet open, open it by selectingWindow
Propertiesor by pressing Ctrl+F3 on your keyboard. - Change the document properties to better suit the contact form. We suggest setting the document size to
300by400and the stage color to#FFFFCD. - Use the
Texttool to add text to the stage in Flash. The unmistakableTicon, shown in Figure 13-1, represents theTexttool on the toolbar. You can also access this tool by pressing T on your keyboard.

Figure 13-1. The Text tool is used to create text in Flash.
When you select the Text tool from the Tools panel, you should notice the Property inspector changes to immediately assist in the use of text. As shown in Figure 13-2, before text is even applied to the stage, you have the ability to edit its type as well as several other properties responsible for character and paragraph formatting.
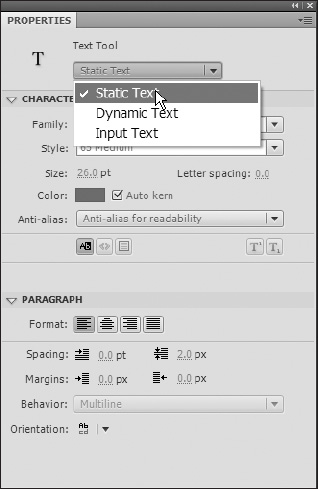
Figure 13-2. The Text Type drop-drown box allows a user to choose static, dynamic, or input text.
For this example we will be creating text fields for collecting a user's information. Therefore, we will need several static text fields to use as labels and several input text fields to allow users to enter their information. We will be able to come back and format text fields later in the development cycle. For now, let's add a couple simple text fields.
- With the
Texttool selected, change the text type in theProperty inspectortoStatic Text. You can then click the stage to place the text field. - Type the words
First Namein the text field. Once the text is entered, you can exit the text field by clicking the stage. This text field will serve as our label for the area where the user will enter his or her first name.
- Next, we need a place for the user to enter their information. The
Texttool should still be selected from the previous entry. In theProperty inspector, change theText Typesetting toInput Text. - Add the input text field to the stage by clicking the stage.
Ultimately, if any application uses an input text field, the information from that field is going to be used with ActionScript. You may have noticed that when you changed the text type from static to input that the <Instance Name> field appeared in the Property inspector above the Text Type drop-down menu. We are going to use this field to name our input and dynamic text fields so we can use them later in ActionScript.
- Use the
Selectiontool (select theblack arrowicon in theToolspanel or press V on your keyboard) to select the input field that you just created. In the<Instance Name>field in theProperty inspector, enter a name that is descriptive of the information that will be in that field. For this example we usedfirstNameas the instance name of our input field as shown in Figure 13-3.

Figure 13-3. The <Instance Name> field is used to give text fields descriptive names for use in ActionScript.
At this point, it will be a good idea to begin thinking about the layout of the form we are creating. Though it would be easy in this particular case to copy/paste (or Alt-drag on a PC, Option-drag on a Mac) and use the Align panel to quickly arrange multiple text fields on the stage, it is extremely important to begin seeing things the way ActionScript sees them.
When working with ActionScript, developers do not have the luxury of using a method such as myObject.align(center); because it simply does not exist. Objects in programming are typically placed on a stage using absolute coordinates like x and y. Even if the object is placed relatively in relation to another object, the programmer will ultimately need to know the absolute position of one of those objects. To use an analogy from football: if the football is 10 yards from the end zone, we still need to know exactly where the end zone is for this statement to make sense.
Positioning text fields
For this example, we will eventually be creating multiple text fields. Some of these text fields will be created using ActionScript. It is important that we have an understanding of where exactly our author time text fields are positioned so we know where our runtime text fields are supposed to go. To manage this, we will be using the Position and Size section of the Property inspector.
- With the
firstNameinput text field selected, click the smallchainicon as shown in Figure 13-4. This icon is used to lock the aspect ratio of the height and width properties of the selected object. When this icon is showing as abroken chain, we can change the height and width properties independently of one another.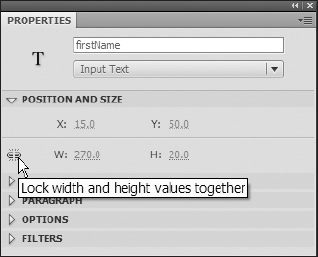
Figure 13-4. The Lock feature is used to maintain the aspect ratio of height and width properties.
- Now change the
X, Y, W, andHproperties of this section as shown in Figure 13-4. This helps us develop a framework for how the other items will be arranged on the stage. - Select the static text field you have created and adjust the font family, font color, size, and letter spacing. Experiment with several combinations until you find a look and feel that suits your design eye. For this exercise, it would be best to keep the font size under 20 pt, as you will be adding other text fields to the form.
There is a touch of method to this madness. Recall in Step 2 under "Starting a simple contact form" that we set the document width to 300 pixels (px). We then figured it would be a good idea for this form to have some kind of frame or margin, so we chose an arbitrary margin width of 15 px. Because the form will need a left and right margin, our total horizontal margin will be 30 px, which is 15 px on the left and 15 px on the right. If we subtract this value from the original 300 px width of the stage, we are left with 270 px. We can then use this value of 270 as the W, or width, property of the input text field. If we also set the X property to 15, the text field will be positioned 15 px from the left side of the stage. This will also leave 15 px on the right side of the stage. The result is a perfectly centered text field. The remaining two properties, Y and H, were then set to give an approximate starting point that also played into the layout aesthetically.
Once the input text field is set in its proper position, we are going to want to also do a bit of work on the static text that will serve as the label for this input area. To accomplish basic text styles, we can use the Character section of the Property inspector as demonstrated in Figure 13-5. Within this area are located the standard formatting properties that you would expect to find in a design-based IDE. From this area you can select the font to be used, style if the font contains additional styles like bold and italic, font size, font color, letter spacing, and auto-kerning.
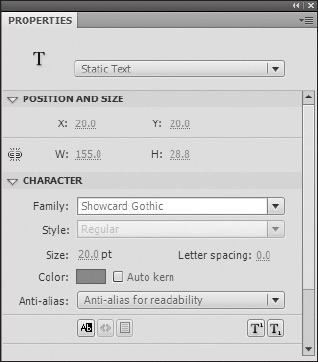
Figure 13-5. Several basic properties can be applied to text using the Character section of the Property inspector.
Render modes and text field modifiers
In the Character section of the Property inspector we are also presented with a few special sets of attributes that can be modified for both text and text field rendering. Because Flash goes beyond the basics and offers several different kinds of text, it provides you with versatile enhancements. The first of these options is the ability to set the anti-aliasing properties, or render modes, of specific text fields. The anti-aliasing of text refers to how the text is rendered. When considering anti-aliasing, emphasis is typically placed on how the edges of text are rendered. Sharp or crisp edges tend to have a more jagged, less appealing appearance. Conversely, fully anti-aliased fonts have a smoother, more appealing look.
Flash offers the following options to consider when creating and rendering text. Figure 13-6 demonstrates the differences in these various types of rendering. Though the differences may seem subtle, they can have a dramatic effect on your application.
Device fonts:Best used when the purpose of the text is utilitarian, or functional. The SWF file will look for standard texts that are stored on the machine on which the SWF is displayed. The primary benefit to this method is that file size is not increased because fonts are not embedded in the SWF. Quite simply, if the application does not require the use of special fonts, this is an excellent choice.Bitmap text (no anti-alias): Used to create sharper-looking text. This option applies no anti-aliasing to the font. As a result, text with this option applied will not scale well. This option also increases overall file size because font outlines are embedded.Anti-alias for animation:Best used when working with animation. It ignores information associated with kerning and alignment to generate a smoother effect. This is best used with fonts over 10 pt in size. This option will increase the overall file's size because font outlines are embedded.Anti-alias for readability:Can be used to improve the overall legibility of text. It should not be used on any text that is to be animated. This option will increase the overall file's size because font outlines are embedded.Custom anti-alias:Does exactly what it says it will do—allows you to determine your own custom anti-aliasing settings. This can be the most ideal setting, as it gives designers the maximum amount of control over font rendering.
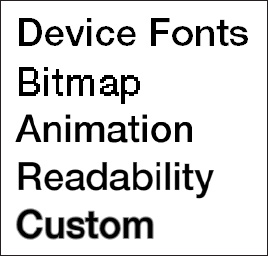
Figure 13-6. Applying different rendering options to text can affect the text's look and size in the overall application.
The next set of text field modifiers offered in the Character portion of the Property inspector, shown in Figure 13-7, are several special behaviors that enhance the functionality of text fields.
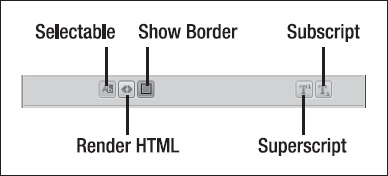
Figure 13-7. Text fields can be given special properties through the use of the text field modifiers.
These standard modifiers are as follows:
Selectablegives you have the ability to toggle whether or not this text will be selectable at runtime. It is often necessary during the life cycle of an application for text to be either selectable or not. This feature makes that a simple task.Render HTMLgives you the ability to have the text field render as HTML. This becomes an extremely useful tool when formatting large amounts of text that can be edited and reformatted externally without recompiling the SWF.Show Borderis a feature that can be applied to input and dynamic text fields. The benefits of this feature are an increased degree of flexibility, as you will see when we use it later to enhance the form we created previously in the chapter. With the addition of this feature, designers now have the option of creating custom aesthetics for their input fields in Flash, Photoshop, or Illustrator and overlaying the transparent input field. Designers also have the ability to quickly apply a border to text fields by simply clicking theShow Borderbutton.SubscriptandSuperscriptare not exactly behaviors for text fields, but they are worthy of mention. Though these buttons made their debut with the release of Flash CS4, this functionality was present in Flash CS3 through theTextmenu.
Embedding characters
When working with dynamic or input text in Flash, it is possible that you will want to display this text with a custom font that does not exist on the end user's machine. Perhaps you have created a game, and the score needs to be rendered in a space-age digital font. Or, maybe you have created a holiday e-greeting and the recipient's name is entered at runtime and displayed in a fancy cursive font. Often, there is no way to determine which characters will be used, but you must hold true to the design aspect of the application.
For situations such as this, Flash allows you to embed characters or sets of characters from custom font families that can be used at runtime. As discussed in the previous section, the Character section of the Property inspector has some added special functionality. You may notice when selecting either Dynamic Text or Input Text that another button, labeled Character Embedding, appears at the bottom of this section. When you click this button, the dialog shown in Figure 13-8 appears, allowing you to pick the characters or set of characters that will be embedded.
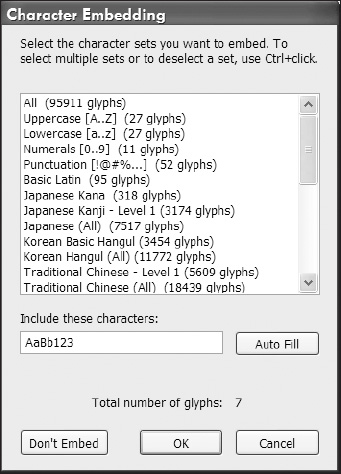
Figure 13-8. Using the character embedding function lets you embed entire fonts or specific characters of a font.
Embedding characters with this feature is actually pretty easy. With a text field selected, type the characters in the fields just below Include these characters and click OK. You can also use the Auto Fill button to automatically embed all characters that currently exist in the selected text field. Finally, the Don't Embed button will clear all characters that have been previously embedded for the selected text field.
Formatting paragraphs
Like all good text editors in graphics programs should, Flash possesses additional functionality for dealing with paragraphs of text. Much like the Character section, the Paragraph section includes many of the usual suspects you would expect to find when working with paragraph data. Figure 13-9 displays the Paragraph section.
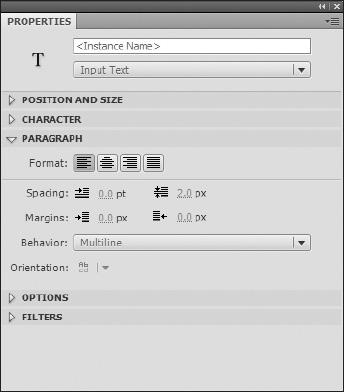
Figure 13-9. The Paragraph section of the Property inspector is used to control paragraph settings for text fields.
Format allows you to adjust the alignment and justification of the paragraph. Spacing indents the first line of text as well as the spacing between lines. Margins adds extra space on the left and right of the paragraph. The two areas to take note of in this section are the Behavior and Orientation.
The Behavior field in the Paragraph section of the Property inspector adjusts how input and dynamic text fields will be used. These are the options:
Single linedisplays runtime text in a single continuous string.Multilineallows runtime text to wrap to multiple lines within the text field.Multiline (no wrap)maintains multiple lines, but text will not wrap at the end of the text field.Passwordis a special case used with input text only. This behavior allows the text typed into an input field to appear as bullets rather than letters.
Finally, the Orientation button is used to adjust the orientation and direction of text. In a nutshell, you can use this option to have text display horizontally or vertically. Using the Rotate button, shown in Figure 13-10, allows you to change the relative orientation of the letters contained in the text field.

Figure 13-10. The Rotate button is used to change the orientation of letters in text fields.
Using the Options section of the Property inspector
The Options section of the Property inspector is rather unique when working with textual data because it completely changes its parameters depending on the kind of text that is currently selected. Figure 13-11 outlines the options that are available for each type of text field.
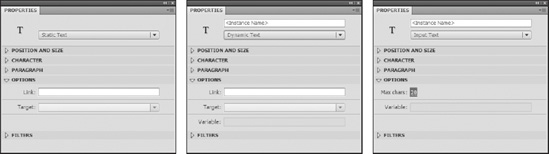
Figure 13-11. Text fields can be given special properties through the Options section of the Property inspector.
When Dynamic Text or Static Text is selected, designers have the ability to turn that text into a hyperlink, allowing this text to link your Flash movie to another web page.
When working with input text, the Max chars field in the Options section allows designers to restrict the number of characters a user can enter at runtime. This is especially helpful when dealing with passwords.
Filtering text elements
The final section that is active in the Property inspector when text is selected is the Filters section. Since filters were covered extensively in Chapter 5, we will not discuss them in further detail here. Just understand that text, like movie clip and button symbols, has the ability to have filters applied to it for enhanced visual dynamics. Therefore, any filters like drop shadows and blurs can also be applied to text fields.
Continuing the contact form
Now that you have been fully introduced to the Property inspector as it relates to working with text, let's put the finishing touches on the front end of our contact form. To accomplish this you can use the file that you have been employing so far in this chapter or use ch13_01_02.fla from the working files.
To wrap this up we will need to add a few more text fields and a button to trigger the form's actions. You should already have a static text field and an input text field set up for the user's first name on the contact form. Now you will need to add a pair of fields for the following items:
- Last name
- Phone number
- Address
- Comments
The reason we are looking for a pair of fields for each item is that you need to create one static text field that serves as the label and one input field to allow users to supply information. This coincides with the two fields created for a user's first name from the example earlier in this chapter.
There are several different ways to accomplish the task of adding more text fields. You could create eight new text fields and format them. You could copy and paste (or Alt-drag on a PC, Option-drag on a Mac) the existing fields. For this exercise, we will go with the copy/paste method, because this method is easiest to conceptualize.
- With
ch13_01_02.flaor the aforementioned working file open, select the two existing text fields that reside on the stage by drawing a selection rectangle around them both using theSelectiontool. - Press Ctrl+C (Cmd+C on a Mac) to copy the text fields.
- Press Ctrl+Shift+V (Cmd+Shift+V on a Mac) to paste the fields in the exact location from which they were copied. This is referred to as paste in place.
Now, what you should have on your stage is two identical sets of text fields on top of each other. By using the paste-in-place command, we were able to maintain the integrity of the text fields' x positions. This simply means that the new text fields are in the exact position of the ones that we copied. All that remains is to adjust the y position to move our new text fields below the originals.
Because the approximate combined height of the two text fields is 50, we will use this value to offset our current value for y. Looking at the Y value in the Position and Size portion of the Property inspector, you can see that the current y value for these two sets of text fields is 20. If we then add the H, or height value, of 50 to the current y position, we get 70. We now have a pretty good y value for our newly pasted text fields.
- With the pasted text fields still selected, set the Y value in the Position and Size section of the
Property inspectorto70and press Enter.
You should see that the text fields have changed position; the x position should be perfectly aligned and the y position of all four text fields should be adequately spaced. This is also demonstrated in Figure 13-12.

Figure 13-12. Copy and paste allows you to quickly clone text fields.
Repeat step 4 until you have five sets of two text fields on the stage—that is, five static text fields and five input text fields. Remember to adjust in increments of 50.
Once all the text fields are in place, it will be necessary to do a little spring cleaning. Looking at the stage, you should have five text fields that all say First Name, similar to the image shown in Figure 13-13. What is not as obvious is the fact that you also have five input fields with the instance name of firstName. This is definitely not the most efficient contact form. What we need to do is change some of the naming used to make each field descriptive and unique.

Figure 13-13. All text fields have been properly added and spaced.
- Go through each text field and rename them appropriately. For the static text fields, change the names starting with the second from the top to Last Name,
Phone, Address, andComments. For the input fields, again starting at the second from the top, change the instance name for each tolastName,phone,address, andcomments.
Now, we only need to make two more tweaks, and the contact form interface will be completed.
- With the
Charactersection of theProperty inspectoropen, select each input field and press the button forShow Border. This will ensure that your text fields are visible at runtime.
When you reach the input field for comments, you will need to make this field a bit bigger to allow users to input their comments.
- Select the comment input field and change its
H(height) property to100in thePosition and Sizesection of theProperty inspector. Then in theParagraphsection, change the Behavior setting to Multiline to allow users to enter lengthy comments. - Finally, open the
Componentspanel (Window Components) and drag a button symbol onto the stage. With the button selected, change its X and Y properties in thePosition and Sizesection of theProperty inspectorto185and365, respectively.
When you are finished, save this file in a familiar place so you can access it later with ActionScript. Your final result should look similar to the image shown in Figure 13-14.

Figure 13-14. The form is complete when the button is added.
Breaking apart and animating text
One of the more useful features for animators working with Flash is the ability to break apart text. The action of breaking apart can be performed on all symbols and bitmap assets that are used in a Flash movie. When you break apart an object, you are essentially separating it into its most basic parts. Static text, for example, can be broken into individual letters. Each letter of the original text is actually separated out into its own new text field. Designers then have the option to select this text again and break it apart further. In such cases, the letters would no longer be text fields. They would be basic vector shapes capable of being edited with Flash vector editing tools. As shown in Figure 13-15, a text field containing the phrase "Break Apart" is broken apart into its individual letters. The letters are then broken apart again to produce a series of basic vector shapes.

Figure 13-15. Text fields can be broken apart into letters and then vector shapes.
Animating text fields
Now you will see how quickly and easily you can break apart and animate text fields. In this example, because we are going to be animating our text, it will not be necessary for us to further break this text into its vector-based shapes. However, if you did want to convert this text into vectors, you would simply need to select the text fields again, right-click, and select Break Apart from the context menu.
- Open
ch13_02_start.fla, which is located in the source directory. You will notice the text field on the stage containing the phrase "Break Apart." - Right-click the text field and select
Break Apartfrom the context menu. The text field should then be broken into individual text fields. Each new text field contains one letter from the original phrase as shown in Figure 13-15.
In order to animate these letters individually, they need to reside on their own independent layers. To achieve this quickly, we will use the Distribute to Layers command.
- Using the
Selectiontool, draw a selection rectangle that contains all letters located on the stage. Using the selection rectangle will ensure that you have selected-everything. - Right-click any one of the selected letters and select
Distribute to Layersfrom the context menu.
Once the letters have been distributed, you should notice that each letter has been moved to a layer that has been conveniently labeled with respect to the letter that that layer contains. You should also take note that the Break Apart layer no longer contains any information or visual assets.
Now that the letters are in the proper location, it is possible to animate them individually.
- With the timeline open, select frame 9 of the layer labeled
B. - Holding down the Shift key, select frame 9 of the layer labeled t. You should notice that all the layers, with the exception of the
Break Apartlayer, are now selected. - Press F5 to add new frames to the selected layers. Your layer configuration should now resemble what is shown in Figure 13-16.

Figure 13-16. Extra frames can be added to the timeline by pressing F5.
Applying tweens to layers
The next steps to setting up the text "Break Apart" animation are going to be applying tweens to the appropriate layers. Similar to how we added additional frames to each layer, we will select all layers and apply motion tweens simultaneously.
- Select frame 1 of the layer labeled
Bin the timeline. - Holding the Shift key, select frame 1 of the layer labeled t in the timeline.
- With the layers still selected, right-click frame 1 of the layer labeled t and select
Create Motion Tweenfrom the context menu. - Save this file as
ch13_02_a.fla.
When animating phrases, there are traditionally two ways in which your text could animate: explosion and implosion. Explosion simply means that the letters of the word start in their proper position and move away from each other, much like an explosion. Implosion, as you may have guessed, is exactly the opposite; letters typically come in from offstage and animate into position to reveal the word.
At this point, we will animate the letters in an exploding fashion. Because of Flash's new object-animation method, all you need to do is move the playhead of the timeline to frame 9, select the various letters, and move them to where you would like them to end up. When you test your movie, you should now see the letters of the words "Break Apart" explode off in many directions.
Imploding letters
To create the effect of implosion, as demonstrated in ch13_01_finish.fla, we will need to add a couple more steps to this exercise. Because the animated assets were derived from a text field that was broken apart, the inherited starting position for each letter is where that letter appears in the word. And because this starting point represents the first keyframe of the animation, we cannot update the position of each letter without affecting all subsequent frames on that layer.
In order to solve this situation, we will need to manually create a second keyframe to each layer. This will allow us to maintain the arrangement of the letters to form a word and change the position of the letters in the first keyframe to create an implosion.
Open ch13_02_a.fla.- With the timeline open, select frame 10 of the layer labeled
B. - While holding down the Shift key, select frame 10 of the layer labeled t and press F6 to insert keyframes.
Once the new keyframes are added to the animation, you can successfully return the playhead of the timeline to frame 1 and begin changing the positions of the letters. Now when you test the movie, it will look like the letters are flying in from all over to form the words "Break Apart" as demonstrated in Figure 13-17.

Figure 13-17. Broken-apart text can be animated to look like it is exploding or imploding.
Use the breaking apart and animating text techniques to experiment with different properties of each letter. You should be able to achieve some pretty cool effects. Try changing the size, alpha, and filtering of each letter and see what you can come up with.
Now that you have seen the robustness of Flash's text capabilities on the design side, let's jump into learning how to experiment with text and ActionScript.
Manipulating text with ActionScript
Creating text and text fields with ActionScript is something that you have already been introduced to on a basic level. In Chapter 8, we used a text field in the final example to display the text "Hello World!" In Chapter 10, when developing the Germaphobe game, the score was also displayed using a dynamically created text field. In this section we will take that exact same approach to create text fields dynamically using ActionScript. To further expand on this, we will now also be using ActionScript to add advanced formatting to dynamically created text.
We will also be using ActionScript to manipulate string data. As discussed in Chapter 8, String is one of the primitive data types. And though strings are basic, they are extremely powerful and fundamental to the development of any application.
Plucking some strings
A string by its most basic definition is nothing more than a character or a series of characters encapsulated within a set of quotation marks. In fact, it is possible to assign a string value simply by placing a set of quotation marks after the assignment operator in a declaration statement as shown here:
var aString:String = "";
The preceding example is considered an empty string, but you could have any number of characters contained within the quotation marks. Here's another example:
aString = "99 bottles of beer on the wall...0 bottles of beer wall";
The real power of strings comes with the ability to manipulate this information. Concatenation and deconstruction of strings give developers the ability to either create string data or extract certain elements from strings.
Table 13-1 lists some of the more useful string functions.
Table 13-1. A set of the more commonly used string methods
| Function | Description |
charAt |
Locates and returns a character at a specific location |
concat |
Concatenates two strings |
indexOf |
Locates and returns a string from within a string |
join |
Converts the elements of an array to a string |
slice |
Extracts a substring from a string |
split |
Converts a string into an array |
string |
Converts another data type to String |
substr |
Returns a substring based on a given length |
substring |
Returns a substring based on a start and end point |
toLowerCase |
Converts a string to all lowercase letters |
toUpperCase |
Converts a string to all uppercase letters |
Concatenation
Concatenation is a process in which various pieces of information are joined together to form a string. You have had a fair amount of exposure to concatenation throughout this book. Concatenation takes place when a string and any other type of information is joined together using the additive operator (+) as shown next. If the data type of one of the operands is not a string, it is converted to one when the join takes place.
var age:Number = 99;

var aString:String = "I am ";


aString = aString + age; // I am 99
aString += age; // I am 99
Don't be deceived by this; the 99 in the string has no numerical value whatsoever. When concatenation occurs, all values are converted to text strings. Therefore, the 99 in the previous example is no more valuable numerically than gg. This is important to understand because, as shown in the following code sample, adding a numeric to a string will always return a string:
var answer:* = 2 + "2"; // 22
In the previous code we created the variable answer and typed it miscellaneous using the untyped (*) data type. This will prevent a type mismatch, allowing our variable to accept both numeric and string data. When the values 2 and "2" are added together, the resulting data is the string value of "22". This reiterates the fact the numbers in strings have no numerical value at all.
Filtering and deconstructing strings
There are several methods available in ActionScript to extract various parts of strings based on character or location. This becomes extremely valuable when trying to extract information from a set of data that is retrieved in the form of a string. Often many web applications have a tendency to send information as encoded strings. In a situation like this, it is very important to be able to pull only the information that you need from this data. This process of filtering and extracting information from strings is also known as deconstruction. The three most commonly used methods for filtering strings are as follows:
charAtsubstrsubstring
The charAt method is used to retrieve a character at a specific location. For example, when given the following code, if you wanted to retrieve the letters from the string, you could do so by using their location in the string. Starting with zero and including spaces, you would determine that the s was the ninth character in the string. The charAt function could then return the value of s based on that index or position.
var aSong:String = "99 bottles of beer on the wall";

aSong.charAt(9); //s
Similarly, the substr and substring methods return a group, or substring, of characters from a given string. These methods work in exactly the same manner with the exception of the second parameter each one accepts. Given the string "ABCDEFGHI", the following example demonstrates how these two methods operate.
The substr method accepts two parameters. The first of these is the starting index of the substring you would like to return. The second is the number of characters that are to be included with the return. Remember, the counting starts at zero.
var aString:String = "ABCDEFGHI";

aString.substr(3, 3); // DEF
The substring method also accepts two parameters. The first, like the substr method, is the starting point or index of the return value. The second, however, is the ending index. Therefore, this method simply means, "Get me the values between here and here."
var aString:String = "ABCDEFGHI";

aString.substring(4, 8); // EFGH
Formatting and creating text fields
The text field is the sole vessel for displaying textual data to the client in ActionScript. As mentioned earlier in this chapter, you have already had some exposure to working with text fields. Now we will take a closer look at how ActionScript allows us to apply various styles to text that is displayed within text fields as well as styling the text fields-themselves.
TextFormat class
I (Paul) love the TextFormat class! When I think back to when I first began learning to work with text formats in ActionScript 2.0, I can remember thinking how much I hated them. A contradiction, I know. I could never understand why I couldn't simply apply formatting style directly to text fields. The interesting thing is that now that my mindset has changed, the TextFormat class makes it a lot easier to stay organized.
So what is the TextFormat class? Well, it is a special kind of object that contains all specific types of formats that can be applied to a text field. To create a TextFormat object, simply declare a variable and instantiate a new TextFormat class. Once the object is created, you can set the values of the various properties of the TextFormat object as shown here:
var tFormat:TextFormat = new TextFormat();

tFormat.font = "Tahoma";

tFormat.size = 24;

tFormat.color = 0xFF00FF;

tFormat.bold = true;

tFormat.align = "right";
Table 13-2 is a complete list of properties available through the TextFormat class.
Table 13-2. Properties for the TextFormat class
Assigning formats to text fields
Once the TextFormat object is created, it is very easy to assign the format to a text field. Flash offers two quick means for accomplishing this task. The first of these is to use the defaultTextFormat property, which is a property of the text field itself. As shown in the following code, you can simply set the value of defaultTextFormat as the TextFormat object itself:
var tField:TextFiled = new TextField();

tField.defaultTextFormat = tFormat;
The second way by which you can apply the formatting is to use the setTextFormat method. The setTextFormat method works in a similar manner to the defaultTextFormat property, the primary difference being that instead of assigning the TextFormat object as a value, you pass it as a parameter as shown here:
var tField:TextField = new TextField();

tField.setTextFormat(tFormat);
There are several other properties available when working with text fields that allow you to change the styling and format of that field directly. Table 13-3 lists a few of the more popular text field properties.
Table 13-3. Formatable properties associated with text fields
| Property | Description |
autoSize |
Resizes text fields to fit text |
background |
Determines the existence of a background |
backgroundColor |
Sets the color of the background |
border |
Determines the existence of a border |
borderColor |
Sets the border color |
defaultTextFormat |
Applies a TextFormat object to the text field |
multiline |
Sets the multiline property |
numLines |
Sets the number of lines used with multiline text |
restrict |
Sets a character limit for a text field |
selectable |
Determines whether text is selectable |
styleSheet |
Applies a CSS style to a text file |
text |
Sets the textual value of a text field |
textColor |
Sets the text color |
type |
Sets the type of text field |
wordWrap |
Determines whether text wraps |
Adding dynamic text fields to the contact form
The final stop we will make in this chapter will be to add some back-end functionality to our contact form. For this section you may elect to either construct your own back-end functionality or simply follow along with the working files that are associated with this chapter.
To finish the form we are going to need to create a document class that manages some of our additional functionality. The finished class can be found in the working files directory. You may also choose to use the ch13_01_finish.fla file or your saved version of the contact form from earlier in this chapter.
- To get started, create a new ActionScript file. Save this file in your personal working directory as
ContactForm.as. - Begin creating the class by adding the following package definition and
importstatements:
package

{

  import flash.display.Sprite;

  import flash.events.FocusEvent;

  import flash.events.MouseEvent;

  import flash.net.*;

  import fl.controls.Button;

  import flash.text.TextFormat;
For this class we will use the six imported classes just shown. Because our movie is only one frame, it is best to use Sprite as our display container. The next two import statements will be used to add the various event-based functionalities to the file. We then import the entire flash.net package to allow us to format and send information via URL. Finally, the Button and TextFormat classes are imported to govern our visual elements.
- Next, enter the following code to define the class, properties, and constructor function:
public class ContactForm extends Sprite

{


  private var required:TextField;


  public function ContactForm()

  {

    this.addEventListener(FocusEvent.FOCUS_IN, focus_in);

    this.addEventListener(FocusEvent.FOCUS_OUT, focus_out);

    submit_btn.addEventListener(MouseEvent.CLICK, submit);


    clearFields();

  }
The class definition is standard. We are extending Sprite; again, this is the most efficient choice because we are only using one frame. At this time we define one private variable, required. This variable will be employed later to reference text fields used for required feedback.
In the constructor function, we define three event listeners. The first two are used to determine when a display object has the stage focus. In this case, we are particularly interested in knowing when the text fields have focus. These listeners are added to the main timeline using the this keyword. Recall that we can use a single set of event listeners to govern all display objects on the stage. The third listener is a simple CLICK event that handles the clicking of the Submit button.
Finally, we call the clearFields() method, which is responsible for clearing textual data from the text fields.
- Enter the following code to create the handlers for the
focus_inandfocus_outevents:
private function focus_in(e:FocusEvent)

{

  var t:TextField = TextField(e.target);

  t.borderColor = 0xFF0000; //Red


  removeChild(required);

 }
The focus_in function is used to change the border color of any text field when a user focuses on it. In this function, we create the variable t, which is used to cast and reference the event's target as a TextField. The target in this case is any text field that has focus. We then set the border color of the text field to red using the borderColor property of the TextField.
private function focus_out(e:FocusEvent)

 {

  var t:TextField = TextField(e.target);

  t.borderColor = 0x000000;

 }
The focus_out function works in exactly the same manner as the focus_in function. We can then use this to change the border color of our text field back to black when a user leaves the text field.
Next, create thesubmitfunction that will be called by theSubmitbutton's event listener. This method will serve a couple of different purposes.
First, the TextFormat object, errorFormat, is created. We will be creating required field error feedback to let users know that certain text information is required. In the format we set the font color to red and the font weight to bold.
private function submit(e:MouseEvent)

 {

  var errorFormat:TextFormat = new TextFormat();

  errorFormat.color = 0xFF0000; //Red

  errorFormat.bold = true;
The next block of code in this function is used to create the text field itself. Once the field is created, we set its textual property to read Required Field. We then apply the errorCode format to the text field, which makes the text bold and red. Finally, we set the x position to 150 so we can have this text display next to the static fields we created in our form.
required = new TextField();

required.text = "Required Field";

required.setTextFormat(errorFormat);

required.x = 150;
We then check for required fields. This is a simple task that uses an if statement to determine whether or not our input fields contain text. If they do not contain any information, the subsequent code block executes. Within this code block we set the y value of the required text field to a position just to the right of the static text for that given input field. We then use addChild() to place the required field on the stage. The return keyword is used as a stop or break in this sequence. When the program comes across this, it will immediately stop executing the remaining code in this method.
In this example we are checking four of the five fields for valid information.
if(firstName.text == "")

{

  required.y = firstName.y - 21;

  addChild(required);

  return;

}


if(lastName.text == "")

{

  required.y = lastName.y - 21;

  addChild(required);

  return;

}


if(phone.text == "")

{

  required.y = phone.y - 21;

  addChild(required);

  return;

}


if(address.text == "")

{

  required.y = address.y - 21;

  addChild(required);

  return;

}
Finally, we call the two methods sendInfo() and clearFields(), which are both declared next. Because we used the return keyword throughout the function, these two methods are called only if all required information is completed.
sendInfo();

clearFields();


}
- Create the
clearfields()function as shown next. TheclearFieldsfunction is used to reset the values of all the text fields.
private function clearFields()

{

  firstName.text = "";

  lastName.text = "";

  phone.text = "";

  address.text = "";

  comments.text = "";

} - The last method in this class is the
sendInfo()function. And though it may seem a bit complicated at first, the following code is really nothing more than a simpleURLRequestlike those created in Chapter 11:
private function sendInfo()

{

  var url:String = "http://www.friendsofed.com/EssGuideFlashCS4/ur.php";

  var ur:URLRequest = new URLRequest(url);

      ur.method = URLRequestMethod.GET;


  var uv:URLVariables = new URLVariables();

      uv.fn = firstName.text;

      uv.ln = lastName.text;

      uv.ph = phone.text;

      uv.ad = address.text;

      uv.co = comments.text;


  ur.data = uv;


  navigateToURL(ur);

}

} // Close Class

} // Close Package
The first three lines in this method set up the URLRequest itself. The string variable url is used to reference the location of the web script where we will be receiving the information from our form. We declare the URLRequest (ur) and pass it the url variable. We then set the method property of the URLRequest object to URLRequestMethod.GET. Recall in Chapter 11 that we discussed the difference between sending information via GET or POST; the GET method will send information as part of the query string.
The next part of this function involves packaging the variable data for the URLRequest. We first create the URLVariables object (uv) and assign the current values of our text fields to properties of the uv object. Remember, these property names are completely arbitrary. Once the values are set, we can assign the uv object as the value of the ur.data property. This will effectively package the URLVariable with the URLRequest.
Finally, we use the navigateToURL() method to have our browsers navigate to the previously defined URL. We pass this function the URLRequest object as its parameter. This ensures that all information required for the request is packaged and included.
- Once you have completed this function, save the AS file and test your FLA. Go ahead and fill out the form and click the
Submitbutton. If you failed to provide the information correctly, you will get a notification as shown in Figure 13-18. If you did fill the form out correctly, you will be taken to a page that will display your information.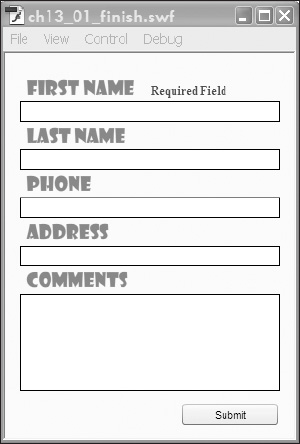
Figure 13-18. Failing to properly fill in the form will prompt ActionScript to create an error message.
Summary
Though often overlooked, proper use of fonts is often just what an application needs to achieve that final look of professionalism. In mainstream development, it is not uncommon for developers to simply slap a few text fields on the stage and begin passing information to them. The reality is that text layout is as aesthetically important to a design as the most vibrant of colors.
In addition to good looks, it should not go without mention that a mastery of string data is essential to any great application developer's bag of tricks.
The following are the important topics covered in this chapter:
- Formatting, rendering, and modifying text fields
- Embedding characters
- Breaking apart text fields
- Concatenation, filtering, and deconstruction of strings
- Creating and formatting text fields with the TextField and TextFormat classes