CHAPTER 15
USING THE ADOBE MEDIA ENCODER—A CRASH COURSE
The new Adobe Media Encoder CS4 combines the most useful functions of the Flash Video Encoder, the Flash CS3 Video Import Wizard, and the Adobe Media Encoder found in Adobe Premiere CS3 into one stand-alone tool.
It will output files compatible with devices such as an iPod PSP and many others and has a handy list of presets to help get you started. You no longer have the option of using Flash to convert video using the Flash CS4 Video Import Wizard. If you try to import video that is not in a format that the Flash Player can play back, Flash will let you know that the player cannot play back media in that format and direct you to try using the Media Encoder to convert the video to a format the Flash Player can play and/or add cue points to the video file.
In this chapter we'll tour the interface of the Adobe Media Encoder and show you how to encode your video using presets as well as using some custom settings. We'll also talk briefly about what the advanced settings mean and show you how to add cue points and metadata directly to the video. Let's begin with the interface.
Introduction to the interface
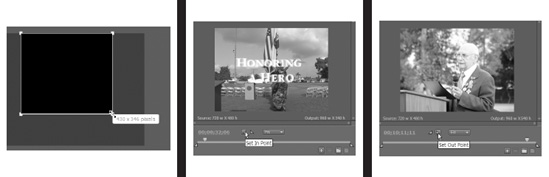
The Media Encoder interface is deceptively simple when you open it (see Figure 15-1). It looks a lot like the Flash CS3 Video Encoder—but there's plenty more under the hood.
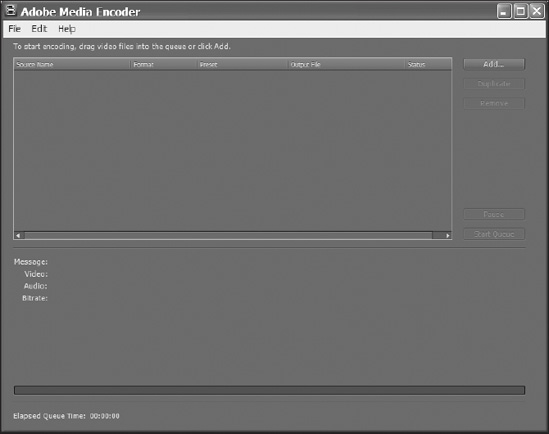
Figure 15-1. The Queue window of the Adobe Media Encoder
The top half is the queue—it's a list of all the media you have waiting to be encoded. It shows you the source file path, the video format you've chosen to encode to, the preset (or custom settings) being used, the output file path, and the status of that file.
To the right of the queue are the five following buttons, which manage the items in the queue and whether the queue is running or not:
AddDuplicateRemovePauseStart Queue
We'll use these buttons later in this chapter.
Figure 15-2 displays the bottom half of this screen of the interface, which shows you information about what is being encoded at any given moment. Below that section is a sliver of the interface reserved for showing you how long the queue has been running in total.

Figure 15-2. Basic information about the status of the queue
So with that very brief description of the interface, let's encode some video! (Hey, it's a crash course, right?)
Encoding your first video using presets
Most of us will just need to pull out the old encoder to convert a video or two for a project. Nothing fancy, just turning that professionally polished AVI (or MOV) file into something for that Flash microsite you may have just finished to play back. Doing this is as easy as dragging your source file into the queue and clicking the Start Queue button to the bottom right of the queue. You could also use the Add button to the right of the queue and browse to your file. Figure 15-3 shows the queue with one item waiting to be encoded. It's true—that's all you have to do—although many of us might want just a tad more control.
For instance, you may need to resize the video, add cue points for navigation, or perhaps tweak the bitrate settings to meet your particular needs.

Figure 15-3. The queue shown with a single file to be encoded. The preset and output file names are links to the Save As and Export Settings windows.
Choosing a preset
After dropping your source file into the queue, you'll notice that under the Preset column a default preset has been selected for you. You will also notice a small arrow button to the left of that (still under the Preset column). Click this arrow to see a drop-down of available presets, as shown in Figure 15-4. The Media Encoder will default to the last-used preset, but you can choose from any preset listed. You can also select Edit Export Settings from the bottom of the list, which will open the Export Settings window. You'll learn about the options in this window later in the chapter.
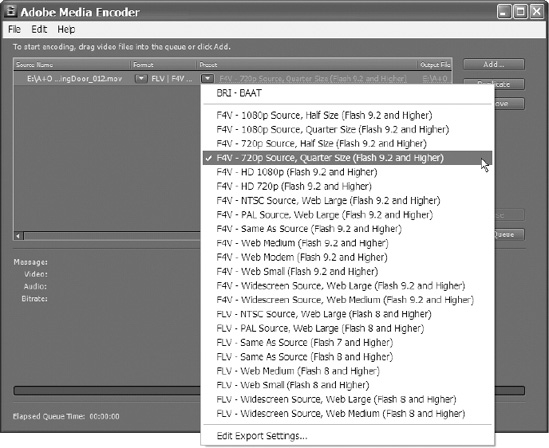
Figure 15-4. The Presets drop-down menu in the queue
Now that you've selected a preset for encoding your video, let's make sure that the file is named the way you need it and that it gets saved to a location of your choosing.
Choosing your output file name and location
To change the file name and location of the output file, click the text under the output file column of the queue. This will open the Save As dialog (see Figure 15-5). Proceed through this dialog as you would with any other type of file.
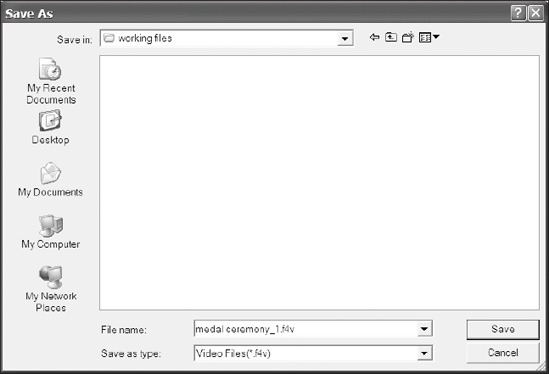
Figure 15-5. Choosing a file name and location should be a familiar task.
After selecting the file name and location for your output file, click the Start Queue button. You will see a small version of your video as it is being encoded along with information about its progress as shown previously in Figure 15-2. Once the encoding is complete, browse to your file and play it back to see the result.
Congratulations! Now that you've successfully encoded your file, let's look at how to encode many files at once.
Encoding multiple files
It's as easy to encode multiple files as it is to encode a single file. Simply select multiple files and drop them into the queue or browse to them individually using the Add button. Once you have adjusted the encoding and output settings for each file, press the Start Queue button, and all of the files in the queue will be encoded in turn.
In the cases where you need to encode the same file for different audiences (broadband, dial-up, DVD-ROM, etc.), the Duplicate button is an easy way to add another encoding job to the queue. Since you would be using the same source file, this button saves you the trouble of browsing for it or dragging it into the queue again.
Adobe Media Encoder will auto-increment the output file name by default. For instance, if your first item in the queue is set to output a file named myVideo_1.flv, pressing the Duplicate button will duplicate all of the settings but change the output file name to myVideo_2.flv. You can change this behavior in the Preferences dialog by unselecting Increment output file name if file with same name exists (see Figure 15-6). So by using the Presets drop-down menu (shown earlier in Figure 15-4) and the Duplicate button, you can very quickly and easily encode video for multiple audiences.
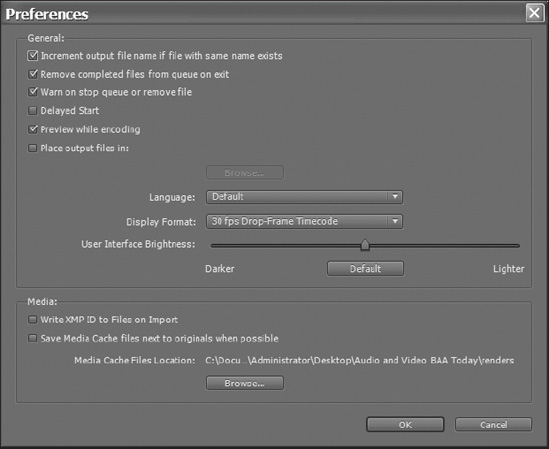
Figure 15-6. The Preferences dialog of the Adobe Media Encoder. The first option allows the Media Encoder to auto-increment file names for you.
Now that you can add multiple files to the queue, you might also need to remove an item from the queue. To do this, simply select the item in the queue and click Remove. The Media Encoder will pop up a confirmation dialog to make sure you really want to remove this item from the queue. In the event that you need to stop encoding temporarily, you can do so by clicking the Pause button.
Next we'll take a closer look at the Export Settings window.
Taking a close look at the Export Settings window
There's more to the interface than the Queue and Progress windows. You can choose to customize your encoding by selecting Edit Export Settings from the bottom of the Presets drop-down menu or clicking the name of the preset as it appears in the queue. Doing so will open the Export Settings window shown in Figure 15-7.
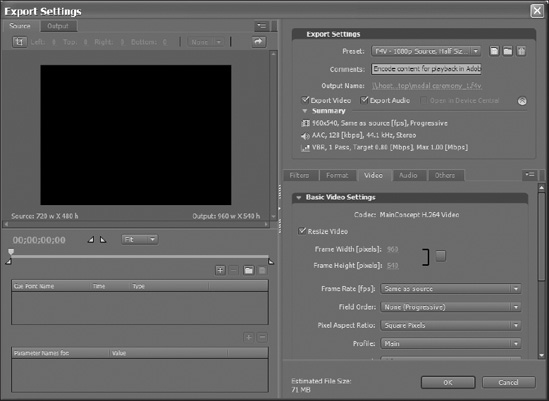
Figure 15-7. The Export Settings window shown here with the Video tab in advanced mode
The Export Settings window is divided into two main sections and has two main view options: Simple Mode and Advanced Mode. To switch between these modes, click the round arrow toggle button shown in Figure 15-8.
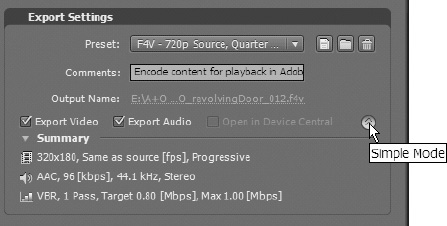
Figure 15-8. The button shown here toggles between simple and advanced mode.
On the left side in simple mode you can see the video as it is before encoding and a preview of the video as it will appear after encoding. You can select the portion of the original video clip you want encoded, set cropping of the original video, select the pixel mode of your video, and adjust the size of the video playback window.
Switching to advanced mode allows you to add cue points to the output file.
On the right side of the interface in simple mode you can select a preset (this is useful for getting to a starting point quickly for custom encode settings), manage custom presets, and choose to include or exclude audio or video from the encoding process.
Switching to advanced mode adds the ability to apply filters to the video, choose a video format, select a video codec, change the output size of the video, modify bitrate settings, modify the audio format, modify audio bitrate and quality settings, configure FTP settings for uploading the queue, as well as modify and include/exclude XMP data.
Simple mode encoding features
Simple mode offers quite a bit of control over your output but generally speaking leaves out the more technical decisions where video, audio, and ActionScript are concerned. Simple mode provides the following features:
- Cropping video
- Setting in and out points
- Managing custom presets
Cropping your video
The user experience in cropping video is much improved over the Flash CS3 Video Encoder. If you're one of those who have used the disassociated slider method of cropping video in previous versions of the Flash Video Import Wizard and Flash CS3 Video Encoder, you will appreciate being able to drag the cropping bounds to size and then move the crop area around on the video preview window. In order to crop your videos, you must first enable cropping by clicking the Crop button in the upper-left corner of the interface, as shown in Figure 15-9.
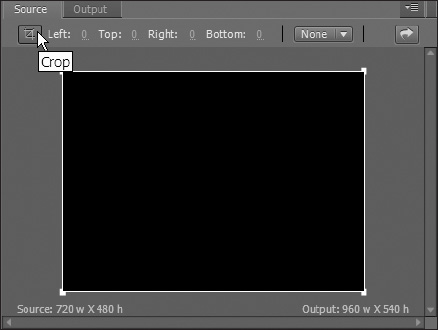
Figure 15-9. The source preview of the Export Settings window with cropping enabled
After cropping is enabled you'll notice that the text above the video preview is now active. You can modify the cropping values using the hot text for each value, which is handy when you know the exact cropping you need. The values you can change here are as follows:
Left:How many pixels from the left edge of the video to cut offRight:How many pixels from the right edge of the video to cut offTop:How many pixels from the left top of the video to cut offBottom:How many pixels from the bottom edge of the video to cut off
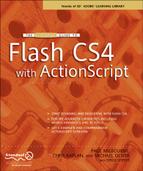
Figure 15-10 shows 140 pixels from the left edge of the video will be cropped out of the video during encoding.
Figure 15-10. The numeric controls for cropping video
To the right of these values is a drop-down menu of fixed-aspect ratios. Selecting one of these aspect ratios from the drop-down will resize your current crop settings to satisfy the ratio and also make sure that the aspect ratio of the cropping bounds is maintained through further adjustments.
You can also resize the cropping bounds (the white box that now appears over the video preview) by clicking and dragging any of the corner handles to change the height and width at the same time or by grabbing and dragging any of the sides of the cropping bounds shown here in Figure 15-11. You can then go back to the numeric entry and fine-tune if needed. You can also move the cropping bounds around on the video by clicking and dragging anywhere inside the cropping bounds.
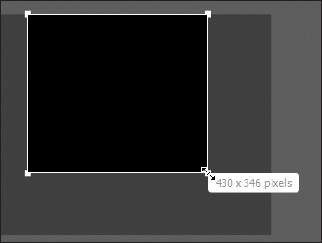
Figure 15-11. The cropping bounds can be resized using the handles.
Now that you have a crop area, you need to tell the Media Encoder how you want your cropping to impact the final video dimensions. You have three options, listed here:
Scale to Fit:The Media Encoder will scale your crop area until it matches the height or width of your output size, whichever comes first.Black Borders:The Media Encoder will simply replace any video falling outside of your crop area with black but maintain the original output dimensions of your video.Resize Video:The Media Encoder will change the output dimensions of your video to match that of your crop area. It's important to note that after selectingResize Video, selecting one of the other two crop settings will not resize the video. You'll need to uncheck theResize Videooption to return your output to its original dimensions.
Setting in and out points
Setting an in point and an out point for your video allows you to encode and output smaller portions of a larger source file without having to edit it first. Let's suppose you have been handed a video file of a professional conference that includes four different speakers. You might consider the following workflow to output a separate video file for each of them:
- Open the Adobe Media Encoder.
- Locate the source video file and drag it into the queue.
- With your video selected in the queue, open the
Export Settingswindow. - Drag the playhead until you locate the point in the larger video where you'd like your shorter video to begin.
- Click the
Set In Pointbutton above the playhead (see Figure 15-12).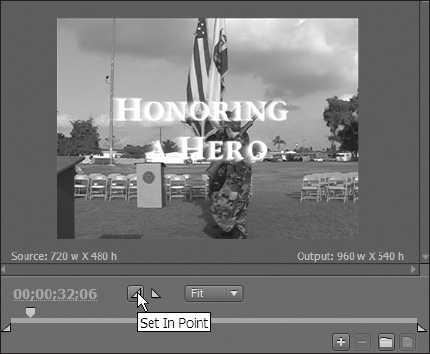
Figure 15-12. The
Set In Pointbutton - Drag the playhead until you locate the point in the larger video where you'd like your shorter video to end.
- Click the
Set Out Pointbutton above the playhead (see Figure 15-13).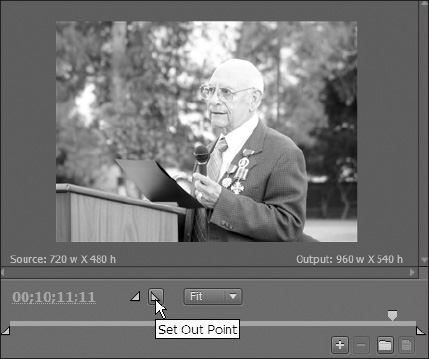
Figure 15-13. The
Set Out Pointbutton - Use the output name link to open the
Save Asdialog and choose a file name and location for the output file. - Click the
OKbutton at the bottom-right corner of the window. - With the video you just modified active in the queue, click
Duplicateon the side of the queue. Doing this will create a new item in the queue with identical settings, with the file name automatically incremented for you. (You may select any file name and location you wish at any time until the file has been exported.) - Repeat steps 3 through 10 until you have set up four items in the queue with the in and out points marked. You'll notice that duplicating a queue item also duplicates the in and out point settings.
- Click the
Start Queuebutton and let the Media Encoder do its thing.
You should wind up with four separate files trimmed to show only the portions of the larger video that you want.
Managing custom presets
Finally, in simple mode you can manage your presets in the Export Settings area of the Export Settings window. We highly recommend using one of the many presets as a starting point for creating your own presets. The dimensions, codecs, and bitrates in the presets are based on commonly used settings and will save you time and effort. After selecting a preset, making any change to the settings will change the preset selection to Custom. Figure 15-14 shows the three following preset management buttons:
Save:Select this button (diskicon) to save the current settings as a preset.Load:Select this button (foldericon) to load an existing preset.Delete:Select this button (trash canicon) to delete a preset.
Figure 15-14. The buttons used for managing your custom presets
When you are done making your adjustments, simply click the disk icon next to the Presets drop-down. You will be presented with a dialog where you name and save your preset. The next time you use the Presets drop-down menu, your custom preset will appear at the top of the list under Custom.
To delete a custom preset, select it from the Presets menu, and then click the trash can icon. Read the confirmation dialog and click OK to delete or Cancel to cancel.
Advanced mode encoding features
The advanced mode gives you an opportunity to make technical decisions about your settings at a deeper level. These settings are geared toward the user who deals with encoding and distributing media on a regular basis. That being said, it is not outside the realm of possibility that your customers will have you reaching for the advanced mode as you try to balance the priorities between quality, bitrate, and file size. Nothing tells you more about what these settings do than trying out a lot of things in a systematic fashion and paying close attention to the result. Hint: test small portions of video to avoid the long wait between comparisons.
Advanced mode encoding features consist of the following:
Let's start with a discussion of cue points.
Cue points
In short, a cue point is a special event triggered at a specified point in time during video playback. Although you can add cue points using ActionScript, you can also embed them into the video stream itself during the encoding process, which is what we'll cover in this section.
Adding cue points Generally speaking, you add a cue point to video because you want something to happen in your Flash application when the video reaches a particular moment during playback or you want to leave a marker in the video that can be used as a navigation point. Here's how to add a cue point to your video:
- Make sure you are in advanced mode.
- Drag the playhead to the desired point in your video.
- Click the
plusicon.
Voilà! You have added a cue point to your video—well, technically it will be added during the encoding, but you get the idea. Figure 15-15 shows the cue point listing with one cue point added to it.
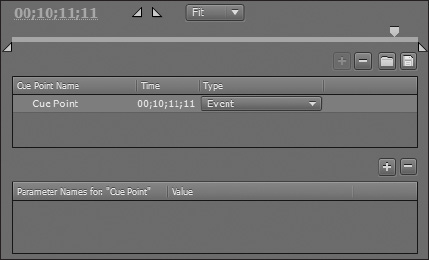
Figure 15-15. One cue point has been added to the video.
Two types of cue points can be added as metadata to your video stream, event and navigation. Another type, an ActionScript cue point, can be added via ActionScript. (Bet you didn't see that coming.) To select either the event or the navigation type, use the drop-down menu under the Type column of the cue points table below the video preview.
Adding parameters to cue points Parameters are passed to the event handler for a cue point as an object comprised of name-value pairs. To add parameters to your cue points, first select a cue point. This will make the Parameters section below it active. If you selected Cue Point from the list of cue points, you should now see Parameter names for: "Cue Point" as the parameter names column header of the parameters grid, indicating that this is the cue point you will be adding parameters to.
Add a parameter by clicking the plus button. By default the first parameter is named Name_0 and the value for it is Value_0, as shown here in Figure 15-16. To change these to something more useful, click a name or value and tailor the parameter to your own needs.
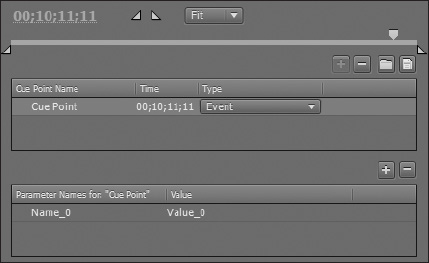
Figure 15-16. A parameter has been added to the cue point. Shown here are the default names for both.
Remember, the parameters are passed to the event handler for a cue point as an object, so the names will be properties of that object, and the values will be the values of those properties. For this reason, parameter names must be unique within each cue point.
Saving cue points Click the Save Cue Points button (disk icon) shown in Figure 15-16 to save your cue points as an XML file. This can come in handy if you need to pass the cue points from, say, a producer's workstation where cue points are entered, to a developer who adds parameters to cue points, or perhaps to a compression workstation where the files are actually compressed.
Importing cue points The other half of saving cue points is being able to import them. If you're the developer or the person running the compression, and you receive a cue point file from the producer via e-mail, you can import this file by clicking the Import Cue Points button (folder icon) shown in Figure 15-17. Importing cue points might also come in handy in a situation where you have created a custom tool that creates cue points dynamically.
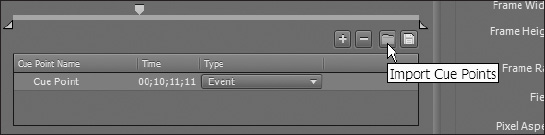
Figure 15-17. The buttons used for managing your cue point parameters
Removing cue points and parameters Of course, nothing is ever set in stone, so you have the ability to manage your cue points. Figure 15-17 shows the following cue point management buttons, from left to right:
Add Cue PointDelete Cue PointImport Cue PointsSave Cue Points
To delete a cue point, just select it and then click the Delete Cue Point button (minus icon) above the cue point grid. Confirm and that's it. It works the same way for removing-parameters.
Advanced encoding options
If you're not already using advanced mode, you can switch to it by clicking the advanced/simple mode toggle show previously in Figure 15-8. In advanced mode you will see the following row of tabs under the Export Settings area of the Export Settings window, further expanding your options:
FiltersFormatVideoAudioOthers
Read on for the skinny, starting with the Filters tab.
Filters tab
At the moment you have one choice for applying filters to your output and that is Gaussian Blur. To apply this filter, first select the Filters tab. You have three parameters:
On/Off:You can include/exclude the filter (handy for quick comparisons using the preview window) using this check box option.Blurriness:You can enter the size of the blur using theBlurrinesscontrol. A value between 0 and 50 is valid.Blur Dimension:This control lets you determine which direction the blur is applied—horizontally, vertically, or both.
Format tab
The Format tab lets you select the file format of your output. Your decision here will be based on your audience and what player versions and computer systems you assume them to have. You can choose from FLV or F4V. Depending on which file format you choose, your options under the Video and Audio tabs will change.
The FLV format The FLV format (which stands for Flash Video) uses either the Sorenson Spark codec or the On2 VP6 codec. While the On2 VP6 codec produces higher-quality video at lower bitrates, keep in mind that it is more computationally expensive—so for audiences with older, slower processors, you will want to consider using the Sorenson Spark codec.
It's important to know that the amount of math a computer needs to execute (computational expense) in order to make sense of your video file (decompress it) will impact the computer's processor and is not related to the connection speed your user has to the Internet (and therefore your video file).
The F4V format The F4V format, which uses the MainConcept H.264 video codec, provides an even better quality-to-bitrate value but it is even more computationally expensive than the On2 VP6 codec.

Figure 15-18. Selecting the H.264 codec for the MP4 file format has to be done from the queue.
Video tab and bitrate settings
The video tab is where you make all of your decisions around how the video is handled. Prior to this most of your selections have been around what the video will be—not how it will be transformed. Figure 15-19 shows the three following areas of the Video tab in advance mode:
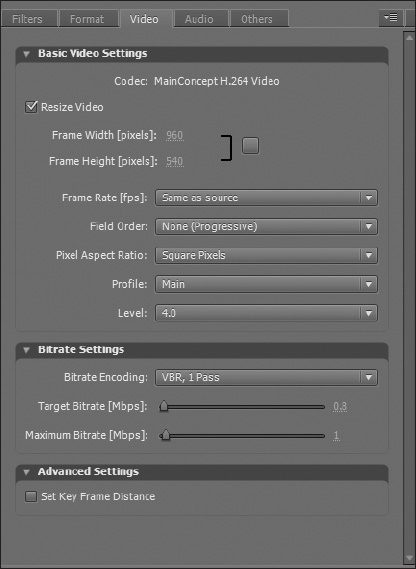
Figure 15-19. Advanced encoding options with the Video tab selected
Basic video settings If you chose to export to the FLV format under the Format tab, your first choice will be whether to use the Sorenson Spark or On2 VP6 codec for compression as discussed in the previous section. Additionally, choosing the On2 VP6 format adds the ability to take advantage of any alpha channel in the source video as well as using variable bitrate (VBR) encoding and multipass encoding (explained in the "Passes" section). If you chose to export to the F4V format, you can only use the MainConcept H.264 codec for compression.
Bitrate settings "Bitrate" here is the amount of data (usually kilobits) per amount of time (usually seconds) needed to "feed" the playback software so that the video plays back smoothly. And to be clear, it's the video stream itself that dictates how much data per second is needed in order to play back, and that need is what we're talking about setting here.
So you have some real flexibility when it comes to bitrate. Even though there are only a few choices to make, the number of combinations and range of quality you can achieve here (or not) is vast. In order to get the most out of the bitrate settings, you should understand what bitrate means and how it impacts the transmission of video online.
Imagine that you are a waiter or waitress at a famous beverage shop. You can serve one gallon of liquid (data) every second, and you have a tap that happens to spit out one gallon of water every second. You can get every drop of that water to your customer, and you can keep on serving for as long as the water comes out of the tap without ever keeping your customer waiting for water (assuming that your customer will drink no more than one gallon of water per second).
Now let's imagine that you have another tap that spits out only a half gallon of water per second. Again, you will have no problems serving that half gallon of water to your customer every second.
Finally, let's bring out the big tap. This thing spits out a whopping two gallons of water every second. NO WAY can you serve it all at the same speed it comes out of the tap. You'd have to store enough at the table (where the customer can get to it) before you start serving so you could let the customer drink while you try to keep up.
This is what buffering is all about. Buffering essentially means collecting and "setting aside" enough video before playback so that the video does not get interrupted during playback. Since you don't want your viewer to experience hiccups in the video, you just let it collect until you're sure that you can keep up with "two gallons per second" until the "water" runs out. Of course, this only works when you know how much video there is to serve.
In the transmission of video (or audio), you have to deliver it at the minimum amount per second in order for the viewer to see the video without stuttering or buffering.
Bitrate encoding It would be nice if video were as simple as water, but it's not. Some frames of video are a lot more complicated than others, whereas one sip of water is pretty much the same as the next. They're pictures after all, and if you consider the simplicity of a picture of a box versus the complexity of a picture of a tree, you sort of get the idea.
You can select CBR, or constant bitrate encoding, and treat your video so that the picture of the tree takes as much bandwidth to deliver as the picture of the box, but you don't have to. The good news is that the very smart people who created these codecs understand that video is not the same on every frame, and they actually let you use this to your advantage by giving you something called VBR, or variable bitrate encoding. They basically rob from the data used for the picture of the box and give it to the picture of the tree.
Passes Since this is a pretty complicated bit of data juggling, the software can do it only so well if it gets one chance. So, there's an additional option for the number of passes the encoder takes over the video—one or two. The benefit is that you have a ton of flexibility in how the encoder distributes the data in that you can set constraints on how high (Maximum Bitrate setting) and how low (Minimum Bitrate setting) as a percentage the bitrate will go as well as control the overall variability of the target bitrate, as shown here in Figure 15-20.
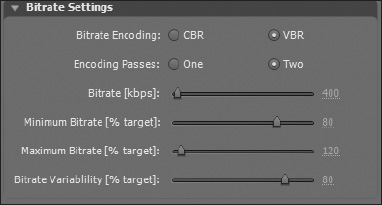
Figure 15-20. The multipass VBR options for F4V
Experiment with these settings to get a feel for what produces the quality bandwidth compromise you can live with. Can you live with a slightly blocky video in order to maintain the feeling of fluid motion and still keep the video within your required bandwidth? Or is it more important to have a crystal-clear image with a lower frame rate? The answer will differ from one situation to the next.
Depending on the nature of the video you are encoding—a talking head vs. a roller derby, for example—different compression settings will be required for each to produce an acceptable result.
The drawback to multipass encoding is that it takes longer than one-pass encoding, which can be a small price to pay for the quality. One thing that you do want to consider is that the multipass VBR encoded video is a lot more complicated than a CBR encoded video and requires more processing power on your end user's computer in order to decode and watch.
Bitrate Finally! The bitrate settings should now be fairly meaningful and straightforward for you. Using what you know about your target audience and the connection speed you assume them to have to your video, select a bitrate.
Remember that the lower your bitrate is, the less data per second can be given to your video—and with that sacrifice in "amount of data" per second comes a sacrifice in the quality of the images that can be created.
Advanced settings The advanced settings vary depending on what video format is selected for output, but in general include the following:
Keyframe Distance:The term "keyframes" in video compression refers to frames where a complete set of the image data is stored in the video stream.Encoding Profile:Setting this toSimpleeliminates the ability for the resulting video to use frames that come after it for encoding, resulting in a less-compressed file.Compression Quality:Setting this higher will result in better image quality but requires more time to encode. A lower setting will encode faster but sacrifice some quality.
The advanced video settings give you tremendous control over how your video is compressed and enter into topics about video compression that fall outside the scope of this book. Refer to http://en.wikipedia.org/wiki/H.264/MPEG-4_AVC#Profiles for a technical introduction to the various profiles and levels included in the H.264 specification.
Audio tab
The video format you choose has an impact on how audio is handled during compression. Audio that accompanies video of the FLV format is MP3. Audio that accompanies the video of the F4V format is AAC.
The preceding discussion of bitrate applies to audio as it does to video—the main difference being that you can get a lot more bang for your buck from a few Kbps more of audio than you can for video. Little changes make more perceivable differences in audio than they do with video. Furthermore, changing your audio setting has a very small impact on your overall output file size. To illustrate this point, we want to point out the Estimated File Size indicator at the bottom of the encoder screen.
Change all of the audio settings to the lowest quality for its format. Figure 15-21 shows the Audio tab of the Export Settings window. Make it mono if it is an option, set the frequency as low as it will go, and do the same for the bitrate all the while keeping your eye on that estimated file size. You can run the gamut from worst possible audio quality to best possible quality and see little to no change whatsoever in the overall file size. Add this to the fact that you get big gains in perceived quality for little increases in file size, and you see that cheating a few Kbps from audio for the benefit of the video stream is a bad bet. Play with these settings and pay close attention to your results.
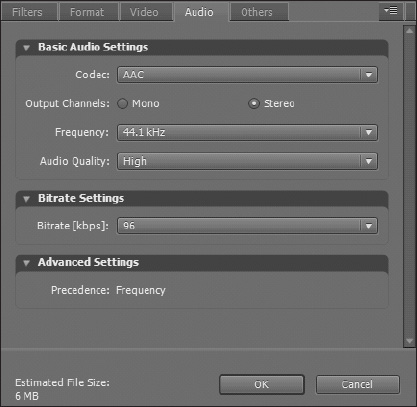
Figure 15-21. The audio options. You get a lot of bang for your buck with audio. Using a little more bandwidth for audio will make the user experience much more enjoyable.
Audio that isn't being given enough bandwidth can sound crackly, watery, or fuzzy depending on the nature of the source audio. Speech will generally require less bandwidth than music to produce acceptable results; however, if that speech audio content contains a lot of reflective secondary audio (reverb), you may find that you have to bump the audio bitrate in order to achieve an intelligible result.
The Others tab
One very exciting addition to the Media Encoder is the Others tab, which at this time allows you to set up an FTP destination for your output file (see Figure 15-22). How sweet is that?! It gets a little better in that you can have different settings for each file. The downside is that you can't save FTP locations (although the Media Encoder remembers the last settings used), nor do the settings get saved with a custom profile.
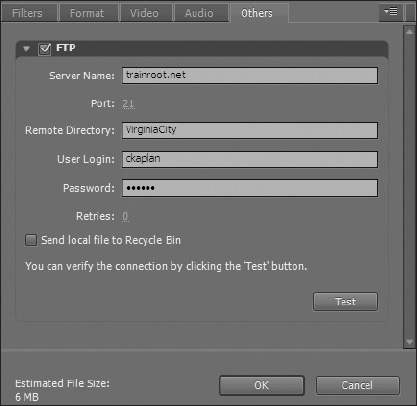
Figure 15-22. The Others tab lets you designate an FTP account to upload your files to after encoding is complete.
XMP metadata
XMP, which stands for Extensible Metadata Platform, is an open standards–based labeling technology that allows you to embed data about a file into the file itself. You can choose to include or exclude XMP metadata by clicking the menu icon of the Advanced Settings area (shown in Figure 15-23) and selecting or deselecting Include Source XMP Metadata.
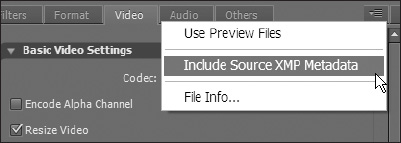
Figure 15-23. Launching the XMP info inspector
To modify the XMP metadata in your video or audio file, select File Info.This will open the XMP window shown in Figure 15-24. As you can see, the categories of information are extensive, but because XMP is open and therefore allows for the possibility of being extended rather than replaced, it can be made to include more information as more people adopt it without making older metadata obsolete.
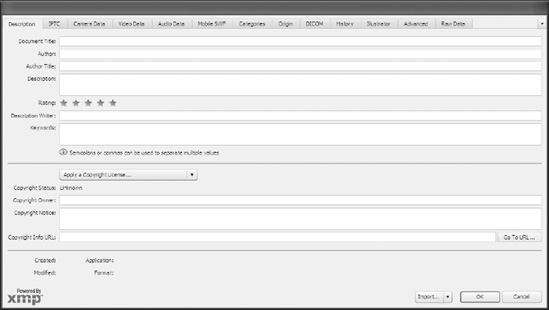
Figure 15-24. The XMP info inspector
To find out more about XMP, visit www.adobe.com/products/xmp/.
Summary
Like most topics covered in this book, the discussion of video compression could be a book in and of itself, as could the operation of the Adobe Media Encoder, but we hope that with what we covered here, you have enough background to produce quality work while you are getting to know this evolving tool. In this chapter, we talked about
- The basic operation of the Adobe Media Encoder including how to encode one or more files and the various file formats the Media Encoder can output
- Using the Adobe Media Encoder for common tasks like cropping, resizing, and trimming the beginning and end of your video
- Bitrate and the basics of video transmission over the Internet
- Audio compression and its impact on video
- The advanced video settings for compression and format, as well as embedding cue points and parameters in your video
- Things to consider when preparing video for your audience such as connection speed and computer performance and how to adjust encoding settings to match the needs of your audience
- Using the Adobe Media Encoder to automatically post your encoded video to an FTP site