
13
EXTENDING GHIDRA’s WORLDVIEW

One of the things we hope for from a high-quality reverse engineering tool is fully automated identification and annotation of as much of a binary as possible. In ideal cases, 100 percent of instructions are identified and grouped into 100 percent of the original functions that compose the binary. Each of these functions would have a name and a full prototype, and all data manipulated by the functions would also be identified to include full understanding of the original data types used by the programmers. This is precisely Ghidra’s goal, beginning with the initial import of a binary and continuing through auto analysis, at which point anything that Ghidra was unable to accomplish becomes an exercise for its user.
In this chapter, we look at the techniques Ghidra uses to identify various constructs within binaries and discuss how you can enhance its ability to do so. We begin with a discussion of the initial loading and analysis processes. The choices you make during these steps help determine what resources Ghidra will bring to the table for the file you are analyzing. This is your opportunity to provide Ghidra with information that it may have failed to detect automatically so that Ghidra’s analysis stages can make more informed decisions. Following that, we will look at how Ghidra utilizes word models, data types, and function identification algorithms, and how each of these may be enhanced to tailor its performance to your particular RE application.
Importing Files
During the import, the dialog shown in Figure 13-1 presents Ghidra’s initial analysis of the file’s identity, which will guide the file-loading process. You can override any of the fields or proceed with the recommendations Ghidra has made. The additional options, accessed with the Options . . . button, are specific to the type of file being loaded. Figure 13-1 shows options for a PE file, and Figure 13-2 shows options for loading an ELF binary.
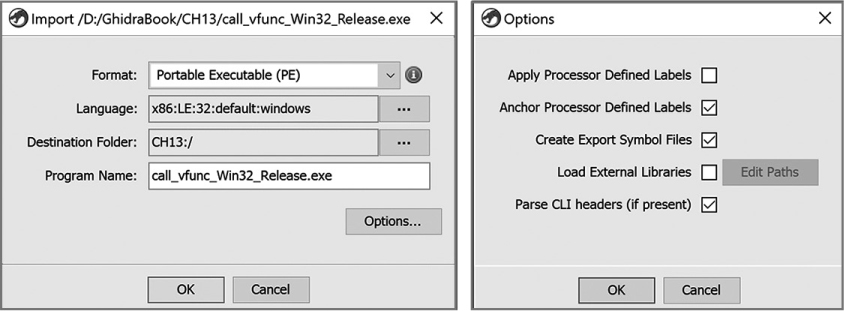
Figure 13-1: Import dialog and options for a PE file
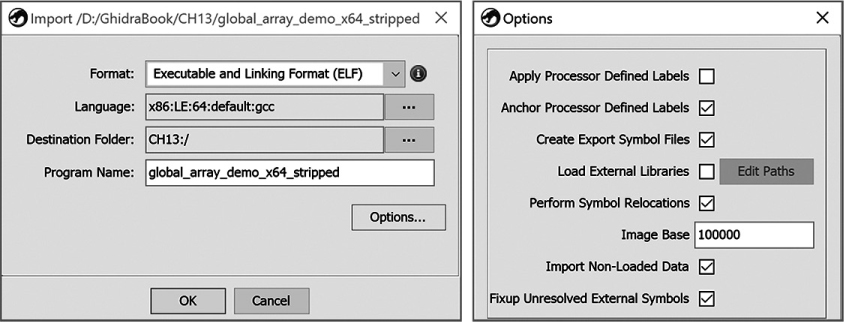
Figure 13-2: Import dialog and options for an ELF binary
LANGUAGE/COMPILER SPECIFICATIONS
The Language field in Figures 13-1 and 13-2 dictates exactly how Ghidra will interpret any bytes recognized as machine code within the file you are loading. The language/compiler specification is composed of three to five colon-separated subfields, as described here:
- The processor name field names the processor type for which the binary was built. It directs Ghidra to a specific subdirectory under Ghidra/Processors.
- The endian field indicates the endianness of the binary’s processor, which is either little-endian (LE) or big-endian (BE).
- The architecture size (bitness) field usually coincides with the size of a pointer for the chosen processor (16/32/64 bits).
- The processor variant/mode field is used to choose a specific model of the selected processor or identify a specific mode of operation. For example, when the x86 processor is selected, we can choose modes System Management Mode, Real Mode, Protected Mode, or default. For the ARM processor, we can choose models v4, v4T, v5, v5T, v6, Cortex, v7, v8 or v8T, among others.
- When known, the compiler field names the compiler, or in some cases a calling convention, that was used to compile the binary. Valid names include windows, gcc, borlandcpp, borlanddelphi, and default.
Figure 13-3 breaks down the language identifier ARM:LE:32:v7:default into its component subfields. One of a loader’s most important jobs is to infer a correct language/compiler specification.

Figure 13-3: Language/compiler specification example
The Format option specifies which loader Ghidra will use to import the file. Ghidra relies on a loader’s detailed knowledge of a particular file format to identify characteristics of the file and choose the proper plugins to use for analysis. A well-written loader recognizes specific content or structural features to identify the file’s type, architecture, and, hopefully, the compiler that was used to create the binary. Information about the compiler can enhance function identification. To fingerprint a compiler, a loader examines the structure of a binary to look for compiler-specific characteristics (like number, name, position, and ordering of program sections) or searches the binary for compiler-specific byte sequences (like blocks of code or strings). For example, it is not uncommon to find version strings in binaries compiled using gcc—for example, GCC: (Ubuntu 7.3.0-27ubuntu1~18.04) 7.3.0.
When Ghidra has completed the loading process, an Import Results Summary window is displayed, as shown in Figure 13-4.

Figure 13-4: Import Results Summary window for an ELF binary
This summary identifies an ELF Required Library, lib.so.6 ➊. (Note that this library would not be listed as a requirement if the file were statically linked.) More than one library file may be listed when an executable depends on multiple shared libraries. Understanding which libraries a program depends on can help direct you to resources you may need while analyzing the program. For example, if libssl.so or libcrypto.so appears in the list of required libraries, you might want to locate OpenSSL documentation and possibly source code. We discuss how Ghidra can make use of source code later in this chapter. Once a file has been successfully imported, you can auto analyze the file.
Analyzers
Auto analysis is accomplished by a collection of cooperating analysis tools (analyzers) that are activated either manually (for example, when opening a new file) or automatically when a change that can affect the resulting disassembly is detected. Analyzers run sequentially in a prioritized order based on the type of analyzer because the changes an analyzer makes can affect subsequent analyzers. For example, the stack analyzers cannot look at functions until a function analyzer has looked at all calls and created the functions. We investigate this hierarchy in more detail in Chapter 15 when we build an analyzer.
When you open a new file in the CodeBrowser and choose to auto analyze it, Ghidra presents a list of analyzers that can be run on that file. The list of default and optional analyzers is dependent on file information provided by the loader (which is also displayed to the user as part of the import summary, as shown in Figure 13-4). For example, the Windows x86 PE RTTI Analyzer would not be of much use in analyzing an ELF or ARM binary. Default analyzer selections can be modified using the Edit ▸ Tool Options menu.
Some analyzers are also available as one-shot options by using the Analysis ▸ One Shot menu in the CodeBrowser. An analyzer appears in the list if it supports one-shot use and applies to the type of file being analyzed. One-shot analysis is useful for running analyzers that were not selected during the initial auto analysis, or for rerunning an analyzer after new information has been located that might benefit from additional analysis. For example, if you receive a missing PDB error message during initial analysis, you can locate the PDB file and then run the PDB analyzer.
The Analyze All Open option on the CodeBrowser ▸ Analysis menu analyzes all open files in the project at once, using the list of analyzers selected in Edit ▸ Tool Options. If all of the open files in the project have the same architecture (language/compiler specification), all of the files will be analyzed. Any files that do not match the architecture of the current file will not be included in the analysis. This ensures that the analyzers are consistent with the type of file being analyzed.
Many CodeBrowser tools, including analyzers, rely on various artifacts in order to identify important constructs in a file. Fortunately for us, we can extend many of these artifacts to improve Ghidra’s capabilities. We will start with a discussion of word model files and how they are used to identify special strings and types of strings within search results.
Word Models
A word model provides a way to identify special strings and types of strings you’re interested in searching for, such as known identifiers, email addresses, directory pathnames, file extensions, and so on. When your string search is associated with a word model, the String Search results window will include a column called IsWord that specifies whether the found string is a word according to the word model. Defining strings of interest as valid words and then filtering for valid words is a good way to prioritize strings for further inspection.
At a high level, a word model uses training sets of valid strings to determine that “if trigram X (a sequence of three characters) appears in a sequence Y of length Z, then there is a probability, P, that Y is a word.” The resulting probability is used indirectly as a threshold to determine if the string should be considered a valid word during analysis.
StringModel.sng, seen in Figure 13-5, is the default word model file for string searches in Ghidra.

Figure 13-5: Search for Strings dialog
The following excerpt from the StringModel.sng file shows the format of a valid word model file:
➊ # Model Type: lowercase
➋ # Training file: contractions.txt
# Training file: uniqueStrings_012615_minLen8.edited.txt
# Training file: connectives
# Training file: propernames
# Training file: web2
# Training file: web2a
# Training file: words
➌ # [^] denotes beginning of string
# [$] denotes end of string
# [SP] denotes space
# [HT] denotes horizontal tab
➍ [HT] [HT] [HT] 17
[HT] [HT] [SP] 8
[HT] [HT] ( 1
[HT] [HT] ; 1
[HT] [HT] 25
[HT] [HT] a 2
[HT] [HT] b 1
[HT] [HT] c 1
The first 12 lines in the file are metadata comments about the model. In this example, the model type ➊ is lowercase, which likely means the model does not distinguish between upper- and lowercase letters. The names of the training files used for this model are listed ➋. The names generally indicate the content: contractions.txt is likely a file of valid contractions, like can’t. Four lines ➌ describe the notation for some nonprinting ASCII characters used in the trigrams. The actual trigram list starts ➍, where each entry row contains the three characters in the trigram followed by a value that is used in determining the probability that the trigram is part of a word.
You can supplement or replace the default word model by editing StringModel.sng or creating new model files and storing them in Ghidra/Features/Base/data/stringngrams and then selecting the new file in the Word Model field in the Search for Strings dialog. There are many reasons to modify word models, like including strings specific to known malware families or detecting words in languages other than English. Ultimately, word models provide a powerful means to control the types of strings that Ghidra recognizes as higher priority by tagging them in the Strings window.
In a similar manner, we can edit and extend the data types that Ghidra recognizes.
Data Types
The Data Type Manager allows us to manage all of the data types associated with a file. Ghidra lets you reuse data type definitions by storing them in data type archive files. Each root node in the Data Type Manager window is a data type archive. Figure 13-6 shows a Data Type Manager window with three data type archives selected by the Ghidra loader.

Figure 13-6: Data Type Manager window
The BuiltInTypes archive is always listed. This archive includes all (and only) types that are modeled within Ghidra by Java classes that implement the ghidra.program.model.data.BuiltInDataType interface. Ghidra searches for every such class within its classpath in order to populate this archive.
The second archive is specific to the file that is being analyzed, and the archive shares the file’s name. In this case, the archive is associated with the file global_array_demo_x64. The checkmark next to the archive indicates that it is associated with the active file. Initially, Ghidra populates this archive with data types specific to the file’s format (for example, PE- or ELF-related data types). During auto analysis, Ghidra copies additional types, from the other archives, into this one when they are recognized to be in use in the program. In other words, this archive contains the subset of all data types, known to the Data Type Manager, that happen to be in use in the current program. This archive is also the home to any custom data types that you choose to create in Ghidra, as discussed in “Creating Structures with Ghidra” on page 166.
The third archive provides the 64-bit ANSI C function prototypes and C library data types. This particular archive contains information extracted from the standard C library headers of a 64-bit Linux system and is one of several platform-specific archives in a default Ghidra installation. It is present because this particular binary has a library dependency on libc.so.6, as indicated in Figure 13-4. A default Ghidra installation has four additional platform-specific data archives, located in the Ghidra/Features/Base/data/typeinfo directory under a subdirectory specific to the platform. The filenames indicate the platforms they support: generic_clib.gdt, generic_clib_64.gdt, mac_osx.gdt, windows_vs12_32.gdt, and windows_vs12_64.gdt. (The .gdt extension is used for all Ghidra data type archives.)
In addition to the archives that the Ghidra loader selects automatically, you can add your own data type archives as nodes in the Data Type Manager window. For demonstration purposes, Figure 13-7 shows the Data Type Manager window after all of the default .gdt files have been added to the Data Types list. The right side of the figure shows the menu for manipulating archives and data types. Additional archives are loaded using the Open File Archive menu option, which opens a file browser for you to select an archive of interest.
To add new built-in types to the BuiltInTypes archive, add corresponding .class files to Ghidra’s classpath. If you add types while Ghidra is running, you must Refresh BuiltInTypes (see Figure 13-7) in order for them to appear. The refresh operation causes Ghidra to rescan its classpath to find any newly added BuiltInDataType classes. The inquisitive reader may find numerous examples of built-in types in their Ghidra source distribution at Ghidra/Framework/SoftwareModeling/src/main/java/ghidra/program/model/data.
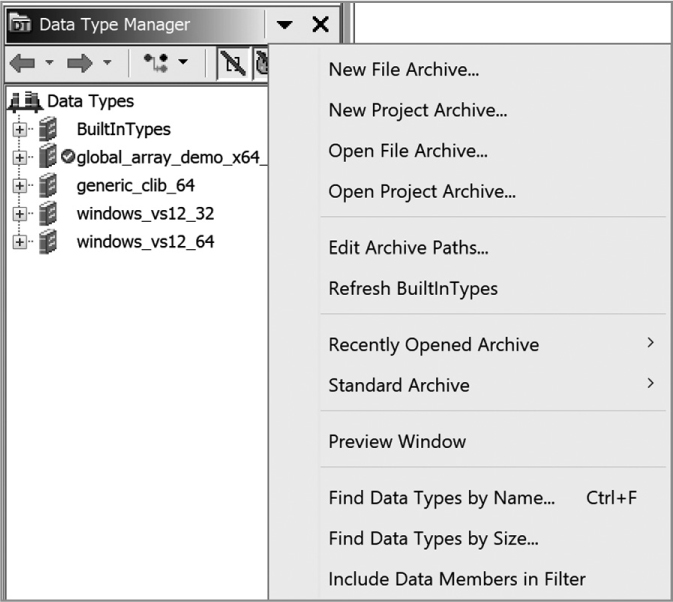
Figure 13-7: Data Type Manager with all standard archives loaded and options menu expanded
Creating New Data Type Archives
It’s impossible to anticipate every data type that you may encounter while analyzing binaries. The archives included in your Ghidra distribution include data types culled from the most commonly used libraries on Windows (Windows SDK) and Unix (C library) systems. When Ghidra doesn’t contain information on the data types used in a program you’re analyzing, it offers you the ability to create new data type archives, populate them in a variety of ways, and share them with others. In the following sections, we discuss the three ways you are likely to create new data type archives.
Parsing C Header Files
One of the most common sources for data type information is C header files. Assuming you have the header files you need, or take the time to create them yourself, you can create your own data type archive by using the C-Parser plugin to extract the information from an existing C header file. For example, if you frequently find yourself analyzing binaries that link against the OpenSSL cryptographic library, you might download the OpenSSL source code and ask Ghidra to parse the included header files to create an archive of OpenSSL data types and function signatures.
This process is not nearly as straightforward as it might seem. Header files are often littered with macros designed to influence the behavior of a compiler based on the compiler being used and the operating system and architecture being targeted. For example, the C structure
struct parse_demo {
uint32_t int_member;
char *ptr_member;
};
occupies 8 bytes when compiled on a 32-bit system and 16 bytes when compiled on a 64-bit system. This variability poses a problem for Ghidra, which is attempting to act as the universal preprocessor, and it is up to you to guide Ghidra through the parsing process to create a useful archive. When the time comes to use your archive with Ghidra, you must have ensured that the archive was created in a manner compatible with the binary you are analyzing (that is, don’t load 64-bit archives to help you analyze a 32-bit file).
To parse one or more C header files, select File ▸ Parse C Source in the CodeBrowser to open the dialog shown in Figure 13-8. The source files to parse section provides an ordered list of header files for the plugin to parse. The order is important, as the data types and preprocessor directives from one file become available for the next file.
The Parse Options box provides a list of options, similar to compiler command line options, that influence the behavior of the C-Parser plugin. The parser recognizes only the -I (include directory) and -D (define a macro) options understood by most compilers. Ghidra offers a number of preprocessor configurations, in the form of .prf files, that you can choose from to provide reasonable defaults for common operating system and compiler combinations. You can also customize any of the available configurations or create your own from scratch and save them to your own .prf for future use. A common change to the parser options is to correctly set the architecture that you want the C-Parser to target, as all of the supplied configurations target x86. For example, you might change -D_X86_ in a Linux-oriented configuration to -D__ARMEL__ if you are analyzing little-endian ARM binaries.
The plugin’s output can be merged into the current active file with the Parse to Program button or stored in a separate Ghidra data type archive file (.gdt) with Parse to File. Additional information about the C-Parser can be found in Ghidra Help.
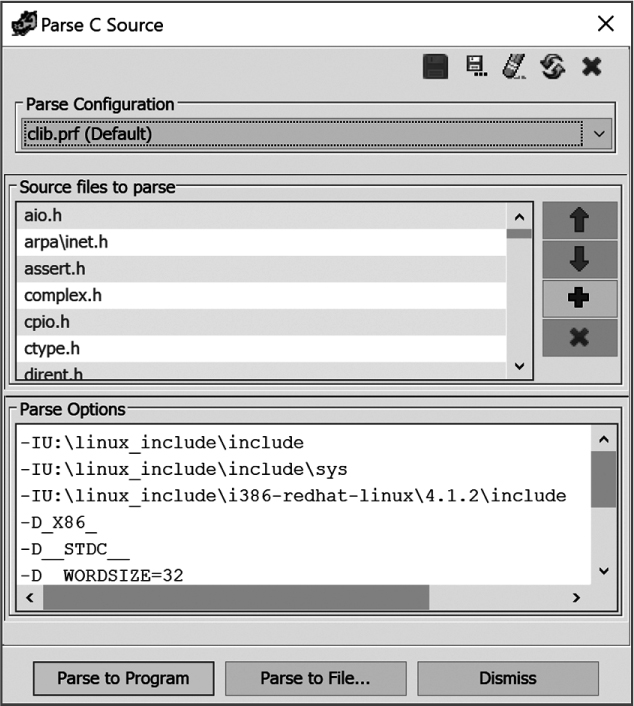
Figure 13-8: Parse C Source dialog
Creating a New File Archive
As an alternative to parsing C headers files, you might want to capture custom data types that you create while analyzing a file into an archive that can be shared with other Ghidra users or used in other Ghidra projects. The Data Type Manager’s New File Archive option (refer to Figure 13-7) asks you to select a filename and save location, and then creates a new, empty archive that is listed in the Data Type Manager window. You can add new types to the archive by using the techniques described in “Creating Structures with Ghidra” on page 166. Once your archive is created, you may share it with other Ghidra users or use it in your other Ghidra projects.
Creating a New Project Archive
A project data archive exists only within the project in which it was created. This may be useful if you expect to reuse custom data types in more than one file within a project but never expect to use the data types outside your project. Within the Data Type Manager, the New Project Archive option (refer to Figure 13-7) asks you to select a folder within your project to hold your new archive, and then creates a new, empty archive that is listed in the Data Type Manager window. As with the other data type archives, you can add new types to the archive as needed.
Function IDs
When you set out to reverse engineer any binary, the last thing you want to do is waste time reverse engineering library functions whose behavior you could learn much more easily by simply reading a man page, reading some source code, or doing a little internet research. Unfortunately, statically linked binaries blur the distinction between application code and library code: entire libraries are combined with application code to form a single, monolithic executable file. Fortunately for us, Ghidra has tools to recognize and mark library code, regardless of whether the code was taken from a library archive or is simply the result of code reuse across multiple binaries, allowing us to focus our attention on the unique code within the application. The Function ID analyzer recognizes many common library functions using function signatures included with Ghidra, and you can extend the function signature databases by using the Function ID plugin.
The Function ID analyzer works with Function ID databases (FidDbs) that use a hierarchy of hash values to characterize functions. A full hash (which is intended to be resilient against changes that might be introduced by the linker) and a specific hash (which helps differentiate between variants of functions) are computed for each function. The major difference between the two is that the specific hash may include the specific values of any constant operands (based on a heuristic), whereas the full hash does not. The combination of the two hashes coupled with information about any associated parent and child functions forms a fingerprint for each library function, which is recorded in an FidDb. The Function ID analyzer derives the same type of fingerprint for each function in the binary you are analyzing and compares it against all known fingerprints in relevant FidDbs. When a match is found, Ghidra recovers the function’s original name from the FidDb, applies the appropriate label to the function under analysis, adds the function to the Symbol Tree window, and updates the function’s plate comment. The following is a sample plate comment for the _malloc function:
**************************************************************
* Library Function – SingleMatch *
* Name: _malloc *
* Library: Visual Studio 2005 Release *
**************************************************************
Information about functions in a FidDb are stored hierarchically and include a name, version, and variant. The variant field is used to encode information such as compiler settings, which affect the hashes but aren’t part of the version number.
The Function ID analyzer offers several options, accessible when you select the analyzer in the Auto Analysis dialog, to control its behavior, as shown in Figure 13-9. Instruction count threshold is a tunable threshold designed to reduce false positives from random matches against small functions. False positives occur when a function is incorrectly matched to a library function. False negatives occur when a function is not matched to a library function but should be. The threshold roughly represents the minimum number of instructions that a function, its parents, and its children must contain (combined) in order to be considered for a match. Refer to Scoring and Disambiguation in Ghidra Help for more information on match scores.

Figure 13-9: Auto analysis options
Since the actual functionality within a binary is generally contained in functions, the ability to extend function signatures is paramount to minimizing duplication of effort, and this work is facilitated by the Function ID plugin.
Function ID Plugin
The Function ID plugin (not to be confused with the Function ID analyzer) allows you to create, modify, and control associations for FidDbs. This plugin is not enabled in a default Ghidra installation. To enable it, select File ▸ Configure from the CodeBrowser window and then click the checkbox for Function ID. Choose Configure within the Function ID description and select the FidPlugin to see additional information about actions associated with the plugin, as shown in Figure 13-10.
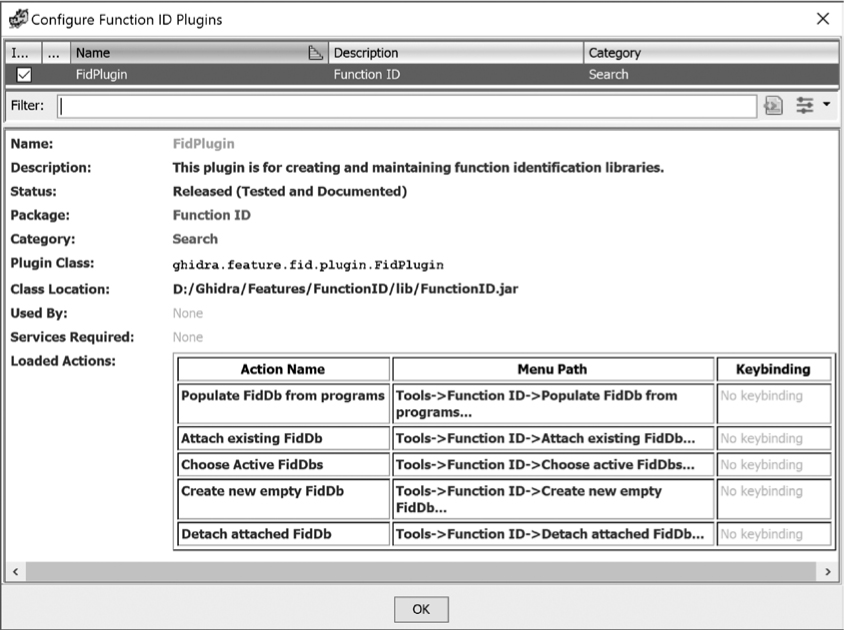
Figure 13-10: FidPlugin details
Once enabled, the Function ID plugin is controlled via the CodeBrowser’s Tools ▸ Function ID menu, as shown in Figure 13-11.

Figure 13-11: CodeBrowser Function ID submenu
Before we walk through an example of using the Function ID plugin to extend Ghidra signatures, let’s briefly discuss the five new menu options:
Choose active FidDbs Displays a list of active Function ID databases. Each may be selected or deselected using an associated checkbox.
Create new empty FidDb Allows you to create and name a new Function ID database. The new FidDb will be listed when Choose active FidDbs is selected.
Attach existing FidDb Displays a file chooser dialog that lets you add an existing FidDb to the list of active FidDbs. After you add the FidDb, you can select Choose active FidDbs to see the added FidDb listed.
Detach existing FidDb Can be applied to only FidDbs that have been manually attached. The operation removes the association between the selected FidDb and the current Ghidra instance.
Populate FidDb from programs Generates new function fingerprints to add to an existing FidDb. The dialog in Figure 13-12 is used to control this process, and its use will be discussed shortly.
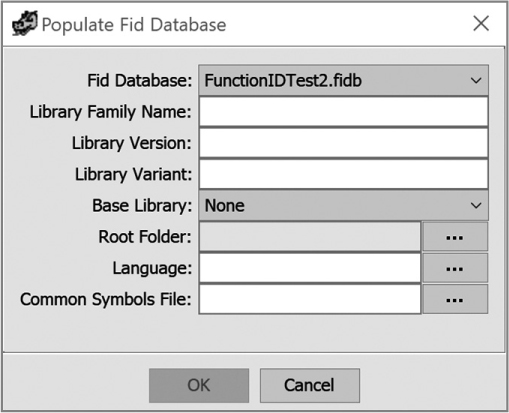
Figure 13-12: Populate Fid Database dialog
Function ID Plugin Example: UPX
When we auto analyze binaries that contain very few functions outside of library functions that Ghidra recognizes, our reverse engineering task is somewhat simplified. We can focus on the subset of functions that Ghidra fails to recognize under the assumption that this is where the new, interesting functionality lies. Our task is much more challenging when Ghidra can’t identify any functions. When we (human analysts) recognize functions and extend Ghidra’s ability to recognize those same functions in the future, we reduce our future workload. Let’s walk through a demonstration of how powerful this sort of extension can be.
Let’s assume we load a 64-bit Linux ELF binary into Ghidra and auto analyze the file. The resulting Symbol Tree entries are shown in Figure 13-13. We use the Symbol Tree to navigate to the entry point and examine the code. Our initial analysis leads us to believe that the binary is packed using the Ultimate Packer for eXecutatbles (UPX) and that the functions we are seeing were added by the UPX packer to unpack the binary at runtime. We confirm this hypothesis by comparing the bytes we see in entry with published bytes for the UPX entry point function. (Alternatively, we could create our own UPX-packed binary for comparison.) Now, we add this information to our FidDb so that we don’t have to perform this same analysis should we ever encounter another UPX-packed 64-bit Linux binary.
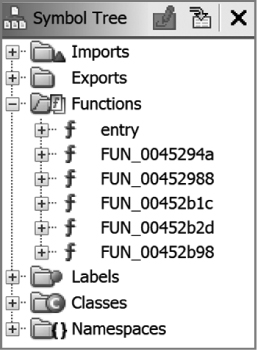
Figure 13-13: Suspected UPX packer functions for upx_demo1_x64_static.upx
Functions you add to an FidDb should have meaningful names. Accordingly, we change the names of the functions in our example to indicate that they are part of a UPX packer, as shown in Figure 13-14, and then add these functions to a new Function ID database so that Ghidra can label the functions appropriately in the future.

Figure 13-14: Labeled UPX packer functions for upx_demo1_x64_static.upx
We create a new FidDb by selecting Tools ▸ Function ID ▸ Create new empty FidDb and then name the new FidDb UPX.fidb. Next, we populate our new database with information extracted from the updated binary by selecting Tools ▸ Function ID ▸ Populate FidDb from programs. Enter information about the FidDb in the resulting dialog, as shown in Figure 13-15.
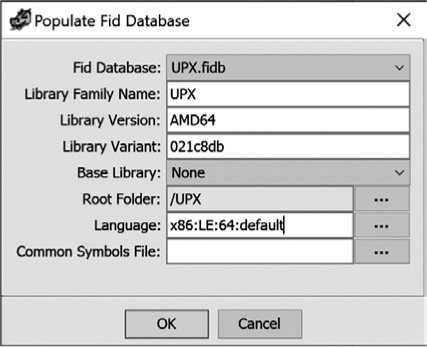
Figure 13-15: Populate Fid Database dialog
The purpose of each field and the values we have entered are described here:
Fid Database UPX.fidb is the name of our new FidDb. The pull-down list allows you to choose from among all of the FidDbs you have created.
Library Family Name Choose a name that describes the library from which you are extracting function data. In our case, we have input UPX.
Library Version This can be a version number or a platform name or a combination of both. Since UPX is available for many platforms, we chose the library version based on the architecture of the binary.
Library Variant This field may be used for any additional information that distinguishes this library from others of the same version. In this example, we used the commit ID for this version of UPX from the UPX repository on GitHub (https://github.com/upx/).
Base Library Here you may reference another FidDb that Ghidra will use to establish parent/child relationships. We did not use a base library, as UPX is completely self-contained.
Root Folder This field names a Ghidra project folder. All files in the chosen folder will be processed during the function ingest process. In this case, we chose /UPX from the pull-down menu.
Language This contains the Ghidra language identifier associated with the new FidDb. To be processed from the root folder, a file’s language identifier must match this value. This entry is populated from the Imports Results Summary window for the binary, but may be modified using the button to the right of the text box.
Common Symbols File This field names a file containing a list of functions that should be excluded from the ingest process. This field is unused in this case.
When we click OK, the ingest process begins. When it’s complete, we see the results of the FidDb population (Figure 13-16).

Figure 13-16: Results window from UPX FidDb population
Once the new FidDb is created, Ghidra can use it to identify functions in any binary you are analyzing. We demonstrate this by loading a new UPX packed 64-bit Linux ELF binary, upx_demo2_x64_static.upx, and auto analyze the file without the Function ID analyzer. The resulting Symbol Tree, shown in Figure 13-17, shows five unidentified functions, as we expect.

Figure 13-17: Symbol Tree entry for upx_demo2_x64_static.upx before Function ID analyzer
Running Function ID as a one-shot analyzer (Analysis ▸ One Shot ▸ Function ID) results in the Symbol Tree shown in Figure 13-18, which includes the UPX function names.

Figure 13-18: Symbol Tree entry for upx_demo2_x64_static.upx after Function ID analyzer
The analyzer also updates the Listing window with new function names and plate comments, like the plate comment for UPX_1 shown next. This plate comment contains the information that we provided when creating the FidDb:
**************************************************************
* Library Function - Single Match *
* Name: UPX_1 *
* Library: UPX AMD64 021c8db *
**************************************************************
undefined UPX_1()
undefined AL:1 <RETURN>
UPX_1 XREF[1]: UPX_2:00457c08(c)
00457b1a 48 8d 04 2f LEA RAX,[RDI + RBP*0x1]
00457b1e 83 f9 05 CMP ECX,0x5
Creating new FidDbs is only the beginning of extending Ghidra’s function identification capabilities. You can analyze parameters associated with a function and save them in a Data Type archive. Then, when Function ID correctly identifies the function, you can drag the appropriate Data Type Manager entry onto the function in the Listing window, and the function prototype will be updated with the appropriate parameters.
Function ID Plugin Example: Profiling a Static Library
When you are reverse engineering a statically linked binary, one of the first things you may wish for is an FidDb that matches the functions linked into that binary, so that Ghidra can identify the library code and save you the effort of analyzing it. The following example addresses two important questions: (1) how can you know whether you have such an FidDb, and (2) what can you do if you don’t have one? The answer to the first question is simple: Ghidra ships with at least a dozen FidDbs (in the form of .fidbf files), all related to Visual Studio library code. If the binary is not a Windows binary and you have not yet created or imported any FidDbs, you’ll need to make your own FidDb by using the Ghidra Function ID plugin (which addresses the second question).
The most important thing to understand when populating a new FidDb is that you need an input source that has a high probability of matching against any binaries you plan to apply the FidDb against. In the UPX example, we had a binary that contained code that our intuition told us we might see again in the future. In a common static linking case, we have a binary and we simply want to match as much code in that binary as possible.
There are a variety of ways to recognize that you’re dealing with a statically linked binary. Within Ghidra, look at the Imports folder within the Symbol Tree. This folder will be empty for a fully statically linked binary with no need for imported functions. A partially statically linked binary may have some imports, so you can look for copyright or version strings from well-known libraries in the Defined Strings window.
On the command line, you can use simple utilities like file and strings:
$ file upx_demo2_x64_static_stripped
upx_demo2_x64_static_stripped: ELF 64-bit LSB executable, x86-64,
version 1 (GNU/Linux), statically linked, for GNU/Linux 3.2.0,
BuildID[sha1]=54e3569c298166521438938cc2b7a4dda7ab7f5c, stripped
$ strings upx_demo2_x64_static_stripped | grep GCC
GCC: (Ubuntu 7.4.0-1ubuntu1~18.04.1) 7.4.0
The output of file informs us that the binary is statically linked, stripped of any symbols, and from a Linux system. (A stripped binary contains no familiar names to clue us in to the behavior of any of the functions.) Filtering the output of strings using grep GCC identifies the compiler, GCC 7.4.0, as well as the Linux distribution, Ubuntu 18.04.1, used to build the binary. (You can locate the same information with CodeBrowser’s Search ▸ Program Text functionality using GCC as a qualifier.) It’s likely this binary was linked with libc.a,1 so we take a copy of libc.a from Ubuntu 18.04.1 and use it as the starting point for recovering symbols in our stripped binary. (Additional strings in the binary might lead us to select additional static libraries for the Function ID analysis; however, we limit this example to libc.a.)
To use libc.a to populate an FidDb, Ghidra must identify the instructions and functions that it contains. The archive (hence .a) file format defines a container for other files, most commonly for object files (.o) that a compiler might extract and link into an executable. Ghidra’s process for importing container files differs from its process for importing single binaries, so when we import libc.a with File ▸ Import, as we usually do when importing a single file, Ghidra offers alternate import modes, as shown in Figure 13-19. (These other options are also available from the File menu.)

Figure 13-19: Importing a container file
Single File mode asks Ghidra to import the container as if it was a single file. Since the container is not an executable file, Ghidra is likely to suggest the Raw Binary format for your import and perform minimal automated analysis. In File System mode, Ghidra opens a file browser window (see Figure 13-20) to display the contents of the container file. In this mode, you may choose any combination of files from the container to import into Ghidra using options from context menus.
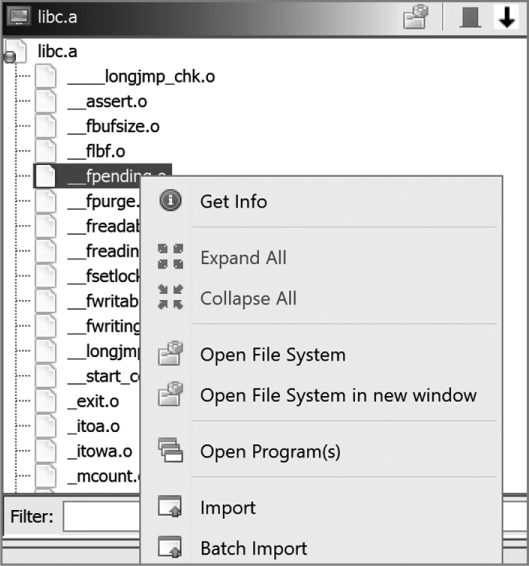
Figure 13-20: File System import mode
In Batch mode, Ghidra automatically imports files in the container without pausing to display individual file information. After initially processing the container’s contents, Ghidra displays the Batch Import dialog shown in Figure 13-21. Before clicking OK, you can view information on each file being imported, add more files to the batch import, set import options, and choose the destination folder within your Ghidra project. Figure 13-21 shows that we are about to import 1690 files from the libc.a archive into our CH13 project’s root directory.
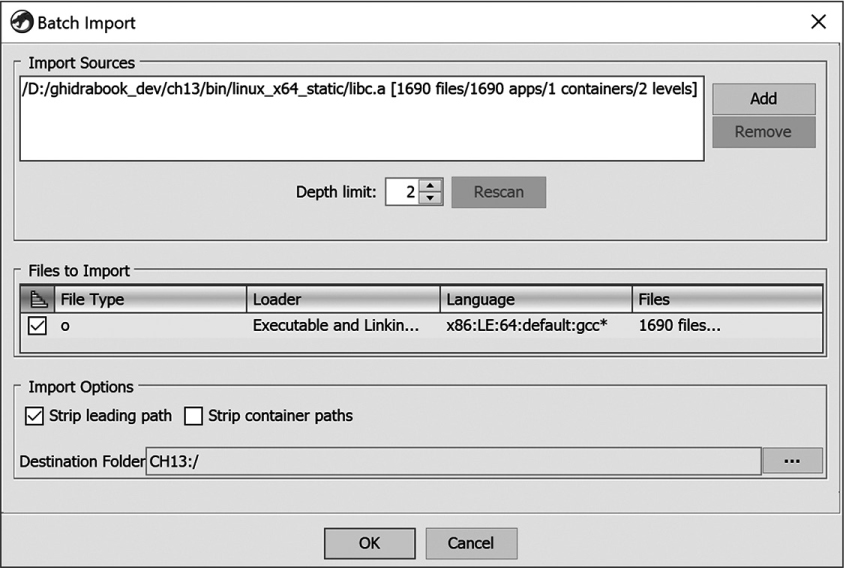
Figure 13-21: Ghidra’s Batch Import dialog
Click OK to kick off the import process (which may take some time). Once the import is complete, you will be able to browse the newly imported files in the Ghidra Project window. Because libc.a is a container file, it will appear as a folder in the Project window, and you can navigate its contents to open and analyze any one of the files contained in the folder.
At this point, we can finally capture fingerprints of each libc function into an FidDb and use that FidDb to perform Function ID analysis against our sample statically linked binary. This process parallels the UPX example, beginning with creating a new empty FidDb that will then be populated from programs. The programs in this case will be the entire contents of our newly import libc.a folder. Here we run into a significant challenge.
When we select the files to populate our new FidDb, we must ensure that every file has been properly analyzed by Ghidra to identify functions and their associated instructions (the input to the Function ID hashing process). Up to this point, we have seen Ghidra analyze programs only when we open them in the CodeBrowser, but with libc.a, we are faced with the daunting task of analyzing 1690 individual files within the libc.a archive. Opening and analyzing them one at a time is not a good use of our time. Even selecting to open all files on import and using Ghidra’s Analyze All Open option will still take us a while to work through all 1690 files (and will likely require manual intervention to adjust our tool options and resource allocations to accommodate a task of this size within our Ghidra instance).
If this problem seems unwieldy, you are correct. This is not the sort of task that we should be solving manually through the Ghidra GUI. This is a well-defined repetitive task that shouldn’t require human intervention. Fortunately for us, the next three chapters introduce methods we can use to automate this and other tasks. When we get to “Automated FidDb Creation” on page 359, we will revisit this specific task and demonstrate how easily batch processing can be accomplished using Ghidra’s headless mode of operation.
Regardless of the method we use to process libc.a, once complete, it’s a simple matter to return to the Function ID plugin and populate our new FidDb, yielding the following results:
FidDb Populate Results
2905 total functions visited
2638 total functions added
267 total functions excluded
Breakdown of exclusions: FAILS_MINIMUM_SHORTHASH_LENGTH: 234
DUPLICATE_INFO: 9
FAILED_FUNCTION_FILTER: 0
IS_THUNK: 16
NO_DEFINED_SYMBOL: 8
MEMORY_ACCESS_EXCEPTION: 0
Most referenced functions by name:
749 __stack_chk_fail
431 free
304 malloc
...
Our new FidDb is now available for use and allows the Function ID analyzer to match many of the functions contained in upx_demo2_x64_static_stripped, significantly reducing our reverse engineering workload for this particular binary.
Summary
This chapter demonstrated some of the ways that Ghidra can be extended by parsing C source files, extending word models, and extracting function fingerprints using the Function ID plugin. When a binary contains statically linked code or code reused from previously analyzed binaries, matching those functions against Ghidra FidDbs can save you the hassle of manually wading through a mountain of code. Predictably, so many static link libraries exist that it is not possible for Ghidra to include FidDb files that cover every possible use case. The ability to create your own FidDb files when necessary allows you to build up a collection of FidDbs that are tuned to your particular needs. In Chapters 14 and 15, we introduce Ghidra’s powerful scripting capabilities to further extend Ghidra’s functionality.