
16
GHIDRA IN HEADLESS MODE

In earlier chapters, we focused on exploring a single file within a single project, facilitated by the Ghidra GUI. In addition to the GUI, Ghidra has a command line interface called the Ghidra headless analyzer. The headless analyzer provides some of the same capabilities as the Ghidra GUI, including the ability to work with projects and files, but it’s better suited for batch processing and scripted control of Ghidra. In this chapter, we discuss Ghidra’s headless mode and how it can help you perform repetitive tasks across a larger number of files. We start with a familiar example and then expand our discussion to more complex options.
Getting Started
Let’s start by recalling our first use of Ghidra in Chapter 4. We successfully accomplished the following steps:
- Launch Ghidra.
- Create a new Ghidra project.
- Identify a location for the project.
- Import a file to the project.
- Auto analyze the file.
- Save and exit.
Let’s replicate these tasks using the Ghidra headless analyzer’s command line interface. The headless analyzer (analyzeHeadless or analyzeHeadless.bat) as well as a helpful file called analyzeHeadlessREADME.html can be found in the support directory of your Ghidra installation. To simplify file paths, we have temporarily placed the file global_array_demo_x64 in the same directory. First, we will identify the commands and parameters needed for each of the individual tasks and then we will put them all together to accomplish our goal. While it hasn’t made a significant difference in previous chapters, there are more distinctions between the three Ghidra platforms when we are operating from the command line. In our examples, we use the Windows installation and make note of significant differences on other platforms.
TO SLASH OR BACKSLASH?
A major difference among the operating system platforms that support Ghidra is the manner in which they identify filesystem paths. While the syntax is consistent, different platforms use different directory separators. Windows uses a backward slash, whereas Linux and macOS use a forward slash. A path looks like this in Windows:
D:GhidraProjectsch16demo_stackframe_32
And it looks like this in Linux and macOS:
/GhidraProjects/ch16/demo_stackframe_32
This syntax can be even more confusing for Windows users as forward slashes are used in URLs and command line switches (and Ghidra documentation). Operating systems recognize this issue and try to accept either, but not always in a predictable manner. For the examples in this chapter, we use the Windows convention so readers can enjoy being backward compatible with DOS.
Step 1: Launch Ghidra
This step is accomplished using the analyzeHeadless command. All additional steps will be accomplished using the parameters and options associated with this command. Running analyzeHeadless without any parameters displays a usage message with the command’s syntax and options, as shown in Figure 16-1. To launch Ghidra, we need to add some of these parameters to the command.

Figure 16-1: Headless analyzer syntax
Steps 2 and 3: Create a New Ghidra Project in a Specified Location
In headless mode, Ghidra creates a project for you if the project does not already exist. If the project already exists in the specified location, Ghidra opens the existing project. As a result, two parameters are required: the project location and the project name. The following command creates a project named CH16 in our D:GhidraProjects directory:
analyzeHeadless D:GhidraProjects CH16
This is a minimal launch of headless Ghidra to open a project and accomplishes nothing more. In fact, the response message from Ghidra tells you exactly that:
Nothing to do...must specify -import, -process, or prescript and/or postscript.
Step 4: Import a File to the Project
To import a file, Ghidra requires the -import option and the name of the file to import. We will import global_array_demo_x64, which we have used in the past. As mentioned, for simplicity in this initial example, we have placed the file in the support directory. Alternatively, we could specify the full path to the file on the command line. We add the -import option to our command:
analyzeHeadless D:GhidraProjects CH16 -import global_array_demo_x64
Steps 5 and 6: Auto Analyze the File, Save, and Exit
In headless mode, auto analysis and saving happen by default, so the command in step 4 accomplishes everything we want. An option is required to not analyze the file (-noanalysis), and there are options available to control how the project and associated files are saved.
Here is our completed command to accomplish our six objectives:
analyzeHeadless D:GhidraProjects CH16 -import global_array_demo_x64
As with many console commands, you may be asking yourself, “How can I be sure anything has happened?” Your first sign of success (or failure) is the messages displayed at the console. Informational messages that start with the prefix INFO provide progress reports as the headless analyzer starts its work. Error messages start with the prefix ERROR. Listing 16-1 includes a subset of the messages, including an error message.
➊ INFO HEADLESS Script Paths:
C:UsersGhidrabookghidra_scripts
➋ D:ghidra_PUBLICGhidraExtensionsSimpleROPghidra_scripts
D:ghidra_PUBLICGhidraFeaturesBaseghidra_scripts
D:ghidra_PUBLICGhidraFeaturesBytePatternsghidra_scripts
D:ghidra_PUBLICGhidraFeaturesDecompilerghidra_scripts
D:ghidra_PUBLICGhidraFeaturesFileFormatsghidra_scripts
D:ghidra_PUBLICGhidraFeaturesFunctionIDghidra_scripts
D:ghidra_PUBLICGhidraFeaturesGnuDemanglerghidra_scripts
D:ghidra_PUBLICGhidraFeaturesPythonghidra_scripts
D:ghidra_PUBLICGhidraFeaturesVersionTrackingghidra_scripts
D:ghidra_PUBLICGhidraProcessors8051ghidra_scripts
D:ghidra_PUBLICGhidraProcessorsDATAghidra_scripts
D:ghidra_PUBLICGhidraProcessorsPICghidra_scripts(HeadlessAnalyzer)
INFO HEADLESS: execution starts (HeadlessAnalyzer)
INFO Opening existing project: D:GhidraProjectsCH16 (HeadlessAnalyzer)
➌ ERROR Abort due to Headless analyzer error:
ghidra.framework.store.LockException:
Unable to lock project! D:GhidraProjectsCH16 (HeadlessAnalyzer)
java.io.IOException: ghidra.framework.store.LockException:
Unable to lock project! D:GhidraProjectsCH16
...
Listing 16-1: Headless analyzer with error condition
The script paths used in headless mode are listed ➊. Later in the chapter, we show how to use additional scripts with our headless commands. The extension we created in the preceding chapter, SimpleROP, is included in the script path ➋ because every extension adds a new path to the script path. The LockException ➌ is perhaps the most common error associated with the headless analyzer. The headless analyzer fails if you attempt to run it on a project that you already have open in another Ghidra instance. When this occurs, the headless analyzer is unable to lock the project for its own, exclusive use, so the command fails.
To fix the error, close any running Ghidra instance that has the CH16 project open and run the command again. Figure 16-2 shows the tail end of the output for successful execution of our command, which is similar to the pop-up windows that we see when analyzing files in the Ghidra GUI.

Figure 16-2: Headless analyzer results displayed to the console
To verify the results in the Ghidra GUI, open the project and confirm that the file has been loaded, as shown in Figure 16-3, and then open the file in the CodeBrowser to confirm analysis.

Figure 16-3: Ghidra GUI confirmation that the project has been created and the file loaded
Now that we have replicated our earlier analysis using Ghidra in headless mode, let’s investigate some situations where headless mode has an advantage over the GUI. To create a project and load and analyze all of the files shown in Figure 16-4 using the Ghidra GUI, we could create the project and then load each file individually, or select files to include in a batch import operation, as discussed in “Batch Import” on page 226. Headless Ghidra allows us to name a directory and analyze all contained files.

Figure 16-4: Input directory for headless Ghidra examples
The following command tells the headless analyzer to open or create a project named CH16 in the D:GhidraProjects directory and import and analyze all of the files in the D:ch16 directory:
analyzeHeadless D:GhidraProjects CH16 -import D:ch16
After the command is executed, we can load the new project into the Ghidra GUI and see its associated files, as shown in Figure 16-5. The subdirectory D:ch16CH16_subdirectory does not appear in the project, nor do any of the files within the subdirectory. We will come back to this when we discuss additional options and parameters that can be used with headless Ghidra in the following section.
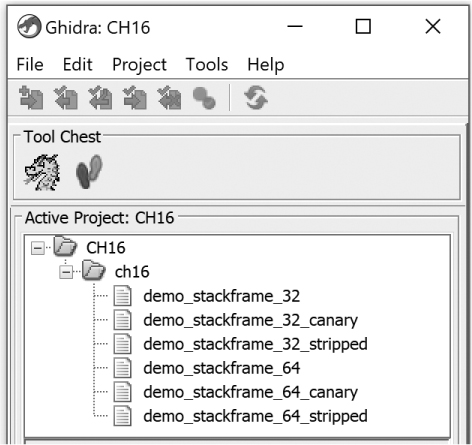
Figure 16-5: Project resulting from pointing headless Ghidra at a directory
Options and Parameters
The simple examples of using headless Ghidra to create a project, load and analyze a single file, and use batch processing to import an entire directory are just the beginning of what is possible. While we will not be able to discuss all capabilities of headless Ghidra, we will provide a brief introduction to each of the options currently available.
General Options
The following are brief descriptions with related examples of additional options that we could use to further control what is happening in our simple examples. (Wrapped lines are indented.) When encountered, common error conditions are discussed. Specialized error conditions are left as an exercise for the reader in the comfort of the Ghidra Help file.
-log logfilepath
Many things can go wrong (and right) when executing from the command line. Fortunately, Ghidra plugins provide continuous feedback as to what is happening while Ghidra is running. While this feedback is less vital in the Ghidra GUI (because you have visual cues as to what is happening), it is important in headless Ghidra.
By default, a logfile is written to .ghidra/.ghidra_<VER>_PUBLIC/application.log in the user’s home directory. You may select a new location by adding the -log option to your command line. To create a directory, CH16-logs, and write a logfile to CH16-logfile, use the following command:
analyzeHeadless D:GhidraProjects CH16 -import global_array_demo_x64
-log D:GhidraProjectsCH16-logsCH16-Logfile
-noanalysis
This option instructs Ghidra not to analyze any files that you import from the command line. Opening the file global_array_demo_x64 in the Ghidra GUI after the following statement is executed would present you with a loaded, but not analyzed, version of the file within the CH16 project:
analyzeHeadless D:GhidraProjects CH16 -import global_array_demo_x64
-noanalysis
-overwrite
In Listing 16-1, we saw an error condition when Ghidra tried to open a project that was already open. A second common error occurs when Ghidra tries to import a file into a project and the file has already been imported. To import a new version of the file, or overwrite the existing file regardless of contents, use the -overwrite option. Without this option, running the following headless command twice would result in an error during the second execution. With this option, we can rerun the command as many times as we wish:
analyzeHeadless D:GhidraProjects CH16 -import global_array_demo_x64
-overwrite
-readOnly
To import a file without saving the file in the project, use the -readOnly option. If you use this option, the -overwrite option will be ignored (if present). This option also has meaning when used with the -process option rather than the -import command. The -process option is covered later in the chapter.
analyzeHeadless D:GhidraProjects CH16 -import global_array_demo_x64
-readOnly
-deleteProject
This option instructs Ghidra not to save any project being created with the –import option. This option can be used with any of the other options but is assumed (even if omitted) when using -readOnly. The newly created project is deleted after analysis is complete. This option will not delete an existing project:
analyzeHeadless D:GhidraProjects CH16 -import global_array_demo_x64
-deleteProject
-recursive
By default, Ghidra does not recurse into subdirectories when asked to process an entire directory. Use this option when you do want Ghidra to perform recursive directory processing (that is, process any subdirectories it finds along the way). To demonstrate this functionality, we will point Ghidra at the same ch16 directory we processed earlier, but this time will use the -recursive option:
analyzeHeadless D:GhidraProjects CH16 -import D:ch16 -recursive
Opening the project, CH16, after running this command results in the project structure shown in Figure 16-6. In contrast to Figure 16-5, the CH16_subdirectory is included in the project as well as its associated file, and the directory hierarchy is retained within the project hierarchy.
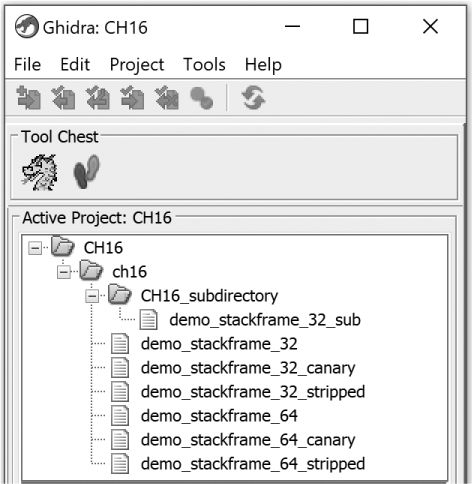
Figure 16-6: Headless Ghidra project resulting from the -recursive option
WILDCARDS!
Wildcards provide an easy method to select multiple files for headless Ghidra without listing each one separately. In short, an asterisk (*) matches any sequence of characters, and a question mark (?) matches a single character. To load and analyze only the 32-bit files from Figure 16-7, use a wildcard as follows:
analyzeHeadless D:GhidraProjects CH16 -import D:ch16demo_stackframe_32*
This creates the CH16 project and loads and analyzes all of the 32-bit files in the ch16 directory. The resulting project is shown in Figure 16-7. See analyzeHeadlessREADME.html for detailed information about using wildcards to specify files for import and processing. You will also see wildcards in future headless Ghidra scripting examples.

Figure 16-7: Project files resulting from the wildcard demo_stackframe_32*
-analysisTimeoutPerFile seconds
As you have analyzed (or sat and watched Ghidra analyze) files, you may have noticed several factors that impact the analysis time, like the size of the file, whether it’s statically linked, and the decompiler analysis options. Regardless of the file contents and options, you can’t know in advance exactly how long it may take to analyze a file.
In headless Ghidra, particularly when you are processing a large number of files, you can use the -analysisTimeoutPerFile option to ensure that your task ends in a reasonable amount of time. With this option, you specify a time-out in seconds, and analysis will be interrupted should time expire. For example, our existing headless Ghidra command takes a little over one second to analyze on our system (refer to Figure 16-2). If we had really limited time to execute this script, the following headless command would stop analysis after one second:
analyzeHeadless D:GhidraProjects CH16 -import global_array_demo_x64
-analysisTimeoutPerFile 1
This would result in the console display shown in Figure 16-8.
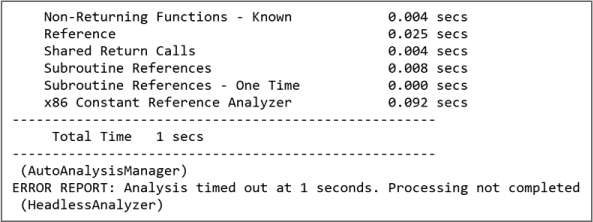
Figure 16-8: Console warning that analysis timed out
-processor languageID and -cspec compilerSpecID
As shown in previous examples, Ghidra is generally quite good at identifying information about a file and making import recommendations. A sample window showing the recommendations for a particular file is shown in Figure 16-9. This window is displayed every time you use the GUI to import a file into a project.
Figure 16-9: Ghidra GUI import confirmation dialog
If you feel that you have additional insight into the appropriate language or compiler, you can expand the box to the right of the Language specification. This presents you with the window shown in Figure 16-10, which gives you the opportunity to select a language and compiler specification.

Figure 16-10: Ghidra language/compiler specification selection window
To do the same in headless Ghidra, use the -cspec and/or processor options, as shown next. You cannot use the -cspec option without using the -processor option. You can use the -processor option without the -cspec option, in which case Ghidra will choose the default compiler associated with the processor.
analyzeHeadless D:GhidraProjects CH16 -import global_array_demo_x64
-processor "x86:LE:64:default" -cspec "gcc"
-loader loadername
The -loader option can be the most complex of the headless Ghidra options. The loadername argument names one of Ghidra’s loader modules (discussed in Chapter 17) that will be used to import a new file into the named project. Sample loader names include PeLoader, ElfLoader, and MachoLoader. Each loader module may recognize additional command line arguments of its own. These additional arguments are discussed in support/analyzeHeadlessREADME.html.
-max-cpu number
This option allows to you to put an upper limit on the number of processor (CPU) cores used to process the headless Ghidra command. The option requires an integer value as an argument. If the value is less than 1, the maximum number of cores is set to 1.
analyzeHeadless D:GhidraProjects CH16 -import global_array_demo_x64
-max-cpu 5
Server Options
Some commands are used only when interacting with a Ghidra Server. As this is not the focus of this book, we will mention these commands only briefly. Additional information can be found in analyzeheadlessREADME.html.
ghidra://server[:port]/repository_name[/folder_path]
The previous examples have all specified a project location or project name. This alternative allows you to specify a Ghidra Server repository and optional folder path.
-p
With Ghidra Server, this option forces a password prompt via the console.
-connect [userID]
This option provides a userID to override the default userID when connecting to a Ghidra Server.
-keystore path
This option allows you to specify a private keystore file when using PKI or SSH authentication.
-commit ["comment"]
While commit is enabled by default, this option allows you to associate a comment with a commit.
Script Options
Perhaps the most powerful applications for headless Ghidra are associated with Ghidra’s scripting abilities. Chapters 14 and 15 both demonstrated how scripts can be created and used with the Ghidra GUI. After we present script options, we will demonstrate how powerful headless Ghidra can be in a scripting context.
-process [project_file]
This option processes select files (as opposed to importing them). If you do not specify a file, all files in the project folder will be processed. All specified files will also be analyzed unless you use the -noanalysis option. Ghidra accepts two wildcard characters (* and ?) for the –process option in order to simplify selection of multiple files. For this option, unlike with the –import option, you are naming Ghidra imported project files, not local filesystem files, so you need to quote any filenames that contain these wildcards in order to prevent your shell from expanding them prematurely.
-scriptPath "path1[;path2...]"
By default, headless Ghidra includes many default script paths as well as script paths for imported extensions, as seen in Listing 16-1. To extend the list of paths that Ghidra searches for available scripts, use the –scriptPath option, which requires a quoted path list argument. Within the quotes, multiple paths must be separated using a semicolon. Two special prefix designators are recognized in path components:
$GHIDRA_HOME and $USER_HOME. $GHIDRA_HOME refers to the Ghidra installation directory, and $USER_HOME refers to the user’s home directory. Note that these are not environment variables and that your command shell may require you to escape the leading $ character in order for it to be passed to Ghidra. The following example adds the D:GhidraScripts directory to the script path:
analyzeHeadless D:GhidraProjects CH16 -import global_array_demo_x64
-scriptPath "D:GhidraScripts"
After you run the command, the new script directory, D:GhidraScripts, is included in the script path:
INFO HEADLESS Script Paths:
D:GhidraScripts
C:UsersGhidrabookghidra_scripts
D:ghidra_PUBLICGhidraExtensionsSimpleROPghidra_scripts
D:ghidra_PUBLICGhidraFeaturesBaseghidra_scripts
D:ghidra_PUBLICGhidraFeaturesBytePatternsghidra_scripts
D:ghidra_PUBLICGhidraFeaturesDecompilerghidra_scripts
D:ghidra_PUBLICGhidraFeaturesFileFormatsghidra_scripts
D:ghidra_PUBLICGhidraFeaturesFunctionIDghidra_scripts
D:ghidra_PUBLICGhidraFeaturesGnuDemanglerghidra_scripts
D:ghidra_PUBLICGhidraFeaturesPythonghidra_scripts
D:ghidra_PUBLICGhidraFeaturesVersionTrackingghidra_scripts
D:ghidra_PUBLICGhidraProcessors8051ghidra_scripts
D:ghidra_PUBLICGhidraProcessorsDATAghidra_scripts
D:ghidra_PUBLICGhidraProcessorsPICghidra_scripts (HeadlessAnalyzer)
INFO HEADLESS: execution starts (HeadlessAnalyzer)
-preScript
This option names a script to be run before analysis. The script may contain an optional list of arguments.
-postScript
This option names a script to be run after analysis. The script may contain an optional list of arguments.
-propertiesPath
This option specifies the path to any property files associated with a script. Property files provide input to scripts that are run in headless mode. Examples of scripts and their associated property files are included in the headless analyzer documentation.
-okToDelete
As scripts can do whatever their creators intend, it is possible for a script to delete (or try to delete) files within a Ghidra project. To prevent this as an undesired side-effect, headless Ghidra will not allow deletion of files by a script unless the -okToDelete option is included when the script is invoked. Note: This parameter is not required when running in -import mode.
Writing Scripts
Now that you understand the basic components of a headless Ghidra command, let’s build some scripts to run from the command line.
HeadlessSimpleROP
Recall the SimpleROP analyzer that we wrote in Chapter 15. We wrote the module using the Eclipse IDE and then imported the extension into Ghidra so we could run it on any file we imported. Now we want to point SimpleROP at a directory and have it identify ROP gadgets in every file (or select files) in the directory. In addition to the SimpleROP output file with ROP gadgets for each existing binary, we also want a summary file that lists each file and the number of identified ROP gadgets in each.
For a job like this, running SimpleROP through the Ghidra GUI would introduce a time penalty for actions like opening and closing the CodeBrowser to display each file in the listing window, and so on. We do not need to see any of the files in the CodeBrowser window to accomplish our new goal. Why can’t we just write a script to find the gadgets independent of the GUI completely? This is exactly the kind of use case appropriate for headless Ghidra.
While we could modify the functionality of SimpleROP to accomplish our goal, we do not want to lose the utility of an existing Ghidra extension that other users may find useful. (We realize that we just introduced it in the preceding chapter . . . but it might have gone viral.) Instead, we will use some of the code from SimpleROP as a base to create our new script, HeadlessSimpleROP, which finds all ROP gadgets in <filename> and creates and writes them to <filename>_gadgets.txt, then appends <path>/<filename> and the count of ROP gadgets to a HeadlessSimpleROP summary file called gadget_summary.txt. All other functionality required (parsing directories, files, and so on) will be provided by headless Ghidra using the options we discussed earlier in this chapter.
To simplify development, we create a new script using the Eclipse ▸ GhidraDev approach presented in Chapter 15 and then copy the SimpleROPAnalyzer.java source code into the new script template and edit the code as needed. Finally, we will run the script using the -postScript option so that it is invoked following the analysis phase for each opened file.
Creating the HeadlessSimpleROP Script Template
Begin by creating a template. From the GhidraDev menu, choose New ▸ GhidraScript and fill in the information shown in the dialog in Figure 16-11. While we could place the script in any folder, we will place it in the ghidra_scripts folder within our existing SimpleROP module in Eclipse.

Figure 16-11: Create Ghidra Script dialog
Click Finish to see the new script template, complete with metadata, as shown in Figure 16-12. The task tag on line 14 shows you where to get started.
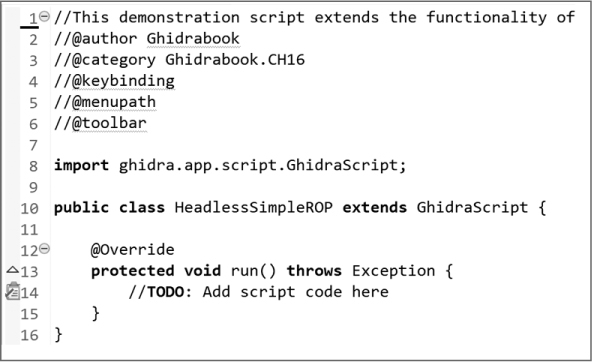
Figure 16-12: New HeadlessSimpleROP script template
To convert the SimpleROP analyzer into the HeadlessSimpleROP script, we need to do the following:
- Remove the unneeded import statements.
- Remove the analyzer public methods.
- Duplicate the functionality of the added method that is called when the SimpleROPAnalyzer is invoked with the run method, which is called when the HeadlessSimpleROP script is invoked.
- Add the functionality to append the filename and number of gadgets found to the summary file, gadget_summary.txt.
We will place our script, HeadlessSimpleROP, in the D:GhidraScripts directory and use the headless analyzer to demonstrate its functionality. In the next sections, we will run a series of tests invoking the HeadlessSimpleROP script using items in the directory structure shown in Figure 16-6. These tests also demonstrate some of the options associated with headless Ghidra.
Test Scenario 1: Load, Analyze, and Process a Single File
In the following listing, we use headless Ghidra to import, analyze, and invoke our script to generate a gadget report for a single file (the ^ character is the line-continuation character in a Windows command shell):
analyzeHeadless D:GhidraProjects CH16_ROP ^
-import D:ch16demo_stackframe_32 ^
-scriptPath D:GhidraScripts ^
-postScript HeadlessSimpleROP.java
When executed, the Ghidra headless analyzer creates a project called CH16_ROP in the GhidraProjects directory, then imports the file demo_stackframe_32, which will also be loaded and analyzed. We indicate the directory in which our script resides using scriptPath. Finally, after analysis, our script is run on the imported and analyzed file.
Once the command has completed, we check the contents of the gadget_summary.txt and demo_stackframe_32_gadgets.txt files to determine if our script worked correctly. The demo_stackframe_32_gadgets.txt contains 16 potential ROP gadgets:
080482c6;ADD ESP,0x8;POP EBX;RET;
080482c9;POP EBX;RET;
08048343;MOV EBX,dword ptr [ESP];RET;
08048360;MOV EBX,dword ptr [ESP];RET;
08048518;SUB ESP,0x4;PUSH EBP;PUSH dword ptr [ESP + 0x2c];PUSH dword ptr [ESP + 0x2c];
CALL dword ptr [EBX + EDI*0x4 + 0xffffff0c];
0804851b;PUSH EBP;PUSH dword ptr [ESP + 0x2c];PUSH dword ptr [ESP + 0x2c];
CALL dword ptr [EBX + EDI*0x4 + 0xffffff0c];
0804851c;PUSH dword ptr [ESP + 0x2c];PUSH dword ptr [ESP + 0x2c];
CALL dword ptr [EBX + EDI*0x4 + 0xffffff0c];
08048520;PUSH dword ptr [ESP + 0x2c];CALL dword ptr [EBX + EDI*0x4 + 0xffffff0c];
08048535;ADD ESP,0xc;POP EBX;POP ESI;POP EDI;POP EBP;RET;
08048538;POP EBX;POP ESI;POP EDI;POP EBP;RET;
08048539;POP ESI;POP EDI;POP EBP;RET;
0804853a;POP EDI;POP EBP;RET;
0804853b;POP EBP;RET;
0804854d;ADD EBX,0x1ab3;ADD ESP,0x8;POP EBX;RET;
08048553;ADD ESP,0x8;POP EBX;RET;
08048556;POP EBX;RET;
Here is the associated entry in gadget_summary.txt:
demo_stackframe_32: Found 16 potential gadgets
Test Scenario 2: Load, Analyze, and Process All Files in a Directory
In this test, we import an entire directory, rather than a file with the import statement:
analyzeHeadless D:GhidraProjects CH16_ROP ^
-import D:ch16 ^
-scriptPath D:GhidraScripts ^
-postScript HeadlessSimpleROP.java
When the headless analyzer is complete, the following contents are found in gadget_summary.txt:
demo_stackframe_32: Found 16 potential gadgets
demo_stackframe_32_canary: Found 16 potential gadgets
demo_stackframe_32_stripped: Found 16 potential gadgets
demo_stackframe_64: Found 24 potential gadgets
demo_stackframe_64_canary: Found 24 potential gadgets
demo_stackframe_64_stripped: Found 24 potential gadgets
These are the six files in the root directory shown in Figure 16-6. In addition to the gadget summary file, we also produced individual gadget files listing the potential ROP gadgets associated with each file. In the remaining examples, we will concern ourselves only with the gadget summary file.
Test Scenario 3: Load, Analyze, and Process All Files in a Directory Recursively
In this test, we add the -recursive option. This extends the import operation to recursively visit all files in all subdirectories within the ch16 directory:
analyzeHeadless D:GhidraProjects CH16_ROP ^
-import D:ch16 ^
-scriptPath D:GhidraScripts ^
-postScript HeadlessSimpleROP.java ^
-recursive
When the headless analyzer is complete, the following contents are found in gadget_summary.txt, with the subdirectory file appearing at the top of the list:
demo_stackframe_32_sub: Found 16 potential gadgets
demo_stackframe_32: Found 16 potential gadgets
demo_stackframe_32_canary: Found 16 potential gadgets
demo_stackframe_32_stripped: Found 16 potential gadgets
demo_stackframe_64: Found 24 potential gadgets
demo_stackframe_64_canary: Found 24 potential gadgets
demo_stackframe_64_stripped: Found 24 potential gadgets
Test Scenario 4: Load, Analyze, and Process All 32-bit Files in a Directory
In this test, we use an * as a shell wildcard to restrict the import contents to the files with the 32-bit designator:
analyzeHeadless D:GhidraProjects CH16ROP ^
-import D:ch16demo_stackframe_32* ^
-recursive ^
-postScript HeadlessSimpleROP.java ^
-scriptPath D:GhidraScripts
The resulting gadget_summary file contains the following:
demo_stackframe_32: Found 16 potential gadgets
demo_stackframe_32_canary: Found 16 potential gadgets
demo_stackframe_32_stripped: Found 16 potential gadgets
If you know in advance that you’re interested in only the generated gadget files, use the -readOnly option. This option instructs Ghidra not to save imported files into the project named in the command, and is useful for avoiding project clutter from batch-processing many files.
Automated FidDb Creation
In Chapter 13, we started creating a Function ID database (FidDb) populated with fingerprints of functions taken from a static version of libc. Using the GUI and Ghidra’s batch file import mode, we imported 1,690 object files from a libc.a archive. However, we ran into a roadblock when it came to analyzing the files because the GUI has minimal support for batch analysis. Now that you are familiar with headless Ghidra, we can use it to complete our new FidDb.
Batch Import and Analysis
Importing and analyzing 1,690 files from an archive once seemed a daunting task, but the preceding examples have shown us everything we need to know to make short work of this task. We consider two cases here and provide command line examples for each.
If libc.a has not yet been imported into a Ghidra project, we extract the contents of our libc.a into a directory and then use headless Ghidra to process the entire directory:
$ mkdir libc.a && cd libc.a
$ ar x path oarchive && cd ..
$ analyzeHeadless D:GhidraProjects CH16 –import libc.a ^
-processor x86:LE:64:default –cspec gcc –loader ElfLoader ^
-recursive
The command results in thousands of lines of output as Ghidra reports its progress on the 1,690 files it processes, but once the command has completed, you will have a new libc.a folder in your project that contains 1,690 analyzed files.
If we’ve used the GUI to batch import libc.a, but had not processed any of the 1,690 imported files, the following command line would take care of the analysis:
$ analyzeHeadless D:GhidraProjects CH16libc.a –process
With the entire static archive efficiently imported and analyzed, we can now use the features of the Function ID plugin to create and populate an FidDb, as detailed in Chapter 13.
Summary
While GUI Ghidra remains the most straightforward and fully featured version, running Ghidra in headless mode offers tremendous flexibility in creating complex tools built around Ghidra’s automated analysis. At this point, we have covered all of Ghidra’s most commonly used features and examined ways that you can make Ghidra work for you. It is time to move on to more advanced features.
Over the course of the next few chapters, we will look at approaches for some of the more challenging problems that arise while reverse engineering binaries, including dealing with unknown file formats and unknown processor architectures by building sophisticated Ghidra extensions. We’ll also spend some time investigating Ghidra’s decompiler and discuss some of the ways that compilers can vary in their generation of code to improve your fluency in reading disassembly listings.