
23
BINARY DIFFERENCING AND VERSION TRACKING

We have spent the previous chapters introducing you to ways that Ghidra can assist your reverse engineering analysis efforts. Throughout this journey, we have introduced many ways to transform and annotate your work to document and facilitate understanding of the binary.
In this chapter, we introduce binary differencing and Ghidra’s Version Tracking tool to help you identify similarities and differences between files and functions and facilitate the application of previous analysis results to new files. We also discuss file differences from three perspectives: binary differencing, function comparison, and version tracking.
Binary Differencing
In the preceding chapter, we patched a binary to modify the flow of a function to bypass a call to exit by changing a single byte in a single instruction: JZ (74) to JNZ (75). To confirm the change and document exactly what was changed, we could use an external tool such as VBinDiff or WinDiff to compare the two files at the byte level. However, to compare files at the instruction level, we need a much more sophisticated tool: the Program Diff tool available in Ghidra’s Listing window. Once the differences have been computed, they can be viewed using custom displays designed to emphasize the differences, facilitate understanding of each change, and provide opportunities to take action based on the type of difference.
To compare two files that have been imported to a project and are in the same state (for example, both analyzed or neither analyzed), open one of the files in the CodeBrowser and then choose Tools ▸ Program Differences and select another file within the current project for comparison. Alternatively, you can use the Listing window tool icon shown in Figure 23-1. This icon serves as a toggle to open or close the Program Diff tool.

Figure 23-1: CodeBrowser Diff View toggle icon
For this example, we will start by opening the unpatched version of the file, selecting the Diff View icon, and choosing the patched version of the file. This opens the Determine Program Differences dialog shown in Figure 23-2.
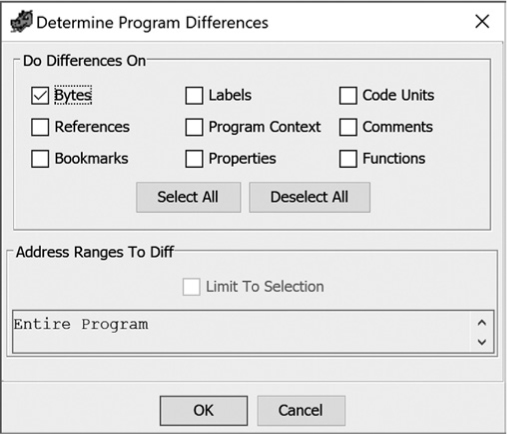
Figure 23-2: The Diff tool’s Determine Program Differences dialog
While all available differences fields will be selected by default, in this case Bytes is the appropriate choice to confirm that the patch worked correctly, so it is the only difference option selected. When you click OK, you can see the two binaries in the Listing window, which has been split into side-by-side listings, with one file displayed in each. By default, the listings are synchronized, so navigating in one also navigates the other. There are several ways to navigate the detected differences within this tool, which we present later in the chapter.
When you open two files for diffing, Ghidra initially positions the Listing view at the beginning of each file. The down arrow tool on the Listing window toolbar (or CTRL-ALT-N) may be used to navigate to the first difference between the two files. To call your attention to the differing code, changes are indicated with color-highlighted disassembly lines in each file’s Listing window as well as in the Decompiler window if the difference is within a function. (The Decompiler window is synchronized with the first of the two files.) Navigating to the first detected difference reveals the single byte that is JZ (74) in the original listing and JNZ (75) in the second listing.
To view more details, choose Window ▸ Diff ▸ Diff Details. You will see the following report in the Diff Details window at the bottom of the CodeBrowser window:
Diff address range 1 of 1.
Difference details for address range: [ 00100708 - 00100709 ]
Byte Diffs :
Address Program1 Program2
00100708 0x74 0x75
Code Unit Diffs :
Program1 CH23:/DiffDemo/debug_check_x64 :
00100708 - 00100709 JZ 0x00100720
Instruction Prototype hash = 16af243b
Program2 CH23:/DiffDemo/debug_check_x64.patched :
00100708 - 00100709 JNZ 0x00100720
Instruction Prototype hash = 176d4e0c
The first line indicates the number of address ranges that contain differences. In this case, only one range in the file contains differences, so you can be confident that the two programs differ by only a single byte. This simple example barely scratches the surface of the capabilities associated with Ghidra’s Program Diff tool, so let’s take some time to investigate other capabilities that this tool provides.
Program Diff Tool
The nine options at the top of Figure 23-2 form the basis of your comparison, and you can select any or all of them. By default, the Program Diff tool operates on the entire program for each file. If you wish to limit your comparison to a specific address range, you must highlight the range in the first file before opening the tool. Once you have made your selections and clicked OK, the split Listing window you see is called a Program Diff.
Program Diff
Program Diff View lets you view both files simultaneously. Basically, the Listing window now has two listings, one on the left side and one on the right. When you open the Diff Details window, it opens at the bottom of the CodeBrowser window. Within the Diff Details window, the left file is considered Program1 (the file you opened originally), while the right file is considered Program2 (the file you chose to compare to Program1). The Decompiler window reflects the contents of Program1. When you are comparing two files, Ghidra can compute the differences in either direction. It is up to you to remember which file is which as you use the Program Diff tool.
A common workflow is to begin analyzing a file and then realize that some or all of the code looks familiar, which may prompt you to open a file you have previously analyzed in order to begin diffing. Fortunately, Program Diff maintains alignment between the two files by inserting blank lines when necessary. Differences are highlighted, and the Program Diff toolbar provides you navigational capability and the means to determine how you wish to handle the differences.
Program Diff Toolbar
The Program Diff toolbar extends the Listing window toolbar options by adding the tools shown in Figure 23-3.

Figure 23-3: Program Diff toolbar options
Diff Apply Settings
The Diff Apply Settings define the actions that you would like to take when there is a difference between the two files. Choosing the Display Diff Apply Settings option displays the window shown in Figure 23-4.

Figure 23-4: Diff Apply Settings window
Each setting specifies a default action you would like to apply from the second program to the first program you opened and how you would like that option applied. The following four options are available from each drop-down:
Ignore Do not change the first program (available for all cases).
Replace Change the first program’s content to match the second program’s content (available for all cases).
Merge Add the difference from the second program to the first program. If applied to a label, this will not change which label is set to primary (available for only Comments and Labels).
Merge & Set Primary The action is the same as Merge, but the primary label is set to the second program label if that is possible (available for only Labels).
At the top of Figure 23-4, there are two toolbar icons. The Save as Default icon saves the current Diff Apply Settings. The arrow opens a menu that allows you to make changes to all of the settings at one time by choosing one of the options shown in Figure 23-5.
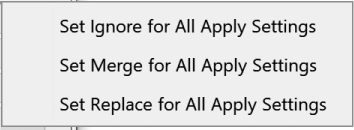
Figure 23-5: Diff Apply Settings pull-down menu
If you select the Set Merge option and Merge is not a valid choice for a particular setting, it will be changed to Set Replace. For labels, it will be changed to Merge & Set Primary.
Choose Apply Differences from the toolbar if you wish to apply all of the default changes. When you have finished with the Program Diff tool, toggle the Diff View icon in the Listing window and you will see the dialog displayed in Figure 23-6.
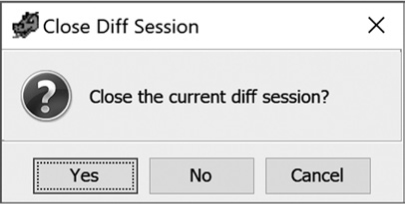
Figure 23-6: Close Diff Session confirmation dialog
Confirming that you wish to close the current diff session will close the display of the second file and return you to a normal Listing window with the first file (and all of the changes that you have selected from the diff analysis) displayed.
The Program Diff tool was designed for two primary use cases: first, to compare files analyzed by two different users who don’t share a Ghidra Server instance; second, to compare code generated from different versions of the same source code base (for example, unpatched and patched versions of a shared library). In the following example, we walk through the process of using this tool to reconcile two copies of the same binary, each of which was analyzed independently.
Example: Merging Two Analyzed Files
Assume that you are analyzing a binary that contains a crypto routine. A colleague mentions that she is midway through analyzing a binary that also appears to have a crypto routine and is likely from the same malware family. She agrees to provide you with her project so that you can compare the two files. When you look at the files in Diff View, you immediately notice that the two of you appear to be analyzing the same binary.
The challenge is that you have each made progress and have modified the contents of the file based on your individual analysis. You need to merge the two analyzed files so that you can each benefit from the other’s analysis. You have agreed to take on this responsibility and have opened your binary in the CodeBrowser and initiated a Program Diff session, adding your colleague’s binary for comparison.
Choosing the down arrow on the Program Diff toolbar takes you to the first difference in this file. At this point, you can open the Diff Details window by choosing the option from the Program Diff toolbar (or hotkey F5). This provides you with the following listing (broken into two sections to facilitate discussion). In the first section at the top of the Diff Details, you see the following:
Diff address range 1 of 4. ➊
Difference details for address: 0010075a ➋
Function Diffs : ➌
Program1 CH23:/Crypto/diff_sample1 :
Signature: void encrypt_rot13(char * inbuffer, char * outbuffer) ➍
Thunk? : no
Stack Frame:
Parameters: ➎
DataType Storage FirstUse Name Size Source
/char * RDI:8 0x0 inbuffer 8 USER_DEFINED
/char * RSI:8 0x0 outbuffer 8 USER_DEFINED
Local Variables: ➏
DataType Storage FirstUse Name Size Source
/int EAX:4 0xc0 length 4 USER_DEFINED
/int Stack[-0x1c]:4 0x0 idx 4 USER_DEFINED
/char Stack[-0x1d]:1 0x0 curr_char 1 USER_DEFINED
Program2 CH23:/Crypto/diff_sample1a : ➐
Signature: void encrypt(char * param_1, long param_2)
Thunk? : no
Stack Frame:
Parameters:
DataType Storage FirstUse Name Size Source
/char * RDI:8 0x0 param_1 8 DEFAULT
/long RSI:8 0x0 param_2 8 DEFAULT
Local Variables:
DataType Storage FirstUse Name Size Source
/undefined4 Stack[-0x1c]:4 0x0 local_1c 4 DEFAULT
/undefined1 Stack[-0x1d]:1 0x0 local_1d 1 DEFAULT
The first of four identified difference address ranges ➊ in this file is being displayed and is associated with the current address, 0010075a ➋. The listing begins by detailing a difference in the function headers of the two binaries ➌. For your binary, you have provided a meaningful name for the function and the parameters in the function signature ➍. Further, each parameter has an appropriately defined type ➎. Likewise, the local variables have been given meaningful names and types ➏. In the second program ➐, the analyst did not make any changes to the default Ghidra header for the corresponding function.
You want to retain your version of the changes for the function definition and local variables. You could use the toolbar icon to reject the change, but this would reject all of the differences associated with this address. Since you have not yet reviewed all of the differences, just scroll down to the next difference in the Diff Details window.
The next section of the differences associated with the first address range contains the label and comment differences.
➊ Label Diffs :
Program1 CH23:/Crypto/diff_sample1 at 0010075a :
0010075a is an External Entry Point.
Name Type Primary Source Namespace
➋ encrypt_rot13 Function yes USER_DEFINED Global
Program2 CH23:/Crypto/diff_sample1a at 0010075a :
0010075a is an External Entry Point.
Name Type Primary Source Namespace
➌ encrypt Function yes USER_DEFINED Global
➍ Plate-Comment Diffs :
➎ Program1 CH23:/Crypto/diff_sample1 at 0010075a :
****************************************************************
* FUNCTION *
* This is a crypto function originally named cryptor. Renamed *
* to use our standard format encrypt_rot13. Changed the *
* function parameters to char *. Added meaningful variable *
* names. Function first seen in fileC13d by Ken H *
****************************************************************
Program2 CH23:/Crypto/diff_sample1a at 0010075a :
No Plate-Comment.
➏ EOL-Comment Diffs :
Program1 CH23:/Crypto/diff_sample1 at 0010075a :
No EOL-Comment.
➐ Program2 CH23:/Crypto/diff_sample1a at 0010075a :
This looks like an encryption routine. TODO: Analyze to get more information.
Within the label differences ➊, the only difference is the name of the function ➋ ➌, which has already been discussed. In the Plate-Comment section ➍, your file has a detailed comment ➎, but the other file has no plate comments. In the EOL-Comment section ➏, there is a brief comment by the other analyst ➐ but none in your file. When you examine the comment, you see that it is a TODO action item that you have already done in your file.
After evaluating all of the differences between the two files, your decision is to retain your content and not accept any new content from the other binary. You accomplish this by choosing the Ignore Differences and Move icon. This takes you to the next difference. Since you already have the Diff Details window open, its contents are updated as soon as you navigate, and you see the following:
Diff address range 1 of 3. ➊
Difference details for address range: [ 0010081a - 0010081e ]
Reference Diffs :
Program1 CH23:/Crypto/diff_sample1 at 0010081a :
Reference Type: WRITE From: 0010081a Mnemonic To: register:
RAX USER_DEFINED Primary
Program2 CH23:/Crypto/diff_sample1a at 0010081a :
No unmatched references.
You have decreased the number of ranges containing differences by rejecting the previous difference ➊. Once again, your file has more information than the second file. This time you will navigate to the next difference by clicking the down arrow. This takes you to the following:
Diff address range 2 of 3. ➊
Difference details for address: 00100830
Function Diffs :
Program1 CH23:/Crypto/diff_sample1 :
Signature: undefined display_message()
Thunk? : no
Calling Convention: unknown
Return Value :
DataType Storage FirstUse Name Size Source
/undefined AL:1 0x0 <RETURN> 1 IMPORTED
Parameters:
No parameters.
Program2 CH23:/Crypto/diff_sample1a :
Signature: void display_message(char * message) ➋
Thunk? : no
Calling Convention: __stdcall
Return Value :
DataType Storage FirstUse Name Size Source
/void <VOID> 0x0 <RETURN> 0 IMPORTED
Parameters:
DataType Storage FirstUse Name Size Source
/char * RDI:8 0x0 message 8 USER_DEFINED
Notice that the number of ranges has not changed ➊. You have just been moved to the next difference range without impacting the total number of difference ranges. Evaluating this new difference shows that the second file contains information provided by the other analyst that is not available in your file. The function signature has a return type, and a parameter has been added to the function signature ➋. You can include this in your binary by right-clicking the difference in the right-hand Listing window and choosing Apply Selection (hotkey F3), or by clicking the Apply Differences icon on the toolbar.
Navigating to the next difference, you see the following details:
➊ Diff address range 2 of 2.
Difference details for address range: [ 00100848 - 0010084c ]
Pre-Comment Diffs :
Program1 CH23:/Crypto/diff_sample1 at 00100848 :
No Pre-Comment.
Program2 CH23:/Crypto/diff_sample1a at 00100848 :
➋ This is a potential vulnerability. The parameter is being passed
in to printf as the first/only parameter which may result in a format
string vulnerability.
The number of difference ranges has decreased because you applied the differences in the previous range ➊. In this final difference, you see an interesting entry in the Pre-Comment section ➋ in the other file. The analyst has detected a potential vulnerability. To be sure this information is included in your file, you choose Apply Differences.
Now that you have completed the comparison of the two files, you can click the Diff View icon and confirm that you want to close the current Program Diff session. Your listing view now reflects the combined analysis from both binaries, and you can save and close your file.
The Ghidra Program Diff tool provides the ability to investigate the differences between two versions of the same file. While it will attempt to diff two unrelated files, any results are likely to reflect only coincidental similarities. Let’s shift our focus to a different tool that facilitates comparisons between selected functions within the same or different programs.
Comparing Functions
If you see a function that is reminiscent of a function you have analyzed in the past, it can be helpful to directly compare the two functions so the outcome of your initial analysis can be applied to the current function when appropriate. Ghidra provides this capability through its Function Comparison window which allows you to view two functions at the same time as shown in Figure 23-7.
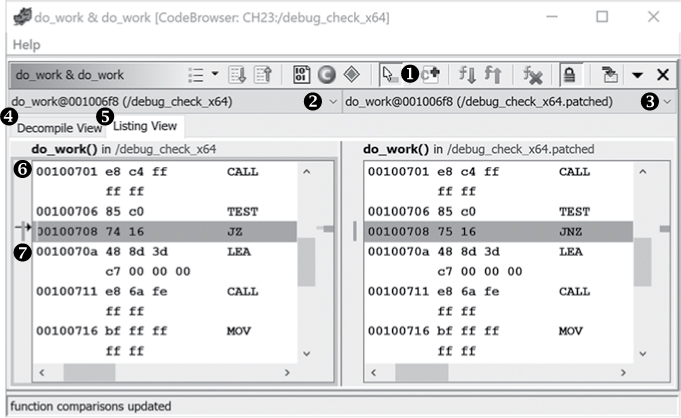
Figure 23-7: Listing view in Function Comparison window
Function Comparison Window
To use the Function Comparison window, open the one or more binaries that contain the functions in the CodeBrowser, load an initial function by highlighting a function in the active CodeBrowser tab, and select Compare Selected Functions (hotkey SHIFT-C) from the right-click context menu. The Function Comparison window shows two functions side by side with potential differences highlighted, as shown in Figure 23-7. (If you have selected only one function, it will be displayed in both windows until you load more functions.)
To add additional functions to compare, choose the Add Functions icon ➊. This will display a list of all functions in the active program in the CodeBrowser. You can select a function from the list or switch to the CodeBrowser window to change the active program by selecting another program tab in the Listing window.
To the left of the active listing (indicated by a box around the listing ➏) is a cursor arrow ➐. If the functions match, the arrow will also appear at the same location in the other window. In Figure 23-7, the instruction in the primary window does not match the instruction in the other window, so the cursor arrow is not shown in both windows.
The Function Comparison window provides the opportunity to load more than two functions from more than two binaries. You can add and remove functions from each panel when needed. A helpful pull-down menu lets you choose the function to be displayed in the associated window ➋ ➌.
This window lets you easily switch between Decompile View ➍ and Listing View ➎ for the two functions and change the function displayed in either window. The Decompile View for this example is shown in Figure 23-8.

Figure 23-8: Decompile view in the Function Comparison window
The exploratory capabilities available in this window overlap significantly with the Program Diff tool, except you are comparing only two functions at a time and you can easily switch between the decompiled code and the listing. The toolbar menu for this window is shown in Figure 23-9.

Figure 23-9: Function Comparison toolbar options
Let’s walk through an example that demonstrates some additional Function Comparison tool capabilities.
Example: Comparing Crypto Routines
Congratulations on your promotion! Based on your successful analysis and use of the Program Diff tool for crypto routines, you have now been labeled the crypto expert in your shop. Every time one of your colleagues suspects that they have a crypto routine, they send you the binary to see if it is a crypto routine you recognize.
You now have a new file from a colleague and wish to determine whether the crypto routine used in this file is something new or is a routine you have identified in the past. Rather than loading and comparing each crypto routine against the new function, you have set up a special Ghidra project that contains all of your previously analyzed and documented crypto routines. Your goal is to load your crypto routines on one side of the Function Comparison window and then import the new file on the other side to compare against the existing crypto routines. (To simplify this example, you currently have only one analyzed crypto routine in your collection: the ROT13 routine that you merged in the previous example.)
After you load your complete collection of analyzed crypto files into the CodeBrowser and have loaded your function, encrypt_rot13, in the Function Comparison window, you need to load the new file into the same CodeBrowser instance (File ▸ Open) and make it the active file. At this point, you can explore the file, but it isn’t necessary. You can always switch back to the CodeBrowser window if you can’t find the function you need. In this case, choosing the Add Functions option from the Function Comparison toolbar, you see the complete list of functions in the new binary, and halfway down the list is a function with a name that intrigues you, encrypt, as shown in Figure 23-10.

Figure 23-10: Select Functions window with the encrypt function selected
A cursory glance at the loaded files in the Decompile View of the functions, shown in Figure 23-11, suggests that these two functions are quite different.
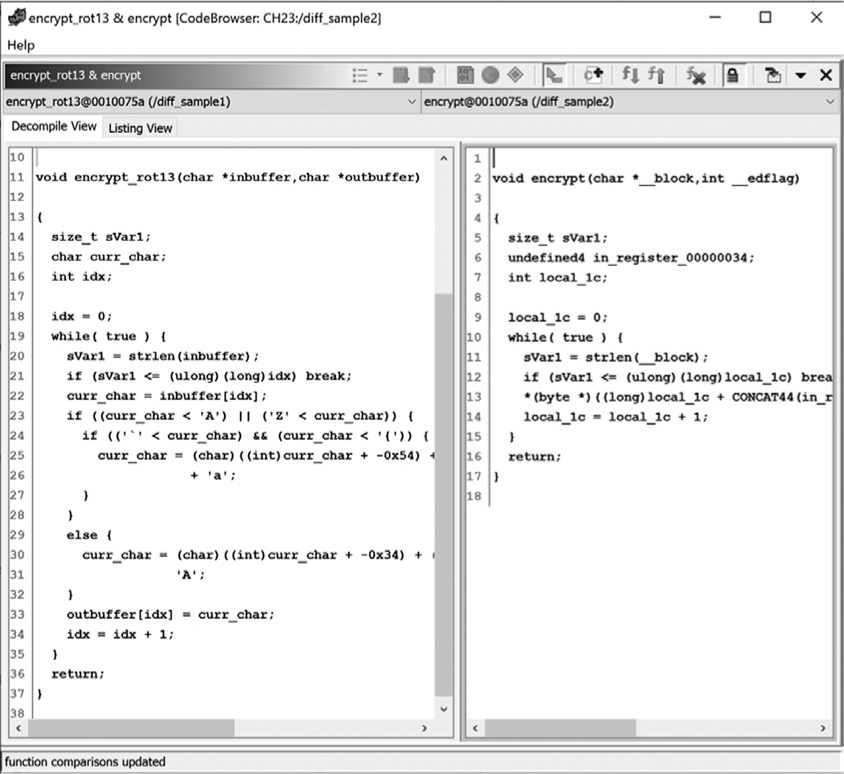
Figure 23-11: Decompile View of Function Comparison window for two crypto routines
The Listing View, shown in Figure 23-12, confirms that these two functions have significant differences.

Figure 23-12: Listing View of Function Comparison window for two crypto routines with differences highlighted
On further analysis, you discover that the new routine XORs each byte with the constant value 0xa5. This is definitely different from the current crypto routine that you have, so you name and document this new function and add it to your collection (which will then have two members!). Returning to the CodeBrowser, you update the function signature and add comments to document the new crypto routine. The changes you make are reflected in the Function Comparison window as well.
As you are documenting, you notice the new binary has a function called display_message, as does the binary you are comparing it against. You recall that this function was identified as having a vulnerability in your current binary, so you decide to compare these two functions. You load them into the Function Comparison window to see if they have similarities beyond the common name. They seem different in both the Decompile and Listing Views, as shown in Figure 23-13.

Figure 23-13: Decompile and Listing views for display_message functions
In the second example, param_1 is being passed to puts for output, which fixes the vulnerability.
Now that you have documented this crypto routine, you see that you have received yet another binary from your colleagues. To reset to the start of your crypto comparison process, you can use the Function Comparison toolbar icon to remove the display_message functions from the window, leaving you with your crypto routine collection, which now has two distinct members: encrypt_rot13 and encrypt_XOR_a5.
An initial exploration of this new file indicates that three functions seem to involve encryption: encrypt, encrypt_strong, and encrypt_super_strong. You load these into the Function Comparison window so you can compare them to your existing crypto routines. After comparing encrypt_rot13 against each of the new functions, you notice the following:
encrypt_rot13 vs. encrypt Almost entirely different. The encrypt routine is just a test that may call one of the other two encryption routines.
encrypt_rot13 vs. encrypt_strong Almost entirely the same.
encrypt_rot13 vs. encrypt_super_strong Very different. A closer look at the differences between these two functions leads you to believe that they are not the same function.
A closer look at the differences shows that the instructions in encrypt_rot13 and encrypt_strong are identical—the differences primarily consist of address labels, as shown in Figure 23-14.

Figure 23-14: Function Comparison window with address label differences
You would not expect address labels to match perfectly in this case, as the locations of the functions within the binaries are different. The locations are consistent relative to the current address, so we are likely dealing with the same function. The only other difference is 1 byte associated with the call to strlen, as shown in Figure 23-15. This is a similar issue and can be explained by the difference in the relative positions of the encryption function and strlen in each binary.
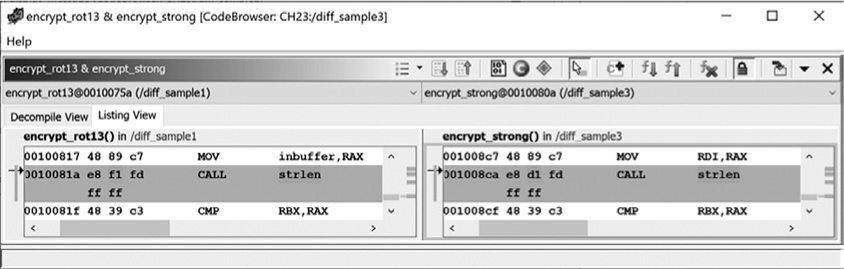
Figure 23-15: Function Comparison window with byte difference in call to strlen
After determining that these are the same function, you can right-click the previously analyzed function and choose Apply Function Signature To Other Side from the right-click context window. This will update the function signature in all needed locations, including the Listing window and Symbol Tree. Note that the Function Comparison window does not provide all of the capabilities available in the Diff View. To copy additional information (such as the detailed comments associated with the function), use the Program Diff tool.
Having completed your comparative analysis of encrypt_rot13, you turn your attention to encrypt_XOR_a5 and observe the following relationships with each of the new functions:
encrypt_XOR_a5 vs. encrypt Almost entirely different.
encrypt_XOR_a5 vs. encrypt_strong Very different. A closer look at the differences between these two functions also leads you to believe that they are not the same function.
encrypt_XOR_a5 vs. encrypt_super_strong Almost entirely the same.
The identified differences between encrypt_XOR_a5 and encrypt_super_strong are also just address labels and some bytes in the call to strlen. You can handle this situation the same way you did the previous matching functions.
While this is a trivial example (and not likely consistent with the actual crypto routines you might see in the wild), it does demonstrate how Function Comparison can be used to minimize the duplication of analysis effort when you encounter familiar routines in new binaries.
The final tool for investigating two files is the most complex: the Version Tracking tool.
Version Tracking
Imagine that you have spent months analyzing a very large binary. The binary has hundreds or thousands of functions and no symbols. As part of your effort, you have provided meaningful names to the majority of the functions; renamed data, local variables, and function parameters; and added a mountain of comments that would take days or longer to re-create.
Now imagine that a new version of the binary is released, and the world stops using the version you know so much about. You could continue to analyze the old version to learn more about it under the assumption that the new version behaves similarly, but you would fail to learn about any new or modified behaviors in the updated binary. Instead, you decide to begin working on the newer version of the binary and quickly realize that you spend significant amounts of time reading the markup in the older binary to help guide you through the new binary.
Alternating back and forth between two CodeBrowser windows is not an optimal use of your time. It’s time to switch from the CodeBrowser to the other default tool that Ghidra provides in the Project Tool Chest, as shown in Figure 23-16.
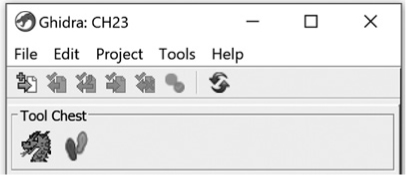
Figure 23-16: The Version Tracking tool (footprints) in the Project Tool Chest
Ghidra’s Version Tracking tool is designed to help you with precisely this situation. Through the use of various correlators, Ghidra attempts to match items, such as functions or data, in a source binary with their corresponding versions in a destination binary. Once functions have been matched between the two binaries, Ghidra can automatically migrate information, including your labels and comments, from the source binary to the destination binary. In addition to rapidly migrating your existing analysis, the Version Tracking tool makes it easy to identify which things haven’t changed, which things have only minor changes (detected by diffing), and which things are entirely new.
The Version Tracking tool is one of the most configurable tools in Ghidra, which makes it easy to adapt to a particular line of inquiry. It is also a challenging tool to present in its entirety. In the following sections, we walk you through the version tracking process at a very high level and point you to resources that can help you discover the correct settings and components to use when using the Version Tracking tool to assist you in discovering the relationship between two files.
Version Tracking Concepts
While Function Comparison and Program Diff tools answered specific questions about the atomic differences between two files or functions, the Version Tracking tool provides you with functionality to answer a more holistic question: how similar are these two binaries, and can you highlight and provide insight about the similarities between them? The foundational work unit is called a session, and each session is configured to identify and handle correlations between two files.
Correlators
At a high level, the Version Tracking tool is looking for correlations between two files. There are seven types of correlators that generate matches between two binaries:
Data Match correlators
Function Match correlators
Legacy Import correlators
Implied correlators
Manual Match correlators
Symbol Name Match correlators
Reference correlators
Rather than just counting and compiling a list of specific differences in each of the categories, the Version Tracking tool extends correlations between the two files to identify matches with varying levels of exactness:
Exact matches These are one-to-one matches between the two files and can match data, function bytes, function instructions, or function mnemonics (for example, when two binaries contain the exact same function).
Duplicate data match These are exact matches that are not one-to-one matches (for example, when a string appears once in one file and seven times in the other file).
Similar matches These are matches that pass a user-controlled similarity threshold. The matching is similar to the approach used for word models described in Chapter 13, but uses 4-grams as well as trigrams.
With the ability to introduce thresholds, and accept and reject matches, this tool offers a powerful capability to migrate your previous analysis to new versions of a binary. Further, the information associated with each session provides an effective analysis audit trail that can help capture the incremental changes of a binary or the evolution of a malware family.
Sessions
While an in-depth walk-through of a complete session would take a significant amount of time, a basic version tracking session might include the following steps:
Open Ghidra's Version Tracking tool.
Create a new session by choosing a source file and a destination file.
For all appropriate correlators: add to the existing session, choose the correlator, select all resulting matches, and accept all matches and apply their markup items.
Save the session.
Close the session.
The preceding workflow provides a very general overview, and the combinatorial potential associated with the correlator step is extensive. The potential of and the nuances associated with this tool cannot be covered in a single chapter. The Ghidra team has provided sample workflows (as well as significant documentation about the Version Tracking tool) in Ghidra Help. It is up to you to determine how best to apply the capabilities of this tool in your reverse engineering workflow.
Summary
In this chapter, we stepped away from a single binary to begin looking at ways to identify differences and similarities between binaries by using the Program Diff, Function Comparison, and Version Tracking tools. These tools are valuable time-savers for porting existing work to new binaries, merging annotations from your colleagues, and rapidly identifying exactly what has changed between two versions of the same program.
As we wrap up our tour of Ghidra’s vast landscape of features, know that we have only scratched the surface of Ghidra’s capabilities. You should now have a deeper understanding of Ghidra and how it can be applied to the reverse engineering challenges you face. When you have questions, the Ghidra community is there to help through resources like GitHub, Stack Exchange, Reddit, YouTube, and many other forums.
More importantly, you should now be in a position to contribute by answering questions and providing help to others. Ghidra is community-supported software and continually evolving. We hope you participate by posting tutorials, writing and publishing Ghidra scripts and modules, identifying and addressing issues, or perhaps even developing new functionality for Ghidra itself. The future of Ghidra will be determined by the community, and that now includes you. Welcome, and happy reversing!