
15
ECLIPSE AND GHIDRADEV

The scripts that are distributed with Ghidra and the scripts we created in Chapter 14 are relatively simple. The coding required was minimal, which greatly simplified the development and testing phases. The basic script editor provided by Ghidra’s Script Manager is fine for quick-and-dirty work, but it lacks the sophistication to manage complex projects. For more substantial tasks, Ghidra provides a plugin that facilitates development using the Eclipse development environment. In this chapter, we look at Eclipse and the role it can play in the development of more advanced Ghidra scripts. We also show how Eclipse can be used to create new Ghidra modules and revisit this topic in later chapters as we expand Ghidra’s inventory of loaders and discuss the inner workings of Ghidra processor modules.
Eclipse
Eclipse is an integrated development environment (IDE) that is used by many Java developers, which makes it a natural fit for Ghidra development. While it is possible to run both Eclipse and Ghidra on the same machine without any interaction between them, the integration of the two can greatly simplify Ghidra development. Without integration, Eclipse would just be another script editing option outside the Ghidra environment. By integrating Eclipse with Ghidra, you suddenly have a rich IDE that includes Ghidra-specific functionality, resources, and templates to facilitate your Ghidra development process. Integrating Eclipse and Ghidra does not require significant effort; you just need to provide each with some information about the other so that they can be used together.
Eclipse Integration
In order for Ghidra to work with Eclipse, Eclipse needs to have the GhidraDev plugin installed. You can integrate the two applications from within either Ghidra or Eclipse. Instructions for both integration approaches are included in the GhidraDev_README.html document found in the Extensions/Eclipse/GhidraDev directory of your Ghidra installation.
While the written documentation does walk you through the details of the process, the easiest starting point is to select a Ghidra action that requires Eclipse, such as Edit Script with Eclipse (refer to Figure 14-2). If you select this option and have not previously integrated Eclipse and Ghidra, you will be prompted for the directory information required to make the connection. Depending on your configuration, you may need to provide the path to your Eclipse installation directory, your Eclipse workspace directory, your Ghidra installation directory, your Eclipse drop-in directory, and possibly the port number used to communicate with Eclipse for script editing.
Ghidra’s documentation will help you overcome any obstacles that you encounter during the integration process. The truly adventurous can explore the integration plugins in the Ghidra/Features/Base/src/main/java/ghidra/app/plugin/core/eclipse directory in Ghidra’s source repository.
Starting Eclipse
Once Ghidra and Eclipse are successfully integrated, you can use them for writing Ghidra scripts and plugins. The first time you launch Eclipse after it has been integrated with Ghidra, you are likely to see the dialog shown in Figure 15-1, requesting to establish a communication path between your Ghidra instance and your Eclipse GhidraDev instance.
Venturing onward, you will see the Eclipse IDE welcome screen, as shown in Figure 15-2. This instance of Eclipse has a new addition on the menu bar: GhidraDev. This is the menu we will use to create more complex scripts and Ghidra tools.
The landing page for Ghidra Eclipse, the Welcome to the Eclipse IDE for Java Developers workbench, includes links to numerous tutorials, documentation, and information about the Eclipse IDE and Java that should provide the necessary background support to users new to Eclipse as well as an optional refresher for experienced users. To move ahead with Ghidra, we will focus our discussion on how the GhidraDev menu can be used to augment Ghidra’s existing capabilities, build new capabilities, and customize Ghidra to improve our reverse engineering workflow.
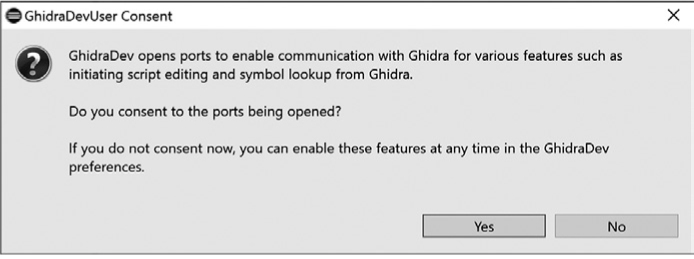
Figure 15-1: GhidraDevUser Consent dialog
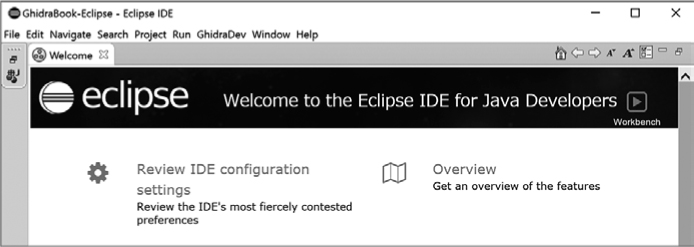
Figure 15-2: Eclipse IDE welcome screen
Editing Scripts with Eclipse
Once the GhidraDev plugin has been installed in Eclipse, you are ready to create new scripts, or edit existing ones using the Eclipse IDE. As we migrate from using Ghidra’s Script Manager to create and edit scripts, to using Eclipse, it’s worth remembering that while it is possible to launch Eclipse from Script Manager, it is possible to do so only to edit an existing script (see Figure 14-2). If you want to edit a new script using Eclipse, you’ll need to first launch Eclipse and then use the GhidraDev menu to create the new script. Whether you launch Eclipse yourself, or arrive in Eclipse via Ghidra’s Script Manager, for the remainder of this chapter, we use Eclipse rather than the Script Manager’s basic editor to create and modify scripts and modules for Ghidra.
To edit the first script we created in “Edit Script Example: Regex Search” on page 290, select File ▸ Open File from the Eclipse menu and navigate to the script FindStringByRegex.java. This opens the script in the Eclipse IDE, and you can begin using Eclipse’s rich set of editing options. Figure 15-3 shows the first few lines of the script with the comments and imports collapsed. Collapsing lines is a default feature of the Eclipse IDE that could cause some confusion if you are switching between the basic editor provided by Ghidra and Eclipse.
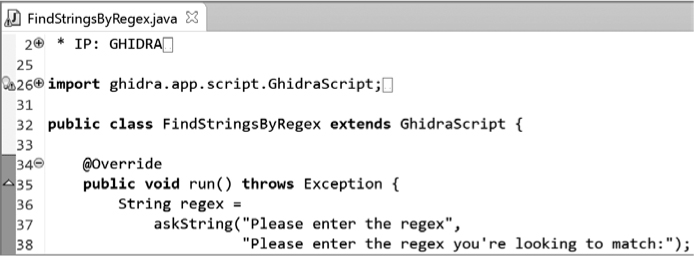
Figure 15-3: Eclipse editor presentation of FindStringsByRegex
Only one line of comments is displayed by default. You can click an icon to expand (the + icon at the left of line 2) the content and display all of the comments as well as to collapse (the – icon at the left of line 34) the content if desired. The same is true on line 26 with the import statements. Hovering over the icon for any section that is collapsed displays the hidden content in a pop-up window.
Before we can start building examples that expand Ghidra’s capabilities, you need to understand more about the GhidraDev menu and the Eclipse IDE. Let’s shift our focus back to the GhidraDev menu and investigate the various options and how they can be used in context.
GhidraDev Menu
The expanded GhidraDev menu is shown in Figure 15-4 and includes five options that you can use to control your development environment and work with files. In this chapter, we focus on developing in Java, although Python is an option in several of the windows.
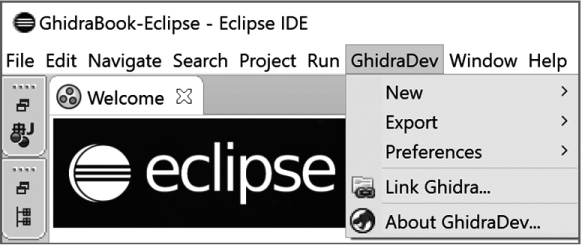
Figure 15-4: GhidraDev menu options
GhidraDev ▸ New
The GhidraDev ▸ New menu provides you with three submenu options, as shown in Figure 15-5. All three of the options launch wizards that guide you through an associated creation process. We start with the simplest option, which is to create a new Ghidra script. This is an alternative path to creating scripts from that discussed in Chapter 14.
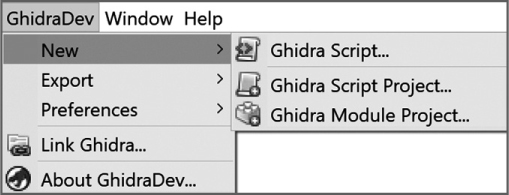
Figure 15-5: GhidraDev ▸ New submenu
Creating a Script
Creating a new script using GhidraDev ▸ New ▸ Ghidra Script results in a dialog that allows you to enter information about your new script. An example of the dialog populated with content is shown in Figure 15-6. In addition to the directory and file information, the dialog collects the same metadata that we manually entered into our script files in the Script Manager’s basic editor.

Figure 15-6: Create Ghidra Script dialog
The Finish button at the bottom of the dialog produces the script template shown in Figure 15-7. The metadata entered in Figure 15-6 is included in the comment section at the top of the script. This content is in the same format as the metadata we saw in Chapter 14 (see the top of Figure 14-4). When you edit this script in Eclipse, the task tag (clipboard icon, seen on the left side of line 14 in Figure 15-7) associated with each TODO item in the script identifies locations where there is work to be done. You can delete and insert task tags at will.
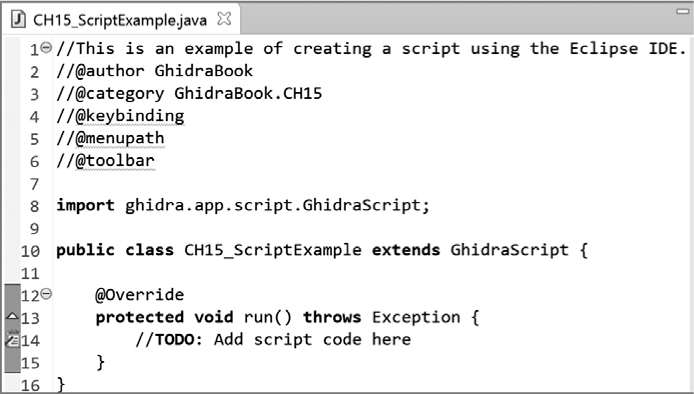
Figure 15-7: GhidraDev ▸ NewScript script shell
Eclipse does not preload your script with the list of import statements like the Ghidra basic editor does (refer to Figure 14-4). Not to worry. Eclipse helps you to manage your import statements by letting you know when you use something that requires an associated import statement. For example, if we replace the TODO comment in Figure 15-7 with the declaration of a Java ArrayList, Eclipse adds an error tag to the line and underlines ArrayList in red. Hovering over the error tag or ArrayList displays a pop-up window suggesting quick fixes to solve the issue, as shown in Figure 15-8.

Figure 15-8: Eclipse Quick Fix options
Choosing the first option in the suggestion list instructs Eclipse to add the selected import statement to the script, as shown in Figure 15-9. While it was helpful to have the list of potential import statements loaded when creating a new script in the CodeBrowser Script Manager, it is not as essential in Eclipse.

Figure 15-9: Eclipse after Quick Fix import is applied
Creating a Script Project
The second option in the GhidraDev ▸ New menu creates a new script project, as shown in Figure 15-10. We name our first script project CH15_ProjectExample_linked and place it in the default directory that we have set up for Eclipse. The Create run configuration checkbox allows you to create a run configuration, which provides Eclipse with the necessary information (command line arguments, directory paths, and so on) to launch Ghidra and allows us to use Eclipse to run and debug the script in Ghidra. Leave this checkbox in its default state, selected. Click Finish to complete creation of the script using the default format, which links the script project to your home directory.

Figure 15-10: Eclipse Ghidra Script Project dialog
We will create a second script project CH15_ProjectExample and this time will choose the Next button. Choosing Next yields the dialog with two Link options that are set by default (hence the _linked extension on our first project name). The first option creates a link to your home script directory. The second lets you link to the Ghidra installation script directories. Link, in this case, is a way of saying that folders representing your home script directory and/or Ghidra’s own script directories will be added to your new project, making any script in those directories easily accessible to you while working on your project.
The results of selecting or deselecting these options and then clicking the Finish button will become clear later in the chapter when we discuss the Eclipse Package Explorer. For this second script project, de-select the first link checkbox as shown in Figure 15-11.
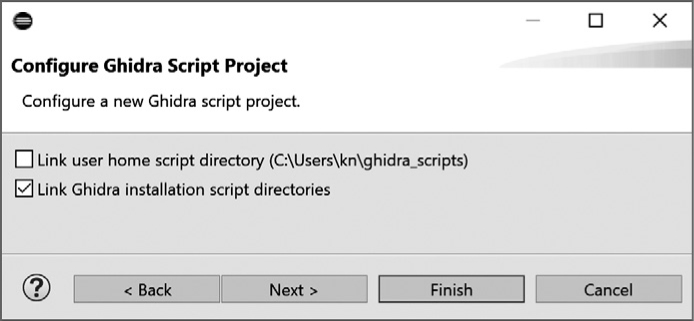
Figure 15-11: Eclipse configuration options for script projects
Creating a Module Project
The final option in the GhidraDev ▸ New menu creates a Ghidra module project.1 Not to be confused with a Ghidra module (for example, analyzer, loader, and so on), a Ghidra module project aggregates code for a new Ghidra module with associated help files, documentation, and other resources, such as icons. Further, it allows you some control over how your new module interacts with the other modules within Ghidra. We demonstrate Ghidra modules in context in this and future chapters.
Choosing New ▸ Ghidra Module Project displays the dialog shown in Figure 15-12, which should be familiar because it is exactly the same as the Script Project dialog. We name our new project CH15_ModuleExample to make it easy to identify in the Package Explorer.
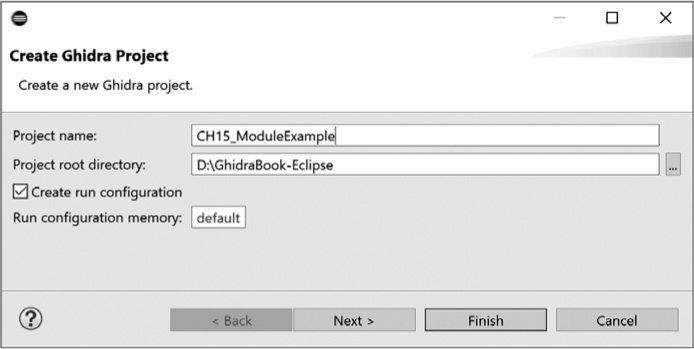
Figure 15-12: Eclipse Module Project dialog
Clicking Next at this point allows you to base your module on existing Ghidra templates, as shown in Figure 15-13. By default, all of the options are selected. You can change this to include none, some, or all of the templates, depending on your development goals. Any of the options you choose will be grouped together in a project within the Package Explorer. In our case, we have deselected all of the options.
While most of the selections will produce an associated source code template with task tags, there are two exceptions. First, if you do not select any of the module templates, you will not have a template file. In addition, the processor module does not produce a template file but does generate other supporting content. (Processor modules are discussed in Chapter 18.)
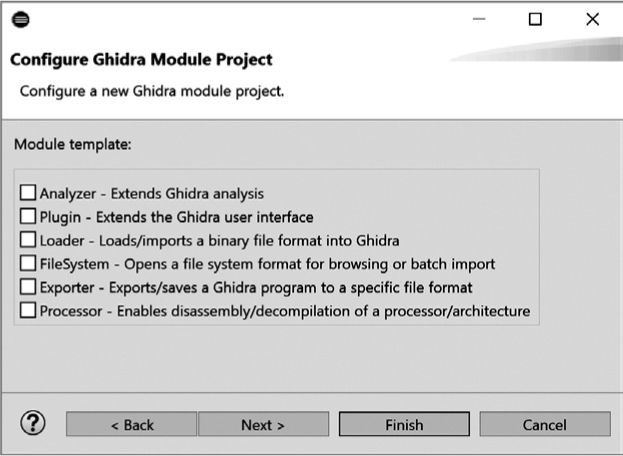
Figure 15-13: Template options for Ghidra module projects
Now that you know how to create Ghidra scripts, script projects, and module projects, let’s shift our focus to the Eclipse Package Explorer to better understand how we can work with our new creations.2
Navigating the Package Explorer
Eclipse’s Package Explorer is the gateway to the Ghidra files you need to complete your Ghidra extension. Here, we present the hierarchical organization and then drill down into examples of Ghidra projects and modules created through the GhidraDev menu. Figure 15-14 displays a sample Eclipse Package Explorer window containing the items we created earlier in this chapter as well as a few others we created to demonstrate the effect of various options on the resulting Package Explorer contents.

Figure 15-14: Package Explorer populated with example modules and project
We start by looking at the two script projects. CH15_ProjectExample_linked is the script project we created with both link options checked (refer to Figure 15-11). Immediately below it, we see a similar project, CH15_ProjectExample, but in this case, neither link option was checked. A partially expanded Package Explorer entry for CH15_ProjectExample is shown in Figure 15-15.
The following four components are included in this script project:
JUnit4 This is an open source unit-testing framework for Java. More information is available at https://junit.org/junit4/index.html.
JRE System Library This is the Java Runtime Environment System Library.
Referenced Libraries These are referenced libraries that are not part of the JRE System Library, but are part of our Ghidra installation.
Ghidra This is the directory for your current Ghidra installation. We have expanded this directory so that you can see the familiar file structure introduced in Chapter 3 (see Figure 3-1) and used throughout this book.

Figure 15-15: Package Explorer script project entries without links
Compare the contents of Figure 15-15 with the expanded contents from CH15_ProjectExample_linked shown in Figure 15-16. For this script project, we selected both link options. Linking the user home script directory results in the Home scripts entry in the project hierarchy and provides us easy access to the scripts we have previously written to use as examples or to modify.
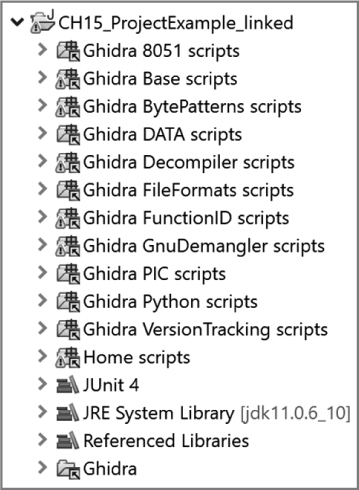
Figure 15-16: Package Explorer script project entries with links
Linking Ghidra installation script directories results in all of the folders in Figure 15-16 that start with Ghidra and end with scripts. Each one of these corresponds to a script directory within in the Ghidra/Features directory in your Ghidra installation.3 Expanding any of these folders provides access to the source code for each of the scripts included in your Ghidra installation. Like the home scripts, these can serve as examples to modify or use as a base for creating new scripts. While you are not permitted to overwrite these scripts from within the Ghidra Script Manager basic editor, you can edit them in Eclipse and other editors outside of the Ghidra Project environment. When you have finished creating or editing a new script, you can save it in the appropriate script directory within your script project, and it will be available to use the next time you open the Ghidra Script Manager.
Now that we have looked at scripts within the Eclipse Package Explorer, let’s see how the Ghidra module project we built is represented. The partially expanded content of our project in the Package Explorer is shown in Figure 15-17.
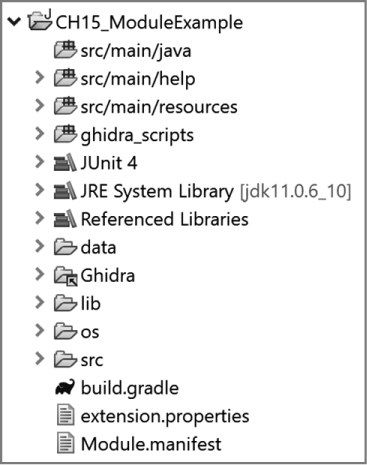
Figure 15-17: Package Explorer hierarchy for CH15_ModuleExampleModule
ARE WE BUILDING THAT SCRIPT AGAIN?
In Chapter 14, we presented a toy example within the Ghidra Script Manager environment where we modified the existing script CountAndSaveStrings and used it to build a new script called FindStringsByRegex. The following steps do the same task within the Eclipse IDE:
- Search for CountAndSaveStrings.java in Eclipse (CTRL-SHIFT-R).
- Double-click to open the file in the Eclipse editor.
- Replace the existing class and comments with the new class and comments.
- Save the file (EclipseFindStringByRegex.java) in the recommended ghidra_scripts directory.
- Run the new script from the Script Manager window in Ghidra.
You can launch Ghidra manually to get access to the Script Manager window. Alternatively, you can select the Run As option in the Eclipse IDE, which will show the dialog in Figure 15-18. The first option launches Ghidra for you. The second option launches a non-GUI version of Ghidra, which is the topic of Chapter 16.

Figure 15-18: Eclipse Run As options
Once Ghidra has been launched, you can run your script from the Script Manager and edit it using Eclipse.
Module projects include the following new elements:
src/main/java This is the location for the source code. If you created a module type that has a template available, the associated .java files are placed in this directory.
src/main/help When you create or extend content, you have the opportunity to add useful information to Ghidra Help by using the files and information in this directory.
src/main/resources As with many of the other entries in the src/main directory, expanding this content will lead you to a README.txt file that provides additional information about the purpose of the directory and how it should be used. For example, the src/main/resources/images/ README.txt file lets you know that it is the location in which any image or icon files associated with the module should be stored.
ghidra_scripts This is where Ghidra scripts that are specific to this module are stored.
data This folder holds any independent data files that are used with this module. (While not prohibited from use with other module types, this folder is primarily used with processor modules and is discussed in Chapter 18.)
lib Any .jar files required by the module should be stored in this folder.
os There are subdirectories within this folder for linux64, oxs64, and win64 to hold any native binaries that the module may depend upon.
src This directory is used to hold unit test cases.
build.gradle Gradle is an open source build system. This file is used to build your Ghidra extension.
extension.properties This file stores metadata about the extension.
Module.manifest You can enter information about the module such as configuration information in this file.
You may have noticed in Figure 15-14 that we created additional Test modules (AnalyzerTest, AllTypeTest, and LoaderTest). Each was created using a different combination of Module Template options (see Figure 15-13), which results in a different set of files being instantiated for each project. When using these templates as a starting point for your projects, it’s useful to know just how much work Eclipse and Ghidra have done for you—and how much work is left for you to complete.
Let’s begin by looking in the AnalyzerTest directory that we created to demonstrate an analyzer template. Expand the src/main/java directory to find a file called AnalyzerTestAnalyzer.java. The name is a concatenation of the module name (AnalyzerTest) with the template type (Analyzer). Double-click this file to open it in the editor and see the code shown in Figure 15-19. Like the script templates earlier in the chapter, the Eclipse IDE provides task tags with associated comments to guide us through building our analyzer as well as the options to expand and collapse content. The LoaderTest module contains the template for building a loader, which is discussed further in Chapter 17. The remaining module, AllTypeTest, is the default module that results when you bypass the module template options. This populates the src/main/java directory with all of the templates, as shown in Figure 15-20.
Now that we have seen how helpful Ghidra and Eclipse can be when we create new modules, let's use this information to build a new analyzer.
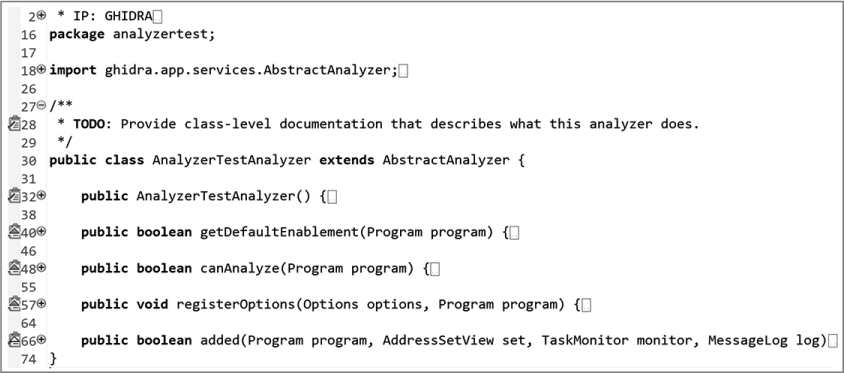
Figure 15-19: Default analyzer template for a module (comments, imports, and functions collapsed)
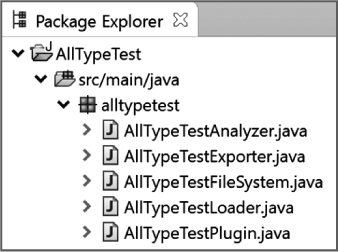
Figure 15-20: Sample default module source code content
Example: Ghidra Analyzer Module Project
With the Eclipse integration basics behind us, let’s walk through building a simple Ghidra analyzer to identify potential ROP gadgets in our listing. We will use a simplified software development process, as this is just a simple demonstration project. Our process includes the following steps:
- Define the problem.
- Create the Eclipse module.
- Build the analyzer.
- Add the analyzer to our Ghidra installation.
- Test the analyzer from our Ghidra installation.
WHAT’S A ROP GADGET AND WHY DO WE CARE?
For those unfamiliar with exploit development, ROP stands for return-oriented programming. One software security mitigation that aims to defeat raw shellcode injection is to ensure that no memory region that is writable is, at the same time, also executable. Such mitigations are often referred to as Non-eXecutable (NX) or Data Execution Prevention (DEP)) because it becomes impossible to inject shellcode into memory (must be writable) and then transfer control to that shellcode (must be executable).
ROP techniques aim to hijack a program’s stack (often through a stack-based buffer overflow) to place a carefully crafted sequence of return addresses and data into the stack. At some point after the overflow, the program begins using the attacker-supplied return addresses rather than return addresses placed on the stack by normal program execution. The return addresses the attacker places on the stack point to program memory locations that already contain code as a result of normal program and library loading operations. Because the original author of the exploited program did not design the program to do the attacker’s work for them, the attacker often needs to pick and choose small portions of this existing code to sequence together.
A ROP gadget is a single one of these code fragments, and the sequencing mechanism often relies on the gadget terminating in a return (hence return-oriented) instruction, which retrieves an address from the now attacker-controlled stack to transfer control to the next gadget. A gadget often performs a very simple task such as loading a register from the stack. The following simple gadget could be used to initialize RAX on an x86-64 system:
POP RAX ; pop the next item on the attacker-controlled stack into RAX
RET ; transfer control to the address contained in the next stack item
Because every exploitable program is different, attackers can’t depend on a specific set of gadgets being present in any given binary. Automated gadget finders are tools that search a binary for instruction sequences that may be used as gadgets and present these gadgets to the attacker, who must decide which ones are useful in crafting their attack. The most sophisticated gadget finders infer the semantics of a gadget and automatically sequence gadgets to perform a specified action, saving the attacker the trouble of doing it themselves.
Step 1: Define the Problem
Our task is to design and develop an instruction analyzer that will identify simple ROP gadgets within a binary. The analyzer needs to be added to Ghidra and be available as a selectable analyzer in the Ghidra Analyzer menu.
Step 2: Create the Eclipse Module
We use GhidraDev ▸ New ▸ Ghidra Module Project to create a module called SimpleROP using the analyzer module template. This creates a file called SimpleROPAnalyzer.java in the src/main/java folder within the SimpleROP module. The resulting Package Explorer view is shown in Figure 15-21.
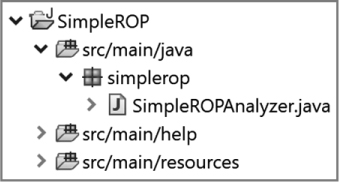
Figure 15-21: Package Explorer src/main entries for SimpleROP
Step 3: Build the Analyzer
A portion of the generated SimpleROPAnalyzer.java code is shown in Figure 15-22. The functions have been collapsed so that we can see all of the analyzer methods that are provided. Eclipse will recommend imports if we need them as we develop our code so we can jump right into coding the tasks we need to perform and add the recommended import statements when Eclipse detects that we need them.

Figure 15-22: SimpleROPAnalyzer template
The six task tags (to the left of the line numbers) in Figure 15-22 indicate where we should start our development. We will expand the associated sections as we address each task and include the before and after content associated with each task. (Note that some content will be wrapped or reformatted for readability and comments minimized to conserve space.)
For functionality, we will rely on the following class-level declarations:
private int gadgetCount = 0; // Counts the number of gadgets
private BufferedWriter outFile; // Output file
// List of "interesting" instructions
private List<String> usefulInstructions = Arrays.asList(
"NOP", "POP", "PUSH", "MOV", "ADD", "SUB", "MUL", "DIV", "XOR");
// List of "interesting" instructions that don’t have operands
private List<String> require0Operands = Arrays.asList("NOP");
// List of "interesting" instructions that have one operand
private List<String> require1RegOperand = Arrays.asList("POP", "PUSH");
// List of "interesting" instructions for which we want the first
// parameter to be a register
private List<String> requireFirstRegOperand = Arrays.asList(
"MOV", "ADD", "SUB", "MUL", "DIV", "XOR");
// List of "start" instructions that have ZERO operands
private List<String> startInstr0Params = Arrays.asList("RET");
// List of "start" instructions that have ONE register operand
private List<String> startInstr1RegParam = Arrays.asList("JMP", "CALL");
Comments associated with each declaration describe the purpose of each variable. The various List variables contain the instructions from which our gadgets will be composed and classify those instructions based on the number and type of operands they require, and whether the instruction is a legal start instruction for one of our gadgets. Because our gadget construction algorithm works its way backward in memory, start here actually means a starting point for our algorithm. At runtime, these same start instructions would actually be the last instructions executed in a given gadget.
Step 3-1: Document the Class
When we expand the first task tag, we see the following task description:
/**
* TODO: Provide class-level documentation that describes what this
* analyzer does.
*/
Replace the existing TODO comments with comments that describe what the analyzer does:
/**
* This analyzer searches through a binary for ROP gadgets.
* The address and contents of each gadget are written to a
* file called inputfilename_gadgets.txt in the user’s home directory.
*/
Step 3-2: Name and Describe Our Analyzer
Expanding the next task tag provides us with a TODO comment and the line of code that we need to edit. Within the Eclipse IDE, the code to be modified appears in purple font and has a name indicative of the associated task. The second task contains the following:
// TODO: Name the analyzer and give it a description.
public SimpleROPAnalyzer() {
super("My Analyzer",
"Analyzer description goes here",
AnalyzerType.BYTE_ANALYZER);
}
The two strings need to be replaced with meaningful content. In addition, the analyzer type needs to be specified. To facilitate dependency resolution across analyzers, Ghidra groups analyzers into the following categories: byte, data, function, function modifiers, function signatures, and instruction. In this case, we are building an instruction analyzer. The resulting code is as follows:
public SimpleROPAnalyzer() {
super("SimpleROP",
"Search a binary for ROP gadgets",
AnalyzerType.INSTRUCTION_ANALYZER);
}
Step 3-3: Determine If Our Analyzer Should Be a Default Analyzer
The third task asks us to return true if the analyzer should be enabled by default:
public boolean getDefaultEnablement(Program program) {
// TODO: Return true if analyzer should be enabled by default
return false;
}
We do not want this analyzer enabled by default; therefore, no code modifications are required.
Step 3-4: Determine If the Input Is Appropriate for This Analyzer
The fourth task requires us to determine whether our analyzer is compatible with the program content:
public boolean canAnalyze(Program program) {
// TODO: Examine 'program' to determine of this analyzer
// should analyze it.
// Return true if it can.
return false;
}
Since this analyzer is only for demonstration purposes, we assume that the input file is compatible with our analysis and simply return true. In reality, we would add code to verify compatibility of the analysis file prior to using our analyzer. For example, we might return true only after we have determined that file is an x86 binary. Worked examples of this verification can be found in most analyzers included in your Ghidra installation (Ghidra/Features/Base/lib/Base-src/Ghidra/app/analyzers), accessible through your module directory within Eclipse:
public boolean canAnalyze(Program program) {
return true;
}
Step 3-5: Register Analyzer Options
The fifth task offers us the opportunity to specify any special options we wish to present to users of our analyzer:
public void registerOptions(Options options, Program program) {
// TODO: If this analyzer has custom options, register them here
options.registerOption("Option name goes here", false, null,
"Option description goes here");
}
Since this analyzer is only for demonstration purposes, we will not add any options. Options might include user-controlled choices (for example, choose output file, optionally annotate the listing, and so on). Options for each analyzer are displayed in the Analyzer window when an individual analyzer is selected:
public void registerOptions(Options options, Program program) {
}
Step 3-6: Perform the Analysis
The sixth task highlights the function that gets called when our analyzer gets invoked:
public boolean added(Program program, AddressSetView set, TaskMonitor
monitor, MessageLog log) throws CancelledException {
// TODO: Perform analysis when things get added to the 'program'.
// Return true if the analysis succeeded.
return false;
}
This is the part of the module that does the work. Four methods are used by this module, each of which is detailed next:
//*************************************************************************
// This method is called when the analyzer is invoked.
//*************************************************************************
➊ public boolean added(Program program, AddressSetView set, TaskMonitor
monitor, MessageLog log) throws CancelledException {
gadgetCount = 0;
String outFileName = System.getProperty("user.home") + "/" +
program.getName() + "_gadgets.txt";
monitor.setMessage("Searching for ROP Gadgets");
try {
outFile = new BufferedWriter(new FileWriter(outFileName));
} catch (IOException e) {/* pass */}
// iterate through each instruction in the binary
Listing code = program.getListing();
InstructionIterator instructions = code.getInstructions(set, true);
➋ while (instructions.hasNext() && !monitor.isCancelled()) {
Instruction inst = instructions.next();
➌ if (isStartInstruction(inst)) {
// We found a "start" instruction. This will be the last
// instruction in the potential ROP gadget so we will try to
// build the gadget from here
ArrayList<Instruction> gadgetInstructions =
new ArrayList<Instruction>();
gadgetInstructions.add(inst);
Instruction prevInstr = inst.getPrevious();
➍ buildGadget(program, monitor, prevInstr, gadgetInstructions);
}
}
try {
outFile.close();
} catch (IOException e) {/* pass */}
return true;
}
//*************************************************************************
// This method is called recursively until it finds an instruction that
// we don't want in the ROP gadget.
//*************************************************************************
private void buildGadget(Program program, TaskMonitor monitor,
Instruction inst,
ArrayList<Instruction> gadgetInstructions) {
if (inst == null || !isUsefulInstruction(inst)➎ ||
monitor.isCancelled()) {
return;
}
gadgetInstructions.add(inst);
➏ buildGadget(program, monitor, inst.getPrevious()➐, gadgetInstructions);
gadgetCount += 1;
➑ for (int ii = gadgetInstructions.size() - 1; ii >= 0; ii--) {
try {
Instruction insn = gadgetInstructions.get(ii);
if (ii == gadgetInstructions.size() - 1) {
outFile.write(insn.getMinAddress() + ";");
}
outFile.write(insn.toString() + ";");
} catch (IOException e) {/* pass */}
}
try {
outFile.write("
");
} catch (IOException e) {/* pass */}
// Report count to monitor every 100th gadget
if (gadgetCount % 100 == 0) {
monitor.setMessage("Found " + gadgetCount + " ROP Gadgets");
}
gadgetInstructions.remove(gadgetInstructions.size() - 1);
}
//*************************************************************************
// This method determines if an instruction is useful in the context of
// a ROP gadget
//*************************************************************************
private boolean isUsefulInstruction(Instruction inst) {
if (!usefulInstructions.contains(inst.getMnemonicString())) {
return false;
}
if (require0Operands.contains(inst.getMnemonicString())) {
return true;
}
if (require1RegOperand.contains(inst.getMnemonicString()) &&
inst.getNumOperands() == 1) {
Object[] opObjects0 = inst.getOpObjects(0);
for (int ii = 0; ii < opObjects0.length; ii++) {
if (opObjects0[ii] instanceof Register) {
return true;
}
}
}
if (requireFirstRegOperand.contains(inst.getMnemonicString()) &&
inst.getNumOperands() >= 1) {
Object[] opObjects0 = inst.getOpObjects(0);
for (int ii = 0; ii < opObjects0.length; ii++) {
if (opObjects0[ii] instanceof Register) {
return true;
}
}
}
return false;
}
//*************************************************************************
// This method determines if an instruction is the "start" of a
// potential ROP gadget
//*************************************************************************
private boolean isStartInstruction(Instruction inst) {
if (startInstr0Params.contains(inst.getMnemonicString())) {
return true;
}
if (startInstr1RegParam.contains(inst.getMnemonicString()) &&
inst.getNumOperands() >= 1) {
Object[] opObjects0 = inst.getOpObjects(0);
for (int ii = 0; ii < opObjects0.length; ii++) {
if (opObjects0[ii] instanceof Register) {
return true;
}
}
}
return false;
}
Ghidra invokes an analyzer’s added method ➊ to initiate analysis. Our algorithm tests every instruction ➋ in the binary to determine whether the instruction is a valid “start” point ➌ for our gadget builder. Each time a valid start instruction is found, our gadget creation function, buildGadget, is invoked ➍. Gadget creation is a recursive ➏ walk backward ➐ through the instruction list that continues as long as an instruction is considered useful ➎ to us. Finally, each gadget is printed, by iterating over its instructions ➑, as it is completed.
Step 4: Test the Analyzer Within Eclipse
During the development process, it is common to test and modify code frequently. As you are building your analyzer, you can test its functionality within Eclipse by using the Run As option and choosing Ghidra. This opens Ghidra with the current version of the module temporarily installed. If the results are not what you expect when you test the module, you can edit the file within Eclipse and retest. When you are satisfied with your result, you should move on to step 5. Using this method to test your code within Eclipse can be a great time-saver during the development process.
Step 5: Add the Analyzer to Our Ghidra Installation
To add this analyzer to our Ghidra installation, we need to export our module from Eclipse and then install the extension in Ghidra. Exporting is accomplished by selecting GhidraDev ▸ Export ▸ Ghidra Module Extension, choosing your module, and clicking Next. In the next window, select the Gradle Wrapper option shown in Figure 15-23 if you do not have a local Gradle installation (note that an internet connection is required in order for the wrapper to reach out to gradle.org). Click Finish to complete the export process. If this is your first time exporting the module, a dist directory will be added to your module within Eclipse and a .zip file of the exported content will be saved to the folder.
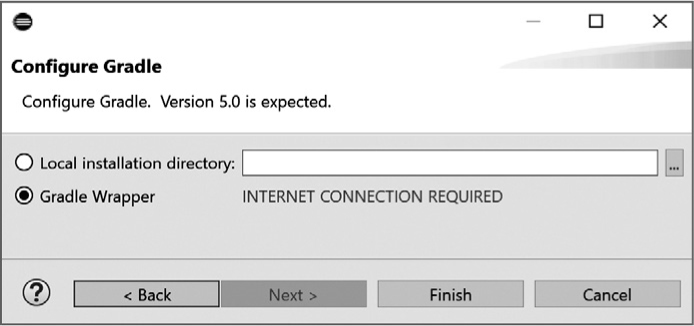
Figure 15-23: Configure Gradle dialog
In the Ghidra Project window, add the new analyzer by selecting File ▸ Install Extensions. A window similar to that shown in Figure 15-24 will be displayed showing all of the existing extensions that have not been installed.
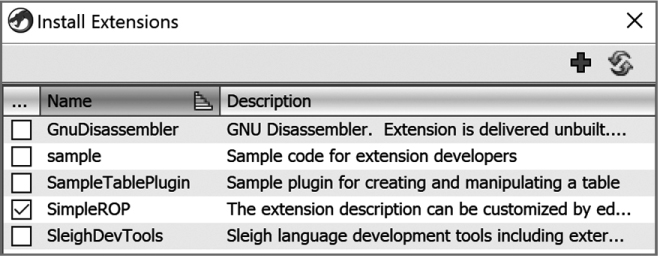
Figure 15-24: Install Extensions window
Add the new analyzer SimpleROP by selecting the + icon at the top right and navigating to our newly created .zip file in the associated dist directory. Once our analyzer appears in the list, we can select it and click OK (not shown). Restart Ghidra to use the new functionality from the Analysis menu.
Step 6: Test the Analyzer Within Ghidra
As with our limited development plan, we used a limited scope test plan just to demonstrate functionality. SimpleROP passed acceptance testing as the analyzer met the following criteria:
- (Pass) SimpleROP appears in the Analysis Options in the CodeBrowser ▸ Analysis menu.
- (Pass) The description of SimpleROP appears in the Analysis Options description window when selected.
Test cases 1 and 2 passed, as shown in Figure 15-25. (Had we chosen to register and program associated options in step 3-5, they would have been displayed in the Options panel on the right side of the window).
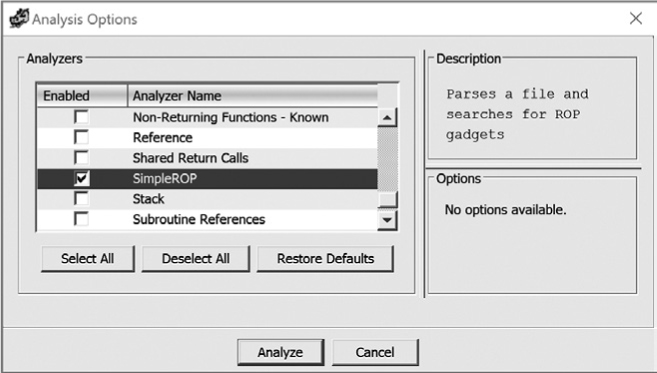
Figure 15-25: Analysis Options window
- (Pass) SimpleROP executes when selected.
In this case, we ran SimpleROP on an analyzed file, and as part of auto analysis. Running SimpleROP on an unanalyzed file would not yield any results, as INSTRUCTION_ANALYZER extensions require instructions to have been previously identified (a default part of auto analysis). When SimpleROP is run as part of the auto analysis, it is prioritized appropriately because of the analyzer type we assigned in step 3-2. Figure 15-26 shows the Ghidra Log confirmation that the SimpleROP analyzer ran.
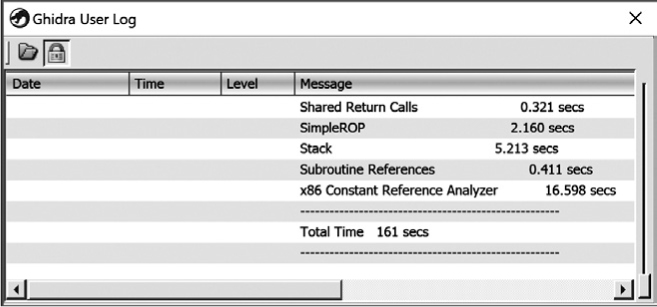
Figure 15-26: Ghidra User Log window showing analysis confirmation
- (Pass) SimpleROP writes each gadget to a file called fileZZZ_gadgets.txt when analyzing fileZZZ.
The following excerpt from the file call_tree_x64_static_gadgets.txt shows that many of the gadgets are taken from the portion of the call_tree_x64_static listing shown in Figure 15-27:
00400412;ADD RSP,0x8;RET;
004004ce;NOP;RET;
00400679;ADD RSP,0x8;POP RBX;POP RBP;POP R12;POP R13;POP R14;POP R15;RET;
0040067d;POP RBX;POP RBP;POP R12;POP R13;POP R14;POP R15;RET;
0040067e;POP RBP;POP R12;POP R13;POP R14;POP R15;RET;
0040067f;POP R12;POP R13;POP R14;POP R15;RET;
00400681;POP R13;POP R14;POP R15;RET;
00400683;POP R14;POP R15;RET;
00400685;POP R15;RET;
00400a8b;POP RBP;MOV EDI,0x6babd0;JMP RAX;
00400a8c;MOV EDI,0x6babd0;JMP RAX;
00400a98;POP RBP;RET;
Figure 15-27: CodeBrowser listing of call_tree_x64_static
Summary
In Chapter 14, we introduced scripting as a means of extending Ghidra’s capabilities. In this chapter, we introduced Ghidra extension modules along with Ghidra’s Eclipse integration capabilities. While Eclipse is not your only option for editing Ghidra extensions, the integration of Ghidra and the Eclipse IDE provides an incredibly powerful environment for developers extending Ghidra’s capabilities. The development wizards and templates lower the bar for authoring extensions as they present coders with a guided approach to modifying existing content and building new extensions. In Chapter 16, we take a look at headless Ghidra, an option that appeared in Figure 15-18. Subsequent chapters build on the integration of Ghidra and the Eclipse IDE to further extend Ghidra’s capabilities and provide a solid foundation for making Ghidra into the optimal tool for your reverse engineering workflow.