If you’ve made it this far, you’re just a few steps away from mastering all of the programming skills in this book. You’ve learned how to use many different programming blocks as well as how to work with essential tools, such as data wires. This chapter completes the programming section of this book by teaching you how to use constants as well as how to use the EV3’s memory with variables.
The Constant block provides a starting point for a data wire whose value you can choose manually. You choose the data wire type by selecting a mode (Text, Numeric, or Logic), and you enter its value in the Value field, as shown in Figure 16-1.
The Constant block is useful if you want to configure the settings of multiple blocks with the same value. For example, the ConstantDemo program (see Figure 16-1) makes the motors on SK3TCHBOT turn at the same speed, but in opposite directions. To accomplish this, the Constant block sends the number 50 to both the first Large Motor block and the Math Block, which multiplies the value by –1 before passing it on to the second Large Motor block. To change the speed of both motors at once, simply change the value in the Constant block. (Without this block, you’d have to change two values).
Think of a variable as a kind of suitcase that can carry information. When a program needs to remember a value (such as a sensor reading) for later use, it puts that value in the suitcase and stows it away. When the program needs to use the value, it opens the suitcase and uses the stored value. The variable is stored in the EV3’s memory until it’s needed.
Once information is stored in a variable, you can access it from other parts of your program. For example, you could store an Infrared Sensor’s proximity value in the suitcase and use it to control the speed of a motor 5 seconds later.

Figure 16-1. The ConstantDemo program. (Create a new project called SK3TCHBOT-Variable for all of the programs in this chapter.)

Figure 16-2. Values, like the proximity reading shown here, can be stored in variables in the EV3’s memory. (You’ll learn what this program does and how to create it later in this chapter.)
The program can access this stored information at any time while it’s running, but the data is lost once the program stops. To store and access variable information, use a Variable block, which you’ll recognize by the suitcase icon on the block. Figure 16-2 shows an overview of what happens when you use variables.
Each variable has a name, has a data type, and contains a value. For example, a Numeric-type variable might be called Proximity and have a value of 56. Besides Numeric variables, there are Logic variables (containing true or false) and Text variables (containing a text line, such as Hello).
But before you can use a variable in your program, you’ll need to define it by choosing a name and a type for the variable. You can do this on the Project Properties page, as shown in Figure 16-3, or you can use the Variable block to define a variable, as you’ll see in a moment. When you define a variable in a project, you can use that variable in each program inside the project.
To delete a variable, open the Variables tab on the Project Properties page, select the variable you want to delete, and click Delete.
Once you’ve defined a variable, you can use it in a program with the Variable block. The Variable block can either read values from or write (store) values to a variable in the EV3 memory, as shown in Figure 16-4.
To configure a Variable block, first use the Mode Selector to choose whether to read from a variable (Read; book icon) or write a value to it (Write; pencil icon). Next, select the type of variable you want to read or write (Numeric, Logic, or Text). Finally, select the variable you want to use from the Name list.

Figure 16-3. Defining a variable on the Project Properties page. Step 1: Open the Project Properties page. Step 2: Open the Variables tab. Step 3: Click Add to make a new variable. Step 4: Enter a name for the variable (Proximity) and select the data type (Numeric). Then, click Ok.
Note
The Name list contains only the variables with the type that matches the block’s mode. For example, to see the Numeric variable you’ve just defined (Proximity), the block must be in Read – Numeric or Write – Numeric mode.
The Variable block has one parameter called Value. In Write mode, the Value input allows you to enter the value you want to store. If you connect a data wire rather than entering a value, the value carried by this wire is stored. If a value was stored in this variable previously, the old value is erased, and the new one is stored instead.
In Read mode, the Variable block retrieves the information from the EV3’s memory and outputs it with the Value plug so that you can send it to other blocks with a data wire. When a variable’s value is read, the value doesn’t change, so if you read it again with another Variable block, you’ll get the same value.
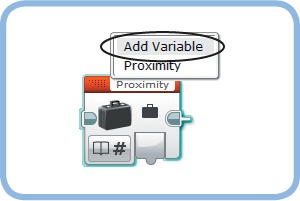
A second way to define a variable is to click Add Variable in the Name list in the Variable block, as shown in Figure 16-5. Doing so creates a new variable of the same type as the block’s mode. For example, because this block is in Read – Numeric mode, the new variable will be Numeric. (To create a new Logic variable using this method, first change the mode to Read – Logic or Write – Logic.)

Now that you know the essentials of defining and using variables, you’re ready to create the VariableDemo program in Figure 16-6. The program stores the Infrared Sensor’s proximity value in a variable called Proximity. After 5 seconds, it retrieves the value from the variable and uses it to control the speed of motor B, which means that the motor speed is based on what the sensor measured 5 seconds ago. (Before configuring this program, define a variable called Proximity if you haven’t already done so, as shown in Figure 16-3.)
VariableDemo demonstrates the concept of using variables, but it’s a very basic program. Once you’ve created it, continue practicing with variables in Discoveries #106 and #107 on the next page.
Note
Don’t confuse the Variable block with the Constant block. Both blocks have a suitcase icon on them, but the Constant block also shows a padlock, which serves as a reminder that constants can’t change while a program is running.

Discovery #106: Old vs. New!
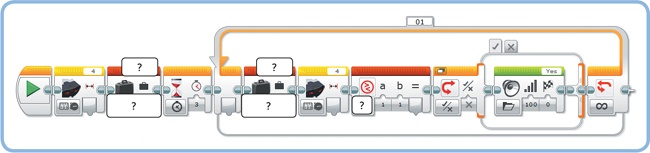
Can you create a program that repeatedly compares new sensor readings to the sensor value stored in a variable at the beginning of the program? If the new reading is lower, the robot should say “Yes”; otherwise, it should say “No.” Figure 16-7 shows part of the program.
Discovery #107: Previous vs. New!
The program in Discovery #106 compares the new sensor value to the sensor value measured at the start of the program. Can you create a new program that compares each new measurement to the previous one? If the new one is lower, the robot should say “Yes”; otherwise, it should say “No.” As a consequence, the robot will say “Yes” whenever an object is approaching the Infrared Sensor from the front.
Hint
Create a program similar to the one shown in Figure 16-7, with one variable called Previous. Each time through the loop, the robot should compare the Previous value to a new sensor reading. The last block in the loop should be a Variable block configured to store the newer sensor value in Previous; this way, the next time through the loop, Previous contains the measurement found during the previous repetition of the loop.
Sometimes you’ll want to change a variable’s value—for example, when you want to use a variable to track a high score or a total number of Touch Sensor presses. Often, you’ll want to increase a variable’s value by 1, which is called incrementing. The TouchCount program you’ll now create demonstrates how to use a variable to track the number of times a Touch Sensor is bumped (pressed and then released).
You begin by defining a new Numeric variable called Count to store the number of Touch Sensor bumps. The program will wait until the Touch Sensor is bumped, at which point the Count value will increase by 1. To make the program keep counting, you’ll also use a Loop block.
But how do you increase the variable’s value by 1? As shown in Figure 16-8, you use a Variable block to read the Count value. Then, you transfer this value to a Math block, which adds one to the value. The result of this addition is wired into another Variable block configured to write (store) the new value in the Count variable, which is therefore now increased by 1. The Loop block repeats this process for 5 seconds, after which the total Count value is displayed on the EV3 screen. (The loop has to run at least once, which means that the final value will always be 1 or more.)
Using this method, you can change a variable’s value however you want. This example has shown you how to add 1 to a value, but you could use the same method to subtract from a value, too.
When programming with variables, it’s important to initialize them by giving them a starting value. You did this in the TouchCount program by setting the Count value to 0 at the beginning of the program. Initializing variables makes a program more reliable by making sure that each time you run the program, it will function the same way because it starts at the same place.
The starting value doesn’t have to be 0, though. For example, initializing the Count variable to 5 makes the program begin counting at 5.
If you don’t choose an initial value for a Numeric variable in your program, the EV3 software will initialize it to 0. However, it’s good practice to always initialize variables in your programs, even if you want them to start at 0.
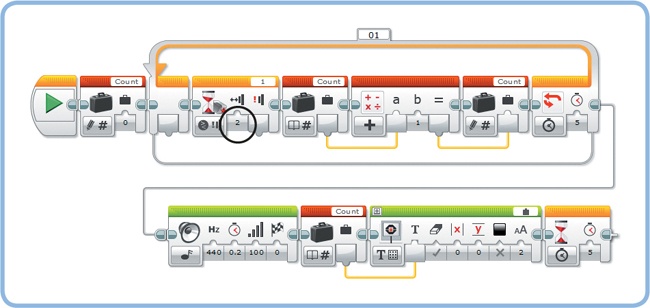
Figure 16-8. The TouchCount program counts the number of Touch Sensor presses during 5 seconds and displays the total number on the screen. Note that I connected the Sound block to the Loop block using a Sequence Wire for better visibility, but you should simply place the Sound block directly after the Loop block.
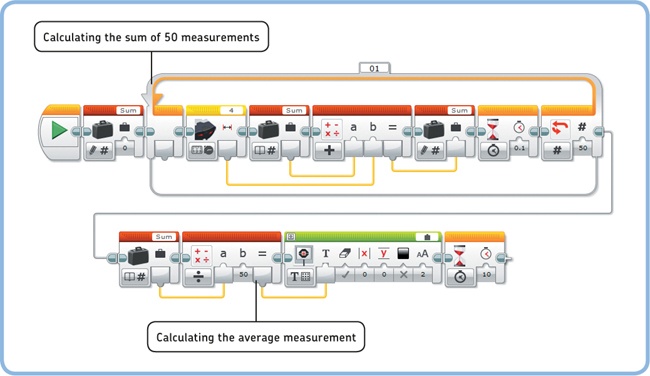
In the next example, you’ll use a variable to calculate the average value of 50 sensor measurements. To calculate an average measurement (the mean value), divide the sum of all measurements by the number of measurements (50, in this case). The Average program in Figure 16-9 calculates this sum by repeatedly adding the sensor value to a variable called Sum. The variable is initialized at 0, and the blocks in the Loop block add the latest sensor measurement to Sum each time. After 50 repetitions, the sum is divided by 50 to calculate the average sensor measurement, which is in turn displayed on the screen.
Calculating an average value can be useful to get a more accurate sensor value. For example, you might have an obstacle-avoiding robot that turns around if the proximity value is less than 50. Sometimes, the sensor appears to detect an obstacle up close (at a proximity of 40, say) when there is actually nothing in its path. Normally, this measurement would trigger the robot to turn, but if you take the average of three measurements, giving (100 + 100 + 40) / 3 = 80, this false positive won’t trigger the robot.
Congratulations! You’ve completed all of the programming theory in this book. Now you’re ready to go on to the next chapter, where you’ll create a larger program that turns SK3TCHBOT into an Etch-A-Sketch-like device. But before you do, take a look at the following Discoveries. These may be more difficult than the other ones you’ve done so far, but remember that there are multiple solutions to each. Give them a try, and check out solutions to many of the Discoveries at http://ev3.robotsquare.com/ for inspiration.
Discovery #108: Counting Up and Down!
Can you create a program based on the TouchCount program that uses a variable to track the number of times the Left and Right EV3 buttons are pressed? If you press the Right button, the variable’s value should increase by 1; if you press the Left button, it should decrease by 1. Display the variable’s value on the EV3 screen.
Discovery #109: Limited Average!
Can you expand the Average program in Figure 16-9 to calculate the average of all proximity measurements taken between the start of the program and the moment that you press the Touch Sensor?
Discovery #110: Random Verification!
In this Discovery, you are challenged to verify how well the Random block in Logic mode works. To do this, you’ll have the robot generate 10,000 random logic values and determine how many of those are true and how many of them are false. Experiment with the Probability of True setting and see if you get the expected result.
Discovery #111: Closest Approach!
Can you create a program that determines the lowest recorded proximity measurement out of 50 measurements? Have the program pause for 0.1 seconds between each measurement and display the lowest value on the screen.
Design Discovery #27: Customer Counter!
Can you create a robot that counts the number of people in a room? Design a contraption that opens the door when guests press the Touch Sensor to enter the room, and have them place their hand up close to the Infrared Sensor to open the door when they want to leave. Then, modify the program you made in Discovery #108 in Discovery #108: Counting Up and Down! to count the number of people in the room: A Touch Sensor press should increase the counter; a wave at the Infrared Sensor should decrease the counter.
Hint
Rather than designing a robot that actually turns a door handle, it’s much easier to design a vehicle robot that opens the door by pushing it forward and closes the door by pulling it backward. Be sure not to close the door all the way. Alternatively, use some tape or string to prevent the door handle from clicking into the closed position.