When building and programming the robots in this book, you may occasionally run into problems transferring your programs to the EV3, and this appendix aims to help you find solutions to such problems. You’ll also learn how to manage wireless connections to the EV3 brick, how to reset it, and how to update its firmware.
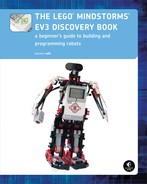
When you download your program to the EV3 brick, the EV3 software turns your source code (the programming blocks you see on the screen) into a file with more compact code representing the actions that the EV3 brick will perform. This process is called compilation. Compilation sometimes fails, and if it does, you’ll see an error message such as the one shown in Figure A-1.
Compilation will fail if a program tries to run a block that no longer exists. If this happens, a question mark will be displayed on the missing block (see Figure A-1). Let’s say you have a My Block called Talk and a program called SoundProgram that uses the Talk My Block. The project fails to compile if the Talk My Block is missing—for example, if you’ve deleted the Talk My Block from the Project Properties page.
Note that the error message doesn’t tell you which My Block is missing (Talk); rather, it tells you which program (SoundProgram) contains references to the missing My Block.
To solve the problem, you can create a new My Block with the same name (Talk) or copy it from another project into your current project, using the instructions in Figure 5-13. Or, if you just want to continue without the missing blocks, delete all blocks with a question mark on them.
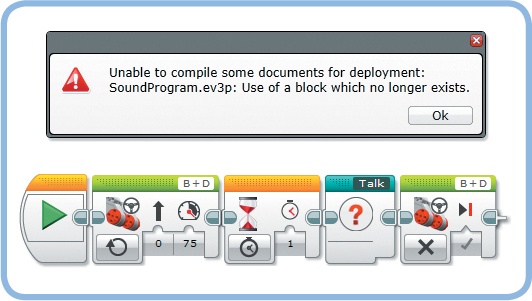
Compilation can also fail if your program contains instructions that the software doesn’t understand. For example, compilation will fail if you enter an unknown symbol in the Equation setting of the Math block, as shown in Figure A-2.
The software doesn’t tell you which block causes the compilation to fail, but you can track down the error by selecting a few blocks and trying to run them using the Run Selected button. If a selection runs, it contains no compilation errors; if it fails to run, the selection contains an error. As you systematically rule out which sections work and which ones don’t, you should eventually find the block that contains an error. Then, you can resolve the error if you know what caused it or delete the block and replace it with a new one.
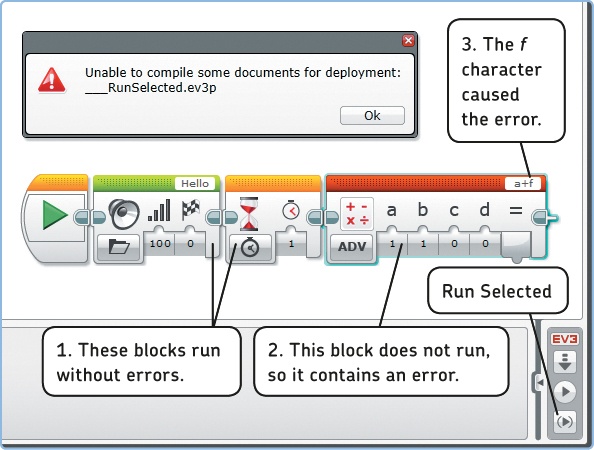
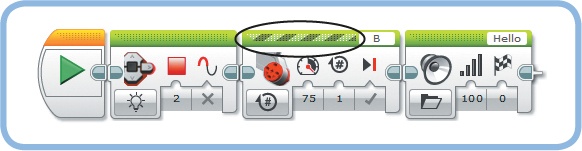
When you copy a Variable block from one project and paste it into another, the definition is not always copied along with it. This means that even though the variable’s name appears on the block that you copied, it’s not available for use in other Variable blocks (see Figure A-3). To solve this problem, define a new variable of the same type with the same name.
The same thing can happen when you import a program or My Block containing Variable blocks into your project. You can see an overview of all variables on the Variables tab of the Project Properties page (see Figure 16-3). These variables should be available for use in all programs throughout your project.
The previous section can help you solve certain technical problems, but what if you have a program that runs, just not in the way you expect it to? This outcome can have many causes, and in many cases, there may simply be a user error. I’ve programmed robots for many years, and I still often make mistakes. For example, sometimes I forget to connect a data wire, and then my robot won’t work.
Figure A-3. The Numeric variable called TestVar is unavailable because it isn’t yet defined. To define it, click Add Variable and choose TestVar as the variable’s name.
On the other hand, making mistakes can help you discover new techniques and solutions that you might not have found by following the steps perfectly. Troubleshooting might not seem useful or fun while you’re at it, but it’s an essential element of robotics. And, once you make your robot work by solving the problem on your own, programming is even more rewarding.
You may find the following tips useful for troubleshooting and preventing errors in your own programs:
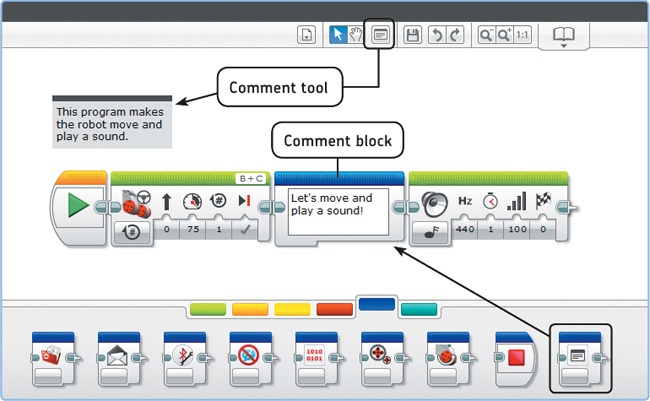
Add comments to your program. Comments don’t affect the way your program works, but they can help you remember what each part of your program is supposed to do when you look at it later. You can place comments in your program using the Comment tool, or you can use the Comment block, as shown in Figure A-4. Use the Comment tool if you want your comment to stay in the same place on the Canvas; use the Comment block if you want the comment to stay in the same place in your program. For example, if you place another programming block before the Move Steering block, the Comment block automatically moves to the right along with the rest of the blocks, whereas the normal comment stays in the same place. To further document your project, you can add text and pictures to the Content Editor (see Figure 3-19).
Choose descriptive names for programs, My Blocks, and variables. For example, if you have two variables to count how many times the Left and Right buttons have been pressed, respectively, it’s better to call them CountLeft and CountRight instead of Count1 and Count2. Then you’re less likely to pick the wrong one later on.
Figure A-4. You can add comments to your program using a Comment block or the Comment tool. The Comment block isn’t available in version 1.0 of the EV3 software. To use it, install version 1.1 or higher using the instructions in Chapter 1. If you’re not sure which version you have, click Help > About LEGO MINDSTORMS EV3.
Use sounds, the display, and the brick status light to signal the program’s progress. For example, place a Sound block after a block that waits for a sensor to be triggered, or make the status light red while a certain My Block is running. This helps you see which part of the program is running. If the program fails, you’ll know roughly where to look for the problem.
Display values on the screen. For example, if you use a Switch block to make a decision based on a sensor value, it can be helpful to display that value so you can see what value triggered the true or false part of the switch. For example, an unexpected value, such as 0, might indicate that the sensor isn’t connected.
Use the EV3 software to see which block is currently running. This can help you see where a program gets stuck (see Figure A-5). For example, if the program stalls on a Large Motor block, something might be preventing the motor from reaching its target—perhaps it’s blocked.
Test changes to your program often. If your program works fine at first but stops working when you add a new block, the last block you added may be the cause of the problem. When you make several big changes to your program, be sure to test your program after each change.
Test your program under different conditions. If your robot works once, there’s no guarantee it’ll work the next time around if the conditions are different. A line-following program may work fine in one room, but it might not correctly detect the line in another room that has a lot of external lights, such as a robot competition table.
Note
If one of the programs in this book doesn’t work as described, you can visit the book’s companion website (http://ev3.robotsquare.com/) to download the ready-made programs and compare them to your own.
This section will show how you can diagnose several aspects of the EV3 brick, such as the battery level, free memory, and the USB connection between the EV3 and the computer, and it’ll illustrate how to reset or update the EV3.
You can find information about the EV3 brick and devices connected to it on the Hardware Page, as shown in Figure A-6. The Brick Information tab shows the name, the battery level, and the firmware version of the EV3 brick that’s currently connected. To change the name of the EV3, type a new name in the indicated field and press the ENTER key. The personalized name should also appear at the top of the EV3 brick’s display. This name helps to distinguish EV3 bricks if you have more than one. The Port View tab displays the sensor value of each motor or sensor connected to the EV3 (see Figure 6-5).
The Available Bricks tab lists the personalized name of each EV3 brick detected by the EV3 software. Depending on how your EV3 is configured, you can choose to connect the EV3 via USB, Bluetooth, or Wi-Fi by clicking the checkbox in the appropriate column. For example, the EV3 in Figure A-7 is called EXPLOR3R, and it’s connected to the computer via USB.
Use the Refresh button to update the list. Use the Disconnect button to cancel a current connection so you can connect to another EV3 brick.
You can manage the EV3’s files from your computer by opening the Memory Browser from the Brick Information tab, as shown in Figure A-8. You’ll see all of the programs currently on the EV3, with one folder for each project.
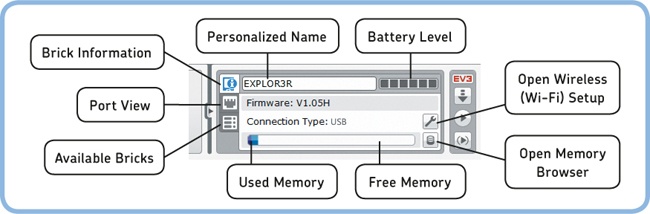
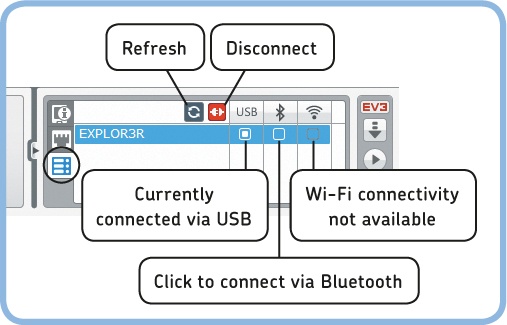
Figure A-7. You use the Available Bricks tab to manage connections to the EV3 brick. If a checkbox is greyed out, the connection type isn’t currently available.
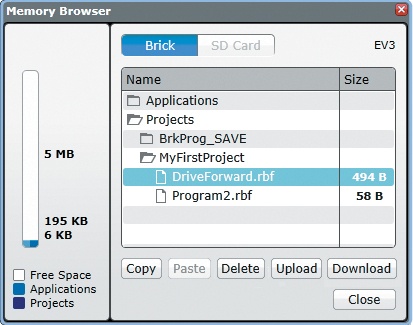
Figure A-8. Open the Memory Browser from the Hardware Page (see Figure A-6) or click Tools > Memory Browser.
Compiled programs are very small (several KB) compared to the amount of free space (more than 4MB) on the EV3, so you shouldn’t run out of space quickly. To avoid clutter on the File Navigation tab on the EV3 brick, however, you can remove unused projects by selecting them and clicking Delete.
You can send a file from the EV3 brick to a computer by selecting it and clicking Upload. You can send a file from the computer to the EV3 brick by selecting the destination folder on the EV3 and clicking Download. Note that transferring compiled programs back to the computer doesn’t reveal the program’s source code, which is what you normally program and edit using the EV3 software. You cannot “decompile” an EV3 program to continue working on it, so you should always save the source code for later use. On Brick programs are an exception to this rule, as you’ll see in Appendix B.
When you connect the EV3 brick to the computer with the USB cable, the EV3 software should detect the EV3 automatically, as indicated by the red EV3 symbol (![]() ) on the Hardware Page. If the symbol stays grey (
) on the Hardware Page. If the symbol stays grey (![]() ), try following these directions to resolve the issue:
), try following these directions to resolve the issue:
Make sure the EV3 brick is turned on.
Make sure the EV3 brick is connected to the computer with the USB connection labeled PC (see Figure 2-5). The other end of the cable should be plugged into any of the computer’s USB ports.
If you’re sure everything is connected properly, try unplugging the USB cable and then plugging it back in, or try using another USB port on the computer.
Close the EV3 software and restart it, or reboot the computer.
If that doesn’t help, unplug the USB cable, turn off the EV3 brick, turn it back on, wait for it to fully start, and then plug the cable back in.
You may experience problems when trying to connect an EV3 to a public computer, such as a computer in a classroom. If so, ask the system administrator to log in, launch the EV3 software, and check whether it connects to the EV3. When you’re done, you should be able to connect to the EV3 using your own account.
If an EV3 program stalls and you can’t abort it with the Back button, you can restart the EV3 brick by pressing the Back button and Center button simultaneously until the brick status light turns off (see Figure A-9). The EV3 brick should restart when you release the buttons. Note that you will lose all programs and settings added to it since you last turned it on.
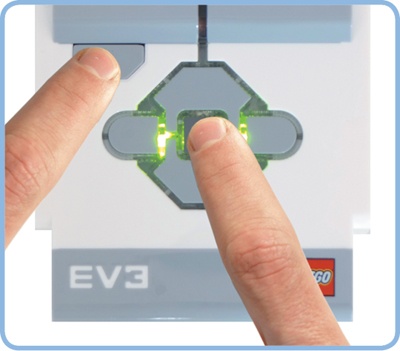
Figure A-9. To restart the EV3, hold the Back and Center buttons until the brick status light turns off.
If your EV3 brick fails to start or if you see the brick status light blink red only briefly, replace the batteries with fresh ones and try updating the firmware, as discussed in the next section.
If the software prompts you to update the EV3’s firmware, you can do so by going to Tools > Firmware Update. Connect the EV3 to the computer with the USB cable, choose the latest firmware version from the list, and click Download. The EV3 brick should automatically go into Update mode and display “Updating..” on the EV3 screen. When the two progress bars on the computer screen complete after a few minutes, the EV3 should restart automatically, and the process will be complete.
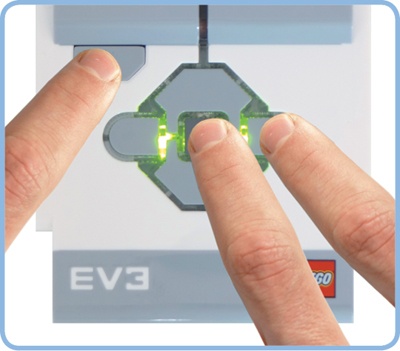
If the software fails to put the EV3 brick in Update mode, you can do this manually by pressing the Back, Center, and Right buttons simultaneously until the brick status light turns off, as shown in Figure A-10. Then release only the Back button. As soon as you see “Updating..” on the EV3 screen, you can release the other buttons, too. Now that the EV3 is in Update mode, plug in the USB connection again and retry updating the firmware.
When you send a program to the EV3 brick, it’s saved in temporary memory. The EV3 saves files and settings to permanent storage only when you turn off the EV3 brick. (This is why shutting down the EV3 takes a while.)
If you restart the EV3 without shutting down first, or if you remove the batteries while the EV3 is on, you’ll lose all files and settings that changed since the EV3 brick was last turned on because the EV3 won’t have had a chance to store them permanently. In fact, if you remove the batteries during shutdown (when the EV3 is busy saving files), you may lose older files, too.
While this can be frustrating, it’s not usually a critical problem because you should have a copy of the source code on your computer. However, you can avoid this type of data loss by adding a microSD card to the EV3, as shown in Figure A-11. Projects will be saved to the card automatically each time you download a project to your robot; you shouldn’t need to take any additional steps. The programs should stay on the card even if you restart the EV3 or update its firmware.
If you use a microSD card, you’ll find your projects in the SD_Card folder on the File Navigation tab of the EV3 brick. Even large programs are just a few kilobytes in size, so a small microSD card should provide plenty of storage.

Instead of using the supplied USB cable, you can connect your EV3 brick to the computer using either Bluetooth or Wi-Fi. Wireless transfers make programming a lot easier because you don’t have to repeatedly connect and disconnect the USB cable each time you download a program.
Once you’ve set up the wireless connection, transfer programs to the EV3 using the Download and Run button as you would with the USB cable.
The EV3 brick has built-in Bluetooth functionality that can be used for wireless programming, to communicate with another EV3 brick, or to connect with a smartphone or tablet for remote control. (Note that you can use only one of these features at a time.)
To use Bluetooth for wireless programming, you’ll need either a computer with built-in Bluetooth functionality or a compatible Bluetooth dongle that plugs into the USB port on a computer (see Figure A-12).
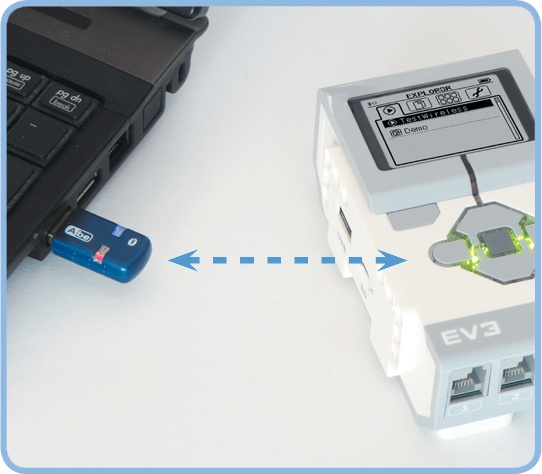
There are many compatible Bluetooth dongles, many of which cost less than $10. Generally, it’s not the dongle hardware but its drivers, in combination with the computer’s operating system, that will determine whether the dongle is compatible or not. In many cases, you’ll be able to simply plug the dongle into the computer, wait for the drivers to install automatically, launch the EV3 software, and follow the connection procedure in the next section. The drivers you’ll need will depend on your operating system and your Bluetooth dongle. Visit the companion website (http://ev3.robotsquare.com/) for links to recommended Bluetooth dongles.
If you’re experiencing problems with a computer’s built-in Bluetooth, try disabling it and using an external Bluetooth dongle instead.
Follow the next steps to set up a Bluetooth connection between the computer and the EV3 brick for the first time:
Plug a compatible Bluetooth dongle into a free USB port on the computer, or verify that built-in Bluetooth is enabled. Depending on the operating system, some drivers are automatically located and installed. Usually, it’s not necessary to install the additional drivers that come with your dongle.
Turn on the EV3 brick and connect it to the computer with the USB cable.
Activate Bluetooth on the EV3 by going to the Settings tab and selecting Bluetooth. Then, check Visibility and Bluetooth, and uncheck iPhone/iPad/iPod with the Center button, as shown in Figure A-13.
Figure A-13. Go to the Settings tab on the EV3 brick, choose Bluetooth, and configure the settings as shown. (The iPhone/iPad/iPod setting should be checked for remote control with iOS devices only; it should be unchecked when using Bluetooth for wireless programming with a computer or when using it for remote control with an Android device.)
In the EV3 software on the computer, go to the Available Bricks tab on the Hardware Page and click Refresh, as shown in Figure A-7. The search process should take about 30 seconds. When ready, the list of EV3 devices is updated with the EV3s that are available for a connection.
In the list of EV3 bricks, there should be a checkbox for each available connection type. Create the Bluetooth connection by checking the box under the Bluetooth symbol (
 ). If the checkbox cannot be checked, click Refresh again. If that doesn’t help, uncheck Bluetooth in the menu on the EV3 (see Figure A-13), check it again, and retry the connection procedure.

You can tell whether an EV3 has made a working Bluetooth connection by looking at the top left of the EV3 screen, which shows ![]() when connected and
when connected and ![]() when not connected to a computer. If successful, you can now unplug the USB cable and start downloading programs.
when not connected to a computer. If successful, you can now unplug the USB cable and start downloading programs.
The next time you launch the software, you should need only to follow steps 4 and 5 to make the Bluetooth connection, and you shouldn’t need the USB cable to configure the wireless connection.
If you didn’t connect a USB cable in step 2 to make the first connection, the EV3 brick will ask you to confirm the connection and to choose a password to secure it when you reach step 5. Once you’ve set the password, the EV3 software will prompt you to enter the same password. In turn, the EV3 will ask you to confirm once more, and the connection should be ready. It’s easiest if you stick with the default password (1234). If you use the USB cable to set up the Bluetooth connection, the software handles all of these security measures in the background.
You can add a Wi-Fi dongle to your EV3 brick so that it can connect to a wireless network, as shown in Figure A-14. When both the computer and the EV3 brick are connected to the same network, you can program your robot wirelessly. As of this writing, the EV3 brick supports only the NETGEAR WNA1100 N150 Wi-Fi USB Adapter.

For the next steps, I’ll assume that you already have a wireless network and that it’s protected with a WPA2 password. I’ll also assume that you know the network’s name (SSID) and the password and that the computer is connected to this network. Follow these steps to establish the Wi-Fi connection:
Turn on the EV3 brick, and plug the compatible Wi-Fi dongle into the USB host port on the EV3 brick (see Figure A-14). Also, connect the EV3 brick to the computer using the USB cable (not shown in figure).
On the Brick Information tab of the Hardware Page, click Open Wireless (Wi-Fi) Setup (see Figure A-6). The EV3 brick should turn on Wi-Fi automatically and begin searching for wireless networks. When it’s ready, choose your network from the list that appears on the computer screen and then click Connect. If you get an error message saying “No Wi-Fi Adapter found attached to the Brick,” the EV3 brick didn’t detect a (compatible) Wi-Fi dongle.
Enter the network’s password on the dialog that appears, and click Connect. If successful, the symbol on the top left of the EV3 screen should change from
 (Wi-Fi is on) to
  (Wi-Fi is connected). The EV3 brick is now connected to the router in your network but not yet to the computer.
Go to the Available Bricks tab on the Hardware Page, and click Refresh, as shown in Figure A-7.
There should be a checkbox for each available connection type. Create the Wi-Fi connection by checking the Wi-Fi checkbox (
 ). If it becomes checked, the connection is successful and you can unplug the USB cable. If the checkbox cannot be checked, try disconnecting the computer from the network, reconnecting it, and clicking Refresh again.
If you would like to program your robot wirelessly, I recommend that you use Bluetooth. First, you won’t need a Wi-Fi network, nor will you need to configure its settings. Second, there’s only one supported Wi-Fi dongle, and it takes up a lot of space in your robot. (By contrast, the EV3 already has Bluetooth built in.) Finally, Bluetooth requires just a few clicks to set up after the first time.
On the other hand, because the EV3 brick is actually a small Linux computer, Wi-Fi can be used to access more advanced features of the EV3 brick that can’t be used with the standard EV3 software. However, unless you plan to learn how to use these features, you’re probably better off using Bluetooth.
I hope that this short appendix has helped you find a solution to your problem. Of course, only a few problems and solutions are listed here, and you may have other questions relating to one of the building or programming instructions in this book. Visit http://ev3.robotsquare.com/ for links to other helpful resources, including forums where you can ask questions about LEGO MINDSTORMS EV3 in general.