Instead of using the EV3 software to create programs on a computer, you can create basic programs on the EV3 brick itself using the Brick Program application. This technique is useful for testing your robot if you’re not near a computer. Sometimes it’s sufficient to test your design with the IR Control app and to monitor sensors using Port View, but the Brick Program app can be used to create programs that involve both motors and sensors. For example, to test a mechanism with a Touch Sensor, such as the claws of the SNATCH3R, you can make a motor turn until the Touch Sensor becomes pressed.
This appendix will show you how to create On Brick programs as well as how to import them into the EV3 software so that you can continue working on them on a computer.
Note
Creating On Brick programs is similar to creating EV3 programs on a computer. You enter commands differently, but the underlying principles are the same. For this appendix, I’ll assume you’ve already mastered the techniques covered in Chapter 1–Chapter 6, and I’ll show you how you can use the same techniques to create an On Brick program.
You can start working on a new On Brick program by selecting Brick Program on the Brick Apps tab of the EV3 brick, as shown in Figure B-1. On Brick programs always consist of one Loop block, and you can place a series of Action blocks and Wait blocks inside it.

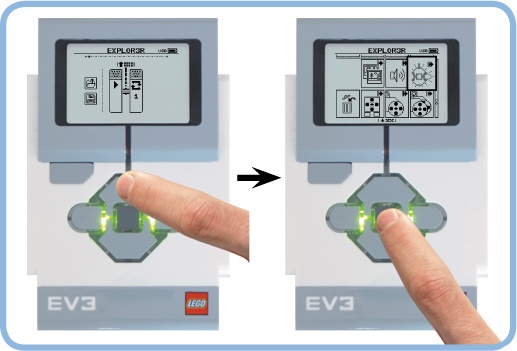
You navigate through a program using the Left and Right buttons, and the selected item is always positioned in the middle of the screen. To place a new block in the loop, navigate to an empty spot between two blocks and press the Up button (see Figure B-2). Next, select a block of your choice and place it in the loop with the Center button. Alternatively, cancel the selection with the Back button. For example, choose the Brick Status Light block to make the EV3 brick status light turn orange.
You can place up to 16 blocks in the loop.
You can replace a block in your program with another one by selecting it (place it at the center of your screen with the Left and Right buttons) and pressing the Up button. Then, choose the new block with the Center button, or cancel the change with the Back button.
You can delete a block from your program by selecting it, pressing the Up button, and selecting the trash bin, as shown in Figure B-3.
Each block has one configurable setting. To change it, select the block you want to change and press the Center button, as shown in Figure B-4. Then, use the Up and Down buttons to change the setting. Confirm with the Center button or cancel with the Back button.


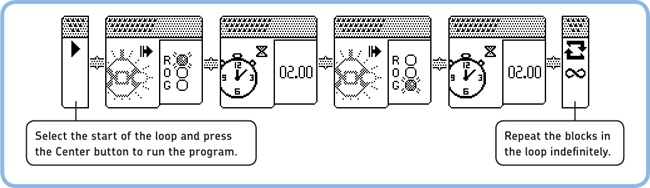
Now create the OnBrickStatus program (see Figure B-5). Place two Brick Status Light blocks and two Wait blocks in the loop. Then, configure the program to change the light color to red, wait 2 seconds, change the light color to green, and wait 2 more seconds. Finally, change the setting of the Loop block so that it keeps repeating the blocks within it.
Now run the program by selecting the left part of the Loop block and pressing the Center button, as shown in Figure B-5. The brick status light should blink red for 2 seconds, blink green for 2 seconds, and continue alternating back and forth. You can abort the running program by pressing the Back button.
Select the Save symbol to save your current program, as shown in Figure B-1. On the screen, you’ll see a keyboard that you can control using the EV3 buttons. Select backspace (![]() ) to remove the current name, enter OnBrickStatus by choosing letters with the Center button, and then select the check mark.
) to remove the current name, enter OnBrickStatus by choosing letters with the Center button, and then select the check mark.
To open and edit a previously saved On Brick program, select the open symbol and choose a program from the list that appears. If you just want to run your saved program, you can find it in the BrkProg_SAVE folder on the File Navigation tab of the EV3 brick.
If you close the Brick Program app using the Back button, you’ll be prompted to save the program. Choose X to close without saving, or select the check mark to choose a name and save it.
Table B-1 shows which blocks are available for your On Brick programs, alongside the equivalent programming block in the EV3 software. You can choose from a selection of Action blocks or a Wait block in one of several modes. Use the page numbers in the table to find more information about each block or sensor mode.
The Brick Program app allows you to change just one setting on each block. The equivalent setting on the block in the EV3 software is marked in blue. Other settings, such as the sensor or motor ports, can’t be changed. For example, if you want to use the Touch Sensor in an On Brick program, it must be plugged into input port 1.
The numeric settings on the Display and Sound blocks correspond to different image and sound files, respectively. You can find which file corresponds to each number in the brick program app assets list in Figure 5-12 of the EV3 user guide. (Click User Guide in the EV3 Software Lobby, as shown in Figure 3-2.)
You can use these blocks to create programs similar to those you made throughout Chapter 4–Chapter 6. For example, you can create a program that makes a Large Motor turn for 1 second each time you press the Touch Sensor. Attach the Touch Sensor to input port 1, attach a Large Motor to output port D, and create and run the OnBrickTouch program (see Figure B-6).
Note that this program makes the motor move for 1 second by switching the motor on, waiting 1 second, and then setting the motor speed to 0.
You can import a saved On Brick program into an EV3 software project by connecting the EV3 brick to the computer and clicking Tools > Import Brick Program, as shown in Figure B-7. Choose the program on the dialog that appears, and click Import. The program should now appear on its own tab inside your current project.
Table B-1. the blocks available in the brick program app and the equivalent blocks in the EV3 software
Page | Wait Blocks (mode) | Page | |||||
|---|---|---|---|---|---|---|---|
Medium Motor | 46 | Time | 49 | ||||
Large Motor | 46 | Brick Buttons | 98 | ||||
Move Steering | 35 | Motor Rotation Degrees | 99 | ||||
Display | 42 | Color Sensor Color | 78 | ||||
Sound | 40 | Color Sensor Reflected Light Intensity | 81 | ||||
Brick Status Light | 44 | Infrared Sensor Proximity | 90 | ||||
Infrared Sensor Remote | 92 | ||||||
Touch Sensor State | 66 | ||||||
Gyro Sensor[a] Angle | n/a | ||||||
Temperature Sensor[a] Celsius | n/a | ||||||
Ultrasonic Sensor[a] Distance Centimeters | n/a | ||||||
[a] These sensors are not included in the EV3 home set (#31313). For more information about these sensors, visit http://ev3.robotsquare.com/. | |||||||


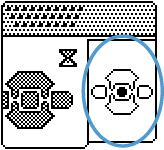


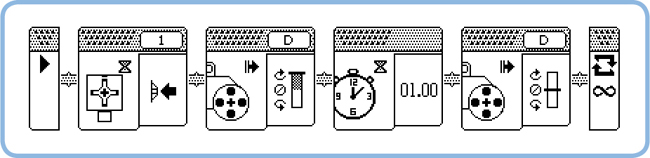
Figure B-6. The OnBrickTouch program makes the Large Motor on port D move for 1 second each time you press the Touch Sensor.

Once your program is imported into the EV3 software, you can edit it as you would any other EV3 program. As you can see, the blocks of the OnBrickTouch program have turned into the equivalent set of blocks in the EV3 computer software, according to Table B-1. When you run this program, it should behave just like the program you made on the EV3 brick.
Once imported into the EV3 software, a copy of the original On Brick program remains on the EV3 brick, but if you modify the program in the computer software, you can’t turn it back into an On Brick program.
Note
There is one exception to Table B-1: In an On Brick program, a Wait block in Motor Rotations – Degrees mode always resets the Rotation Sensor to 0 before it runs, but once the program is imported, it will no longer do this. You can reset the Rotation Sensor in your program if necessary with an additional block (see Figure 9-4).
You can create basic programs on the EV3 brick without a computer using the Brick Program app. Doing so can be a useful way to test a robot when you’re away from a computer. On Brick programs always consist of a series of Action blocks and Wait blocks placed in one Loop block. Once you’ve imported an On Brick program into the EV3 software, you can edit and run it as you would a normal EV3 program.