
5
waiting, repeating, and other programming techniques
The previous chapter taught you how to program your robot to perform a variety of actions, such as moving. In this chapter, you’ll learn several programming techniques that will allow you to do more with the blocks you used earlier, including how to pause a program with Wait blocks, how to repeat a set of actions with Loop blocks, how to run multiple blocks simultaneously, and even how to make your own so-called My Blocks.
the wait block
So far you’ve been using three different programming blocks to make the robot move, play sounds, or display something on its screen. Now you’ll meet a block that does nothing more than pause the program for a given amount of time. This block is the Wait block, as shown in Figure 5-1.

Figure 5-1: The Wait block and its Configuration Panel
understanding the wait block settings
You use the Wait block just like any other programming block. You place it on the Work Area and then configure its settings. The block can operate in two modes, as specified in the Control box of the Configuration Panel: Sensor or Time. You’ll use only the Time option in this chapter.
When set to use the Time mode, the Wait block simply pauses the program for a certain amount time, such as five seconds. Once the time has elapsed, the program continues with the next programming block. To enter an amount of time for the block to wait, enter the time in the Seconds box as either an integer (such as 14) or a decimal (such as 0.5).
seeing the wait block in action
Why would you want to use a block that doesn’t perform any actions? Here’s an example of the Wait block in action. Create the Explorer-Wait program according to the instructions shown in Figure 5-2, and run it. This program will display two text lines on the NXT screen.

Figure 5-2: The configuration of the blocks in the Explorer-Wait program
understanding the explorer-wait program
When you run the Explorer-Wait program, the Wait blocks give you time to read what is displayed on the NXT screen. Had you not placed the Wait blocks in the program, the program would end immediately after the text was displayed on the NXT screen, making it impossible to read this text.
more on the move block: moving unlimited
The Move block comes in handy when you want to make the Explorer drive around, and you’ve used it in many of your programs so far. However, there is an important setting on its Configuration Panel that you have not used yet.
the unlimited option
The Move block’s Duration box allows you to set how long the robot’s motors will run in seconds, degrees, or rotations. Once the robot has moved for the specified duration, the motors stop, and the next block in the program runs. When the Unlimited option is selected in the Duration box, the motors are simply switched on, and they run indefinitely. Once a Move block (defined as Duration Unlimited) has switched on the motors (which itself takes almost no time), the program moves on to the next block in the program while the motors are still turning.
Difficulty: Hard
Create a program that makes the NXT display an exploding bomb after three seconds. The program should count down from 3 to 0, while displaying the remaining time on the screen. Create your program so that the display looks like Figure 5-3 after three seconds. For more fun, use Sound blocks to make the robot say how much time is left and have it shout when the bomb explodes.
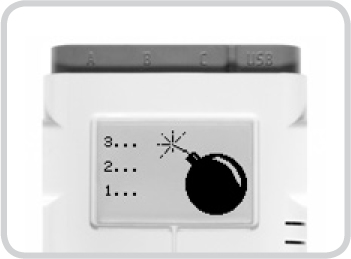
Figure 5-3: The appearance of the NXT screen in Discovery #12
To stop the robot, use another Move block set to stop the motors (by selecting the stop sign in the Direction box). The robot will also stop moving once the program has finished running all of its blocks. You can use the Unlimited option to create programs that allow your robot to make sounds while it moves, as you’ll see in the following example program.
the duration unlimited setting in action
The next program, named Explorer-Unlimited, will help you understand exactly how the Unlimited setting works. This program will allow your robot to make a sound while it drives. Create the program as shown in Figure 5-4.
NOTE When configuring blocks in a program, you may find that you can’t access some of the boxes on the Configuration Panel. This occurs when a setting is grayed out, meaning it’s not one that you can use. For example, you cannot set the Steering in block d in this program because this block makes the robot stop, and you cannot steer while you’re braking. When a setting in one of these images is grayed out, just ignore it. It’s grayed out for a reason.
understanding the explorer-unlimited program
When you run the Explorer-Unlimited program, a Move block (block a) switches on the motors. Because block a’s Duration is set to Unlimited, the program instantly moves on to the next block, the Sound block (b). After two seconds, the sound stops, and a Wait block (c) makes the program wait three more seconds before moving on to the next block. Finally, another Move block (d) stops the motors, and a Sound block (e) triggers the NXT to play a tone.
problems with moving unlimited
When creating a program with just one Move block with the Duration set to Unlimited, you might think that the robot would go forward indefinitely, but that’s not the case. This block only switches on the motors, and the program ends because it has finished running all of its blocks; and when the program ends, the motors stop. (You’ll learn how to create programs that run indefinitely in the next section.)
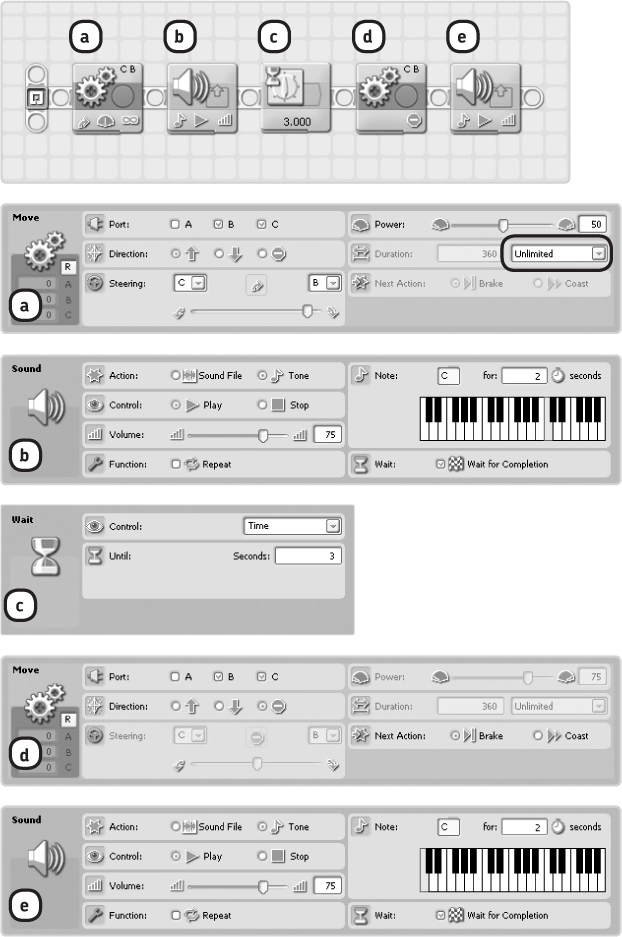
Figure 5-4: The configuration of the blocks in the Explorer-Unlimited program
the loop block
Imagine you are walking on a square-shaped line, like the one shown in Figure 5-5. As you walk, you follow a certain pattern over and over again: Go straight, then go right, go straight, go right, and so on.

Figure 5-5: The Explorer moving in a square
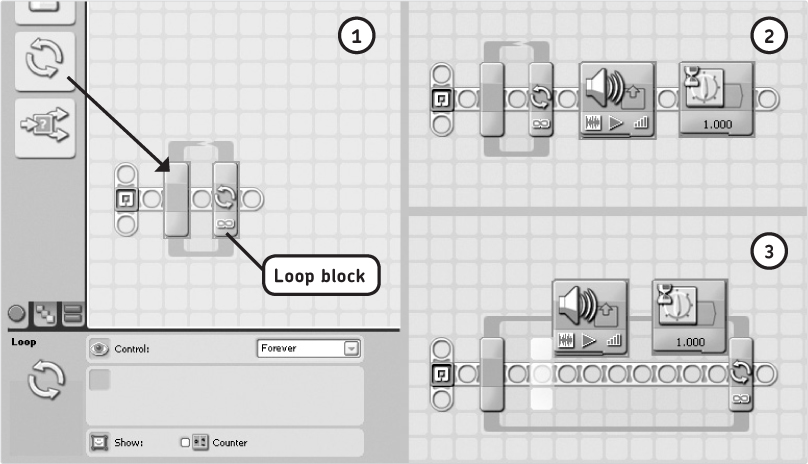
Figure 5-6: The Loop block and its Configuration Panel (1). To place blocks inside a Loop block, first place all required blocks on the Work Area (2). Next, select the blocks you want to move, and drag them into the loop (3). The Loop block should automatically enlarge to create space for the blocks as you try to drag them into it. Also, when you drag a Loop block around, its contents should remain inside it.
To create this sort of behavior with your robot, you could make your robot drive around with Move blocks so that it follows the same pattern. You could make it go straight and then right and use a Move block for each movement. To make your robot trace one complete square and return to the starting position, you would have to use each of these two blocks four times, for a total of eight blocks.
Rather than use eight Move blocks to create this program, it’s much easier to use the Loop block, which lets you repeat sequences of blocks that are placed within it. Loop blocks are especially useful when you want to repeat certain actions many times. For example, to have your robot drive in a square, you would place the Move blocks to go forward and go right inside the Loop block, which would then run each block’s action four times. You’ll create just such a program in “Seeing the Loop Block in Action” on page 47.
using the loop block
Figure 5-6 shows the Loop block with its Configuration Panel, as well as how to place blocks inside a loop.
The flow of this program from beginning (left side) to end (right side) is slightly different when using Loop blocks, as shown in Figure 5-7.
understanding the loop block settings
The settings on the Loop block’s Configuration Panel control how many times the blocks inside the loop should be repeated. In the Control box, you can configure the block to repeat a set number of times (Count), to keep repeating for a certain amount of time (Time), or to repeat indefinitely (Forever).
* If you select Count, you can enter the number of repetitions in the Count box.
* If you select Time, you can enter the amount of time that the block should loop in the Seconds box.
* When Forever is selected, the Loop block keeps repeating the blocks placed inside indefinitely, unless you end the program by pressing the Exit button on the NXT brick. The Control box also offers settings for Sensor and Logic, which you’ll learn about later in this book. You’ll learn how to configure the Show setting on the Configuration Panel later as well.
seeing the loop block in action
You’ll now create the program that I discussed earlier (Figure 5-5). This program will have the Explorer move in a square-shaped pattern. Create the Explorer-Loop program as shown in Figure 5-8.
NOTE If your robot doesn’t make 90-degree turns when steering, try adjusting the number of degrees in Move block c, similar to what you did in Discovery #2 in Chapter 4.
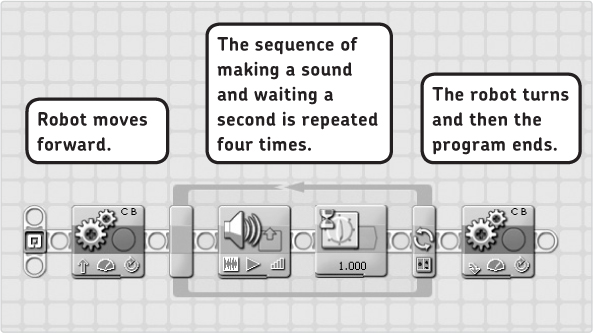
Figure 5-7: A program with a Loop block that loops four times. Once the Loop block has run the two blocks inside it four times (as specified by its Configuration Panel), the program continues with the next block, a Move block in this case.

Figure 5-8: The configuration of the blocks in the Explorer-Loop program
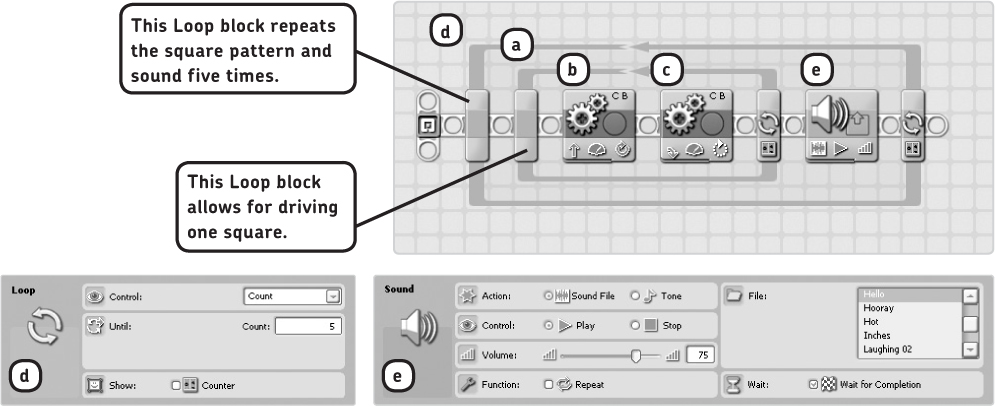
Figure 5-9: The Explorer-Square program shows you how you can have one Loop block inside another one. The inner Loop block makes the Explorer drive through a shaped pattern, and the outer loop repeats this behavior, as well as making a sound, five times.
using loop blocks within loop blocks
The structure of the Loop block with the two Move blocks in the Explorer-Loop program (Figure 5-8) makes the Explorer drive in a square. You can use a Loop block to repeat the square driving behavior so that the robot drives through, say, five complete square patterns. You’ll configure the block to loop five times, and you’ll drag the blocks from the previous program into it, as shown in Figure 5-9. You’ll also add a Sound block to make Explorer say something after driving each square.
making your own blocks: the my block
In addition to using ready-made blocks, you can make your own blocks to meet specific needs. Blocks that you create are called My Blocks and consist of a set of programming blocks. My Blocks are especially useful when you want to use a specific set of blocks in your program more than once. For example, you could create a My Block to make the Explorer drive in a square-shaped pattern whenever you use that block.
Difficulty: Easy
Create a program to allow the Explorer to constantly move back and forth in front of your bedroom door, as if guarding it (see Figure 5-10). Use one Loop block configured to loop indefinitely (set to Forever), a Move block to move forward, and another Move block to turn around.

Figure 5-10: The path for the Explorer in Discovery #13
Difficulty: Medium
You’ve created a program to drive in square-shaped patterns. How could you modify the Explorer-Loop program to drive in triangle-shaped patterns or in a six-sided figure? (Be sure to repeat each figure five times.)
Also, using My Blocks can help you keep your programs look organized, because you’ll see fewer blocks on the screen. You’ll see how to create and use My Blocks as you read on.
creating my blocks
To demonstrate the My Block functionality, you’ll create a program that makes the Explorer drive in a square, turn around, make a sound, and then drive another square. Because Explorer drives the square-shaped figure twice, you’ll create a My Block to perform this action, as shown in Figures 5-11 through 5-13. Once you’ve created your My Block, you can place it in a program whenever you want Explorer to drive in a square. You’ll use the Explorer-Loop program as a foundation for this experiment.
NOTE If you didn’t save the Explorer-Loop program earlier, create it again by following the directions in Figure 5-8, or download it from the companion website.
1. Select the blocks that you want to turn into a My Block, and click the Create My Block button, as shown in Figure 5-11.

Figure 5-11: Selecting the blocks to be turned into a My Block
2. Enter a name for your My Block in the Block Name box, such as Square, as shown in Figure 5-12. Use the Block Description area to describe your block so that you’ll remember how it works if you want to reuse it later, and then click Next.
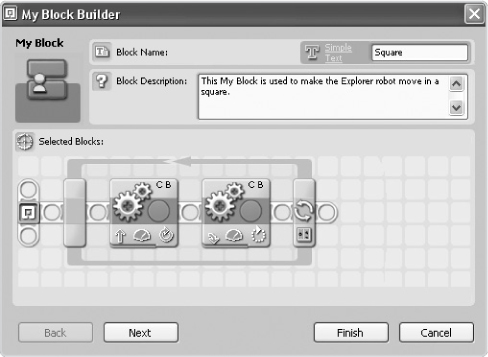
Figure 5-12: Enter a name and description for your My Block.
3. Drag icons to your block from the Icon Builder to give it a unique look (as shown in Figure 5-13), and then click Finish.
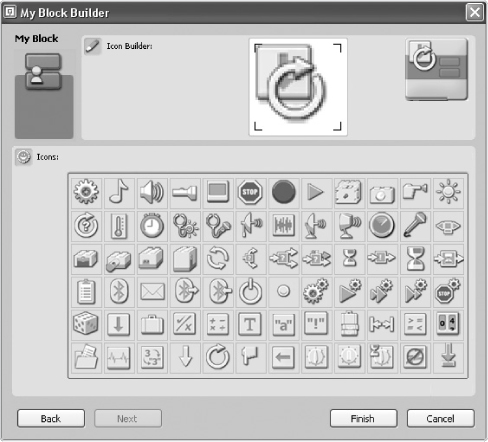
Figure 5-13: Adding icons to your My Block
using my blocks in programs
Once you’ve finished creating your My Block, it should appear on the Work Area and in the Custom Palette, which you can open as shown in Figure 5-14. (The figure also shows the Explorer-MyBlock program.)

Figure 5-14: The configuration of the blocks in the Explorer-MyBlock program. You can find My Blocks on the Custom Palette. (The My Block’s Configuration Panels are not shown because there are no settings to change on these panels.)
When you run the program, the robot should first move in a square (controlled by the square My Block) and then turn, make a sound, and drive another square.
editing my blocks
You can edit My Blocks after you create them. To do so, double-click a My Block on the Work Area to reveal its contents, and then edit it as you’d like. When you’re finished, click Save, and return to the program that uses the My Block.
To change the icons that you added to your block, select the My Block on the Work Area, and select Edit▸Edit My Block Icon on the Toolbar.
parallel sequences of blocks
All the blocks that you’ve used so far are executed linearly in the order in which they were placed on the Sequence Beam. However, the NXT can execute multiple blocks at the same time, in parallel, using a Parallel Sequence Beam, as shown in Figure 5-15.
using parallel sequences in a program
To learn how Parallel Sequences work, you’ll create the Explorer-Parallel program that makes the robot drive in circles as it makes sounds. Create the program shown in Figure 5-16.

Figure 5-15: Blocks on the Main Sequence Beam and a Parallel Sequence Beam are run at the same time. Note that the Wait Block here causes only the sequence of blocks it appears in to pause; the blocks on the Parallel Sequence are not affected by the Wait Block.

Figure 5-16: The configuration of the Explorer-Parallel program. Place the blocks required for this program on the Work Area (1). Next, connect the two Sequence Beams as shown in the figure (2).
further exploration
Now that you’ve successfully gone through the first part of this book, you have a solid knowledge of several essential programming techniques. In this chapter, you learned how to use Wait and Loop blocks and how to work with My Blocks as well as parallel sequences of blocks.
In the next part of this book, you’ll create robots that can interact with their environments via sensors. But before you do, practice a bit with what you’ve learned in this chapter by solving the following discoveries.
Difficulty: Medium
Create a program that makes the Explorer drive in the pattern shown in Figure 5-17 while making different sounds.
HINT If you look carefully, you’ll see that you can divide the track into four equal parts, so you have to configure a set of Move blocks for only one of these parts. Next, you’ll place these blocks in a Loop block configured to loop four times.
Figure 5-17: The drive track for Discovery #18
In Building Discovery #1 (in Chapter 4), you found instructions to control a third NXT motor. This time you are challenged to use the extra motor to create a waving hand for your Explorer. Use other LEGO parts to further decorate your robot, and turn it into your own Mr. Explorer. Make him repeatedly wave his hand and play sounds like “Good morning!” at the same time.