
15
CCC: the compact chimney climber
Many NXT robots move on wheels, some move on legs, and still others do something while remaining in place. But the Compact Chimney Climber (CCC) that you’ll build in this chapter is different: It moves vertically. This robot climbs between two walls, as if up a chimney, as shown in Figure 15-1. When it reaches the top of the “chimney,” it safely returns to the ground.
NOTE This is the last robot you’ll build—not because it’s the most difficult but because the CCC is the trickiest one to get to work. Beware! If done incorrectly, this robot can damage your LEGO.
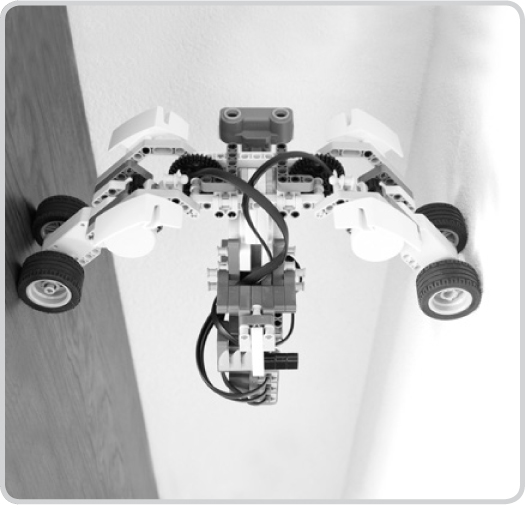
Figure 15-1: The Compact Chimney Climber moves vertically between two solid objects, such as a bookcase and a wall.
understanding the climbing technique
The CCC consists of two arms that extend to touch the walls it will climb so that the robot can move up and down by turning the wheels on its arms (see Figure 15-1). This climbing technique isn’t very complicated and it works fairly well, but a simple robot with this technique will eventually lose contact with the wall and fall down. To prevent the robot from crashing to the ground, you’ll need to keep it balanced as it moves, on both the x- and y-axes, as shown in Figure 15-2.
staying balanced on the x-axis
The CCC robot balances on the x-axis automatically by design. The main weight of the robot, the NXT with its batteries, is positioned below the axis, causing the robot to behave like the swing shown in Figure 15-3. If you were to try to turn the axis in this figure with your hands, you’d notice that gravity tries to stop you. Something similar happens when the climber tries to rotate along the x-axis: Gravity keeps it upright.

Figure 15-2: To be able to climb, the CCC has to balance on two axes. (Only one wall is shown here for better visibility.) If balance isn’t maintained, the robot will eventually tilt in one of the directions indicated by the gray arrows and lose contact with the walls.

Figure 15-3: A simplified version of the climber shows how balance is maintained on the x-axis. Build this or a similar construction with the pieces in your NXT set. If you try to turn the axis (gray arrow), gravity will try to keep the weight below the axis (black arrow).
balancing on the y-axis
The CCC robot climbs by turning the wheels on both of its arms (the Wheel motors) at the same speed, as if the robot were driving up the walls. While climbing, the wheels on one side of the robot may slip, or one may grip the wall more than the other. When this happens, one side of the robot climbs faster than the other, which causes the robot to tilt along the y-axis, as shown on the left of Figure 15-4.
detecting balance errors
It is easy for us humans to see when the robot starts to become unstable on the y-axis, but the robot can also catch this error by using the Color Sensor as a balance detector, as shown in Figure 15-4. The sensor is tightly connected to the robot, but a swing in front of it with different colored parts moves freely; because of gravity, it always points downward. Because the sensor tilts along with the robot and the swing does not, the sensor sees different colors depending on how the robot is titled.
solving balance errors
The robot easily corrects balance errors by temporarily stopping the Wheel motor of the arm positioned higher than the other one, which allows the lower arm to keep up. For instance, if the robot sees black, the wheels on the right side should stop, as shown on the left of Figure 15-4. Once the wheels on both arms are at the same altitude (the sensor sees white), they should move at the same speed, allowing the robot to continue up the chimney (shown on the right of Figure 15-4). This same control technique is used when the robot goes down, except that the opposite wheel is stopped when a balance error is detected.
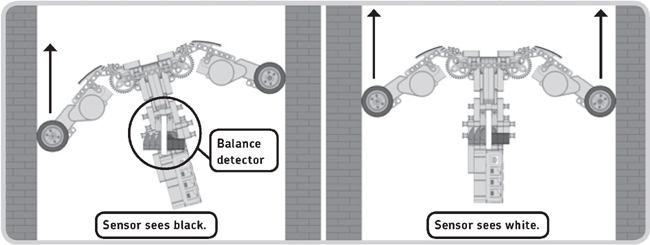
Figure 15-4: Detecting and correcting balance errors on the y-axis
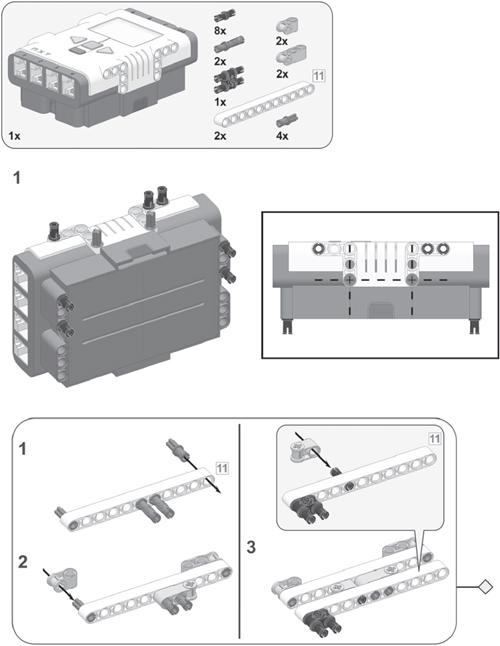
building the compact chimney climber
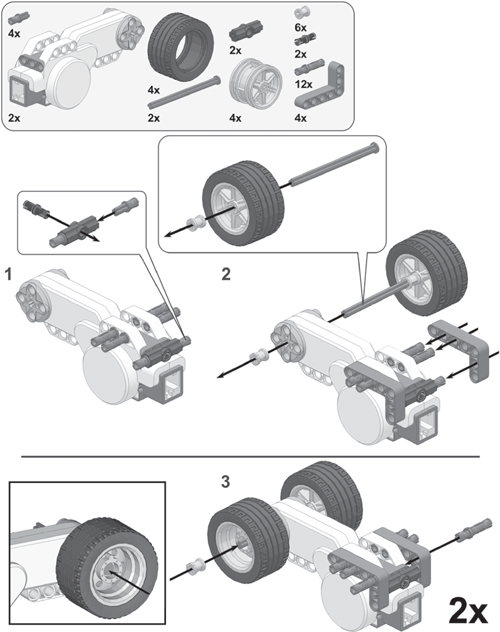
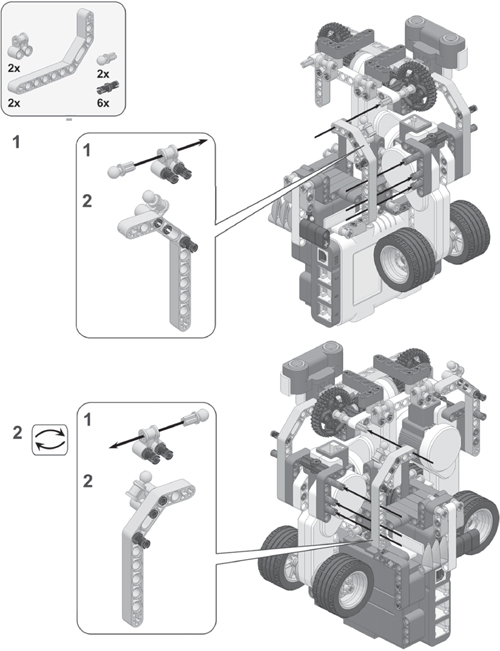
Now build this robot by following the instructions on the next pages. First select the required pieces for the robot, as shown in Figure 15-5.
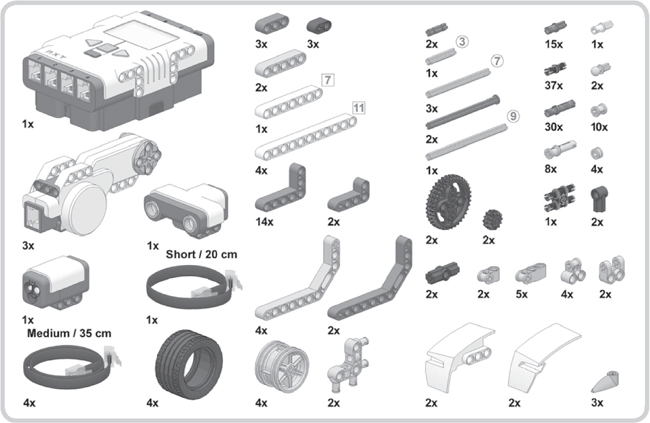
Figure 15-5: Required pieces for the Compact Chimney Climber


preparing a chimney
Before programming this robot, you’ll need to find an appropriate “chimney” for the robot to climb, such as the crevasse made between a wall and the side of a bookcase, as shown in Figure 15-6. Whatever your choice, your chimney’s walls should be as follows:
* Solid and unable to move while the robot climbs. Perhaps try the edge of a desk or strong, heavy moving boxes.
* Perfectly parallel to each other.
* About 32 cm (12.5 inches) apart. A slightly smaller (30 cm) or wider (35 cm) gap is fine too. Adjust the width of the gap by moving one of the two walls if possible.

Figure 15-6: An example of a chimney suitable for your CCC
Even if your chimney meets these requirements, be very careful when using the CCC robot because it may still fall. When first testing your robot, make sure to guide it with your hands so that you can instantly grab it if it starts to become unstable. For extra security, put a pillow at the bottom of the chimney just after the robot lifts off the floor.
The program you’ll create for this robot will make CCC move up until it spots the ceiling. If one or both walls do not reach the ceiling, your robot won’t be able to see it. In that case, keep your hand in front of the sensor to tell the robot to go down again. And if you damage any LEGO pieces, well, you’ve been warned!
programming the compact chimney climber
Now that you’ve built the CCC and found an appropriate chimney for it to climb, you’re ready to program it. Your CCC program will allow the robot to climb the chimney toward the ceiling and return to its starting position. “Further Exploration” on page 283 will give you some ideas to expand the program.
step 1: extending the arms
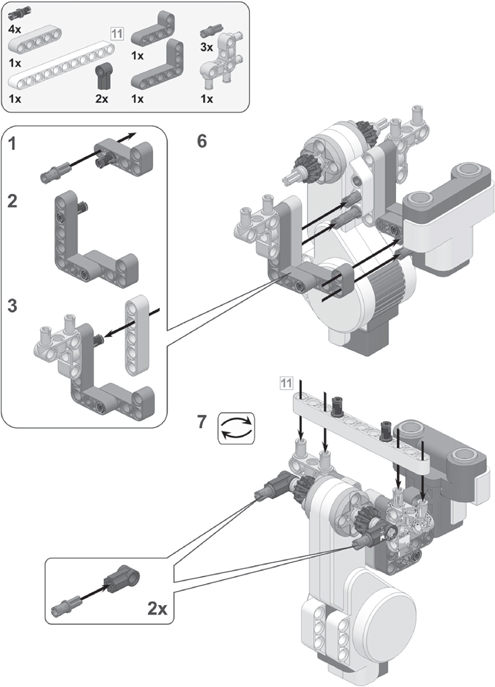
First, the program switches on the Wheel motors B and C. Next, the arms are extended to touch the walls of the chimney by rotating the motor on port A inside the climber backward. As the robot climbs, the NXT keeps applying power to this motor so that the robot’s wheels are pressed against the walls, giving them more grip. Configure the blocks that perform these actions as shown in Figure 15-7.
NOTE Unless specified otherwise in the figures, all the Motor blocks in the CCC program have the following configurations: Motor Power: Checked; Duration: Unlimited. Also, the blocks in steps 1 and 2 are set to make the motor turn backward, and those in step 3 make a motor run forward.
step 2: climbing and staying balanced
Recall that the CCC robot uses the Color Sensor to detect balance errors on the y-axis (see Figure 15-4). While climbing, the robot repeatedly polls this sensor and controls the Wheel motors accordingly to maintain balance until the Ultrasonic Sensor detects the top of your chimney, as shown in Figure 15-8.
NOTE When the Color Sensor sees something red, it’s actually detecting the orange parts of the swing that balances in front of the sensor.
Follow Figure 15-9 to turn this programming structure into real programming blocks.

Figure 15-7: The configuration of the blocks that switch on the Wheel motors and extend the arms

Figure 15-8: An overview of the control technique used to keep the robot balanced. If the sensor reads white, the robot is correctly balanced, so none of the Wheel motors should be stopped.

Figure 15-9: The configuration of the blocks that keep the robot balanced as it climbs
step 3: going down, staying balanced, and stopping
Once at the top, the robot stops moving, plays a sound, and starts going down. The blocks that control the robot to go down are similar to the ones you used to climb the chimney, except that the Motor blocks now make the robot move in the opposite direction. Therefore, you can simply copy the previous Loop block and its contents, place it as shown in Figure 15-10, and adjust the settings of each block as indicated.
When you run the program, you’ll notice that when going down, the motors spin more slowly and the opposite motor is stopped when a balance error is detected (in other words, black now stops motor C). The Loop block repeats the blocks in it until the Rotation Sensor in motor C reports value 0, indicating that the robot has reached its starting position, at which point the program ends, and the motors stop moving. Because the motor on port A is no longer keeping the arms outstretched, they are released from the wall.
troubleshooting the CCC
Running the program for this robot requires a bit more attention than the other programs you’ve made so far. Before you run it, make sure that the robot is positioned in the middle of the chimney as shown in Figure 15-6. When starting the program for the first time, carefully follow the robot on its way up with your hands to make sure it won’t fall! If you’re having problems making the robot work, see the following troubleshooting tips, or visit the companion website for more help:
* There may be something wrong with your chimney. Be sure to check the guidelines in “Preparing a Chimney” on page 280.
* If the robot becomes unstable because it moves too fast or too slow, you might need to adjust the power levels in the Motor blocks that control the Wheel motors. Also, try running the program with new or fully charged batteries.
* Before starting the program, both of the robot’s arms should point straight to the ground (Figure 15-6). If only one arm points straight down while, for example, the other sticks out to the right, carefully review building steps 8 and 9 on page 273 to fix the problem. You might also be able to fix this simply by applying some force on the arm in question (you’ll hear a clicking sound), but don’t do this too often.
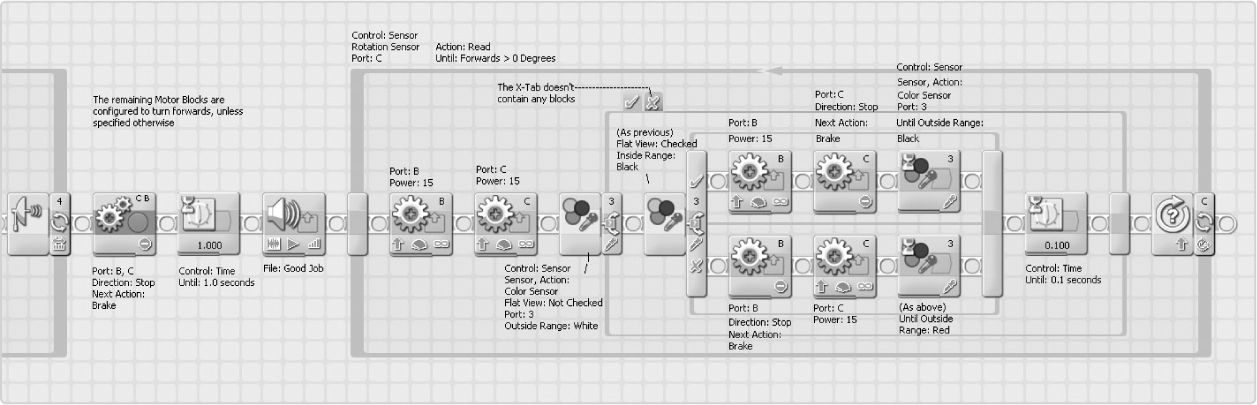
Figure 15-10: the configuration of the blocks that are run when the robot spots the ceiling. the robot pauses for a second, plays a sound, and returns to the ground.
further exploration
You’ve reached the end of this book. Congratulations! I hope you enjoyed learning the ins and outs of the LEGO MINDSTORMS NXT 2.0 robotics kit, as well as building and programming the robots in this book. But the fun doesn’t end here. You’re now ready to start creating robots on your own and share your ideas with the world. Whether your robots drive, shoot, walk, grab, sort, or climb, the possibilities are endless with LEGO MINDSTORMS NXT!
But before you close this book, try solving the following two discoveries that will let you do more with the Compact Chimney Climber and the knowledge you gained in this chapter.