
4
working with programming blocks: move, sound, and display
In Chapter 3, you learned the basics of how to create a new program and transfer it to the Explorer robot. You also learned that the programs you make are collections of programming blocks, which are instructions that tell the robot what to do. In this chapter, you’ll learn more about these programming blocks and how to use them to make working programs.
You’ll begin by learning more about how to make the Explorer move as you explore NXT programming in more detail. You’ll also learn how to make the robot “talk” and display text or images on the NXT screen. As you practice with the sample programs in this chapter, you’ll be challenged to solve some programming puzzles by yourself!
what do programming blocks do?
NXT programs consist of a series of programming blocks, each of which is used to make the robot do something specific, such as move forward for one second. All the blocks are put on the Sequence Beam, as shown in Figure 4-1.
The NXT program runs the blocks on the Sequence Beam one by one, beginning with the first block. Once the first block finishes running, the program continues with the second block, and so on. Once the last block finishes running, the program ends.
using blocks to create programs
As you learned in Chapter 3, you add a block to a program by selecting the block from the Programming Palette and placing it on the Work Area. Once you’ve done that, you can modify the block’s actions in the Configuration Panel. For example, you can configure a block to make the robot move backward instead of forward.
When you’ve finished creating your program, you download it to the NXT brick and run it.

Figure 4-1: Two programming blocks on the Sequence Beam
using different programming blocks
Many different programming blocks exist, including ones that make the robot move or make sounds. Each block has its own name and unique look so you can easily tell the difference between the blocks that you place on the Work Area. Different combinations of blocks and settings will make your robot behave differently, and this chapter will teach you how some of the essential programming blocks work.
the move block
The first block you’ll learn to use is the Move block, which controls the movement of a robot’s motors. By using this block in your program, you can make the Explorer move forward and backward and steer left or right.
For example, you used a Move block in Chapter 3 to make your Explorer move forward for a short while.
seeing the move block in action
Before you learn how the Move block works, you’ll make a small program to see its functionality in action. This program will make the Explorer drive backward for three seconds and then quickly spin to the right. Because these are two different actions, you’ll use two Move blocks.
1. Create a new program called Explorer-Move, and then pick two Move blocks from the Programming Palette and place them on the Work Area, as shown in Figure 4-2.
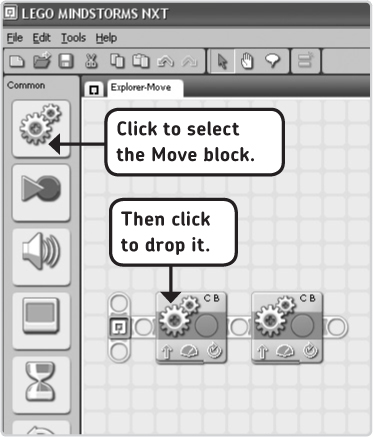
Figure 4-2: Choose a Move block from the Programming Palette, and place it on the Start Area. To place the second block, choose another block, and put it next to the first one.
2. By default, the blocks you’ve just placed are configured to make the robot go forward for a little while. However, you want the first Move block to make the robot drive backward and the other block to steer the robot. To accomplish this, you’ll change the settings in the Configuration Panel of each block, as shown in Figure 4-3.
3. Next, you’ll modify the configurations of the second block, as shown in Figure 4-4. This block will make the Explorer spin quickly to the right. When both wheels have made two complete rotations, the motors will stop as specified in the block. (You’ll learn more about each of the settings in the next section.)

Figure 4-3: The configuration of the first block in the Explorer-Move program. Click the block to select it, and configure your block settings to look like those in this figure. The selected block makes the Explorer drive backward slowly for three seconds.

Figure 4-4: The configuration of the second block in the Explorer-Move program. Before applying these settings, click the second Move block to open its Configuration Panel.
4. Once you have configured both Move blocks, you can download the program to your robot and run it. The Explorer should go backward for exactly three seconds and then turn around quickly.
understanding the configuration panel
You’ll now take a closer look at the settings on the Configuration Panel for each block to better understand how the sample program really worked. The combination of all the settings determines what the block will do.
Figure 4-5 shows the Move block’s Configuration Panel. At the top left of the panel you see the word Move and an image of two gears indicating that this is a Move block. Each block has its own name and image. (You’ll also see a small section with several letters and numbers just below this image, but you won’t use these values just yet. When configuring blocks, you can ignore these values.)
The rest of the Configuration Panel is divided into light gray boxes, each of which configures one setting. For example, you use the Power setting to set the robot’s speed. You’ll now look at the functions of each of the settings.
port
Because the Explorer is driven by two motors connected to output ports B and C with cables, ports B and C are selected in this block’s panel. If you build a robot with different connections (such as ports A and B), select the appropriate ports in the Ports box.
direction
In the Direction box, you select whether you want the robot to move forward or backward. In other words, you select the direction in which the motors must turn. If you select the upward-pointing arrow, the robot will go forward; select the downward-pointing arrow, and it will move backward.
You can also use the Move block to make the motors stop moving by selecting the stop sign in this Direction box. (This is useful only when the robot is already moving because of another block, as you’ll see in “More on the Move Block: Moving Unlimited” on page 44.)
steering
As you saw with the Explorer-Move program, you can also use a Move block to make the robot steer. To adjust your robot’s steering, drag the Steering slider to the left (to make the robot steer to the left) or right.
But how can a vehicle turn without a steering wheel? Figure 4-6 shows the effect of different combinations of Direction and Steering configurations. Notice that the Explorer can turn by altering the speed and direction of both wheels.
power
Use the Move block’s Power box to control the speed of the motors. Zero power means that the wheels do not move at all, while 100 sets the motors to maximum speed.
duration
In the Explorer-Move program you saw that you can control how long a certain movement will run. For instance, setting Duration to 3 Seconds made the Explorer move for three seconds. Other options here include Rotations and Degrees:
* Rotations controls the number of times that the wheels go through a complete rotation. For example, when you set Duration to 2 Rotations in the sample program, both wheels made two complete rotations.
* Degrees works like Rotation, except that it controls the number of degrees that the wheels turn. For example, you could set Duration to 180 Degrees to make the wheels turn one-half rotation.
(You’ll learn about the Unlimited option in Chapter 5.)

Figure 4-5: The Move block Configuration Panel contains several subsections to change the way the robot moves.

Figure 4-6: To make the robot turn, adjust the Steering setting in the Move block’s Configuration Panel. When you do so, the NXT should control the motor’s speed and direction to make the robot turn. The dashed arrows indicate that a wheel rolls forward, and the gray arrows mean that the wheel rolls backward. The big black arrow shows the direction in which the robot eventually moves.
Difficulty: Easy
Now that you’ve learned some important information about the Move block, you’re ready to experiment with it. The goal in this discovery will be to create a program that makes the robot move slowly at first but accelerate as the program progresses. To begin, place 10 Move blocks on the Work Area, and configure the first one as shown in Figure 4-7. Configure the second one in the same way, but set the motor’s Power setting to 20. In subsequent blocks, set the Power setting to 30, and so on, incrementing by 10 with each block. What happens when you run this program?

Figure 4-7: The Configuration Panel of the first block of the program for Discovery #1
NOTE One complete motor rotation is equal to a 360-degree turn. To find the number of rotations, divide the number of degrees by 360. To find the number of degrees, multiply the number of rotations by 360. For example, instead of entering 180 degrees in the Duration box, you could also use 0.5 rotations.
next action
The Next Action box controls what happens after the Move block completes its movement:
* Brake stops the motors immediately.
* Float stops the motors gently.
understanding the configuration icons
As you change a block’s settings in the Configuration Panel, the configuration icons on the block change as well, as shown in Figure 4-8. By looking at these icons, you can roughly determine what a block does. This is a useful way to get a general overview of how a program works.
For instance, as you can see in Figure 4-8, the second Move block is configured to turn right. You can also see that the robot will turn at the maximum speed and that the Duration setting is configured as Rotations. To determine what an icon on a block means, you can either check how it changes as you change the Configuration Panel or click More help in the Little Help Window.
NOTE When creating the programs in this book, you don’t need to remember what each specific configuration icon stands for because the figures show you the Configuration Panel of each block, making it easy for you to re-create the program.

Figure 4-8: Configuration icons on the blocks in the Explorer-Move program
making accurate turns
When you use a Move block to have the robot make a 90-degree turn, you might think you need to set the Duration setting to 90 degrees, but this is not correct. The Duration setting specifies only how many degrees the motors (and therefore the wheels) turn. The actual number of degrees that the motors should turn in order to enable the robot to make a 90-degree turn is different for every robot. Discovery #2 gets you started finding the appropriate number of degrees for your robot.
the sound block
It’s fun to make programs that allow the Explorer to drive around, but things become even more fun when you can program the NXT with sounds using the Sound block. Your robot can play two types of sounds: a simple tone (like a beep) or a sound file, such as applause or a spoken word such as “Yes.” When you use a Sound block in your programs, the robot will be appear to be more interactive and lifelike because it can “talk.”
understanding the sound block configurations
Even though every programming block allows the robot to do something different, all blocks are used in the same way. In other words, you can simply pick a Sound block from the Programming Palette and place it on the Work Area as you did with the Move block. Once it’s in place, you adjust the block’s settings in the Configuration Panel.
Before you start creating bigger programs with Sound blocks, you’ll take a quick look at the Sound block’s Configuration Panel. Create a new program called Explorer-Sound, and place one Sound block on the Work Area, as shown in Figure 4-9.
action
Use the Action setting on the block’s Configuration Panel to set whether the block should play a sound file or a tone.
Depending on the option you select, the Configuration Panel changes slightly, as explained next.
control
Normally, the Control box is specified as Play. To abort a sound that is currently playing, select Stop.
volume
Use the Volume setting to make the sound softer or louder.
function
In the Function box, you can specify whether to repeat a sound by checking the Repeat checkbox. To stop the sound from repeating, use another Sound block with the Control setting configured to stop the sound.
file
If you’ve configured the Sound block’s Action setting to play a sound file, you can select one from a list in the File box. You can choose from various sounds like words (such as “Hello”), numbers (such as “Two”) or short phrases (such as “You’re good”). If you use multiple Sound blocks in a row, with each configured to play a sound file, you can make your robot appear to talk.
You can also create your own sound files by recording your voice with a microphone or by using an existing music file. To do so, select Tools ▸ Sound Editor on the Toolbar.

Figure 4-9: The Sound block and its Configuration Panel
(To learn more, see page 56 in the NXT’s user guide.) Once you’ve made your own sound file, you can use it in your programs with the Sound block, just like a regular sound file.
NOTE If you use sounds files in your program, they will be downloaded to the robot as you transfer your program. If you use a lot of different sounds, you might get the message that “the NXT device is out of memory.” To solve this problem, see the appendix.

Figure 4-10: The Configuration Panel of a Sound block that is configured to play a tone
note
If you configure the Sound block’s Action setting to play a tone, a different box appears in the Configuration Panel, as shown in Figure 4-10. Instead of selecting a sound file, you can now select a note from a keyboard, as well as the length of time that the tone should sound.
wait
You’ll find the last setting in the Wait box. The Wait for Completion checkbox should be checked if you want the program to wait for the sound to finish playing before continuing with the rest of the program, as explained in the next section.
seeing the sound block in action
You’ll now learn how to make a program that uses Sound blocks so that you can see how they work. The program will allow the robot to move around while making sounds.
To begin, open the Explorer-Sound program (or create it if you haven’t already done so), and place two Sound blocks and two Move blocks in it, as shown in Figure 4-11. Configure the blocks as shown in the Configuration Panels. When you’ve finished creating your program, download it to your robot, and run it.

Figure 4-11: The four blocks of the Explorer-Sound program. Use these images of the Configuration Panels to configure each of the programming blocks. Panel “a” shows the settings of block “a.”
NOTE The letters a, b, c, and d are there to help you understand which Configuration Panel belongs to which block. They’re not part of the actual program.
understanding the explorer-sound program
Now that you’ve run the program, you’ll learn how it works. The first Sound block makes the Explorer say “Hello.” The Wait for Completion box in this block is checked, so the robot waits until the robot finishes saying “Hello.” Once it has, a Move block makes the robot drive forward for three seconds. Next, another Sound block causes the NXT to play a tone. This block doesn’t wait for the tone to complete, so while the sound is playing, the second Move block gets the robot to drive backward for three seconds. Finally, the robot stops moving. Because the tone was also configured to play for three seconds, the program ends.
the display block
In addition to moving around and playing sounds, an NXT program can also control what is displayed on the NXT’s LCD screen. For example, you could create a program that makes the NXT display look like Figure 4-12. (The LCD screen is 100 pixels wide and 64 pixels tall. Pixels are like small dots.)
You use the Display block to display an image (like a LEGO minifigure head), text (a word like “Hello”), or drawings (such as a line) on the NXT screen.
NOTE The Display block can’t put multiple images or text lines on the screen at once, so you’ll need to use a series of Display blocks in your program in order to create the display shown in Figure 4-12.

Figure 4-12: Using Display blocks, you can show images, text, and drawings on the screen of the NXT brick.
Once the block has put something on the NXT screen, the program moves on to the next block, say, a Move block. The NXT screen keeps showing the image until another Display block is used to display something else. So, in this example, the image remains on the screen while the robot moves.
When a program ends, the NXT automatically displays the NXT’s menu. Therefore, when the last block in your program is a Display block, you won’t have time to see what’s on the display because the program has already ended. To see it, you’d need to add another block, such as a Move block, to keep the program from ending instantly.
understanding the display block configurations
Before you can use Display blocks in your programs, you need to understand how they work. In this section, I’ll discuss the settings of the block’s Configuration Panel.
Create a new program (call it Explorer-Display), and place one Display block on the Work Area, as shown in Figure 4-13.
action
Use the Action setting to choose whether the screen should display an image, some text, or a drawing. The Configuration Panel will change slightly, depending on the option you choose. Reset will make the screen look like the display of a program that doesn’t use any Display blocks at all.
display
When the Clear checkbox in the Display box is checked, the NXT removes everything from the screen before displaying something new. This is useful if you don’t want different images to overlap each other. Uncheck this option when the screen should not be cleared before displaying something, such as when you want to display more than one text line on the NXT screen. Because the screen isn’t cleared, the new text line will simply be added below the previous text line on the screen. (You’ll practice with this option in the sample program.)
displaying images
The Configuration Panel that you see displayed will depend on which option you select in the action box. For example, if you select Image, the panel should look like the one in Figure 4-13.
* Use the File box to select an image from a list of images. When you do this, you should see a preview of this image on the right side of the panel.
* Use the Position box to define where to place the image. Drag the image around with your mouse, or enter values in the X box (0 is the most left and 63 is the most right) and the Y box (0 is the lowest and 99 is the highest) to set the image’s position. (The X and Y coordinates would set the position of the bottom-left corner of the image.)
Just as you can create your own sound files, you can also create your own image files using drawings of squares, lines, and circles, or you can simply use an existing picture. To do so, select Tools▸Image Editor on the Toolbar. (For more information, see page 57 of the NXT user guide.) When you’re done creating your image, you can display it with the Display block as you would any other image.
displaying text
If you select Text in the Action box, you’ll see a Configuration Panel as shown in Figure 4-14.
Enter the text you want to display in the Text box. Use the settings in the Position box to define where the text should be displayed either by dragging the text with your mouse or by specifying the X and Y values as with displaying images.
You can also position lines of text by setting the Line number. Selecting 1 for Line will display text at the top of the screen, while selecting 8 for Line puts text on the bottom of the screen. This configuration is useful when you want to display a longer sentence that doesn’t fit on one line: You can split the sentence into multiple parts and display each part on one text line to keep your text nicely aligned.

Figure 4-13: The Display block and its Configuration Panel
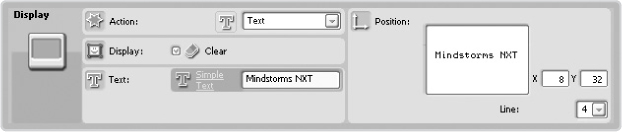
Figure 4-14: The Configuration Panel of a Display block configured to display text
displaying drawings
To display lines, points (dots), or circles, select Drawing in the action box. Your Configuration Panel should now look like Figure 4-15.
In the Type box, select whether to display a point, a line, or a circle. You can adjust the position of each by setting the appropriate values in the X and Y boxes or by dragging the object with your mouse in the Position area. When displaying a line, you can enter the coordinates of the line’s starting and ending points. When displaying a circle, use the Radius box to set the circle’s size.
seeing the display block in action
Now that you understand most of the Display block’s features, you’ll test its functionality by creating a program that puts things on the NXT screen while the robot moves.
To do so, place three Display blocks and two Move blocks on the Work Area, as shown in Figure 4-16; then configure each block as shown in the Configuration Panels. Once you’ve configured all the blocks, you can transfer the program to your robot and run it.
understanding the explorer-display program
In the Explorer-Display program, the Display blocks simply put several things on the screen, and the Move blocks allow the Explorer to drive around. (Notice how the Clear checkboxes in the blocks are configured.)
The first Display block (block a) clears the screen before it displays an image. The robot then starts to move, and the image stays on the screen while the Move block (b) is running. The next Display block (c) is also configured to clear the screen, so it removes the image before it writes a line of text on the screen. The program then moves on to another Display block (d), which puts a circle on the screen. This block doesn’t clear the screen in advance, so you’ll see both the text and the circle on the screen. Finally, a Move block makes the robot turn to the right, and then the program ends.
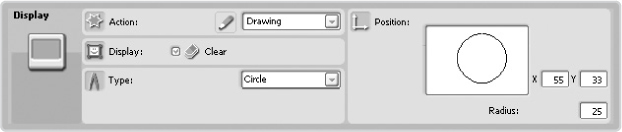
Figure 4-15: The Configuration Panel of a Display block configured to display a drawing

Figure 4-16: The configuration of the blocks in the Explorer-Display program
further exploration
You’ve completed the basics of LEGO MINDSTORMS NXT programming. Congratulations! You should now know how to program robots to perform actions such as moving, making sounds, and displaying text and images on the NXT screen. Chapter 5 will teach you more about using programming blocks, including how to use blocks to pause a program and how to repeat a set of blocks.
But before you move on, try to solve some of the following discoveries to further fuel your programming skills, and then share your solutions with fellow book readers at the companion website (http://www.discovery.laurensvalk.com/).
Difficulty: Easy
Create a program that uses three Sound blocks to say, “Hello, sir, thank you!” Use Display blocks to display what the robot says as subtitles on the NXT screen and to clear the screen each time the robot starts saying something new. Where do you place each of the Display blocks?
Difficulty: Medium
Create a program with Move blocks that make the robot drive in the pattern shown in Figure 4-17. While moving, the robot should display arrows on the NXT screen that show the direction of its movement. When finished, it should display a stop sign. In addition to displaying the directions, use Sound blocks to enable to robot to speak the direction it’s moving in. How do you configure the Wait for Completion box in the Sound blocks?
HINT You can find all the direction signs shown in Figure 4-17 in the list of images in the Display block’s File box. Use Sound blocks to play sounds like “Forward” and “Left.”
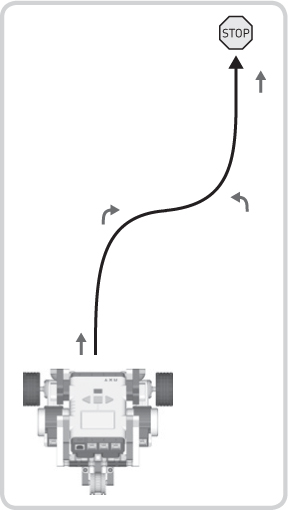
Figure 4-17: The driving pattern and the navigation images of Discovery #8
Difficulty: Easy
Can you make the Explorer drive in a circular pattern with a diameter of about 1 meter (3 feet)? You’ll need only one Move block to accomplish this. How do you configure the Duration and Steering settings? And how does changing the motor speed affect the circle?
Difficulty: Medium
Program the Explorer to drive in a figure eight, as shown in Figure 4-18. The robot should show a happy face on the screen as it moves.

Figure 4-18: The drive track for Discovery #10
Difficulty: Hard
Make the Explorer play musical beats (using Sound blocks) continuously while it dances in zigzagging movements (using Move blocks). After each movement, the robot should start playing a different sound.
HINT Experiment with the Repeat setting in the Sound blocks.
In this building discovery you’re challenged to expand the Explorer robot design. Using LEGO pieces, create an attachment for your robot to hold a pen. As the robot drives over a big piece of paper, it will draw lines and figures with the pen as it moves. As a start, you can make it draw the pattern in Discovery #11.
Advanced building: Attaching a fixed pen is certainly fun for drawing simple figures, but you won’t be able to use a fixed pen to draw words since the pen is constantly on the paper. Use the third motor in your NXT kit to lift up the pen, and connect this motor to output port A with a cable. You can control this motor with a Move block, with the Port setting specified to control only motor A (not B and C). Can you make the robot write your name?