9
strider: the six-legged walking creature
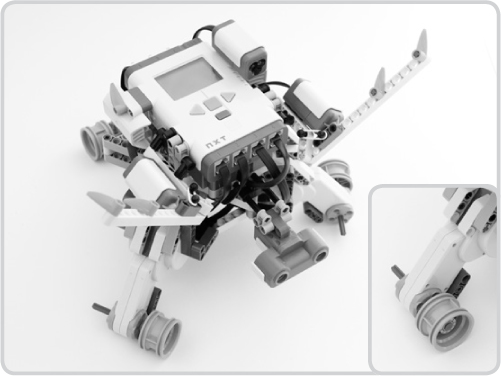
You can make interesting models that move on wheels, but it is also possible to make robots that walk. Such creations are slightly more challenging to make, but in this chapter you’ll find instructions to build Strider, a six-legged walking creature, as shown in Figure 9-1. Once you finish building it, you’ll program it to walk around and respond to human interaction.

The Strider robot uses three identical motor assemblies to walk, each of which controls one pair of legs. The leg modules are interconnected with a triangle-shaped frame, which also carries the NXT with several sensors attached. Two Touch Sensors on the Strider act like antennas, detecting touches from objects or people in Strider’s environment (they are not used as bumpers to prevent the robot from walking into something). The Ultrasonic Sensor allows the walker to measure the distance of nearby objects, while the Color Sensor in Light Sensor mode can detect whether it is dark or light outside.
building strider
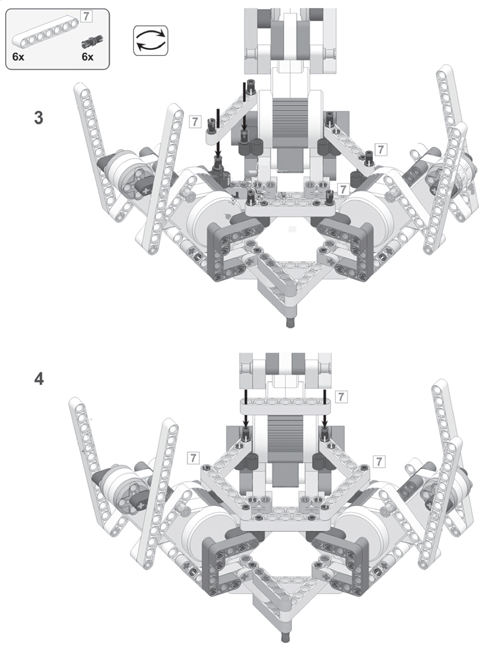
We’ll now move on to building the robot by following the instructions on the subsequent pages. Before you start building, select the pieces you’ll need to complete the robot as shown in Figure 9-2.
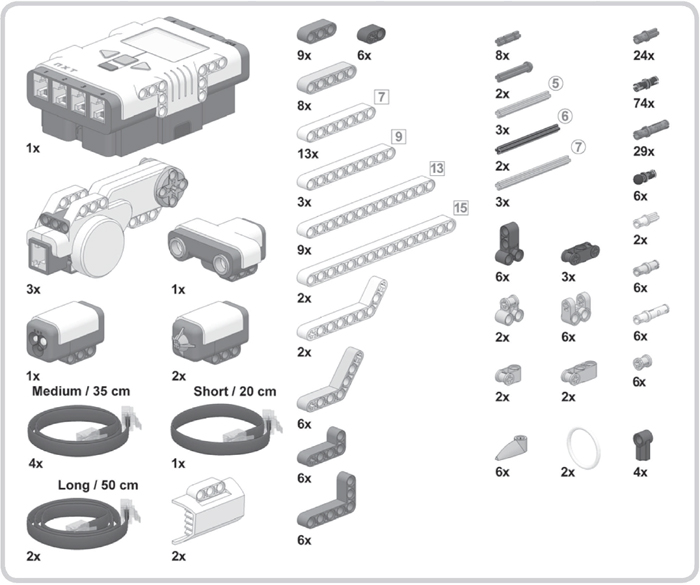
Figure 9-2: The required pieces to build the Strider


connecting the sensor cables
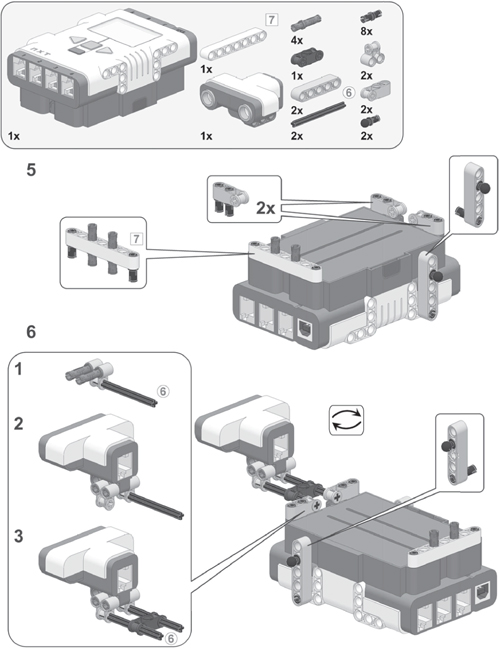
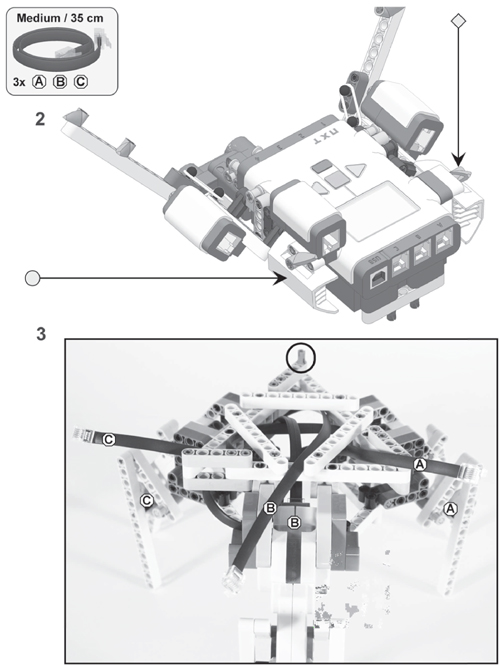
You connected the motor cables on pages 132 and 133. Table 9-1 and Figure 9-3 will show you how to connect the sensors. When connecting the cables, guide them through the space under the NXT so that they don’t stick out.
table 9-1: the cable placement for strider
From motor/sensor |
To NXT brick port |
Cable length |
Right Touch Sensor (1) |
Input port 1 |
Long (50 cm/20 inches) |
Left Touch Sensor (2) |
Input port 2 |
Long |
Color Sensor |
Input port 3 |
Medium (35 cm/15 inches) |
Ultrasonic Sensor |
Input port 4 |
Short (20 cm/8 inches) |
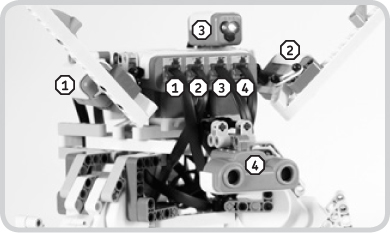
Figure 9-3: Connect the cables as shown.
understanding strider’s walking technique
Before you can program Strider, you need to understand how it walks. Figure 9-4 shows how three minifigures can move a heavy object forward.
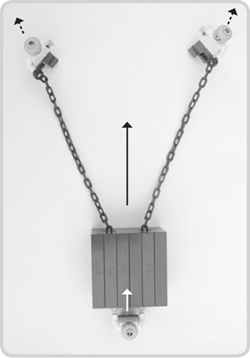
Figure 9-4: Two minifigures pull the heavy object (dashed arrows), and one pushes (white arrow). As a result, the object moves forward (solid black arrow).
The minifigures in Figure 9-4 represent each of Strider’s motor compartments, and the heavy object represents the NXT, as shown in Figure 9-5.
Each of the Strider’s three leg pairs functions a bit like your own legs. As a motor rotates, its attached leg pair walks by repeatedly putting one leg in front of the other. Whether a leg pair pushes or pulls the robot in a certain direction depends on whether the motor is configured to turn forward or backward (Figure 9-6).
When a leg’s motor spins backward, it has the same effect on the Strider as the minifigure pulling an object. When the leg’s motor rotates forward, it acts like the minifigure pushing an object. The combination of motor directions makes up the direction that Strider eventually walks in.
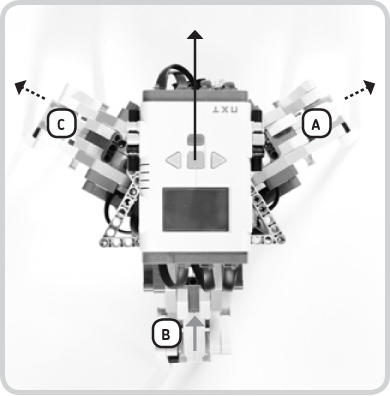
Figure 9-5: Motors A and C pull the robot forward (dashed arrows), and motor B pushes (gray arrow). As a result, the Strider walks forward (solid black arrow). (The sensors have been removed here to make the motors more visible.)

Figure 9-6: When NXT motors are specified to turn forward, the corresponding leg pair moves in the black direction. The gray denotes backward movement of the motor.
NOTE The Strider can only walk on a really smooth surface, such as tiles, a desk, or a smooth wooden floor. If you put it on carpet or a rough floor, the legs will probably break!
programming strider
Now that you understand the basics of making Strider walk, you’ll create three My Blocks to make it walk. Following that, you’ll use these blocks to create larger programs.
creating the walk-forward my block
You’ll begin by creating the Walk-Forward My Block. Because motors A and C will pull the robot, those motors will rotate backward. Motor B will be configured to turn forward since its leg compartment pushes the robot. The Duration settings are all set to Unlimited so that the My Block will just switch on the motors. You’ll use other blocks (like Wait blocks) to control how long the Strider walks in a specific direction.
To begin, create a new program, pick three motor blocks from the Programming Palette, and configure them as shown in Figure 9-7. Motor B spins slightly faster than the other two because the corresponding leg pair pushes the robot along in the direction it’s walking (Figure 9-5); this makes the robot more stable as it walks.
NOTE For a refresher on how to create My Blocks, see Chapter 5 for step-by-step instructions.
Select these three Motor blocks, turn them into a My Block called Walk-Forward, and then add a Wait Block to the program (Figure 9-8). Run the program, and the Strider should walk forward for 10 seconds and then stop when the program ends.
creating the walk-left and walk-right my blocks
Now you’ll create two more My Blocks to make Strider walk left and right. The blocks are essentially the same as the one you just made, except that the Direction and Power settings now make the robot move in a different direction, as shown in Figure 9-9. Create these two My Blocks just like the one you made in the previous section, and see Table 9-2 for their names and motor Direction and Power settings.

Figure 9-7: The configuration of the blocks in the Walk-Forward My Block

Figure 9-8: A quick test program to make the Strider walk forward

Figure 9-9: By changing the direction in which its motors turn, the Strider can walk forward, left, or right. In each case, two motors pull the robot in one direction (dashed arrows), and the third motor pushes the robot (gray arrow). The resulting direction is indicated with a solid black arrow.
table 9-2: the motor direction and power settings for the motor blocks
My Block name |
Motor A |
Motor B |
Motor C |
Walk-Forward |
Backward, 50 |
Forward, 60 |
Backward, 50 |
Walk-Left |
Forward, 60 |
Backward, 50 |
Backward, 50 |
Walk-Right |
Backward, 50 |
Backward, 50 |
Forward, 60 |
NOTE If you’re experiencing that the Strider has trouble walking or if its legs come off, try making it walk on a smoother surface.
using the my blocks in an interactive program
Now that you know basically how to control the Strider, you can create bigger programs. As you noticed in Discovery #43, the Strider cannot turn around, which means it will always look in the same direction with the Ultrasonic Sensor. However, it is still capable of going everywhere when you combine the Walk-Forward, Walk-Left, and Walk-Right My Blocks properly.
The next program you’ll create will have the Strider walk forward until you press one of its antennas, at which point it will walk left or right, depending on which sensor you press (programming steps 1 and 2). You’ll use sounds and the NXT screen to give feedback about the sensor readings (steps 3, 4, and 5). You can see an overview of the program in Figure 9-10.
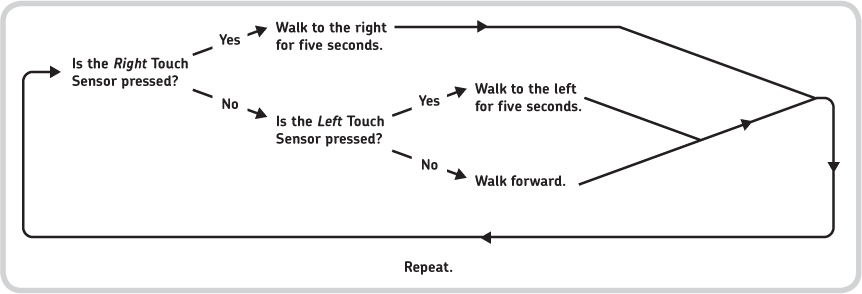
Figure 9-10: The program flow for the Strider-Touch program. While walking sideways for five seconds, the robot also makes sounds and displays text on the NXT screen to say which direction it is going (left or right).
creating the program
Start a new program, and save it as Strider-Touch. Then follow the instructions in Figure 9-11 and Figure 9-12 to create the program.
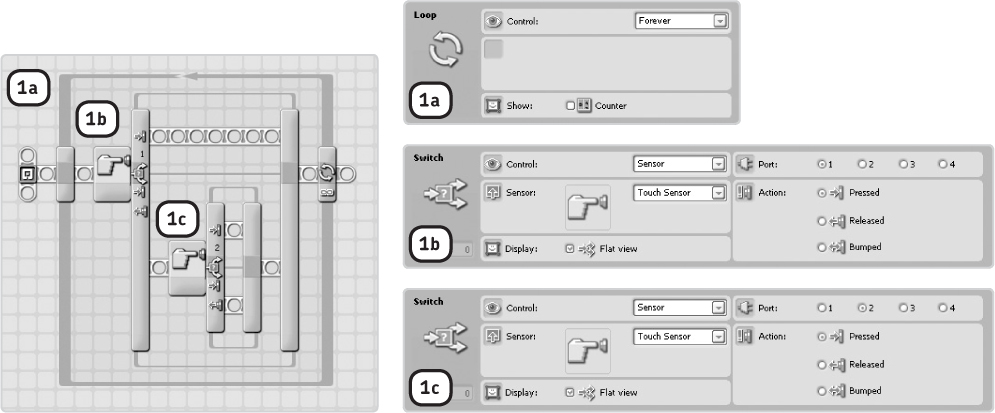
Figure 9-11: Step 1: These blocks form the program’s main structure. The program should keep running until you manually abort it, so you use a Loop Block. Inside the loop, you place two Switch Blocks to tell whether a sensor is pressed.

Figure 9-12: Step 2: You configure the robot’s movements by placing your My Blocks in the Switch Blocks. For example, when you press the Touch Sensor connected to port 1, the Strider robot should start to walk to the right and (because of the Wait Block) keep going in this direction for five seconds. Next, it should go back to the beginning of the program to see whether a sensor is pressed. If no sensor is pressed at that point, the Strider should continue to walk forward.
The blocks you configured in steps 1 and 2 form the basis of this program. At this point, download the program to the Strider to test it. To make the program more fun and interactive, you’ll add Display, Sound, and Color Lamp Blocks in steps 3, 4, and 5 (Figures 9-13, 9-14, and 9-15).
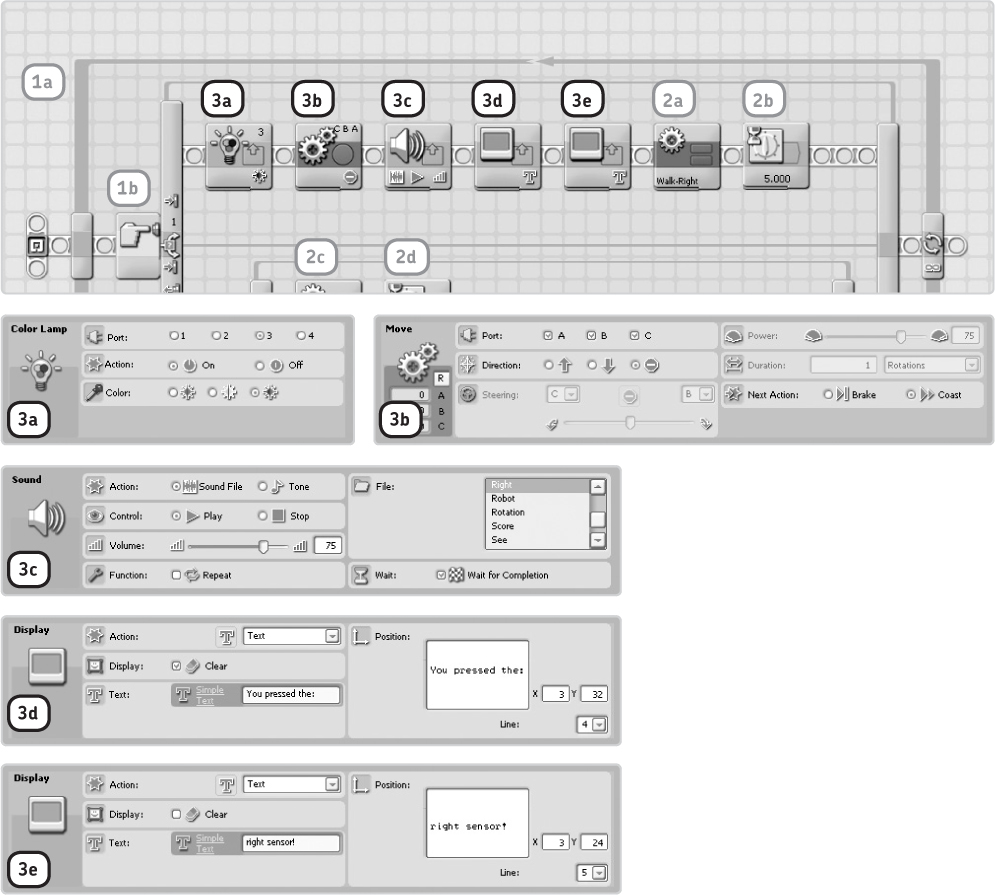
Figure 9-13: Step 3: Here you add the blocks that should be run when the right Touch Sensor is pressed. When the sensor is pressed, a blue light should be switched on, the robot should stop walking, and it should say “Right” and display “You pressed the right sensor!” on the NXT screen. Next, the Strider robot should walk to the right because of the Walk-Right My Block that you placed earlier.

Figure 9-14: Step 4: The blocks you place here are similar to those in step 3, except that they are run when the left Touch Sensor is pressed. Consequently, the Sound and Display Blocks are configured to tell that the robot is walking to the left.

Figure 9-15: Step 5: The blocks here run when no antennas are touched, so the NXT screen will display “You pressed no sensors!” After configuring the Strider to walk forward with the Walk-Forward My Block, the program goes back to see whether any sensors are pressed, so you don’t need a Wait Block here.
Congratulations, you can now download and run the program to make Strider walk!
creating the scared strider program
In the next program, you’ll have Strider walk forward until someone turns on a light, at which point it will shout and immediately sit still until the light is switched off. But before you create this program, you need to learn two new programming tricks: Feedback Boxes and thresholds.
polling sensors with feedback boxes
The Configuration Panels of certain blocks contain a section with a fixed value called Feedback Boxes. Feedback Boxes (as shown in Figure 9-16) display sensor values when the robot is connected to the computer, either through USB or through Bluetooth.

Figure 9-16: A Feedback Box reports sensor values. The Wait Block Configuration Panel shown here is configured to poll the value of the Ultrasonic Sensor.
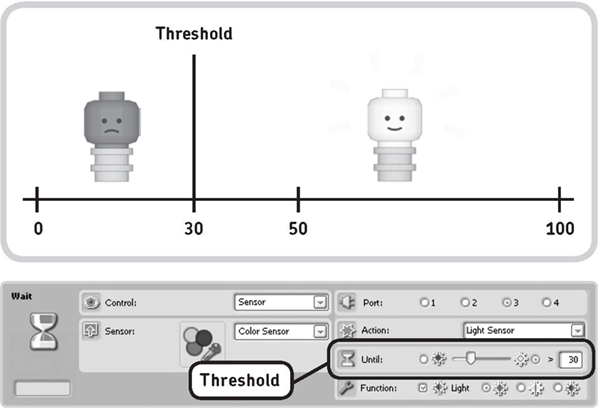
Figure 9-17: You use a threshold (trigger value) to set the edge between light and dark. You set this value in the Configuration Panel of a block set to work with a sensor, such as the Wait Block shown here. In this case, any value greater than 30 will be considered light, and values 30 and less will be dark. As a result, this block makes the robot wait until the Light Sensor reports a value greater than 30 before the program continues.
setting thresholds
It’s easy to tell whether a Touch Sensor is pressed or not because it’s either pressed or released, but how can you use a Light Sensor to tell when it is dark or light? Unlike a mechanical sensor that is either switched on or switched off, light can have many measured values. On the NXT, the values from the Color Sensor in Light Sensor mode range from 0 (darkest) to 100 (brightest). To tell your robot what you consider to be light or dark, you’ll define light and dark in your program using a trigger value, also known as the threshold (Figure 9-17). You’ll consider a measured light sensor value greater than this threshold as light and a measurement lower than the threshold as dark.
Threshold values are unique to every situation and will likely vary depending on the light conditions in the room. To set the threshold value, you begin by deciding how you want to define the light conditions in your program (a room with the lights on and the same room with the lights off), and next you measure the light value in each case.
Because the NXT’s View menu won’t let you poll the Light Sensor, you’ll use a Wait Block’s Feedback Box configured as a Color Sensor in Light Sensor mode (Figure 9-18) to poll it. For dark conditions, I measure a value of 4, and for bright conditions I measure a value of 30 with the Feedback Box method. Your measurements may vary.
Once you have the two measured values (one for the dark room and one for the light one), you calculate the average of the two, as shown in Figure 9-19. Your measured values may differ; be sure to calculate your own thresholds using your own measurements.
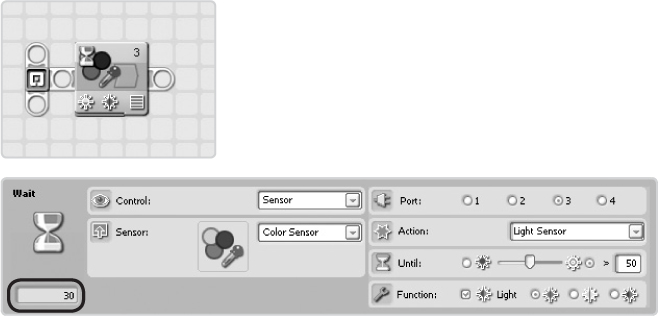
Figure 9-19: The threshold is the average of the Light Sensor value found in the dark room (a low number) and the one found in the room with the lights on (a bigger number). To calculate the average, add both values, and divide the total by 2.

Figure 9-18: Using the Feedback Box to poll the Light Sensor value
creating the program
You’ll now create the program that has the Strider robot move forward, shout when a light comes on, and stop moving until the light turns off. Create a new program, store it on your computer as Strider-Scared, and follow the instructions shown in Figure 9-20.
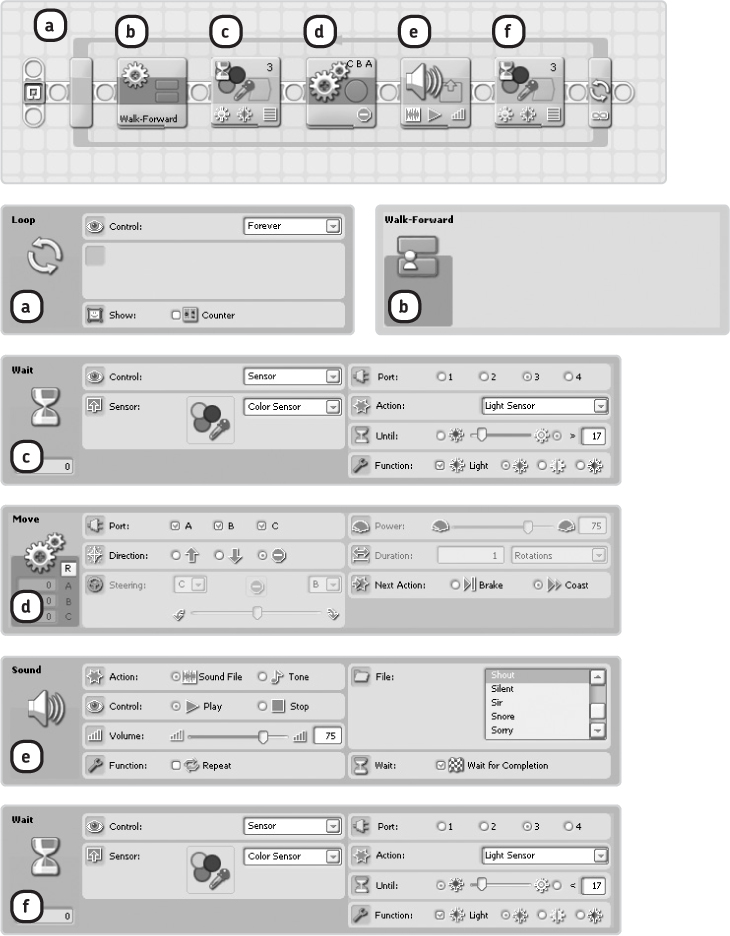
Figure 9-20: After making the Strider move forward, the program waits until the measured light intensity exceeds the threshold (set to 17 here). Once the threshold is exceeded, all motors stop, and the robot makes a loud sound. The last block waits until the sensor sees that it is dark again, at which point the loop restarts and Strider starts walking again.
further exploration
It’s not easy to design walking robots, so if you want to create your own walker, try building another one according to a set of directions first to get a better sense of how walkers are designed. On the back of the LEGO MINDSTORMS NXT 2.0 box, you’ll find a small picture of Manty, another six-legged creature of mine. This robot’s walking technique is very different from Strider’s because Manty has two sets of three legs and because it can turn in place. You can download building and programming instructions for this NXT 2.0 robot from http://www.discovery.laurensvalk.com/.
Now, before you move on to your next robot, take the time to improve your building and programming skills in Building Discoveries #8 and #9 and Discovery #46.
You may have noticed that Strider’s base structure is a solid triangle, an uncommon construction for a LEGO MINDSTORMS robot. What happens if you put this triangle on wheels? Remove the legs from the motor compartments, and attach wheels (without the rubber tires) to them, as shown in Figure 9-21. Try to run the programs you made for the Strider robot. Do they still work? What happens if you attach the rubber tires?
Difficulty: Medium
Do you remember the remote control you made for the Shot-Roller? In this discovery, you’ll do something similar with the Strider. Remove the antennas from the Strider robot, and use the Touch Sensors with long cables as remote buttons. How do you program Strider to walk in multiple directions?
When you built the Discovery robot with the two bumpers in Chapter 7, it almost never got stuck because it could always turn away from the walls it ran into. This is not the case for Strider because it cannot turn around. To make sure the robot never gets stuck, Strider needs to be able to sense the walls from any direction. It can already see things ahead of it with the Ultrasonic Sensor. Now, remove the antennas from the Strider, and create special bumpers on the two other sides of Strider. Can you use Touch Sensors to build bumpers so that this robot will not crash into objects?