
3
creating and modifying programs
Now that you’ve built your robot, the next thing the robot needs in order to function is a program. Programs tell your robot what to do. For example, a program can make the Explorer drive forward and then steer. This chapter will teach you how to create and edit programs.
a quick first program
You’ll first take a quick look at the NXT-G programming software by creating and downloading a small program to the robot. To create the program, follow these steps:
1. Connect the robot to the computer using the USB cable that came with the kit (Figure 3-1), and then turn on the NXT brick by pressing the orange Enter button. (You have to connect the robot to the computer each time you want to download a program to the robot.) If you want to use Bluetooth to transfer programs to the NXT, see the appendix.
2. Launch the LEGO MINDSTORMS NXT 2.0 software (also called NXT-G). Once it finishes loading, you should see a screen like the one shown in Figure 3-2. This is the main menu of the programming software. You’ll use it to create new programs or to open programs you’ve made.
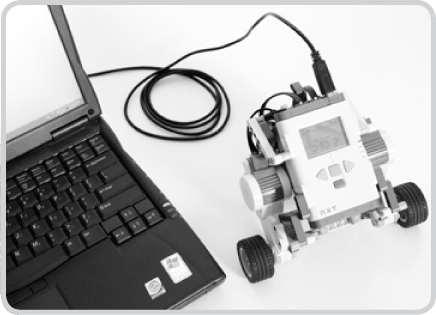
Figure 3-1: The robot connected to the computer
3. Create a new program by entering Explorer-1 in the Create new program box (located in the middle of the screen), and then click the Go >> button (Figure 3-3). You can choose any name for your program, but it’s a good idea to give it a descriptive name that will be easy for you to recognize later. For example, in this case, you can call your program Explorer-1 because it is the first program for the Explorer robot.

Figure 3-2: The NXT-G startup screen

Figure 3-3: Creating a new program
4. Pick a block and place it on the location indicated by Figure 3-4. Remember that a program is basically a list of instructions for actions that the robot should perform. The single block you place here is just such an instruction—one that makes the robot move forward for a short while.
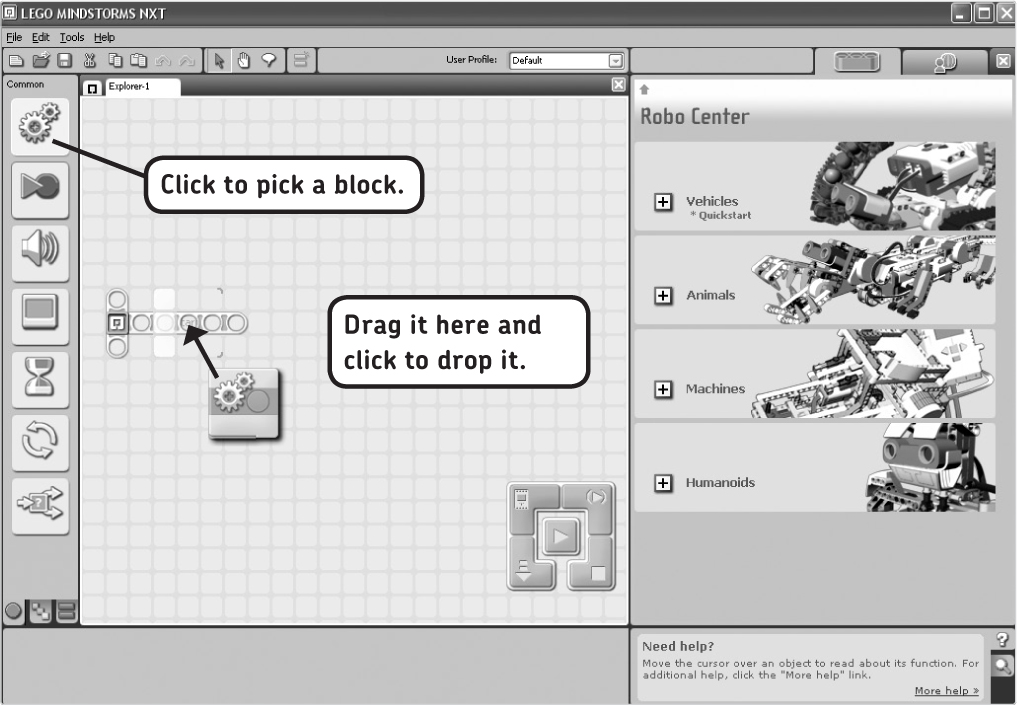
Figure 3-4: Picking and placing a block
5. Once you’ve finished steps 1 through 4, click the Download and Run button, and wait for your robot to start moving. (Figure 3-5). Each time you want to download the program again, simply click this button.

Figure 3-5: Downloading the program to the robot
Congratulations! If your robot moves forward a short distance, you’ve successfully created your first program.
NOTE If for some reason your robot did not move as described or if you got an error message, something may be wrong with the USB connection. Try turning the NXT brick off and then back on again. If that doesn’t help, see the appendix for more instructions.
creating a basic program
It was cool to see that you could make the robot move, but what exactly did you do to accomplish this? You’ll now look at several sections of the NXT-G software to better understand how to create and edit basic programs before you move on to creating more complicated ones.
Figure 3-6 shows what your screen should look like just after you start working on a new program. I’ll discuss each of the marked sections in turn.
1. programming palette
A program for your robot consists of one or more programming blocks. Each block instructs the robot to do something, such as move forward or make a sound. You can select any of these blocks from the Programming Palette (Figure 3-7), and each of them will make the robot do something different.
There are multiple Programming Palettes, but for now you need only one. If your Programming Palette doesn’t look like the one shown in Figure 3-7, click the tab at the bottom of the palette to open the correct one.
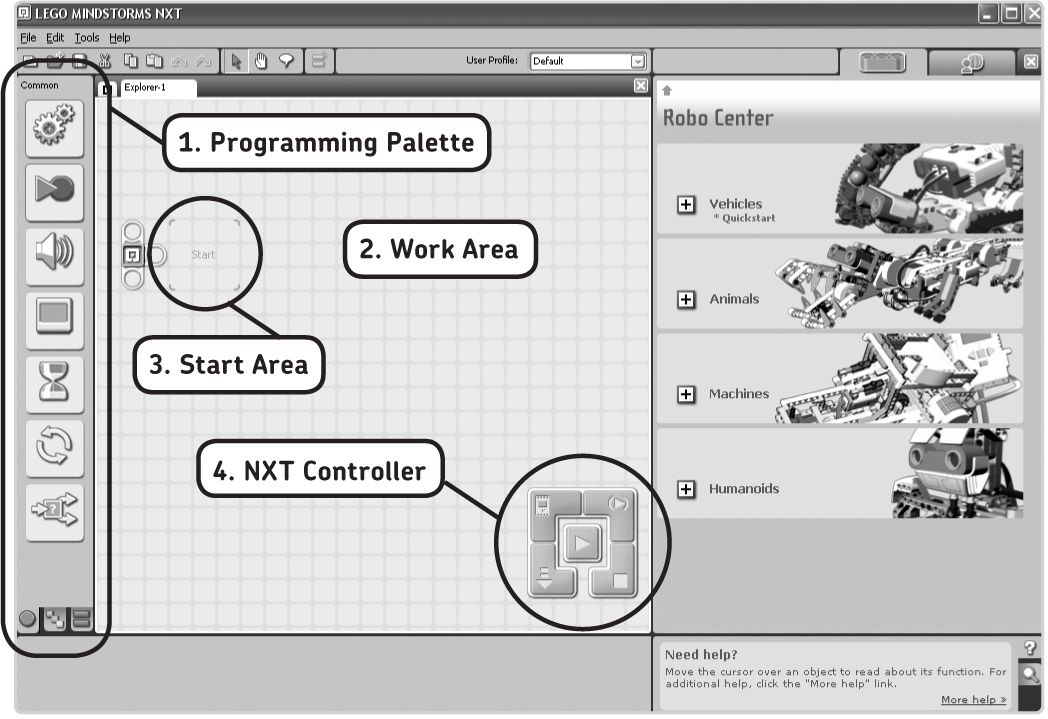
Figure 3-6: The NXT-G software window has several sections. You used each of the labeled ones when you created your first program.
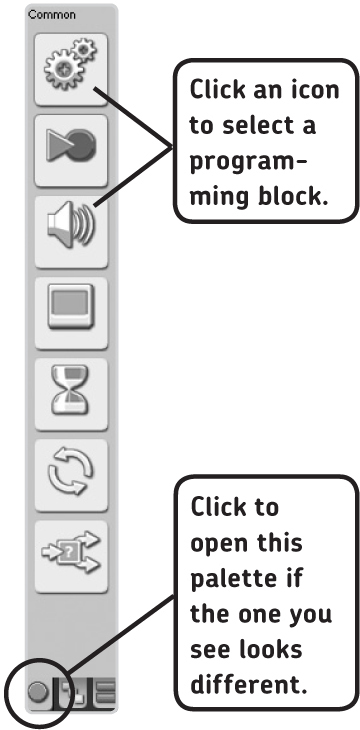
Figure 3-7: The Programming Palette (a close-up of section 1 in Figure 3-6)
2. work area
Once you’ve selected a block to use in your program, you place that block on the Work Area, as shown in Figure 3-8. The Work Area is where you create your program. Programs often consist of more than one block.

Figure 3-8: Once you’ve picked a block by clicking an icon on the Programming Palette, you place it on the Work Area. If it’s the first block in a program, you place it on the Start Area.
To move a block to the Work Area, simply click an icon on the Programming Palette, and then click the Work Area where you want to place the block.
moving and deleting blocks
Once you’ve placed a block on the Work Area, you can move it by clicking it with the left mouse button and keeping the button pressed as you move the block around. To delete a block from the Work Area, click to select it, and press the DELETE key.
3. start Area
The Start Area, shown in Figure 3-8, is where you’ll place your program’s first programming block. You’ll place all subsequent programming blocks to the right, next to the previous block. (You’ll learn about programs with more than one block in Chapter 4.)
4. NXT controller
You use the NXT controller (shown in Figure 3-9) to download (transfer) your programs to the NXT brick.
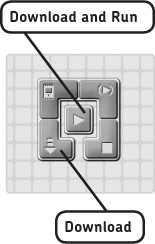
Figure 3-9: The NXT controller has five buttons, but for now you’ll use only the Download and Download and Run buttons.
downloading and running a program
To transfer a program to the NXT brick, make sure that the brick is connected to your computer (either via USB or via Bluetooth), and then click the Download and Run button on the NXT controller. The robot should beep to indicate that the program has been transferred successfully, and the program should begin running automatically. The program will stop when it finishes running each block of the program.
Once a program has been sent to the NXT brick, the robot can run the program independent of the computer. Even when you unplug the robot’s USB cable, the program should continue to run.
manually running a program
When a program ends or when you abort a program by pressing the Exit button on the NXT brick, you can restart the program manually using the NXT buttons, as discussed in Chapter 2. You can find all the programs downloaded to the brick by navigating to My files▸Software Files. Your programs remain in the brick’s memory even when you turn off the NXT, allowing you to run them whenever you want, including when you’re not near a computer.
downloading a program without running it
Sometimes it is not very helpful to have a program run automatically once you’ve finished downloading it to your robot. For example, if you program your robot to drive around the room and you still have it to connected to your computer by a USB cable, your robot might get stuck because of that connected USB cable.
To transfer a program to the brick without having the program run automatically, click the Download button on the NXT controller. Once the program finishes downloading (as indicated by the beeping sound), you can disconnect the USB cable and then start the program yourself using the buttons on the brick.
using Bluetooth to download programs to the NXT
You can transfer programs to the brick using Bluetooth instead of a USB cable. If you’d like to use Bluetooth, please see the appendix.
working with the NXT-G software
You’ve just seen what creating programs is all about, but you’ll have to look at some more options of the NXT-G software before you can create more complex programs. Figure 3-10 shows you a few more important sections of the software.
5. configuration panel
If you click a programming block on the Work Area, the Configuration Panel shows up at the bottom of the software window (Figure 3-11).
You learned that each block makes the robot perform a certain action. The block you see in Figure 3-10 makes the Explorer move, but the exact movement is specified with the Configuration Panel. For instance, you can use the panel to configure the robot to move backward instead of forward.

Figure 3-10: The section “Working with the NXT-G Software” discusses these remaining sections.
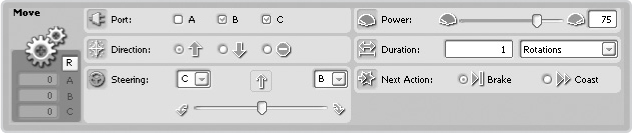
Figure 3-11: The Configuration Panel
Many different programming blocks exist, each with its own Configuration Panel. Subsequent chapters will teach you about many of these blocks and their Configuration Panels.
6. little help window
If you keep your mouse on a programming block for a few seconds, the Little Help Window shows up at the bottom right of the screen (Figure 3-12). This window tells you what kind of block you selected and gives you brief information about its function.
To learn more about the block in question, click More help.
We’ll discuss many programming blocks in this book, but if you are looking for specific information, such as the settings of a certain block, try using the Little Help Window.
7. program navigation bar
You can work on more than one program at the time. Each program has a corresponding tab on the Program Navigation Bar at the top of the Work Area. To navigate to a program, simply click the tab with the program’s name on it, as shown in Figure 3-13. You’ll also find a tab here that you can click to return to the main menu and, at the top right of the Work Area, a button to close the program on which you are currently working.

Figure 3-12: The Little Help Window gives you brief information about a selected programming block.
8. toolbar
At the top left of the screen is the Toolbar (see Figure 3-14). The buttons on this bar are used to manage and modify your programs. (The Toolbar also has a few drop-down menus, but you won’t be using them right now.)
managing programs
Use the three buttons on the left of the Toolbar to create new programs (New Program), open ones you’ve made (Open Program), or save programs you are currently working on (Save Program).
When you save a newly created program for the first time, you’ll be asked to enter a name for the program. (Note that you can also create or open programs in the main menu, as you saw when creating your first program.)
modifying programs
The next three buttons on the Toolbar are the Cut, Copy, and Paste buttons. These buttons are just like the cut, copy, and paste functions in word processors. Instead of copying text, however, you’ll use these buttons to copy one or more programming blocks, as shown in Figure 3-15.

Figure 3-13: You can navigate between different programs and the main menu by clicking the corresponding tab. To close a program you’re currently working on, click the red button at the top right of the Work Area.
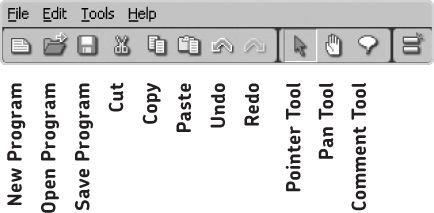
Figure 3-14: The buttons on the Toolbar are used to manage and modify programs.

Figure 3-15: Copying a series of blocks. Step 1: Keep the left mouse button pressed while you drag a selection around the blocks you want to copy; then press the Copy button. Step 2: Click the Paste button. Step 3: Use the left mouse button to drag the new blocks next to the blocks that were already there.
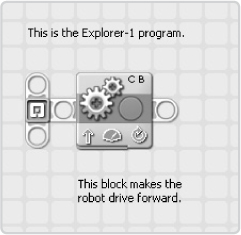
Figure 3-16: Comments in a program
The Undo and Redo buttons are used to undo or redo changes you make to a program. For instance, you can undo the event in which you accidentally deleted a block.
using the pointer, pan, and comment tools
When creating programs, you can use three tools to edit or navigate around programs. The Pointer Tool is most commonly used. When the Pointer Tool is selected on the Toolbar (Figure 3-14), you can use the mouse to place, move, and configure programming blocks on the Work Area.
If you select the Pan Tool, the mouse is used to move the Work Area. This is especially useful when you make large programs that don’t fit on your computer screen. To navigate to a specific part in your program, select the Pan Tool, click somewhere in the Work Area, and drag this area around by moving the mouse while you keep the left mouse button pressed.
Next on the Toolbar is the Comment Tool. Use this tool to place your own comments on the Work Area. These comments do not affect the actions of your program, but they will help you remember what each part in a program does when you review the program later. To add a comment, select the Comment Tool on the Toolbar, click where you want to place the comment on the Work Area, and enter the comment. You can see an example of a program with comments in Figure 3-16.
9. robo center
On the right of the software window is the Robo Center, as shown in Figure 3-17. This section contains building and programming plans for the four robots featured on the LEGO MINDSTORMS NXT 2.0 box. To view these instructions, click one of the robots.
When you are creating programs for the robots in this book, you won’t be using the Robo Center, so go ahead and close it (by clicking the red X button) to free up space on your computer screen to work on your program. You can open it at any time by clicking the orange beam, as shown in Figure 3-17.
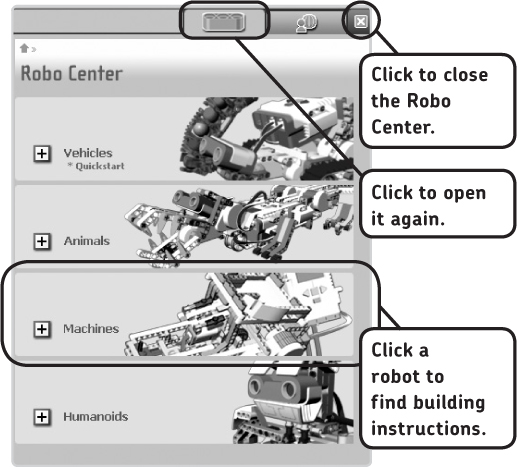
Figure 3-17: Close the Robot Center to free up space on the programming field. To reopen it, click the orange LEGO beam.
controlling the robot remotely
Programming a robot to move autonomously (as you’ll learn in Chapter 4) is certainly fun, but you can also control it remotely from your computer keyboard using the arrow keys. To do so, make sure that the robot is connected to the computer (either via the USB cable or via Bluetooth), and follow the instructions in Figure 3-18.

Figure 3-18: To control the Explorer remotely, click Tools in the Toolbar and then click Remote Control. You should now be able to control the robot by clicking the arrows onscreen or by using the arrow keys on your keyboard. To adjust the robot’s speed, click the + and - buttons. To return to programming, click the Close button.
conclusion
In this chapter, you’ve learned a lot about working with the NXT-G programming software. You should now know how to create, edit, and save programs, as well as how to transfer programs to the NXT brick.
Now that you’ve gained this essential bit of information, you’re ready to take on some serious programming challenges in Chapter 4.