
12
using variables, constants, and playing games on the NXT
If you’ve made it this far, you’re just a few steps away from mastering all of the programming skills in this book. By now you’ve learned how to use many different programming blocks, as well as how to work with essential tools such as data wires. This chapter completes the programming section of this book by teaching you how to use the NXT memory with variables as well as how to use constants.
In addition to learning about variables and constants, you’ll create a program in this chapter that combines almost all of the programming skills you’ve learned so far. This somewhat advanced program will demonstrate yet another possibility of the NXT system: It will let you play a real game on the NXT!
using variables
Think of a variable as a kind of suitcase that can carry information. When a program needs to remember a value (such as a sensor reading) for later use, it puts that value in the suitcase and stows it away. When the program needs to use the value, it opens the suitcase and uses the stored value. The variable is stored in the NXT’s memory until it’s needed.
Once information is stored in a variable, you can access it from other parts of your program. For example, you could store an Ultrasonic Sensor value in the suitcase and compare it later to a new sensor reading.
The program can access this stored information at any time while running, but the data is lost once the program stops. To store and access variable information, you use a Variable block, which you’ll recognize by a suitcase icon on the block. Figure 12-1 shows an overview of what happens when you use variables.
defining a variable
Each variable has a name and contains a value. For example, a variable might be called Reading with a value of 56. Like data wires, a variable can contain either a numeric value (such as 56), a logic value (such as true), or a text value (such as “hello”).
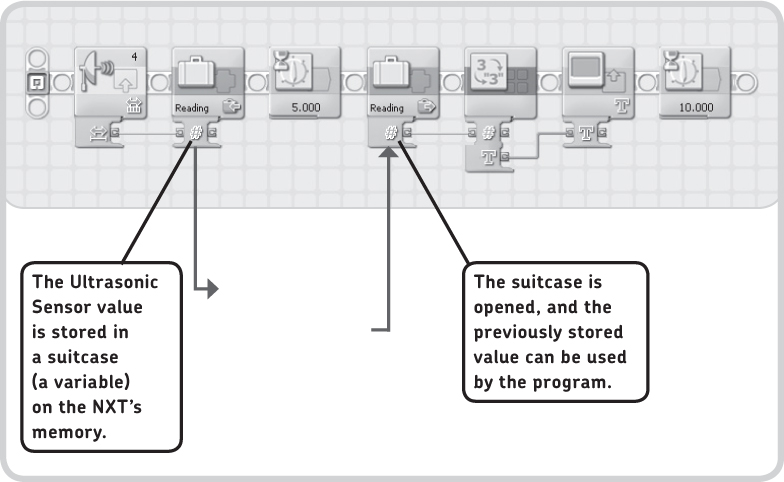
Figure 12-1: Values (like the Ultrasonic Sensor reading shown here) can be stored in variables in the NXT’s memory. Once a value is stored, a program can retrieve it from memory in order to use it. You’ll learn what this program does and how to create it later in this chapter.
But before you can use a variable in your program, you’ll need to define it in the Edit Variables dialog box, as shown in Figure 12-2.
To delete a variable, open the Edit Variables dialog box, select the variable you want to delete, and click Delete.
NOTE You can use variables only in the program in which you’ve defined them.
using the variable block
Once you’ve defined a variable, you can use it in a program with the Variable block. The Variable block can read values from or write (store) values to a variable in the NXT memory. To configure a Variable block, first select the variable you want to read or write in the List box on the Configuration Panel. Next, in the Action box, specify whether you want to write a value to the variable or read a value from it. When you choose Write, the block stores the value that you enter in the Value box of its Configuration Panel.
If a data wire is connected to the block’s Value data plug, the value carried by this wire is stored. If a value was stored in this variable previously, the old value is erased, and the new one is stored instead.
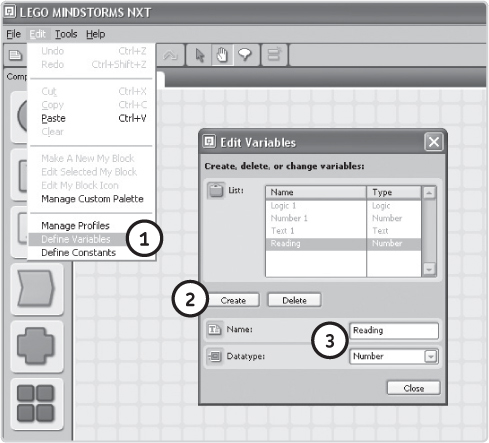
Figure 12-2: Defining a variable in the variable editing window. Step 1: Select Edit▸ Define Variables. Step 2: Click Create to make a new variable. Step 3: Enter a name for the variable (Reading), and select the data type (Number). Once you’ve done this, click Close.
When configured to read a value, the Variable block retrieves the information from the NXT’s memory and outputs it with a data wire so that the value can be used in the program to, for example, define a motor’s Power setting.
When reading a variable’s value, the value isn’t changed, so if you read it again with another Variable block, you’ll get the same value.
creating a program with a variable
The Smart-Variable program shown in Figure 12-3 stores the Ultrasonic Sensor value in a variable called Reading.
After five seconds, it retrieves the value from the variable and displays it on the NXT screen, which means that the value you see on the NXT screen represents what the sensor measured five seconds ago. (Before configuring this program, define a variable called Reading to carry numeric information, as shown in Figure 12-2.)
Smart-Variable demonstrates the concept of using variables in a program, but it’s a very basic program. Once you’ve created it, as shown in Figure 12-3, continue practicing with variables in Discovery #63.
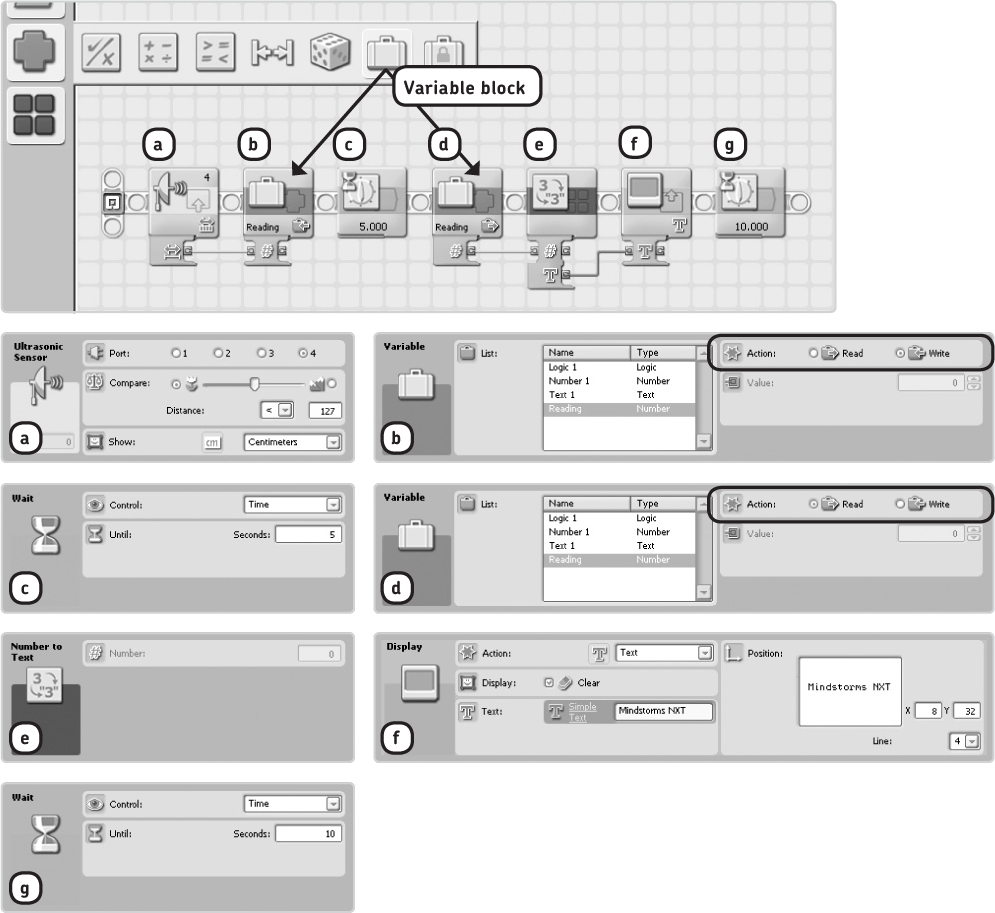
Figure 12-3: The configuration of the blocks in the Smart-Variable program. The Wait block at the end of the program gives you time to see the value on the NXT screen before the program ends.
Difficulty: Medium
You’ll create another program with variables that repeatedly compares new sensor readings to the sensor value stored in a variable at the beginning of the program. If the new reading is higher, the robot should say “Yes”; otherwise, it should say “No.” Figure 12-4 shows part of the program.
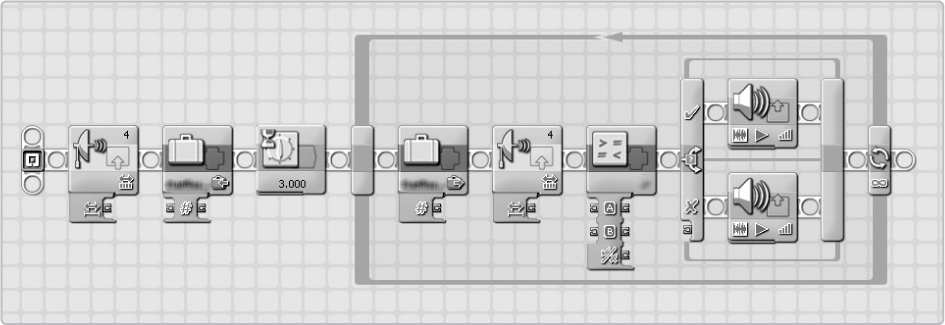
Figure 12-4: A starting point for Discovery #63
HINT What is your first step when creating a program with data wires? Which Variable blocks must read or write a value? How do you connect the data wires?
changing variable values
Previous sections have shown you how to write values to a variable and how to read values from one. Sometimes you’ll want to change a variable’s value, for example to increase its value by one, such as when you want to use a variable to track a high score or a total number of Touch Sensor presses. The Smart-Count program you’ll now create demonstrates how to use a variable to track the number of times a Touch Sensor is bumped (pressed and then released).
You begin by defining a new number variable called PressCount to store the number of Touch Sensor bumps. The program will wait until the Touch Sensor is bumped, at which point the PressCount value will increase by one. To make the counting ongoing, you’ll also use a Loop block in this program.
But how do you increase the variable’s value by one? As shown in Figure 12-5, you use a Variable block to read the PressCount value. Then you transfer this value to a Math block, which adds one to the value. The result of this addition is wired into another Variable block configured to write (store) the new value in the PressCount variable, which is therefore now increased by one. The result of the addition is stored in the variable and displayed on the NXT screen. By using this method, you can change any variable’s value. This sample has shown you how to add one to a value, but you can use the same method to subtract from a value.
Now create the program as shown in Figure 12-5.
initializing variables
When programming with variables, it’s important to initialize them by giving them a starting value. You do this in the Smart-Count program in Figure 12-5 by setting the PressCount value to 0 at the beginning of the program. Initializing variables makes a program more reliable by making sure that each time you run the program, it will function the same way because it starts at the same place.

Figure 12-5: The Smart-Count program counts the number of Touch Sensor presses and displays the total on the NXT screen.
It’s a good idea to initialize variables at the beginning of a program, especially when you’re creating bigger programs. If you don’t, you may find that the initial variable value is not equal to 0, which may cause the program to malfunction or to act unpredictably. Although usually not the case, your robot might, for example, say that you pressed the Touch Sensor five times, even when you haven’t touched it all, because the variable count was left at 5.
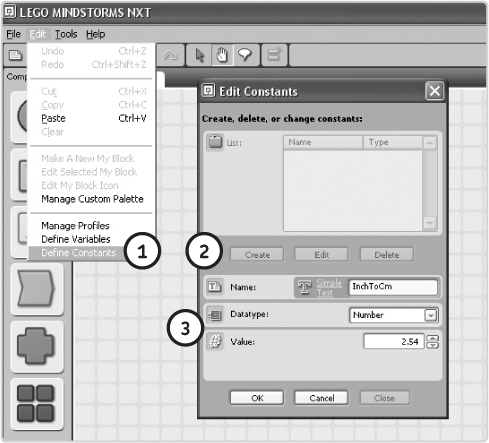
Figure 12-6: To define a constant, select Edit ▸ Define Constants (1), and click Create (2). Give your constant a name, select the type of value it should contain, and enter that value (3).
using constants
A constant is a value that cannot be changed while a program is running. For example, if your program needs to convert a distance measured in inches to one in centimeters, you would use a constant to multiply the inch value by 2.54. By creating a constant in an NXT program (let’s call the constant InchToCm) with the value 2.54, each time you want to perform this conversion you would simply use the constant InchToCm.
You must define a constant before you can use it, as shown in Figure 12-6. Once you’ve defined one, you can use it in any of your programs.
using the constant block
You use Constant blocks to integrate defined constants into your program in one of two ways. In the Action box of the Constant block’s Configuration Panel, you specify whether to select a constant from of a list of defined ones (Choose from list) or to use a custom constant (Custom). When you select Choose from list, the Constant block functions like a Variable block configured to read a value: The constant is read and output with a data wire, which then transfers the value to another block in the program. When you select Custom, you use the block to output a value that you enter in the Configuration Panel. (You don’t need to define this constant in advance.) The Custom configuration is useful when a single value needs to be transferred to multiple blocks, as shown in Figure 12-7.
creating a program with constants
The Smart-Constant program (shown in Figure 12-7) uses both configurations of the Constant block as it converts inches to centimeters and displays both values on the NXT screen. You’ll use a custom constant for the number of inches to convert so that when you run the program again to convert another value to centimeters, you’ll need to adjust only the value in the Constant block, rather than in both the Math and Display blocks. You’ll choose the constant for the conversion (2.54) from the list of constants as defined previously in Figure 12-6.

Figure 12-7: The Smart-Constant program. The first Custom block (block b) is a custom constant, while the second one (block e) is a constant you defined previously.
playing a game on the NXT
You’ll now create one large program that combines many of the programming techniques that you’ve learned throughout this book. I’ve introduced each programming technique and block previously with short example programs, but now you’ll see how to combine them for use in a larger program. Your goal will be to create a program that lets you play a game on the NXT. The NXT screen will display the game, and the NXT buttons will be the game controllers.
When playing the game, targets will appear on the NXT display randomly on the left and right. When a target appears, you’ll press the left or right NXT button quickly to destroy it, and the program will pop up the next target, as shown in Figure 12-8. The more targets you hit within 30 seconds, the higher your score. If you miss a target, your score will decrease.
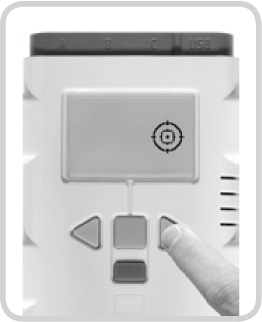
Figure 12-8: The Smart-Game program in action
NOTE At this point you should be able to re-create programs without viewing all the Configuration Panels, so from now on you’ll see text comments on the programming images that tell how to configure the blocks. If the text doesn’t tell how to set a certain setting, leave the default.
Because the Smart-Game program is much larger than any program you’ve created so far, take a good look at exactly what the program should do, as shown in Figure 12-9. The program consists of several sections, each of which has a specific function in the program. You’ll create these sections step-by-step. As you create each section, you’ll find descriptions of how each section works and why you need it in the program.
Steps 1 through 6 configure the blocks that display a target on the screen and adjust the score when you try to hit a target by pressing a button. You configure the Loop block in step 7 (repeating these actions for 30 seconds) and add a block to set the initial score to zero. Also in step 7, you add blocks to display the final score.
defining the variables
This program has three variables. The Score variable tracks the total score, and therefore it is defined to carry numerical values. The Position variable stores the target’s position, and the Button variable stores which button was pressed.
Before updating the Score variable, the program checks to see whether Position and Button variables are equal. To make this comparison easier, you’ll make Position and Button number variables. You’ll indicate left with 1 and right with 2. For example, if the user presses the Left Arrow button, the program will set the Button variable to 1. Once you’ve defined the Score, Button, and Position variables as numerical, you’re ready to begin creating the program.
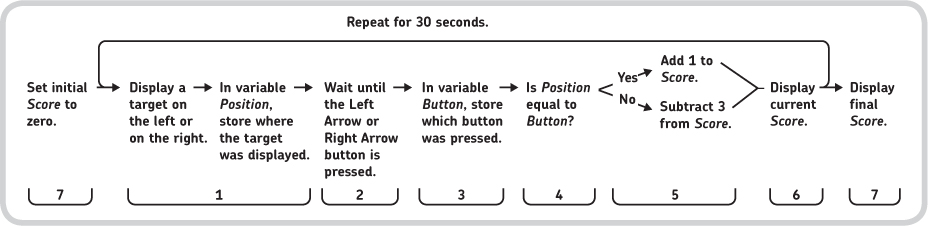
Figure 12-9: An overview of the Smart-Game program. The names of the variables used in this program are italicized. You’ll re-create this program with programming blocks in seven steps.
step 1: displaying a target randomly
The program uses a Switch block to decide whether to display a target on the left or right side of the NXT screen, as shown in Figure 12-10. To make this a random decision, you use a Random block to generate a number between 0 and 99, and you use a Compare block to see whether the generated value is less than 50 (the block’s output is then true). Because half of the numbers generated by the Random block will be less than 50, half the time that the program runs these blocks, the Compare block will output a true value, causing the target to be displayed on the left. The rest of the time the Compare block’s output will be false, and the target will be displayed on the right. The target’s position is stored in a variable, to be compared later with the user input. For the left position, 1 is written to the Position variable; for the right, 2 is written to the variable. Figure 12-10 shows the blocks that display the random target and set the Position variable.
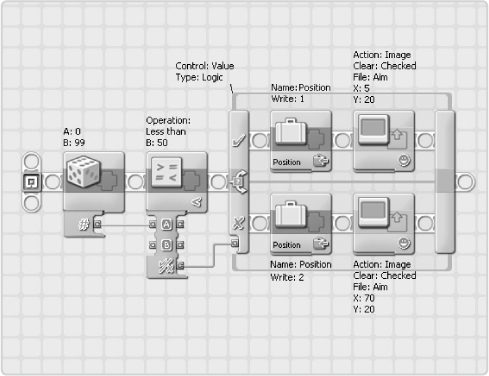
Figure 12-10: The configuration of the blocks placed in step 1
step 2: waiting until a button is pressed
Once the target has been displayed, the program waits until the user presses an arrow button on the NXT. You accomplish this with the technique of polling two sensors at the same time, as you used in Figure 11-11. Configure the blocks for step 2 as shown in Figure 12-11.
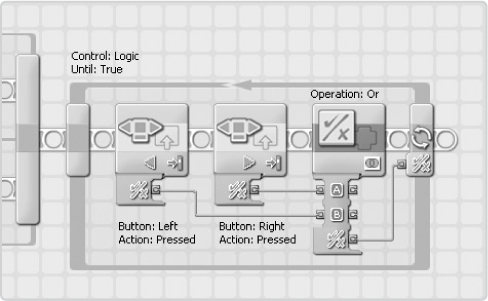
Figure 12-11: The configuration of the blocks placed in step 2
step 3: storing which button is pressed
When you press a button in the previous step, the Loop block stops looping, and the program jumps to the blocks you’ll place in this step. Because programming blocks are run so quickly, the next block will run before you can release the pressed button, so you’ll assume that the button is still pressed as the program runs through the blocks in this step. As a result, you’ll simply use a Switch block to see whether the Left button is pressed. If so, you set the Button variable to 1, and you wait until the button is released. If the left button is not pressed, you know that the right button is, and you set the Button variable to 2 and wait until the right button is released, as shown in Figure 12-12.
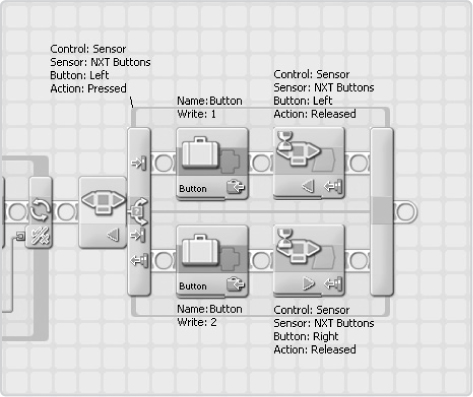
Figure 12-12: The configuration of the blocks placed in step 3
step 4: comparing the position and button variables
At this point in the program you know the position of the target (as stored in variable Position), as well as which button the user pressed (stored in Button). If these values are equal (both are 1 or both are 2), you know that the user has made the correct choice, and the score is increased by one. If they are not equal, the user clicked the wrong button, and the score is decreased by three.
You’ll place the blocks required to modify the score in a Switch block. The Switch block gets input from a Compare block that determines whether Position is equal to Button. If the two values are equal, the Compare block outputs true, and the blocks in the upper part of the Switch are run.
You’ll place the blocks to modify the score in the next step. In this step, configure the blocks to check whether Button equals Position, as shown in Figure 12-13.
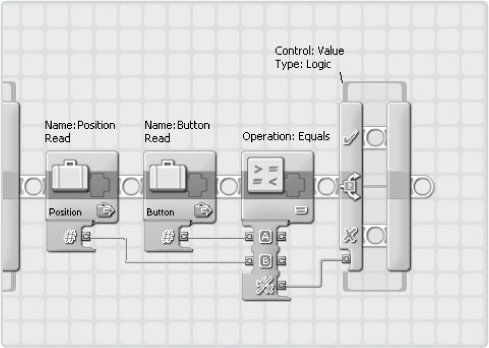
Figure 12-13: The configuration of the blocks placed in step 4
step 5: adjusting the score
If Button and Position were equal, the blocks in the upper part of the Switch shown in step 4 are run. In this step, you’ll place the blocks that add one to the Score variable. The NXT will tell you that you’ve made the correct choice by displaying a V sign on the screen and by playing a high note. The blocks in the lower part of the switch subtract three from the score, display an X sign on the screen, and play a low note. Figure 12-14 shows how to configure the blocks.
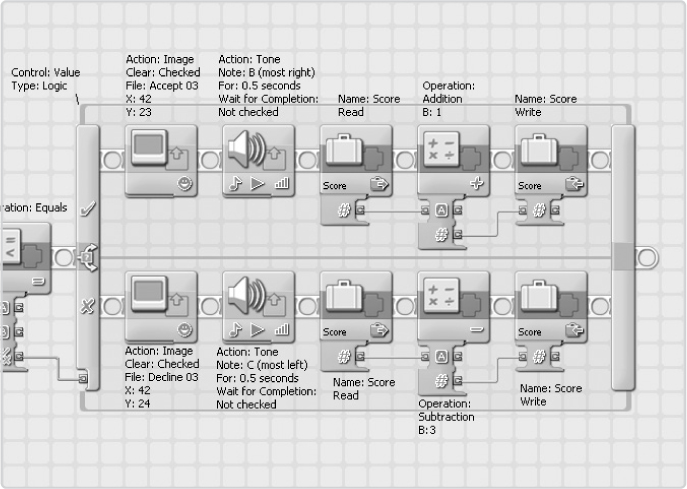
Figure 12-14: The configuration of the blocks placed in step 5
step 6: displaying the current score
The blocks in step 6 display the current score and give you time to see the score as well as the V or X sign on the NXT screen before the program goes back to display a new target. Figure 12-15 shows the blocks that display the score.
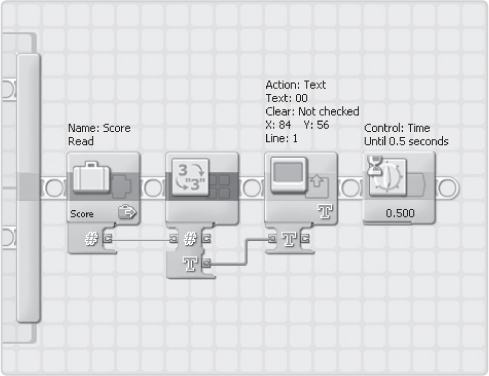
Figure 12-15: The configuration of the blocks placed in step 6
step 7: making the program repeat for 30 seconds
The blocks you’ve placed up to now display a target, wait for a button press, and modify the score based on user input, but you don’t yet have a working game. To turn your steps into a working game, drag all the blocks you placed in steps 1 to 6 into a Loop block configured to loop for 30 seconds.
Finish the program by adding a block at the beginning to set the initial score to zero, and add blocks to display the final score. Figure 12-16 shows the finished program.
Congratulations! You’ve finished the Smart-Game program. Now run it and see which score you can get in 30 seconds.
NOTE If you’re unable to get this program to work as described, download a working version from the companion website.
expanding the program
You’ve now seen how to combine your programming skills to create one large program. But the fun doesn’t have to end here. Here are some suggestions for customizing this program that will make it truly your own:
* Add more sounds to the program: Play applause when the correct button is pressed and a scream if you press the wrong one. Also, make your program play a tune of your own creation once the game is over.
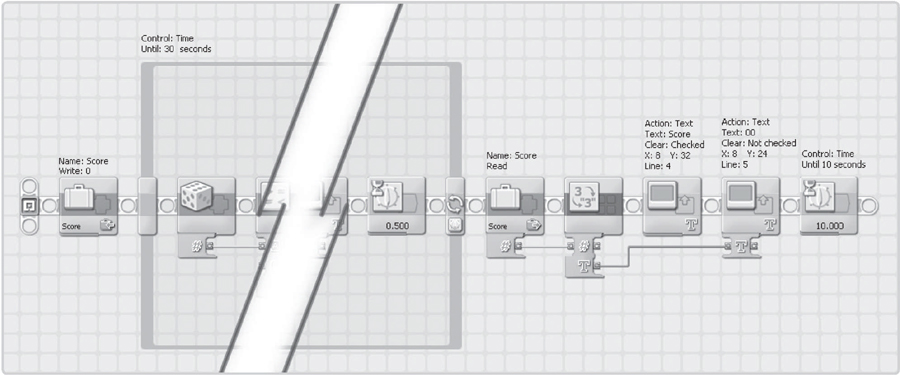
Figure 12-16: The configuration of the blocks placed in step 7. Most of the blocks in the Loop have been hidden here to better focus on the newly placed blocks in this step.
* Create a startup screen that is displayed on the NXT at the beginning of the program. Use images, lines, and drawings to customize your screen. Add extra blocks to have the NXT display Press the enter button to start the game! on its screen.
* Although the Smart-Game program uses only the NXT, that doesn’t mean you can’t use the motors and sensors connected to the robot. Think of a way to use the Color Lamp in your program, or have the Hand motor move faster and faster as you make more mistakes.
further exploration
Congratulations! You’ve completed all of the programming chapters in this book. Now you’re ready to learn how to build and program three more cool robots in the last part of this book.
But before you do, take a look at the following discoveries. These are more difficult than the other ones you’ve done so far, but remember that there are multiple solutions to each. Give them a try. If you think you have a good solution, post it to the companion website (http://www.discovery.laurensvalk.com/) to see what other readers think!
Difficulty: Hard
Expand the Smart-Game program so that it will display targets at three locations instead of only two. Display the third target in the middle of the screen, and use the Enter button to hit it.
Difficulty: Expert
Try this if you’re up for a really complicated discovery. Create a program that displays random addition problems (for example, 7 + 6). The user decides whether the displayed answer is correct by pressing the Left Arrow button (incorrect) or the Right Arrow button (correct), as shown in Figure 12-17.
Half the time, a correct answer should be displayed. The game should display new sums for 30 seconds, after which it should display the total score. Each correct button click is worth one point, but each mistake costs five points.
You can create this program using only the programming blocks discussed in this book, but it’s still quite difficult to make. See the companion website for the full program, as well as a description of how it works.
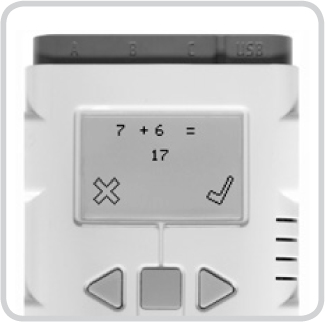
Figure 12-17: An example addition problem in NXT Brain Trainer game
The Smart-Game program is just one example of a game you can play on the NXT. This discovery challenges you to build a construction similar to the Whack-a-Mole game. Use NXT motors to randomly make moles pop up out of a frame of LEGO pieces, and then use the NXT buttons or Touch Sensors to whack the moles down. Create your own advanced program for this machine to turn it into a real Whack-a-Mole game. You can make the NXT display high scores, play sounds, or increase the difficulty level as time passes.