Chapter 4. Scream of the Crop
how to resize and crop photos

You know what? If I go to Google or the iTunes Store (two of my most reliable sources for TV show, song, and movie titles), and type in “crop,” do you know what I’m going to get? That’s right, a bunch of results about corn and wheat. Now, I have to be straight with you—I hate corn. I don’t know what it is about corn that I don’t like (maybe its red color?), but I just never warmed up to it at all. It’s probably because I don’t like the smell of corn, and if you think about it, when it comes to which foods we like and which we don’t like, we generally don’t like any foods that smell bad to us. For example, when was the last time you put a big forkful of food up to your mouth and said, “Wow, this smells horrible!” and you actually ate it? Okay, outside of a fraternity prank, when was the last time? Really? You eat food that stinks? Wow, I never knew that about you. I’m a little surprised frankly, because up to this point, I thought we had kind of a simpatico thing going between us. I write ridiculous stuff, and you don’t return the book for a refund, and you even skip entire chapters just to jump to the next chapter opener. I thought we were buds, but this...this really has me worried. What else haven’t you told me? What? No way! Did you get sick? Oh man, that had to be bad. Did you call the cops? Why not? Oh. Then what? No way! What? What? What? Ewwwww! Look, I’m not sure we can go through any more of these chapter intros together. You’re pretty messed up, and I’m not sure that reading these is good for you. You seem like you’re in kind of a downward spiral. What? No, I am not judging you. Okay, I’m judging you, but no more than anyone else would who knew you did that, which by the way was pretty sick, and yes you should have called the cops, or a lawyer, or a podiatrist, or a taxidermist. So, corn, huh? All that, and you’re totally okay with eating corn, even though it smells bad to you. Well, if it’s any consolation, I don’t eat wheat. I mean, where would you even buy a bushel of wheat? The tack shop? The Purina shop? Subway? Hey, I have a 50% off coupon!
Basic Cropping
After you’ve sorted your images in the Organizer, one of the first editing tasks you’ll probably undertake is cropping a photo. There are a number of different ways to crop a photo in Elements. We’ll start with the basic garden-variety options, and then we’ll look at some ways to make the task faster and easier.
Step One:
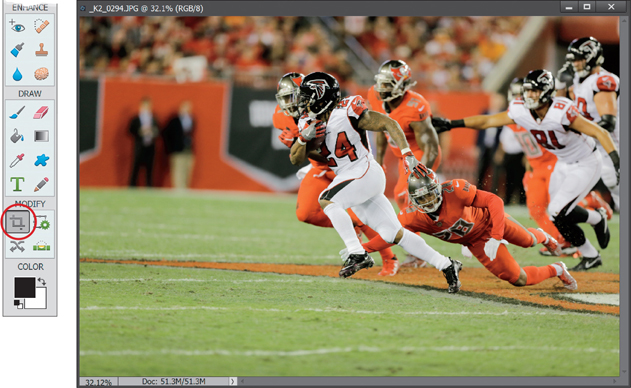
Open the image you want to crop in the Elements Editor, and then press the letter C to get the Crop tool (you could always select the tool directly from the Toolbox, but I only recommend doing so if you’re charging by the hour).
Step Two:
Click within your photo and drag out a cropping border. By default, you’ll see a grid appear within your border. This feature lets you crop photos based on some of the popular composition rules that photographers and designers use. We’ll go over this feature more in a moment, so for now click on the None icon in the Grid Overlay section on the right end of the Tool Options Bar. The area to be cropped away will appear dimmed (shaded). You don’t have to worry about getting your cropping border right when you first drag it out, because you can edit it by dragging the control handles that appear in each corner and at the center of each side.
TIP: Turn Off the Shading
If you don’t like seeing your photo with the cropped-away areas appearing shaded (as in the previous step), you can toggle this shading feature off/on by pressing the Forward Slash key (/) on your keyboard. When you press the Forward Slash key, the border remains in place but the shading is turned off.

Step Three:
While you have the cropping border in place, you can rotate the entire border. Just move your cursor outside the border, and your cursor will change into a double-headed arrow. Then, click-and-drag, and the cropping border will rotate in the direction that you drag. (This is a great way to save time if you have a crooked image, because it lets you crop and rotate at the same time.)

Step Four:
Once you have the cropping border where you want it, click on the green checkmark icon at the bottom corner of your cropping border, or just press the Enter (Mac: Return) key on your keyboard. To cancel your crop, click the red international symbol for “No Way!” at the bottom corner of the cropping border, or press the Esc key on your keyboard.

Step Five:
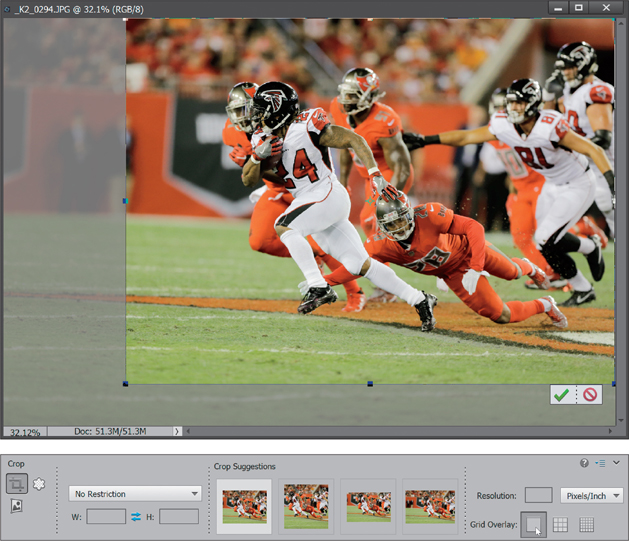
Elements includes a feature called Crop Suggestions in both Quick and Expert edit modes. It automatically looks at your photo and gives you a few suggestions for ways to crop it. It’s pretty simple to use: just hover your cursor over the different thumbnails to see the suggestions. If you find one you like, click on it to select it. If you like the size, but not the placement, simply click inside the cropping border and drag it where you want it.

Step Six:
Like I mentioned, Elements includes overlay features to help you crop your photos. The one you’ll use the most is called the Rule of Thirds (and is the default overlay). It’s essentially a trick that photographers sometimes use to create more interesting compositions. Basically, you visually divide the image you see in your camera’s viewfinder into thirds, and then you position your horizon so it goes along either the top imaginary horizontal line or the bottom one. Then, you position the subject (or focal point) at the intersections of those lines (as you’ll see in the next step). But if you didn’t use the rule in the viewfinder, no sweat! You can use this overlay feature to achieve it. There is one other option in the Grid Overlay section: Grid, which is useful for straightening horizons.

Step Seven:
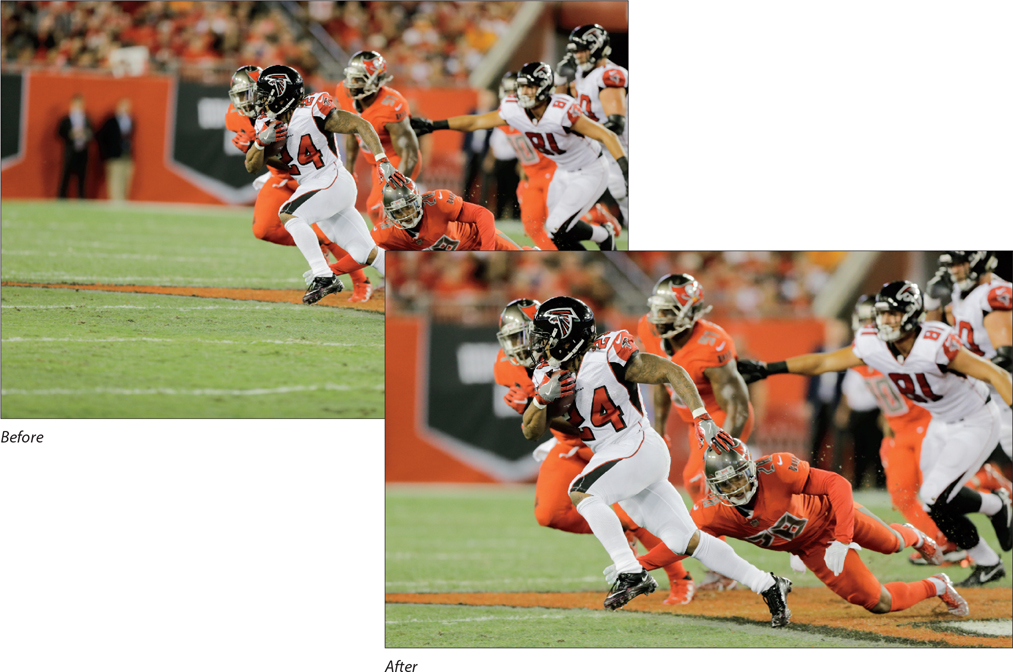
So, click on the Rule of Thirds icon and then click within your photo and drag out a cropping border. When you drag the cropping border onto your image, you’ll see the Rule of Thirds overlay appear over your photo. Try to position your image’s horizon along one of the horizontal grid lines, and be sure your focal point (the running back, in this case) falls on one of the intersecting points (the top-left intersection, in this example).

Auto-Cropping to Standard Sizes
If you’re outputting photos for clients, chances are they’re going to want them in standard sizes so they can easily find frames to fit. If that’s the case, here’s how to crop your photos to a predetermined size (like a 5x7", 8x10", etc.):
Step One:
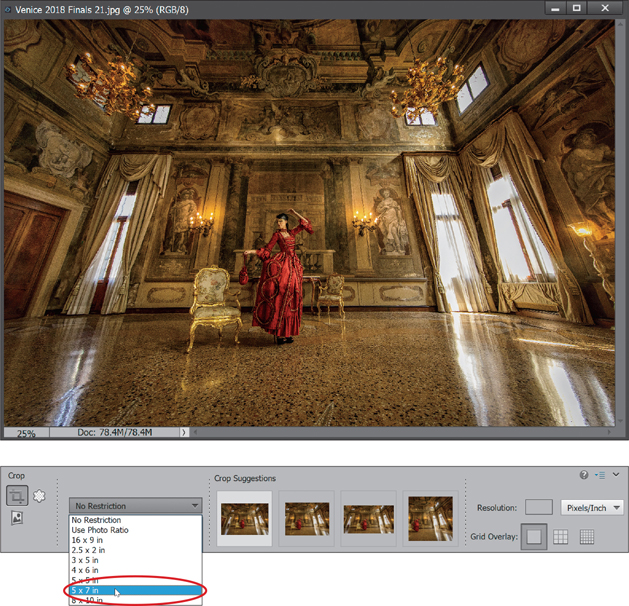
Open an image in the Elements Editor that you want to crop to be a perfect 5x7" for a vertical image, or 7x5" if your image is horizontal. Press C to get the Crop tool, then go to the Tool Options Bar and click on the words “No Restriction” in the pop-up menu on the left. From the list of preset crop sizes, choose 5x7 in. (Note: To hide the Rule of Thirds overlay grid, click on the None icon on the right side of the Tool Options Bar.)
TIP: Swapping Fields
The W(idth) and H(eight) fields are populated based on the type of image you open—7x5" for horizontal images and 5x7" for vertical images. If you opened a horizontal image, but your crop is going to be vertical (tall), you’ll need to swap the figures in the W and H fields by clicking on the Swaps icon between the fields in the Tool Options Bar (as shown here).

Step Two:
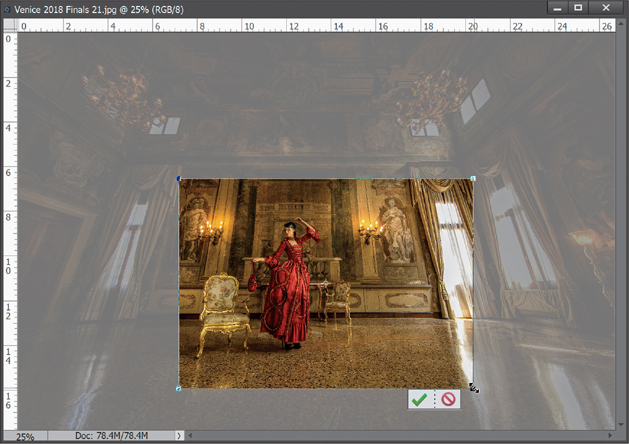
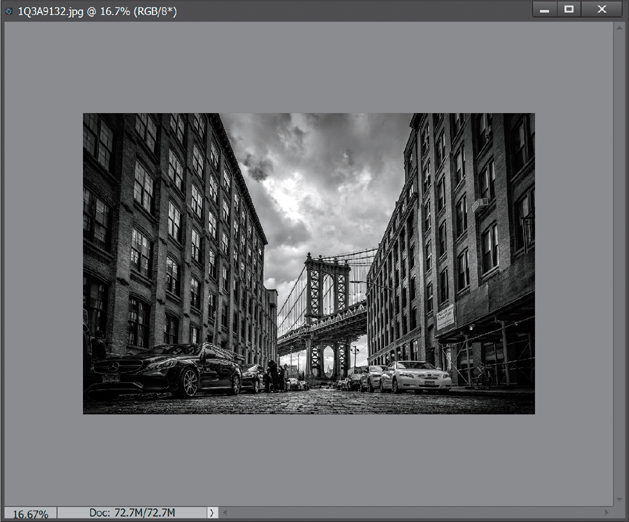
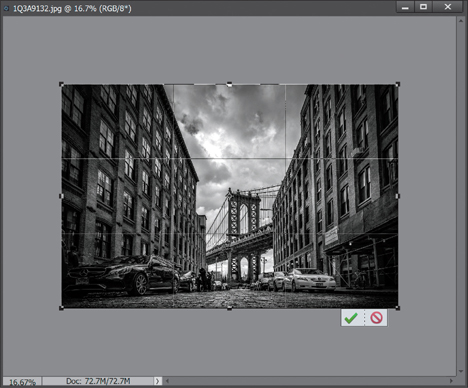
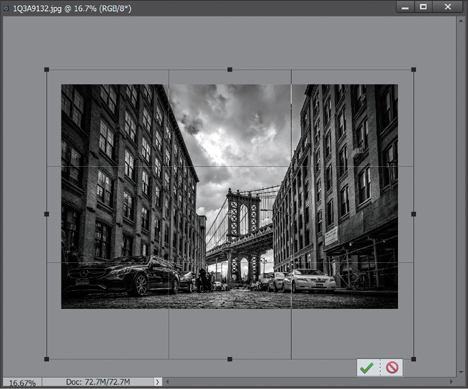
Now click-and-drag the Crop tool over the portion of the photo that you want to be 7x5" (as mentioned on the previous page, if your image is vertical, Elements will automatically adjust your border to 5x7". I made the rulers visible here by pressing Ctrl-Shift-R [Mac: Command-Shift-R]). While dragging, you can press-and-hold the Spacebar to adjust the position of your border, if needed.
Step Three:
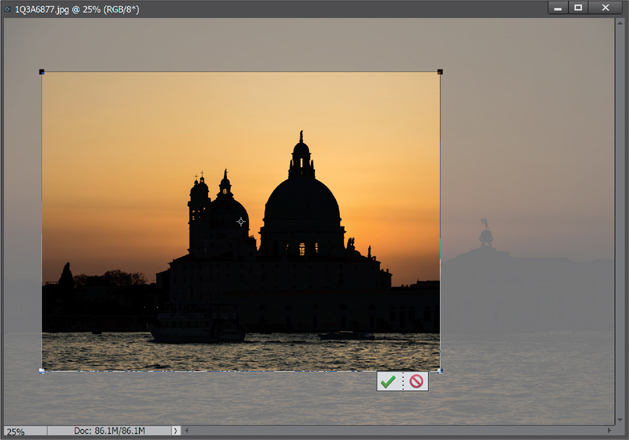
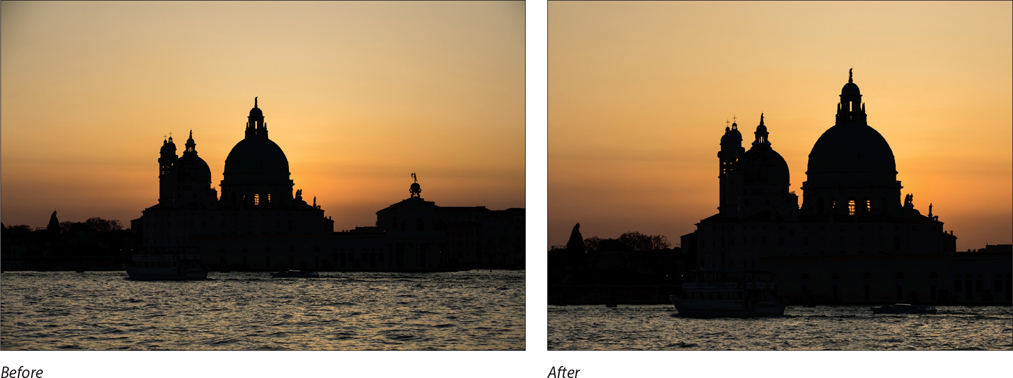
Once it’s set, press Enter (Mac: Return) and the area inside your cropping border will become 7x5" (as seen here).

TIP: Crop with an Action
You can also use the Actions palette (found under the Window menu) in Elements to crop your photos. In the palette, they are in the Resize and Crop folder. Simply open the image you want to crop, click on the cropping action you want to run, then click on the Play Selection icon at the top right of the palette, and—BAM!—your image is cropped and ready to go.
Cropping to an Exact Custom Size
Okay, now you know how to crop to Elements’ built-in preset sizes, but how do you crop to a nonstandard size— a custom size that you determine? Here’s how:
Step One:
Open the photo that you want to crop in the Elements Editor. (I want to crop this image to 8x6".) First, press C to get the Crop tool. In the Tool Options Bar, you’ll see fields for W(idth) and H(eight). Enter the size you want for the width, followed by the unit of measure you want to use (e.g., enter “in” for inches, “px” for pixels, “cm” for centimeters, “mm” for millimeters, etc.). Next, press the Tab key to jump over to the H(eight) field and enter your desired height, again followed by the unit of measure.

Step Two:
Once you’ve entered these figures in the Tool Options Bar, click within your photo with the Crop tool and drag out a cropping border. (Note: To hide the Rule of Thirds overlay grid, click on the None icon on the right side of the Tool Options Bar.) You’ll notice that as you drag, the border is constrained to an 8x6" aspect ratio; no matter how large of an area you select within your image, the area within that border will become your specified size. When you release your mouse button, you’ll still have the corner handles visible, but if you click-and-drag on a side, it will act like a corner handle to keep your size constrained.
Step Three:
Once your cropping border is onscreen, you can resize it using the corner handles or you can reposition it by moving your cursor inside the border. Your cursor will change to a Move arrow, and you can now click-and-drag the border into place. You can also use the Arrow keys on your keyboard for more precise control. When it looks right to you, press Enter (Mac: Return) to finalize your crop or click on the checkmark icon at the bottom right of your cropping border. Here, I made the rulers visible (Ctrl-Shift-R [Mac: Command-Shift-R]) so you could see that the image measures exactly 8x6".

TIP: Clearing the Fields
Once you’ve entered a width and height in the Tool Options Bar, those dimensions will remain there. To clear the fields, just choose No Restriction from the pop-up menu above the W and H fields. This will clear the fields, and now you can use the Crop tool for freeform cropping (you can drag it in any direction—it’s no longer constrained to your specified size).

COOLER TIP: Changing Dimensions
If you already have a cropping border in place, you can change your dimensions without re-creating the border. All you have to do is enter the new sizes you want in the W and H fields in the Tool Options Bar, and Elements will resize your cropping border.

Cropping into a Shape
Elements has a cool feature that lets you crop your photo into a pre-designed shape (like putting a wedding photo into a heart shape), but even cooler are the edge effects you can create by using the pre-designed custom edges. Here’s how to put this feature to use to add visual interest to your own photos:
Step One:
In the Elements Editor, open the photo you want to crop into a pre-designed shape, and press the letter C until you get the Cookie Cutter tool.

Step Two:
Now, go down to the Tool Options Bar and click on the shape thumbnail. This brings up the Custom Shape Picker, which contains the default set of 30 shapes. To load more shapes, click on the Shapes pop-up menu at the top of the Picker and a list of built-in shape sets will appear. From this list, choose Crop Shapes to load the edge-effect shapes, which automatically crop away areas outside your custom edges.

Step Three:
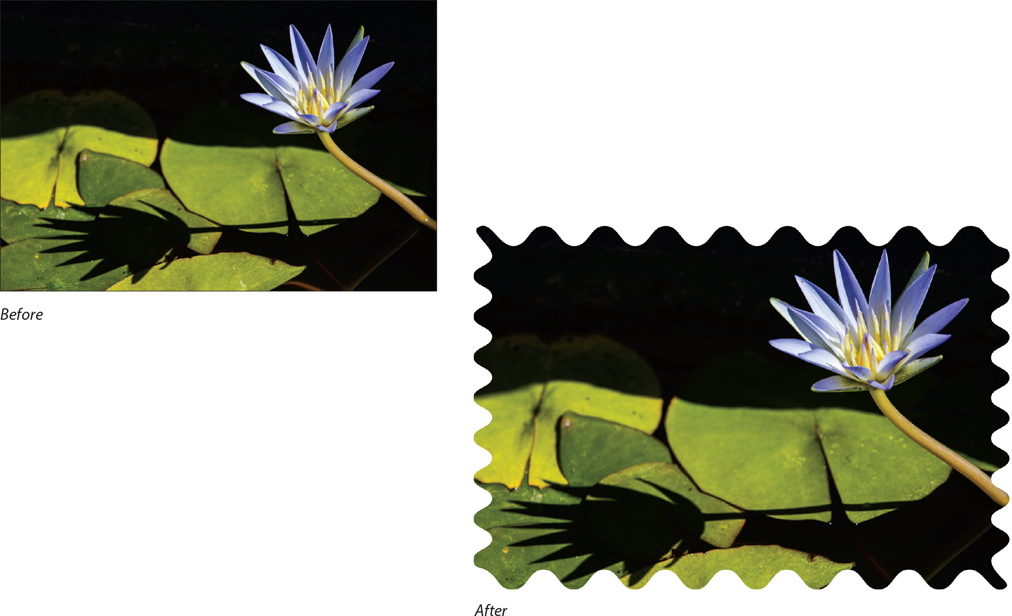
Once you select the custom edge shape you want to use in the Custom Shape Picker, just click-and-drag it over your image to the size you want it. When you release the mouse button, your photo is cropped to fit within the shape. Note: I like Crop Shape 10 for something simple, and Crop Shape 20 (which is shown here) for something a little wilder. The key thing here is to experiment and try different crop shapes to find your favorite.

Step Four:
You’ll see a bounding box around the shape, which you can use to resize, rotate, or otherwise mess with your shape. To resize your shape while keeping it proportional, press-and-hold the Shift key (or choose Defined Proportions from the pop-up menu to the right of the shape thumbnail in the Tool Options Bar), then click-and-drag a corner handle. To rotate the shape, move your cursor outside the bounding box until your cursor becomes a double-headed arrow, and then click-and-drag. As long as you see that bounding box, you can still edit the shape. When it looks good to you, press Enter (Mac: Return) and the parts of your photo outside that shape will be permanently cropped away.

TIP: Tightly Crop Your Image
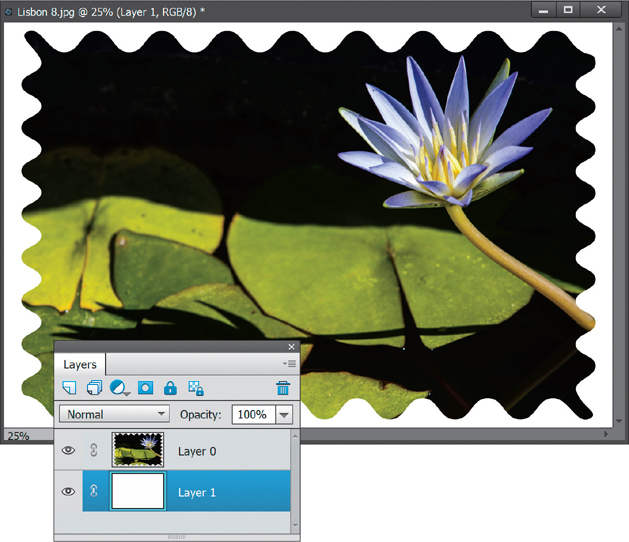
If you want your image area tightly cropped, so it’s the exact size of the shape you drag out, just turn on the Cookie Cutter’s Crop checkbox (in the Tool Options Bar) before you drag out your shape. Then, when you press Enter (Mac: Return) to lock in your final shape, Elements will tightly crop the entire image area to the size of your shape. Note: The checkerboard pattern you see around the photo is letting you know that the background around the shape is transparent. If you want a white background behind the shape, click on the Create a New Layer icon at the top of the Layers palette, and then drag your new layer below the Shape layer. Press D, then X to set your Foreground color to white, and press Alt-Backspace (Mac: Option-Delete) to fill this layer with white.
Fixing Problems with Perspective Crop
This is the tool you reach for when there’s something in your image that’s at an angle, but you need it to be flat (and you need to crop everything else but that object away). It’s a one-trick pony, but when you need it, it really works wonders.
Step One:
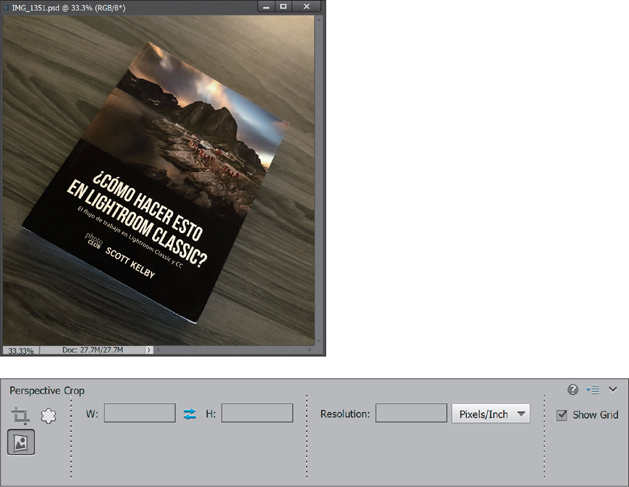
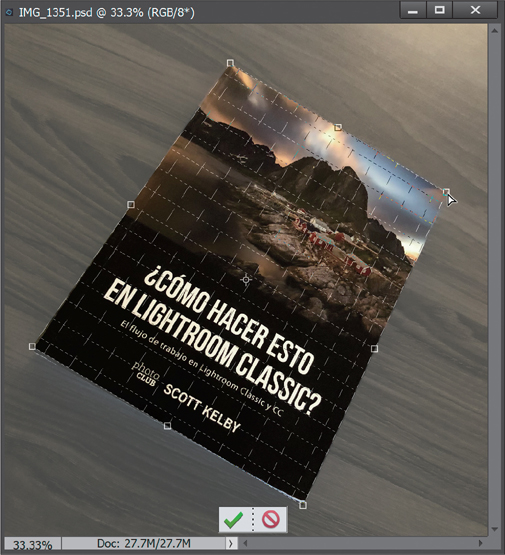
Open an image that has something that’s angled that you want to be flat. In this case, it’s a book sitting on my desk (by the way, this is the Spanish translation of my Lightroom Classic book). Press the letter C until you get the Perspective Crop tool (shown selected here in the Tool Options Bar).
Step Two:
Now, click-and drag a cropping border over the object you want flat. It doesn’t have to surround the whole object at this point because we’re going to adjust it in a second. When you click-and drag, it drags out a visible grid, which is helpful in positioning your crop border (as seen here).
Step Three:
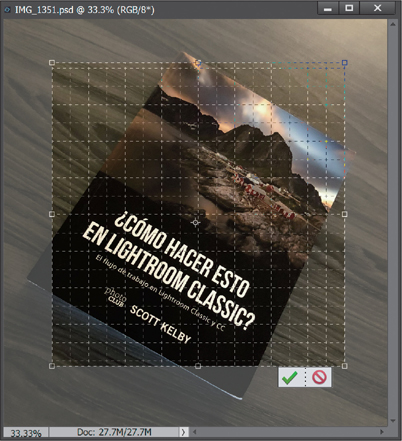
To position the cropping border around the book, just click on the top-right corner handle, and drag it over to the top-right corner of the book. Then, do the same with the top-left and bottom corners—click-and-drag the corner handles to the corners of the book (as shown here). If you need to reposition the grid, just click anywhere inside it and drag it, or use the side handles to resize it. If you’re not happy with the grid you created, just hit the Esc key on your keyboard and you can take another stab at it.
Step Four:
When it looks good to you, press the Enter (Mac: Return) key to apply the crop to your image. It flattens it out like you see here, and crops everything outside that grid away. Again, you’re not going to use this technique every day, but when you need it, it works like a charm.

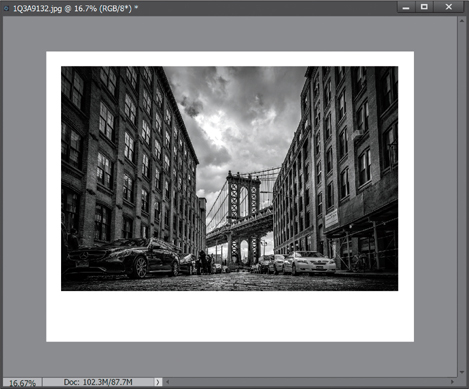
Using the Crop Tool to Add More Canvas Area
I know the heading for this technique doesn’t make much sense—“Using the Crop Tool to Add More Canvas Area.” How can the Crop tool (which is designed to crop photos to smaller sizes) actually make the canvas area (white space) around your photo larger? That’s what I’m going to show you.
Step One:
In the Elements Editor, open the image to which you want to add additional blank canvas area. Press the letter D to set your Background color to its default white. If you want to add a different color canvas, click on the Background Color swatch at the bottom of the Toolbox to open the Color Picker, choose whatever color you want the canvas to be, and click ok.

Step Two:
If you’re in Maximize Mode or tabbed viewing, press Ctrl-– (minus sign; Mac: Command-–) to zoom out a bit (so your image doesn’t take up your whole screen). If your image window is floating, click-and-drag out the bottom corner of the document window to see the gray desktop area around your image. (To enter Maximize Mode, click the Maximize Mode icon in the top-right corner of the image window. To enter tabbed viewing, go under the Window menu, under Images, and choose Consolidate All to Tabs.)
Step Three:
Press the letter C to switch to the Crop tool and drag out a cropping border to any random size (it doesn’t matter how big or little it is at this point).
Step Four:
Next, grab any one of the side or corner handles and drag outside the image area, out into the gray area that surrounds your image. The cropping border extending outside the image is the area that will be added as white canvas space, so position it where you want to add the blank canvas space.
Step Five:
Now, just press the Enter (Mac: Return) key to finalize your crop, and when you do, the area outside your image will become white canvas area.
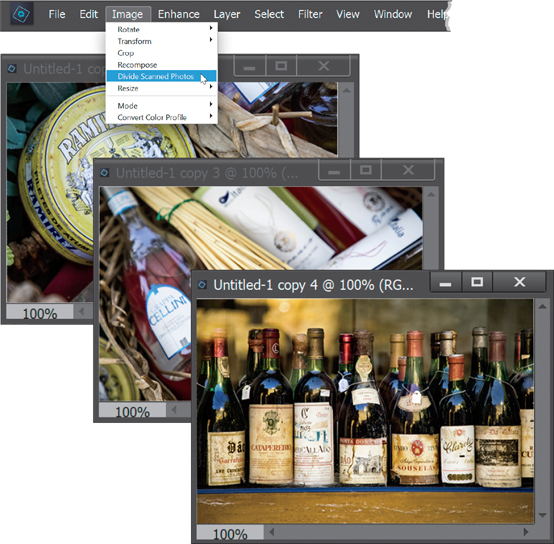
Auto-Cropping Gang-Scanned Photos
A lot of photographers scan photos using a technique called “gang scanning.” That’s a fancy name for scanning more than one picture at a time. Scanning three or four photos at once with your scanner saves time, but then you eventually have to separate these photos into individual documents. Here’s how to have Elements do that for you automatically:
Step One:
Place the photos you want to “gang scan” on the bed of your flatbed scanner. In the Organizer, you can scan the images by going under the File menu, under Get Photos and Videos, and choosing From Scanner (they should appear in one Elements document). In the dialog that appears, select where and at what quality you want to save your scanned document. (Note: This feature is currently not available in the Elements 2020 version for the Mac, so you’ll need to use your scanner’s software.)

Step Two:
Once your images appear in one document in the Editor, go under the Image menu and choose Divide Scanned Photos. It will immediately find the edges of the scanned photos, straighten them if necessary, and then put each photo into its own separate document. Once it has “done its thing,” you can close the original gang-scanned document, and you’ll be left with just the individual documents.
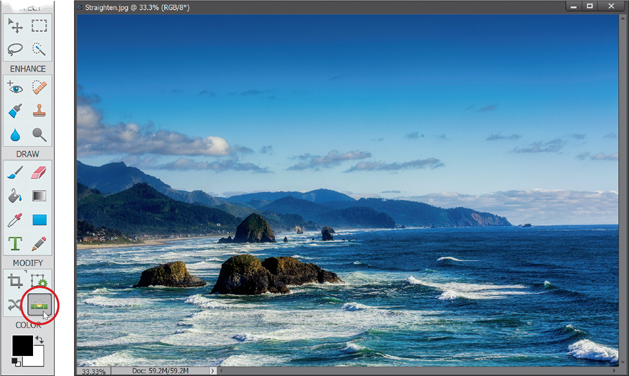
Straightening Photos with the Straighten Tool
In Elements, there’s a simple way to straighten photos, but it’s knowing how to set the options for the tool that makes your job dramatically easier. Here’s how it’s done:
Step One:
Open the photo that needs straightening (the photo shown here looks like it’s sloping down to the left). Then, choose the Straighten tool from the Toolbox (or just press the P key).
TIP: Another Place to Straighten
You can also use the Straighten tool in Quick Mode.
Step Two:
Take the Straighten tool and drag it along an edge in the photo that you think should be perfectly horizontal, like a horizon line (as shown here) or the edge of a building.

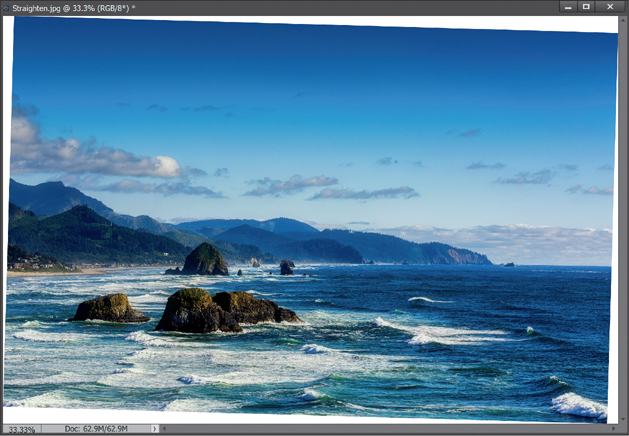
Step Three:
When you release the mouse button, the image is straightened, but as you see here, the straightening created a problem of its own—the photo now has to be cropped again because the edges are showing a white background (as the image was rotated until it was straight). That’s where the options (which I mentioned in the intro to this technique) come in. You see, the default setting does just what you see here— it rotates the image and leaves it up to you to crop away the mess. However, Elements can do the work for you (see the next step).
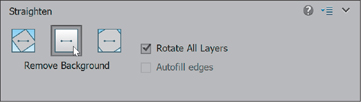
Step Four:
Once you click on the Straighten tool, go down to the Tool Options Bar and click on the Remove Background icon.
Step Five:
Also, there’s a feature in Elements that lets you get the best of both worlds. For example, what happens if you straighten the photo and crop away the edges, but a key part of your photo gets cropped away with it? You’d normally be outta luck. Instead, go back to the default Grow or Shrink Canvas icon that we started with. Then turn on the Autofill Edges checkbox to the right. This time, Elements will try to automatically patch those areas that would normally be left white. You’ll find it works best on skies and water, and areas with non-essential parts of the photo in them. It’s not a gimme and it won’t work every time, but it’s definitely worth a try.

TIP: Straightening Vertically
In this example, we used the Straighten tool along a horizontal plane, but if you wanted to straighten a photo using a vertical object instead (like a column or light pole), just click-and-drag it vertically along an object and that will do the trick.
Resizing Photos
If you’re more familiar with resizing scanned images, you’ll find that resizing images from digital cameras is a bit different, primarily because scanners create high-resolution images (usually 300 ppi or more), but the default setting for most digital cameras usually produces an image that is large in physical dimension, but lower in ppi (usually 72 ppi). The trick is to decrease the physical size of your digital camera image (and increase its resolution) without losing any quality in your photo. Here’s the trick:
Step One:
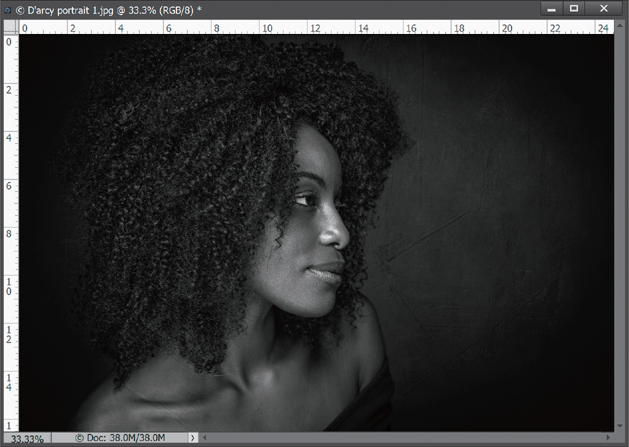
Open the digital camera image that you want to resize. Press Ctrl-Shift-R (Mac: Command-Shift-R) to make Elements’ rulers visible, and then check out the rulers to see the approximate dimensions of your image. As you can see from the rulers in the example here, this photo is around 41x62".

Step Two:
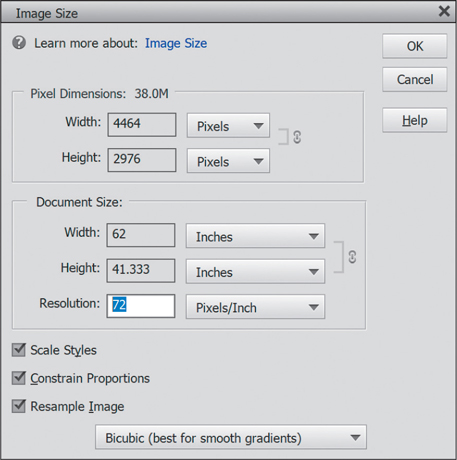
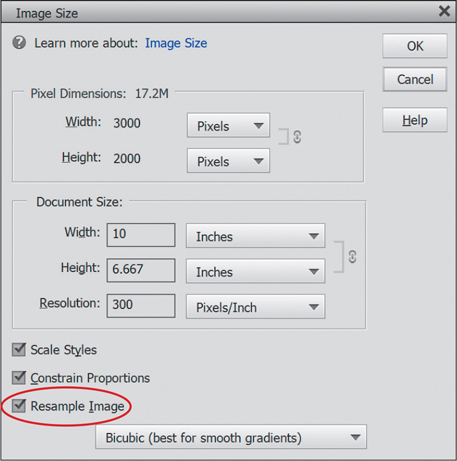
Go under the Image menu, under Resize, and choose Image Size to bring up the Image Size dialog. In the Document Size section, the Resolution setting is 72 pixels/inch (ppi). A resolution of 72 ppi is considered low resolution and is ideal for photos that will only be viewed onscreen (such as web graphics, slide shows, etc.). This res is too low, though, to get high-quality results from a color inkjet printer, color laser printer, or for use on a printing press.
Step Three:
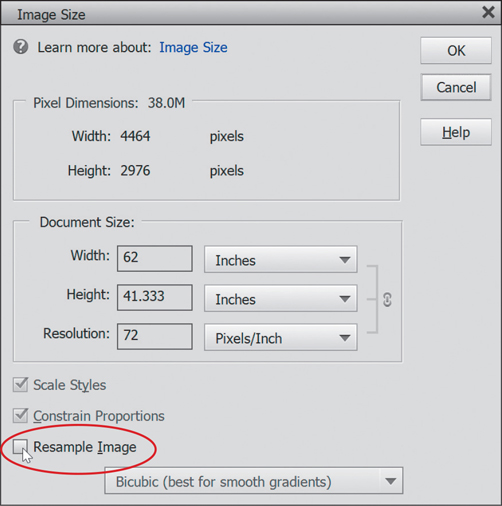
If we plan to output this photo to any printing device, it’s pretty clear that we’ll need to increase the resolution to get good results. I wish we could just type in the resolution we’d like it to be in the Resolution field (such as 200 or 240 ppi), but unfortunately, this “resampling” makes our low-res photo appear soft (blurry) and pixelated. That’s why we need to make sure the Resample Image checkbox is turned off (as shown here). That way, when we type in the setting that we need in the Resolution field, Elements automatically adjusts the Width and Height fields for the image in the exact same proportion. As your Width and Height decrease (with Resample Image turned off), your Resolution increases. Best of all, there’s absolutely no loss of quality. Pretty cool!
Step Four:
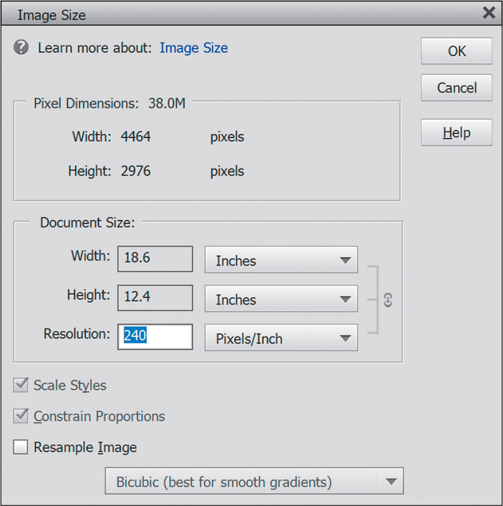
Here I’ve turned off Resample Image, then I typed 240 in the Resolution field (for output to a color inkjet printer—I know, you probably think you need a lot more resolution, but you don’t. In fact, I never print with a resolution higher than 240 ppi). At a resolution of 240 ppi here, I can actually print a photo that is around 18" wide by around 12" high.
Step Five:
Here, I’ve lowered the Resolution setting to 180 ppi. (Again, you don’t need nearly as much resolution as you’d think, but 180 ppi is pretty much as low as you should go when printing to a color inkjet printer.) As you can see, the width of my image is now almost 25" and the height is almost 17". Best of all, we did it without damaging a single pixel, because we were able to turn off Resample Image.

Step Six:
When you click OK, you won’t see the image window change at all—it will appear at the exact same size onscreen. But now look at the rulers—you can see that your image’s dimensions have changed. Resizing using this technique does three big things: (1) it gets your physical dimensions down to size (the photo now fits on a 16x24" sheet); (2) it increases the resolution enough so you can output this image on a color inkjet printer; and (3) you haven’t softened or pixelated the image in any way—the quality remains the same— all because you turned off Resample Image. Note: Do not turn off Resample Image for images that you scan on a scanner—they start as high-res images in the first place. Turning off Resample Image is only for photos taken with a digital camera at a low resolution.
Resizing and How to Reach Those Hidden Free Transform Handles
What happens if you drag a large photo onto a smaller photo in Elements? (This happens all the time, especially if you’re collaging or combining two or more photos.) You have to resize the photo using Free Transform, right? Right. But here’s the catch: when you bring up Free Transform, at least two (or, more likely, all four) of the handles that you need to resize the image are out of reach. You see the center point, but not the handles you need to reach to resize. Here’s how to get around that hurdle quickly and easily:
Step One:
Open two different-sized photos in the Elements Editor. Use the Move tool (V) to drag-and-drop the larger photo on top of the smaller one (if you’re in tabbed viewing, drag one image onto the other image’s thumbnail in the Photo Bin). To resize a photo on a layer, press Ctrl-T (Mac: Command-T) to bring up the Free Transform command. Next, press-and-hold the Shift key to constrain your proportions (or turn on the Constrain Proportions checkbox in the Tool Options Bar), grab one of the Free Transform corner handles, and (a) drag inward to shrink the photo, or (b) drag outward to increase its size (not more than 20%, to keep from making the photo look soft and pixelated). But wait, there’s a problem. The problem is—you can’t even see the Free Transform handles in this image.

Step Two:
To instantly have full access to all of Free Transform’s handles, just press Ctrl-0 (zero; Mac: Command-0), and Elements will instantly zoom out of your document window and surround your photo with gray desktop, making every handle well within reach. Try it once, and you’ll use this trick again and again. Note: You must choose Free Transform first for this trick to work.

Making Your Photos Smaller (Downsizing)
There is a different set of rules we use for maintaining as much quality as possible when making an image smaller, and there are a couple of different ways to do just that (we’ll cover the two main ones here). Luckily, maintaining image quality is much easier when sizing down than when scaling up (in fact, photos often look dramatically better—and sharper—when scaled down, especially if you follow these guidelines).
Downsizing photos where the resolution is already 300 ppi:
Although earlier we discussed how to change image size if your digital camera gives you 72-ppi images with large physical dimensions (like 24x42" deep), what do you do if your camera gives you 300-ppi images at smaller physical dimensions (like a 10x6" at 300 ppi)? Basically, you turn on Resample Image (in the Image Size dialog—go under the Image menu, under Resize, and choose Image Size), then simply type the desired size (in this example, we want a 4x6" final image size), and click OK (don’t change the Resolution setting, just click OK). The image will be scaled down to size, and the resolution will remain at 300 ppi. IMPORTANT: When you scale down using this method, it’s likely that the image will soften a little bit, so after scaling you’ll want to apply the Unsharp Mask filter to bring back any sharpness lost in the resizing (look at the sharpening chapter [Chapter 11] to see what settings to use).
SCOTT KELBY AND ©ISTOCK/THEPALMER

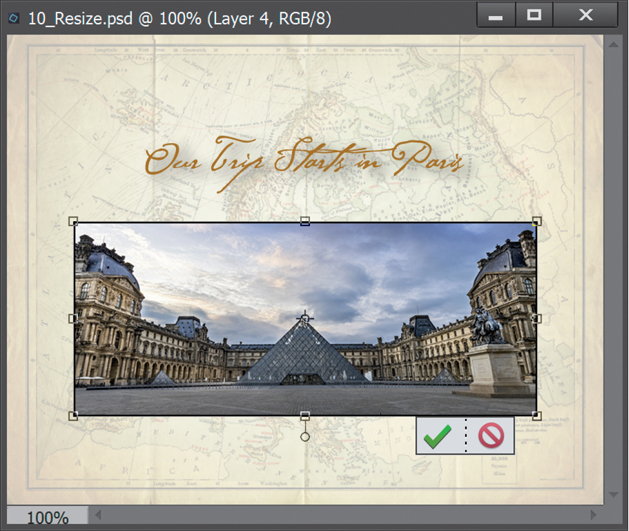
Making one photo smaller without shrinking the whole document:
If you’re working with more than one image in the same document, you’ll resize a bit differently. To scale down a photo on a layer, first click on that photo’s layer in the Layers palette, then press Ctrl-T (Mac: Command-T) to bring up Free Transform. Press-and-hold the Shift key to keep the photo proportional (or turn on the Constrain Proportions checkbox in the Tool Options Bar), grab a corner handle, and drag inward. When it looks good to you, press the Enter (Mac: Return) key. If the image looks softer after resizing it, apply the Unsharp Mask filter (again, see the sharpening chapter).
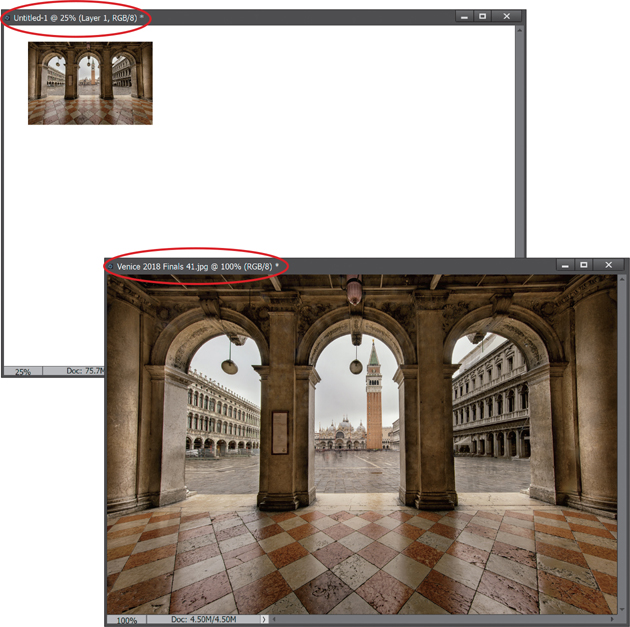
Resizing problems when dragging between documents:
This one gets a lot of people, because at first glance it just doesn’t make sense. You have two documents, approximately the same size, side-by-side onscreen. But when you drag a 72-ppi photo (of St. Mark’s Square, in this case) onto a 300-ppi document (Untitled-1), the photo appears really small. Why is that? Simply put: resolution. Although the documents appear to be the same size, they’re not. The tip-off that you’re not really seeing them at the same size is found in the title bar of each photo. For instance, the photo of St. Mark’s Square is displayed at 100%, but the Untitled-1 document is displayed at only 25%. So, to get more predictable results, make sure both documents are at the same viewing size and resolution (check in the Image Size dialog).
Automated Saving and Resizing
Elements has a pretty slick little utility that lets you take a folder full of images and do any (or all) of the following automatically at one time: (1) rename them; (2) resize them; (3) change their resolution; (4) color correct and sharpen them; and (5) save them in the file format of your choice (JPEG, TIFF, etc.). If you find yourself processing a lot of images, this can save a ton of time. Better yet, since the whole process is automated, you can teach someone else to do the processing for you, like your spouse, your child, a neighbor’s child, passersby, local officials, etc.
Step One:
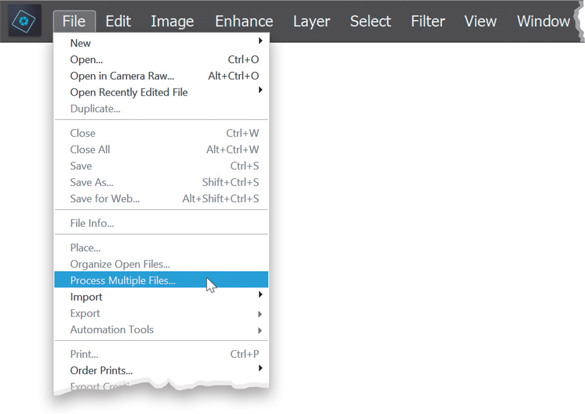
In the Elements Editor, go under the File menu and choose Process Multiple Files.
Step Two:
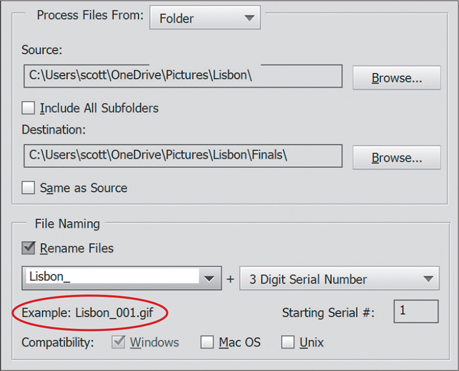
When the Process Multiple Files dialog opens, the first thing you have to do is choose the folder of photos you want to process by clicking on the Browse button in the Source section of the dialog. Then, navigate to the folder you want and click OK (Mac: Choose). If you already have some photos open in Elements, you can choose Opened Files from the Process Files From pop-up menu (or you can choose Import to import files). Then, in the Destination section, you decide whether you want the new copies to be saved in the same folder (by turning on the Same as Source checkbox), or copied into a different folder (in which case, click on the section’s Browse button and choose that folder).

Step Three:
The next section is File Naming. If you want your files automatically renamed when they’re processed, turn on the Rename Files checkbox, then in the fields directly below that checkbox, type the name you want these new files to have and choose how you want the numbering to appear after the name (a two-digit number, three-digit, etc.). Then, choose the number with which you want to start numbering images. You’ll see a preview of how your file naming will appear just below the document name field (shown circled here).
Step Four:
In the Image Size section, you decide if you want to resize the images (by turning on the Resize Images checkbox), and you enter the width and height you want for your finished photos. You can also choose to change the resolution. If you want to change their file type (like from RAW to JPEG Max Quality), you choose that in the bottom section— File Type. Just turn on the Convert Files To checkbox, and then choose your format from the pop-up menu.

Step Five:
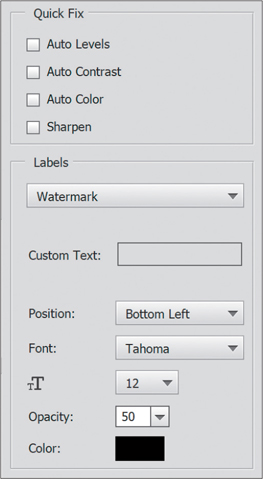
On the top-right side of the dialog, there is a list of Quick Fix cosmetic changes you can make to these photos, as well, including Auto Levels (to adjust the overall color balance and contrast), Auto Contrast (this is kind of lame if you ask me), Auto Color (it’s not bad), and Sharpen (it works well). Also on the right is a Labels section, where you can add a custom watermark or a caption to these photos. Now, just click OK and Elements does its thing, totally automated based on the choices you made in this dialog. How cool is that?
Resizing Just Parts of Your Image Using the Recompose Tool
We’ve all run into situations where our image is a little smaller than the area where we need it to fit. For example, if you resize a digital camera image so it fits within a traditional 8x10" image area, you’ll have extra space either above or below your image (or both). That’s where the Recompose Tool comes in—it lets you resize one part of your image, while keeping the important parts intact (basically, it analyzes the image and stretches, or shrinks, parts of the image it thinks aren’t as important). Here’s how to use it:
Step One:
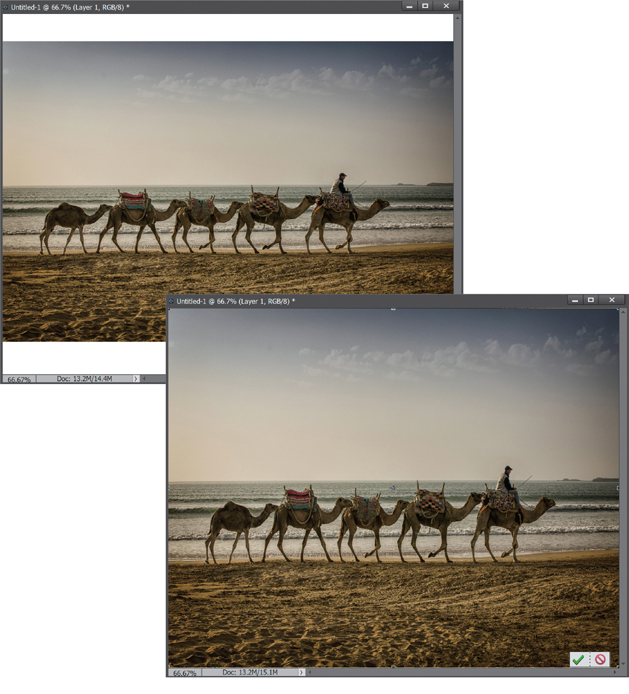
Create a new document at 8x10" and 240 ppi. Open a digital camera image, get the Move tool (V), and drag-and-drop it onto the new document, then press Ctrl-T (Mac: Command-T) to bring up Free Transform. Press-and-hold the Shift key (or turn on the Constrain Proportions checkbox in the Tool Options Bar), then grab a corner point and drag inward to scale the image down, so it fits within the 8x10" area (as shown here on top), and press Enter (Mac: Return). Now, in the image on top, there’s white space above and below the photo. If you want it to fill the 8x10" space, you could use Free Transform to stretch the image to do so, but you’d get a stretched version of the camels (seen at bottom). This is where Recompose comes in.
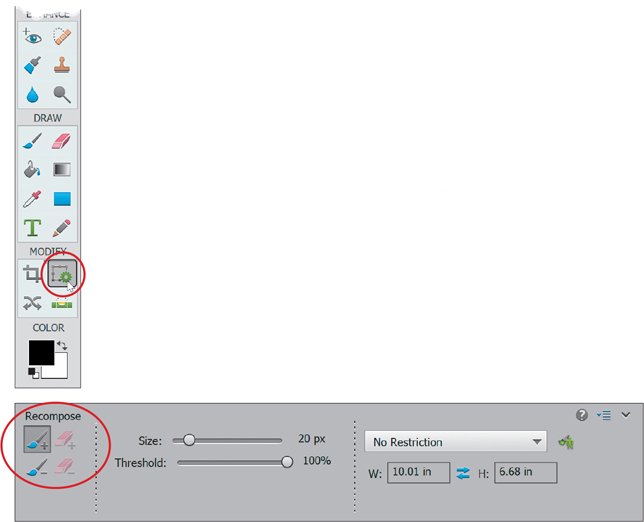
Step Two:
Click on the Recompose tool (W) in the Toolbox. The way the tool works is you tell Elements which areas of the photo you want to make sure it preserves and which areas of the photo are okay to remove/squish/expand/get rid of. This is all done using the four tools at the left end of the Tool Options Bar (circled in red here at the bottom).
Step Three:
Click on the Mark for Protection tool (the brush with the plus sign), and paint some loose squiggly lines over the areas of the photo you want to make sure Elements protects. These are the important areas that you don’t want to see transformed in any way (here I painted over the camels, the man, and some of the beach). If you make a mistake and paint on something you didn’t want to, just use the tool’s corresponding Erase tool to the right of the Mark for Protection tool.

Step Four:
Now you have to tell Elements what parts of the photo are okay to get rid of or stretch out. Click on the Mark for Removal tool in the Tool Options Bar (the brush with the minus sign) and paint some lines over the non-essential areas of the photo. No need to go crazy here, a few quick brush strokes will do just fine.

Step Five:
Click on the top-center handle and drag it upward until it reaches the edge of your document (remember, you already set the document to 8x10). You’ll notice that Elements won’t stretch the camels now, but rather just the sky. Do the same thing with the bottom-center handle. Drag it downward until it reaches the edge. It may stretch the texture in the area you’ve selected a little, but it’s not anything most people will notice. And if it is, then try going back and adjusting the areas to protect/unprotect and sometimes you’ll get better results. In this case, the camels (which are the most important part of the photo) were left alone, and only the sky and some of the beach were stretched to fit the 8x10 print that we’d like to make.

TIP: Use the Preset Pop-Up Menu
The Recompose tool has a preset pop-up menu in the Tool Options Bar with some common print sizes, so when you select one of them, it automatically recomposes your photo to that specific size.
