Chapter 5. Radio Edit
which mode do I use: quick, guided, or expert?
Do you have any idea how many songs are available for download from the iTunes Store that have the phrase “Radio Edit” at the end of their name? Well, let me tell you cowboy, it’s plenty. So many, in fact, that I felt totally justified in using it as the title for this chapter on editing your images using one of the four different editing methods you can choose from in Elements. Now, don’t let the last part of that sentence fool you, this chapter intro is about to take a left turn, because after I settled on this title, I started thinking, “What actually is a ‘radio edit’?” So, I went to Google, and the first search result was (not surprisingly) Wikipedia, which describes it this way: “In music, a radio edit is a modification, typically truncated, to make a song more suitable for airplay, whether it be adjusted for length, profanity, subject matter, instrumentation, or form.” It was right then that I realized that I could save a ton of time on writing these chapter intros if I just copied-and-pasted various long sentences, or even entire paragraphs, from Wikipedia into these openers. I could be done in like three minutes (instead of the four to six hours of grueling research and Hemingway-like devotion to making sure each and every word is as if it was hand-crafted by angels—or at the very least, conceived for a hand-crafted beer). Anyway, did you notice the part of the Wikipedia description that said sometimes these songs are edited for “profanity?” Well, I’m about to share some inside scoop here—the kind of stuff my publisher goes to great lengths to keep hidden deep in the underbelly of the publishing Illuminati underworld, but I think it’s time the reading public knew the truth: the version of this book you are reading (and many of my books, in fact) are actually the “paper edit” versions, which have been heavily edited to remove my neverending stream of profanity that is so vile, so wildly inappropriate that Snoop Dogg himself contacted me via Twitter DM and told me I really needed to tone it down. It was making him, and the rap community in general, uncomfortable. The thing is, I can’t teach Elements without dropping a few “unmentionables” here and there, but it’s mostly because of my penchant for making sure each of the steps in my tutorial rhyme, and that’s hard to do if you can’t use naughty words. Here’s an example: “Step Three: Open the dialog and start to click. If you don’t like it, I’ll show you my [redacted by publisher].” See, I was going to say “technique.” If you were thinking anything else, you need a “mind edit.”
Using Instant Fix to Quickly Edit Your Photos
Before we take a look at the three editing modes in the Editor, I wanted to show you what you can do right in the Organizer. If you want to quickly fix a bunch of photos (okay, “fix” makes it sound like there’s something wrong with them, let’s use the word “enhance” instead), you can do it all right from within the Organizer itself. Plus, Elements is now touch-enabled, so you can do all your editing right on your screen (if you have a touchscreen computer, of course).
Step One:
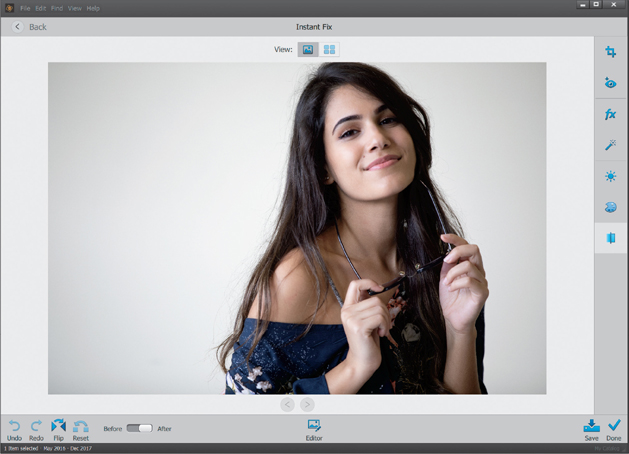
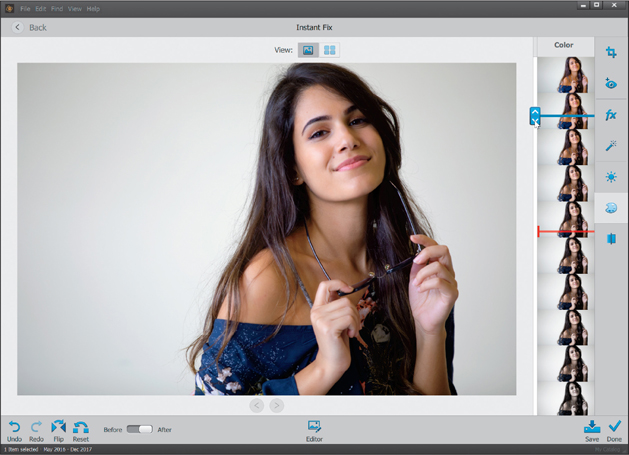
In the Organ izer, select the photo(s) you want to quickly edit using Instant Fix (click on the first image, then Ctrl-click [Mac: Command-click] on any other images you want to edit), then click on the Instant Fix icon in the taskbar at the bottom of the window. This opens your image(s) in the Instant Fix window. If you selected a bunch of photos, but only want to apply a particular effect to one of them, double-click on that photo and it enters Show One Photo view (as seen here).
Step Two:
There are icons for a number of very common adjustments along the right side of the window. Start by clicking on the Smart Fix icon (it looks like a magic wand) and see if you like the results (it’s an automated fix that either does a pretty good job or looks horrible). If you don’t like the way it looks, no sweat, just click on Undo in the bottom left. If the problem is your image is too dark (or too light), click on the Light icon (it looks like a sun), and a vertical list of thumbnails appears with your image ranging from darker to lighter. Just drag the slider up/down to choose the one you want (you’ll see an instant preview onscreen. I moved it up a bit). If color is the problem, click on the Color icon (the paint palette) instead, and this time the vertical list shows warmer or cooler versions of your image. Again, just drag the slider to the one that looks best to you (as shown here, where I moved it up).
Step Three:
If you click on the Crop tool icon, a bunch of preset cropping sizes pop up—to see how one looks, just click on it. To create your own custom crop, click on the first one, Custom, and then click-and-drag the cropping border that appears over your image right where you want it. When you’re done, click on the green checkmark icon. The Crop tool is applied on a one-on-one basis, so it only crops the individual image you’re working on right now, not all your selected images. At the bottom is the Clarity icon. Click on it and it brings up another vertical list of image thumbnails (seen here)— dragging the slider up enhances details (which can look good on landscapes and cityscapes, and things like cars, motorcycles, and stuff with lots of detail); dragging it down adds a softening blur kind of effect. A little bit of it can help smooth skin tone; too much and skin can start to look blocky, so be careful about dragging too far in either direction.

Step Four:
The last two adjustments are Red Eye and Effects. Red Eye, obviously, will get rid of any red eye in your image. If all your image problems (brightness, color, etc.) look good, click on the Effects icon (fx) to add some finishing touches, not far from what you’d get using Instagram’s built-in filter effects. Again, it’s a vertical scrolling list of filter effects, and you’ll see things like duotones, cross-processing effects, tints, and color effects. Which one should you choose? Whichever one looks good to you (luckily, there is no International Committee on which one looks good), so pick one, and roll on (here, I chose Lomo). When all your Instant Fixes are done, click on Done in the bottom-right corner and those Instant Fix edits you chose are applied to all your selected photos all at once (they’ll have a little icon in the top right of their thumbnails in the Media Browser.

Photo Quick Fix in Quick Mode
Quick edit mode is kinda like a stripped down version of Expert mode. If you’re new to Elements, it’s not a bad place to start. I’m usually against “quick” modes and “auto-fix” stuff, but the way they’ve implemented this is actually really nice, and I think it works great for beginners. (Note: We’ll look at a Quick mode special effect in Chapter 10.)
Step One:
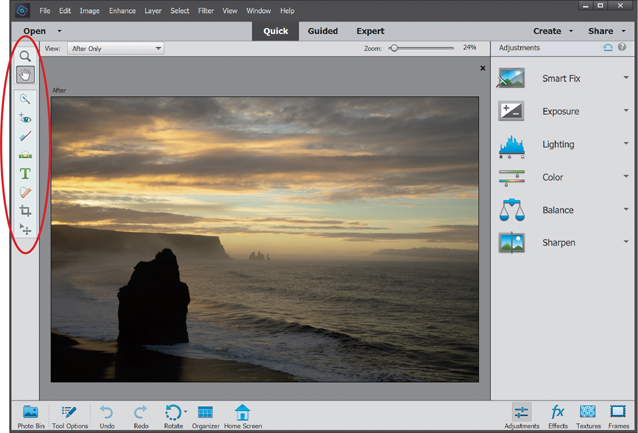
Open a photo and click on Quick at the top of the Editor window. First things first: forget about the left side of the window. The tools in the Toolbox make using Quick mode too much like using Expert mode (but without all of the options that Expert mode has). So, if you find that you need the tools here, you’re better off going into Expert mode to do what you need to do.
Step Two:
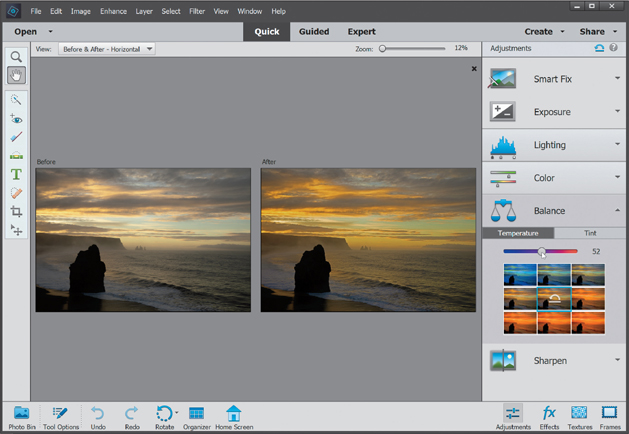
In the preview area of Quick mode, you can see side-by-side, before-and-after versions of the photo you’re correcting (before on the top or left; after on the bottom or right). To see this view, from the View pop-up menu above the top left of the preview area, select Before & After (Horizontal or Vertical). In the Palette Bin on the right side of the window is a group of nested palettes offering tonal and lighting fixes you can apply to your photo. Start with the Smart Fix palette at the top. Click on the Auto button and Smart Fix automatically analyzes the photo and tries to balance the overall tone (adjusting the shadows and highlights), while also fixing any obvious color casts. In a lot of cases, this feature does a surprisingly good job. There’s also a slider within the Smart Fix palette that you can use to increase (or decrease) the effect, or you can click on the thumbnails beneath the slider.

Step Three:
If you’re not happy with the Smart Fix results, don’t try to stack more “fixes” on top of it. Instead, click the Reset Image icon (the curved arrow above a straight line that appears above the top right of the Palette Bin) to reset the photo to how it looked when you first entered Quick mode. Now, let’s take a look at each setting individually: First, click on Exposure to open its palette. The Exposure setting is like the heavy hitter—if the whole photo is too dark or too bright, then this is where to go. You’ll see its palette also has a slider and thumbnails right below it. They’re different ways of doing the same thing. If you like using the thumbnails, just click on the one that looks closest to how bright or dark you’d like your photo to be. As you do that, you’ll see the slider move each time. Usually, though, I just drag the slider (as shown here) until I’m happy with the overall exposure.

Step Four:
More often than not, just adjusting the exposure won’t fix the whole photo. You’ll usually end up in the next palette, which is Lighting. Here you can choose to work on the shadows, midtones, or highlights separately. The Shadows slider is particularly helpful because we tend to lose a lot of detail in the shadows. Drag it to the right a little bit, and watch how it opens up the dark shadow areas in your photo (mainly the detail in the darker areas of the foreground in this photo). The Highlights slider will add some detail back to the sky here, as well. For this one, I increased the Shadows slider to 5, the Midtones slider to 15, and the Highlights slider to 25. I tend to stay away from the Auto Levels and Auto Contrast buttons, because chances are, if Smart Fix didn’t work well, then neither will they.

Step Five:
The next palette down, Color, really has only one setting that I think is worthwhile. You’ll see at the top of the palette you can control the Saturation, Hue, and Vibrance. The Saturation adjustment adds or removes color saturation in the whole photo. It’s worth trying out and maybe even clicking the Auto button. Sometimes the photo looks good, but most of the time, the Vibrance setting is the most useful here. While Saturation adds color to everything in the photo, Vibrance tends to only add color saturation to the colors that need it, while leaving the other colors alone, so you don’t get that fakey look. It’s also great on portraits because it tends to leave skin tones alone and only adds color saturation to everything else.

Step Six:
While the Color palette helps us fix the overall color saturation in a photo, the Balance palette right below it helps remove color casts (like when an indoor photo looks really yellow). It’s pretty simple to use to control the temperature and the tint in the photo. I’ll warn you ahead of time, though, small adjustments here make big changes, so be careful. The Temperature adjustment lets you add more blue or more yellow/ red to a photo. Basically, adding blue removes yellow and adding more yellow removes blue. Photos taken indoors at night are perfect candidates for this since they tend to look really yellow, so dragging the slider toward blue helps balance (hence the name of this palette) the photo. You can also control the Tint (greens and magentas), but honestly, you won’t notice much of a problem there in most cases. But if you do, it works the same—adding more green removes magenta, and adding more magenta removes a greenish color cast.
Step Seven:
The final step here is to sharpen your photo. I always click on the Zoom tool in the Toolbox, and zoom in a little further, so I can see the details. Then, just click the Auto button in the Sharpen palette and watch the results. If the photo isn’t sharp enough for you, drag the slider to the right to increase the amount of sharpening. But, be careful, because over sharpening can ruin the photo by becoming too obvious, and it can introduce color shifts and halos around objects.

Step Eight:
There are a couple other things you can do while you’re here in Quick mode (basically, think of this as a “one-stop shop” for quickly fixing images). Below the preview area is an icon you can click on to rotate your photo (this photo doesn’t need to be rotated, but hey, ya never know). And, I know I told you to forget about the Tool-box on the left, but there is a Crop tool there, so if you need to do a quick crop, you can do it here.

Step Nine:
Okay, so you’ve color corrected, fixed the contrast, sharpened your image, and even cropped it down to size (if it needed it). So, how do you leave Quick mode and return to Expert mode? Just click on Expert at the top of the window (the same place you went to, to get into Quick mode). It applies all the changes to your photo and returns you to the normal Expert editing mode.
Let Guided Mode Walk You Through It
When you use Guided mode, it walks you through a bunch of popular editing options, like cropping, enhancing colors, retouching, and sharpening. They’re kind of like built-in tutorials in Elements—they don’t do all of the work for you, they just explain to you what tools you should use and the order in which to use them. However, there are some other options in Guided mode that can be more useful, because they can help you to easily create some special effects, and they added a couple new ones in Elements 2020. (Note: We’ll look at some of the Guided mode special effects in Chapter 10.)
Step One:
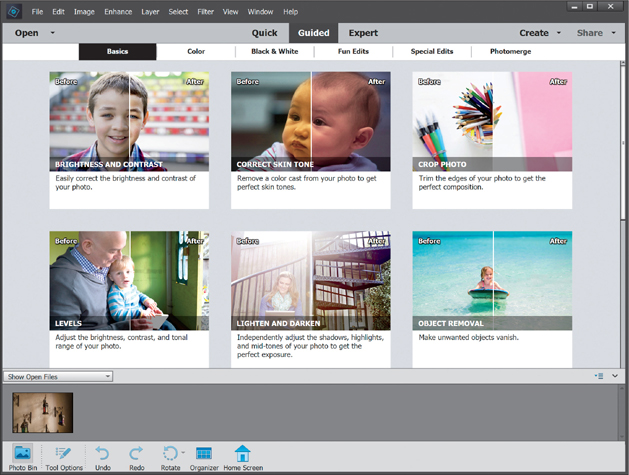
Open a photo and click on Guided at the top of the Editor window. The Guided window has six tabs at the top where you can choose which effect you want to apply to your photo (like the new Pattern Brush option under Fun Edits, which lets you add creative patterns to a photo, or the Perfect Portrait option under Special Edits, which allows you to easily and realistically smooth skin. We’ll look at this one in Chapter 7). Click on a tab and it’ll give you a before/after example of each effect. (Again, the options here are basically tutorials with guided walkthroughs. They’re the kinds of things we cover in this book, so if you weren’t reading this book, then that would be a good mode to check out. Since you are reading this book, I’d stick with the tutorials you just paid for.)
Step Two:
Many of these effects can be done in Expert mode, but you might have to use a bunch of tools, dialogs, etc. So, if the effect you want is here, it’s not a bad place to get to know. Here, we’ll look at the new Object Removal option (which you can also easily do in Expert mode using Content-Aware Fill. See Chapter 9 for more on this) in the Basics tab, so click on that option. By the way, the rest of the effects pretty much work exactly the same—remember, this is “Guided” mode, so Elements will walk you through each step.

Step Three:
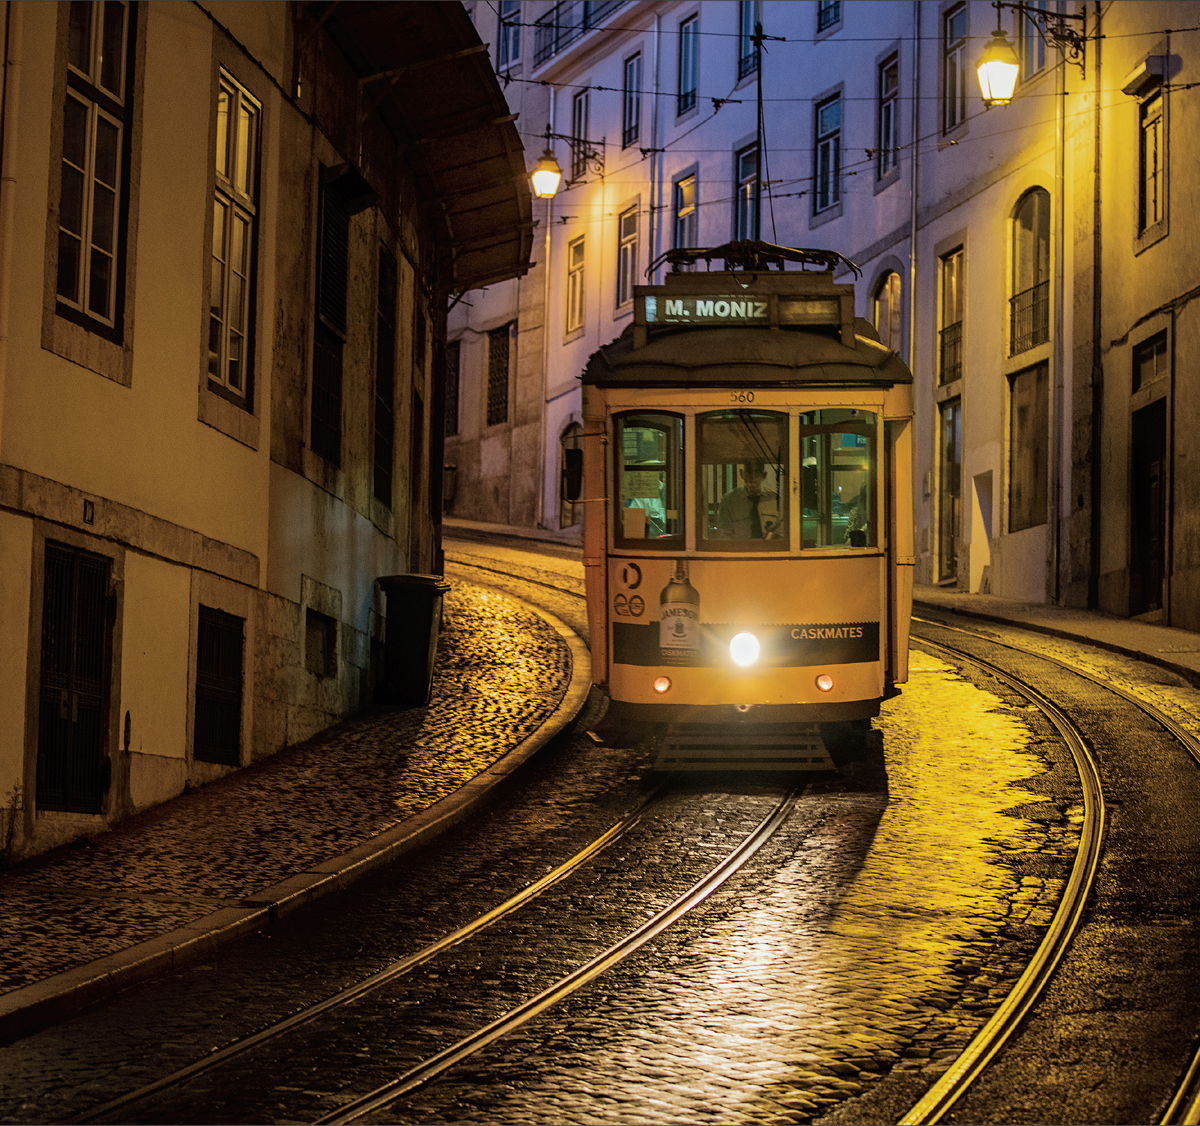
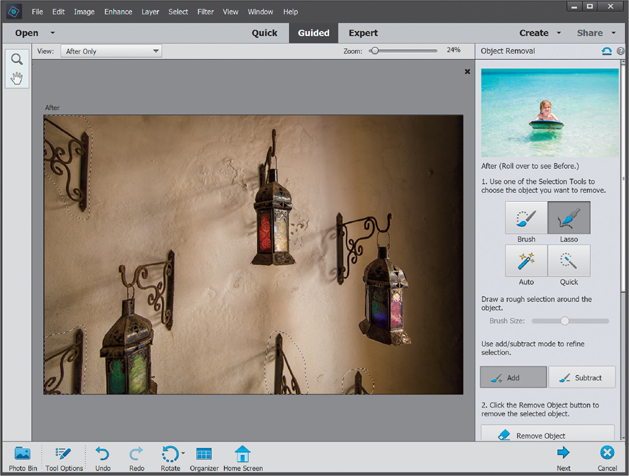
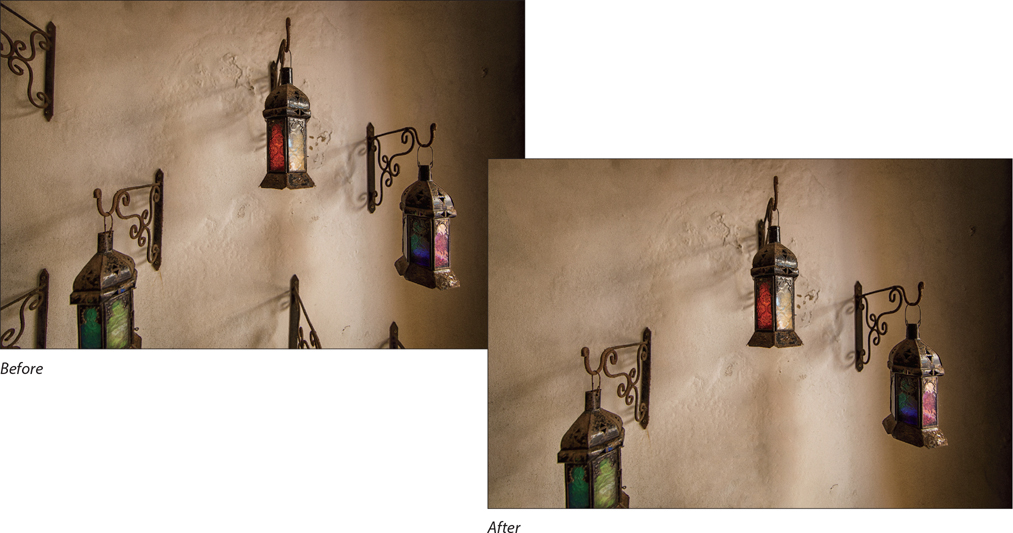
You’ll see the Palette Bin appear on the right side of the window, showing all of the settings you have control over for the effect. The first thing you’ll want to do for this Guided option is click on one of the Selection Tools, then paint or select the thing(s) you want to remove from your image to select them. Here, I’m using the Lasso tool to select the lantern holders without lanterns on the left and bottom. If you select areas you don’t want selected, just click on the Subtract button and remove them from your selection.
Step Four:
Next, just click on the Remove Object button. A little dialog will appear showing you that it’s working to remove the selected objects. Once it’s done, they’re gone. Easy as that.

Step Five:
It did a pretty good job here, but if it leaves something behind, just click on either the Spot Healing Brush button or the Clone Stamp Tool button to remove it. Here, I used the Spot Healing Brush to remove a few shadows that were left behind (you can see them in Step Four) by just painting right over them. If what was left behind is near something that you wanted to keep, use the Clone Stamp Tool, but you’ll need to Alt-click (Mac: Option-click) to sample a clean nearby area first before painting over what you want to remove.

Step Six:
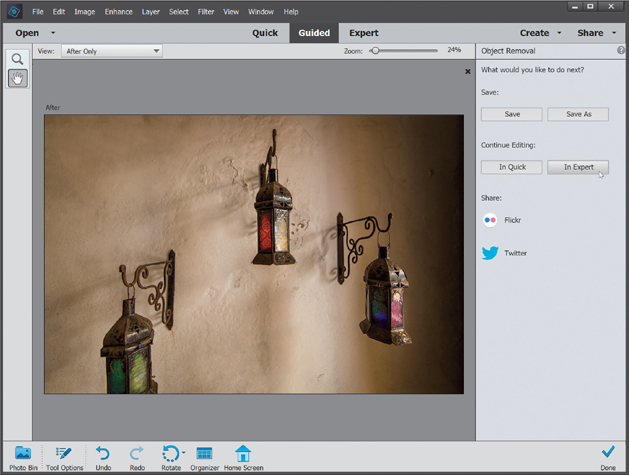
When you’re ready, click the Next button at the bottom right. Here, you’ll choose what you want to do next with your image— save it, continue editing it, or share it to Flickr or Twitter (if you choose to share it to one of these sites, Elements will ask you for authorization first). So, just click on your choice and you’re done. Here, we’ll choose to continue editing in Expert mode.
Step Seven:
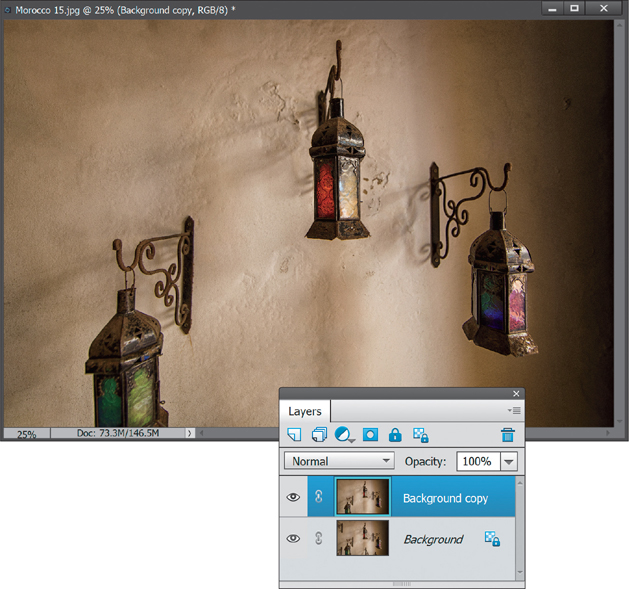
When the image opens in Expert mode, take a look in the Layers palette, and you’ll see Elements has added a layer here. Since the whole effect is layer based, you can always use a layer mask (we’ll look at these in Chapter 6) to add something back in or delete the layer with the removed objects altogether. A before and after is shown below.
A Quick Look at Expert Mode (It’s Not Just for Experts!)
Okay, I know the third editing mode is called “Expert” mode, but don’t let the name fool you—it’s not just for experts. In fact, most of what you’ll do in this book is done in Expert mode because, let’s face it, that’s where all the cool stuff is. You go into Expert mode when you want to do things like retouching photos, or adding text, or modifying just a specific portion of a photo, because it’s got a ton of features like layers, layer masks (which are covered in Chapter 6), and much more. So, get it out of your mind that Expert mode is just for experts. It’s for you, even if you’re not a seasoned pro at Elements.
Step One:
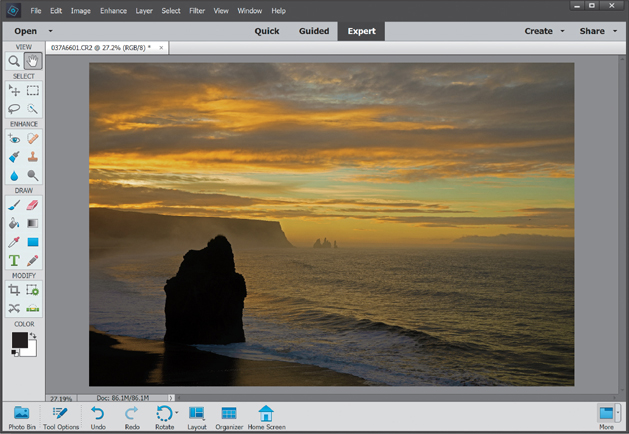
Open an image and then click on Expert at the top of the Editor window, which will take you into the full Elements Editor (if you’re not already there) with all the bells and whistles. By the way, if you were to go into Expert mode after applying a Guided edit, you’d actually see all the layers and effects that Elements has applied.

Step Two:
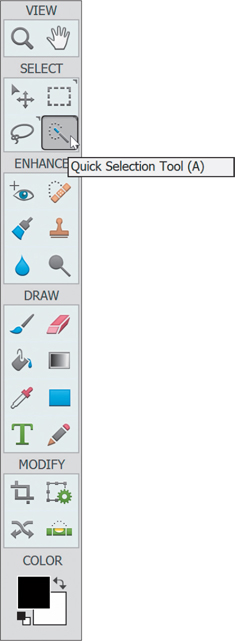
Over on the left side of the window, one of the first things you’ll notice is that there are a bunch of tools in the Toolbox. These tools are broken up into categories: View, Select, Enhance, Draw, Modify, and Color. As a photographer using Elements (which I assume you are, since you bought this book), you won’t use the Draw tools much (except for the Brush tool) and you won’t use the Modify tools much either (except for cropping and straightening). But, you’ll use the Select and Enhance tools plenty.

Step Three:
Go ahead and click on one of the tools in the Toolbox. It can be any tool, so just click around a few times and then look at the bottom of the window beneath the preview area. You’ll see a context-sensitive Tool Options Bar appear for each tool (here, I clicked on the Quick Selection tool). Since most tools have different settings, you’ll notice it changes based on which tool you click on. This is a really important area, so make sure you get accustomed to it. (Note: To hide/show the Tool Options Bar, press F5.)

TIP: Getting to Tools Quickly
If you’re going to be using Expert mode a lot, then it’s a good idea to get used to the keyboard shortcuts for the most commonly used tools. If you hover your cursor over each tool in the Toolbox, you’ll see a tool tip appear with the name of the tool followed by its one-letter keyboard shortcut.
Step Four:
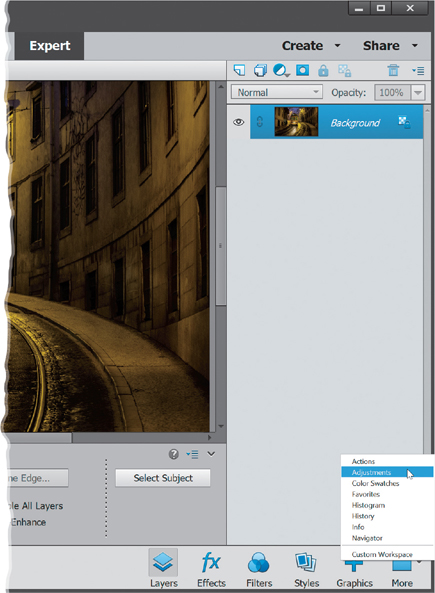
Now look over at the bottom-right of the window. There are six icons there. Click on the Layers icon to open/close the Layers palette on the right side of the window. Layers are one of the key elements to working inside of Expert mode and there’s actually a whole chapter devoted to them (Chapter 6). For now, just know that you should probably keep that palette open all the time, since you’ll be using it a lot.

Step Five:
Click on the More icon to access some of the other palettes. As for the other icons, you (as a photographer, at least) probably won’t use them as much.
TIP: Undock the Layers Palette
To undock the Layers palette from the right side of the window, choose Custom Workspace from the More icon’s popup menu, then click on the Layers palette’s tab and drag it out of the nested palettes. This will minimize the size of the palette, giving you more room in your work area. To hide the other palettes, choose Close Tab Group from the active palette’s flyout menu (click on the down-facing triangle and lines icon at the top right of the palette).

Step Six:
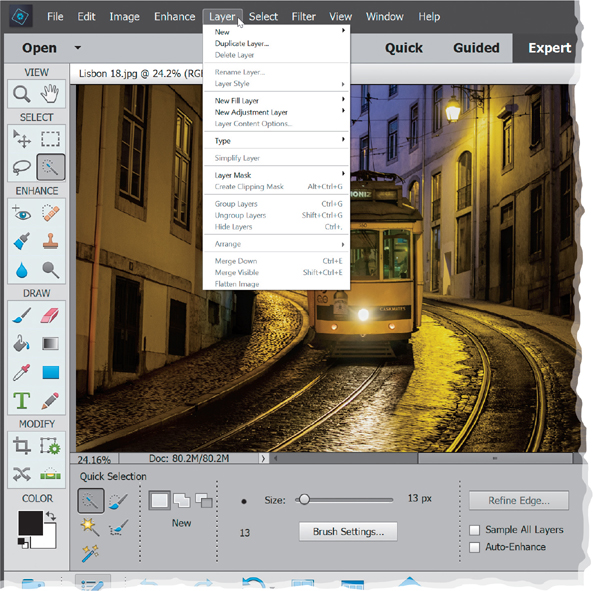
Finally, don’t forget the menu bar at the very top of the window. That’s the launch pad for a lot of the things we’ll do in the book. So, for example, if you read “Go to the Layer menu,” that means to go to the Layer menu up in the menu bar. And, if you read something like “Go to the Layers palette,” that means to go to the palette we just talked about in Step Four.