Chapter 9. Remove
removing unwanted objects

You know you’re having a lucky day when you search the iTunes Store for the word “Remove,” and you immediately find a band with that exact name. Remove. Now, I can’t swear they’re a band per se, because a band usually has some people in it, and their music (well, to be honest I just listened to one song—their song “Fallout,” since it was the first search result to appear in iTunes), and I’m not 100% certain that those noises weren’t actually produced and recorded by a half dozen Roomba® robot vacuums. Now, if I were a music critic for a big music magazine (like Rolling Stone, or...or...well, Rolling Stone), the way I would probably describe the genre the song “Fallout” would be categorized into would undoubtedly be “psychological torture music.” It’s the kind of music you’d expect to hear in a disturbing nightclub scene from a Liam Neeson movie, where he’s going to lightly maim everybody in there about 30 seconds after he walks in, but in the meantime you hear this weird music that makes you think, “I hope he kills the bad guys fast, so they can switch to another scene in the movie where they’re not playing this Roomba music.” So picture that, but with some flashing lights, and some bad guys that are probably bald. Now, how does all this relate to removing distracting objects in Elements you might ask? Well, I’m a little surprised you didn’t see the direct correlation (it seems pretty obvious to me), but when Liam Neeson walks into that seedy nightclub, the first thing Liam would do (in real life anyway) is remove the most distracting objects in the scene, which in this case would have him headed straight to the DJ booth. Once there, he would immediately yank out every cable, cord, and wire connected to the nightclub’s speaker system to make the psychological torture music stop. When he does this, the few scattered patrons in the club would start slowly clapping, and more and more patrons would join in, and pretty soon he’d be getting a standing ovation, but just then, the bad guy would burst into the nightclub, take out a pistol, aim it at the ceiling, fire off a couple of shots, then yell, “I’m missing half a dozen Roombas!” Oh, come on, tell me that couldn’t happen!
Removing Spots and Other Artifacts
Elements has a tool, the Spot Healing Brush tool, which is just about perfect for getting rid of those tiny little spots and other artifacts. (By the way, the term “artifacts” is a fancy ten-dollar word for spots and other junk that wind up in your photos.)
Step One:
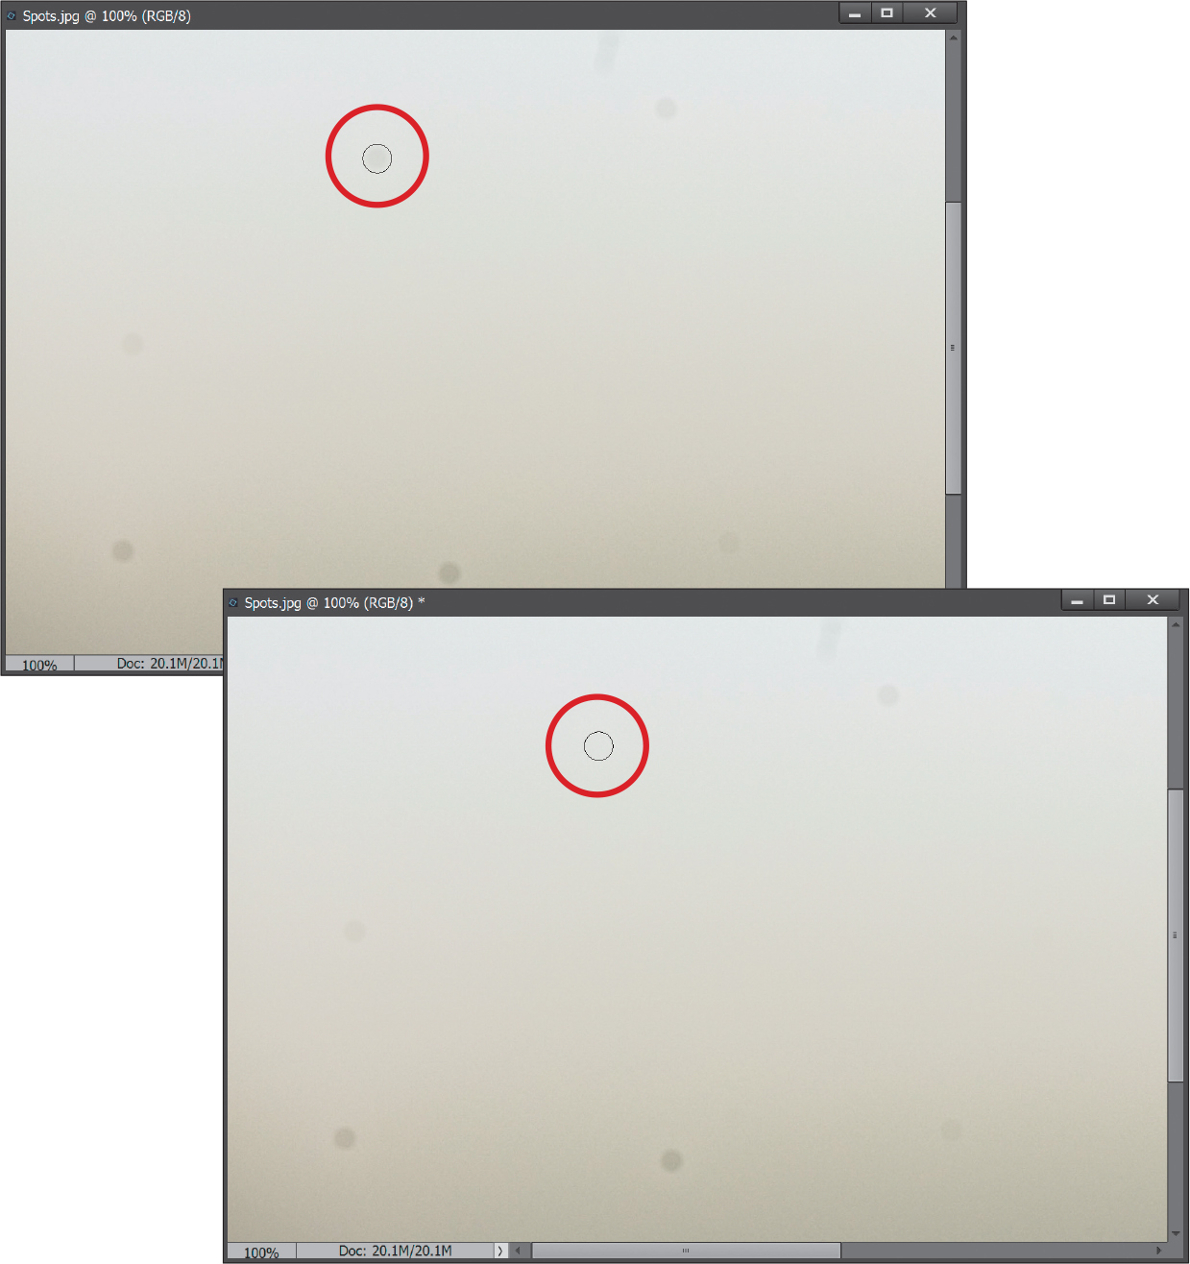
Open a photo that has spots (whether they’re in the scene itself or are courtesy of specks or dust on either your lens or your camera’s sensor). In the photo shown here, there are all sorts of distracting little spots in the sky (yes, I need to get my camera sensor cleaned). :-)

Step Two:
Press Z to get the Zoom tool and zoom in on an area with lots of spots (here, I zoomed in on the sky, which is typically where you’ll see them the most). Now get the Spot Healing Brush tool from the Toolbox (or just press the letter J until you have it).

Step Three:
Position the Spot Healing Brush directly over the spot you want to remove and click once. That’s it. You don’t have to sample an area or Alt-click anywhere first—you just move it over the spot and click, and the spot is gone. (Note: If the fix doesn’t look quite right, make sure Content Aware is chosen for Type in the Tool Options Bar.)
Step Four:
You remove other spots the same way—just position the Spot Healing Brush over them and click. I know it sounds too easy, but that’s the way it works. So, just move around and start clicking away on the spots. Now you can “de-spot” any photo, getting a “spotless” version in about 30 seconds, thanks to the Spot Healing Brush.

The Amazing (and Easiest) Way to Remove Distracting Stuff from Your Photos
When people talk about “Photoshop magic,” the Clone Stamp Tool and Content-Aware options are some of those things they’re talking about. Even after using them for years now to get rid of distracting things in my images, they still amaze me with the remarkable job they do. The fact that they’re incredibly easy to use at the same time really makes them a powerful, and indispensable, tool for photographers. While the Spot Healing Brush in Elements has had a Content-Aware feature for a while now, back in Elements 13 they added Content-Aware Fill, which works a little differently. Most of the time, you’ll end up using a combination of the two.
Step One:
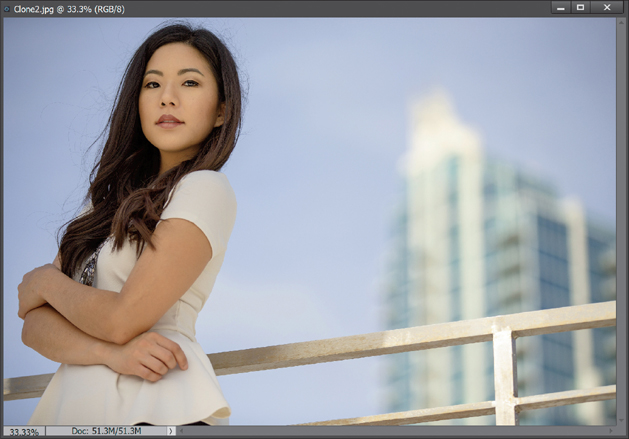
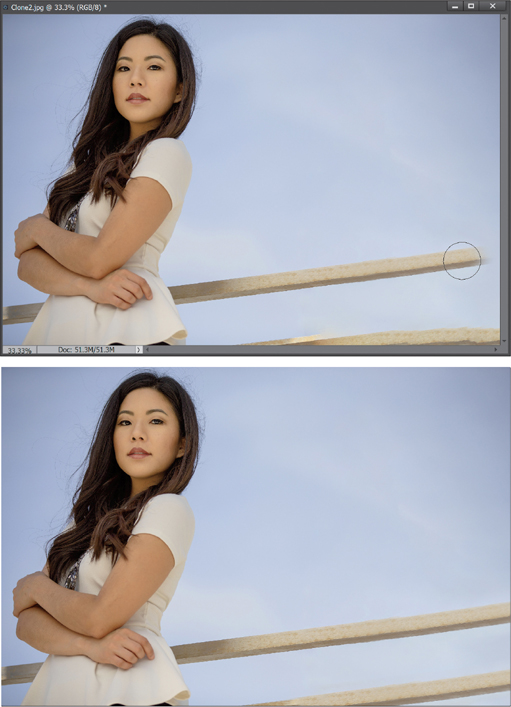
In our natural-light portrait here, we want to get rid of the building on the right. The quickest way to do that is to put a Lasso selection around the entire building (railings and all) and then use Photoshop’s Content-Aware Fill feature to remove it.
Step Two:
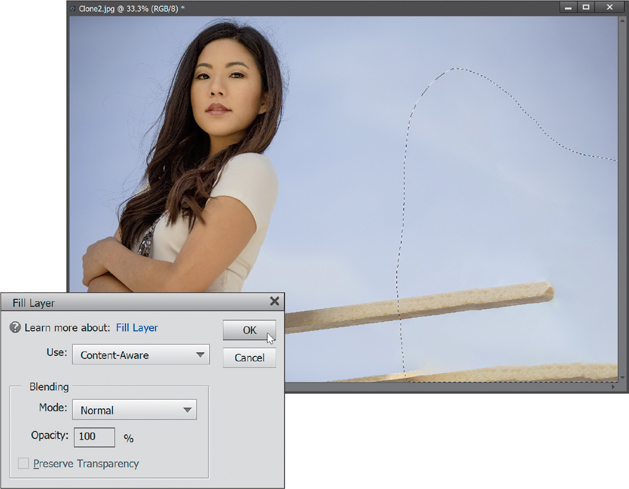
Get the Lasso tool (L), or whichever selection tool you’re most comfortable with (like maybe the Quick Selection tool), and draw a selection around the entire building (railings and all).

Step Three:
Next, go under the Edit menu and choose Fill Selection and choose Content-Aware from the Use pop-up menu (as seen here). Now, just click OK, sit back, and prepare to be amazed (I know—it’s freaky). So, that pretty much got rid of the entire building (that’s why it’s called “Content-Aware” Fill. It’s aware of what is around the object you’re removing, and it does an intelligent filling in of what would normally just be a big white hole in your image), but it kind of trashed the railing in the process. What’s weird is Content-Aware Fill usually does a pretty decent job replacing things like railings, but I think because the building behind it was so blurry, it kind of gave it fits. No problem—the Clone Stamp tool is perfect for fixes like this. Go ahead and deselect by pressing Ctrl-D (Mac: Command-D).
Step Four:
Get the Clone Stamp tool (S) from the Toolbox, make your brush kinda small (you can change the brush size by pressing the Left Bracket key to make it smaller or the Right Bracket key to make it larger), and then Alt-click (Mac: Option-click) right along the edge of the top railing where it still looks nice and straight, and start painting (cloning) that part of the railing right over the missing part. Finish up by cloning that top railing to the bottom one, until it reaches the edge of the image. Now, you will fall deeply in love with Content-Aware Fill if you can come to peace with the fact that it won’t work perfectly every time. But, if it does 70% or 80% of the work for me (in removing something), that means I only have to do the other 20%, and that makes it worth its weight in gold. If it does the entire job for me, and sometimes it does, then it’s even better, right? Right. Also, it helps to know that the more random the background is behind the object you want to remove, the better job Content-Aware Fill generally does for you.
Step Five:
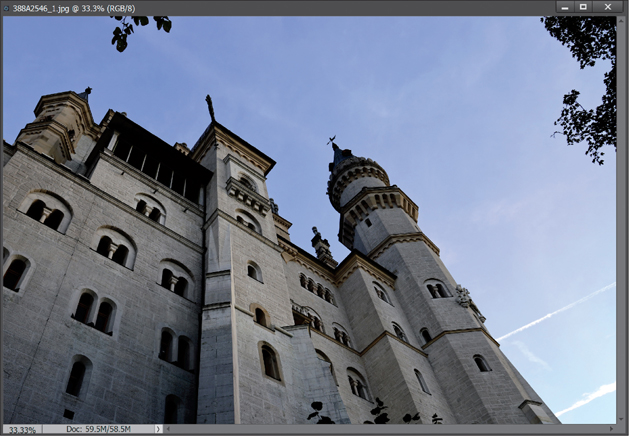
Content-Aware Fill is pretty amazing when it works, but like any other tool in Elements, it doesn’t work 100% of the time on every single type of photo and every situation. When I use Content-Aware Fill, I usually wind up using the Spot Healing Brush along with it, because it has Content-Aware healing built in. Let’s open another image (the shot here) and use these tools together to remove the trees in the top left, right, and bottom, along with the contrails on the right.
Step Six:
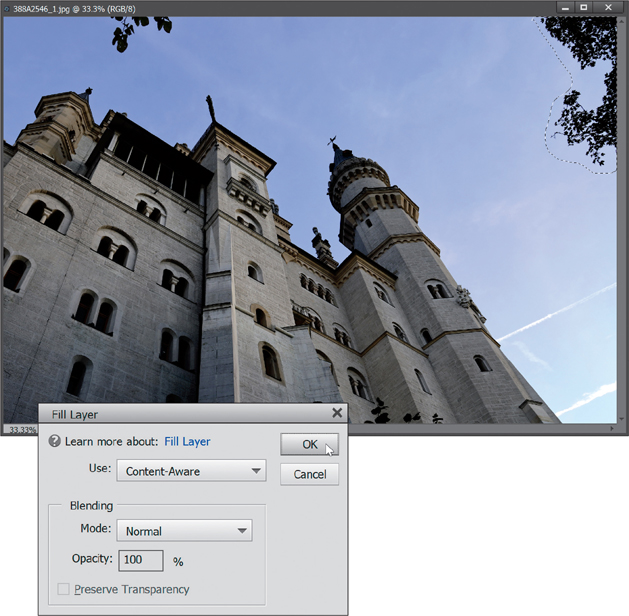
A lot of times, you don’t have to do a really accurate selection. For the tree on the right, take the regular ol’ Lasso tool (like we used for the building), draw a loose selection around it (as seen here), then go under the Edit menu and choose Fill Selection. When the Fill Layer dialog comes up, make sure Content-Aware is selected in the Use pop-up menu, then click OK, and press Ctrl-D (Mac: Command-D) to Deselect (you’ll see in the next step that it’s gone, and that I also removed the one at the top left). If part of its fix doesn’t look great, simply select that area and try again.
Step Seven:
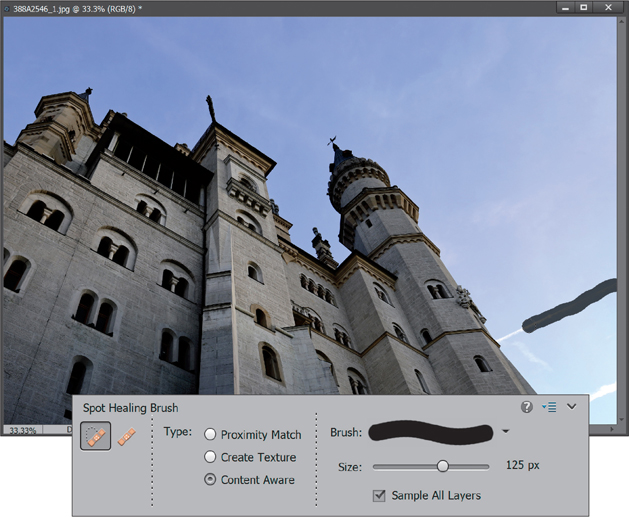
Take a look at where the trees used to be. They’re outta there! Let’s switch to the Spot Healing Brush tool (J) for the contrails on the right (make sure Type is set to Content Aware or Proximity Match in the Tool Options Bar). You literally just make your brush size a little bigger than the contrail, paint over it, and Elements uses the Content-Aware technology to remove it (when I release the mouse button, a second later that will be gone, too!). Note: The regular Healing Brush tool (the one where you have to choose the area to sample from by Alt-clicking [Mac: Option-clicking]) does not have the Content-Aware technology. Only the Spot Healing Brush tool has it.
Step Eight:
As you use the tools more, you’ll start to get a feel for which one works better in which situation when it comes to the Content-Aware stuff. I usually use the Lasso tool and Content-Aware Fill for larger areas, like for the trees in this image, and the Spot Healing Brush with Content Aware turned on for smaller things that are touching an edge of something else, like the contrails. While sometimes they work the same, sometimes they also work differently, so it’s always good to try both ways if you don’t see the result you like right off the bat.
Step Nine:
Let’s finish things off by using both tools to remove the trees at the bottom. They did a great job in this image—they filled them in almost perfectly, as if they were never there. You can see all the fixes in the Before and After images shown on the next page.


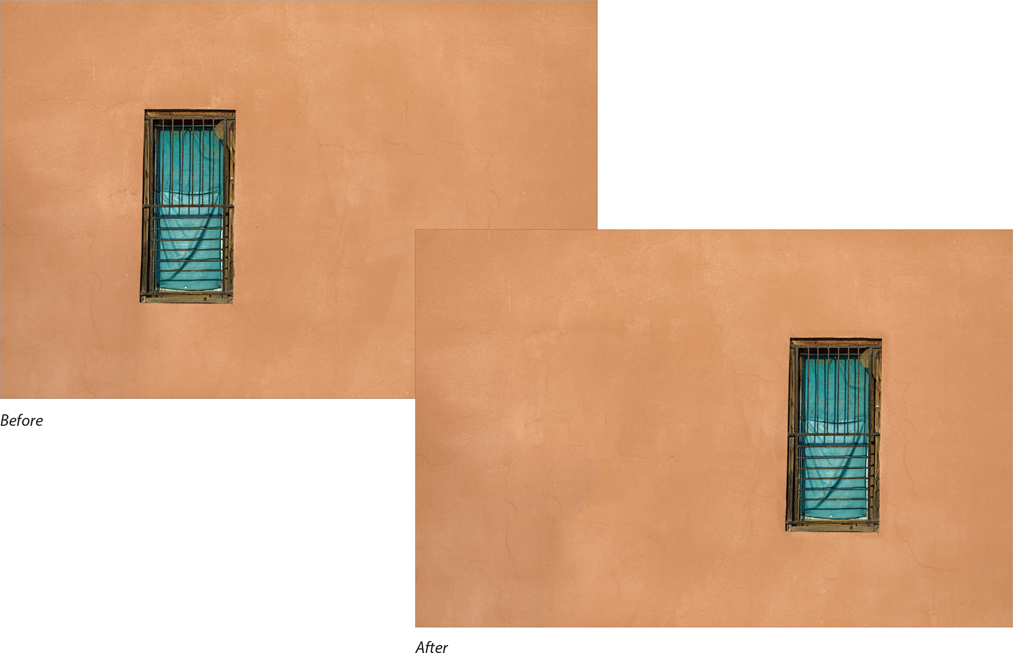
Before

After
Moving Things Without Leaving a Hole Using Content-Aware Move
This is another one of those tools that makes you just scratch your head at the math that must be going on to perform the mini-miracle of letting you select something, then move it someplace else in your image, and Elements automatically repairs the area where it used to be. This doesn’t work for every image, every time, and it’s one of those tools you won’t be reaching for every day, but when you need it, and it does its thing perfectly, your jaw hits the floor. It can be finicky sometimes, but I’ll show you a few things to help it help you.
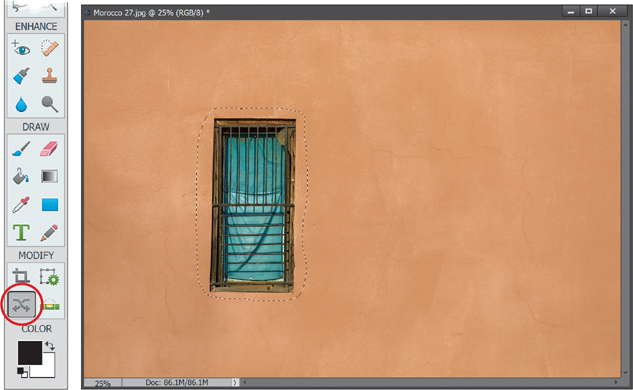
Step One:
Here’s the image we’re going to work on, and in this one, we want to move the window to the right.

Step Two:
From the Toolbox, get the Content-Aware Move tool (or just press the letter Q). Now, draw a selection around the object(s) you want to move (in this case, the window). It doesn’t have to be a perfect selection, but get fairly close.
TIP: Use Any Selection Tool
The Content-Aware Move tool works a lot like the Lasso tool. However, you could draw your selection with any selection tool you’d like, and then simply use the Content-Aware Move tool to move it just like we’re about to do.
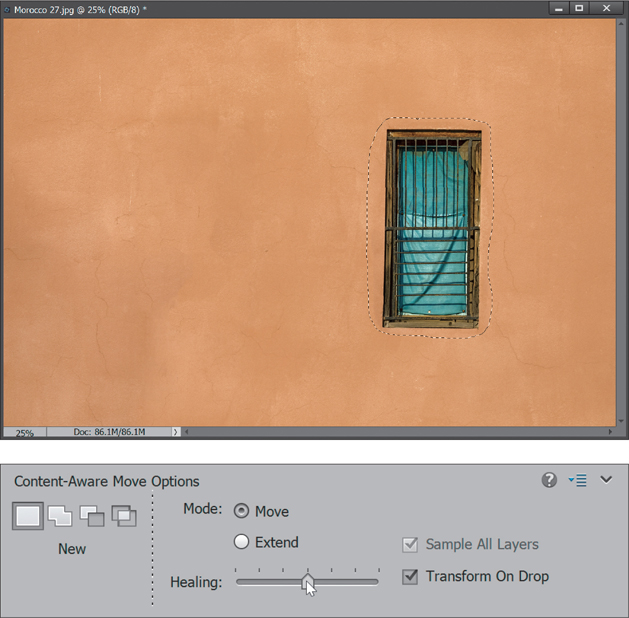
Step Three:
Next, click in your selection and drag it over to the part of the image you want to move it to. When you release the mouse button, the original will still be there in the same position until you click on the checkmark icon or press Enter (Mac: Return). (Note: Turn off the Transform On Drop checkbox in the Tool Options Bar if you want it to just move.)

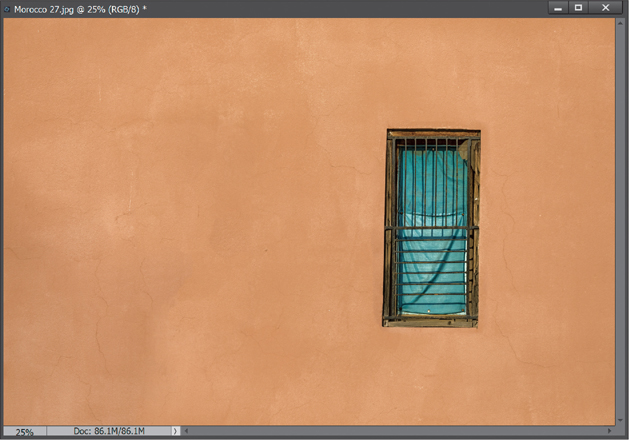
Step Four:
When you commit to the move, it’s going to take a few moments for the magic to happen (depending on how large your file size is), but then you’ll see that not only is your subject moved, but the hole that would normally have been left behind is instead totally patched and filled. However, don’t deselect quite yet. Two things can happen after using this tool. First, the area that was filled in as you moved the selection away may not be perfect. Second, the selected area you moved may not fit nicely into its new background. If either happens, then leave your selection in place—especially if it didn’t work well. While it’s still selected, you can change how Elements creates the background texture that blends with your move. You do this using the Healing slider in the Tool Options Bar. You can choose a different healing amount and it will re-render your move. So, all you have to do is move the slider until you find a place that looks the best (again, I do this only if there’s a problem). If you keep it to the left, it uses a strict healing amount that doesn’t do as much healing between the two areas. This looks more realistic in some cases, but it can make the move look weird in others. You can also move it to the right (more healing), which forces Elements to really look around the selected-and-moved area and find other places to heal those holes with.
Step Five:
I’m not gonna lie to you here. As with many of the auto-fix tools in Elements, Content-Aware Move is not always perfect. Here, it did a pretty good job, but most of the time you’re going to need to do some cleanup after. If that happens, try taking the Spot Healing Brush or the Clone Stamp tool and fixing it. Finally, just press Ctrl-D (Mac: Command-D) to Deselect.
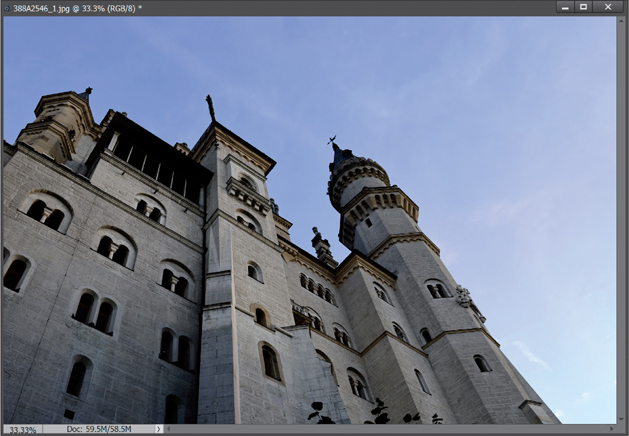
Automatically Cleaning Up Your Scenes (a.k.a. The Tourist Remover)
If you’ve ever tried to photograph a popular landmark or national monument, you’ll know that it’s pretty unlikely you’ll be there alone. Unless you’re willing to get up really early in the morning (when most people are still sleeping), you’re bound to get a tourist or two (or 20) in your photos. In this tutorial, you’ll learn a few tricks to help clean up those scenes and remove the tourists with just a few brush strokes.
Step One:
The first step starts in the camera. You’ll need to take at least two shots of the same scene (but you can use up to 10 if you’d like). So, if you’re in one of those situations where you just can’t get a photo with no people in it, then take a few photos in the hope that the people move around a little (even if they don’t ever exit the area completely).
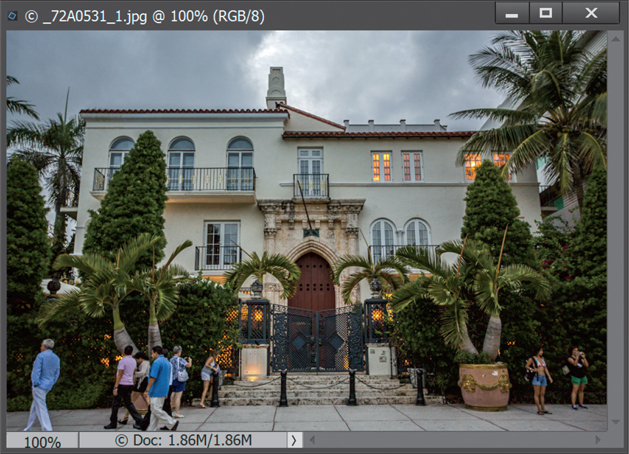
Step Two:
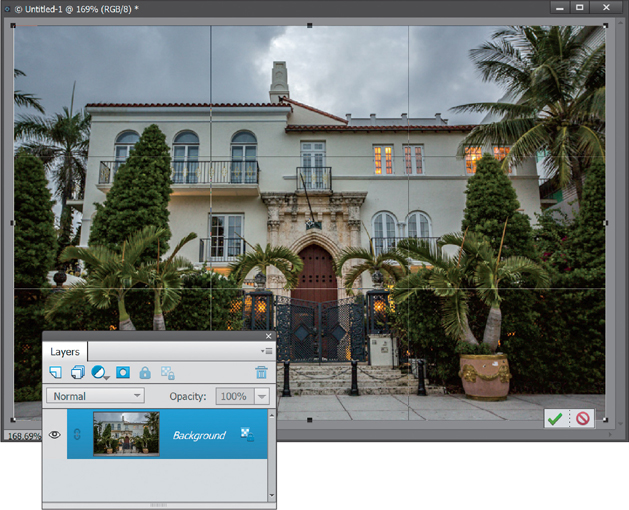
Here, we have a couple shots that I took between two parked cars, along Ocean Drive on Miami’s South Beach. The reason this house always draws a crowd is because it’s actually the famous Villa Casa Casuarina (better known as the Versace mansion). Since we have this feature, though, getting rid of the people is an easy fix.

TIP: Keep Your Camera Steady
While I did shoot this on a tripod, Elements does a great job of auto-aligning photos. If you can’t shoot on a tripod, the key is to try to be as steady as possible, so the actual photo doesn’t change too much.
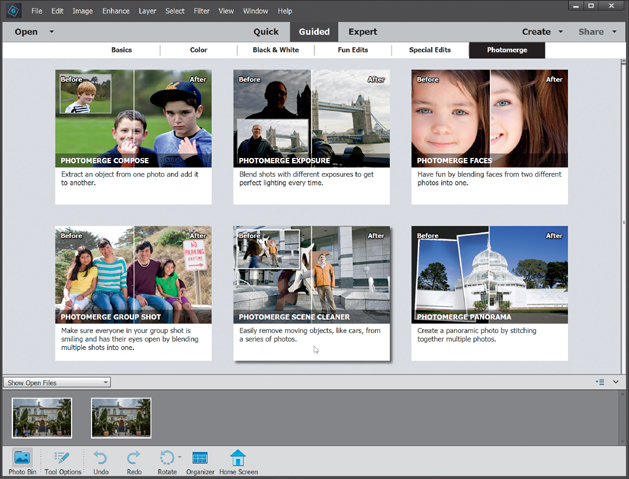
Step Three:
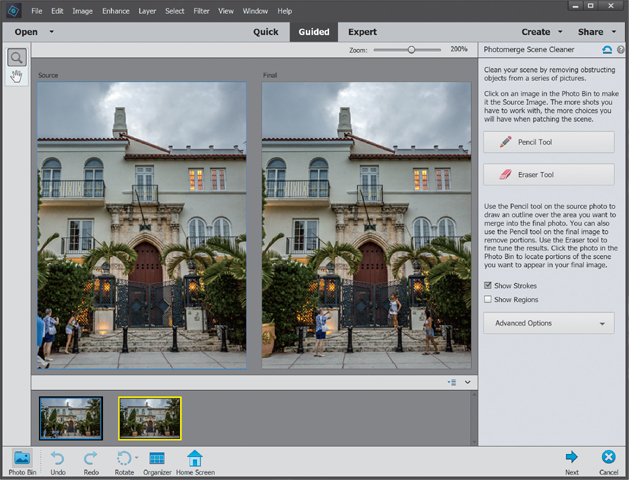
Go ahead and open the photos you’ve taken (remember, you’ll need at least two but can use up to 10. In this example, I’m only using two) in the Elements Editor. Then select them down in the Photo Bin by clicking on the first one and Shift-clicking on the last one. Now, click on Guided at the top of the window. Click on Photomerge at the top right of the Guided window, and then click on Photomerge Scene Cleaner. This will take you into Photomerge.
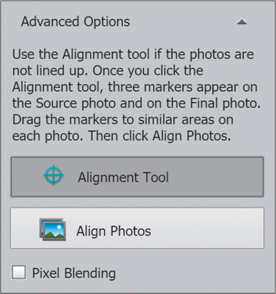
ADVANCED TIP: Try the Advanced Options
Here’s a follow-up to the previous tip. In fact, just file this tip away, because you may or may not need it. If you didn’t shoot on a tripod, and you’re not getting good results from Photomerge, then click on the Advanced Options button at the bottom of the Photomerge palette. Use the Alignment tool to place three markers in the Source window and three in the Final window, on similar places in the photos. Then click Align Photos, and Elements will do its best to align the photos based on those markers. This helps the Scene Cleaner give more predictable results. Again, give Step Three through Step Seven a try first and see how things work out. If everything looks good, then you don’t need the Advanced Options.
Step Four:
The Source window on the left will automatically be populated with the first photo you chose. You’ll need to create a Final photo though, so drag the other photo from the Photo Bin into the Final window on the right.

Step Five:
Now look over at the Source window and find the clean areas from this photo that you’d like copied over to the Final photo. In this example, we’ll paint over clean areas where there aren’t any people to remove them from the Final. You can use the Zoom tool (the one that looks like a magnifying glass in the Toolbox on the left) to zoom in to the area if you need to.
Step Six:
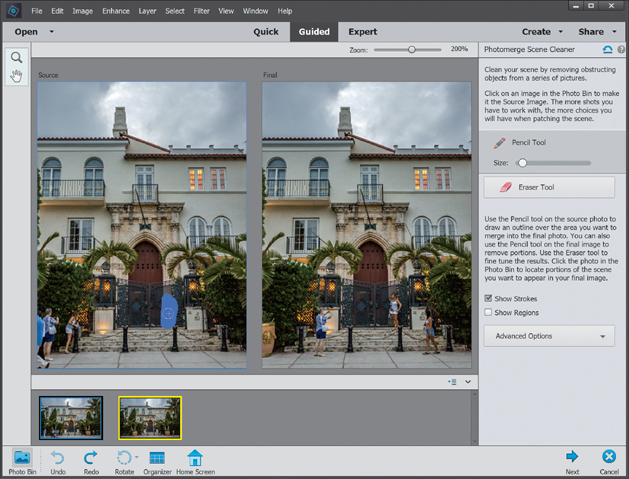
All right, let’s start by getting rid of the woman on the steps. Click on the Pencil tool on the right side of the window because we’re going to use this to paint on the Source image (left side). The way this works is you want to paint on an area from the Source image that you want copied over to the Final image. So, again, I’m going to paint where the woman is on the steps (as shown here). Remember, we’re painting on a clean area that we want copied over to our Final image. Elements will only copy over the areas we paint over with the Pencil tool.
Step Seven:
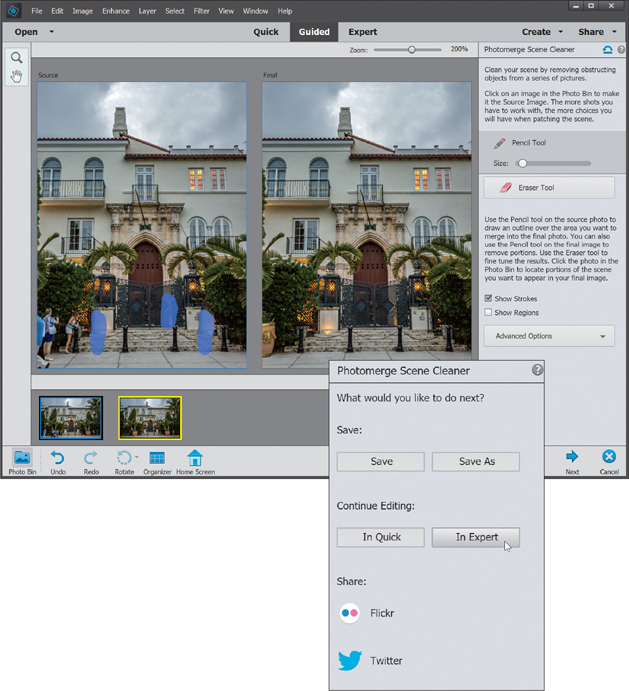
When you release your mouse button, you’ll see Scene Cleaner automatically removes her from the Final image. In this example, she goes away pretty quickly. To get rid of the other people, do the same thing—just paint over an area we want copied into the Final image. When you’re done cleaning up the image, click the Next button and then choose what you’d like to do with the image. Here, we’re going to continue editing it back in the Editor, so I’ll click on the In Expert button.
TIP: Getting Rid of the Pencil Marks
If you move your mouse over the Final image, you’ll see the yellow or blue pencil marks on it, too. If you want to see your Final image without the pencil marks over it, just move your mouse away from it and they’ll disappear. If you want to see the Source image without the marks, then turn off the Show Strokes checkbox in the Photomerge palette on the right.
Step Eight:
If Photomerge left some extra white canvas around your final image, first flatten your image by choosing Flatten Image from the Layers palette’s flyout menu, then just use the Crop tool (C) to remove the extra white canvas. The Before and After images are shown below. In the After image, I also ended up using some of the methods we used earlier in this chapter to remove a couple more people that Scene Cleaner couldn’t remove.