Chapter 11. Sharp Tale
sharpening techniques

Wait a minute. Wait a minute! Isn’t it supposed to be Shark Tale, the DreamWorks animated movie with Will Smith and Renée Zellweger? Hey, look, typos happen. I see them in the New York Times and the Wall Street Journal, so it can surely happen here, even though we run an incredibly thorough process where teams of grammarsticians at university-level research labs in Gstaad, Geneva, Fresno, Bordeaux, and Osaka work night and day to ensure that every word (or at the very least, every third word) in this entire document has most of the components to form adequately spelled words, with just a hint of grammar and sentence form. And, we believe that the properly structured sentence is really a state of mind. A state of existential being where the letter and form congeal and become one. This frees us from the old-fashioned, outdated norms of what is and isn’t acceptable in formal grammar and opens us to a world of discovery, experimentation, and speculative spelling and sentence structure that rewards those who can embrace this new wave of thinking and the profound changes it brings. Besides, all I can remember from Shark Tale is the cover of “Car Wash” by Christina Aguilera (which was not bad, but it’s hard to beat the original). Okay, pop quiz: Who did the original sound track to Car Wash, including the title track? Was it (a) Bon Jovi, (b) Led Zepplin, (c) Rush, or (d) Rose Royce. If you said (a) Bon Jovi, you’re right. (I love when you see them in concert, and Jon comes to center stage and he starts that “Clap. Clap. Clap-ca-clap, clap, clap!” and the place just goes crazy, and the rest of the band joins in, except Richie Sambora because he’s not in the band anymore, which is sad because it was his clap on top of Jon’s clap that really brought it together. And when Richie would come out front with Jon and they’d do “Rappers Delight,” it was just magic. Every time Jon would belt out, “Now what you hear is not a test, I’m a rappin’ to the beat...” and Tico Torres would kick in with record scratching. Man, those were the days.)
Basic Sharpening
After you’ve color corrected your photos and right before you save your files, you’ll definitely want to sharpen them. I sharpen every digital camera photo I take, either to help bring back some of the original crispness that gets lost during the correction process, or to help fix a photo that’s slightly out of focus. Either way, I haven’t met a digital camera (or scanned) photo that didn’t need a little sharpening. Here’s a basic technique for sharpening the entire photo:
Step One:
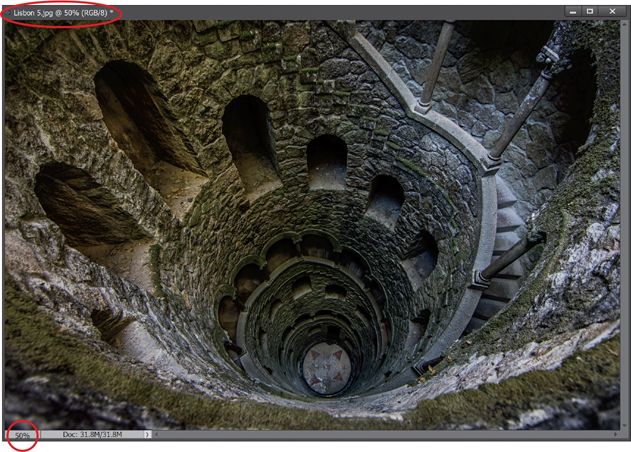
Open the photo that you want to sharpen. Because Elements displays your photo in different ways at different magnifications, choosing the right magnification (also called the zoom amount) for sharpening is critical. Today’s digital cameras produce such large-sized files that it’s now pretty much generally accepted that the proper magnification to view your photos during sharpening is 50%. If you look up in your image window’s title bar, or down in the bottom-left corner of the window, it displays the current percentage of zoom (shown circled here in red). The quickest way to get to a 50% magnification is to press Ctrl-+ (plus sign; Mac: Command-+) or Ctrl-– (minus sign; Mac: Command-–) to zoom the magnification in or out.
Step Two:
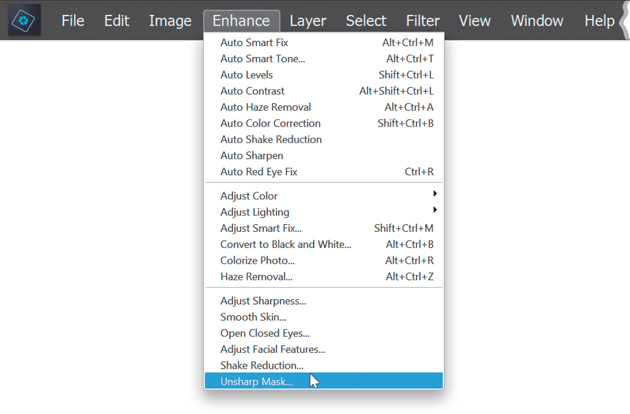
Once you’re viewing your photo at 50% size, go under the Enhance menu and choose Unsharp Mask. (If you’re familiar with traditional darkroom techniques, you probably recognize the term “unsharp mask” from when you would make a blurred copy of the original photo and an “unsharp” version to use as a mask to create a new photo whose edges appeared sharper.)
Step Three:
When the Unsharp Mask dialog appears, you’ll see three sliders. The Amount slider determines the amount of sharpening applied to the photo; the Radius slider determines how many pixels out from the edge that the sharpening will affect; and the Threshold slider determines how different a pixel must be from the surrounding area before it’s considered an edge pixel and sharpened by the filter. Threshold works the opposite of what you might think—the lower the number, the more intense the sharpening effect. So, what numbers do you enter? I’ll give you some great starting points on the following pages, but for now, we’ll just use these settings: Amount: 120%, Radius: 1, and Threshold: 3. Click OK and the sharpening is applied to the photo.


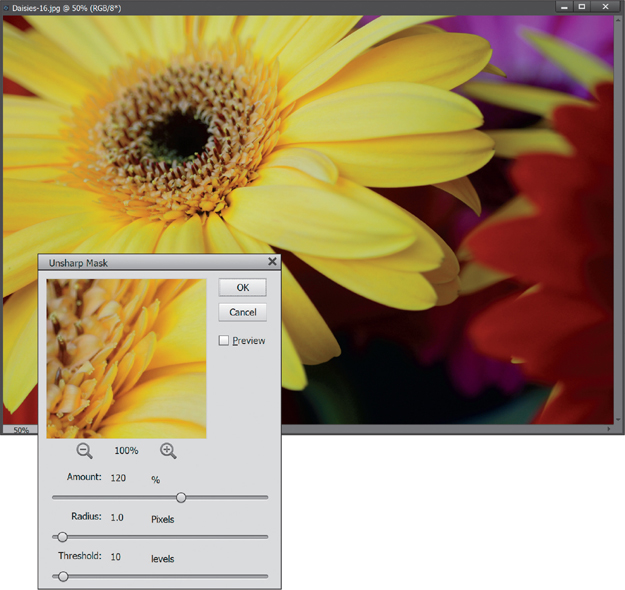
Sharpening Soft Subjects:
Here are the Unsharp Mask settings—Amount: 120%, Radius: 1, Threshold: 10—that work well for images where the subject is of a softer nature (e.g., flowers, puppies, people, rainbows, etc.). It’s a subtle application of sharpening that is very well suited to these types of subjects.
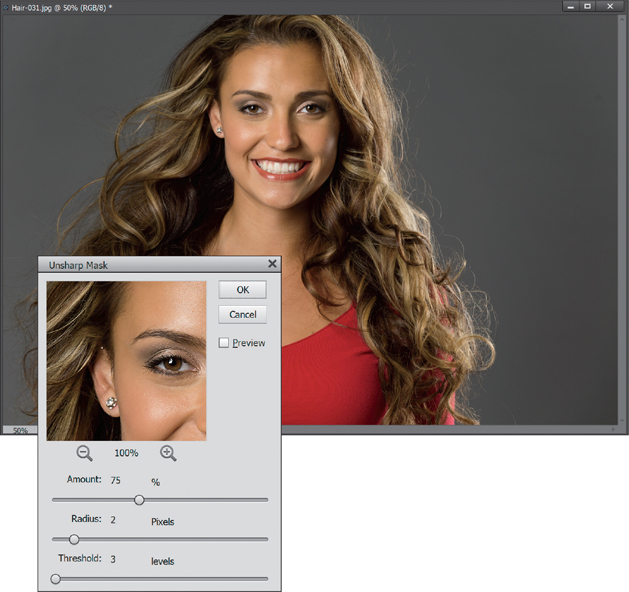
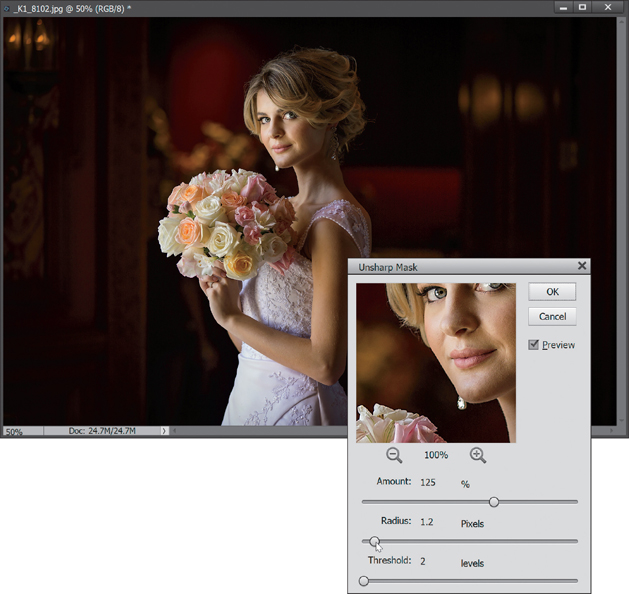
Sharpening Portraits:
If you’re sharpening a close-up portrait (head-and-shoulders type of thing), try these settings—Amount: 75%, Radius: 2, Threshold: 3—which applies another form of subtle sharpening, but with enough punch to make eyes sparkle a little bit, and bring out highlights in your subject’s hair.
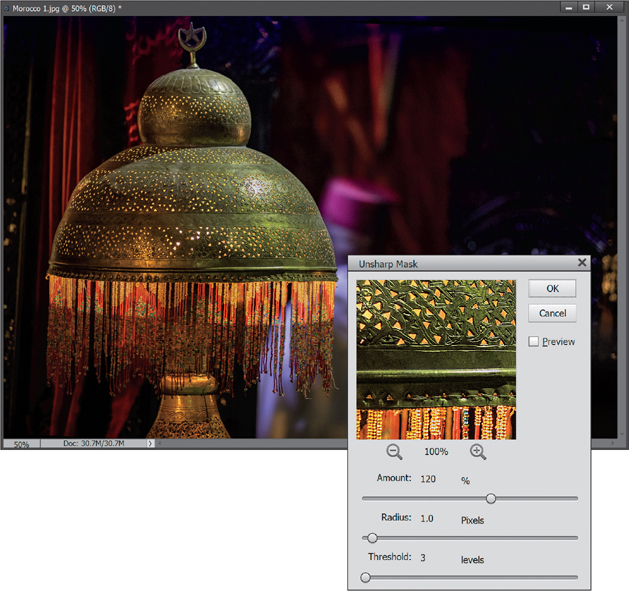
Moderate Sharpening:
This is a moderate amount of sharpening that works nicely on everything from product shots, to photos of home interiors and exteriors, to landscapes (and in this case, a lamp). If you’re shooting along these lines, try applying these settings—Amount: 120%, Radius: 1, Threshold: 3—and see how you like it (my guess is you will). Take a look at how it added snap and detail to the edge of the lamp and the tassels.
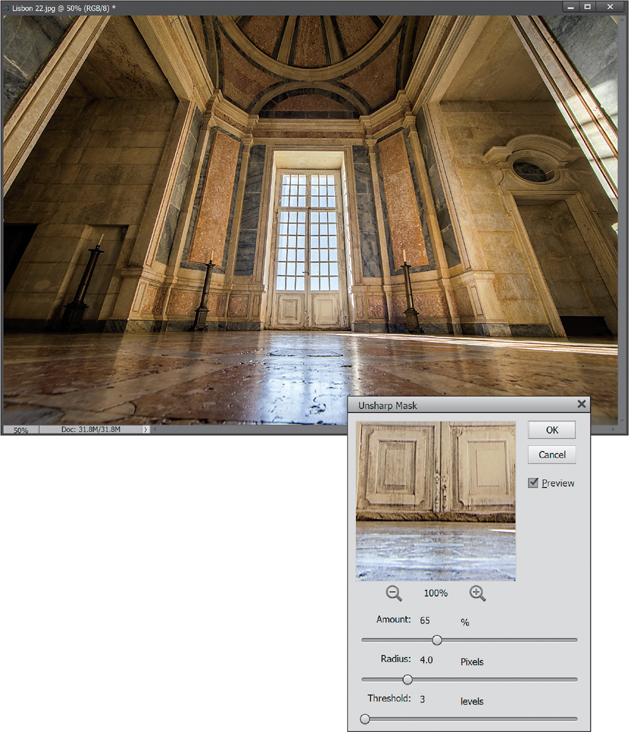
Maximum Sharpening:
I use these settings—Amount: 65%, Radius: 4, Threshold: 3—in only two situations: (1) The photo is visibly out of focus and it needs a heavy application of sharpening to try to bring it back into focus; or (2) the photo contains lots of well-defined edges (e.g., buildings, coins, cars, machinery, etc.). In this photo, the heavy amount of sharpening really brings out the detail in the edges of these boats and the ropes.

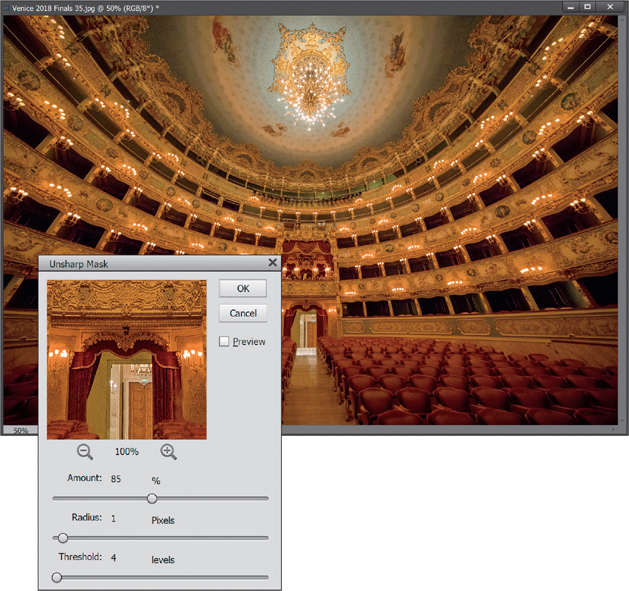
All-Purpose Sharpening:
These are probably my all-around favorite sharpening settings—Amount: 85%, Radius: 1, Threshold: 4—and I use these most of the time. It’s not a “knock-you-over-the-head” type of sharpening—maybe that’s why I like it. It’s subtle enough that you can apply it twice if your photo doesn’t seem sharp enough after the first application (just press Ctrl-F [Mac: Command-F]), but once will usually do the trick.
Web Sharpening:
I use these settings—Amount: 200%, Radius: 0.3, Threshold: 0—for web graphics that look blurry. (When you drop the resolution from a high-res, 300-ppi photo down to 72 ppi for the web, the photo often gets a bit blurry and soft.) If the sharpening doesn’t seem sharp enough, try increasing the Amount to 400%. I also use this same setting (Amount: 400%) on out-of-focus photos. It adds some noise, but I’ve seen it rescue photos that I would have otherwise thrown away.

Coming Up with Your Own Settings:
If you want to experiment and come up with your own custom blend of sharpening settings, I’ll give you some typical ranges for each adjustment so you can find your own sharpening “sweet spot.”

Amount
Typical ranges go anywhere from 50% to 150%. This isn’t a rule that can’t be broken. It’s just a typical range for adjusting the Amount, where going below 50% won’t have enough effect, and going above 150% might get you into sharpening trouble (depending on how you set the Radius and Threshold). You’re fairly safe staying under 150%. (In the example here, I reset my Radius and Threshold to 1 and 2, respectively.)
Radius
Most of the time, you’ll use just 1 pixel, but you can go as high as (get ready)—2. I gave you one setting earlier for extreme situations, where you can take the Radius as high as 4, but I wouldn’t recommend it very often. I once heard a tale of a man in Cincinnati who used 5, but I’m not sure I believe it. (Incidentally, Adobe allows you to raise the Radius amount to [get this] 250! If you ask me, anyone caught using 250 as their Radius setting should be incarcerated for a period not to exceed one year and a penalty not to exceed $2,500.)
Threshold
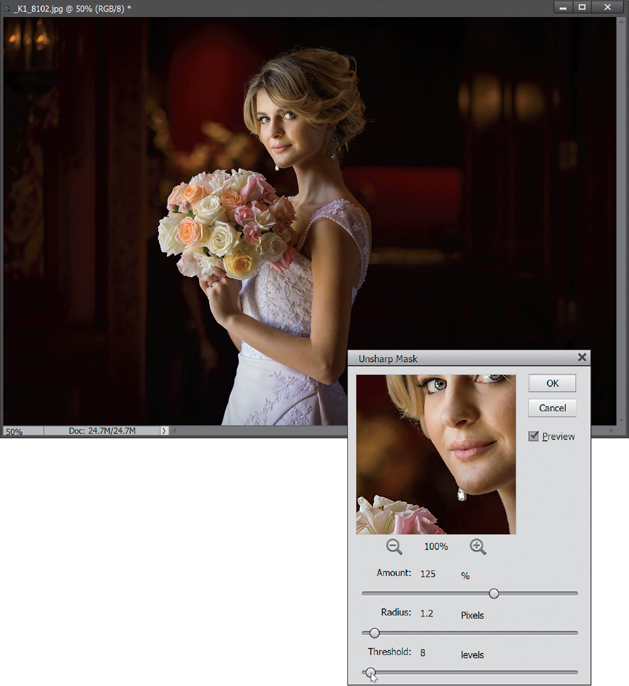
A pretty safe range for the Threshold setting is anywhere from 3 to around 20 (3 being the most intense, and 20 being much more subtle. I know, shouldn’t 3 be more subtle and 20 more intense? Don’t get me started). If you really need to increase the intensity of your sharpening, you can lower the Threshold to 0, but keep a good eye on what you’re doing (watch for noise appearing in your photo).
The Final Image
For the final sharpened image you see here, I used the Portraits sharpening settings I gave earlier (Amount: 75%, Radius: 2, Threshold: 3). If you’re uncomfortable with creating your own custom Unsharp Mask settings, then start with this: pick a starting point (one of the set of settings I gave on the previous pages), and then just move the Amount slider and nothing else (so, don’t touch the Radius and Threshold sliders). Try that for a while, and it won’t be long before you’ll find a situation where you ask yourself, “I wonder if lowering the Threshold would help?” and by then, you’ll be perfectly comfortable with it.

Creating Extraordinary Sharpening
One of the problems we face when trying to make things really sharp is that things tend to look oversharpened, or worse yet, our photos get halos (tiny glowing lines around edges in our images). So, how do we get our images to appear really sharp without damaging them? With a trick, of course. Here’s the one I use to make my photos look extraordinarily sharp without damaging the image:
Step One:
Open your image, and then apply the Unsharp Mask filter (found under the Enhance menu) to your image, just as we’ve been doing all along. For this example, let’s try these settings—Amount: 65%, Radius: 4, and Threshold: 3—which will provide a nice, solid amount of sharpening.
Step Two:
Press Ctrl-J (Mac: Command-J) to duplicate the Background layer. Because we’re duplicating the Background layer, the layer will be already sharpened, but we’re going to sharpen this duplicate layer even more in the next step.
Step Three:
Now apply the Unsharp Mask filter again, using the same settings, by pressing Ctrl-F (Mac: Command-F). If you’re really lucky, the second application of the filter will still look okay, but it’s doubtful. Chances are that this second application of the filter will make your photo appear too sharp—you’ll start to see halos or noise, or the photo will start looking artificial in a lot of areas. So, what we’re going to do is hide this oversharpened layer, then selectively reveal this über-sharpening only in areas that can handle the extra sharpening (this will make sense in just a minute).
Step Four:
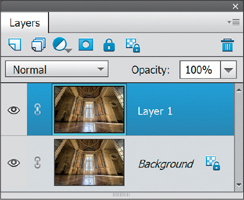
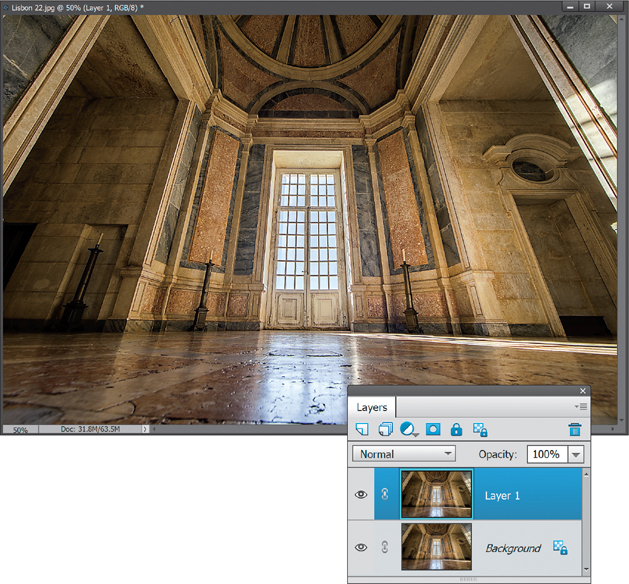
Go to the Layers palette, press-and-hold the Alt (Mac: Option) key, and click on the Add Layer Mask icon at the top of the palette (shown circled here in red). This hides your oversharpened layer behind a black layer mask (as seen here). Note: To learn more about layer masks, see Chapter 6.

Step Five:
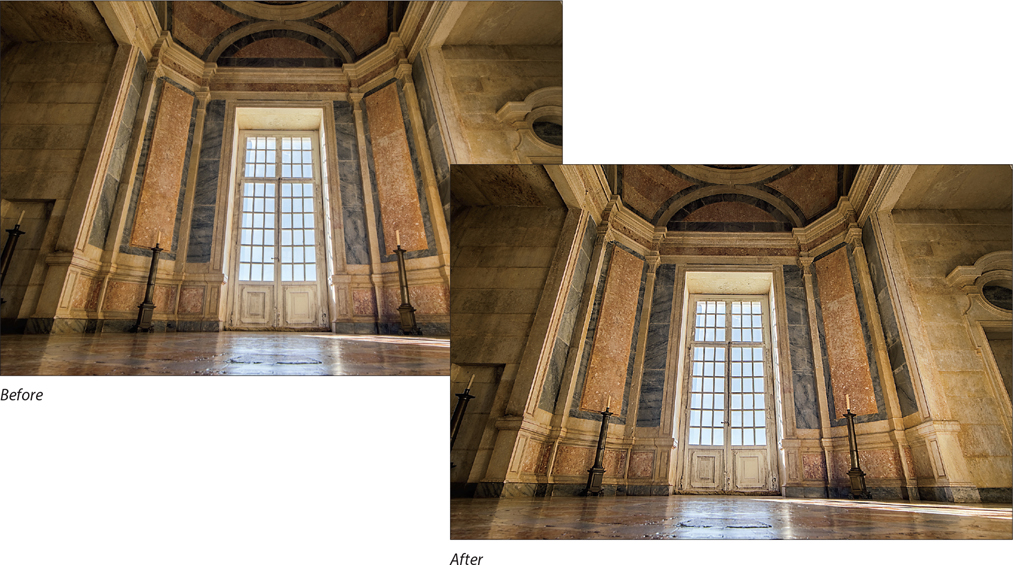
Here’s the fun part—the trick is to paint over just a few key areas, which fool the eye into thinking the entire photo is sharper than it is. Here’s how: Press B to get the Brush tool, and in the Tool Options Bar, click on the Brush thumbnail to open the Brush Picker and choose a soft-edged brush. With your Foreground color set to white, and with the layer mask active in the Layers palette (you’ll see a little blue frame around it), start painting on your image to reveal your sharpening. (Note: If you make a mistake, press X to switch your Foreground color to black and paint over the mistake.) Here, I painted over the candlesticks, the door and window frames, and the columns. Revealing these few sharper areas, which immediately draw the eye, makes the whole photo look sharper.

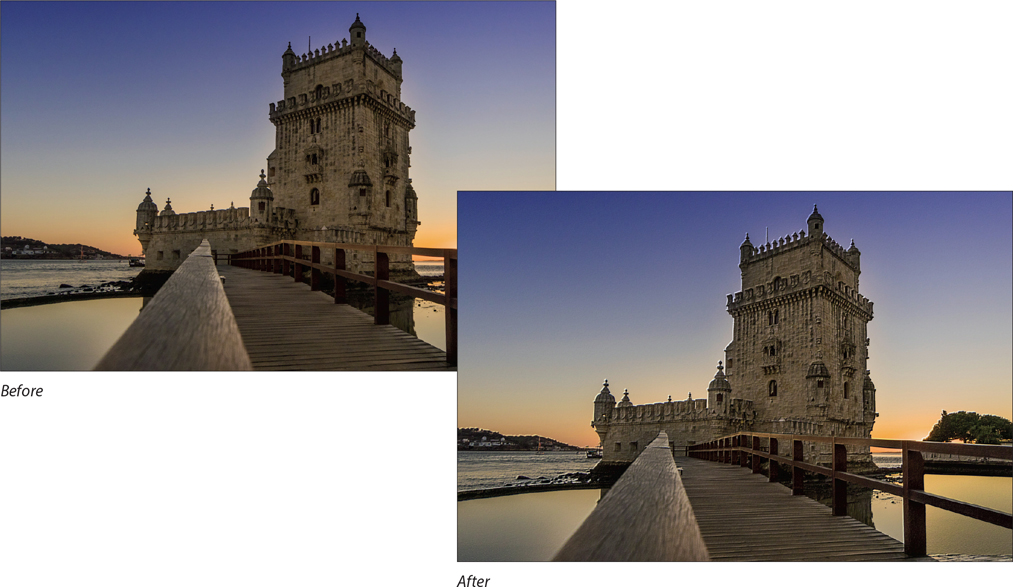
Edge Sharpening Technique
This is a sharpening technique that doesn’t use the Unsharp Mask filter, but still leaves you with a lot of control over the sharpening, even after it’s applied. It’s ideal to use when you have an image that can really hold a lot of sharpening (a photo with a lot of edges) or one that really needs a lot of sharpening.
Step One:
Open a photo that needs edge sharpening applied to it.
Step Two:
Duplicate the Background layer by going under the Layer menu, under New, and choosing Layer via Copy (or pressing Ctrl-J [Mac: Command-J]). This will duplicate the Background layer onto a new layer (Layer 1).

Step Three:
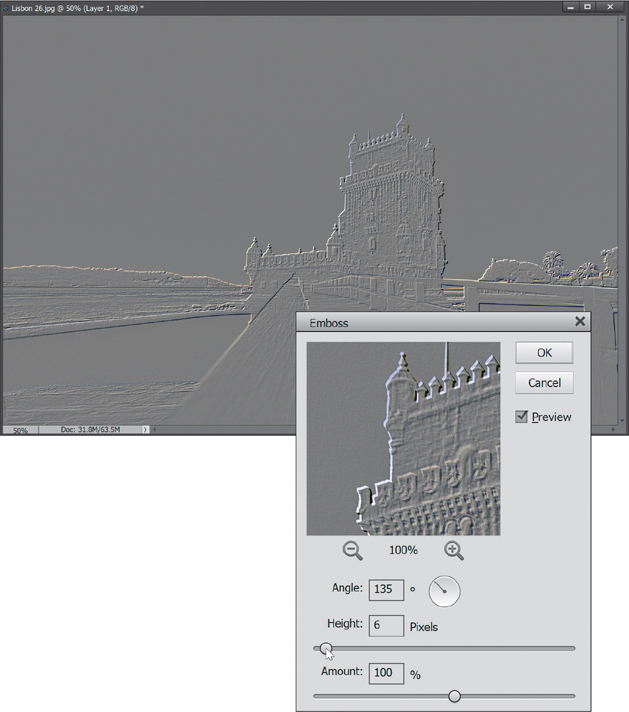
Go under the Filter menu, under Stylize, and choose Emboss. You’re going to use the Emboss filter to accentuate the edges in the photo. You can leave the Angle and Amount settings at their defaults (135° and 100%), but if you want more intense sharpening, raise the Height amount from its default setting of 3 pixels to 5 or more pixels (in the example here, I raised it to 6). Click OK to apply the filter, and your photo will turn gray, with neon-colored highlights along the edges.
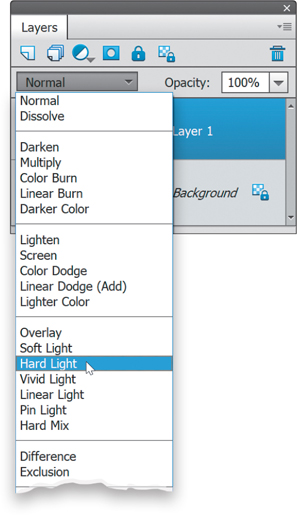
Step Four:
In the Layers palette, change the layer’s blend mode from Normal to Hard Light. This removes the gray color from the layer, but leaves the edges accentuated, making the entire photo appear much sharper.
Step Five:
If the sharpening seems too intense, you can control the amount of the effect by simply lowering the Opacity of this top layer in the Layers palette.

The Most Advanced Sharpening in Elements
We never used to use the Sharpen tool, until Adobe rewrote its underlying logic, taking it from its previous role as a “noise generator/pixel destroyer” to what Adobe Product Manager Bryan O’Neil Hughes has called “…the most advanced sharpening in any of our products.” Here’s how it works:
Step One:
Start by applying your regular sharpening to the overall image using Unsharp Mask or Adjust Sharpness (more on this coming up next)—your choice. In this case, since this is a portrait of a woman, I’d use the portrait sharpening settings I gave you earlier in this chapter. Now, get the Sharpen tool (R; it’s found nested beneath the Blur tool). Once you’ve got the tool, go to the Tool Options Bar and make sure the Protect Detail checkbox (shown circled here in red) is turned on (this is the checkbox that makes all the difference, as it turns on the advanced sharpening algorithm for this tool).

Step Two:
I recommend duplicating the Background layer at this point (by pressing Ctrl-J [Mac: Command-J]) and applying this extra level of sharpening to the duplicate layer. That way, if you think the sharpening looks too intense, you can just lower the amount of it by lowering the opacity of this layer. I also usually zoom in (by pressing Ctrl-+ [plus sign; Mac: Command-+]) on a detail area (like her eyes), so I can really see the effects of the sharpening clearly (another benefit of applying the sharpening to a duplicate layer is that you can quickly see a before/after of all the sharpening by showing/hiding the layer).

Step Three:
Now, click on the Brush thumbnail in the Tool Options Bar, choose a medium-sized, soft-edged brush from the Brush Picker, and then simply take the Sharpen tool and paint over just the areas you want to appear sharp (this is really handy for portraits like this, because you can avoid areas you want to remain soft, like skin, but then super-sharpen areas you want to be really nice and crisp, like her irises and lips, like I’m doing here). Below is a before/after, after painting over areas that you’d normally sharpen, like her eyes, eyebrows, eyelashes, and lips, while avoiding all areas of flesh tone. One more thing: This technique is definitely not just for portraits. The Sharpen tool does a great job on anything metal or chrome, and it’s wonderful on jewelry, or anything that needs that extra level of sharpening.


Advanced Sharpening Using Adjust Sharpness
Sometimes, I’ll turn to the Adjust Sharpness control, instead of the Unsharp Mask filter, to sharpen my photos. Here’s why: (1) it does a better job of avoiding those nasty color halos, so you can apply more sharpening without damaging your photo; (2) it lets you choose different styles of sharpening; (3) it has a much larger preview window, so you can see your sharpening more accurately; (4) it has a More Refined feature that applies multiple iterations of sharpening; and (5) it’s just flat out easier to use.
Step One:
Open the photo you want to sharpen using the Adjust Sharpness control. (By the way, although most of this chapter focuses on using the Unsharp Mask filter, I only do that because it’s the current industry standard. If you find you prefer the Adjust Sharpness control, from here on out, when I say to apply the Unsharp Mask filter, you can substitute the Adjust Sharpness control instead. Don’t worry, I won’t tell anybody.) Go under the Enhance menu and choose Adjust Sharpness.

Step Two:
When the dialog opens, you’ll notice there are only two sliders: Amount (which controls the amount of sharpening—sorry, my editors made me say that) and Radius (which determines how many pixels the sharpening will affect). I generally leave the Radius setting at 1 pixel, but if a photo is visibly blurry, I’ll pump it up to 2. (Very rarely do I ever try to rescue an image that’s so blurry that I have to use a 3- or 4-pixel setting.) Here, I increased the Amount to 200% and left the Radius set to 1 px.

Step Three:
Next is the Remove pop-up menu, which has three types of blurs you can reduce using Adjust Sharpness. Gaussian Blur (the default) applies a brand of sharpening that’s pretty much like what you get using the regular Unsharp Mask filter. Motion Blur requires you to know the angle of blur that appears in your image, so it’s tough to get really good results with this one. So, I recommend Lens Blur. It’s better at detecting edges, so it creates fewer color halos than you’d get with the other choices, and overall I think it just gives you better sharpening for most images. The downside? Choosing Lens Blur causes the filter to take a little longer to “do its thing.” A small price to pay for better-quality sharpening.

Step Four:
Below that is Shadows/Highlights. Just click on the little right-facing arrow to the left of it and these options appear. The Shadows sliders are for reducing sharpening in the shadow areas (I occasionally use these, but just on really noisy images—it allows you to reduce or turn off sharpening in the shadow areas where noise is usually most visible), and the Highlights sliders are used for reducing the amount of sharpening in the highlight areas (I never use those).