
Topics and tasks in this chapter
Choosing a new keyboard, mouse, controller, or monitor
Installing a new keyboard
Installing or replacing a mouse
Installing a new game controller
Attaching a monitor to a PC or laptop
Displaying your computer on a TV
Installing a second monitor to a PC
Adjusting monitor settings
This chapter deals with the common folk of computing: your keyboard, mouse, monitor, and game controller. Your hands or eyes are on them constantly, but you rarely notice that they're there.
In fact, you notice their existence only when something's wrong: a key no longer works, the mouse pointer jumps haphazardly, the monitor displays odd stripes, or the game controller's cable rips apart.
When that happens, turn to this chapter to choose your replacement, install it, and begin to happily ignore it, once again.
Keyboards contain more than 100 moving parts, popping up and down hundreds of times during the day.
Keyboards don't die very often, but when they start to go, the problem is easy enough to diagnose. A few keys start to stickkkk or stop working altogether. And when almost any type of liquid hits a keyboard, every key stops working at the same time.
This section helps you choose a replacement keyboard. It describes the types of keyboards in today's market and explains which works best in different situations. The "Installing a Keyboard" task near the end of the chapter shows how to replace a keyboard that's no longer a trusted friend.
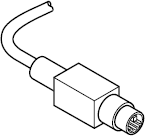
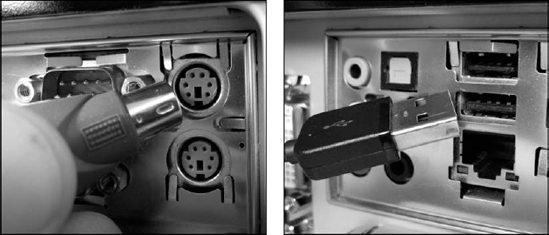
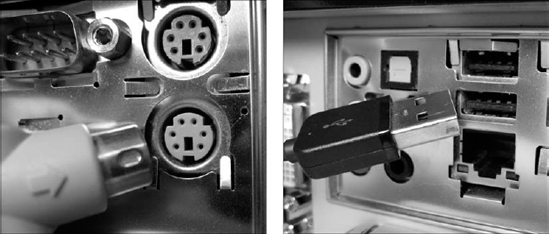
All keyboards — even wireless ones — come with either of two connectors: USB (Universal Serial Bus) or PS/2. Since most computers come with both of those ports, either type of keyboard will work. So, which type is best, USB (shown in Figure 3-1) or PS/2 (shown in Figure 3-2)?
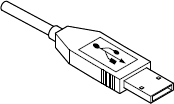
Actually, both types work equally well. Some USB keyboards even come with a PS/2 adapter, a little gadget that lets you plug a USB keyboard into a PS/2 port. So, if your computer has a spare USB port, pick up a USB keyboard. No USB ports to spare? Go with PS/2.
One caveat: Unlike USB keyboards, PS/2 keyboards aren't "hot swappable," meaning you can't unplug them and plug them back in while your computer is running. Also, PS/2 keyboards are inexpensive and basic; fancier, more expensive keyboards require a USB port.
Note
Unlike desktop computers, laptops and netbooks don't include PS/2 ports. If you want a full-size keyboard to supplement your tiny laptop or netbook, buy a USB keyboard.
After you've chosen between a USB or PS/2 keyboard, examine your budget. The cheapest keyboards cost as little as $10; if you pack on some special features, they could reach $100.
Why the huge price range? Because today's keyboards come in a wide variety of flavors: wireless, ergonomic, backlit, and mouse/keyboard "all-in-one" units. Keyboards have never been more complicated.
To help you choose your new keyboard, here's an explanation of the terms found on keyboard boxes and in Web stores:

Gaming/multimedia/multifunction keyboard: Some companies insist that 101 keys aren't enough. So they add even more keys along the keyboard's top or sides. Often devoted to single jobs, these specialized keys can increase or decrease the volume, skip to the next song, or open a favorite program. Keyboards designed for gamers offer programmable keys: One key press lets you open a map to find quick exit routes in World of Warcraft, for example.
Tip
Those specialized keys won't work as soon as you plug in your keyboard. No, those keys require special drivers, included on the keyboard's bundled software. It's an inconvenience, making specialized keyboards a little more troublesome to install.
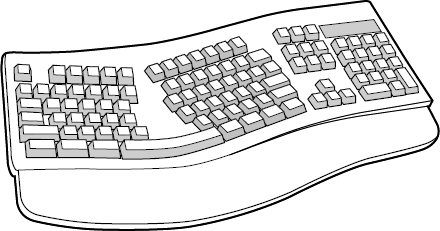
Ergonomic keyboards: Ergonomic keyboards, like the one shown in Figure 2-1, resemble a thick boomerang and spark a love/hate relationship. Some folks say the shape helps them spend hours on the keyboard; others find it awkward and gimmicky. Most computer stores offer display models, so definitely try before you buy.
Table 3.1. Windows 7's Windows Key Shortcuts
To Do This | Press This |
|---|---|
Display Windows Help | Windows key+F1 |
Display the Start menu | Windows key |
Cycle through open windows | Windows key+Tab |
Pin window to monitor's left edge | Windows key+left arrow |
Pin window to monitor's right edge | Windows key+right arrow |
Display Windows Explorer | Windows key+E |
Find files | Windows key+F |
Minimize or restore all windows | Windows key+D |
View System window | Windows key+Pause/Break |
Lock PC |
Wireless: Wireless keyboards bear no cables, making for tidy desktops. They all come in two parts: The keyboard and a receiving unit, which usually plugs into your computer's USB port. (Since most wireless keyboards plug into a USB port, make sure your computer has an unused USB port, described in the previous section.) Batteries last from three to eight months, depending on how much time you spend typing.
Touchpad/trackpad: Found on many netbooks and laptops, these rectangular pads let you move the mouse pointer by sliding your finger across their surfaces; a tap on a corner mimics a click of a mouse button. If you love your laptop's touchpad, buy a keyboard that includes a touchpad. (Trivia: Windows refers to a newly plugged-in touchpad as a "Human Interface Device.")
Media Center keyboard, mouse, and/or remote: All but the least expensive versions of Windows 7 include Windows Media Center software for automatically recording and playing back TV shows. To keep you rested firmly on the couch across from the TV, several companies offer special remote controls and wireless keyboards for channel changing and living room Web surfing.
A few of these new Media Center keyboards, remotes, and mice use Bluetooth, the same wireless technology that links cellphones with headsets. Because older computers didn't include built-in Bluetooth, some Media Center keyboards include a tiny Bluetooth receiver that pushes into your computer's USB port.
Tip
Before buying a new keyboard at the store, remove the keyboard from the box and try it out. Only by trying the keyboard can you see if it "feels" right beneath your fingers.
Mice all tackle the same computing chore. When you nudge your mouse, a little arrow called a mouse pointer moves on your computer's screen. By pointing the arrow at buttons on the screen and pushing buttons on the mouse, you "push" the buttons on the screen.
For years, all mice looked like a beige bar of soap with two buttons and a long tail. Now, mice come in dozens of shapes, sizes, colors, and button arrangements. (Wireless mice even do away with the tethering tail.)
Like keyboards, mice come with one of two connectors: USB (Universal Serial Bus) or PS/2. Since most desktop computers come with both of those ports, both types of mouse are compatible. So, which type is best, USB or PS/2, as shown earlier in Figures 3-1 and 3-2?
The answer depends on your needs. PS/2 mice cost less, and often come with an adapter that also lets the mice work in USB ports, if needed. Or, if you're short on USB ports, a PS/2 mouse lets you save those versatile USB ports for other gadgets.
If you choose USB, however, you'll find a better selection of wireless mice. Plus, USB mice are hot swappable, meaning you can unplug them and plug them back in while your computer is running. PS/2 mice must remain plugged in at all times.
Note
Laptops and netbooks rarely include PS/2 ports. If you want a mouse to replace your laptop's erratic trackpad, buy a USB mouse.
A ten dollar mouse works fine for the basics; I keep one tucked into my laptop bag. If you spend a little more, you'll choose among these options:
Mechanical: Stay away from these antiques. A rubber ball lives inside the mouse's belly; when you move the mouse, you also roll the little ball. The movement of the ball tells the computer the direction and speed to move the onscreen pointer. Unfortunately, mechanical mice need frequent cleaning.
Optical: The much-preferred optical mice ditch the ball/roller mechanics for a small glowing light and a sensor. As you move the mouse, the optical sensor takes tiny snapshots of your illuminated desk, hundreds of times each second. By comparing differences between snapshots, the mouse knows how fast and far you're moving it, and it updates the pointer accordingly. If your desktop is glass or shiny laminate, your optical mouse requires a mouse pad because the reflections confuse the sensor. [Optical mice with lasers are slightly more accurate than light-emitting diode (LED) optical mice.]
Touchpad: Prefer your laptop's touchpad to a mouse? Pick up an external touchpad that plugs into your desktop computer's USB port, eliminating the need for a mouse.
Scroll wheel: This handy little wheel protrudes from the mouse's back, usually between the two buttons. Spin the wheel with your index finger, and your computer scrolls up or down the onscreen page, accordingly. Push down on the wheel to make it click; most scroll wheel mice let you program the wheel click to do just about anything you want.
Trackball: Resembling an upside-down mouse, trackballs lie flat on your desk. By rolling the ball with your fingers, you control the mouse pointer. Trackballs are going out of style among everybody but a few gamers.
Wireless: Wireless mice work just like their keyboard counterparts; in fact, some share the same receiving unit, which usually plugs into your computer's USB port. The mouse sends signals to the receiver, which sends them to your computer. Unlike wireless keyboards, wireless mice are battery hogs. Battery life is improving, but count on buying new batteries every three to six months. Or put rechargeable batteries in heavy rotation from the charger to your mouse and back again.
Many computer games perform just fine with the keyboard and mouse. Keyboards can handle both online chats and direction: Resting the fingers on the W, A, S, and D keys often lets you tell the computer whether you're moving up, left, down, or right. That leaves the mouse free for shooting, or other activities.
But for advanced gaming, many people prefer dedicated game controllers. All modern game controllers insist upon a USB port. (Some garage sale models don't, but they won't work with today's games.)
Because so much of the controller's appeal comes from its feel, take notice of what controllers your friends use when you're visiting. Find one you like, make sure it's compatible with your favorite games, and then buy it.
Note
Some games work better with one kind of game controller over another, and not all controllers work with every game. Serious gamers acquire a serious collection of controllers.
So, how much do you want to spend? It boils down to the features you're looking for, as described here:
Tip
USB: All game controllers, from simple joysticks to foot-controlled rudder pedals, come with a cable that plugs into your computer's USB port. If your computer lacks a front-mounted USB port, or you're running out of unused USB ports, pick up a USB hub: A small USB-port-filled box with a cable that plugs into your computer's remaining USB port.
Joystick/game pad: Joysticks hail from the older school of gaming and use a movable stick for controlling onscreen action. Game pads skip the joystick in favor of a flat surface with many buttons. Some controllers combine both: a joystick surrounded by buttons.
Analog: Analog game controllers measure the direction the joystick moves on a scale of 0 to 255. They send the number to the game, which interprets the joystick's direction and speed, moving the machine gun accordingly. They're best when subtle controls are needed — gently adjusting a flight path, for example.
Digital: Digital controllers, by contrast, work on an on/off basis. Most simply inform the game which of nine directions the joystick is moved: top, top-right corner, right, bottom-right corner, bottom, and so on. The ninth direction? Centered, meaning it's not being moved at all. Game pads, with their many on/off buttons, usually hail from the digital camp.
Analog/digital: Because both analog and digital controllers have their advantages and problems, many controllers combine both: An analog joystick sits next to a digital controller.
Tip
Game controllers all have their own particular feel. When you tell the computer to calibrate the controller, the computer measures the device's movements and corrects its settings to allow smoother and more accurate game play. I explain how to calibrate a controller in this chapter's last task, "Installing or Replacing a Game Controller."
Monitors, unfortunately, can't be repaired. When they're starting to die, they either blank out completely, lose their colors, or start sending odd lines down the screen. Sometimes it's the buttons that give out, keeping you from adjusting the display.
When your monitor's dying, you can almost always tell it's time for a replacement. Before shopping, though, check these steps to rule out a quick fix:
Check to make sure that you plugged the monitor's power cord securely into the wall or power strip, and make sure that your power strip is turned on.
Wiggle the connection where the monitor's video cable plugs into the back of your computer.
Check where the video cord plugs into the back of your monitor. Some cords aren't built into the monitor, leading to loose connections. Push the cord hard to make sure that it's plugged in tight, and screw it down, if that's an option.
Check where the power cord leads to the back of your monitor. Like video cables, some power cords plug into the monitor.
Check your monitor's resolution, a task described later in this chapter.
If that still doesn't fix the problem, it's time to find a monitor that's fits both your computer's video connector and your budget, a journey described in the next two sections.
Monitors grab their video signals from the video circuitry in your computer, so you can tell what type of monitor you need by looking at your computer's video port — the little connector on the back of your computer where you plug in the monitor's cable.
Fortunately, many computers come with several video ports, so they're compatible with several types of monitors. Here's the rundown on the ports you're likely to find on your computer, and the types of monitors they accept:

Tip
Some manufacturers test your patience by claiming their monitor has a "15-pin mini D-SUB connector." That's a fancy term for "VGA port." The most common video port, it's found on nearly every PC and laptop.


Have a Digital (DVI) port on your computer, but an HDMI port on your monitor, or vice versa? Buy a cable with a digital connector on one end for your computer, and HDMI on the other for your monitor. The cables cost less than ten dollars on Amazon.
Tip
Some monitors don't come with any cable, but offer two ports, VGA and DVI. That lets you buy whichever type of cable that fits into your computer's video port. Most DVI monitors include a cable adapter that lets them plug into a VGA port, if necessary, but the display won't be as crisp.
After you decide on your monitor's required connector, VGA, Digital (DVI), or HDMI, you can concentrate on your own budget. Smaller monitors are cheaper; larger monitors are more expensive. And the extra-wide monitors with built-in speakers cost the most of all. You'll find these choices when shopping:
LCD: Nearly all monitors sold today are LCD (liquid crystal display), which pretty much translates to "flat panel." You won't find many, if any, old-school CRT (cathode ray tube) monitors still for sale. In fact, if a friend offers you an old CRT monitor, don't take it. Like old televisions, CRT monitors are qualified as hazardous waste in many areas, so they're difficult to dispose of. (That's why your friend's trying to pawn it off on you.)
Widescreen: These LCD monitors boast a wide screen that's similar in proportion to a movie theater screen. That gives you extra desktop real estate in Windows, as well as letting you watch wide-screen movies in all their glory. (They're great for making home theaters, described in Chapter 11.) Some widescreen monitors even tilt vertically, letting you see an entire page onscreen, not just a choice between the page's top or bottom half.
CRT TV sets: Old-style CRT televisions are designed for moving images, not text, so they make lousy computer monitors. Their low resolution can barely display an icon. Don't bother.
HDTV set: HDTV sets, by contrast, make superb monitors that excel at showing digital photos, movies, computer games, or TV shows recorded in Windows 7 Media Center. Many HDTV sets come with digital video and HDMI ports, letting you plug them into whichever port your computer accepts.
Buy a replacement keyboard that fits your computer's port, either USB or PS/2. If a keyboard says it works with both types of ports, then it's a USB keyboard with a tiny adapter: To plug it into the PS/2 port, slip the adapter onto the USB plug.
Some USB keyboards sport an extra USB port or two on their side, but those USB ports usually aren't powered. That means they'll work fine with low-power gadgets like tiny USB flash drives. But they can't charge an iPod, cellphone, or any other device that needs power through the USB port.
To install a new keyboard, follow these steps:
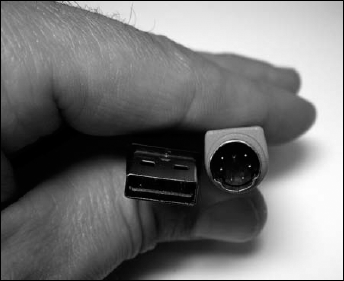
Before installing anything, save your current work and close your programs. If you're installing a PS/2 keyboard, turn off your computer first. (You don't need to turn off your computer to install a USB keyboard.) Remove your old keyboard by pulling the cable's plug from its socket on your computer. Examine the end of the cord; a rectangular plug with a pitchfork symbol on it is a USB plug (left). A smaller, round plug is an older-style, PS/2 plug (right).
Tip
When you're unplugging any type of cord, pull on the plug, not the cord, to save the cord a little wear and tear.
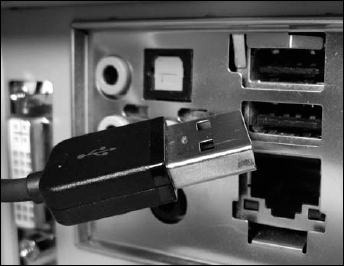
Plug the new keyboard into the correct port. USB ports slide in pretty easily. Doesn't fit? Turn over the plug, and try again, as it fits only one way. If the USB keyboard is wireless, plug its receiver into the USB port. PS/2 plugs need their pins to match up with the notches of the PS/2 ports. Most computers have two PS/2 ports, one for the mouse and the other for the keyboard; if you're lucky, they're labeled with the appropriate icon. They won't do any harm plugged into the wrong port, but they won't work until pushed into the correct port. Push the PS/2 plug firmly into the PS/2 port with the keyboard icon until the plug sits firmly inside.
Turn your computer back on (if you've turned it off). If the computer doesn't complain and your new keyboard works, your computer found the keyboard and liked it. If necessary, install your keyboard's drivers or software: Insert the CD and double-click the Setup program, if necessary. (If the software doesn't work well, visit the manufacturer's Web site to download the latest set of drivers, a task described in Chapter 17.)
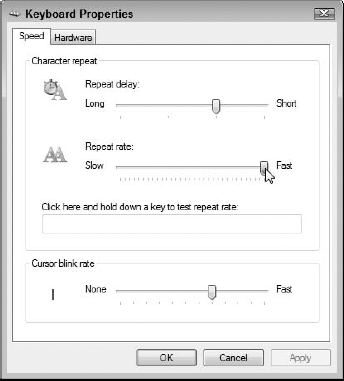
Adjust your keyboard's settings in Windows by choosing Control Panel from the Start menu and typing keyboard in the Control Panel's Search box in its top-right corner. When the Keyboard option appears, double-click it to see the Keyboard Properties dialog box shown in the figure. Here, you can change options like a key's repeat rate — how long it waits before repeating when you hold down a letter. Your keyboard's manufacturer may have tossed in a few options for your specific model, as well. (To adjust your keyboard settings in Windows XP, choose Start

A mouse comes with its own software, if needed, and cord. You needn't buy any extras. If you're buying a fancy mouse for your Windows 7 computer, visit the manufacturer's Web site to see if it offers downloadable Windows 7 drivers. (Because you rarely find up-to-date drivers in a new product's box, I describe how to download and install the latest drivers in Chapter 17.) Windows can use pretty much any old PS/2-style mouse. Just plug it in, turn on your computer, and Windows knows it's there.
To replace or add a mouse, follow these steps:
If you're installing a PS/2 mouse, turn off your computer. Be sure to exit any of your currently running programs first. Examine where you currently plug in your mouse, and make sure your replacement uses the same type of plug, either USB or PS/2. Then unplug your old mouse if it's still plugged in.

Tip
If your mouse just died, here's the magic set of keystrokes to shut down Windows in a gentle way, without reaching for your computer's power button: Press your Windows key (or press Ctrl+Esc). Then press the right arrow key once and press Enter. (In Windows XP, press your Windows key or press Ctrl+Esc; then press the press the U key twice.)
Tip
If your cursor is jumpy when you move your mouse, you probably need to clean your mouse. If you're using an optical mouse, use some screen wipes to clean the shiny lens on its undersurface. A pair of tweezers can remove a stuck cat hair or small fiber that's confusing the sensor.
Push the plug from the new mouse (or from the wireless mouse's receiving unit) into the correct port on your computer. USB plugs slide into USB ports pretty easily. If it's not fitting, turn it over; the connector fits only one way. PS/2 connectors plug into the PS/2 port with a little mouse icon next to it. (The adjacent keyboard PS/2 port won't work.) Make sure the notches and pins line up and push firmly until it's all the way in.
Add batteries to the wireless mouse, if necessary, and run the mouse's installation program. Windows usually provides a basic driver for your newly installed mouse. To use the mouse's fancier features, though, stick its CD into your drive. If the installation program doesn't start automatically, browse the drive's contents for a program named Setup to start things rolling. (For best results, download the mouse's latest drivers at the manufacturer's Web site, described in Chapter 17.) If the mouse cord isn't long enough, buy an extension cable at an office supply or electronics store.
Tip
Left-handed users can switch their mouse buttons through the Buttons tab in Windows 7's Control Panel: Click Start, choose Control Panel, choose Hardware and Sound, and select Mouse.
A game controller comes with its own software, if needed, and cord. You needn't buy any extras. Simple ones don't need any software; the fancier (and more expensive) models sometimes require software before all the features will work. Windows 7 supports game controllers with USB ports only; old-style joysticks won't work.
To replace or add a game controller, follow these steps:
Find a vacant USB port on your computer, preferably in the front. If you're currently using all your USB ports, buy a USB hub — a box that plugs into any USB port and dishes up several more ports. Push the plug from the game controller into an empty USB port. USB plugs slide into USB ports pretty easily. If it's not fitting, turn it over; the connector fits only one way.
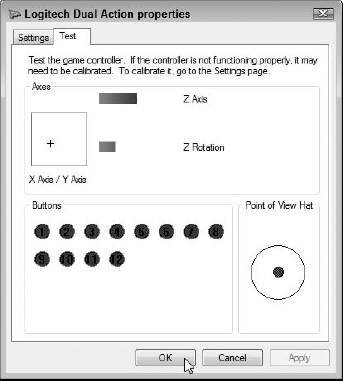
Run the game controller's installation program, if necessary, and then calibrate the controller within Windows by clicking the Start button, choosing Control Panel, and typing Game Controller in the Control Panel's Search box (in the upper-right corner). Choose Setup USB Game Controllers to bring up the Game Controller's window. (For the best gaming experience, visit the gamer controller manufacturer's Web site to download the latest drivers, described in Chapter 17.) In Windows XP, click Start
Click the name of your game controller, and click the Properties button. Click the Test tab and move the controller's joysticks and press its button, watching the onscreen action. If it doesn't seem to be working correctly, click the Settings tab and choose Calibrate to calibrate the game controller.
If you're installing a new video card along with your new monitor, flip to Chapter 9 first for instructions on installing the card. After the new card rests inside your PC, head back here to hook up the monitor.
To install a new monitor, perform the following steps:
Laptop owners can avoid this step. But desktop computer owners should shut down Windows, turn off your computer, and unplug and remove your old monitor. Unplug your old monitor's power cord from the wall before you unplug the monitor's video cable from its little port on the back of your computer's case. Then remove the old monitor from your desktop. Don't throw your old monitor into the trash because many monitors contain noxious chemicals. Check Chapter 13 for tips on finding recycling programs.
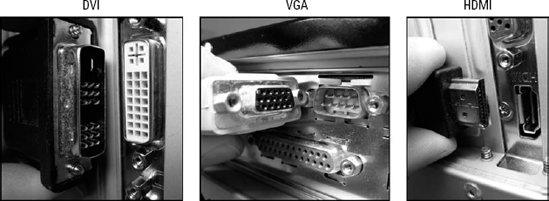
Remove the new monitor from the box, place the monitor on your desk, and push the plug on the end of its cable into your computer's video port on the back of your computer. The cable should only fit into one port, be it DVI, VGA, or HDMI (shown here from left to right). If the cable doesn't fit right, you're either trying to plug it into the wrong port, or your monitor isn't compatible with your computer. (Or, if your monitor has a DVI connector, look amidst the packaging for an adapter that lets it slip into your computer's VGA port, if necessary.) If the monitor's not compatible, you need to upgrade your computer's video card to match your monitor, a chore tackled in Chapter 9. Make sure that the cable is fastened securely on the monitor's end.
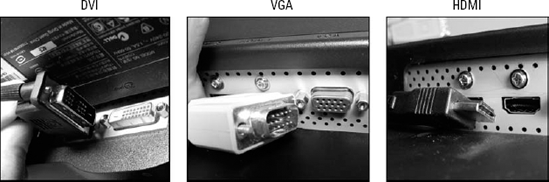
Plug the cable's other end into your monitor's matching port, be it DVI, VGA, or HDMI. Plug the monitor's power cord into the wall or a power strip. Turn on your monitor and then turn on your computer. Can you see words on the screen as the computer spews its opening remarks? If so, you're done. If it doesn't work, however, go through some of the fixes in the "Replacing a Monitor" section earlier in this chapter.
If you bought a fancy monitor with speakers, cameras, or other goodies, you have to perform two more tricks: Plug the cords from the monitor's speakers or camera into their spots in the back of your computer. (The Appendix shows pictures of all your PC's ports and what plugs into them.) Then, if Windows doesn't recognize your new monitor's special features, you probably have to install the drivers that came on the CD that came with the monitor. (Or, for the newest drivers, visit the monitor manufacturer's Web site, a task described in Chapter 17.)
Warning
Monitors are usually one of the quietest parts of your PC. If your monitor ever starts making noise, something is wrong. If those noises are ever accompanied by an odd smell, don't wait for smoke: Turn off your monitor immediately.
Tip
If you install a new video card and the monitor screams, the card is trying to make the monitor do something cruel and unnatural. Chances are that the two aren't compatible. To fix the problem, right-click the desktop, choose Screen Resolution, move the Resolution slider toward the bottom, and click Apply.
You can connect a computer to only a High-Definition TV; older TV sets just don't work well. If you plan on using the TV as a second monitor, finish this task, and then proceed to the next, "Adding a Second Monitor to a PC or Laptop."
Here are the jacks found on both computers and TVs, listed in order of video and sound quality:
Follow these steps to connect your computer to your TV:
Make sure your computer and TV have matching ports, and a cable that connects the two, and then set your computer and your TV within a few feet of each other. Most video cables are less than six feet long, which doesn't give you much room.
Find the matching TV ports on your monitor and your computer, and then connect the appropriate cable between them. The cables and ports will be identical to the ones in the preceding task, "Connecting a Monitor to a PC or Laptop." After all, an HDTV set is just a large monitor.
Adjust your computer's video so it fits on the TV's screen: right-click the desktop, choose Screen Resolution, and move the Resolution slider to the appropriate resolution. Start with a resolution of 1280 × 720. If that works, try bumping up the resolution to 1920 × 1080 to take full advantage of the TV's highest quality.
Tip
Unless you're using an HDMI cable, these steps connect only your PC's video to your TV, not its sound. If your PC's built-in sound isn't good enough, connect your PC's sound to your home stereo, a project I cover in Chapter 11.
Tip
Not hearing sound through your HDMI cable? Make sure you've attached a cable from your PC's digital sound output to the video card's digital sound input. (Most of them are tiny wires that run from two-pins on the video card to two pins on the sound card.)
Until you've added a second monitor to your computer, you won't realize what all the fuss is about. Adding a second monitor gives you the benefits of owning two computers, without the cost. For example, you can do your work as usual on your first monitor. The second monitor can devote itself to showing all those items that used to require shuffling a pile of windows.
For example, a second monitor lets you do these things:
Keep your e-mail program visible for researching old e-mail, or checking for the latest one.
Extend your netbook or laptop's tiny monitor onto your second monitor, doubling your desktop space.
Keep open a Web page with constantly changing information about the weather, news, or research about what you're currently writing.
View files on a networked computer while comparing them with your own.
Keep two Word documents open simultaneously, letting you move or copy paragraphs between them.
To attach a second monitor to a computer, follow these steps:
Plug the second monitor's cable into the monitor and into a second video port on your desktop PC, or into your laptop's single video port. No second video port on your desktop PC? Then you need to buy and install a video card with two ports, one for each monitor, as I describe in Chapter 9. Conveniently, many newer video cards come with two video ports.
Tip
If you're feeling green, recycle the monitor from your old computer by putting it to work as your second monitor.
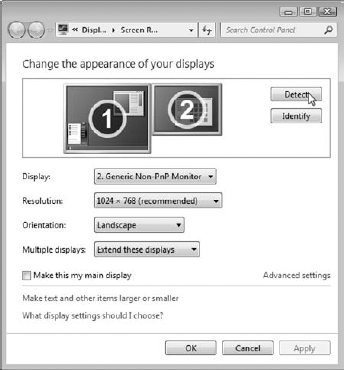
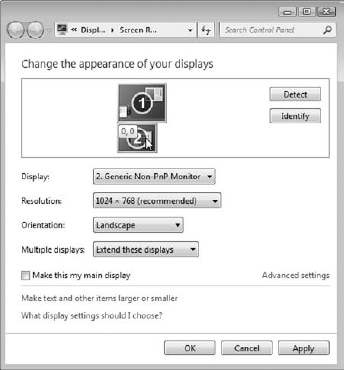
Tell Windows 7 about your second monitor: Right-click a blank part of the desktop and choose Screen Resolution to see both displays listed onscreen. Click the Detect button if Windows can't find the second monitor. Then click the icon representing your main monitor and choose Make This My Main Display to choose which monitor should display your Start button and taskbar. (In Windows XP, right-click the desktop, click Properties, and click the Settings tab. In Windows Vista, right-click the desktop, click Personalize, and click Display Settings.)
Tell Windows how to extend your desktop. Windows can extend your desktop above, below, to the left, or to the right of your current monitor. To tell Windows where you've placed your second monitor, drag the monitor's onscreen outline to the appropriate position, and click Apply. (I like placing the monitor to the right, extending my desktop in that direction.)To test it, move your mouse pointer off the screen in that direction; the mouse pointer should show up on the second monitor.
Tip
When in doubt, click Identify; Windows will place a huge number 1 on the screen of your main monitor, and a huge number 2 on the screen of your second monitor.
Monitors and video circuits can display information in several different resolutions, meaning how much information they can squeeze onto the screen. A high resolution shrinks everything to pack as many windows onscreen as possible. Lower resolutions enlarge everything, limiting what you can fit on your desktop.
To find the resolution that's right for you, follow these steps:
In Windows 7, right-click a blank part of your desktop and choose Screen Resolution. (In Windows Vista, right-click your desktop, click Personalize, and click Display Settings. In Windows XP, right-click the desktop, click Properties, and click the Settings tab.)

In the dialog box that appears, click the Resolution menu to see the Resolution drop-down list and use your mouse to drag the little bar between High and Low. Then watch the little preview screen near the window's top change as you move the mouse. The more you slide the bar upward, the larger your monitor display grows. Unfortunately, the more information Windows 7 can pack onto your monitor, the smaller that information appears.
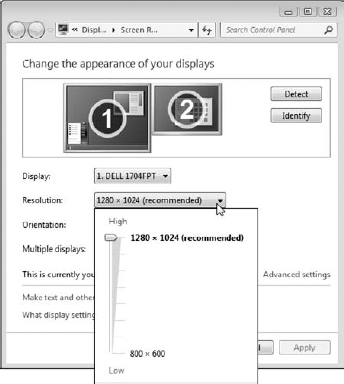
View your display changes by clicking the Apply button, and then, if asked, click the Keep Changes button to authorize the change. Click OK when you're done tweaking the display. After you change your video resolution once, you'll probably never return here. Unless you plug in a second monitor, that is, as described in the preceding section.
Tip
There's no right or wrong choice here, but try the resolution Windows lists as "Recommended." That's the resolution your monitor will display best. Your monitor will still be able to display the other resolutions, but they won't look as crisp.