Adding a second monitor to your new computer
Creating a portable hard drive from your old hard drive
Removing the old hard drive and adding it to your main computer
Turning your old computer into a backup unit
Purging your old computer's data before donating or destroying it
State laws classify computers as hazardous waste and forbid tossing computers into the trash. So, what do you do with the old computer after you buy a new one?
You can donate it to charity, of course, and take a tax deduction. But with a little creativity, you can also salvage a lot of its parts and functionality, which is where this chapter comes in. It turns you into a recycler in the truest sense of the word, taking your old computer's pieces and giving them a new life.
The tasks in this chapter describe how to add a second monitor for your desktop and how to create a portable hard drive, a second drive for your main computer, or a backup unit to keep your work safely duplicated.
If you'd rather donate the computer to a friend or to charity, a final task describes how to cleanse your hard drive of all traces of your personal information: passwords, credit card numbers, and other things you don't want falling into the wrong hands.
Just as a larger closet can hold more goodies, an expanded desktop lets you place more information within your view. Adding a second monitor lets you double your desktop, letting you work on one monitor while eyeballing your reference materials on the other. You can double the size of your cockpit in the latest flight simulator. Or you can keep Facebook or Twitter running on your spare monitor to keep up with your friends.
Here's how to put your old monitor to work as a second monitor on your main computer or laptop:
Unplug the old monitor from your old computer. I describe monitors and their connectors in Chapter 3's task on connecting a monitor to your PC or laptop.
Plug your old monitor into your new netbook, laptop, or computer, which I describe in Chapter 3 task about attaching a second monitor to a computer or laptop. No video port for it on your other computer? Then pluck your old monitor's video card and install it into your new computer, too. Or upgrade to a new video card that has two video ports (I describe both chores in Chapter 6).
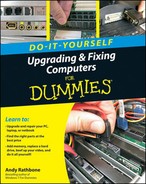
Tell Windows about your second monitor: Right-click a blank part of the desktop and choose Screen Resolution to see both displays listed onscreen. Click the Detect button if Windows can't find the second monitor. Then click the icon representing your main monitor and choose Make This My Main Display to choose which monitor should display your Start button and taskbar.
On that same screen, drag and drop the onscreen monitors until they resemble the way you've arranged them on your real desk. You can tell Windows to spread the desktop to the left or to the right, depending on how you've arranged your two monitors. Or, if you work on long spreadsheets, stack the two monitors on top of each other with a shelf to double your rows of numbers. Then click OK to save your monitor arrangement.
Portable hard drives are very handy to have around. They're great for backing up files, moving information from one computer to another, or simply serving as storage spots for those large files you don't want cluttering up your main computer's hard drive.
This task explains how to remove your old computer's hard drive, slip it into a small case, and turn it into a portable hard drive, all for the cost of the case (usually under $30). Your new portable hard drive will work with any type of computer, be it a netbook, laptop, or desktop. (It will even work with an Apple computer, if you've walked down that path.)
You can reuse the hard drive from either a desktop computer or laptop.
To create a portable hard drive from your old computer's hard drive, follow these steps:
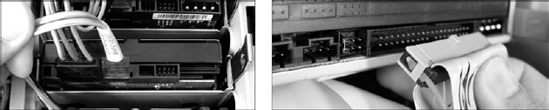
See whether your old hard drive uses SATA (right) or IDE (left) connectors so that you can buy the right type of case. I describe how to determine your type of hard drive in Chapter 6.
Buy either a SATA or an IDE portable hard drive enclosure that fits the size of your drive, either desktop or laptop. If you're using a laptop's drive, buy a case meant for the smaller 2½-inch drives; desktop drives need cases for the standard 3½-inch drives. (They're always a bit larger than that, so don't fret if yours aren't exactly 2½ or 3½ inches.) More expensive enclosures come with more padding, saving them from the hard knocks of travel. Cooling fans add to the cost, as well, but help the drive last longer, especially if it's meant to run constantly.
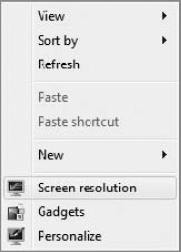
Remove your old computer's hard drive; it's held in place by two cables and either two or four screws. I describe how to remove a hard drive in Chapter 6, in the task about upgrading or replacing your Windows drive.
Take apart the portable hard drive enclosure. The enclosure consists of two main parts: A long rectangular box and a detachable connector on one end. It will also come with a power supply and a USB cable that plugs between the box and your computer's USB port. Plus, you'll find a few screws for holding the drive in place and putting the enclosure together.
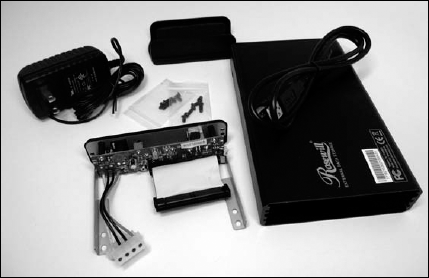
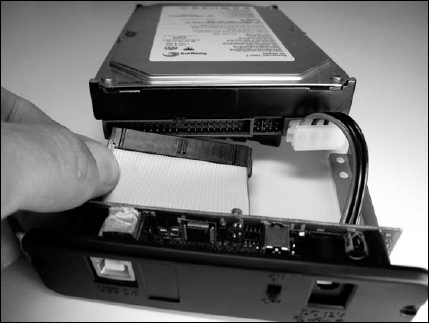
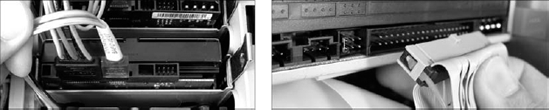
Connect your old drive to the enclosure's connectors, fastening both its power cable and its data cable. The two cables fit into their proper spots only, and they fit only one way — the right way. I describe how to plug in a drive's cables in Chapter 6, in the task about adding a second internal drive.
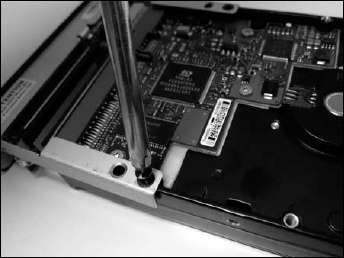
Screw the drive into place on the connector's rails, slide the drive into the large enclosure, and screw the enclosure together with the bundled screws.
Plug your new portable hard drive's adapter into the wall, plug the power adapter cable into the portable drive box, and then plug the portable drive's USB cable into your computer's USB port. Finally, turn your drive on with the enclosure's On switch. The drive will soon appear as a new letter and drive icon in your Start menu's Computer window. Double-click it to see inside.
Tip
If the drive doesn't show up, it's probably a new drive that hasn't been partitioned or formatted. That problem's easily cured by following the steps in Chapter 6, in the task about partitioning and formatting a second internal drive.
If you don't want to bother with a portable hard drive enclosure, take a simpler route: Remove your old computer's hard drive and install it into your new computer. It's easy, involving a screwdriver and unplugging and plugging two cables.
With your old drive inside your new computer, you can easily fetch any important files you want to transfer to your new computer's main drive. And after you've transferred everything that you need, you can erase the old hard drive and use it for extra storage or backups.
This task explains how to remove your old computer's hard drive and install it into your new computer with a total project cost of zero dollars.
Remove your computer's old hard drive as described in Chapter 6, in the task about upgrading or replacing your Windows drive.
Examine both your old hard drive's connectors and your new computer's connectors to see if they match. If they don't, you need an adapter. Because older computers came with IDE connectors and most new computers use SATA connectors, you might need an IDE-to-SATA adapter, which costs about $15 from Amazon (
www.amazon.com) or NewEgg (www.newegg.com).Install the old drive into your new computer, as described in Chapter 6, in the task about adding a second internal drive. If necessary, plug an IDE-to-SATA adapter into your old drive's connector so it can plug into a SATA cable.
Still using your old computer occasionally? Then don't scrap it for parts. Instead, set up a network between your old and new computers. Then, back up your new computer onto your old computer's hard drive. That gives you not only a backup plan, but leaves you with a second computer for light computing tasks.
To back up your main PC to your old computer, follow these steps:
Set up a network between your new and old computers (as explained in Chapter 15). You can connect them either with cables or wirelessly, depending on the distance between your two computers and your broadband Internet source.
After transferring your files from your old computer to your new computer (explained in Chapter 20), free up as much space as possible on your old computer: delete your old files, purge any unneeded user accounts from your old computer, and empty your Recycle Bin.
Set up Windows Backup on your new computer, telling it to store the backup on your old computer. (I explain how to create a system image backup in Chapter 6, in the task about backing up your Windows drive with a system image.)
Check your backup to make sure it's successful.
Tip
Backups grow larger as you create more information with your new computer. Make sure your old computer has enough space to store it all; you may need to add a larger hard drive, as described in the Chapter 6 task about adding a second internal drive.
After a few years, you've filled your computer with passwords, credit card numbers, and other information you'd rather not share with the world. And in these days of quickly copied Internet information, giving your old computer to a charity, a friend, or simply leaving it in the alley is the same as giving that information to the world.
Simply deleting all your drive's files or even reformatting the drive won't irrevocably delete all its information. Data recovery specialists, including thieves, can still recover the files.
To purge your drive of all its information, you need to overwrite your old information with new information. The best data killers overwrite your data seven times, but that's probably overkill unless you're James Bond. The solution is a free program called Darik's Boot and Nuke. Burn the program to a CD, insert the CD into your old computer, and push the restart button: When your old computer comes to life, the program will purge all traces of your data on your old computer's hard drive or drives.
If you can find your old computer's copy of Windows, dig it out and reinstall Windows after wiping your old computer's hard drive clean. (That makes the computer much more valuable to charities.)
If you're ready to donate or sell your old computer and its hard drives, follow these steps to create the Darik's Boot and Nuke CD with your Windows 7 computer. Then you'll run the program on your old computer to wipe away all your old information:
Warning
Don't use this program unless you're ready to wipe out any and all information stored on all the hard drives inside your computer. There's no going back from this point.
With your Windows 7 computer, download a copy of Darik's Boot and Nuke (
www.dban.org/download). The program erases all the information on any hard drive it finds inside your computer. It says it won't erase information stored on external hard drives — drives plugged into a USB port, for example — but unplug them anyway, just to be safe.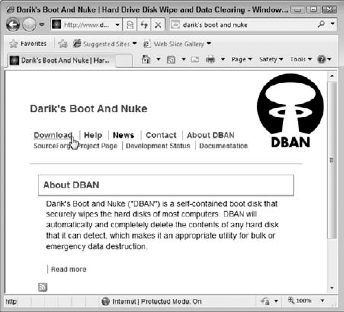
Unzip the Darik's Boot and Nuke program by right-clicking it and choosing Extract All from the pop-up menu. (The program was called
dban-2.2.6_i586.isoon my computer; its name will probably have changed slightly.)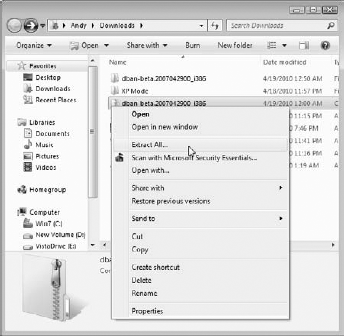
Create the Boot and Nuke bootable CD: Open your Downloads folder, right-click the extracted Boot and Nuke file (
dban-beta.2006042900_i386.iso), and choose Burn Image. Insert a blank CD into your CD or DVD drive, click Burn, and then wait until the computer finishes creating the bootable disc. When it's done, label the disc "Darik's Boot and Nuke" so you won't use it accidentally.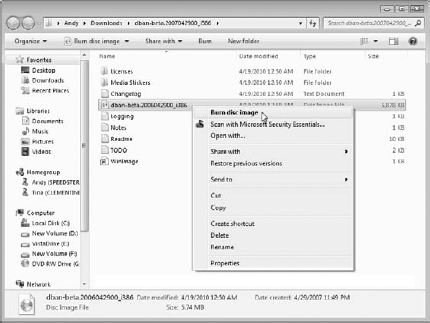
Insert the bootable CD into your old computer's disc drive, and restart your old computer.
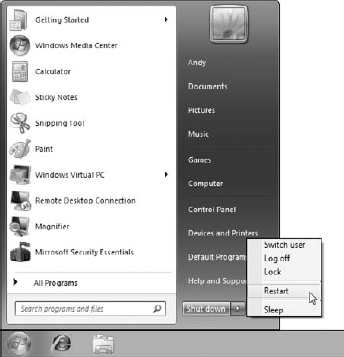
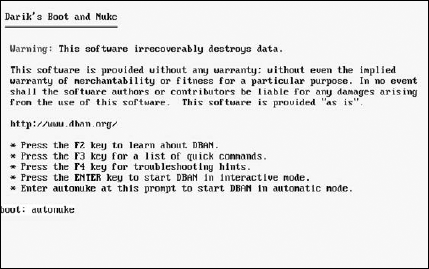
When your computer boots from the Boot and Nuke CD, type autonuke and press Enter. The program begins overwriting your entire drive, leaving it completely covered with random numbers. After you wipe the drive clean, reinstall your copy of Windows, if you have one, place your original Windows CD into the box with your PC, and ship them both to a charity, knowing your TurboTax files won't fall into the hands of strangers.