Topics and tasks in this chapter
Adding a USB TV tuner to your computer
Finding your computer's PCI or PCI-Express 1x slots
Adding an internal TV tuner to your computer
Connecting your computer's sound to a television
Determined to pry TiVo off the nation's TV sets, Microsoft tossed its own digital video recorder into Windows 7. Called Windows Media Center, the built-in program lets you automatically record movie and TV shows with your computer. The catch? Your computer needs three things to record television:
A TV signal, which usually enters through a cable in the wall or an antenna
A TV tuner, which plugs into your computer or lives on a card slipped inside it
Any Windows 7 version but Starter, the stripped-down version sold mostly on netbooks
The three tasks above let you record and playback TV shows, but to hear the best sound, connect your computer's sound to your home theater, a task covered in Chapter 8.
This chapter explains how to install a TV tuner for recording and watching TV on your computer. It also explains how to connect your computer to your TV and home stereo, turning your computer into the backbone of a home theater.
Can't afford a TV tuner? Go ahead and fire up Windows Media Center, anyway. The program lets you watch many TV shows over the Internet, neatly bypassing the need to install a TV tuner.
Your television signal may come into your home through an antenna, or through a cable in the wall. But before you can tell your computer to display or record a show, you need to tell it which channel to grab. And that's where a TV tuner comes in: It's a piece of electronics that separates your coveted TV channel from the dozens of other channels flowing down the wire.
TV tuners hail from two schools. Some plug into a USB port, making them handy for laptops, netbooks, and desktop PCs. Other tuners fit inside a desktop computer; designed for those willing to pick up a screwdriver, these internal tuners usually cost less and offer more performance.
Since nearly any TV tuner on the store shelves will work with your computer, which do you buy? Here's how to juggle your needs, your budget, and the fine-print on the TV tuner's box.
Dual-tuner: Ever wanted to record two shows when they both air at the same time? Then you need a dual-tuner TV tuner. These let you grab an episode of South Park even when it's airing against The Simpsons. The most expensive cards come with four tuners; less-expensive cards include only one.
Hauppauge: This company's been selling TV tuners longer than nearly anybody, so they provide more online support and better drivers than much of the competition. Give them a plus, even it if means a slightly higher price tag.
Windows 7 compatible: Many older tuners won't work with Windows 7. Make sure you're buying one that's guaranteed to work with Windows 7. (A Windows Vista tuner might work, but you're taking chances.)
Remote control: TV tuners that come with handheld remotes receive bonus points. You'll be watching the screen from a distance and need a handy way to control the action. Make sure the remote control works with Windows Media Center, though, or you'll be forced to use the TV-viewing software bundled with the tuner.
Video In: Some cards toss this in for people who want to convert video from old VCRs or camcorders into computer files, which can be edited and burned to DVD. Don't want it? Don't pay for it. If you want it, though, make sure you buy one that supports your old VCR or camcorder's format, either S-Video or regular (also called "composite") video.
CableCARD: All digital channels above channel 99 are encrypted, meaning you can't watch them. Unless, that is, you have a CableCARD: a slim card that slides into your TV tuner and works as a decryption box. CableCARDs come from your TV signal provider, and only the more expensive tuners accept them. And without them, forget about premium HDTV channels.
Antenna: Local TV stations broadcast their HDTV signals over the airwaves. Some TV tuners come with a small antenna, which picks up a handful of local stations or more, depending on your geographic location. If you don't have a CableCARD, a rooftop digital antenna might help.
NTSC (National Television System Committee): Television's old broadcast standard sent channels 2–99 through the airwaves for more than fifty years, so nearly every tuner still accepts it. This old analog standard is now replaced by ATSC.
ATSC (Advanced Television Systems Committee): Tuners supporting this standard can tune in to digital broadcasts, which include high-definition channels.
Clear QAM (quadrature amplitude modulation): ATSC channels are sent in this format. If your tuner can grab Clear QAM signals, it can handle nearly anything broadcast today. The most expensive tuners can grab NTSC, ATSC, and Clear QAM.
FM tuner: Recording television is the main attraction, but some deluxe tuners also toss in an FM tuner for recording FM radio stations. Many FM stations come in on the same cable as your TV; others require an antenna.
Your computer's TV tuner comes with plenty of ports to grab video and send it to your TV screen in a variety of ways. Table 11-1 helps you identify the cables, their connectors, and their purpose in life.
Table 11.1. A Cadre of Connectors
The Cable and Its Connectors | Its Name | Its Location | Its Purpose |
|---|---|---|---|
 | USB | Some TV tuners; all computers | |
 | Almost all TV tuners and TV sets | Most TV tuners and TVs receive their signals through this cable. | |
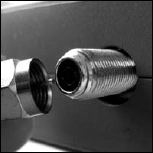
 | RCA (composite) | Some TV tuners and most TVs | Usually found in groups of three, these carry stereo sound and video. Yellow cables always carry video; the red (right channel) and white (left channel) cables carry stereo sound. Some TV tuners accept RCA for recording from VCRs. |
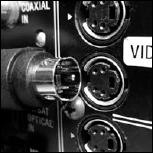 | S-Video | Some TV tuners and some TVs | This cable, usually black, carries high-quality video, but no sound. Many TV tuners accept S-Video for recording from VCRs and DVD players. |
 | HDMI (High-Definition Multimedia Interface) | Some video cards, monitors, and TVs | This single cable carries both "surround sound" and high-definition video to a TV or monitor. |
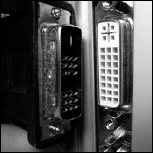 | DVI (Digital Visual Interface) | Some video cards, monitors, and TVs | This cable carries high-quality video from computers to monitors or TV sets. |
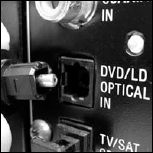 | Optical/Toslink | Some sound cards and home stereos | This carries Dolby AC-3 sound (sometimes called multichannel, surround sound, or 5.1) but no video. |
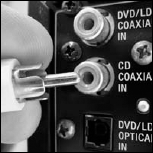 | Some sound cards and home stereos | Like Optical/Toslink, this also carries Dolby AC-3 sound (sometimes called multichannel, surround sound, or 5.1) but no video. |
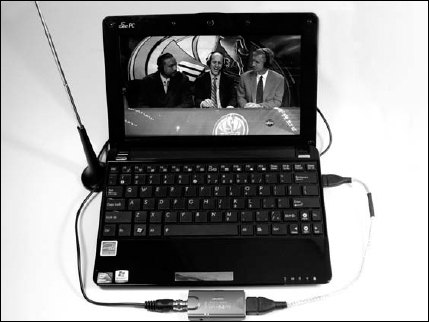
TV tuners that plug into a USB port provide a great way to turn laptops into portable TV sets. USB tuners are also easy to install, and they're easily moved from one computer to another. (Keep an eye on your roommates.)
To install a USB TV tuner, follow these steps, and then head to an upcoming task, "Connecting Your TV Signal to Your Computer." Without a TV signal, you won't see any TV shows.
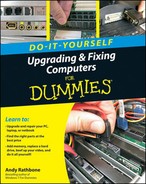
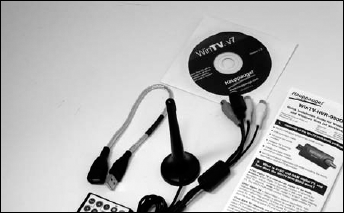
Unpack your TV tuner and find all the parts. The tuner itself has a USB plug on one end, and a coaxial cable port on the other. Look for a USB cable and a cable for connecting the tuner to your TV set, if desired. Some tuners also come with remote controls, as well as miniature antennas for pulling TV signals from the air.
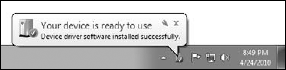
Slide the tuner's USB plug into a USB port. Windows usually recognizes newly installed USB devices and sets them up to work correctly. If you don't see the words "Device Installed Successfully," install the tuner's software, which should contain the right drivers. If you're still having trouble, head for Chapter 17 for quick-fix tips about installing drivers.
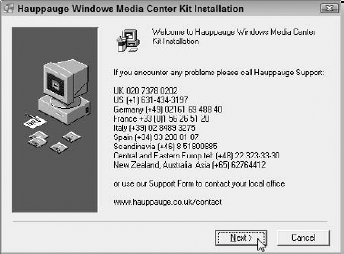
Visit the manufacturer's Web site and download the latest setup software for your model of TV tuner, and run that software instead of the CD included in the box. (It's more up-to-date.) Also, some TV tuners come with their own TV-viewing software. Instead of installing that bundled program, run a Windows Media Center Kit setup software, if you see one. The kit lets you control the tuner through Windows 7's Media Center, instead of the bundled viewer.
Set up the remote, if included. USB TV tuners usually have the receiver built into their box. Aim the remote control at the little box's built-in receiver when changing channels. (The built-in receiver is usually hidden by dark translucent plastic.) After you've installed the TV tuner, it's time to connect it to your TV signal, described in Chapter 3's task, "Connecting a TV to a PC or Laptop." (The video signal must come from your computer's video card, not the TV tuner.)
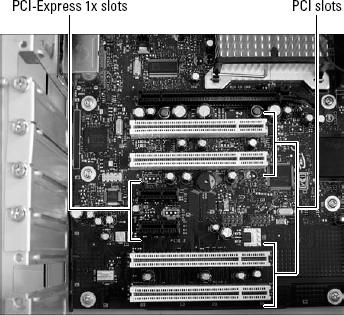
If you're planning on installing your TV tuner inside your desktop computer, you need to make sure your PC has the right slots — little plastic things where the card lives.
Every computer sold in the past ten years comes with PCI slots, so you're always safe buying that option. Chances are, your PC also has the slots preferred by the latest TV tuners, PCI-Express 1x. Follow these steps to locate one or both of those slots inside your computer so that you know exactly which type of tuner card you should buy for your PC.
Turn off your PC, unplug it, and remove your computer's case, as described in this book's Cheat Sheet, downloadable from
www.dummies.com/cheatsheet/upgradingandfixingcomputersdiy.Examine the row of parallel slots inside your PC. The tiniest slots, about an inch long, are PCI-Express 1x slots. (They're often black.) The adjacent slots, about three times as long, are usually PCI slots. (They're often white.) The longest slot is usually a PCI-Express 16x slot, almost always reserved for video cards, which I cover in Chapter 9.
Tip
If you find both type of slots, you're exceptionally lucky: You can install a TV tuner card built for either PCI slots or PCI-Express 1x slots, as well as USB tuners. No little PCI-Express 1x slots in your PC? Then you're limited to PCI slot cards or USB add-ons.
The more powerful tuners, especially those with two or more tuners, usually come on cards. Before shopping, complete the preceding task, "Finding Your PC's PCI-Express 1x and PCI Slots," so you know which type of card to buy.
To install a TV tuner, follow these steps:
Turn off your PC, unplug it, and remove your computer's case, as described in this book's Cheat Sheet, downloadable from
www.dummies.com/cheatsheet/upgradingandfixingcomputersdiy.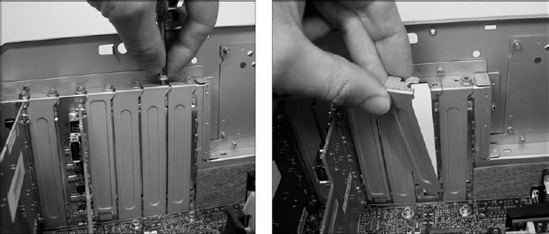
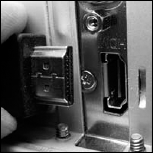
Find an empty PCI or PCI-Express 1x slot to match your TV tuner card. Then remove the empty slot's metal backplate by removing the single screw that holds the backplate in place. Then lift out the little plate. (Save the screw, as you need it to secure the new sound card in place.)
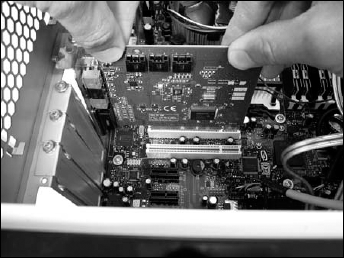
Push the card into the appropriate slot, either PCI-Express 1x or PCI. Hold the card by its edges and position it over the appropriate empty slot. The edge with the shiny metal bracket faces toward the back of your computer. Line up the tabs and notches on the card's bottom edge with the notches in the slot. Push the card slowly into the slot. You may need to rock the card back and forth gently. When the card pops in, you can feel it come to rest. Don't force it!
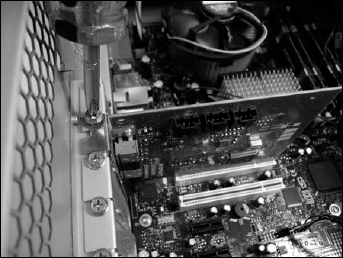
Secure the card in the slot with the screw you removed in Step 2. If you drop the screw, be sure to fish it out of your computer's case. You may have to pick up the case, turn it upside down, and shake it.
Plug the computer's power cord back into the wall and PC, turn on your PC, and see whether Windows recognizes and installs the card. Windows usually recognizes newly installed cards and sets them up to work correctly. If something goes wrong, head for Chapter 17 for tips about installing drivers. If everything's working, however, put your PC's cover back on.
Install the latest version of the card's drivers and software. When you turn on your computer again, Windows will announce that it's recognized the card, just as it does when you plug in a USB gadget, like an iPod. Whenever you install a new tuner card or any other card, visit the manufacturer's Web site. Find the site's Support or Customer Service section, and then download and install the latest drivers for that particular model and your version of Windows. Card manufacturers constantly update their drivers and software to fix bugs.

Install the IR receiver for the remote control, if needed. TV tuner cards that include handheld remote controls sometimes come with an IR receiver that give you something to aim at. The IR receiver is a thin cable with a jack on one end and little plastic receiver on the other end. Plug the cable's jack into the card's IR port, and then place the receiver within sight of where you'll point the remote. Once you've installed the TV tuner, it's time to connect it to your TV signal, described in the next task.
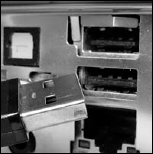
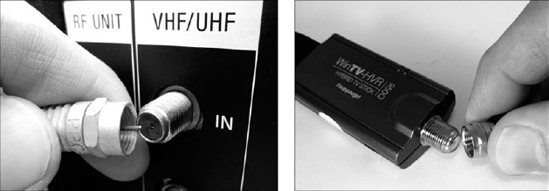
This part's easy, as the vast majority of TV tuners grab a TV signal only one way: through a coaxial port — a little threaded plug that lets you screw a connector onto it. If your room already has a coaxial cable poking out through the wall, screw it onto your tuner's coaxial port. That's it!
But if that coaxial cable's already being hogged by your TV or cable box, then you need a splitter — a little gadget that splits one cable into two, letting one end stay plugged into your TV or cable box, while the other plugs into your computer's tuner. They're available at nearly any store that sells TVs.
Installing a splitter is cheap, easy, and lets your TV work normally, even when your computer's recording a different channel.
Follow these steps to install a splitter, which magically turns one cable into two: One for your computer, and the other for your TV or cable box:
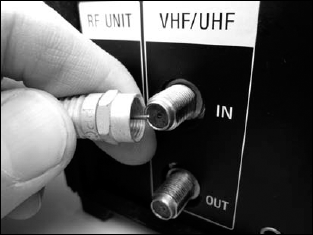
Unplug the coaxial cable from the RF or VHFUHF "In" port on your TV or cable box. Found on the back of every TV and cable box, that port accepts the signal from a TV cable that runs from either the wall or an antenna. You may need a pair of pliers to loosen the connector from the port on the back of your TV or cable box; your fingers can handle the rest.
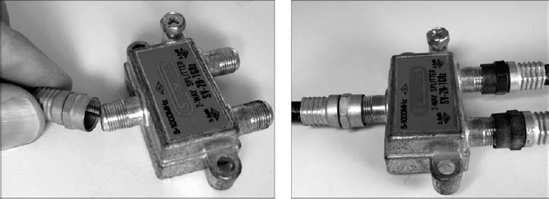
Screw the coaxial cable's connector into the end of the splitter with only one port (left). Coaxial cables should always screw onto a splitter; the push-on connectors tend to fall off. Then plug your two new coaxial cables onto each of the two ports on the splitter's other side (right).
Plug one of your two new cables back into the spot where you unplugged it in Step 1, on either your TV or cable box (left). Then plug the other end into your TV tuner's coaxial port (right). The splitter then lets your TV keep its same connection, so it still receives the same channels. Plus, your computer receives all the channels, as well.
Fire up Windows Media Center, follow the setup screens to tell the program about your tuner, and start watching TV on your computer.
Tip
Want to watch your recorded shows on your television rather than your monitor? I describe how in Chapter 3's task, "Connecting a TV to a PC or Laptop."
Most home stereos cost several hundred dollars more than the cheap desktop speakers sold with many computers today. If you watch a lot of DVDs on your computer and want surround sound — or you simply want higher-quality sound when listening to MP3s or playing games — this task explains how to connect your computer's sound to your stereo or home theater. (If you're connecting to your home theater through an HDMI cable, drop by Chapter 8, where you find a task that explains routing sound through an HDMI cable.)
Most of today's home stereos accept sound from up to three types of connectors: digital, optical, or analog RCA jacks. The key to success is finding the best sound source your sound card dishes up and connecting it to the best sound source accepted by your home stereo.
Follow these steps to connect your computer's sound to your home stereo:
Count the speakers connected to your home theater or stereo. If your stereo sends sound through a single pair of speakers, usually one speaker on each side of the TV, it's probably using analog sound. (I describe how to connect analog sound in Chapter 8's task, "Connecting Your PC's Sound to Your Home Stereo.") If your home theater pipes walls of sound through five or more speakers, however, it's probably using digital sound, which I describe how to connect here.

Discover the type of sound offered by your computer. Examine the sound jacks on the back of your computer. Most offer at least two of these three connectors: Optical/Toslink (digital, left) resembles a square hole. Sometimes it's called an optical connector. When not in use, the hole's usually plugged with a small plastic cover that pulls off with a little effort. Coaxial/RCA (digital, middle) is sometimes called an S/PDIF or digital coaxial connector. A ⅛-inch port (analog, right), like the kind you plug headphones into, is limited to stereo sound, which I describe in Chapter 8.

Examine the back of your stereo to find its Audio In jacks. If you have only two speakers connected to your home stereo, you'll probably spot a pair of RCA Audio In jacks (left). If you have more than two speakers, you'll probably find either a Toslink (middle) or a single RCA connector (right).
Connect the matching digital cable between the matching ports on your computer's sound card and your stereo. You'll need to buy whichever digital cable matches the digital ports on both your computer and home stereo, Optical/Toslink or RCA. Stuck with a Toslink connector on your computer's sound card and an RCA connector on your home stereo — or vice versa? Pick up a Toslink/RCA converter from RAM Electronics (
www.ramelectronics.net) or a stereo store. For less than $30, the little converter box lets the two connect.Most stereos let you hear sound from a variety of gadgets: CD/DVD players, radios, iPods, or even record players. To hear your computer's sound, turn your home stereo's input selector knob to Line In — or the name of the jack where you plugged in your computer's sound cable. If you've plugged in a digital connection, you may need to flip a switch on your stereo to Digital mode.
Play music through your computer at a low volume, and then slowly turn up the volume on your stereo. You'll probably want to control the volume at your computer because that's within reach. So turn the volume up on your stereo, and leave your computer set fairly low. Then, as you turn up the volume on your computer, your stereo will grow louder, as well. Play around with the volume settings for a while until you find the right mix. If the computer's too loud and the stereo's too low, you'll hear distortion. If the stereo's too loud and the computer's too low, you'll blast your ears when you turn up the sound on your computer.