
Open Directory is a shared repository of users, groups, computers, and groups of computers. Open Directory has a number of options that local accounts do not have, such as a shared Kerberos repository providing single sign on (which means that when users authenticate to one service, they are authenticated to all servers and services in a given Kerberos realm). The first server in the Open Directory environment is known as the Master. Subsequent servers are then Replicas, also providing authentication and authorization services for systems that have been configured to work with Open Directory.
If you will be enabling a service that requires Open Directory, then Open Directory can be configured by that service during setup. Otherwise, if you wish to use Open Directory (e.g., you want to use mobile home folders, or user home folders that roam between machines when users log in), it can be set up manually. To do so, open Server Admin from /Applications/Server and click on the name of the server in the SERVERS sidebar. Then, click on the Settings button in the Server Admin toolbar and the Services tab. At the list of services, check the box for Open Directory and click on Save to show it in the list of services under the server name (Figure 2-15).

Click on Open Directory in the list of services under the server name and then click on Settings in the Server Admin toolbar and click on the General tab. The Role should initially be configured as a standalone directory, meaning that accounts are stored locally rather than shared to the domain. Then, click on the Change… button to bring up the Open Directory Assistant. At the Choose Directory Role screen, click on Set up an Open Directory master and click on the Continue button (setting up replicas will be covered later in this section).
At the Directory Administrator screen, the administrative account that has rights to manage Open Directory is configured. The Open Directory database is separate from the database of local users (in fact, those that are local have pictures from the OS X picture library and those from the directory have generic pictures with globes beside them in the Server application). Here, provide the following information:
- Name
The full name that the Open Directory administrative account will have, which by default is Directory Administrator, but could be changed to something like Edge Family Administrator
- Short Name
The short name of the previously provided account (e.g., edgeadmin)
- User ID
A number at or above 1,000, which should likely be left as the default value
- Password
Provide the password that the Directory Administrator will use
When you are satisfied with the information for the account, click on the Continue button (Figure 2-16).

The Domain and Certificate Authority screen then appears. The Open Directory domain, or realm, will have an SSL certificate of its own (in addition to the certificate described earlier in this chapter) to further secure the environment. The Kerberos realm and LDAP Search Base should likely remain as they are (we will not be covering custom realm names or complicated LDAP configurations in this book). The Organization Name and CA Administrator Email fields are required and should be set to the name of your environment (e.g., The Edges) and the email for the domain (e.g., [email protected]), respectively (Figure 2-17).

At the Confirm Settings screen, make sure the configuration is as you wish and then click on the Continue button. Open Directory is then set up. Accounts created in the Server application will then automatically be created in the Open Directory domain. Accounts that existed prior to creating the Open Directory Master remain in the local directory service, but are still functional.
It is a helpful option to have a second server with the usernames and passwords available. If you have a second server, then some aspects of the Open Directory environment will still function in case the first server goes offline. Most importantly, if you are using network or mobile home directories, the clients can still authenticate to their computers.
In order to create an Open Directory Replica, the Open Directory Master must be accessible by IP or hostname and must have SSH enabled. To set up the Open Directory Replica, enable the service as you did with the Master. Once in the Server Admin sidebar, click on Open Directory under the name of the server and then click on the Change button beside the Role field, as you did with the Master.
This time, at the Choose Directory Role of the Open Directory Assistant, click on the last option in the list (Set Up an Open Directory Replica), and click Continue.
At the Replica and Certificate Authority screen, provide the following settings (Figure 2-18):
- IP address or DNS name of master
Enter the IP address or the name of the Open Directory Master computer.
- Domain administrator’s short name
Enter the short name of the Open Directory administrative account (e.g., diradmin).
- Domain administrator’s password
Enter the password for the previously supplied account.
- CA administrator’s email
Enter the email address that was used in the CA field when configuring the Open Directory Master.
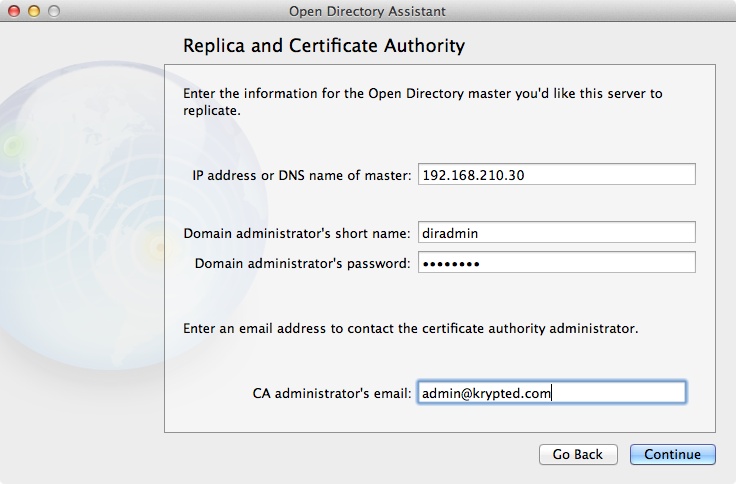
Once the settings are provided, click on the Continue button and the assistant will complete. The Replica should then install, provided the prerequisites were met.
Once configured for Open Directory, the server announces its presence to computers on the network so they can join the domain. Users can also manually bind to the server (or be bound to the server in most cases). In order to do so, open System Preferences from under the Apple menu and then click on the Users & Groups System Preference pane. Click on the Login Options and then click on the Edit… button beside the Network Account Server field.
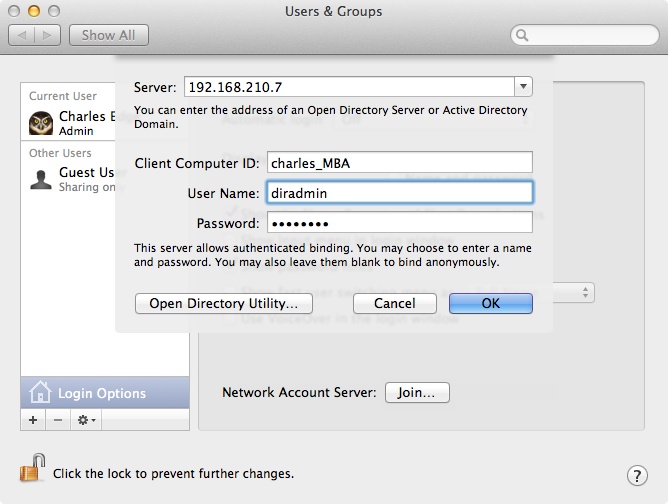
At the pop-up screen, click on the plus sign (“+”) to be prompted for a Server. Here, provide the address (name or IP address) of the Open Directory Master (or a Replica), as in Figure 2-19.

Provided that the server has an SSL Certificate (they all should in Lion), choose “Trust the certificate” and the screen will expand to ask for a computer name, username, and password. Usually, leave the name of the computer as is and enter credentials of the directory administrator for Open Directory (Figure 2-20). Click on the OK button to complete the binding.
You now have the first client joined to the server domain. Next, let’s look at putting some of the features of the server to use in a more managed environment.
Once a server is running as an Open Directory Master and clients can bind to it, accounts can be stored locally or in Open Directory. Both can be accessed and managed using Workgroup Manager, a tool installed with the Server Admin tools installed earlier in this chapter. Workgroup Manager is in the /Applications/Server directory. When opened, Workgroup Manager defaults to showing the contents of the local directory service.
To switch to the Open Directory database, click on the field under the Workgroup Manager toolbar that is labeled as Viewing local directory: /Local/Default and select the /LDAPv3/127.0.0.1 option. Doing so shows the Open Directory accounts, which by default consists only of the Directory Administrator account. This is known as switching between directory domains or domains of accounts (i.e., accounts in the local directory or Open Directory—or even Active Directory if the server is configured to work with Active Directory).
Click on the icon of the lock toward the right of the Directory Domain toolbar and then provide the username and password of the account that has administrative capabilities for that domain. You will then be able to create users, groups, and even computer accounts.