
Blogs are a stream of consciousness. My blog now has around 2,000 posts, and other than the occasional link between articles to build on topics, it’s just a reverse chronology of technical exploits and the occasional banter about football or some other random topic. Blogs aren’t usually meant to guide users to content. Instead, they’re meant to simply be user-generated content. Blog articles can certainly be referenced in wikis, where a wiki guides users to content.
Blog articles can also dynamically appear in a wiki. Blog articles are not meant to be collaborative. Once an article is published, it’s meant to stay fairly static. Multiple users do not have access to edit one another’s blog entries. Before creating entries though, first to set up the first user blog.
Each user in a Lion Server environment can have a blog. The ability to enable and use the blog is then up to each user. To enable a user’s blog, open the My Page site that is listed on the main site. Once open, click on the cogwheel icon to bring up a menu and click on Settings.
At the Settings page, click on Services. At the Services screen, click the checkbox to enable the user blog and then click on the Save button to create the site.
An entry in the Settings sidebar then appears. Click on Blog to see options for defining who can access the blog. Type the name of a user or group in the provided field. Then select the level of permissions that the users or groups selected should have (read only, read and write, or no access). The two entries already provided are by default given no access. If you want anyone in the world to see the blog, change the “All guests” entry to “Read Only” (Figure 5-6). If you want only users with accounts on the server (e.g., the members of your family, students or staff at your school, etc.) to have access, leave “All guests” set to “No access” and change “All logged in users” to “Read Only.”
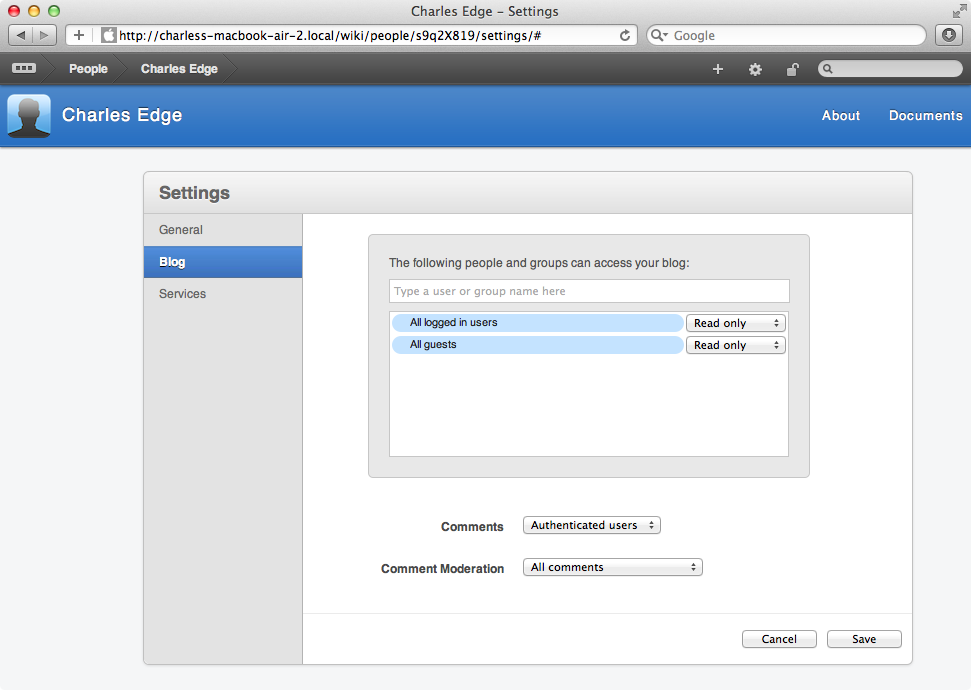
Users can then comment on each blog entry. By default, comments are disabled. However, they can be enabled on a per-blog basis. To do so, set the Comments field to Anyone or Authenticated Users. Once set, click Save if you wish to enable commentary. Also, consider who can moderate comments. For a larger environment, there may be a lot of commentators, whereas for a smaller environment, it may only be a given teacher. Click on Comment Moderation and set it to All Comments.
When you are finished filling in all of the appropriate information, click Save to commit any changes to the system and you will be finished setting up your initial blog.
Each user who has the blog service enabled has a profile and (hopefully) blog entries. To edit the user profile, click on the People option from My Page and then click on the pencil icon in the top row of the screen. This will bring up the same WYSIWYG editor we looked at earlier in the chapter.
From the same screen, click on the plus sign (“+”) at the top of the screen and click on New Blog Post in My Blog (Figure 5-7). Editing the blog is similar to editing a wiki. However, when you do so, the content is then accessible in reference to the user. Clicking on People at the home screen shows each user.

Note
Under the Settings entry for each user, the icon for users can be changed to custom art files (e.g., a photo of the user).
When an organization allows anyone to create content, the sheer volume of content can make it difficult to find any content when someone needs it. The more content, the harder it is to wade through it all. Apple has provided a few tools just for such issues.
The first is Spotlight integration with web services. From any screen in the web portal, click on the hourglass field and begin typing text until a match comes up. Click on the selected match for the search and you will be taken to the page for that entry. This is one of the most simple features to use, but also one of the most powerful.
Another way to guide visitors to relevant content is to have them visit the appropriate page. From the main page that acts as a gateway into the portal, click on My Page to see updates to your content. For example, if someone has commented on one of your articles, then you will see the new icon, indicating new content that you should be aware of. A list of users can be directly accessed using https://127.0.0.1/wiki/people and then clicking on each will show you their specific page.
The Updates option from the main portal page casts an even wider net. Here, click on the Showing field. As you can see in Figure 5-8, you can show only items you’ve marked as favorites, only your own content, items that have been marked hot by others, or all items.

For many, constricting the output of various searches is a critical aspect of finding relevant content. For others, it is not a very important aspect of managing web services. A common entity it might not be great for is someone that doesn’t really use many services other than redirecting other websites.