
As mentioned earlier in the chapter, NetInstall is a tool used to create a custom installer of Mac OS X that is hosted from a centralized server. The NetInstall image, at creation time, will have a number of automations associated with it. These automations are capable of setting up network settings, installing software, renaming computers, and running scripts (which in turn gives unlimited potential to what can be done).
As with NetBoot, the first step with NetInstall is to build the image.
To get started with building your NetInstall image, you will first need the Lion installer, available on the App Store. Once downloaded, you won’t need to run the installer; instead, just leave it in the /Applications directory where it automatically downloads. You can also download it and then save the Install Mac OS X Lion installer on a hard drive, so that you can copy it to the /Applications directory of the system you will be running System Image Utility on. With the installer in your /Applications directory (therefore, before you actually install Lion), open System Image Utility.
Next, we’ll create the Network Disk Image. When the Install Mac OS X Lion installer is in the /Applications directory, the option for NetInstall Image will be available when you open System Image Utility. Click on Install Mac OS X Lion in System Image Utility sidebar (under Sources) and then click on the radio button for NetInstall Image. Once NetInstall image has been clicked, click on the Continue button.
Next, customize the NetInstaller. At the Image Settings screen, provide the following information:
- Network Disk
The name of the hard drive that is mounted for client computers
- Description
Enter a description for the image; usually it is a good idea to include software, versioning and the date the image was created
- Image will be served from more than one server
Use this checkbox if you will have two (or more) NetBoot servers that both host this image
When you click on Create, the image will be created (as with a NetBoot image, you also need to agree to the licensing agreement and provide the username and password for a local administrator of the system you are creating the NetInstall image on). This image is just like having a network copy of the Mac OS X installer on your Local Area Network, which lets you install Lion systems faster.
Alternatively, you can also build in a number of powerful automations into the NetInstall image. In the following example, we will create a local workflow that creates a local administrative account. From System Image Utility, use the NetInstall option and then click on the Customize button instead of the Continue button before providing the settings for the image, which brings up a screen that resembles Automator, complete with an Automator Library specific to System Image Utility options (Figure 10-8).
By default, the Define Image Source workflow item will have the Install Mac OS X Lion image and there will be a Create Image workflow item with the same options that were available previously. Drag the Add User Account workflow item from the Library to between the Define Image Source and Create Image options. Notice that the workflow items are all then linked, as seen in Figure 10-9.
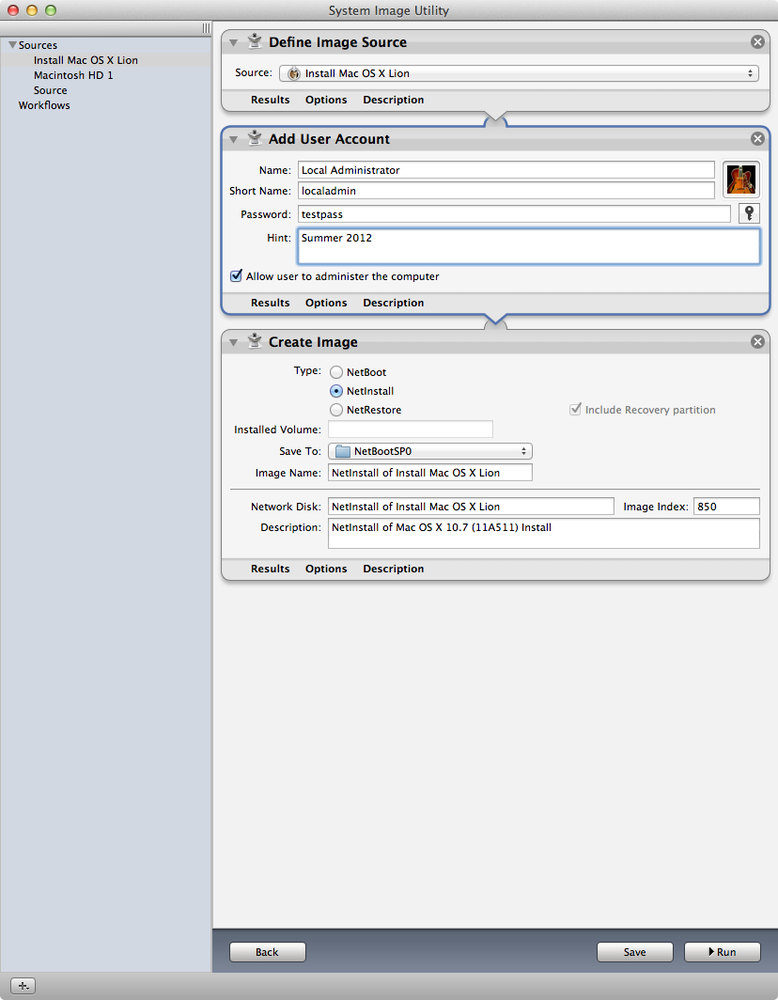
If the items are not linked, then the imaging process will not include any unlinked items.
- Name
Provide a name for an administrator account that will be created on the NetBoot image
- Short Name
Provide a short name for the above administrative account
- Password
Enter the password that will be used on the administrative account created
- Hint
A Password hint, used at the Login Window (e.g., summer 2012 if all of your systems purchased in the summer of 2012 have the same local administrative password)
- Allow user to administer the computer
Adds the user account as an administrator (e.g., to the Administrators group)
The Save button is used to save a copy of the workflow on the computer you are imaging from. The workflow can then be imported into other Mac OS X computers and used to create images. You can also use the Run option to create the NetInstall image. You will be prompted to provide a local administrator’s username and password and then the image will be created and placed into the location from the Save To option. If you have already set up the NetBoot service, as described previously in this chapter in the section Using NetBoot, the NetBootSP0 directory will be the default home for the image.
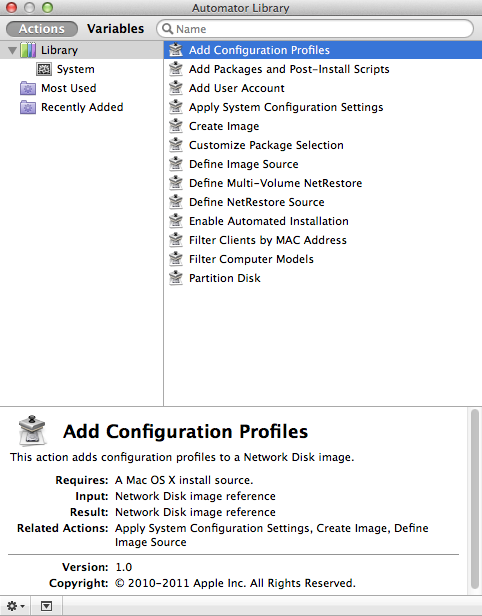
Once created, you can NetBoot a client to the server and it will automatically start the setup process for Lion on client systems. There are a number of other workflow items that can be added to a workflow, to be saved into an image. The Automator Library includes the following (in addition to the Add User Account):
- Add Configuration Profiles
Installs Configuration Profiles on client systems (for more information on Configuration Profiles, see Chapter 8).
- Add Packages and Post-Install Scripts
Runs a package installer (.pkg or .mpkg) or a shell script. Packages are typically distributed by software developers to aid you in installing their software (e.g., Microsoft). Scripts are one of the most powerful aspects of the imaging process, giving administrators access to change any setting on client systems.
- Apply System Configuration Settings
Binds clients to a directory service, renames computers and resets ByHost settings (usually a good idea to check this box).
- Create Image
Part of every workflow, specifies the name of the image and where it saves to when the workflow is run.
- Customize Package Selection
Used to, for example, install the Server Software package.
- Define Image Source
The installer or disk image (.dmg) or disk used for NetBoot and NetRestore options (for more on NetRestore, see the section Deploying Computers with NetRestore later in this chapter).
- Define Multi-Volume NetRestore
If you are using NetRestore, gives an option to restore one disk image per local volume on client computers.
- Define NetRestore Source
Used to create a NetBoot set that restores NetRestore images over a network, such as those located on an AFP share or using multicast asr (asr is the command-line process used as the backend for most every imaging scenario in Mac OS X).
- Enable Automated Installation
If a disk will get erased as part of the installation, enables administrators to automatically choose which disk and then choose a language for the installer to use, thus requiring less keystrokes during the installation process. This is a must for “1 touch deployments” where you boot a lot of computers holding down the N key and everything just images with no further input during the process.
- Filter Clients by MAC Address
Enables you to define a number of MAC addresses that the image will install on, or to define MAC addresses that the image specifically will not install on.
- Filter Computer Models
Enables you to define a number of computer models that the image will install on, or to define computer models that the image specifically will not install on.
- Partition Disk
Used early in the workflow process, the Partition Disk option is used to split up hard drives in multivolume restores, or in the event that you want the operating system and user data to be separate from one another.
As you can see, there are powerful automations available for imaging. When we image 50,000 computers, these are a must. But when I image my wife’s computer at home, I use a very basic and generic workflow. The options are built to allow scaling but not to require you to write complicated Python scripts and build crazy packages for every option you may use, whether you are using NetInstall or NetRestore.