
Many of the tasks to perform before configuring the mail service are out of your control, making it frustrating. Now for the easy part. To set up the mail service is one of the easier tasks to perform in Lion Server. One reason being that Lion Server comes with a Service Configuration Assistant that will configure the server as needed. First, enable the Mail service.
To enable the mail service, open Server Admin and click on the name of the server in the Server Admin sidebar. Then click on Settings in the Server Admin toolbar (horizontally at the top of the Server Admin window) and click on the Services tab. Click on the checkbox for the Mail service and then click on Save.
The Mail service will appear under the name of the server. Click on the service and then click on the Overview button in the Server Admin toolbar. Click on the Configure Mail Service… button to bring up the Service Configuration Assistant for the mail service, which will guide you through the setup of a mail server.
At the Introduction screen, a list of technologies that comprise the Mail service is shown (e.g., Postfix, Dovecot, Kerberos, Mailman, etc.). Click on Continue to proceed to the Mail Service: General screen. Here, use the first three checkboxes to enable each protocol used in your environment. These include the following:
- POP (Post Office Protocol)
Downloads messages to your computer, usually removing them from the server immediately or after a certain number of days
- IMAP (Internet Message Access Protocol)
Leaves messages on the server so that all mail clients stay in synchronization with one another (including Mac OS X, iOS, and Windows clients)
- SMTP (Simple Mail Transfer Protocol)
The protocol used to send mail through a mail server and used to route mail between mail servers
For most modern environments, IMAP and SMTP will be all that is required. Provided the mail server will be used to accept mail, also configure the following options (as shown in Figure 6-2):
- Allow incoming mail
Enables incoming email on the server (via SMTP)
- Domain name
The name that the server will listen to mail for (e.g., for an address that is [email protected], the domain would be krypted.com)
- Host name
The name of the server (e.g., mail.krypted.com)
- Hold outgoing mail
Holds outgoing mail for approval
- Relay outgoing mail through host
If your ISP allows you to relay outgoing mail through them or if you have a third-party service that filters outgoing mail, enter it here
Once you are satisfied with your options, click on the Continue button.

At the Mail Service: Filters screen are options to check mail for spam and viruses (Figure 6-3). The options for each are as follows:
- Scan email for junk mail
Enables Spam Assassin as a junk mail filter for the full server (almost always use this feature if you’re not already)
- Minimum junk mail score
Used to configure how aggressively the junk mail filter will work (the default setting, which is 6, is a good start, although you can always increase or decrease later if you encounter false positives)
- Scan email for viruses
Enables the ClamAV virus scanner on incoming mail
- Infected messages should be
Choose whether messages that are flagged as having a virus are deleted, bounced (or sent back to the user from whom the message originated), or redirected (sent to a special mailbox for infected email)
- Update the virus databases
Number of times per day (evenly distributed throughout the day) that the ClamAV virus scanner updates itself from the ClamAV repository
Click on the Continue button, once the options are appropriate for your needs. You will then be looking at a bunch of checkboxes on the Mail Service: Security screen (Figure 6-4). Here, you are simply choosing which protocols the mail server will use. By default, these are secure (requiring SSL certificates). Unless you need to add POP access, leave them as they are, as any protocol not enabled during the setup assistant can be enabled once complete.


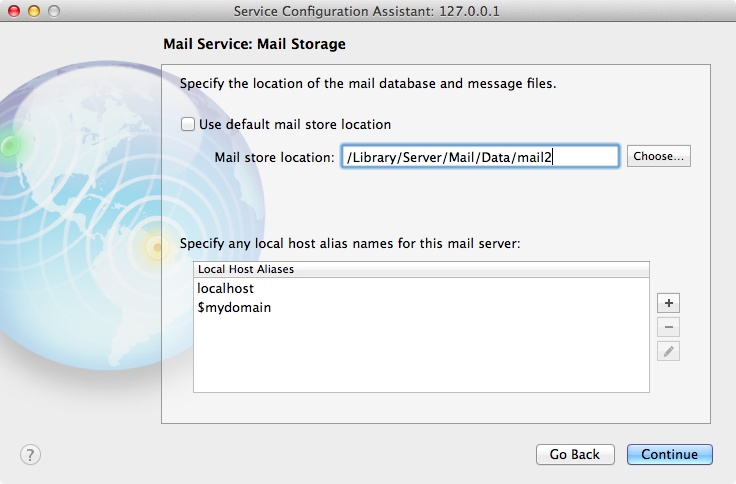
Click on the Continue button and you will be taken to the Mail Service: Mail Storage screen. The default location of the mail store (or the directory that all of the email is stored in) is /Library/Server/Mail/Data/mail, as you can see in Figure 6-5. If you will be using an external storage array, such as a Thunderbolt drive, then you can choose to use a mail folder stored there by unchecking the “Use default mail store location” box and then using the Choose button to locate the desired alternative location. Additionally, the Local Host Aliases section at the bottom of the screen can be used to add additional names to the mail server (e.g., if you use a name other than those listed to access the mail server).
Click on the Continue button and then review the settings that will be used at the Mail Service: Confirm Setup screen. If they are as intended, click on the Continue button to finish setting up your mail server.
Once the assistant has completed, the services are configured. You can then more finely tune each service from Server Admin if you need anything that wasn’t configured by the Assistant. This might be mailbox quotas, who can relay (or send) mail through the server, mailing lists, and various degrees of what gets logged. A common feature to enable that isn’t covered in the service configuration assistant is mail quotas.
To enable mail quotas, open the Server Admin application from /Applications/Server and click on the Mail service in the Server Admin sidebar. Then click on the Settings icon in the Server Admin toolbar (which runs along the top of the window) and click on the Quotas tab. Here, you will see a number of settings (seen in Figure 6-6) that include the following:
- Refuse messages larger than
Sets the maximum size of a mail message that the server will receive, configured in megabytes (e.g., 1,024 megabytes being 1 gigabyte)
- Enable quota warnings
Enables a warning that gets emailed to users who are close to their quota; this is also known as a soft quota
- Send quota warnings when usage exceeds
Sets the percentage of the quota that triggers an email to a user that they are nearing their message limit
- Edit Quota Warning Message
Customizes the message sent to users who are almost over their quota
- Disable a user’s incoming mail when they exceed 100% of quota
Also called a hard quota, this setting disables mail for a user when their quota has been exceeded
- Edit Over Quota Error Message
Customizes the message sent to users who are over their quota

Quotas are then configured per user in the Workgroup Manager application (covered in Chapter 2). The Mail tab provides an option for setting the quota for each user. As many environments have a lot of users, you can use the Command key to select multiple users and set their quotas concurrently.
The configuration options in Lion Server also include automatically clustering the mail service. This is pretty cool for really large environments, as you can add multiple mail servers to the cluster as environments grow. Such a feature is only required in very large environments, and even with the sleek assistant to leverage when clustering, administrators still need a fairly advanced knowledge of managing large scale messaging environments to fully implement the functionality.
Once the mail server has been set up, you will need to create email accounts. Email accounts can be created in the Server Application or using Workgroup Manager. To create an account, open the Server application (e.g., by using LaunchPad) and click on Users in the ACCOUNTS section of the Server sidebar. Then click on the plus sign (“+”) to bring up the New User window. At the New User screen, provide the following information:
- Name
The name of the user, as it should appear to people receiving mail
- Address
The user’s email address
- Description
A simple description of what the account is used for (e.g., work email)
- Incoming Mail Server
The IMAP or POP server being used
- Outgoing Mail Server
The SMTP server being used
Click on Done to create the new user account. The user will then have the email address provided in the Email Address field, provided that the domain used in the email address (e.g., oreilly.com) matches a domain local to the mail server.