
5. Working with Shapes
In This Chapter
• How can I find the right shapes for my diagrams?
• How can I keep my favorite shapes handy?
• What is a stencil?
• How do I use Masters?
• How can I search for shapes?
Interaction with shapes is so crucial to creating diagrams in Visio that there are a few chapters focused on the ins and outs of shapes. This chapter focuses on the process of finding the right shapes for your diagram and how to keep your trusty go-to shapes handy.
Shapes are associated with stencils, so this chapter spends a little time considering stencils and how to make them work for you.
Find the Right Shape
When you open any drawing window in Visio, you see the Shapes pane. This is your principle means of accessing and finding shapes for your drawings. The Shapes pane has two major modes: Stencils and Search. Stencil mode presents you with readily available shapes grouped into stencils so that you can get right to work. And Search gives you the ability to locate shapes that may be in different stencils.
→ To learn more about working with the Shapes pane, see page 53.
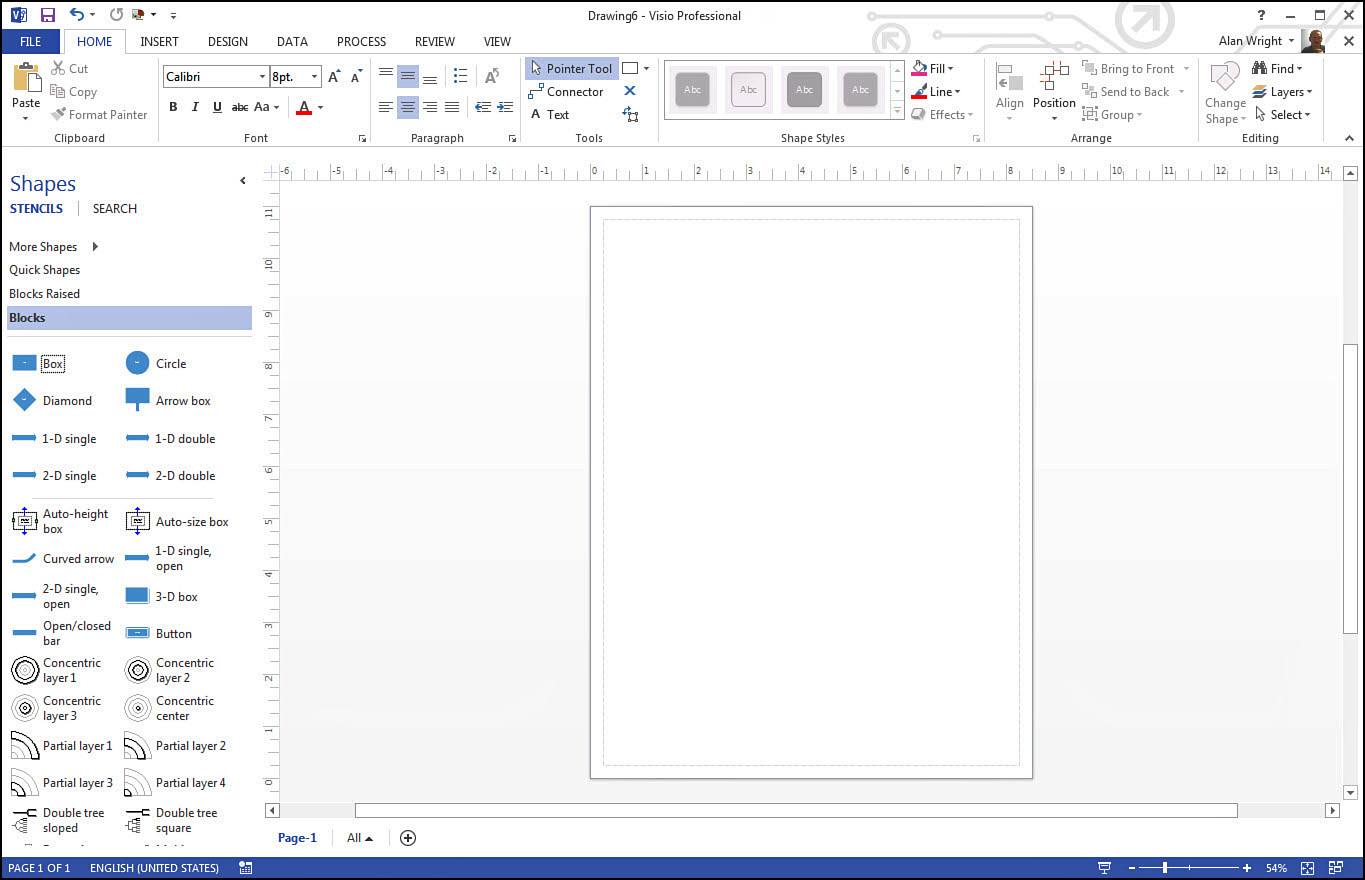
Figure 5.1 shows shapes preloaded based on the template used to start the drawing. These are the shapes you get after opening a Block Diagram template.
Selecting Available Shapes
As you saw in Chapter 1, “Getting to Know Visio 2013,” dragging shapes into your drawing is very easy. Take a look at how to do this again by creating a simple drawing that shows a few network servers connected in a small office.
1. Go to the File tab, New. Change from Featured to Categories and choose Network. Select Basic Network Diagram–3D.
2. Select Create to open the template. You are presented with a collection of shapes right away in a stencil labeled Network and Peripherals–3D.
3. Find the Router shape and then drag it over to the middle of the drawing window and drop it.
4. With the Router selected, hover over the router until you see four faint arrows. Hover over an arrow and select the Server shape.
5. Add a couple more servers using this technique until you have something like the layout shown in Figure 5.2.
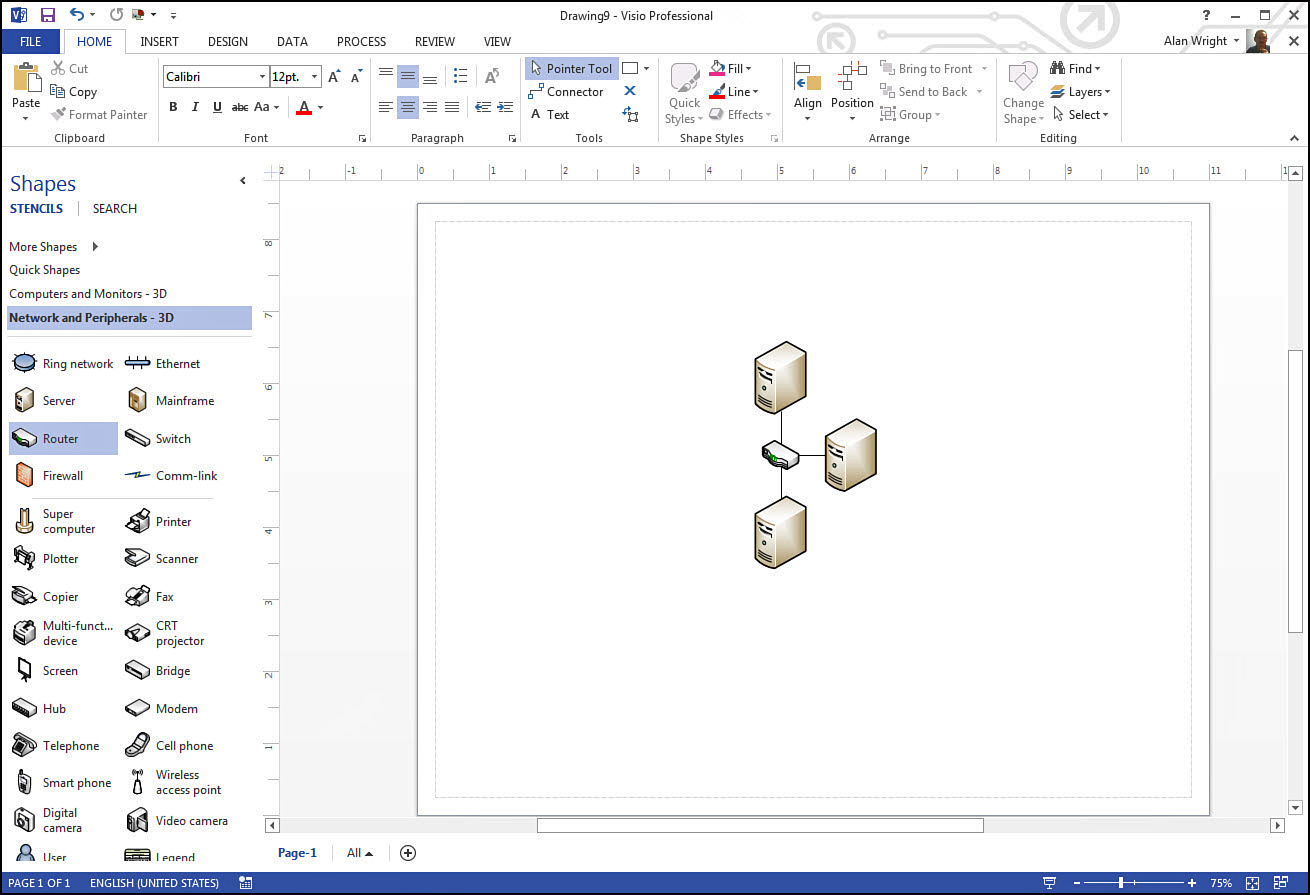
Although this is by no means a completed diagram, it reviews a fundamental way to interact with shapes that have similar characteristics. You continue to build on this diagram, so save it now with the name VisioServers. You will refer to this file throughout the chapter.
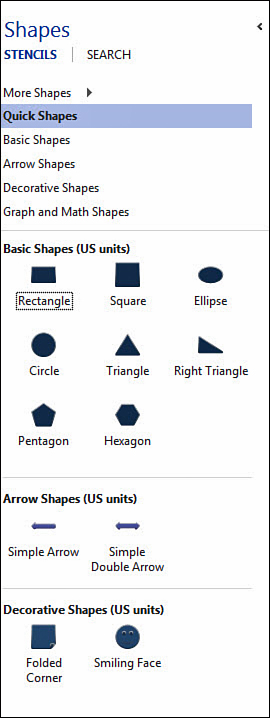
Frequently Used Shapes
The shapes you most likely use appear in an unlabeled grouping called Quick Shapes at the top of each stencil, they are separated from the entire group of shapes by a faint horizontal line which can be seen in Figure 5.2. Groups of Quick Shapes are also brought together into their own stencil in the Shapes pane. Take a look at what the Quick Shapes stencil contains with the Basic Network Diagram–3D you just used.
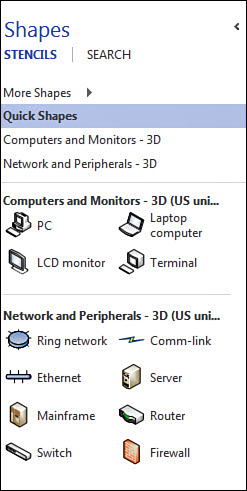
Choose the Quick Shapes stencil and see that two groups of shapes are displayed: Computers and Monitors–3D and Network and Peripherals–3D. As shown in Figure 5.3, these correspond to the Stencil tabs displayed in the Shapes pane that was opened by your template. The contents of this Quick Shapes stencil will vary depending on the stencils we have open at the moment.
Quick Shapes are considered to be the most frequently used shapes for a particular stencil by the developer that created the stencil. This is an arbitrary grouping that does not change even if you use other shapes more often in the stencil. You can manually modify this group, however, and make it work for you.
Open the Computers and Monitors stencil tab, and you see four Quick Shapes above a faint horizontal line and six other shapes below the horizontal line. Imagine that in your office you use a lot of iMac computers but not any terminals. In the following steps we will use the VisioServers diagram you created in the previous section. To modify the group of Quick Shapes for a stencil, follow these steps:
1. In the Shapes pane select the Computers and Monitors – 3D stencil.
2. Drag and drop the New iMac shape above the line into the Quick Shapes group.
3. Drag and drop the terminal shape to the other shapes area below the horizontal divider.
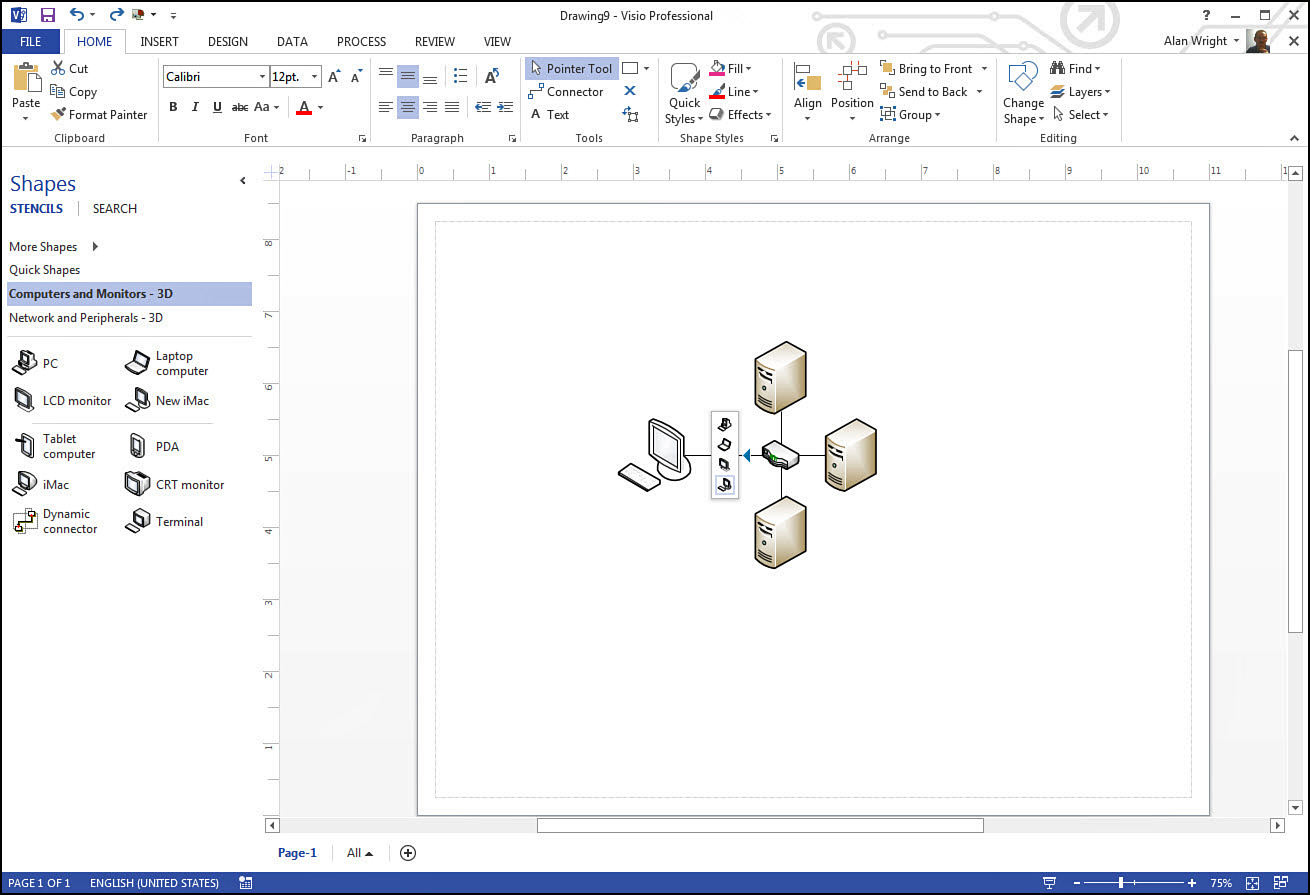
4. Hover over the router shape and notice that the arrow produces a different set of shapes now—computer and monitor shapes. Because you added it to the Quick Shapes group, the New iMac shape is now one of the shapes offered (see Figure 5.4).
5. Select Quick Shapes. Notice the contents have been updated here also, and New iMac is now included.
 Tip
Tip
You can also right-click a shape and choose Add to Quick Shapes or Remove from Quick Shapes.
 Note
Note
Your list of Quick Shapes can be smaller or larger than four shapes; in many stencils, the list is larger. To make sure a particular shape is part of a Quick Shapes list that appears when using hover to add shapes as described in these steps, you may need to limit the group to just four shapes. Also make sure that stencils are arranged to reflect your usage hierarchy because the hover Quick Shapes list pulls from the top stencil in the Shapes pane.
You can grab and move individual stencil tabs. Notice in Figure 5.5 that the Computers and Monitors–3D stencil has been pulled out of the Shapes pane and is now a separate task pane. It is anchored and pinned so it auto hides when not in use. To restore this stencil tab to your Shapes pane, grab it and drag it back to the Shapes pane.

More options for stencils are revealed by right-clicking, as shown in Figure 5.6.
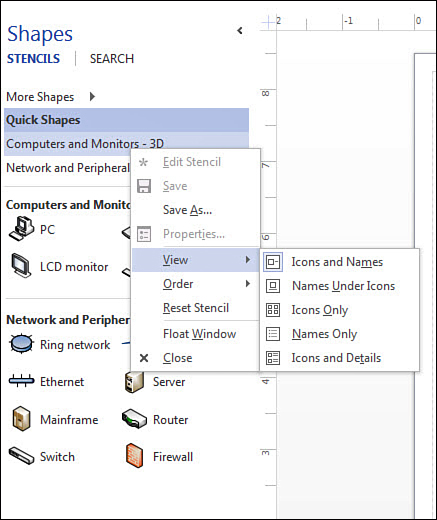
• You can close a stencil at any time by selecting Close.
• View is related to how shapes are displayed in the stencil.
• Reset Stencil removes any changes made to the stencil.
• Float Window removes the stencil from the main Shapes pane, just as you did using drag and drop earlier.
• Order allows you to change the position of the stencil in your list of tabs, moving up or down.
As previously mentioned, a template includes certain stencils that are considered appropriate to that template. You may need shapes that are included in a different stencil, and the More Shapes tab allows you to browse through those other stencils. Take time to browse through the different categories as well as the many stencils available to you (see Figure 5.7). Select a stencil to add it to the open stencils listed in your Shapes pane.

Changing Shapes
Many Visio users like the capability to painlessly swap a shape that was placed into a diagram for a different shape. Perhaps they made a diagram with simple shapes and now want to place more appropriate shapes. Don’t delete and then drag a new shape; use Change Shape.
1. Open the diagram from your earlier exercise saved with the name VisioServer.
2. Select a server shape.
3. Select the Home tab, and in the Editing section, select Change Shape (see Figure 5.8).
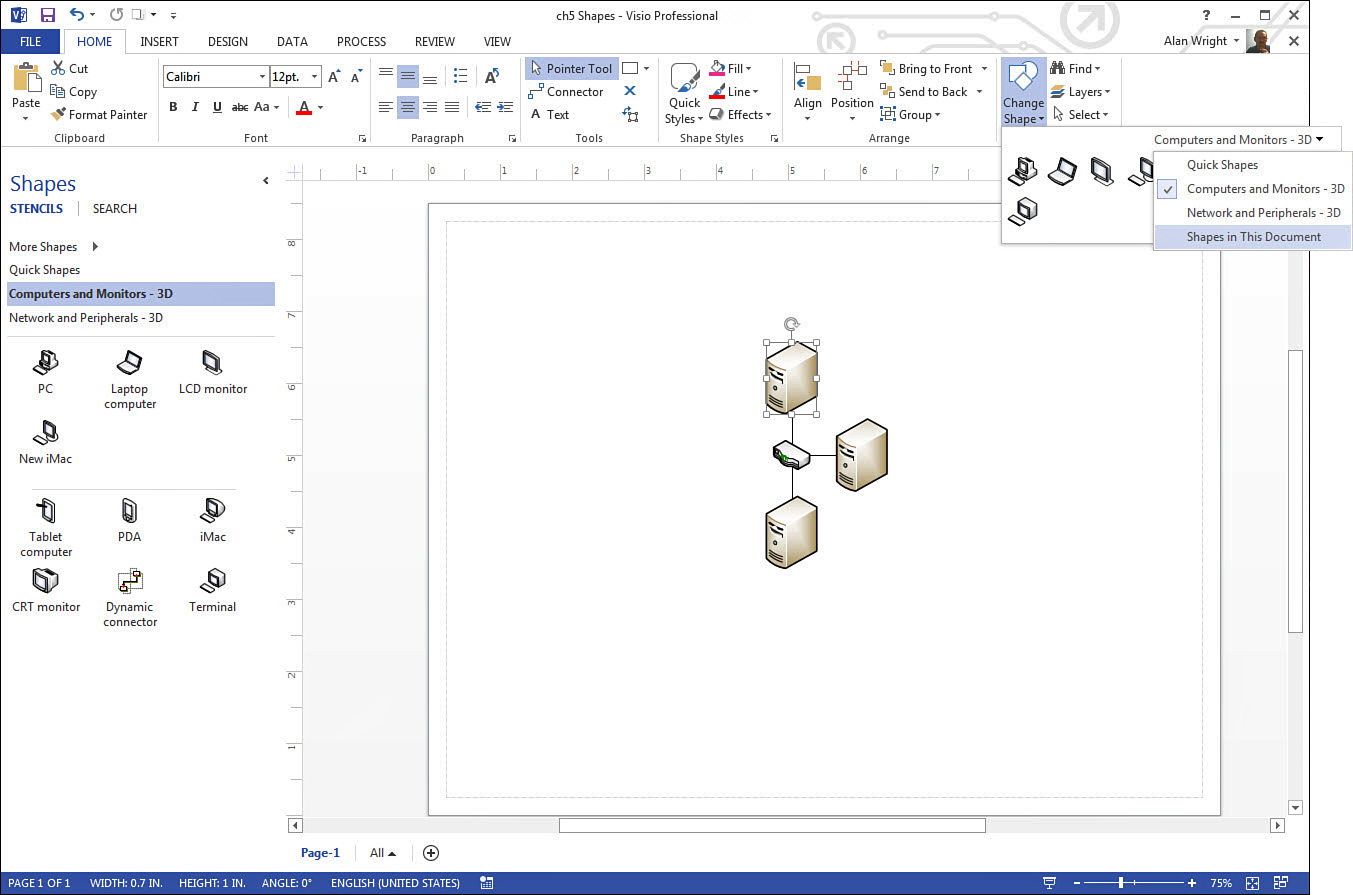
4. Notice that a selection of shapes are available for substitution. Click the drop-down menu to navigate to more shapes.
5. Select a shape, and it replaces the selected shape with your new selection.
Shapes that are selected and swapped using this tool keep connections and save time compared to manually reconnecting and aligning your shapes and connectors. Besides selecting Change Shape from the Ribbon menu, you can also right-click a shape and select Change Shape from the context menu. It has the same overlapping shapes icon and appears just to the left of Styles.
Note
When you use Change Shape in Visio 2013, a lot happens behind the scenes. Although it may appear that the old shape is deleted and a new one is inserted, important properties of the old shape are transferred to the new one by default. This includes formatting, text, and local shape data. Hyperlinks, layer property, and alignment properties are also transferred to the new shape. Additionally, some shapes are considered special and can be replaced only by like shapes. Callouts are an example of this.
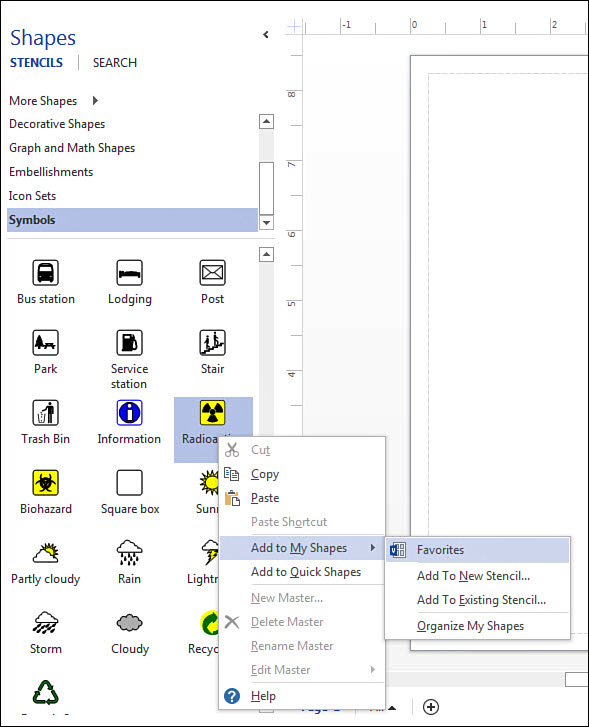
Saving Favorites
You can create your own collection of favorite shapes that behave as a stencil. These are saved by default in the Favorites stencil. This stencil is located in the My Shapes category, which can be seen in Figure 5.7 at the top of the list of More Shapes from the Shapes pane. To open the Favorites stencil you would select it like any other stencil, and it will appear in the list of open stencils in the Shapes pane.
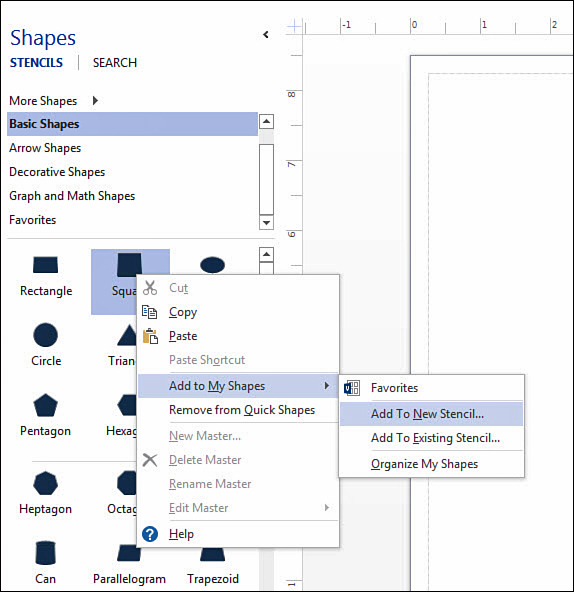
To add a shape to your favorites, right-click a shape and then select Add to My Shapes, Favorites, as shown in Figure 5.9.
If you open your Favorites stencil, you have the option of selecting your Quick Shapes.
Understanding Stencils
We talk about stencils in this chapter, and you no doubt grasp the idea that stencils are predefined groups of shapes that have been assembled for particular templates. By default they are located in the Shapes pane and appear as vertical tabs under the heading STENCILS (see Figure 5.10). Much more takes place behind the scenes when you work with stencils, and this section briefly explains the mechanics and provides some tips for using stencils.
What Is a Master?
The shapes that you find in a stencil are considered masters. When you open a stencil and drag a shape from the stencil to a drawing, you use a master shape, and Visio understands that you want an instance or copy of that shape placed where you have indicated.
You might compare the master to a cookie cutter. Shapes you create inherit the properties of the master shape and remain linked to the master shape that spawned them. One benefit of this behavior is that the master shape can be edited or modified after a diagram is created, and all linked shape instances will reflect this change.
It is possible to copy and edit existing masters as well as create your own master shapes from scratch. Finally, you can download custom stencil sets of master shapes from many sources. In Chapter 16, “Additional Visio Resources” we’ll offer suggestions about looking for stencils on the internet and other Visio tools.
Creating Personalized Stencils
Creating your own stencil can be practical for a variety of reasons. Large companies often create and provide their own stencils that include custom shapes that are used in graphics, web content, or advertising. You may find it convenient to put some of your favorite shapes and company logos all in one place as well.
To create your own custom stencil, follow these steps. Remember that master shapes are the ones in a stencil.
1. Right-click a master shape; then select Add to My Shapes and Add To New Stencil (see Figure 5.11).
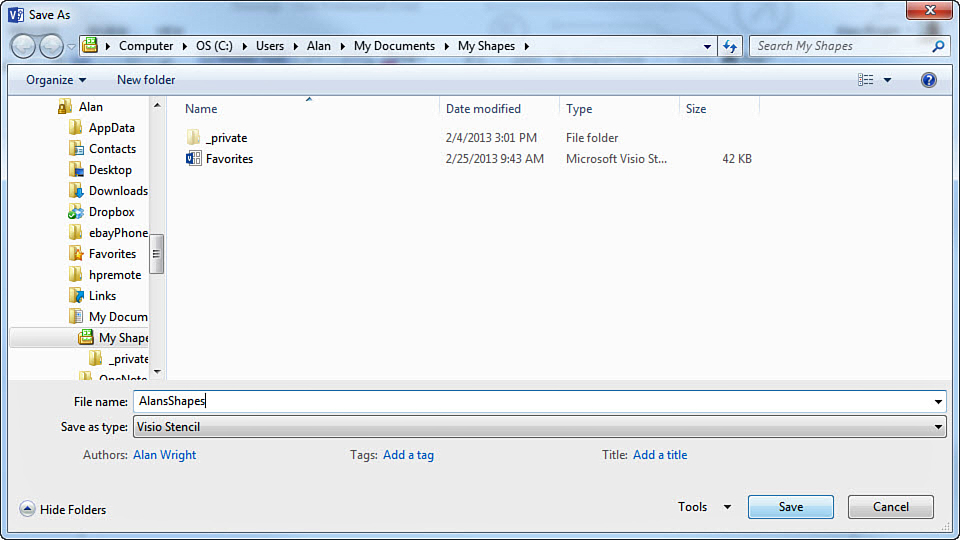
2. Choose a filename for your stencil. Notice the default location and the file type in Figure 5.12. Click Save.
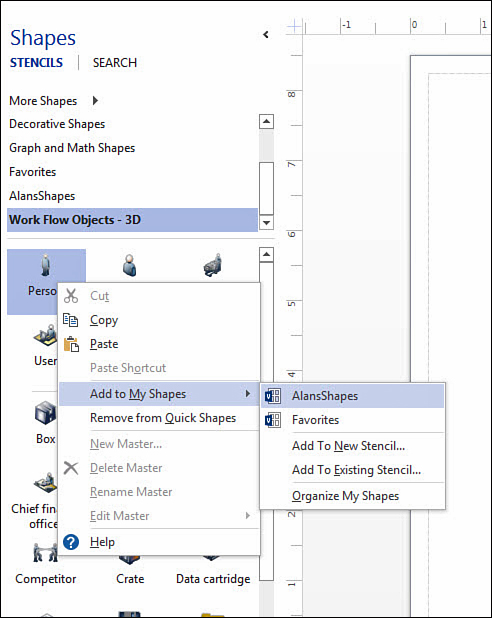
3. Right-click another master shape. Select Add to My Shapes, and then select your new stencil named in step 2. Notice in Figure 5.13 how the name appears above Favorites.
4. In the Shapes pane select More Shapes, My Shapes, and then select your newly named stencil. It now appears among the open tabbed stencils.
You can continue to add more shapes to your custom stencil following step 3.
Edit Stencil Sets
You know how easy it is to add shapes to your favorite stencils and how to create your own custom stencils. Although you are unable to directly edit the stencils that were provided with Visio, you can edit your own custom stencils to add, remove, or update shapes.
Take a look at a couple of common editing tasks:
1. Make sure your stencil created in the previous exercise is open in the Shapes pane.
2. Right-click a master shape in your stencil and notice that Delete Master is grayed out.
3. Right-click the Stencil tab and select Edit Stencil. Notice that an asterisk appears on the tab. (Right-click again, and Edit Stencil appears as enabled in the menu. You can leave the editing mode by selecting again, and the asterisk is removed.)
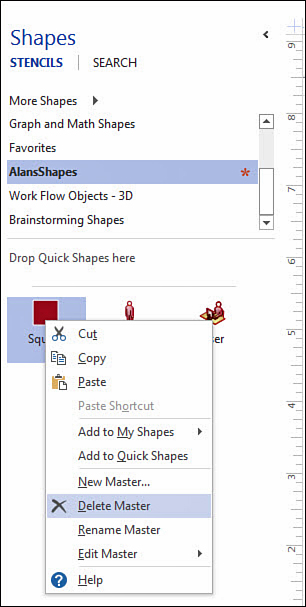
4. Right-click a shape, and notice you now have the Delete Master option (see Figure 5.14).
5. From the Home tab, use the Shape tool to create a custom shape, as shown in Figure 5.15.
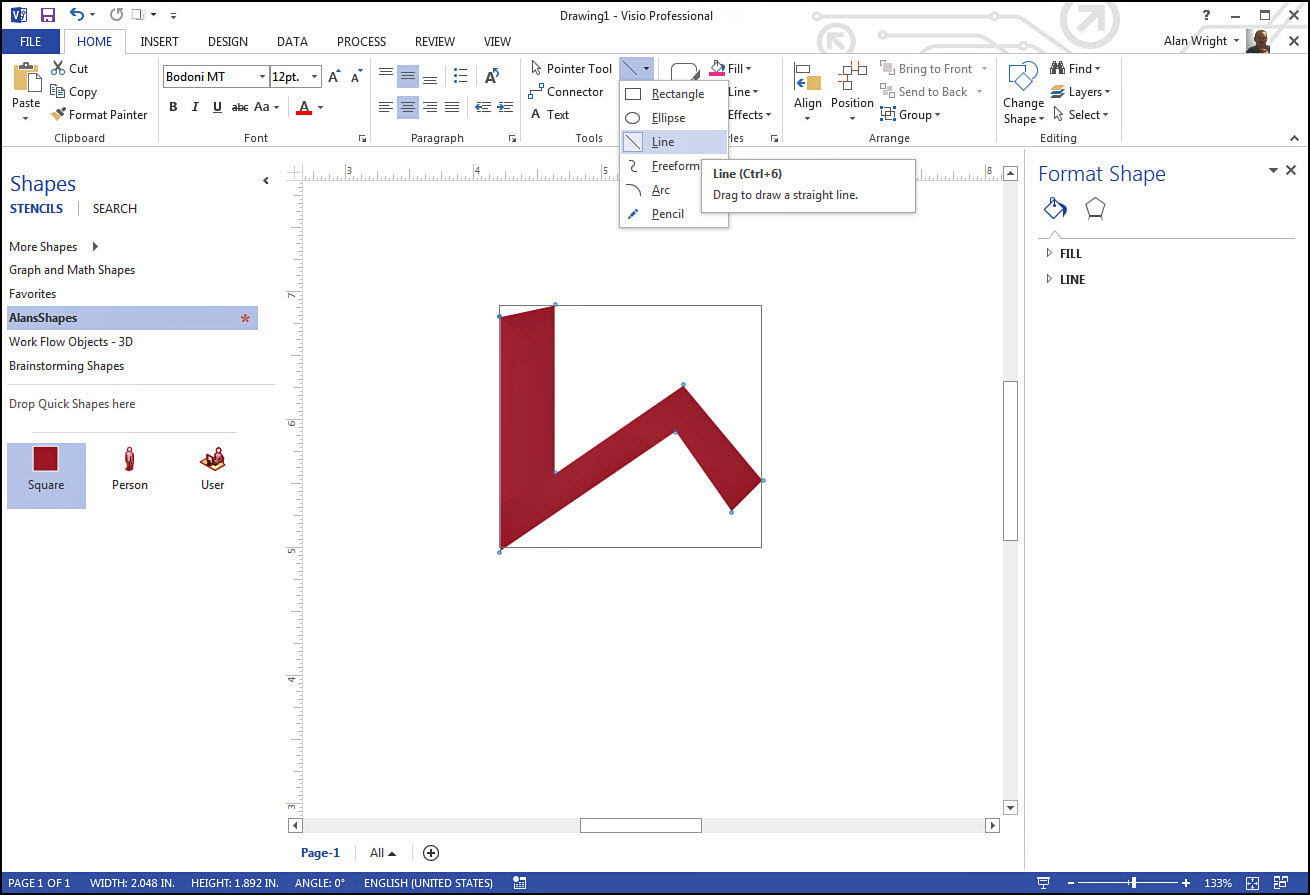
6. Use the Pointer tool to select your new shape, and drag and drop the shape into your stencil.
7. Notice that your shape disappeared from the drawing and now appears as a master shape in your stencil. It has a generic name, like Master.1. Also, the asterisk is replaced by a Save icon on the Stencil tab. This lets you know that there are unsaved changes to your stencil (see Figure 5.16).
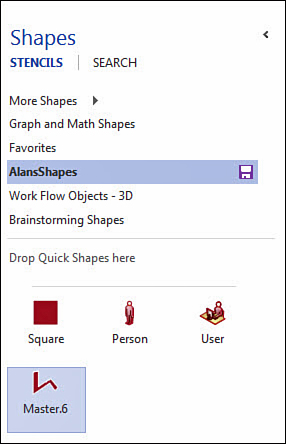
8. Right-click your new master shape and select Rename Master. Type a name.
9. Click the Save icon on the Stencil tab. You can right-click the Stencil tab and disable the Edit mode to lock in the contents of your stencil.
10. Drag the new shape you created onto the drawing and place it as you normally would. This newly created shape behaves as a master shape.
If you have not enabled Edit mode, you see the warning message shown in Figure 5.17 when you drag shapes to your stencil. This is to remind you that the stencil is protected from accidental changes. Click Yes; the shape is added, and you can save and exit Edit mode.

FIGURE 5.17 Visio will warn you if an action will alter a stencil, thus preventing accidental changes to your stencils. Click Yes to continue which will enable Edit mode.
Searching for Shapes
In addition to the Stencils category in the Shapes pane, there is Search tool as well. As you would expect, this is a tool to help you locate shapes that are tucked away inside all those stencils. Suppose you are looking for a shape to add to a drawing but you do not know which stencil it is in, or even if you have a shape that would match your needs.
This is where the Search feature comes in handy. Try several searches to see how to work with the results. As an example, look for a standard traffic stop sign to insert in the flowchart in Figure 5.18 to emphasize the need to pause and follow the next step closely.
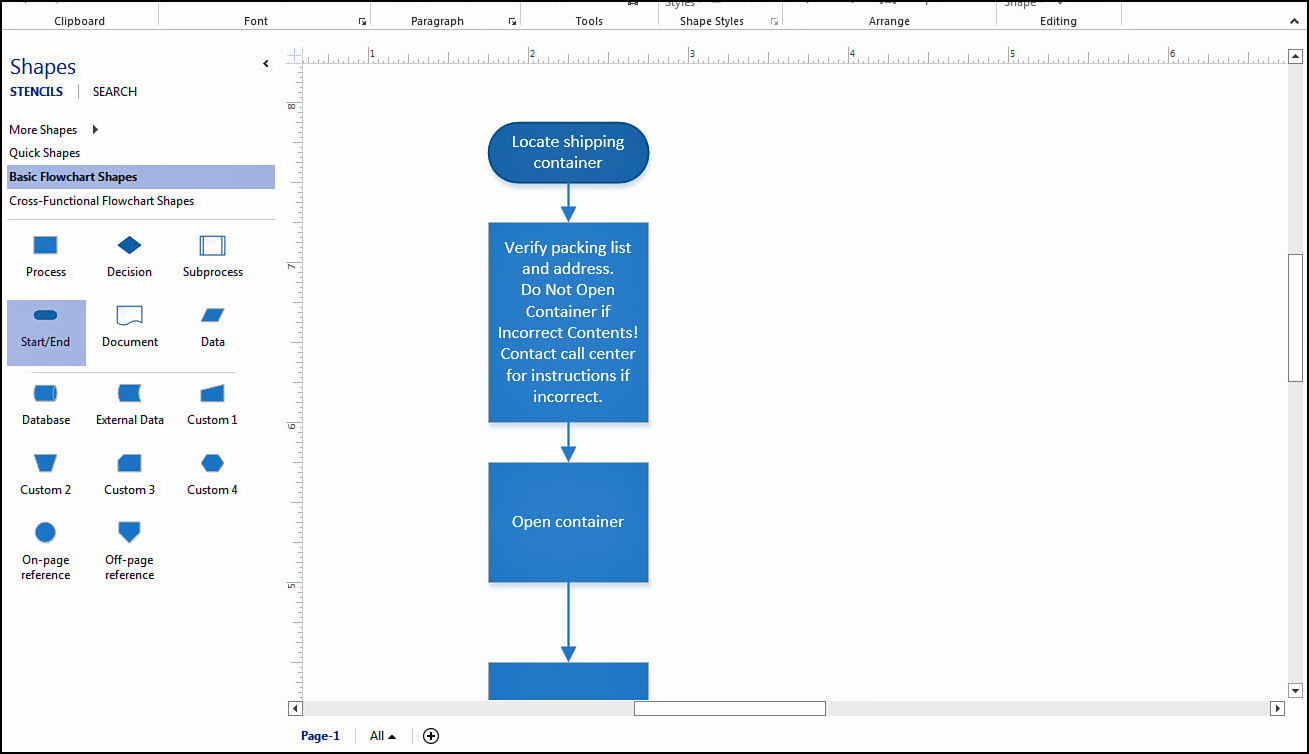
1. Open a new basic flowchart. In the Shapes pane, select Stencils.
2. Type in the word stop and then press Enter. Notice all the results from such a general search—many stencils and shapes. Scroll down until you see Transportation Shapes with the stop sign shape.
3. Type stop sign into the search field and again press Enter to initiate the search. Notice the search results in Figure 5.19.
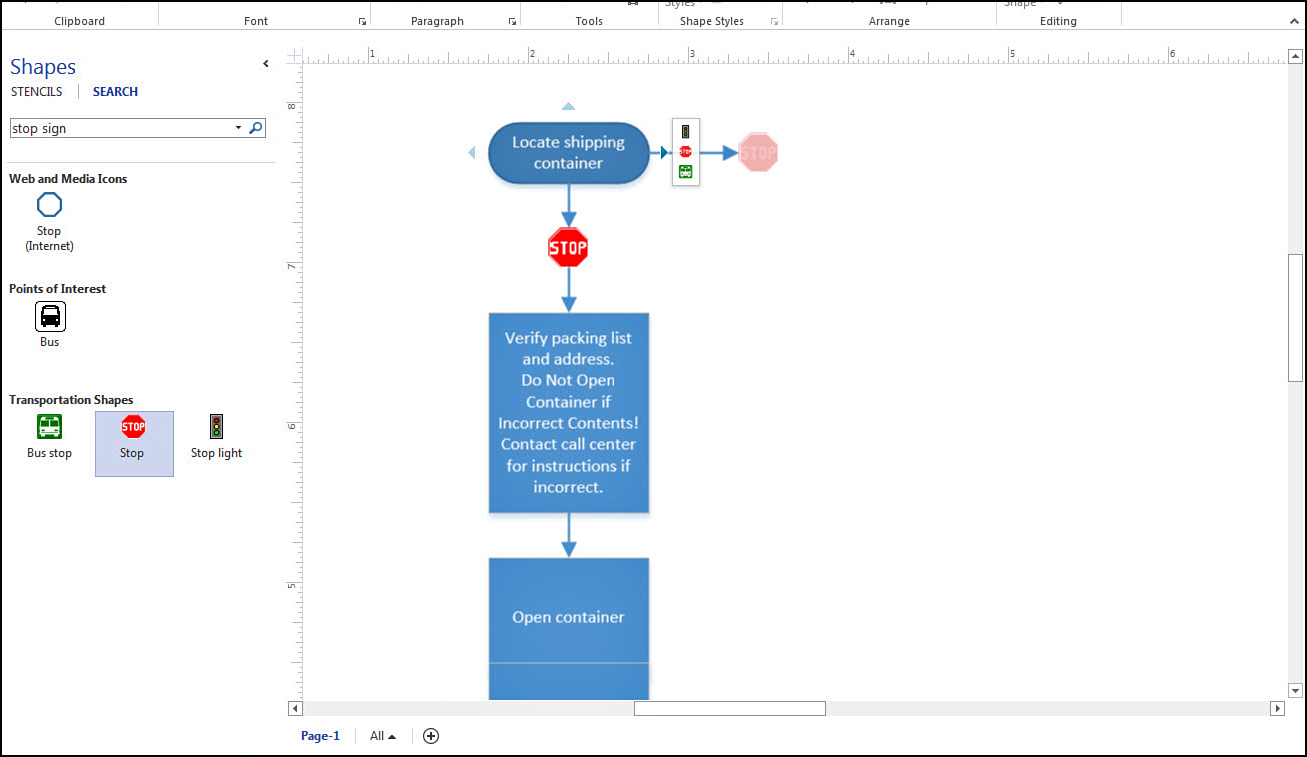
4. The shape can be placed in your drawing, and with a little positioning you have the traffic sign in the drawing, as shown in Figure 5.19. (Notice that with the sign selected, your Quick Shapes menu pulls from the matching shapes in that stencil.)
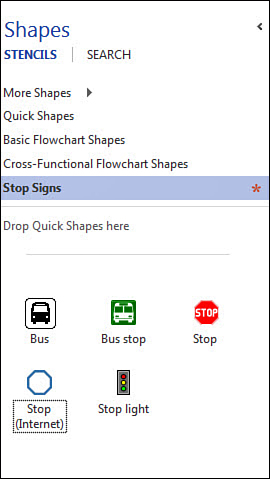
5. Right-click in the results area below the Search field and select Save As. Type the name Stop Signs and click Save. In the Stencils category you now have a stencil named Stop Signs with your search results (see Figure 5.20).
Note
Stencils that are downloaded from third parties and saved to My Shapes show up in search results if the shapes have metadata that matches your search. You can also find shapes you created by searching for them by name.
By using Search, you sometimes find great shapes that are in stencils you did not think to look in. Widen or narrow your search criteria until you have manageable results. If your search does not seem to show what you are looking for, look for the More Results link. Expanding this may reveal additional shapes.