
17. Collaborating with Visio
In This Chapter
• How can I use SharePoint to collaborate with others?
• How can I use co-authoring tools?
• How will commenting tools benefit me?
• How can I use ink and markup tools in my drawings?
• How can I make sure my drawing does not reveal private information?
As you work with a Visio diagram, you can collaborate with others in a variety of ways. Visio 2013 has made it even easier for you to gather input from other people through commenting and instant messaging features that work well with SharePoint. Co-authoring tools are an important new SharePoint 2013 feature, and this chapter shows you how to use them.
Tools such as Ink and Track Markup that have been traditionally used for collaboration are still available in Visio 2013. Finally, sharing files is a big part of collaboration. This chapter shows you how to use Visio tools to prevent sharing unnecessary or confidential information with your files.
SharePoint
SharePoint is a special web based software platform that has been an important tool for businesses and organizations that want to encourage collaboration. Documents are saved to servers and can be made available all the time while ensuring that security concerns are met when accessing documents. This chapter focuses on the collaborative tools that are used with Visio; after all, collaboration is at the heart of SharePoint.
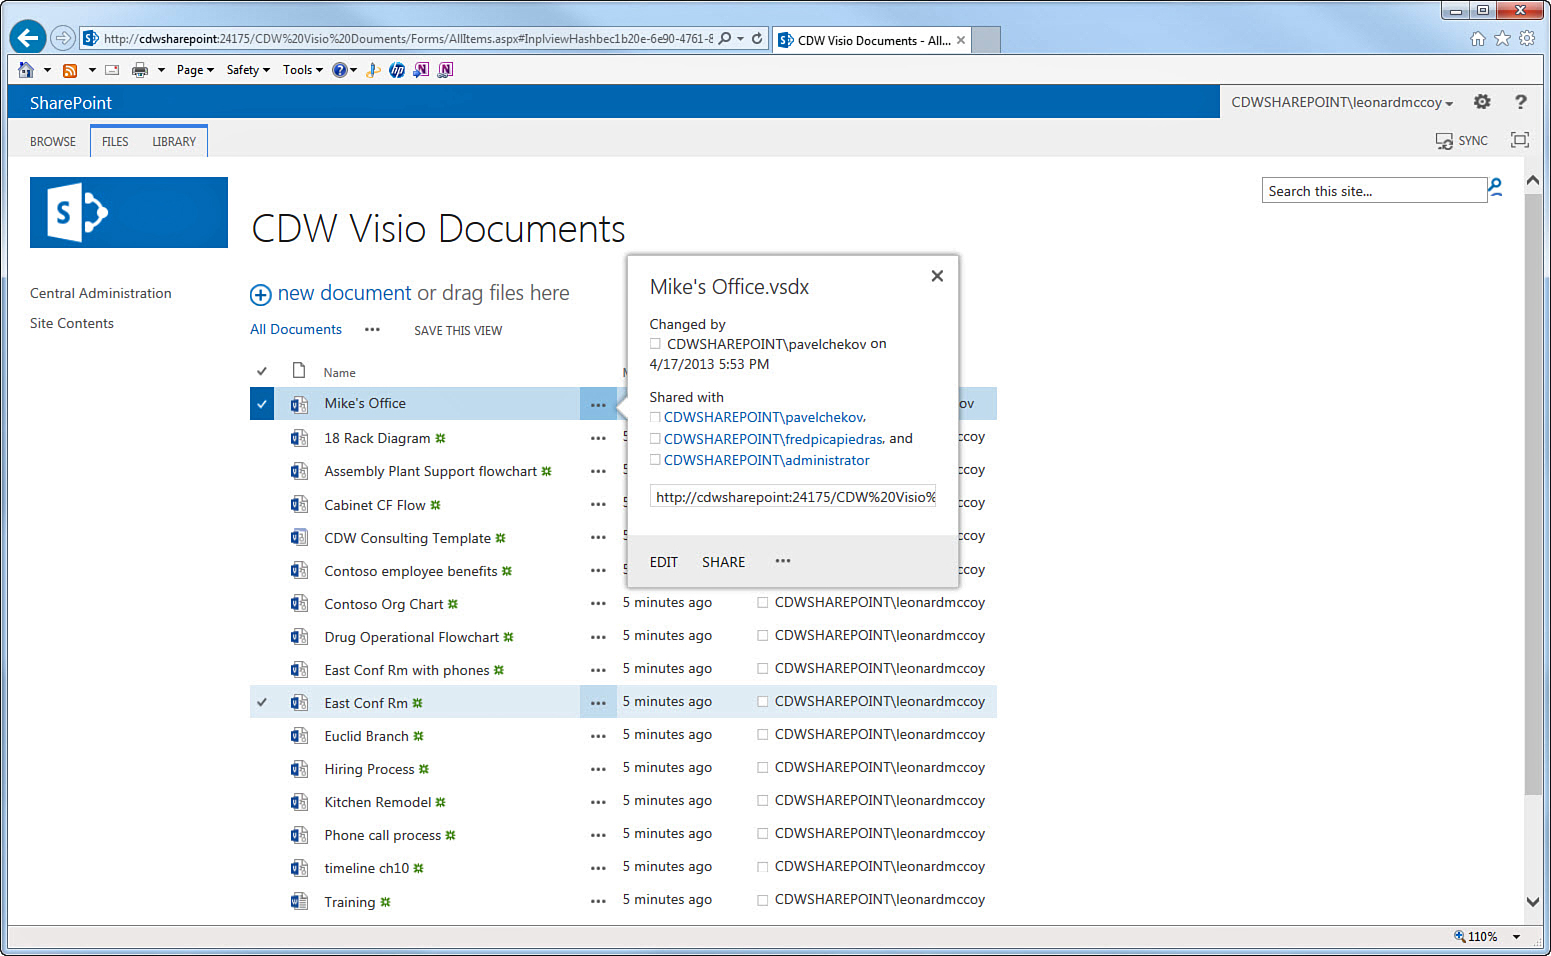
SharePoint uses libraries to organize documents. Figure 17.1 shows a library named CDW Visio Documents with a Visio drawing selected. You can see information about location, date last modified, and even who has been granted access to this file. Edit and Share options can be selected, and you can see an ellipsis (SharePoint uses these a lot) to indicate that additional menu options are available.
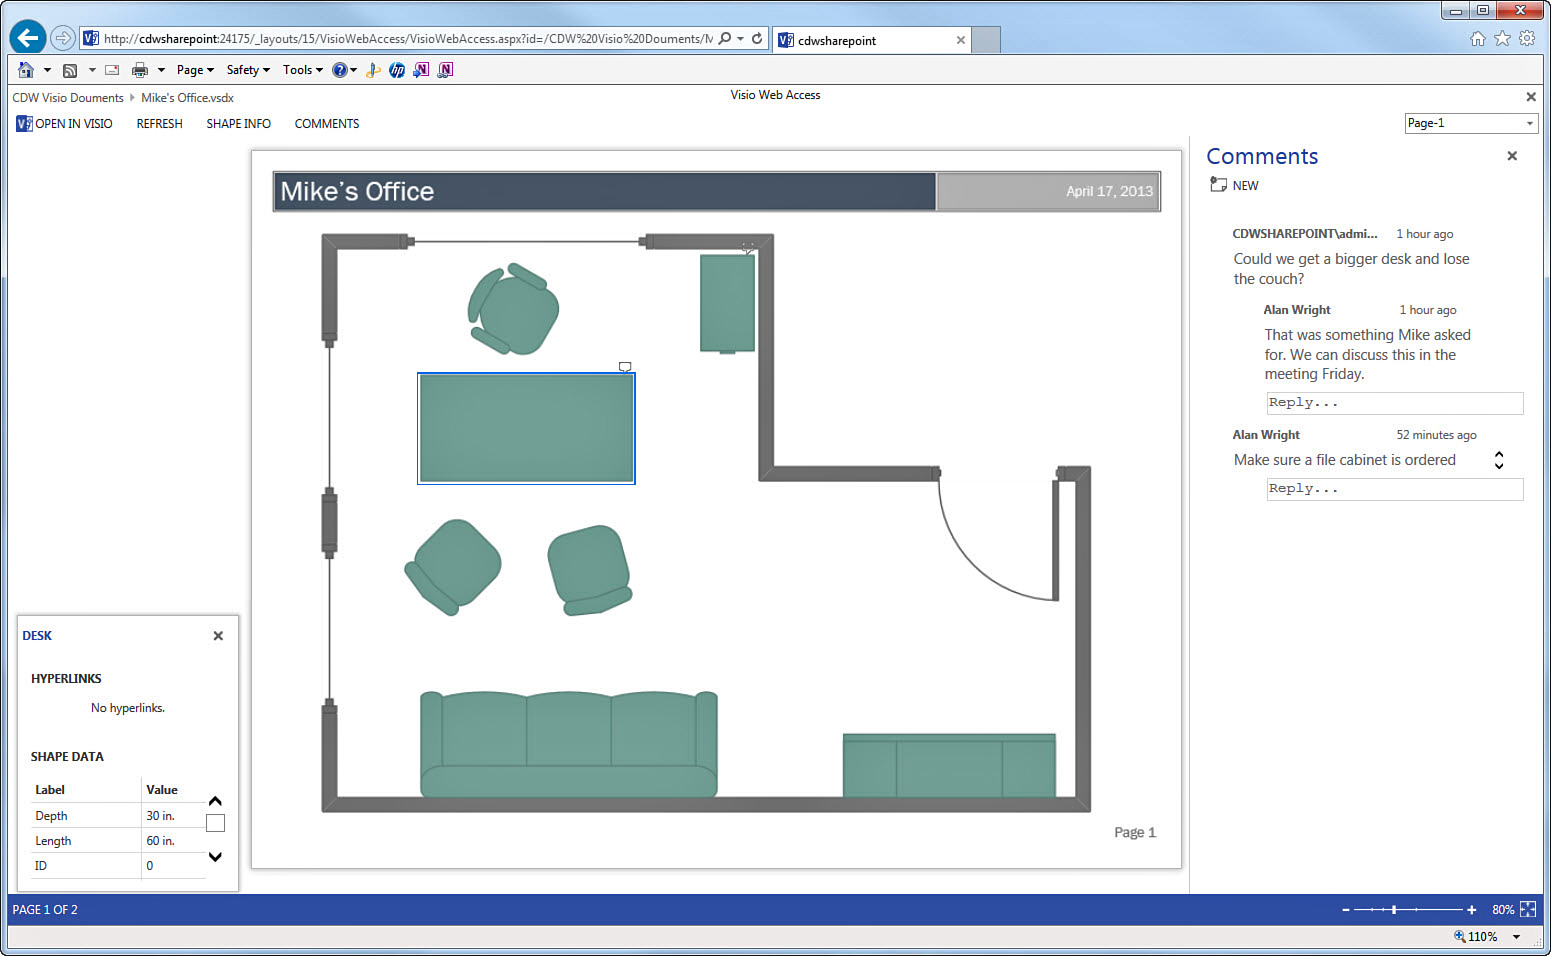
From the SharePoint library, you can select a Visio drawing to open it using Visio Web Apps in your web browser. This means that you can open a Visio drawing without Visio installed on your computer (see Figure 17.2). Notice that you are not able to edit the drawing in this view, but you can select shapes and view shape data by selecting Shape Info. Select Comments to view and add your own comments to selected shapes.
Saving and Editing in SharePoint
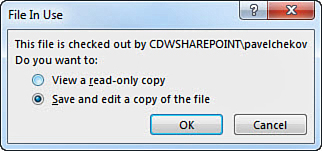
For many years, SharePoint has used a checkout feature to provide you with the option to check out documents for editing and to have exclusive editing control. If a document has been checked out of the library by another user, a message like the one shown in Figure 17.3 appears. If you need to open a file that has been checked out by someone else, you can open a read-only copy or create a second copy.
To check out a Visio drawing from a SharePoint server, follow these steps:
1. In your web browser, enter the path to a document library that contains the drawing you plan to work with. This may have been shared with you as a link in an email.
2. You are likely presented with a prompt to provide a username and password. These may be your network username and password. If needed, login information is usually included when a link has been provided.
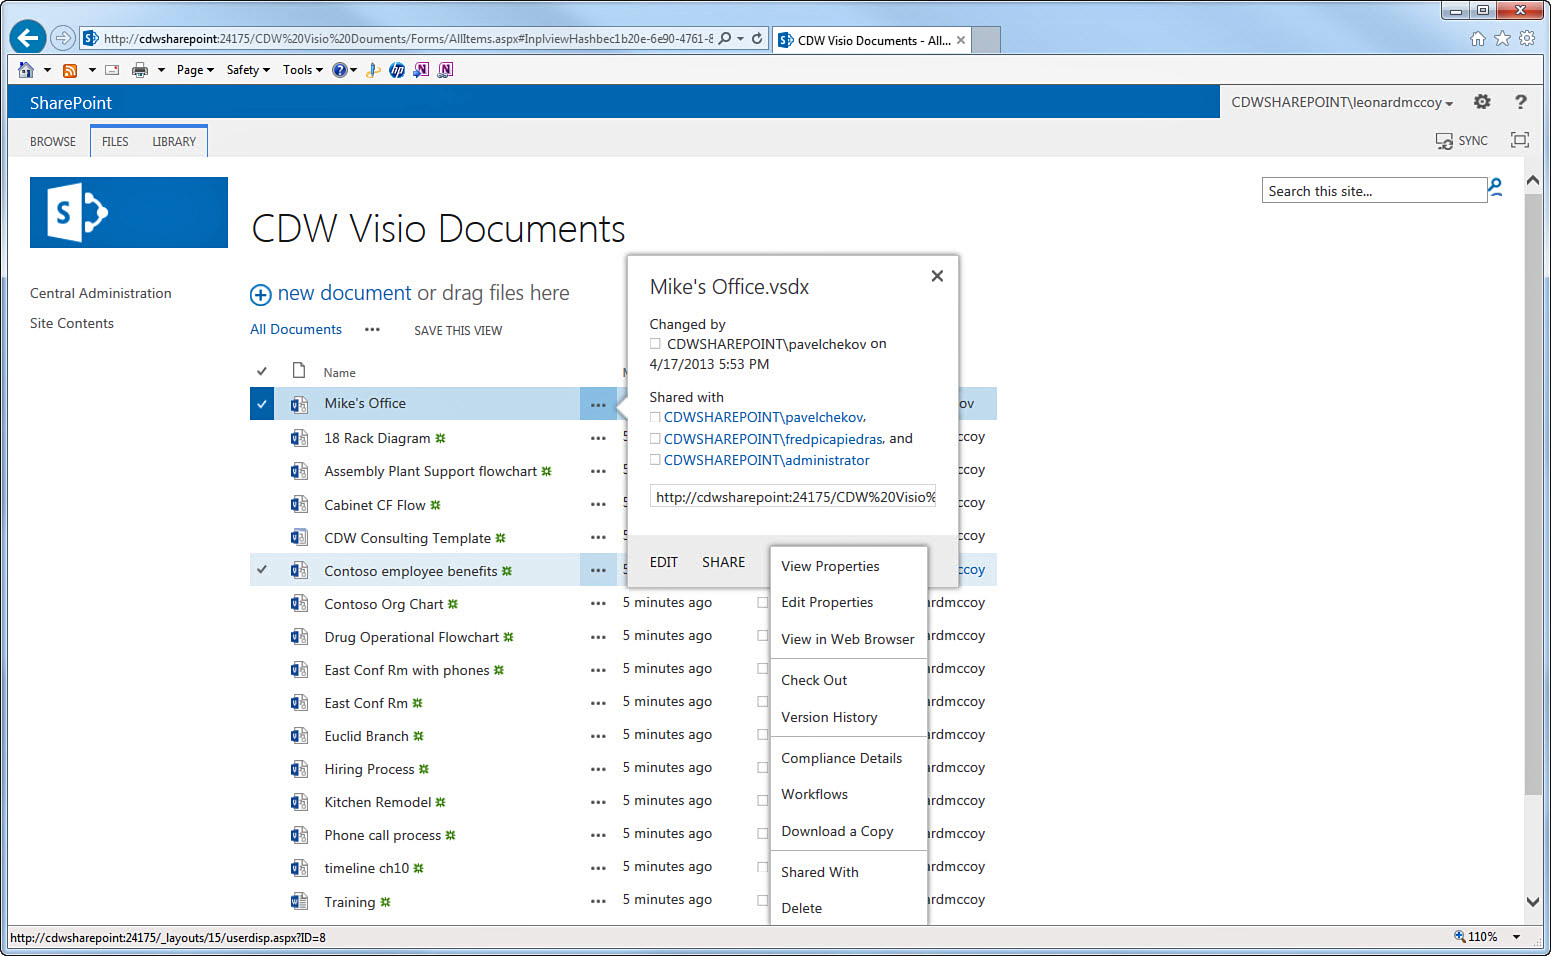
3. Figure 17.1 shows how the library appears from a SharePoint 2013 server after the link has opened. Locate the drawing file and select the three dots (...) to the right of the filename to open the menu shown in Figure 17.1. Select ... again to open the menu shown in Figure 17.4. Notice the options listed here.
4. Select Check Out from the menu shown in Figure 17.4. Notice that the file icon has changed in the SharePoint library. It now indicates it is checked out, and if you hover your mouse pointer over the icon it reveals the information shown in Figure 17.5.

5. Select the filename to open it in Visio Web Access, as shown in Figure 17.2.
6. Select Open in Visio above the drawing and to the left to open the drawing in the Visio application. A dialog box may pop up to warn you about opening files that could contain viruses. Click Yes to open the file.
7. Open the File tab and look at the Info tab for this drawing. Figure 17.6 shows a document that is checked out. The checked-out document remains highlighted in yellow to remind you that you have locked this document and no one else will be able to modify the drawing. (Others who attempt to open your checked-out drawing see a warning like the one shown in Figure 17.3.)
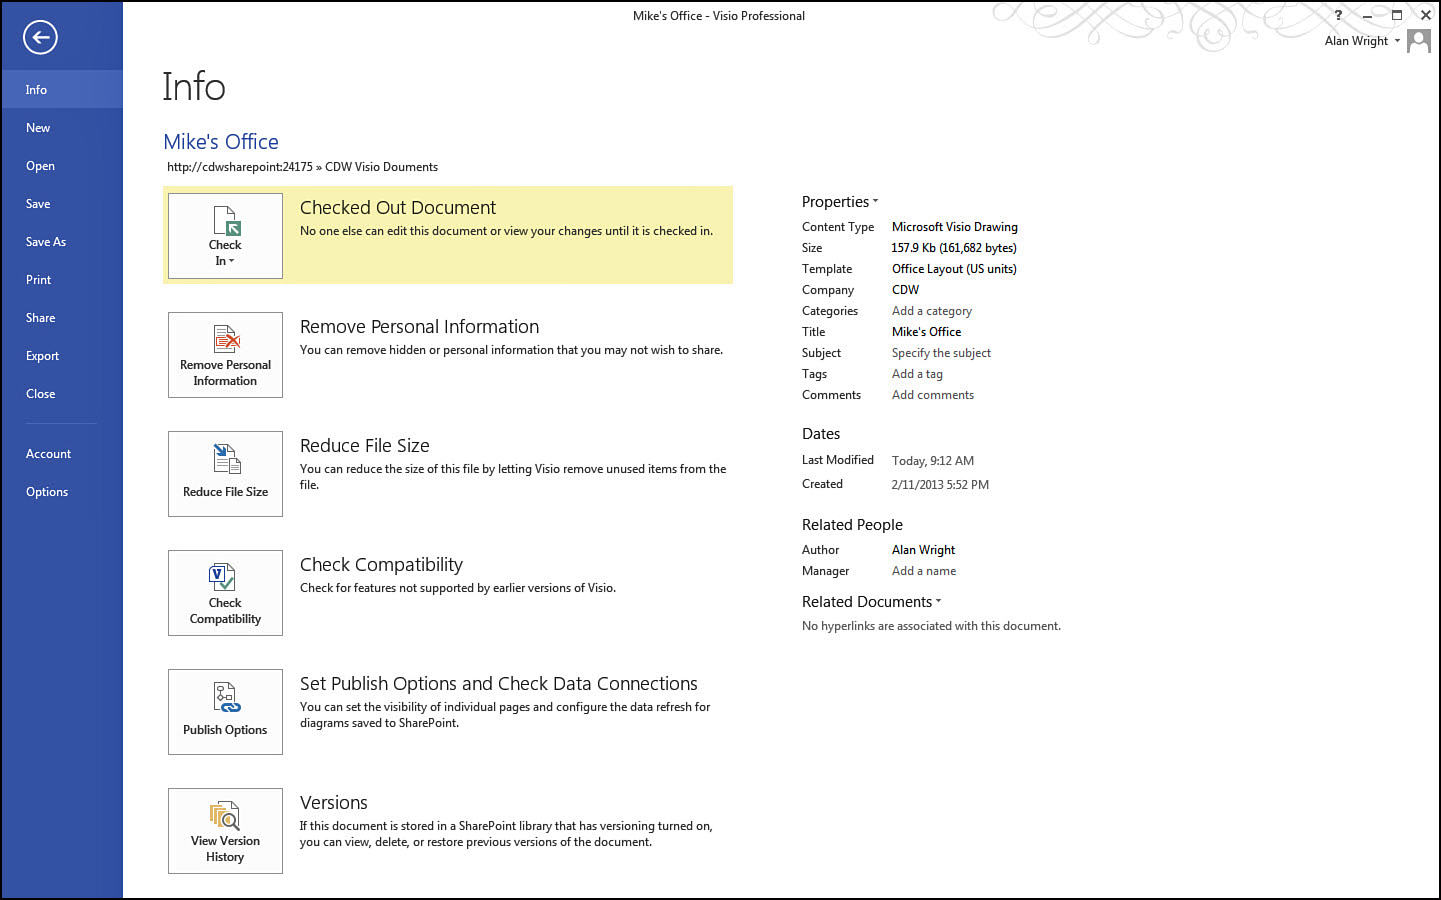
FIGURE 17.6 Visio reveals status information for SharePoint documents, such as this Visio drawing that is currently checked out.
8. Edit the document and then save changes. Don’t forget to check the document back in so that others can work with it and see your changes. Visio reminds you of this when you close the drawing.
 Note
Note
SharePoint has many settings that can be enabled or disabled by your SharePoint administrator. One of these is to require checkout for documents that are opened. Depending on such configuration settings, you may be prompted to check out a drawing automatically. It is worth mentioning here that requiring checkout disables co-authoring, which is discussed in the next section.
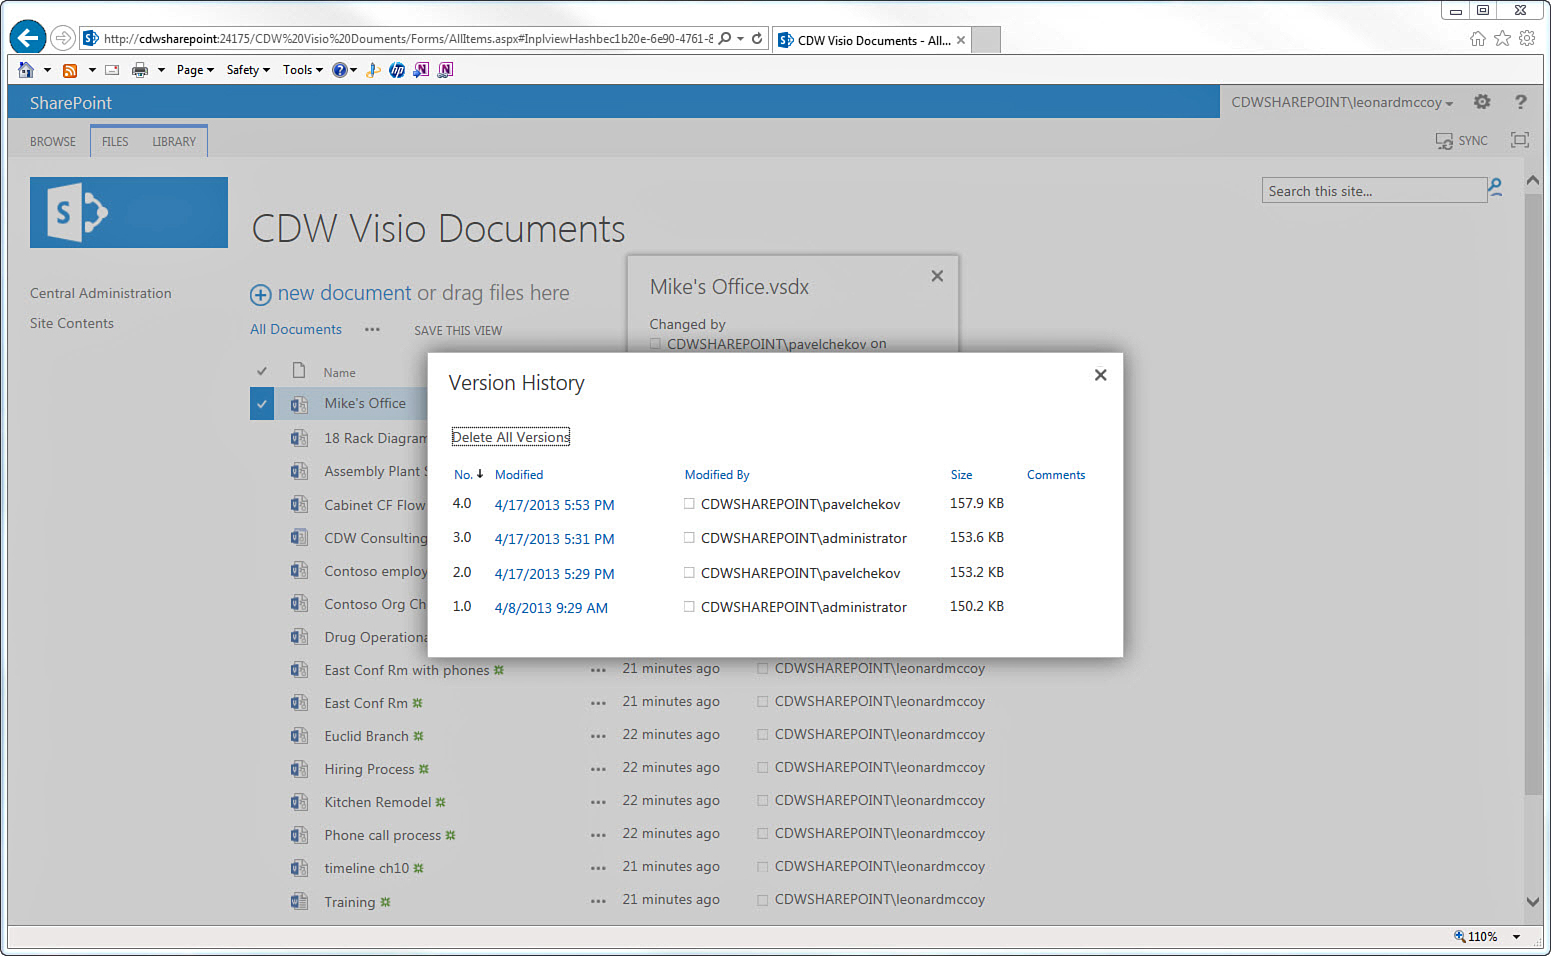
Versioning is another valuable setting that is often enabled in SharePoint. It allows you to track when changes are made to a drawing and who made those changes. Figure 17.7 shows four versions of a document with timestamps and the person who last edited the drawing. Select the timestamp information in the modified column to reveal a drop-down menu. Using this menu you can view older versions, restore the current version from an older version, and delete versions that are no longer needed.
Co-Authoring
An exciting new feature that SharePoint 2013 provides for users of Visio 2013 is co-authoring. This enables multiple individuals to work on the same document simultaneously and make changes that can be saved without interfering with each other. Co-authoring avoids other problems that can frustrate collaboration, such as tracking down the person who forgot to check a document back in to the library or merging several copies of the same original drawing.
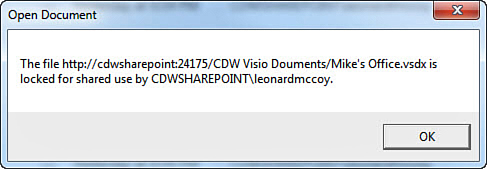
If you try to check out a document that is already open, you see a message like the one shown in Figure 17.8 alerting you that you are denied exclusive access. You can open the document and edit it as if you had checked it out while your co-workers continue to be productive using the same drawing.
Co-authoring comes in handy when
• A large drawing needs to be updated. It can be worked on by an entire group using the same file rather than having several copies that all need to be merged later.
• Several people are invited to review a drawing. Their comments and additions are all saved in the same drawing on the SharePoint server.
You see notifications on your status bar if others have a Visio drawing open, and shapes they are working on will be marked by a small icon, as shown in Figure 17.9. Their work is cached until they save their work, which then releases those edits, and their changes become visible to others. You are alerted on your status bar that changes have been saved to the SharePoint server by the appearance of Updates Available. Click this text or save your work, and the drawings are updated from the SharePoint server to reflect changes others have made.
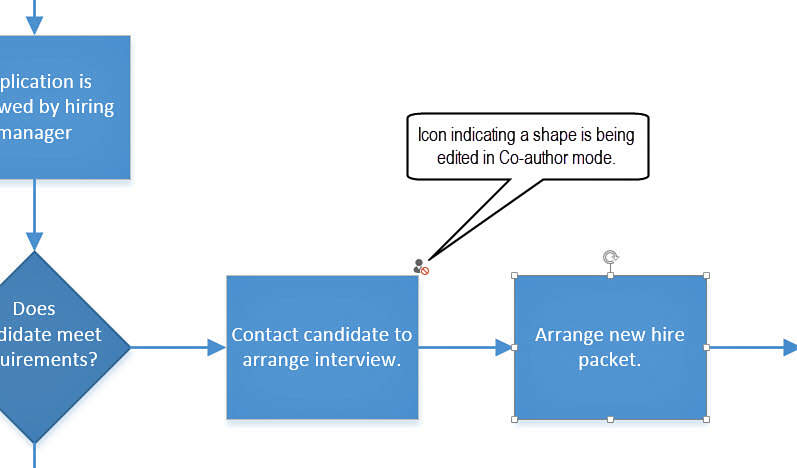
FIGURE 17.9 Visio drawings that are in Co-author mode alert you to shapes that are currently being edited by others.
You can even work on the same shape. If both happen to change the same property, such as the text field, the last to save overwrites the other. This type of conflict is rare, and a little coordination and communication can avoid this problem altogether.
You communicate with others while using Co-author mode by following these steps:
1. Open a Visio drawing from a SharePoint library. Ask a co-worker to open the same drawing, select a shape, and make a change.
2. In your Visio drawing, look for the small Person icon that is shown in Figure 17.9. It appears above the shape near the top-right corner.
3. Click the small icon to reveal the person’s name. Hover over the name with your mouse pointer to reveal contact information, as shown in Figure 17.10.
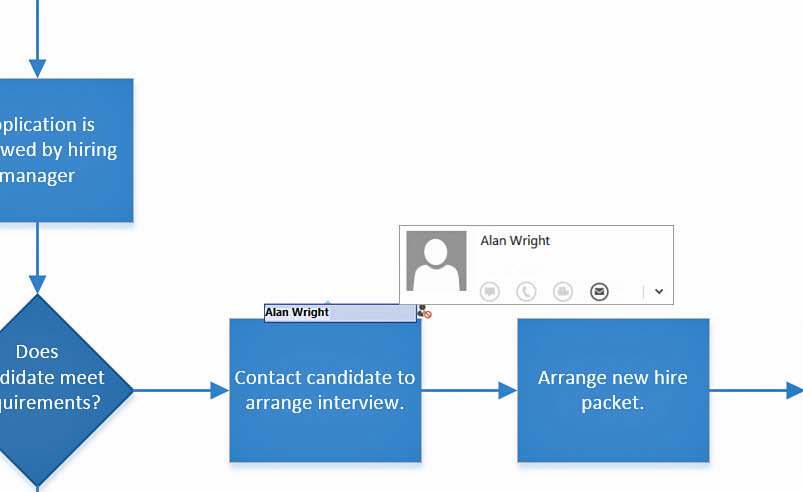
FIGURE 17.10 When you need to identify and communicate with a co-author, select the small Person icon to reveal contact information.
4. Select an icon to use phone, email, or instant messaging to communicate with your co-worker. If no options for a particular mode of communication are available, that icon appears grayed out. In Figure 17.10, only email contact information is available.
Note
Co-authoring can also be used with drawings saved to SkyDrive.
Markup and Review in Visio
Visio provides powerful tools that allow you to collaborate with others while preparing a diagram. You may have used these tools in other Office applications and understood their value. Unlike the use of callouts for commenting—a habit that many people still retain—these special tools can be easily hidden and even removed from a drawing, which only adds to their value.
Adding Comments
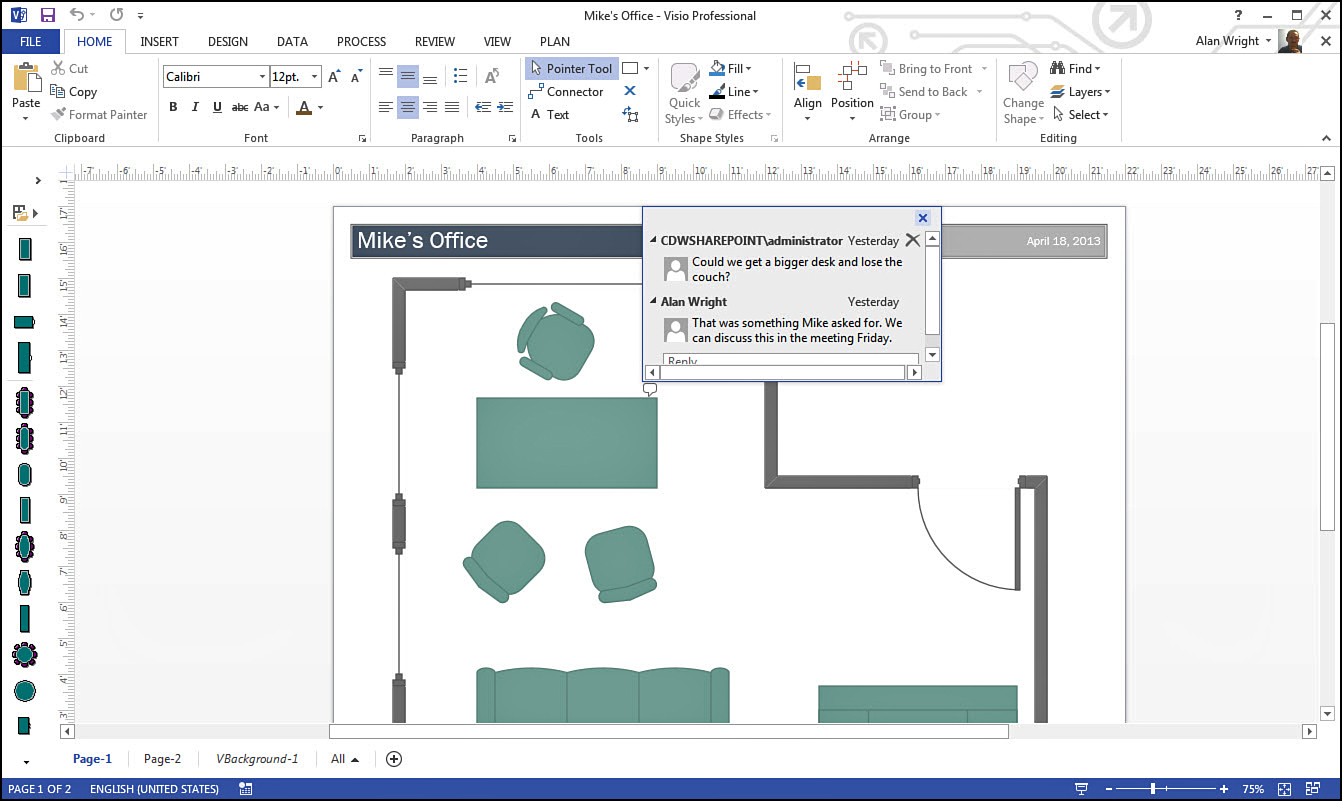
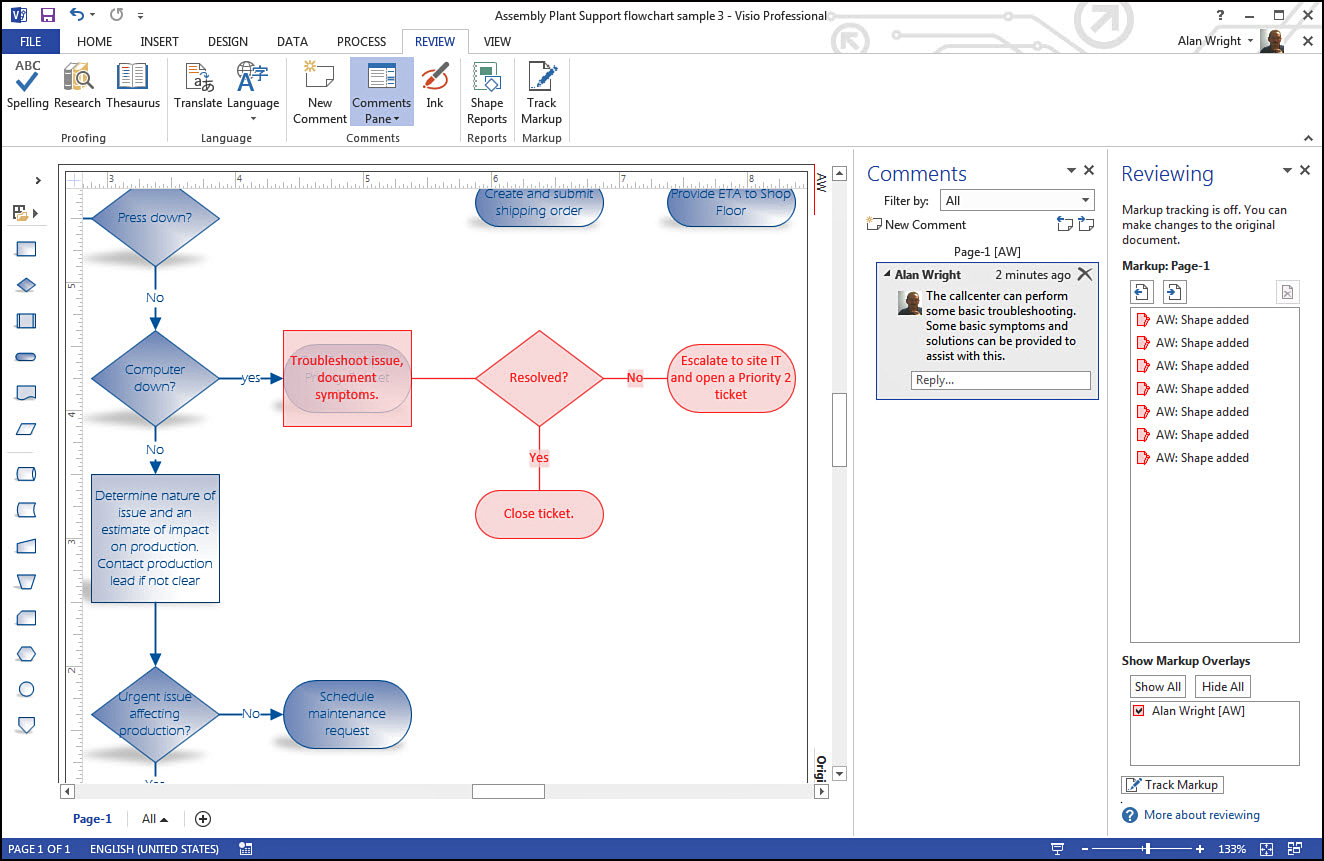
Comments have been reworked in Visio 2013 to make them more useful by attaching them to shapes. Comments will show a timestamp and author. They can be expanded or contracted to allow for easy navigation of long chains of comments. The presence of comments are revealed by small balloon icons that are located at the top-right corner of shapes to provide a visual cue that comments are attached to the shape. To view these comments, click the icon. Figure 17.11 shows a Visio drawing where comments have been opened.
You add comments to a shape by following these steps:
1. Open a Visio drawing, or create a new drawing that has at least one shape located in the drawing window.
2. Right-click a shape and then select Add Comment from the context menu.
3. A small comment icon appears with a field that awaits your comments. Type in a comment, as shown in Figure 17.12, and press Enter. A small icon remains to let you know that there is a concealed comment associated with that shape.
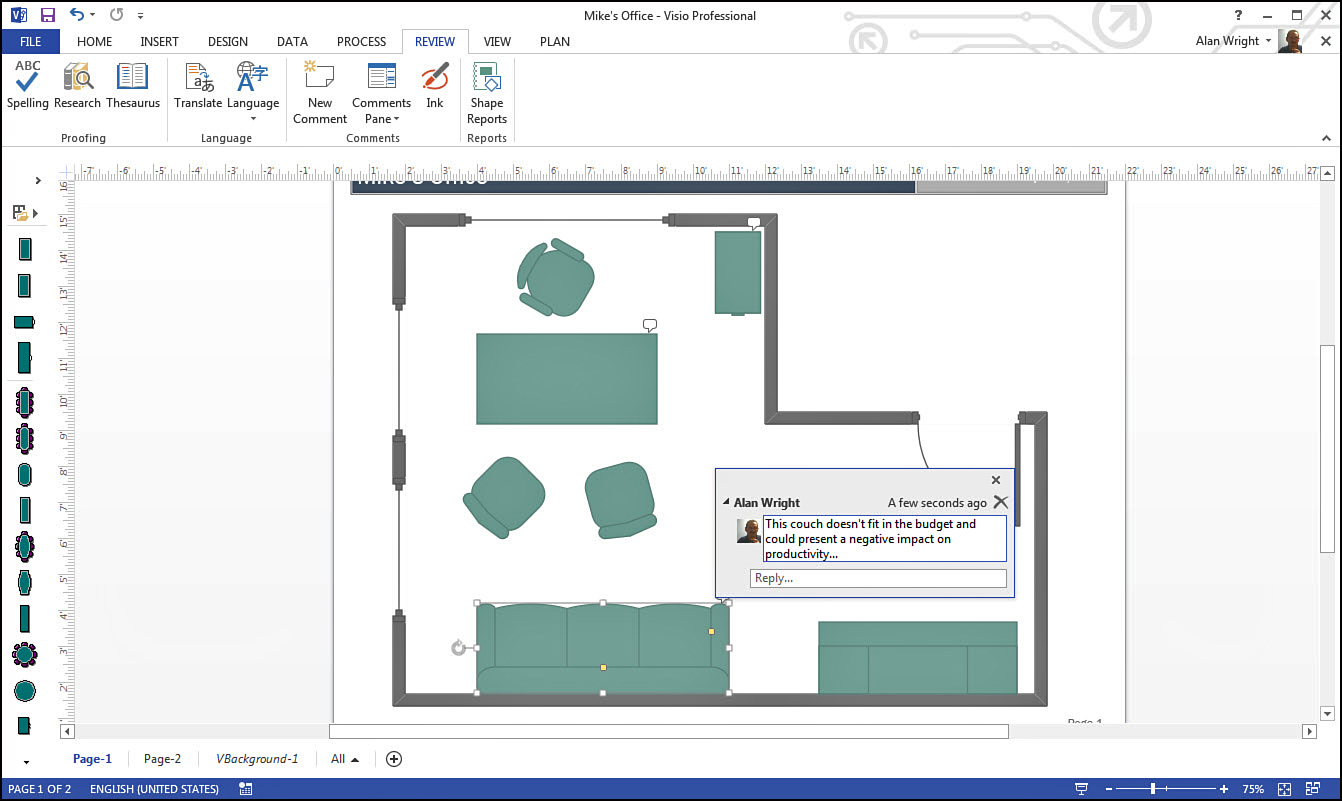
4. Select the Review tab and notice the group of tools labeled Comments. Select the Comments pane drop-down to show the Reveal Tags option. Select the check box to enable and disable this option, and notice how the drawing window is affected. Figure 17.13 shows how comment tags can be hidden completely.

5. Select the Comments pane to add this task pane to the drawing window. It appears docked to the left side, as shown in Figure 17.14, and displays all the comments included in the drawing.
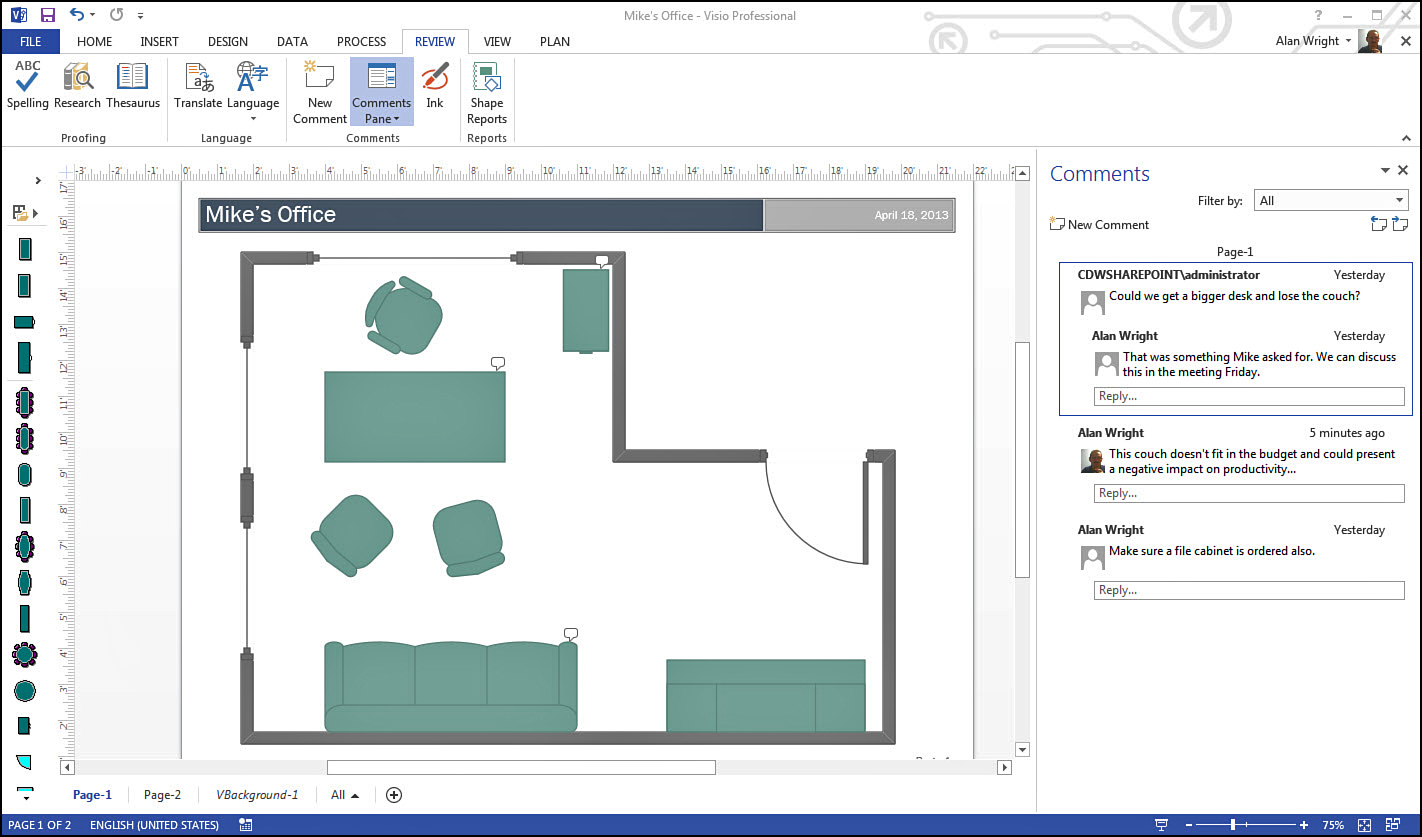
When you select a shape with a comment, the related comments are highlighted in the Comments pane. You can also select a comment in the Comments pane, and the small icon balloon appears highlighted to indicate the shape this comment is attached to. Because comments can multiply so easily, the Comments pane includes a filter to narrow the results in a few ways, including by person, page, or recent comments.
You can select the New Comment button from the Review tab when you want to add a general comment to the entire page.
Using Ink
Ink tools provide another useful way to add commenting to a Visio drawing. Using Ink tools, you can create hand-drawn shapes and handwritten notes when looking over a diagram using tablets and touchscreen devices. Lines and shapes you draw can be left as Ink shapes or converted to Visio shapes that can be edited using standard shape drawing tools. Like other Visio shapes, you can copy, move, and resize ink shapes; these shapes can then be added to your custom stencils to make them available for other drawings. Visio even attempts to convert letters you draw freehand to text.
To use Ink tools, open the Review tab and select the Ink button. Figure 17.15 shows the Ink Tools menu.
The tools found on this tab include the following:
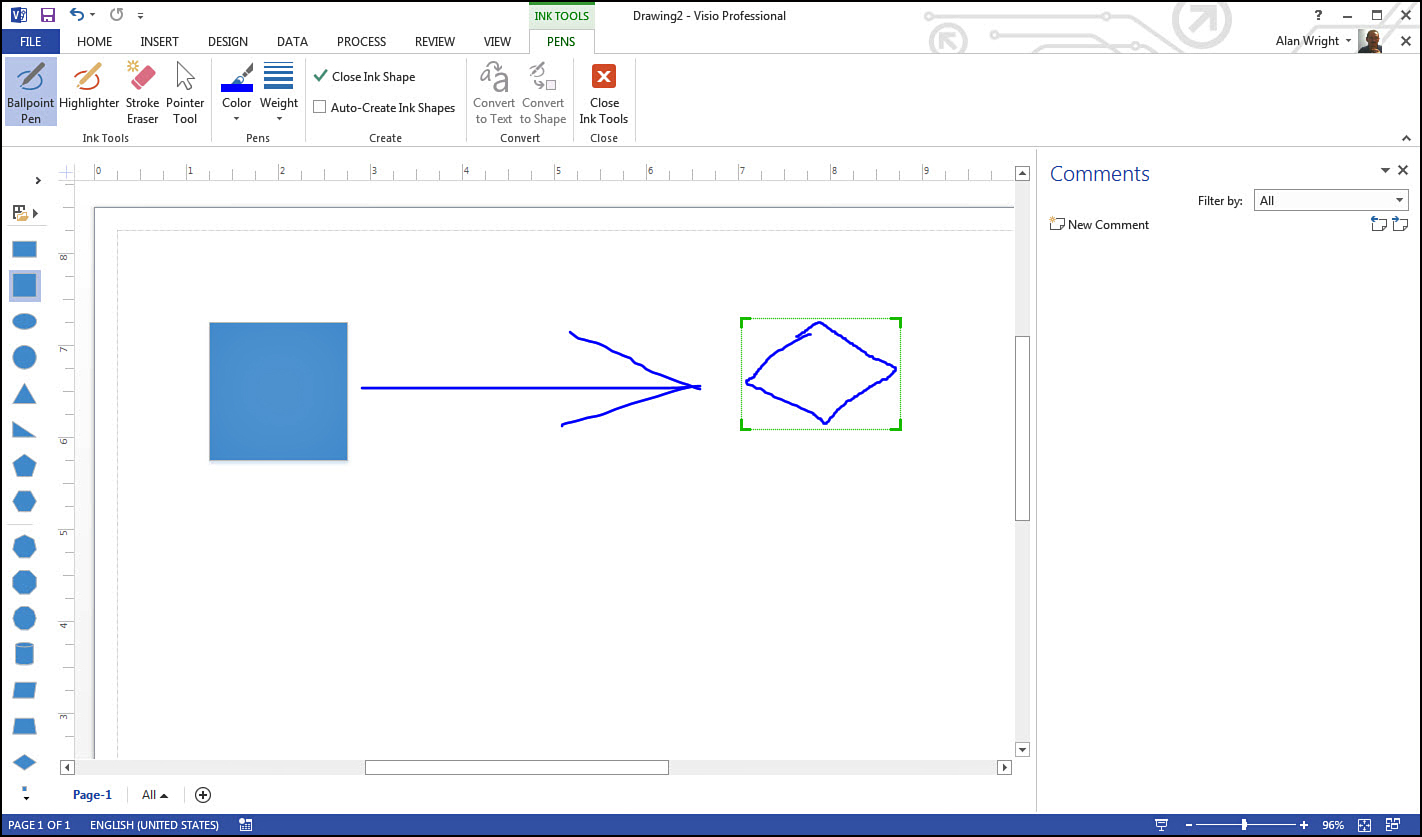
• Ballpoint Pen is a straightforward drawing tool that allows you to draw freehand-style lines (called strokes). These lines combine to form part of the same ink shape until you click the Close Ink Tools button or select the Pointer tool. As an example, Figure 17.15 shows three strokes that form an arrow.
• Highlighter is essentially the same as the Ballpoint Pen tool; it draws strokes that have the appearance of a highlighter, including a degree of transparency.
• Stroke Eraser enables you to selectively remove strokes from an ink shape.
• Pointer tool changes the mouse pointer to the default Pointer tool, and Visio combines any strokes you have drawn into an ink shape.
• Color and Weight provide basic drop-down menus to change those properties of the Ballpoint Pen or Highlighter tools.
• Close Ink Shape provides you with another way to indicate you are done adding strokes to an ink shape. Select this and the next stroke starts a new ink shape.
• Auto-Create Ink Shapes closes ink shapes after a long pause. You can enable or disable this feature using the check box.
• Convert to Text and Convert to Shape converts the selected ink shape to text or a Visio shape. After converting to text, you can edit and format by using standard text tools.
Auto-Create Ink Shapes is enabled by default, and many people like this feature. If you want to adjust the time allowed to automatically close an ink shape, follow these steps:
1. Select the File tab, and select Options from the vertical tab list.
2. When the Visio Options dialog box opens, select the Advanced tab from the side bar.
3. In Ink Tool, under Editing Options, use the slider to increase or decrease the time allowed before this tool closes an ink shape (see Figure 17.16).
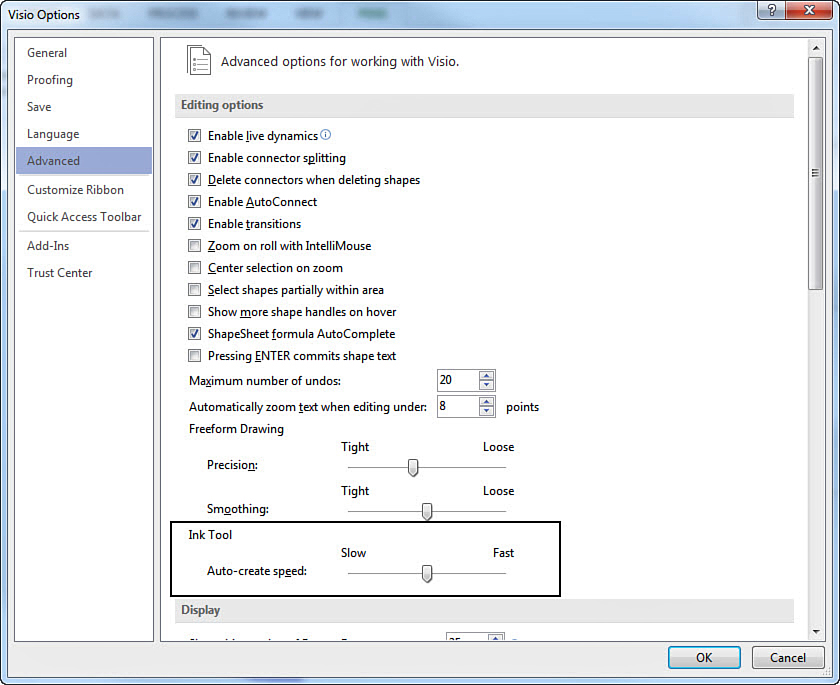
4. Click OK.
Ink has been around for years and has been a valuable tool for tablets that use a pen for an input device. Newer tablets and all-in-one computers that use multitouch touchscreens can still use Ink effectively. Visio 2013 includes additional tools that make working with touchscreens even more enjoyable.
→ To learn more about working with a touchscreen in Visio, see page 246.
Using Track Markup
If you used Visio in the past, you may be wondering where the Markup tools went. With the improvements to the Commenting tools, Markup tools have been removed from the Review tab. You can add them back easily enough if you prefer to keep them readily available.
Track Markup has been used by teams to create an overlay where comments and shapes can be added without changing the original drawing. The Markups can be displayed or hidden easily, and a drawing can have several Markup overlays. Using the tools to remove private information described at the end of this chapter, Markup overlay content can be removed easily.
To add the Track Markup tool to the Review tab, follow these steps:
1. Select the File tab and select Options from the vertical tab list.
2. The Visio Options dialog box opens; select the Customize Ribbon tab from the side bar.
3. In the Choose Commands drop-down list, select Commands Not in the Ribbon.
4. Scroll down the list and select the Track Markup command.
5. Under Customize the Ribbon, select Review, and then click the New Group button.
6. Select the new group, click the Rename button, and type a name for this tool group. (Figure 17.17 shows the name Markup has been used.) Click OK.
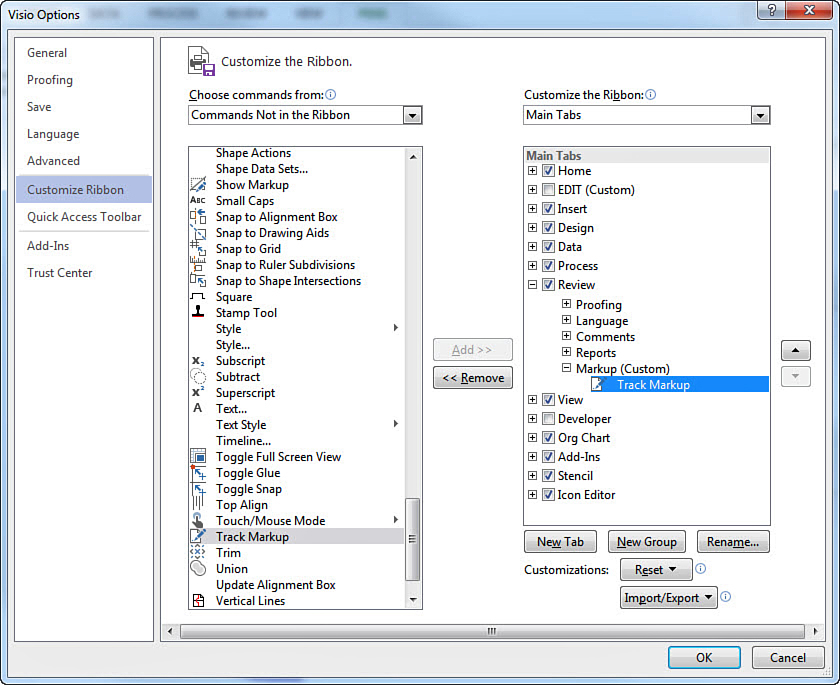
7. Select the Add button between the lists to add the Track Markup command to your new group on the Review tab as shown in Figure 17.17. Click OK.
8. Select the Review tab. You now have a new tool group, and the Track Markup tool is available.
Figure 17.18 shows how easily you can add shapes and comments to an overlay after enabling Track Markup. The drawing area has a colored border, and shapes added share this color. A Reviewing task pane also shows up; this tracks the changes made to the overlay and provides a way to control how overlays are displayed. Select Track Markup again to exit markup mode, and return to the original drawing.
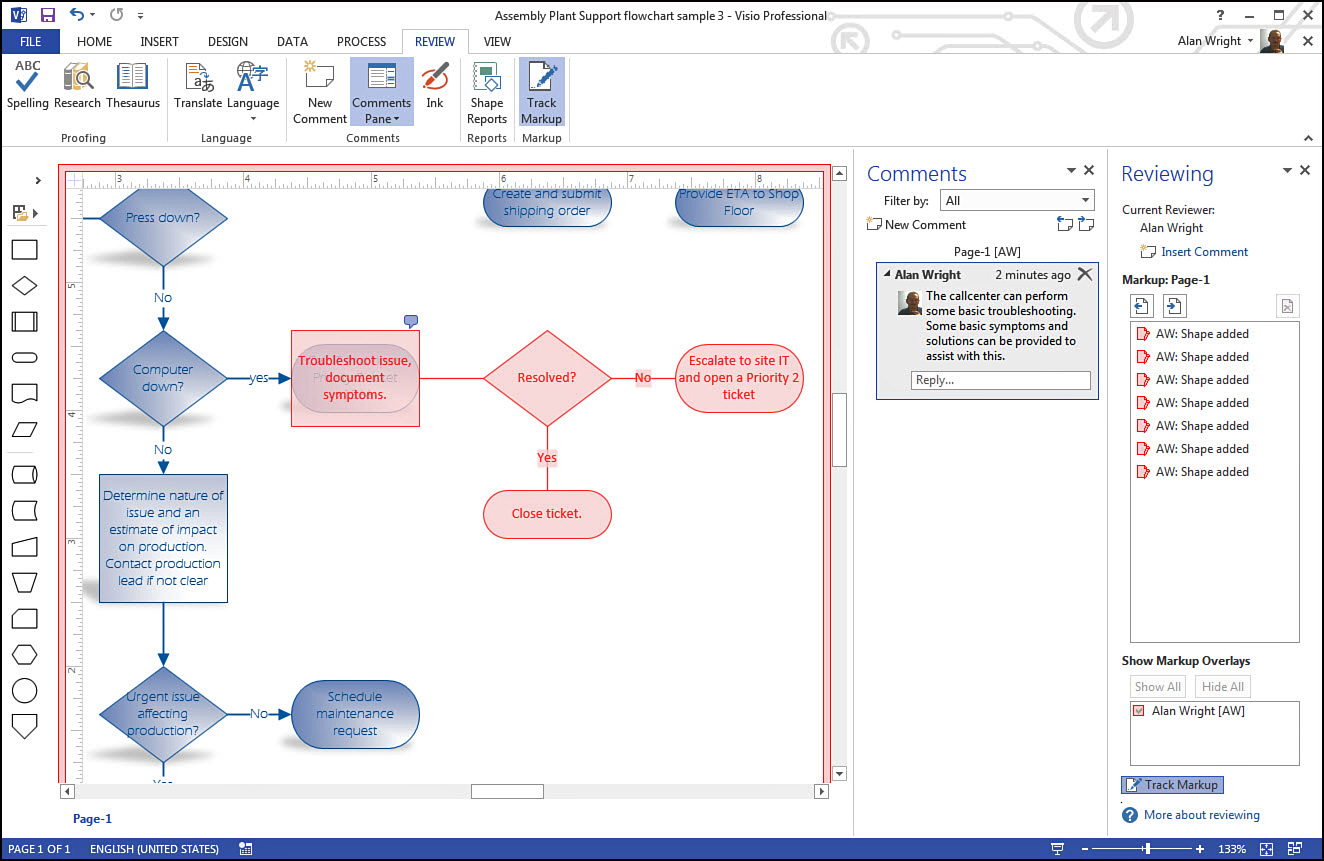
FIGURE 17.18 While Track Markup is enabled, shapes and comments are added to an overlay and do not affect the original drawing.
After leaving Markup mode, you can use the Comments pane to see comments, and the Reviewing pane allows you to show or hide any markup overlays associated with the page by using the corresponding check box under Show Markup Overlays. Figure 17.19 shows a markup overlay; you can see tabs along the right edge of the drawing that indicate the markup layer at the top and a tab at the bottom indicating the original drawing. You can use these tabs to jump back and forth if you want to examine shapes on these layers. Shapes may be visible from multiple overlays, but you can select shapes only if the tab they are on is selected—and this includes shapes in the original drawing.
Don’t Share Too Much
Although you might be understandably focused on sharing the drawings you create, it is wise to consider what is being shared. Your drawing may have grown in size, and sensitive data may be embedded in your document. A couple of handy tools can be found in the Info tab to help you remove unnecessary data to reduce file size and remove sensitive data.
Check information in the document and remove personal information by following these steps:
1. Open a Visio drawing that you saved, and then open the File tab. Make sure the Info tab is selected, as shown in Figure 17.20.
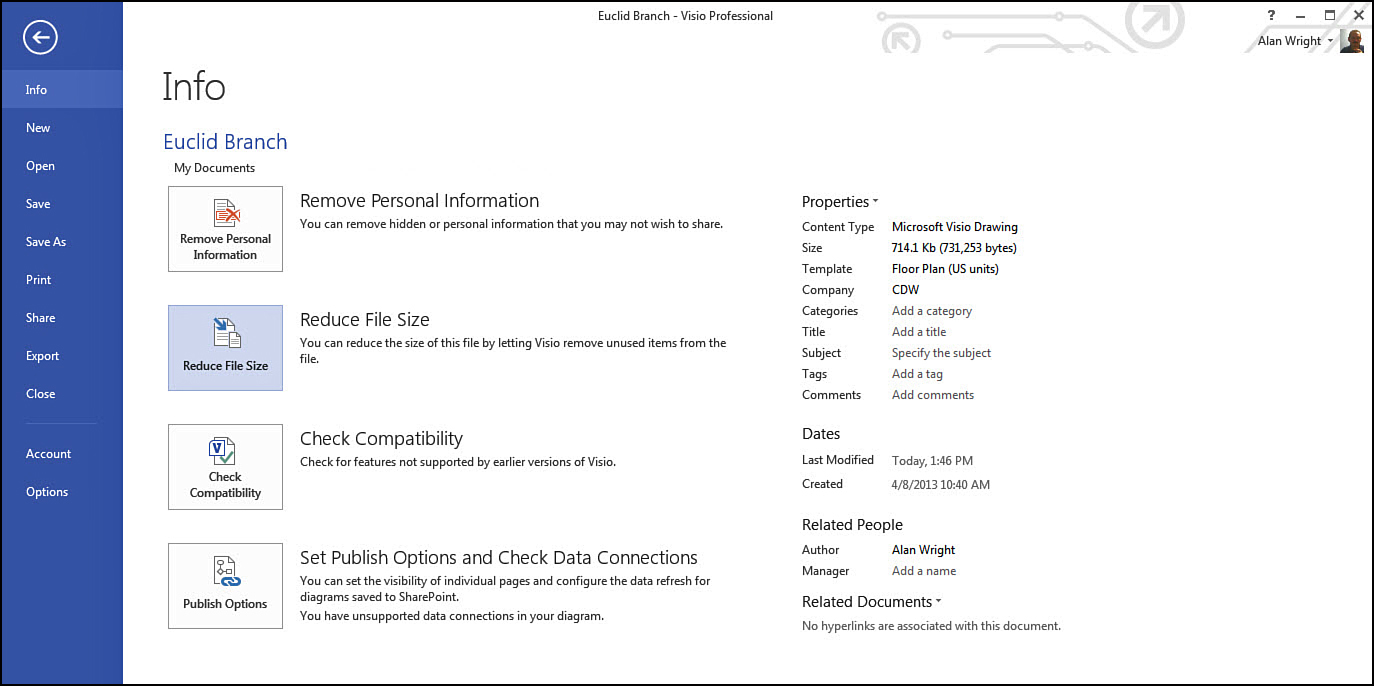
2. Select the large button labeled Reduce File Size to open the Remove Hidden Information dialog box. Click the File Size Reduction tab, as shown in Figure 17.21
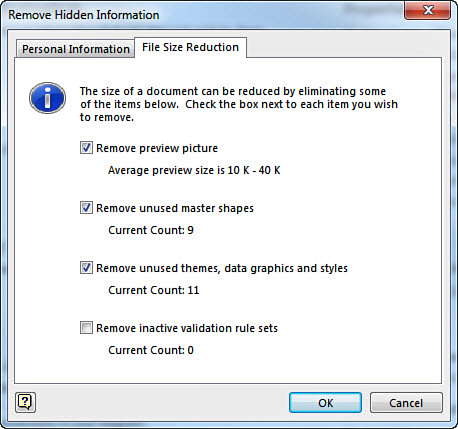
3. Remove any items by selecting them and then clicking OK.
4. Select the Remove Personal Information button also shown in Figure 17.20. The same Remove Hidden Information dialog box appears with the Personal Information tab displayed as shown in Figure 17.22.
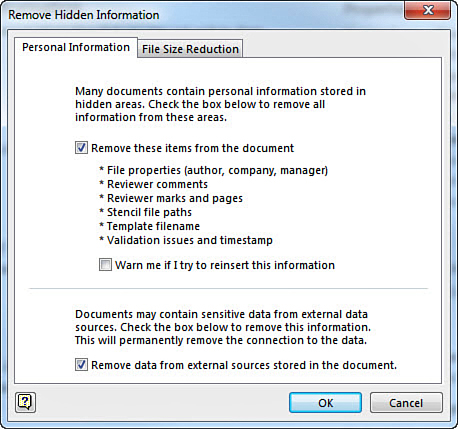
FIGURE 17.22 Using the Remove Hidden Information dialog box enables you to keep confidential information private.
5. Select both check boxes that start with Remove to remove the indicated data types. Check the box that starts with Warn Me if you plan to do further edits before sharing the document. Click OK.
6. Notice the file size and information displayed in Figure 17.23. The file size is a little smaller; of course, this varies depending on the file. Perhaps more important, you can see right away that personal information was removed.
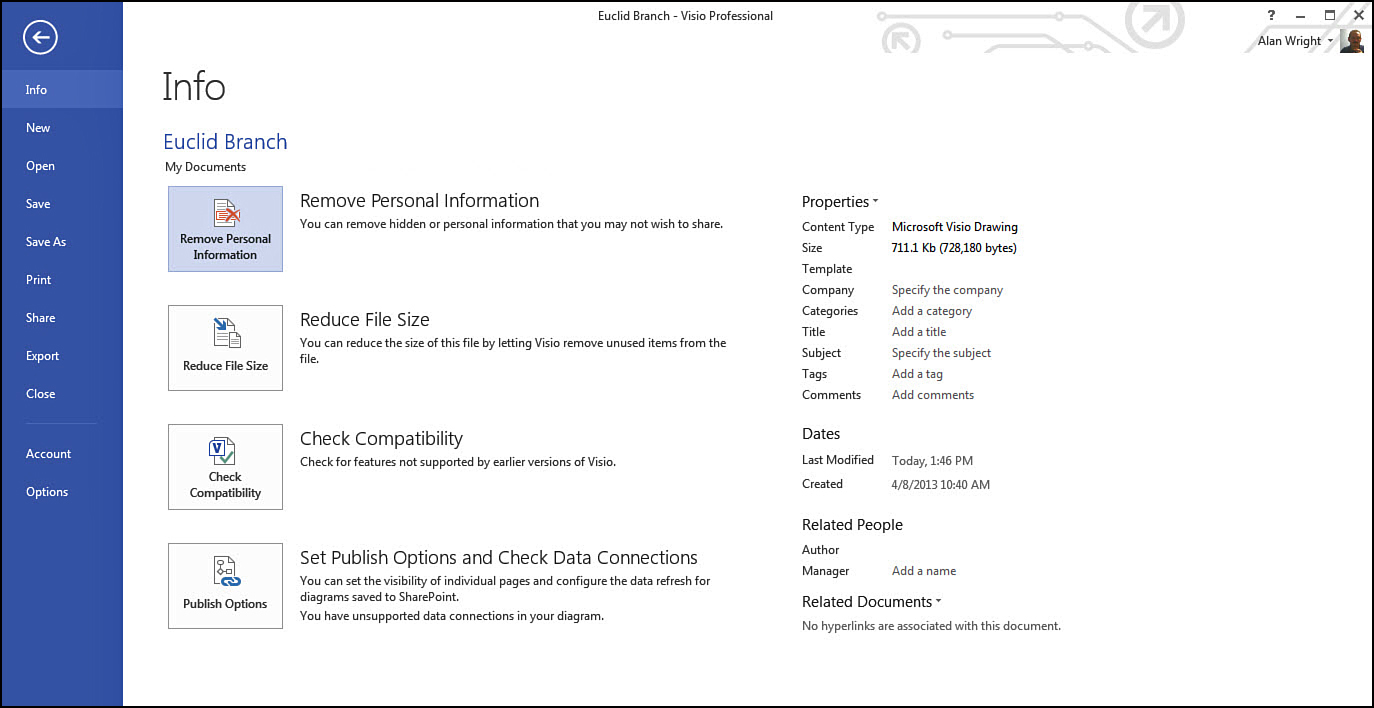
FIGURE 17.23 Visio drawings can be sent safely without accidently providing confidential information after using Remove Personal Information.
What Is Removed
As shown in Figure 17.23, many types of information are stripped from your drawing. Consider why you might want to remove some of these items:
• You likely think of file properties when working with Office documents. You may not want author, manager, and company names revealed through this drawing.
• Because you might not have commenting visible in a drawing, you could forget that reviewer comments and markups are present. This information may contain embarrassing or confidential details aside from being information that does not need to be shared.
• Paths indicating the file locations for stencils and templates might present a security risk as they reveal information about your file structure.
• Drawings that use external data also retain file path information and expose confidential information.
File size is reduced by removing unneeded master shapes and themes that may have been used at one point during the creation of a drawing, as shown in Figure 17.22. It is easy to forget that a drawing retains this information until it is removed. To further improve file size reduction, you might consider resizing inserted image files.
→ To learn more about resizing inserted image files, see page 192.
What Is Not Removed
Drawings retain shape data and text that has been added to text blocks. Therefore, confidential information that was entered in this way is still there. Extra pages temporarily added and callouts used for commenting are not removed. Just to be safe, make it a practice to look through pages to ensure that you (or a co-worker) have not added private or confidential information before a document is shared.