
Chapter 9. Organizing Types Within Namespaces
.NET Framework ships with many built-in types. Such an enormous quantity necessarily needs a hierarchical organization in which types must be divided into their areas of interest (data access, file manipulation, communications, and so on). Moreover, the .NET Framework provides an extensible platform, and companies can also build their own custom components exposing types that could have the same name of existing built-in types in .NET Framework. To avoid naming conflicts and to enable a hierarchical organization of the code, Visual Basic offers the namespaces feature discussed in this chapter.
Understanding Namespaces
Namespaces provide a way for a better organization of the code and avoiding conflicts between types with the same name. Consider a complex hierarchical framework of objects (such as .NET Framework) in which you have the need to expose more than one type with a particular identifier. The typical example is when software companies produce class libraries; different companies could need to provide their own implementation of the Person class, or the same company could provide different implementations of the Person class within the same assembly, so there could be ambiguities for developers when invoking a particular implementation of the Person class. To solve this coding problem, programming languages in the .NET family offer the capability of organizing types within namespaces. For example, imagine using assemblies from two companies, Company1 and Company2, with both produced assemblies exposing their own implementation of the Person class. You would need to use one of the two implementations, but you would still need to reference both assemblies in your project. The following code
Dim p As New Person
can cause the Visual Basic compiler to throw an exception because it does not know which of the two implementations you want to invoke. By using namespaces, you can avoid this ambiguity as follows:
Dim p1 As New Company1.Person
Dim p2 As New Company2.Person
In this code example, Company1 and Company2 are namespaces that virtually encapsulate lots of types, whereas both Company1.Person and Company2.Person represent the full name of the Person class. The .NET Framework Base Class Library (BCL) relies heavily on namespaces. The main namespace in the BCL is System, which is the root in the BCL hierarchy. System exposes dozens of other namespaces, such as System.Xml, System.Data, System.Linq, and so on. Each of these namespaces exposes types and other nested namespaces, and in this way a hierarchical framework is more maintainable. Namespaces solve a coding problem and an object implementation problem. This is because namespaces are all about coding. The Common Language Runtime (CLR) does not recognize namespaces, but it does recognize only full class names, such as Company2.Person in the previous example or System.Object or System.Console. Namespaces are just a logical feature that helps developers write better-organized and reusable code. The CLR never encounters conflicts because it recognizes only full class names, but as you learn later in this chapter, as a developer you might encounter such conflicts. So, having some help in writing and organizing code will be necessary, especially when working with long named classes (see the “Imports Directives” section).
Organizing Types Within Namespaces
Namespaces are defined within Namespace..End Namespace blocks. Every namespace can expose the following types and members:
• Classes
• Structures
• Enumerations
• Modules
• Interfaces
• Delegates
• Nested namespaces
Listing 9.1 shows an example of a namespace exposing most of the preceding listed members.
Listing 9.1. Organizing Types Within a Namespace
Namespace People
Public Interface IContactable
ReadOnly Property HasEmailAddress As Boolean
End Interface
Public MustInherit Class Person
Public Property FirstName As String
Public Property LastName As String
Public Overrides Function ToString() As String
Return FirstName & " " & LastName
End Function
End Class
Public Enum PersonType
Work = 0
Personal = 1
End Enum
Public Class Contact
Inherits Person
Implements IContactable
Public Property EmailAddress As String
Public Overrides Function ToString() As String
Return MyBase.ToString()
End Function
Public ReadOnly Property HasEmailAddress As Boolean _
Implements IContactable.HasEmailAddress
Get
If String.IsNullOrEmpty(Me.EmailAddress) Then
Return False
Else
Return True
End If
End Get
End Property
End Class
Public Class Employee
Inherits Person
Public Property Title As String
Public Overrides Function ToString() As String
Return Me.Title & " " & Me.FirstName & " " & Me.LastName
End Function
End Class
Public Class Customer
Inherits Person
Public Property CompanyName As String
Public Overrides Function ToString() As String
Return Me.LastName & " from " & Me.CompanyName
End Function
End Class
Module GlobalDeclarations
Public Data As Object
End Module
Public Structure PersonInformation
Public Property PersonCategory As PersonType
Public Property HasEmailAddress As Boolean
End Structure
End Namespace
As you can see in Listing 9.1, you can organize your custom objects within a namespace. The code implements an abstract class (Person), three derived classes (Contact, Employee, and Customer), an interface (which is then implemented by the Contact class), an enumeration (PersonType), a structure (PersonInformation), and a module (GlobalDeclarations). The namespace becomes part of the full name of a type. For example, the full name for the Contact class is People.Contact. Therefore, if you need to access a type defined within a namespace, you need to refer to it by writing the full name, as in the following line of code:
Dim firstContact As New People.Contact
Adding Imports
Later in this chapter we discuss the Imports directives, which can prevent the need to add the namespace identifier to the full type name every time.
Namespaces can also expose partial classes. This is a common situation within .NET Framework built-in namespaces.
Why Are Namespaces So Useful?
The purpose of namespaces is to enable a better organization of types. In some situations, an object’s hierarchy could expose two different types with different behaviors, but with the same name. For example, imagine you have two Person classes; the first one should represent business contacts, and the second one should represent your friends. Of course, you cannot create two classes with the same name within one namespace. Because of this, you can organize such types in different namespaces and thus avoid conflicts. The code in Listing 9.2 shows how you can define two Person classes within two different namespaces.
Listing 9.2. Avoiding Conflicts with Different Namespaces
Namespace People
Public Class Person
Public Property FirstName As String
Public Property LastName As String
Public Overrides Function ToString() As String
Return FirstName & " " & LastName
End Function
End Class
End Namespace
Namespace MyFriends
'Will not conflict with People.Person
Public Class Person
Public Property FirstName As String
Public Property LastName As String
Public Property Sibling As String
Public Overrides Function ToString() As String
Return FirstName & " " & LastName & ": " & Sibling
End Function
End Class
End Namespace
This is the way two classes with the same name can coexist within the same assembly. To access both of them, you just need to invoke their full names, as follows:
Dim aFriend As New MyFriends.Person
Dim aContact As New People.Person
The Person class is just an example. You can refer to inheritance as in Listing 9.1 instead of providing different namespaces, but the Person class is the simplest example for demonstrating topics, which is the reason to continue to use such a class.
Nested Namespaces
You can nest namespaces within namespaces to create a complex hierarchy of namespaces. However, you should be careful in creating complex hierarchies of namespaces because this can lead to particular complexity in your code that can cause difficulties in maintainability and reuse. You nest a namespace within another one by adding a new Namespace..End Namespace block. For example, in Listing 9.1 there are two different kinds of people: personal contact and businesspeople (which includes Customer and Employee). You could then consider defining a new namespace for your business objects and one for your personal objects. Listing 9.3 shows a shorter version of the first example, in which nested namespaces expose the two kinds of classes.
Listing 9.3. Implementing Nested Namespaces
Namespace People
Public Interface IContactable
ReadOnly Property HasEmailAddress As Boolean
End Interface
Public MustInherit Class Person
Public Property FirstName As String
Public Property LastName As String
Public Overrides Function ToString() As String
Return FirstName & " " & LastName
End Function
End Class
Namespace Work
Public Class Customer
Inherits Person
Public Property CompanyName As String
Public Overrides Function ToString() As String
Return Me.LastName & " from " & Me.CompanyName
End Function
End Class
Public Class Employee
Inherits Person
Public Property Title As String
Public Overrides Function ToString() As String
Return Me.Title & " " & Me.FirstName & " " & Me.LastName
End Function
End Class
End Namespace
Namespace Personal
Public Class Contact
Inherits Person
Implements IContactable
Public Property EmailAddress As String
Public Overrides Function ToString() As String
Return MyBase.ToString()
End Function
Public ReadOnly Property HasEmailAddress As Boolean _
Implements IContactable.HasEmailAddress
Get
If String.IsNullOrEmpty(Me.EmailAddress) Then
Return False
Else
Return True
End If
End Get
End Property
End Class
End Namespace
End Namespace
As you can see from Listing 9.3, nesting namespaces is an easy task. Creating complex hierarchies can lead to problems in code readability because of several possible indentations. Luckily, Visual Basic enables an alternative syntax for defining nested namespaces without writing indented code. Listing 9.4 shows how you can create nested namespace with the alternative syntax.
Listing 9.4. Nesting Namespace Without Indented Code
Namespace People
Public Interface IContactable
ReadOnly Property HasEmailAddress As Boolean
End Interface
Public MustInherit Class Person
Public Property FirstName As String
Public Property LastName As String
Public Overrides Function ToString() As String
Return FirstName & " " & LastName
End Function
End Class
End Namespace
Namespace People.Work
Public Class Employee
Inherits Person
Public Property Title As String
Public Overrides Function ToString() As String
Return Me.Title & " " & Me.FirstName & " " & Me.LastName
End Function
End Class
Public Class Customer
Inherits Person
Public Property CompanyName As String
Public Overrides Function ToString() As String
Return Me.LastName & " from " & Me.CompanyName
End Function
End Class
End Namespace
Namespace People.Personal
Public Class Contact
Inherits Person
Implements IContactable
Public Property EmailAddress As String
Public Overrides Function ToString() As String
Return MyBase.ToString()
End Function
Public ReadOnly Property HasEmailAddress As Boolean _
Implements IContactable.HasEmailAddress
Get
If String.IsNullOrEmpty(Me.EmailAddress) Then
Return False
Else
Return True
End If
End Get
End Property
End Class
End Namespace
As you can see from Listing 9.4, you can nest namespaces by adding a dot after the parent namespace and then specifying the child namespace name without having to nest namespaces on the code side. This produces the same result, but your code is more readable. By the way, you are free to use both methodologies.
Scope
Namespaces have scope of visibility. As a rule, namespaces have public visibility because they can be recognized within the project, from other projects that reference the project defining the namespace and from external assemblies. Because of this behavior, namespace declarations can be adorned neither with qualifiers nor with attributes. Members defined within namespaces can only be Friend or Public. If you do not want the external world to use some members defined within a namespace, you need to mark such members as Friend. By default, Visual Basic considers members within namespaces as Friend. If you want them to be of public access, you need to explicitly mark them as Public.
Root Namespace
Each application has a root namespace that contains all types defined in the application. When you create a new project, Visual Studio automatically assigns the root namespace (also known as the first-level namespace) with the name of the project. This is important to understand, for several reasons. First, if you develop class libraries or reusable components, the root namespace must follow the naming conventions of the Common Language Specification (CLS). Second, you must know how your types and auto-generated code are organized within your project. For example, the project containing the code of this chapter is named OrganizingTypesWithinNamespaces. By default, Visual Studio assigned the root namespace identifier with the OrganizingTypesWithinNamespaces identifier. Continuing the previous example, you access the People namespace in this way: OrganizingTypesWithinNamespaces.People. You then get access to People’s objects as follows:
OrganizingTypesWithinNamespaces.People.Person
To replace the identifier for your root namespace, you need to open the My Project window and open the Application tab. You find a text box named Root namespace, which is represented in Figure 9.1.
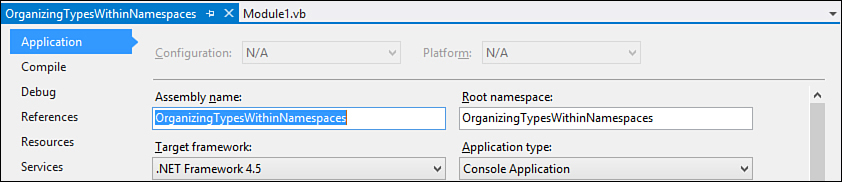
Figure 9.1. Checking and editing the root namespace.
Here you can change the root namespace. If you develop class libraries, the root namespace should have the following form: CompanyName.ProductName (for this particular scenario, you should also consider the Global namespace feature discussed at the end of this chapter).
Root Namespace
When invoking a member defined inside the root namespace, you do not need to include the name of the namespace. This is the only exception when invoking members. For example, if you need to access the People namespace we defined in the code example, type People and not OrganizingTypesWithinNamespaces.People.
Imports Directives
It often happens that you need to invoke types defined within long-named, nested namespaces. To invoke types, you need to write the full name of the type, which includes the identifier of the namespace that defines a particular type, as in the following code:
Dim aFile As New System.IO.FileStream("C: est.txt",
System.IO.FileMode.Open)
Dim onePerson As New ImportsDirectives.People.Work.Customer
Although IntelliSense has been highly improved from previous versions and it helps in writing code, it can result quite annoyingly in typing long-named namespaces. To help developers write code faster, Visual Basic enables the usage of Imports directives. Such directives enable developers to avoid having to write the full namespace identifier preceding the types’ names. The preceding code can be rewritten as follows:
Imports System.IO
Imports ImportsDirectives.People.Work
...
Dim aFile As New FileStream("C: est.txt", FileMode.Open)
Dim onePerson As New Customer
Position in Code of Imports Directives
Imports directives can be added to each code file you need. They must be the first lines of code, preceding any other code except comments, the Option Strict, Option Compare, Option Explicit, and Option Infer directives that are the only lines of code always on the top.
You can now invoke types exposed by the System.IO namespace without having to write the namespace identifier each time. In this particular code example, we had just two invocations of members from the namespace, but in an application that manipulates files, you could have hundreds of invocations; with a single Imports directive. You do not need to write the namespace identifier before the types’ names each time. System.IO is a .NET built-in namespace, but the same applies to your own namespaces (in our example, the ImportsDirectives.People.Work). You can also take advantage of another technique that enables assigning an identifier to a long namespace so that invocations can be smarter (a feature known as namespace alias):
Imports work = ImportsDirectives.People.Work
...
Dim onePerson As New work.Customer
Importing XML Namespaces
Starting from Visual Basic 2008, Imports directives also enable importing XML namespaces. This feature is discussed in Chapter 27, “Manipulating XML Documents with LINQ and XML Literals,” for LINQ to XML.
Imports directives also enable importing class names. This enables invoking only shared members without the need of writing the full class name. Consider the following code, which deletes a file from disk:
System.IO.File.Delete("C: ext.txt")
Delete is a shared method exposed by the System.IO.File class. You can rewrite the previous code as follows:
Imports System.IO.File
...
Delete("C: ext.txt")
This can be useful if you need to invoke lots of shared members from a particular class.
Project-Level Default Imports
By default, Visual Studio 2012 adds some auto-generated Imports directives each time you create a new Visual Basic project, so you do not need to manually add such statements. Default Imports are specific to the project type, so if you create a Console application, there will be Imports related to these kinds of applications. If you create a web application, there will be Imports related to the most common namespaces for web applications and so on. You can easily add project-level namespaces via the My Project window. In the References tab, you can find a group box named Imported namespaces, as shown in Figure 9.2.
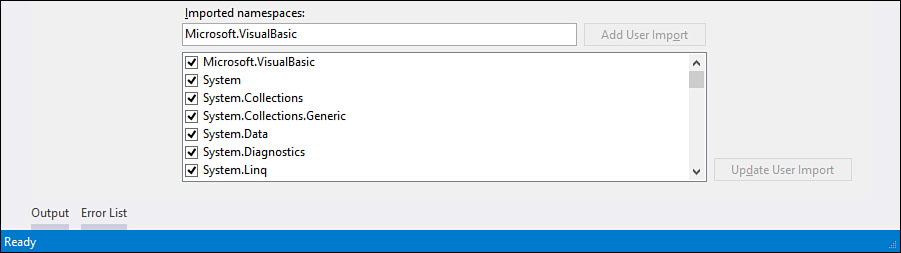
Figure 9.2. Setting project-level namespaces.
You can click the check box corresponding to each available namespace to add project-level Imports directives. This avoids the need of manually typing such Imports.
Additionally, if a particular namespace is not available in the list, you can manually enter its name and it will be added.
Tip
You can add a namespace alias in the Imported namespaces list. For example, if you want to import the System.Windows.Forms namespace, you can type something like F = System.Windows.Forms and then access namespace members as if you wrote the alias in the code (for example, F.TextBox).
Avoiding Ambiguities
You might have situations in which you need to access objects with the same name, coming from different namespaces. For example, both Windows Forms and Windows Presentation Foundation technologies provide a MessageBox class. In interoperability scenarios, where you have both references to Windows Forms and WPF assemblies, invoking such objects could result in ambiguities. Consider the following code:
Imports System.Windows.Forms
Imports System.Windows
Class Window1
Public Sub MyMethod()
MessageBox.Show("")
End Sub
End Class
Both System.Windows and System.Windows.Forms namespaces expose a MessageBox class, but you need those Imports for working with other classes. In such situations, adding Imports directives can cause the background compiler to throw an exception. This is because the code is ambiguous in invoking the MessageBox class, since it is not clear which of the two classes the runtime should invoke. In this case, you can avoid ambiguities by writing the full name of the class:
'Invokes the WPF MessageBox
System.Windows.MessageBox.Show("")
You could also solve this ambiguity by using namespace aliasing. Another example is the one provided by Listing 9.2. There we have two different implementations of the Person class, so adding an Imports directive would lead to ambiguities. Thus, in that case, you have to invoke members with their full names. Generally, when you have multiple namespaces defining classes with the same name, you should write the full class name including the namespace. This is probably one of the best examples for understanding why namespaces are so useful.
Namespaces and Common Language Specification
The Common Language Specification provides a couple of simple rules about namespaces. The first rule is that namespaces identifiers must be Pascal-cased. For example, MyCustomTypes is a well-formed namespace identifier. The second rule establishes that to be CLS-compliant, a namespace must expose at least five types (classes, structures, enumerations, delegates, and so on). If this is not your case, you should prefer single classes or modules or consider merging types within another namespace already containing other types.
Global Namespaces and the Global Keyword
A common scenario in .NET development is creating class libraries that will be reused in other projects or given (or sold) to other developers. In these situations, it is convenient defining one or more first-level namespaces that can expose types or other namespaces. However, when you create a new project, Visual Basic also defines the root namespace (refer to Figure 9.1 for an example). This implies that defining a custom namespace like this:
Namespace MyUtilities
Public Class Utility1
'Your implementation goes here...
End Class
End Namespace
causes the Visual Basic compiler to include the new namespace inside the root one whose name is, by default, the same as the project name (unless you change it manually). Continuing the example, the full name for the new namespace becomes OrganizingTypesWithinNamespaces.MyUtilities, which can be easily verified through the Object Browser window, as represented in Figure 9.3.
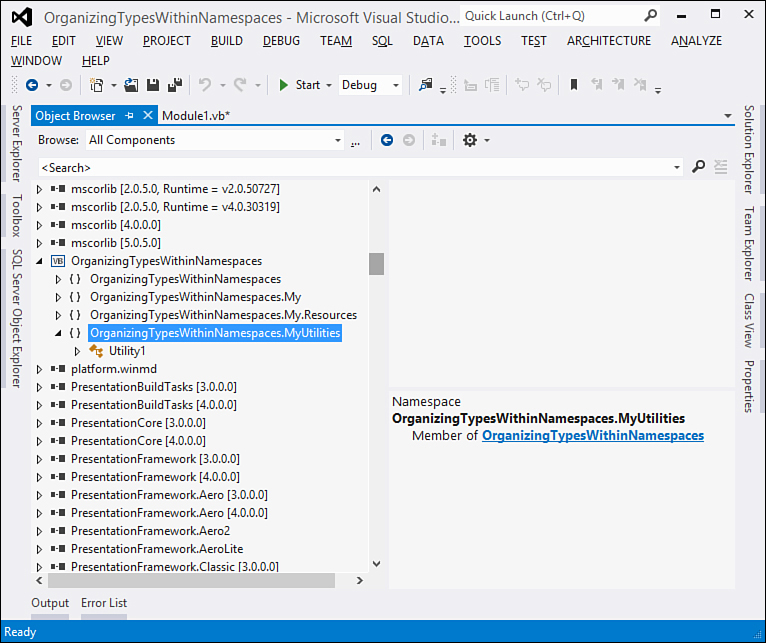
Figure 9.3. New namespaces are nested in the root namespace by default.
So the need at this point is abstracting custom namespaces from the root namespace, so that custom namespaces can be at the first-level like the root one. Until Visual Basic 2010, this was possible only by deleting the content of the Root Namespace box in My Project and then adding the required Namespace..End Namespace statements in every code file. In real-world solutions, this was impossible because a developer or a team could have hundreds or thousands of code files. Fortunately, Visual Basic 2012 introduces the feature of Global Namespaces, which allows you to bring custom namespaces to the same level of the root namespace by using the Global keyword. This is not a new keyword in Visual Basic, but in previous versions it was used to avoid conflicts with system namespaces. You place the Global keyword before the name of the namespace as follows:
Namespace Global.MyUtilities
Public Class Utility1
'Your implementation goes here...
End Class
End Namespace
In this way, you can define standalone namespaces that are independent from the project’s root namespace, as you can easily verify again via the Object Browser (see Figure 9.4).
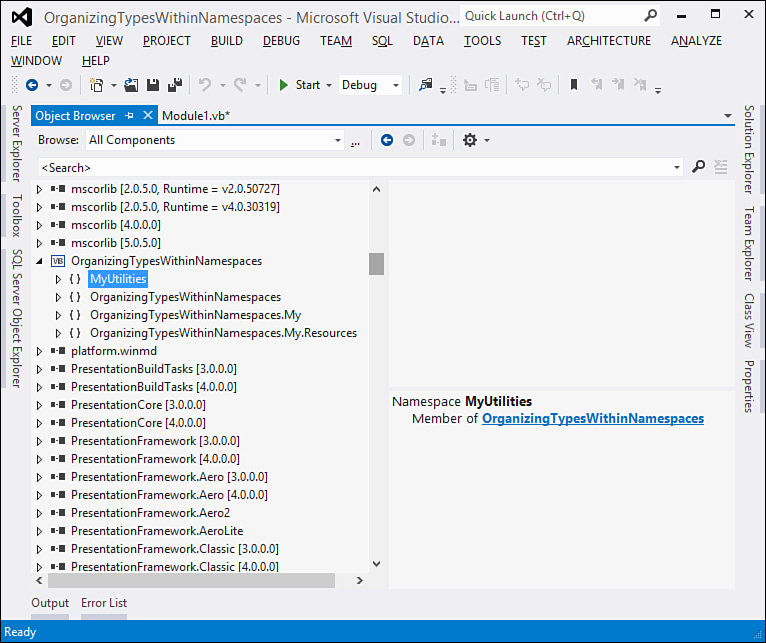
Figure 9.4. Global namespaces are at the same level as the root namespace.
This should also make it easy to understand that this technique allows extending the .NET Framework’s namespaces from others without having the source code. The following code demonstrates how to extend the internal System.String type with a new extension method, passing through the Global namespace:
Imports System.Runtime.CompilerServices
Namespace Global.System
'You can also use the following syntax:
'Namespace Global
' Namespace System
Public Module Extensions
<Extension()>
Public Function Parse(element As String) As String
Return element + " is made of " + CStr(element.Length) + " characters"
End Function
End Module
End Namespace
Extension methods are discussed in more detail in Chapter 20, “Advanced Language Features,” but the code should make you understand how an internal type in .NET is extended. Notice that the compiler assumes the System namespace as the default if no namespace identifier is specified after the Global keyword, so the following line:
Namespace Global
means Namespace Global.System. The suggestion is therefore to always specify the full name of the namespace to avoid confusion. The following code demonstrates how to extend another namespace, more precisely System.Text, with a new class:
Namespace Global.System.Text
Public Class CustomStringBuilder
Private _builder As StringBuilder
Public ReadOnly Property Builder As StringBuilder
Get
Return _builder
End Get
End Property
'Storing the original string into a new string builder
'This is just for demo
Public Sub New(startString As String)
Me._builder.AppendLine(startString)
End Sub
End Class
End Namespace
The purpose of the code is just to show how to extend a namespace, so it is very simple. The new type is being added to the System.Text namespace via the namespace declaration and demonstrating this is easy:
Sub Demo()
'Using the new class from the extended namespace
Dim txt As New System.Text.CustomStringBuilder("Starting string")
Console.WriteLine(txt.Builder.ToString)
End Sub
In summary, the Global namespace allows abstracting custom namespaces from the project’s root namespace and extending existing namespaces.
Summary
.NET Framework Base Class Library ships with many built-in types that are organized within namespaces. As a developer, you can build your custom types; therefore, you can organize them in namespaces. Namespaces are also a way to have different implementations of objects with the same name within a complex framework hierarchy. Because they are visible to other projects or assemblies, namespaces have a Public or Friend scope. Namespaces are also flexible; you can implement complex hierarchies nesting namespaces, and you can use whatever identifier you like. Finally, you saw a new feature in Visual Basic 2012—the Global namespace—and the usage of the Global keyword with this new feature. You have to deal with namespaces many times in object-oriented programming, so this chapter gives you the basis for feeling at home with this important feature of the .NET Framework.