
Chapter 17. Creating Objects: Visual Tools and Portable Libraries
Visual Studio 2012 is the best version ever of the premier developer tool from Microsoft. It offers a powerful code editor with the presence of IntelliSense that dramatically simplifies your coding experience. Writing code and architecting objects before writing code have the same importance, and for this reason Visual Studio lets you reach both objectives easily. On one side, it enables you to graphically design objects for your applications and contextually write code related to such objects. The built-in tool that enables you to perform this task is known as Class Designer, and in this chapter you get a high-level overview of it. On the other side, it is not uncommon for you as a developer to realize that you need to implement new objects on-the-fly—objects that you did not previously consider but that later become necessary or existing objects that must be extended. In this chapter, you also learn how to use this instrumentation and get the most out of its capabilities. Finally, Visual Studio 2012 introduces the Portable Class Library tooling that makes it easier to share the same code across multiple platforms, which is so important in a world where different kinds of applications and frameworks need to communicate with one another. So, in this chapter you also learn how to create portable code with the new instrumentation.
Visual Studio Class Designer
Visual Studio 2012 offers an instrument known as Visual Studio Class Designer that you should already know if you have experience with previous versions. You can design objects in a visual way by taking advantage of a graphical tool. You design objects; Visual Studio generates code. In this chapter, you learn how to design objects according to object-oriented principles using the Class Designer to create a new implementation of the Person class and of a couple of derived classes. Before continuing to read, create a new, empty VB project for the Console. This is the base for your subsequent work.
Enabling the Class Designer
To enable the Visual Studio Class Designer, you need to right-click the project name in Solution Explorer and then select View Class Diagram. When ready, the Class Designer appears as a new window within the IDE and shows a graphical representation of the main application module, including the definition of the Main method. All tasks you can perform on the Class Designer can be accomplished by invoking commands exposed by the context menu that you get when right-clicking the designer’s surface. Figure 17.1 shows the previously mentioned representation of Module1 and the available commands.
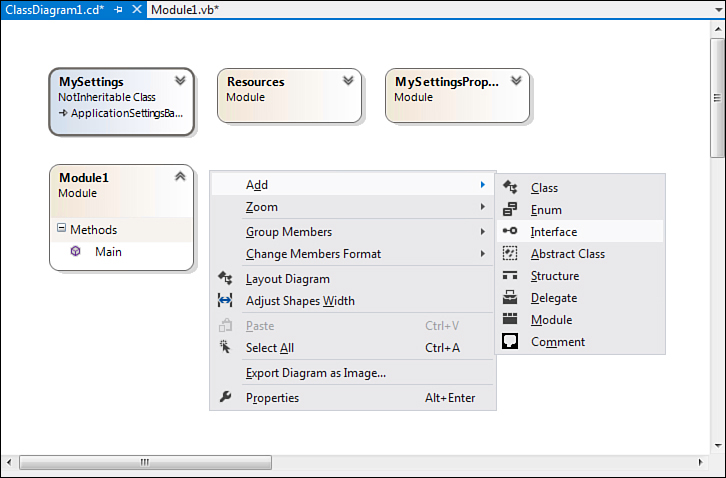
Figure 17.1. The Visual Studio Class Designer when launched, plus available commands for design operations.
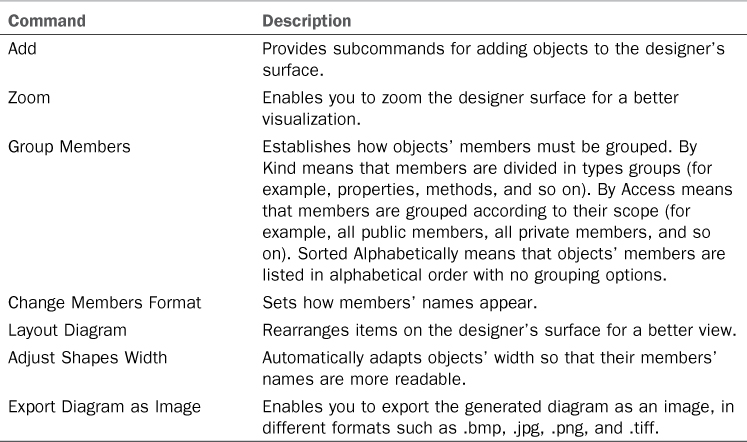
Figure 17.1 also shows the Add command expanded; it provides a list of available objects that you can add to the diagram. Such objects include classes, enumerations, interfaces, structures, delegates, and modules. You can also select the Comment command to add sticky notes on the designer’s surface. Table 17.1 summarizes the goal of other commands in the context menu.
Table 17.1. Commands List for the Class Designer
Class Diagrams Files
Class diagrams generated with the Visual Studio Class Designer are stored within a .cd file that becomes part of the solution. By default, the file is named ClassDiagram1.cd, but you can rename it as you like via Solution Explorer.
Now it’s time to use the Class Designer. Your goal is to design an IPerson interface that an abstract class named Person can implement and that will also be the base class for two other derived classes—Customer and Contact, both created with this interesting graphical tool.
Adding and Designing Objects
The first step to perform is creating an interface. To accomplish this, follow these steps:
1. Right-click the designer surface (see Figure 17.1) and select the Add, Interface command.
2. When the New Interface dialog box appears, specify the IPerson name and leave all other options unchanged, which are self-explanatory. Figure 17.2 shows the dialog box. This adds a new item on the designer, representing an interface.
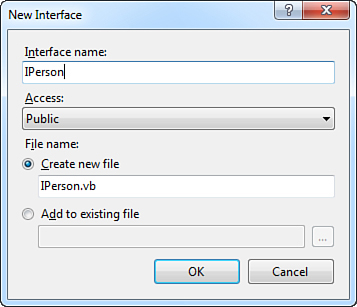
Figure 17.2. The New Interface dialog box enables you to specify the name of the new interface and other settings as the access level and the filename.
3. Right-click the new interface and select the Add, | Property command. For each object type, the context menu provides specific commands related to members the particular object can contain. Figure 17.3 shows how you can accomplish this. When the new property is added to the interface, it is focused and highlighted for renaming, so rename it FirstName. Notice that the default type for members is Integer; therefore, you need to open the Properties window (by pressing F4) and write the appropriate type in the Type field.
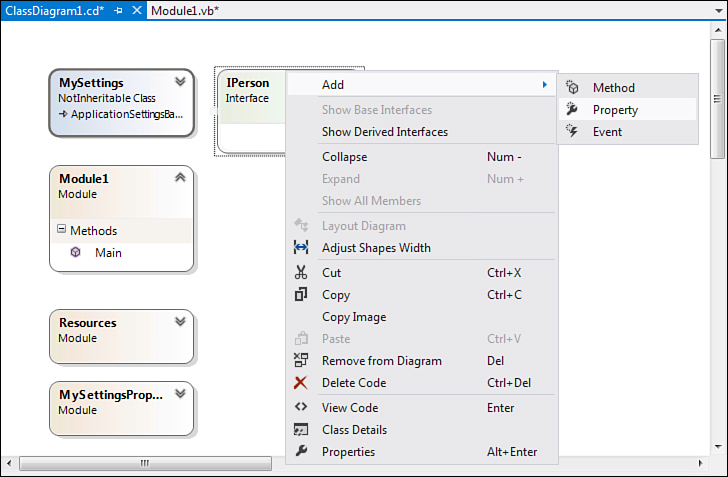
Figure 17.3. Adding members to the new interface.
4. Repeat the previous step to add a new LastName property and a FullName method, both of type String. The Class Designer implements Sub methods by default that are switched to Function when you specify a return type via the Properties window. This step is shown in Figure 17.4.
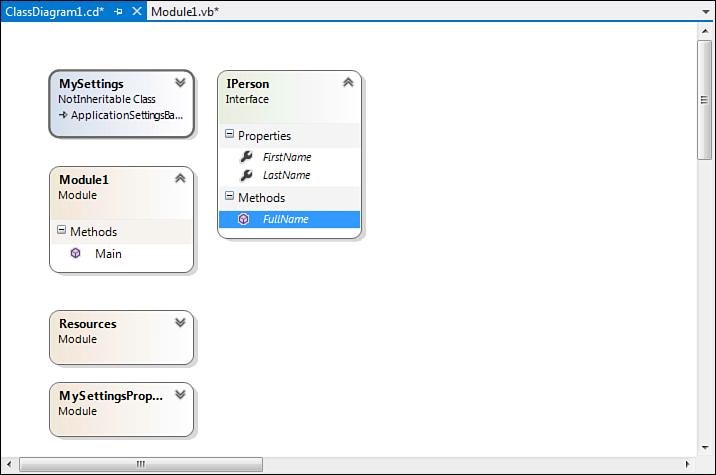
Figure 17.4. Specifying a return type for methods and the new completed interface.
If you now double-click the new interface, Visual Studio 2012 shows the code that it generated behind the scenes, as shown in Listing 17.1.
Listing 17.1. IPerson Interface with Code Generated by Visual Studio
Public Interface IPerson
Property LastName As String
Property FirstName As String
Function FullName() As String
End Interface
The next step is to add an abstract class named Person, which serves as the base class for subsequent classes. To accomplish this, right-click the designer and select the Add, Abstract Class command. Name the new class Person and, when ready, notice within the designer that is marked as MustInherit. Next, double-click the new class and add an Implements IPerson statement below the class declaration. This ensures that the new class is going to implement the IPerson interface. This is reflected in the class diagram and confirmed by the appearance of properties and methods defined within the interface inside the new class and by a rounded symbol that identifies an interface relationship. Figure 17.5 shows the result of the preceding operations.
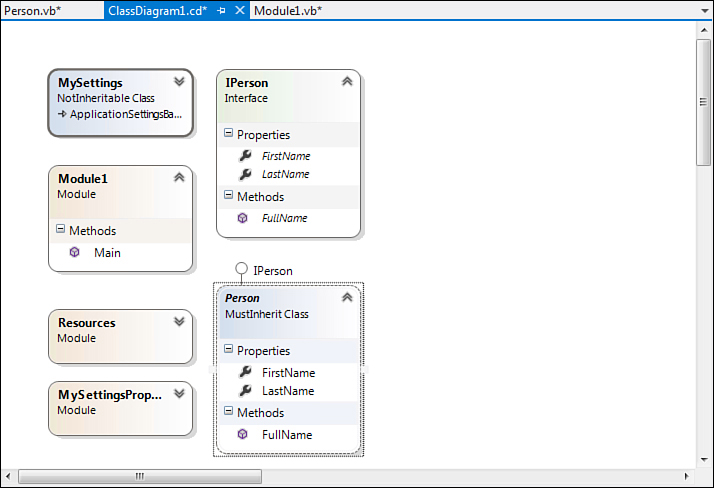
Figure 17.5. A new abstract class that implements an interface.
Listing 17.2 shows the full code for the Person class.
Listing 17.2. Code for an Abstract Class
Public MustInherit Class Person
Implements IPerson
Public Property FirstName As String Implements IPerson.FirstName
Public MustOverride Function FullName() As String Implements IPerson.FullName
Public Property LastName As String Implements IPerson.LastName
End Class
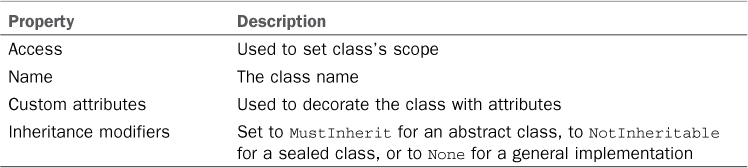
The FullName method is declared as MustOverride. The Properties window offers deep control to classes. Table 17.2 summarizes the most important properties except those related to filenames and locations.
Table 17.2. Class Control Properties
The Properties window also offers the Remarks and Summary fields that enable you to specify descriptions under the form of XML comments. This feature is available for all members, not just classes. Also, the Properties window shows the Generic, Implements, and Inherits fields, which are disabled by design.
Implementing Derived Classes
The Class Designer is powerful enough to provide support for class inheritance. Suppose you want to create two classes deriving from Person—for example, Contact and Customer. To create a Contact class that inherits from Person, follow these steps:
1. Right-click the designer surface and select the Add, Class command. When the New Class dialog box appears, specify the class name and leave the other properties unchanged.
2. When the new class is added to the designer’s surface, select Inheritance from the Toolbox and connect a line between the Person class and the new class. This establishes an inheritance relationship between the two classes. You notice that the designer does not show inherited properties while it is limited to show overridden methods (FullName in our example).
3. Add two new properties, Age of type Integer and Email of type String, using skills gained in the previous subsection. The result of this implementation is shown in Figure 17.6.
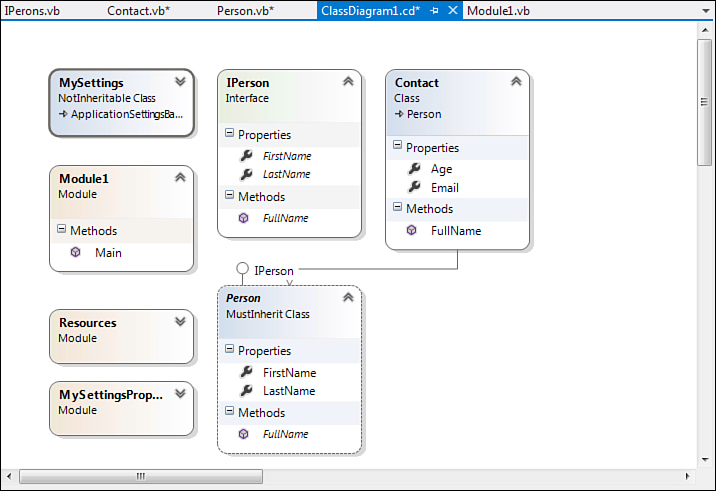
Figure 17.6. The implementation of a derived class.
Now create a new Customer class that still inherits from Person following the previous listed steps, adding two new properties: CompanyName of type String and CustomerID of type Integer. The result of this new implementation is shown in Figure 17.7.
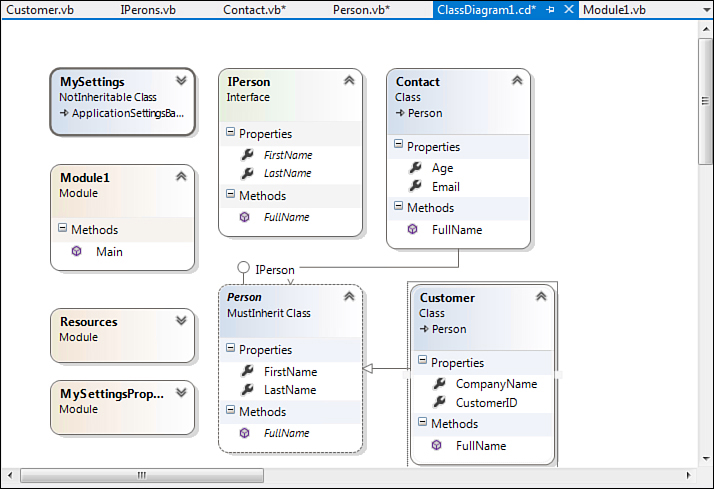
Figure 17.7. The implementation of a second derived class.
To understand how Visual Studio interpreted your operations, click both the Customer and Contact classes. For your convenience, the code of both classes is shown in Listing 17.3.
Listing 17.3. Code for Derived Classes Generated by the IDE
Public Class Contact
Inherits Person
Public Property Age As Integer
Public Property Email As String
Public Overrides Function FullName() As String
End Function
End Class
Public Class Customer
Inherits Person
Public Property CustomerID As Integer
Public Property CompanyName As String
Public Overrides Function FullName() As String
End Function
End Class
It’s worth noticing how the IDE correctly wrote inheritance code and marked as Overrides the FullName method in both classes. The generated code can be considered as a mere template; therefore, you have to populate it your own way. To complete your work, you need to write the methods body for FullName in both classes. The following is an example related to the Contact class:
Public Overrides Function FullName() As String
Return String.Format("{0} {1}, of age: {2}",
Me.LastName,
Me.FirstName,
Me.Age.ToString)
End Function
On the other hand, the following is the implementation for the Customer class:
Public Overrides Function FullName() As String
Return String.Format("Customer {0} is {1}",
Me.CustomerID,
Me.CompanyName)
End Function
In this section you have seen an alternative way for designing classes in Visual Basic 2012. That is important, particularly to get a hierarchical representation. Most of all, such work has been completed with a few mouse clicks.
Creating Multiple Diagrams
You are not limited to creating one diagram. You can add multiple class diagrams to your project so that you can have a graphical representation of a complex hierarchical object’s structure. To add diagrams to your project, right-click the project name in Solution Explorer and select the Add New Item command. When the Add New Item dialog box appears, select the Class Diagram item in the Common Items list (see Figure 17.8).
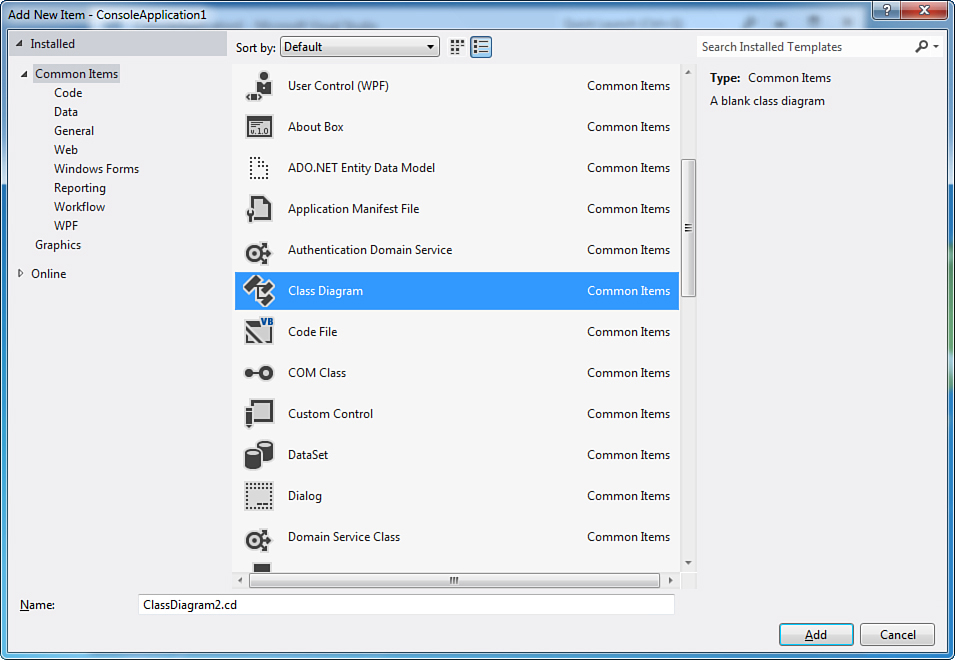
Figure 17.8. Adding a new class diagram to the project.
This can be useful if you have to graphically represent complex frameworks, and if you need large design surfaces.
Exporting the Diagram
As a respectable graphical tool, the Class Designer can export diagrams as images. The tool supports the following image formats:
• Windows Bitmap (24 bit)
• Portable Network Graphics (.png)
• JPEG
• Tag Image File Format (.tiff)
• Graphics Interchange Format (.gif)
To export diagrams to images, right-click the designer’s surface and select the Export Diagram as Image command. Figure 17.9 shows the Export Diagram as Image dialog box.

Figure 17.9. Exporting diagrams to images.
You can select multiple diagrams if available. You need to select the location, which by default points to the project’s folder. The combo box at the bottom of the dialog box enables you to choose the image format.
Class View Window
Since the previous versions of Visual Studio, the IDE offers another graphical tool for managing objects, known as the Class View window. To enable this tool, you can press Ctrl+Shift+C if it’s not already available as a floating window. It’s a browsing tool that shows a graphical representation of the objects’ hierarchy in your solution and enables you to search for specific members or get information about types being part of your project, including base types. Figure 17.10 shows this tool window in action, pointing to the same project used in the previous section.
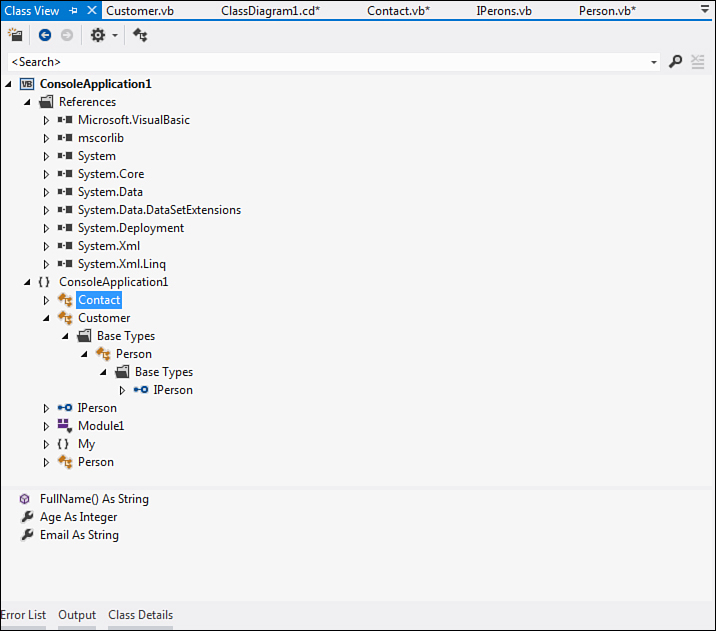
Figure 17.10. The Class View tool window.
As you can see in Figure 17.10, the Class View enables you to browse custom objects in your projects (including base types such as interfaces) and built-in objects invoked by your project. Moreover, you can browse references to assemblies and expand them so that you can still get information on members for your custom objects. The Class View window also provides a Settings command that enables you to specify which kind of objects will be shown. (For example, you can decide if the view must include base types.)
Generate from Usage
One great feature in the code editor that Visual Studio 2012 inherits from its predecessor is the ability to generate on-the-fly objects that do not exist yet. This feature is known as Generate from Usage. To understand how it works, create a new Console application named GenerateFromUsage and, within the Main method, type the following code:
Sub Main()
Dim p As New Person
End Sub
Because the Person class has not been implemented, the Visual Basic compiler throws an exception, offering the usual pop-up button that suggests solutions, as shown in Figure 17.11.

Figure 17.11. Suggestions on how to create the Person class.
As you can see in Figure 17.11, the IDE provides the ability of generating a new Person class directly when writing code offering a Generate ‘Class Person’ command. There is also another choice named Generate, which is discussed later in this chapter. Now focus on the first choice and click the Generate ‘Class Person’ command. Visual Studio then creates a new code file named Person.vb that you can find in Solution Explorer as part of the project. This code file contains a basic definition for the Person class that is declared as follows:
Class Person
End Class
Default Accessibility
When generating objects on-the-fly, Visual Studio assigns the default visibility to both objects and members. If you want to provide a different scope, you need to do it by writing qualifiers manually or by selecting the Generate Other command.
Now go back to the Main method; you notice that the error message disappeared. Type the following assignment:
p.LastName = "Del Sole"
Because the LastName property is not exposed by the Person class, the Visual Basic compiler throws a new error still offering solutions, as shown in Figure 17.12.
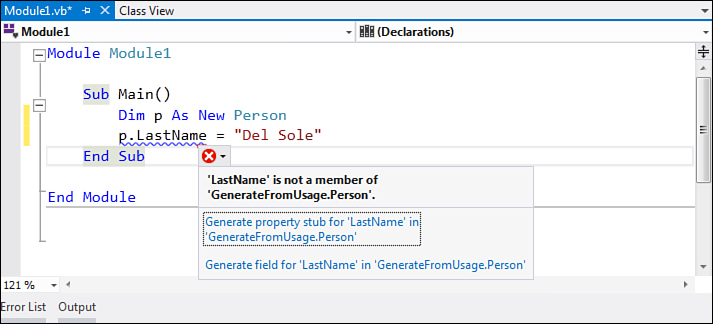
Figure 17.12. Generating members on-the-fly.
The IDE correctly recognizes the assignment and proposes adding a new property or a new field in the Person class. Click the Generate property stub to add a new property that is implemented in the Person class as follows:
Class Person
Property LastName As String
The IDE also correctly specifies the data type to the property (String in the preceding example) based on the assignment content. Repeat this last step to add a second property named FirstName of type String using your first name for convenience. My code looks like the following:
p.LastName = "Del Sole"
p.FirstName = "Alessandro"
Now we should provide a method that returns the full name for the person. Generating a method stub is also an easy task. Write the following:
Dim fullName As String = p.FullName
Now the IDE offers three solutions, as shown in Figure 17.13.
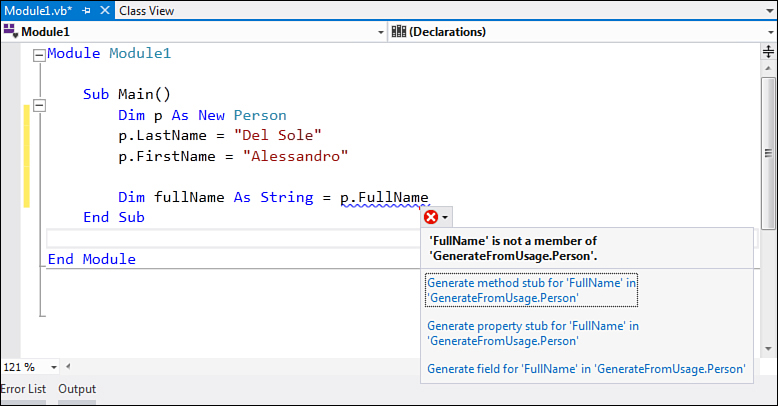
Figure 17.13. Generating a new method stub.
You can choose to generate a method, property, or field. The IDE can distinguish which kind of solutions it can propose in that particular coding scenario. Click the Generate method stub command, and Visual Studio implements the FullName method as follows:
Function FullName() As String
Throw New NotImplementedException
End Function
The new method throws a NotImplementedException; therefore, you need to replace it with your code. All examples shown so far in this book provide the following implementation:
Function FullName() As String
Return String.Concat(LastName, " ", FirstName)
End Function
Now you have generated your definitely working Person class without exiting from the code editor. This is the most basic approach to the new feature, but this tooling is powerful and enables you to define different kinds of objects according to the context in which you are writing code. This is what the next sections discuss.
Generating Shared Members
Visual Studio is intelligent enough to understand whenever you try to define a shared member. For example, imagine you want to implement a method that returns the number of active instances of the Person class. If you type the following code:
Person.ReturnInstanceCount()
and then select the Generate method stub correction option, Visual Studio generates the following code:
Shared Sub ReturnInstanceCount()
Throw New NotImplementedException
End Sub
On-the-Fly Code and Object Initializers
You might often use object initializers to create objects instances in line; generating code on-the-fly is powerful. Consider the following declaration:
Dim p As New Person With {.FirstName = "Alessandro",
.LastName = "Del Sole"}
When you write this code, the Person class and its FirstName and LastName properties do not exist. At this point, you can open the correction options and select the Generate Class command. Visual Studio automatically associates the previous assignments with the class that is initialized in line and generates the appropriate members. Code generation for the previous code snippet produces the following result:
Class Person
Property LastName As String
Property FirstName As String
End Class
With a single mouse click, you have accomplished a task that would normally require a couple more steps, as described in the previous section.
Generating Complex Objects
You can now generate new objects on-the-fly by using default solutions proposed by Visual Studio. You are not limited to generating previously described classes and members. Visual Studio enables you to generate the following types:
• Classes
• Structures
• Interfaces
• Delegates
• Enumerations
The following is instead the list of members you can generate for the preceding types:
• Methods
• Properties
• Fields
You can generate objects on-the-fly by running the New Type dialog box that you can activate by choosing Generate Other solution instead of Generate Class. For example, imagine you want to generate a new structure on-the-fly. First, type the following line of code:
Dim threeDim As New ThreePoint
Because the ThreePoint type does not exist, Visual Studio 2012 throws an error proposing fixes. At this point, click the Generate New Type solution, as shown in Figure 17.14.
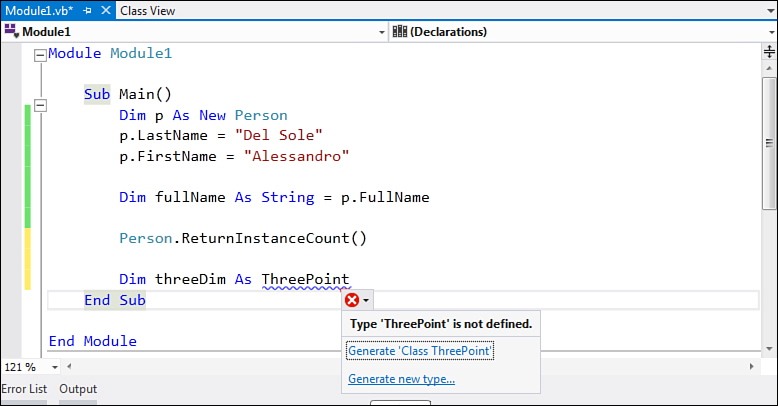
Figure 17.14. Selecting the Generate New Type command for constructing different types.
The Generate New Type window displays, which enables you to get deeper control over the type generation, as shown in Figure 17.15.
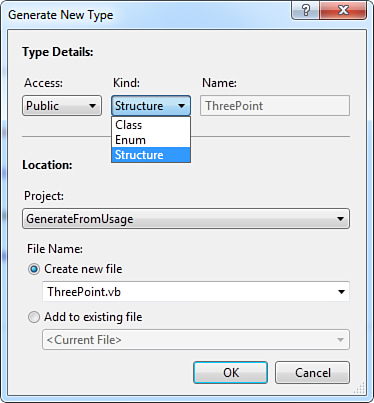
Figure 17.15. The Generate New Type dialog box.
Several options are available for generating a new type. First, the Access combo box enables you to specify the accessibility level that can be Public, Friend, or the default level for the selected type. The Kind combo box enables you to specify which type you intend to generate. Figure 17.15 also shows a list of available types. For our example, leave the default settings unchanged. In the lower part of the dialog box, you can establish where the type must be declared and in which file. You can select which project (if the solution contains more than one project) defines the new type and which code file declares the new type.
Here it’s worth mentioning that you can decide to create a new file (default choice) or to add the code to an existing one using the Add to Existing File control box. When you click OK, the new type is created. Visual Studio generates the following structure declaration:
Public Structure ThreePoint
End Structure
Now you can repeat the steps you performed when you added members to the Person class in the first section of this chapter. For example, first write the following code:
ThreePoint.X = 10
ThreePoint.Y = 20
ThreePoint.Z = 30
None of the X, Y, and Z properties has been implemented yet within the ThreePoint structure; therefore, you can add them via the correction options. (Refer to Figure 17.12 for a recap.)
Interfaces Additions
The Visual Studio 2012 IDE offers default solutions according to naming conventions it finds in your code. This is particularly true if you want to generate interfaces instead of other types. For example, if you type
Dim interfaceVariable as ITestInterface
The IDE notices that ITestInterface’s identifier begins with the letter I and is followed by another capital letter; therefore, it assumes you want to generate an interface (if the second letter is not capital, it would offer to generate a class). Because of this, the default solution in the correction options will not be Generate Class, but Generate Interface. The stub for the new interface is the following:
Interface ITestInterface
End Interface
If you want to change the accessibility level for the new interface, you need to generate it invoking the Generate New Type window or writing the appropriate qualifier manually.
Creating Portable Classes
During the previous years a number of platforms built upon subsets of the .NET Framework have been produced, such as (but not limited to) Silverlight, Windows Phone, and the Windows Runtime for Windows 8. Because of this, one of the biggest concerns for developers is creating class libraries that can share the same code across multiple platforms. So far, developers have had to remember which assemblies and what kind of types were supported in each of those platforms and then manually create and arrange class library projects to make them reusable. Fortunately, Visual Studio 2012 helps Visual Basic developers solve this problem by introducing a new project template called Portable Class Library. This project template enables you to create portable libraries that only reference assemblies that are common to the following platforms:
• .NET Framework 4.5
• Silverlight 4 and 5
• Windows Phone 7 and 7.1 SDK
• .NET for Windows 8 Store Apps
• Xbox 360
You will not be able to take advantage of all the types and members offered by a specific platform, but you will be sure that what you have available in a portable class library will run on all the aforementioned platforms with no effort. You create a portable class library by selecting File, New, Project and then selecting the Portable Class Library project template in the Add New Project dialog box, as demonstrated in Figure 17.16.
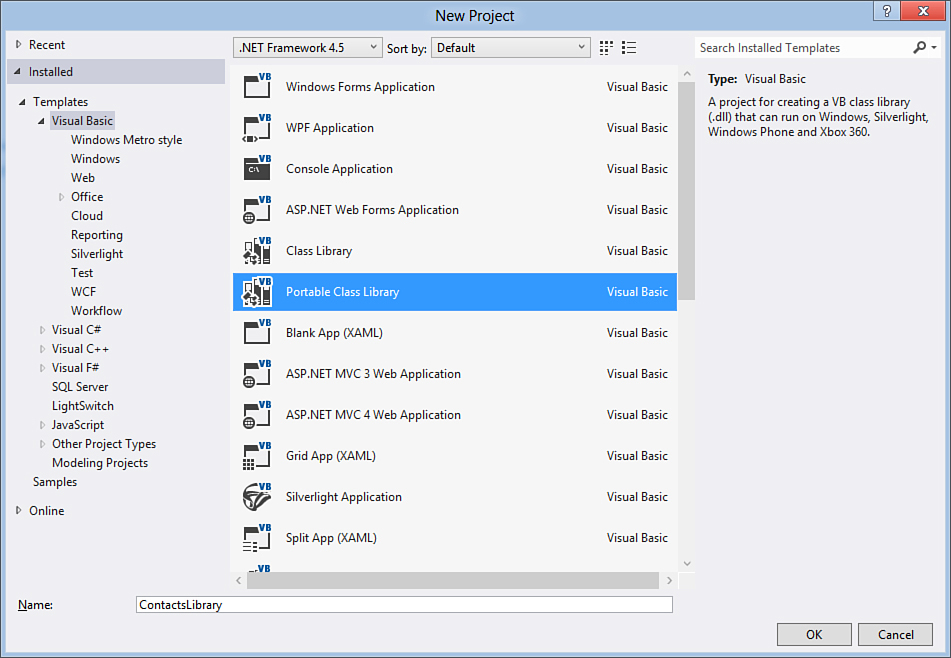
Figure 17.16. Creating a new portable class library.
After specifying a name for the project and clicking OK, Visual Studio will ask you to select the target platforms. By default, the project will target .NET 4.5, Silverlight 4 and 5, Windows Phone 7 and 7.1 SDK, and .NET for Windows 8 Store Apps as represented in Figure 17.17.
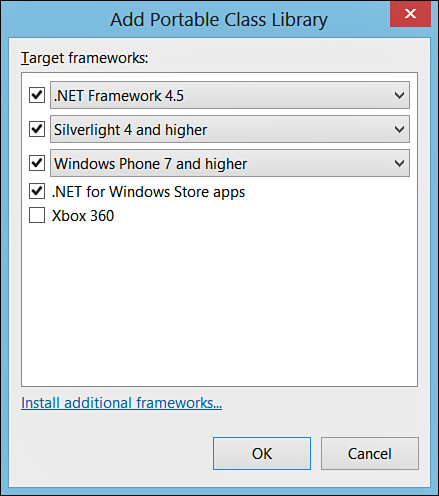
Figure 17.17. Specifying platforms that the portable library will target.
At a higher level, a portable class library project includes references to the following assemblies:
• MsCorLib.dll
• System.dll
• System.Core.dll
• System.ComponentModel.Composition.dll
• System.ComponentModel.Annotations.dll
• System.Net.dll
• System.Runtime.Serialization.dll
• System.ServiceModel.dll
• System.Xml.dll
• System.Xml.Linq.dll
• System.Xml.Serialization.dll
• System.Windows.dll
You can easily see which assemblies and namespaces are part of a portable library by expanding the References node in Solution Explorer and then double-clicking the .NET Portable Subset item, which will be opened in the Object Browser (see Figure 17.18).
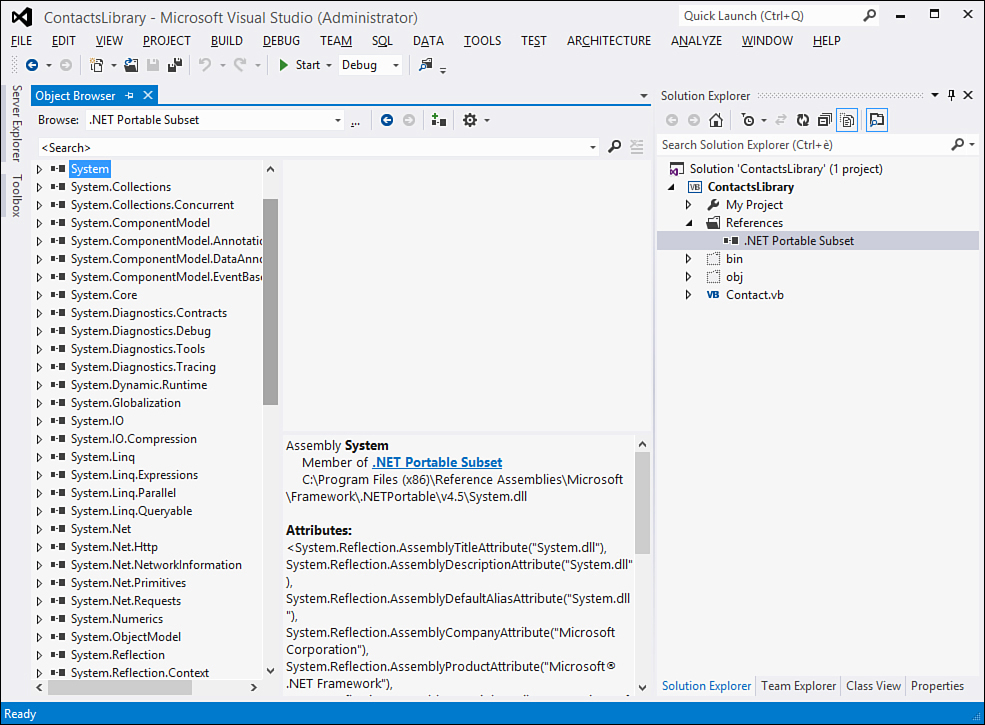
Figure 17.18. Investigating the portable assemblies’ subset.
Not all the assemblies are supported on all the platforms—for example, the System.ComponentModel.Composition.dll, which exposes the Managed Extensibility Framework (MEF), is not supported on Windows Phone and Xbox 360. For a full comparison between platforms and supported assemblies, visit: http://msdn.microsoft.com/en-us/library/gg597391(v=vs.110).aspx. Visual Studio 2012 adds references only to assemblies that are supported by all the selected platforms. If you try to add a reference to an assembly that is not supported by all the selected platforms, then you will get a warning.
Creating a Sample Portable Library
What We Assume About You in this Section
The sample demonstrated in this section assumes you already have experience with either WPF or Silverlight (or both), and the reason is that here we explain concepts such as the MVVM pattern that requires existing knowledge of how the data-binding works in XAML code, of what a command is in those technologies, and knowledge of other concepts specific to WPF and Silverlight that it is not possible to summarize in a short chapter.
Even if having an opportunity of sharing the same code across multiple platforms is obviously a great benefit at a more general level, the Portable Class Library template has a couple of specific purposes: making interaction with Windows Communication Foundation (WCF) services easier and providing portable implementations of the Model-View-ViewModel (MVVM) pattern. This pattern has been very popular among WPF and Silverlight developers in the past years because it enables them to achieve a high level of separation between data business objects (the model), the business logic (view models), and the user interface (the view) built upon XAML. So, even though you can create portable libraries for different purposes, the most common is making MVVM-based objects as reusable as possible. The MVVM pattern is not typically intended for beginners, so this section shows an example that is intended for an intermediate audience with existing experience on the WPF or Silverlight platform. That said, create a new project based on the Portable Class Library template and name it ContactLibrary. The goal of the library is exposing a simplified contact management framework. When creating the project, ensure you are targeting the default platforms.
The Model
When the project is ready in Visual Studio 2012, add a new class called Contact; see the code in Listing 17.4.
Listing 17.4. Defining the Model—A Contact Class
Public Class Contact
Public Property ContactID() As Integer
Public Property FirstName() As String
Public Property LastName As String
Public Property EmailAddress As String
Public Property PhysicalAddress As String
Public Property Phone() As String
End Class
The class is a simplified business object to represent a contact. Next, add a class called Contacts, which is a collection of Contact objects. The code shown in Listing 17.5 demonstrates its implementation.
Listing 17.5. Defining the Model—A Collection of Contacts
Public Class Contacts
Private _contacts As ObservableCollection(Of Contact)
Public Sub New()
Me._contacts = New ObservableCollection(Of Contact)
'Create some sample data
Me._contacts.Add(New Contact With {.ContactID = 1, .FirstName = "Alessandro",
.LastName = "Del Sole",
.EmailAddress = _
"[email protected]",
.Phone = "111-111-111",
.PhysicalAddress = "Cremona"})
Me._contacts.Add(New Contact With {.ContactID = 2, .FirstName = "Renato",
.LastName = "Marzaro",
.EmailAddress = _
"[email protected]",
.Phone = "222-111-111",
.PhysicalAddress = "Varese"})
Me._contacts.Add(New Contact With {.ContactID = 3, .FirstName = "Diego",
.LastName = "Cattaruzza",
.EmailAddress = _
"[email protected]",
.Phone = "222-222-111",
.PhysicalAddress = "Trieste"})
Me._contacts.Add(New Contact With {.ContactID = 4, .FirstName = "Antonio",
.LastName = "Catucci",
.EmailAddress = _
"[email protected]",
.Phone = "222-111-222",
.PhysicalAddress = "Milan"})
End Sub
Public Function GetContacts() As ObservableCollection(Of Contact)
Return Me._contacts
End Function
Public Sub DeleteContact(currentContact As Contact)
Me._contacts.Remove(currentContact)
End Sub
End Class
The code in Listing 17.5 creates some sample contacts in the constructor and populates a collection of type ObservableCollection(Of Contact). Assuming you already have experience with WPF or Silverlight, you might know that this is the most appropriate collection for binding data to the user interface because it supports change notification. Both the Contact and Contacts class represent our data, so they are the Model in the MVVM implementation. In a typical MVVM implementation, you need to implement a class called RelayCommand (by convention), which implements the ICommand interface. Such an interface is typical in WPF and Silverlight and enables you to implement commands—that is, actions that can be executed in the desired circumstance. Implementing ICommand requires exposing a method called Execute (which represents the action to take when the command is invoked) and another method called CanExecute (which returns Boolean and establishes whether the command can be executed). With the RelayCommand class, the code relays the command logic by implementing a generic handler that will launch the action required by every command in the library. The code in Listing 17.6 demonstrates how to implement the RelayCommand class.
Listing 17.6. Relaying the Command Logic
Imports System.Windows.Input
Public Class RelayCommand
Implements ICommand
Private _isEnabled As Boolean
Private ReadOnly _handler As Action
Public Sub New(ByVal handler As Action)
_handler = handler
End Sub
Public Event CanExecuteChanged As EventHandler Implements ICommand.CanExecuteChanged
Public Property IsEnabled() As Boolean
Get
Return _isEnabled
End Get
Set(ByVal value As Boolean)
If (value <> _isEnabled) Then
_isEnabled = value
RaiseEvent CanExecuteChanged(Me, EventArgs.Empty)
End If
End Set
End Property
Public Function CanExecute(parameter As Object) As Boolean Implements ICommand.CanExecute
Return IsEnabled
End Function
Public Sub Execute(parameter As Object) Implements ICommand.Execute
_handler()
End Sub
End Class
Notice how the CanExecute method returns a Boolean value that is set by the caller code. Finally, notice how Execute invokes a generic handler under the form of an instance of the Action class—that is the actual command.
View Models
You now need an intermediate layer that contains the business logic and that exposes data and commands to the user interface. The goal is in fact separating the business logic from the user interface so that the latter will not interact directly with the data. The reason for this separation is making data and business logic abstracted from the UI and, therefore, reusable. By convention, you create a ViewModelBase class that is the base class for all other view models. The code in Listing 17.7 demonstrates how to create the ViewModelBase class and how to create a derived view model specific for the Contacts collection, which exposes data and commands (see comments in the code for explanations).
Listing 17.7. Defining View Models
Imports System.ComponentModel
Imports System.Collections.ObjectModel
'Generic View Model
Public MustInherit Class ViewModelBase
Implements INotifyPropertyChanged
Public Event PropertyChanged As PropertyChangedEventHandler Implements
INotifyPropertyChanged.PropertyChanged
'Raise a property change notification
Protected Overridable Sub OnPropertyChanged(propname As String)
RaiseEvent PropertyChanged(Me, New PropertyChangedEventArgs(propname))
End Sub
End Class
Public Class ContactViewModel
Inherits ViewModelBase
Private _contacts As ObservableCollection(Of Contact)
Private _currentContact As Contact
Private _contactList As Contacts
Private _deleteContactCommand As RelayCommand
Public Sub New()
Me._contactList = New Contacts
Me._contacts = Me._contactList.GetContacts
SetupCommands()
End Sub
'Set up commands by creating instances of RelayCommand
'and passing the appropriate delegate
Private Sub SetupCommands()
DeleteContactCommand = New RelayCommand(AddressOf DeleteContact)
End Sub
'Expose the command
Public Property DeleteContactCommand() As RelayCommand
Get
Return _deleteContactCommand
End Get
Private Set(value As RelayCommand)
_deleteContactCommand = value
End Set
End Property
'Expose the list of contact
Public Property Contacts() As ObservableCollection(Of Contact)
Get
Return Me._contacts
End Get
Set(value As ObservableCollection(Of Contact))
Me._contacts = value
End Set
End Property
'Represents the currently selected contact
'Raise a property change notification
'Enable the command
Public Property CurrentContact() As Contact
Get
Return _currentContact
End Get
Set(value As Contact)
_currentContact = value
OnPropertyChanged("CurrentContact")
DeleteContactCommand.IsEnabled = True
End Set
End Property
'Delete the specified contact
Public Sub DeleteContact()
Me._contactList.DeleteContact(CurrentContact)
End Sub
End Class
It is important to remember that a good view model exposes collections of data only via ObservableCollection(Of T) objects.
The View
The View represents the user interface in a client application and is typically based on XAML code, which means WPF, Silverlight, or Metro-style Windows applications. The goal of the example is to demonstrate how two different clients can share not only the same implementation of the model and view model, but also the same XAML code. For a better understanding, add a WPF project and a Silverlight (version 5) project to the current solution, both for Visual Basic. In both projects, add a reference to the ContactsLibrary project (for the Silverlight project the reference must be added to the client project, not the web one). Both applications will show a data grid and a button that will enable you to delete the selected contact in the data grid. In the WPF project, the XAML code for the main window is represented in Listing 17.8.
Listing 17.8. Defining a View in WPF
<Window x:Class="MainWindow"
xmlns="http://schemas.microsoft.com/winfx/2006/xaml/presentation"
xmlns:x="http://schemas.microsoft.com/winfx/2006/xaml"
Title="MainWindow" Height="350" Width="525">
<Grid>
<Grid.RowDefinitions>
<RowDefinition/>
<RowDefinition Height="40"/>
</Grid.RowDefinitions>
<DataGrid Name="ContactsDataGrid" ItemsSource="{Binding Contacts}"
AutoGenerateColumns="True" SelectedItem="{Binding CurrentContact}"/>
<Button Name="DeleteButton" Command="{Binding DeleteContactCommand}"
Width="100" Height="30" Grid.Row="1"
Content="Delete"/>
</Grid>
</Window>
The DataGrid control is data-bound to the Contacts collection of the view model, and the SelectedItem property is bound to the CurrentContact property of the same view model. The Button control does not work with a Click event; instead it is bound to the DeleteContactCommand command. This makes it so the user interface does not have to work directly against the data. Listing 17.9 shows the user interface in the Silverlight client.
Listing 17.9. Defining a View in Silverlight
<UserControl
xmlns="http://schemas.microsoft.com/winfx/2006/xaml/presentation"
xmlns:x="http://schemas.microsoft.com/winfx/2006/xaml"
xmlns:d="http://schemas.microsoft.com/expression/blend/2008"
xmlns:mc="http://schemas.openxmlformats.org/markup-compatibility/2006"
xmlns:sdk="http://schemas.microsoft.com/winfx/2006/xaml/presentation/sdk"
x:Class="SilverlightApplication1.MainPage"
mc:Ignorable="d"
d:DesignHeight="300" d:DesignWidth="400">
<Grid x:Name="LayoutRoot" Background="White">
<Grid.RowDefinitions>
<RowDefinition/>
<RowDefinition Height="40"/>
</Grid.RowDefinitions>
<sdk:DataGrid Name="ContactsDataGrid" ItemsSource="{Binding Contacts}"
AutoGenerateColumns="True" SelectedItem="{Binding CurrentContact}"/>
<Button Name="DeleteButton" Command="{Binding DeleteContactCommand}"
Width="100" Height="30" Grid.Row="1"
Content="Delete"/>
</Grid>
</UserControl>
Notice that both listings are almost identical—there’s just a difference in the fact that the Silverlight client uses a UserControl object instead of Window and that the DataGrid control requires importing the sdk namespace.
The final step is creating an instance of the view model in the code-behind. The following code shows how to implement the constructor in both projects, exactly in the same way:
Public Sub New()
' This call is required by the designer.
InitializeComponent()
' Add any initialization after the InitializeComponent() call.
Me.DataContext = New ContactLibrary.ContactViewModel
End Sub
If you now run both the applications, you will see how they show a similar user interface and how they are able to perform exactly the same operations against the data collection, which has been possible due to the portable class library and the MVVM pattern. Figure 17.19 shows the WPF application in action, whereas Figure 17.20 shows the Silverlight one.
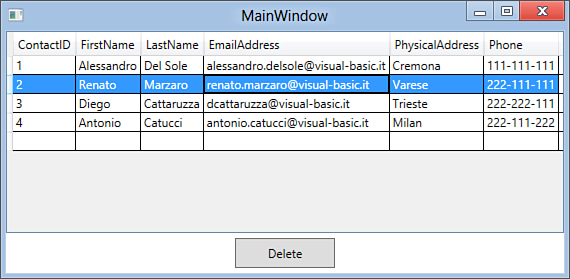
Figure 17.19. The WPF client in action.
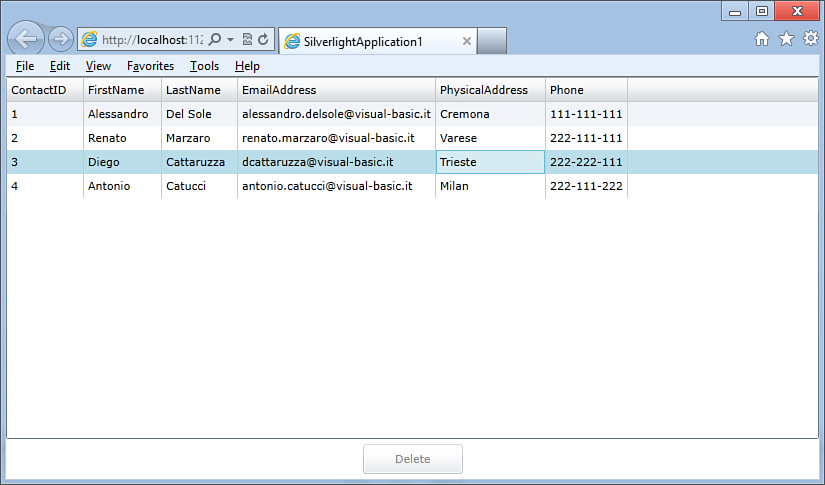
Figure 17.20. The Silverlight client in action.
You might now understand why it is so important to have an opportunity to share code across different platforms and how the Portable Class Library project template makes it easy in Visual Studio 2012.
Deploying portable libraries requires adding libraries themselves as dependencies in the setup procedure you create. Visual Studio 2012 enables you to deploy applications via InstallShield limited edition and ClickOnce, as you discover in Chapter 51, “Setup and Deployment Projects with InstallShield and for Visual Studio,” and Chapter 52, “Deploying Applications with ClickOnce.” You can find information on adding dependencies inside those chapters but also in the MSDN documentation, which also explains some hints for Silverlight clients, available at the following address: http://msdn.microsoft.com/en-us/library/gg597391(v=vs.110).aspx.
Summary
In this chapter you saw how to design objects for your application using the built-in Visual Studio tool known as Visual Studio Class Designer. This tool enables you to design objects via a specific designer that offers support for adding all kinds of .NET objects, such as classes, structures, interfaces, delegates, enumerations, and modules. Behind the scenes, this tool generates code related to design operations. You saw how easily you can implement interfaces, abstract classes, and derive classes by learning steps that you will be required to perform for other objects. Completing the topic, the chapter provided information on creating multiple diagrams and exporting diagrams to images.
An overview about one of the most important IDE features in Visual Studio 2012, known as Generate from Usage, was also presented. You learned how you can generate objects on-the-fly, first writing code and then generating objects that you invoke with just a couple of mouse clicks. You also saw how you can generate customized objects running the Generate New Type dialog box that provides deep control over types to be generated on-the-fly. Finally, you learned how Visual Studio 2012 offers the perfect environment in which to create objects that can be shared across multiple platforms via the Portable Class Library addition, with an advanced example based on the Model-View-ViewModel pattern that was useful to demonstrate how the same code can run on WPF and Silverlight.