
Chapter 35. Publishing ASP.NET Web Applications
To make your web application reachable by other users, you need to deploy it to a host web server, either on the Internet or on a local area network, such as your company’s network. ASP.NET 4.5 and Visual Studio 2012, as in the previous version, make the deployment experience for web applications even simpler, via a special tool named MSDeploy. They also introduce some simplifications for publishing profiles. In this chapter you learn how to publish an ASP.NET 4.5 application using a number of available techniques and get some information about what’s new in version 4.5.
Deployment Overview
Deploying a web application can be accomplished directly from within Visual Studio 2012, as it was for its predecessors. You can publish a web application to the following destinations:
• A web server with Internet Information Services 7 or higher installed
• A website with the FrontPage extensions installed
• An FTP site
• The local file system
• The local Internet Information Services
Visual Studio 2012 retakes some important changes brought by version 2010, which made the deployment experience different but certainly better as you discover in a few moments.
The 1-Click Deployment
Visual Studio 2012 retakes and follows the logic of deployment simplification with 1-Click deployment introduced by its predecessor. What does it mean?
It means that you supply the required information such as web address and credentials; then you just click once on a button and Visual Studio will do the rest of the work for you, independently from the destination type. The reason for this important new way to deploy web applications is the presence of a tool named MSDeploy, which is described later and that can deploy articulated web applications. For now, let’s begin to see how you can deploy web applications to FTP sites and IIS servers with the 1-Click deployment.
Classic Publishing
Visual Studio 2012 still provides the capability of publishing web applications the usual way, so it supports direct deployment to FTP sites, websites with FrontPage extensions enabled, the file system, and the local Internet Information Services, although some innovations are available in the graphical user interface of the deployment window. For example, you might want to deploy the NorthwindOrders web application, created in Chapter 34, “Building ASP.NET Web Applications,” to an FTP site. In Solution Explorer, right-click the project name and then click Publish. This launches the Publish Web dialog box; here you must specify a new profile or import an existing one. Assuming you do not have an existing profile, expand the combo box and select New. At this point, you will be prompted to enter a name for the new profile—for example, MyFirstProfile. The Connection tab is now enabled and you will have to specify settings for the new profile. Select FTP in the Publish Method combo box. Figure 35.1 shows the dialog box.
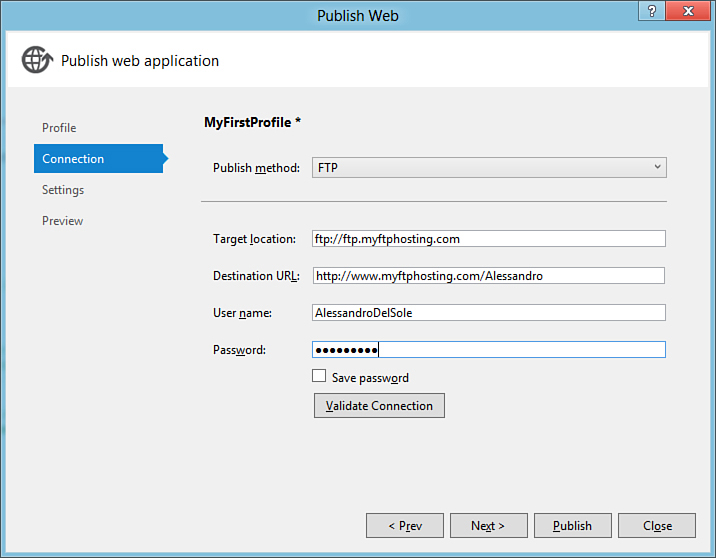
Figure 35.1. Publishing a web application to an FTP site.
Click Publish so that Visual Studio 2012 publishes your web application to the specified FTP, or click Validate Connection if you want to be sure that supplied credentials can establish a successful connection. If you click Settings on the left side of the dialog box before publishing, you will be able to specify which project configuration will be published (Debug, Release, or any other available configuration) and whether files of a previous version of the application will be erased on the target machine when publishing the new one.
Providers’ Firewall
Several Internet service providers or hosts enable firewalls to avoid unrecognized incoming connections. If you want to publish web applications to a website or FTP site, you need to ensure that the host’s firewall accepts connections from Visual Studio 2012.
Another example is publishing the application to IIS, which can be also particularly useful for testing purposes. You accomplish this by setting the File System option in the Publish Method combo box and then typing the IIS instance address, as demonstrated in Figure 35.2. Publishing to the local IIS requires Visual Studio 2012 to be launched with administrative privileges.

Figure 35.2. Publishing the web application to Internet Information Services.
You can click the Browse button (the one with three dots) to select an existing web folder or create a new one inside IIS.
MSDeploy Publish
One of the most interesting features in deploying web applications is the Microsoft Web Deployment Tool, also known as MSDeploy. It is a command-line tool included in the .NET Framework 4.5 and can build advanced deployment scripts. MSDeploy is an advanced tool in that it can
• Publish web applications and their settings
• Deploy SQL Server databases
• Direct advanced deployment to Internet Information Services web servers
• Publish GAC, COM, and Registry settings
MSDeploy is a complex tool, and writing the appropriate command lines can be annoying. Fortunately, Visual Studio 2012 enables you to publish web applications via MSDeploy through the Publish Web dialog box, as demonstrated later. Before getting into that, you need to know how web applications are packaged before deployment.
Understanding Packages
When you deploy a web application via MSDeploy, the application is first packaged into one archive that makes deployment easier. The package contains all the required information about the host web server and files and settings required by the application. You set package information in the Package/Publish Web tab of My Project, as shown in Figure 35.3.
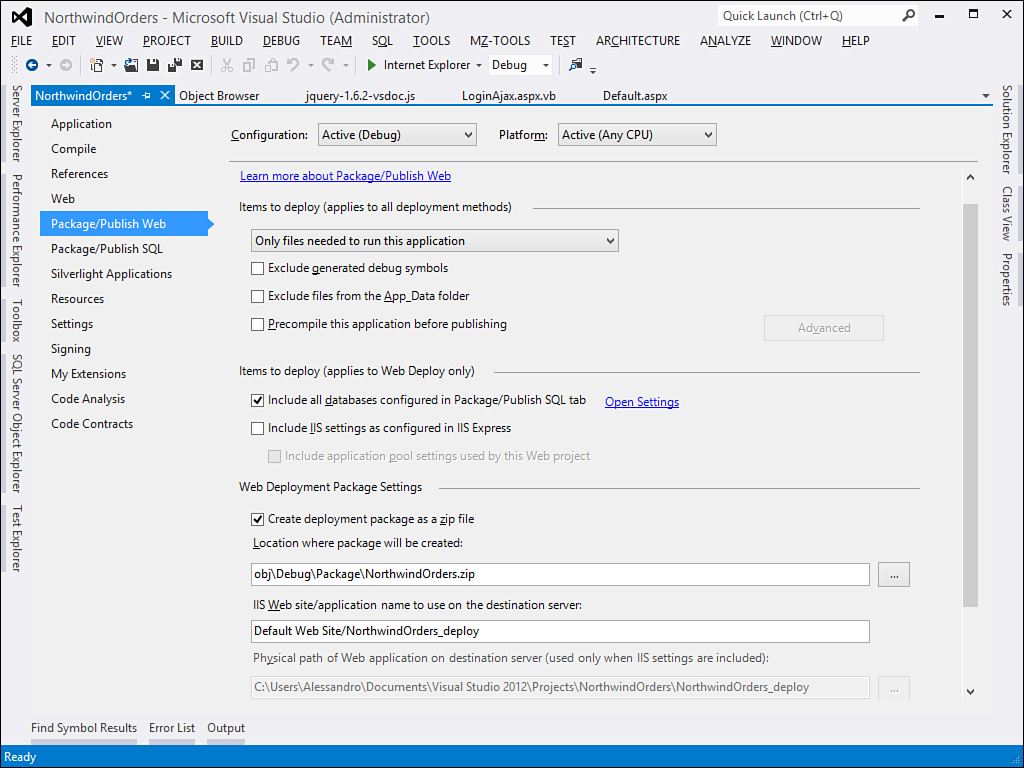
Figure 35.3. Setting options for packaging web applications for deployment.
Here you can find default settings for the local IIS, but you can place settings provided by the system administrator of the target machine. The package contains the following elements:
• The package containing the application and settings
• The destination manifest, which contains information on how to reach the target server
• The command-line script that will be passed to MSDeploy
When you have specified your package’s settings, you are ready to deploy it with MSDeploy.
Precompiling Applications
A new feature in ASP.NET 4.5 enables you to precompile a web application by selecting the Precompile the application before publishing box in the package properties (refer to Figure 35.3). With this option enabled, Visual Studio precompiles the application and merges all the site’s content when you publish it. You can control a number of options by clicking the Advanced button that becomes available after the option is selected, such as merging all the site’s content into one or multiple assemblies.
Web Deploy with MSDeploy
Visual Studio 2012 provides the opportunity to deploy web applications with MSDeploy through its instrumentation in two alternative ways:
• Direct publishing to a web server
• Generation of a package that can be manually installed later on the server
In this chapter we examine both options, starting by the direct publishing. To publish a web application directly to a web server, right-click the project name in Solution Explorer and then click Publish. When the Publish Web dialog box appears, select the Web Deploy option from the Publish Method combo box in the Connection tab. Figure 35.4 shows the dialog box.
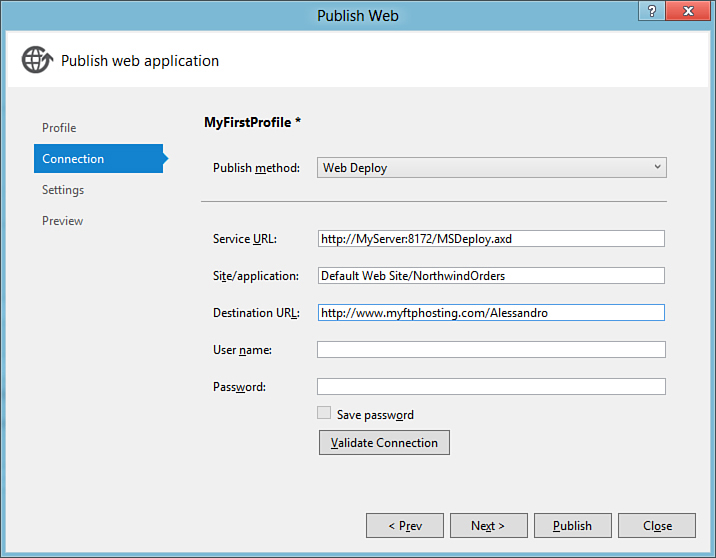
Figure 35.4. Setting options for the MSDeploy publish.
You need to provide some settings to deploy the web application with MSDeploy, and most of them are given to you by the Administrator of the target server. Table 35.1 summarizes the required settings.
Table 35.1. Required Settings for MSDeploy Publish
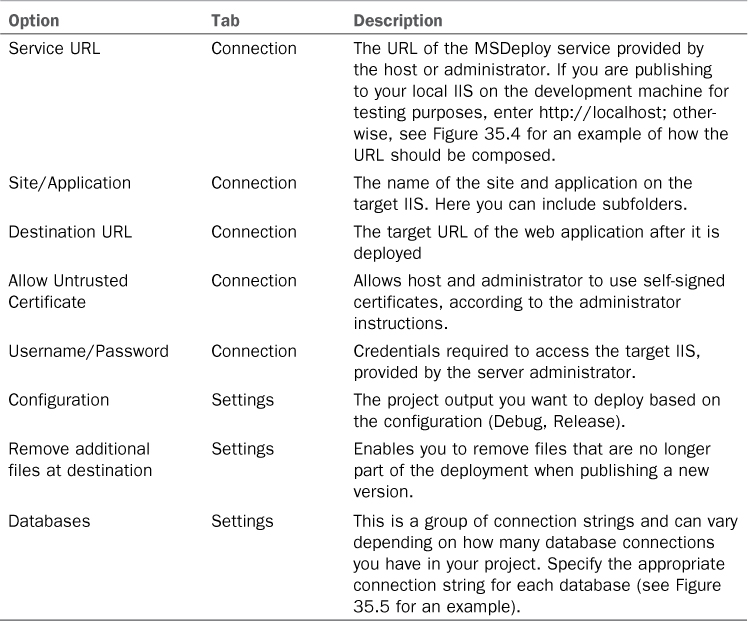
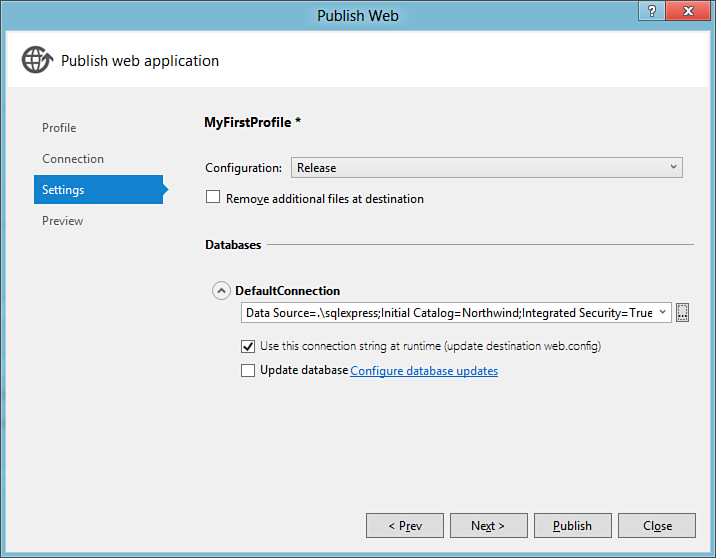
Figure 35.5. Specifying database connections.
If you choose to validate your credentials, Visual Studio will also check whether a valid certificate is available. Also, if you want to see how many files will be deployed to the web server, select the Preview tab in the Publish Web dialog box. This is especially useful when you are updating an existing application and want to see which files are going to be replaced with new versions. When you provide all required settings, click Publish to get your application deployed to the web server with MSDeploy—remembering that this tool provides the opportunity to deploy additional requirements such as SQL Server databases and GAC settings.
Packaging Web Applications for Manual Installation
MSDN References
The goal of this chapter is explaining how to publish web applications from a developer perspective, so here you learn how to generate packages. However, in this section we are assuming that the installation is made by another person such as the server administrator. For this reason (and because explaining the process in detail would be beyond the scope of this book), here you learn how to generate a package. You will be invited to read the appropriate MSDN documentation to understand how to perform a manual installation of the package on the server.
The steps described in the previous paragraph enable you to automate the generation of a package that is automatically deployed to a web server. This is convenient but presents a couple of problems:
• You must have administrative privileges on the server to which you are deploying the application.
• The server administrator might need to customize the installation process because of some company’s policies.
For this reason, Visual Studio allows you to generate a package as a .zip file that can be later installed manually on the server by another person. To accomplish this, you select the Web Deploy Package option in the Connection tab of the Publish Web dialog box and then specify some basic information that can be edited during the installation process. Figure 35.6 shows how you specify the target folder for the .zip package and the destination on the server.
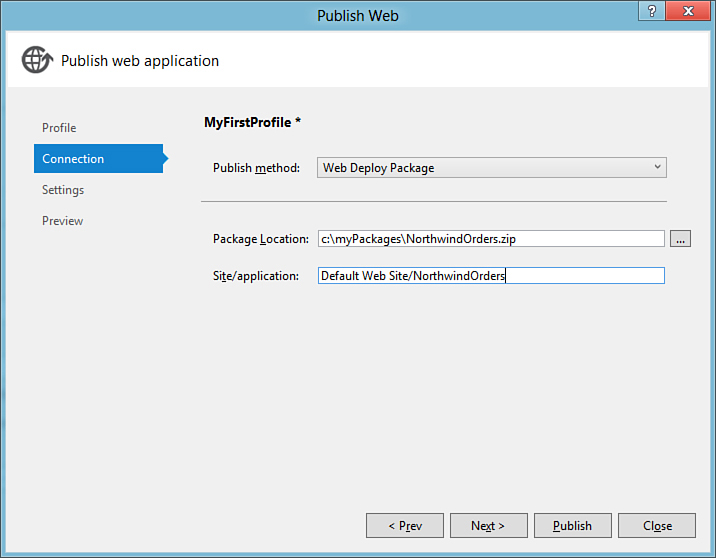
Figure 35.6. Specifying settings for manual package generation.
The Settings tab works like in the Web Deploy option. When you click Publish, Visual Studio generates several files into the folder that you specified, but the most important of them are the .zip package and a .deploy.cmd file (whose name starts with the application’s name). These enable you to install the package locally or remotely. So, now you have two options for installing the package onto the web server:
• Launch the .deploy.cmd file. The MSDN documentation has specific explanations about this at http://msdn.microsoft.com/en-us/ff356104(v=vs.110).aspx.
• Import the package through the Internet Information Services Manager, which must be enabled on the server. Further information can be found at www.iis.net/learn/publish/using-web-deploy/import-a-package-through-iis-manager.
With both options, administrators can control the package installation and make the appropriate decisions based on the company’s policies.
Summary
In this chapter, we discussed how to deploy ASP.NET web applications in both the classic fashion and a new one based on the Microsoft Web Deployment tool. Now you know how to use the 1-Click publish deployment system for quickly deploying your web applications directly from Visual Studio 2012. You also learned how the IDE provides options to generate packages that can be installed manually by administrators.