
Chapter 53. Advanced IDE Features
In This Chapter
• Customizing Visual Studio 2012
• Using, Creating, and Managing Reusable Code Snippets
• Managing Libraries with NuGet
The Visual Studio 2012 integrated development environment is a powerful application and is not a simple code editor. In previous chapters, especially in Chapter 2, “Getting Started with the Visual Studio 2012 IDE,” you learned about some important features and tools that make your development experience easier. In this chapter, you learn about other interesting features and instrumentations that are not necessarily related with code writing but provide advanced control over the environment and in most cases provide a way for reusing existing work. Last but not least, this chapter guides you through a new feature that allows importing libraries and dependencies with just one-click using the Library Package Manager.
Exporting Templates
Visual Studio 2012, as its predecessors since 2005, lets you export projects and items templates. This feature is useful because you can generate skeletons for applications or single items you can reuse in the future. This section covers both options, starting with project templates.
Exporting Project Templates
Imagine you often create WPF applications that need implementing menus. It would be interesting having a project template that automatically implements basic menus so you don’t need to rewrite a lot of code each time. First, create a new WPF project with Visual Basic and name it as WpfMenuProject. When ready, open the MainWindow.xaml file and type the following XAML code inside the Grid tags to implement basic menu functionalities:
<DockPanel LastChildFill="True" VerticalAlignment="Top">
<Menu DockPanel.Dock="Top">
<MenuItem Header="File" IsEnabled="True"
DockPanel.Dock="Top">
<MenuItem Header="_Open" Name="Open"/>
<Separator/>
<MenuItem IsEnabled="True" Name="Save">
<MenuItem.Header>_Save</MenuItem.Header>
</MenuItem>
<MenuItem IsEnabled="True" Name="Exit">
<MenuItem.Header>_Exit</MenuItem.Header>
</MenuItem>
<Separator />
</MenuItem>
<MenuItem Header="Edit"
DockPanel.Dock="Top">
</MenuItem>
</Menu>
</DockPanel>
Before going on, save the project. When saved, select the File, Export template command. The first choice is between the project and item template, as shown in Figure 53.1. Leave unchanged the selection on Project Template and then click Next.
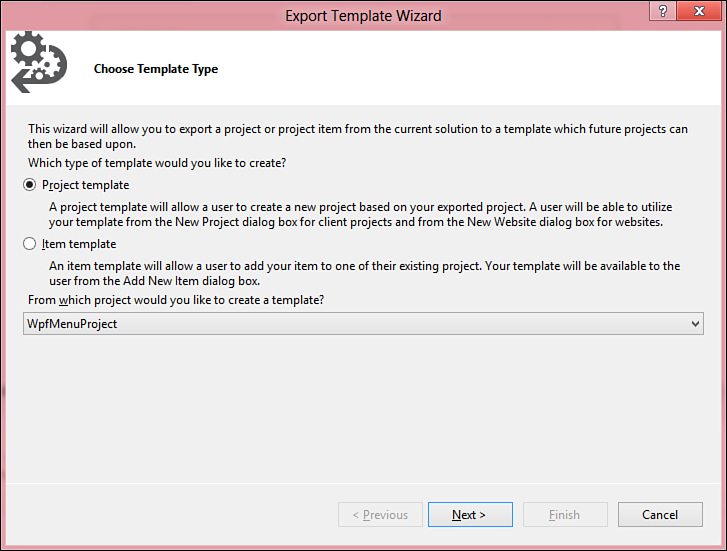
Figure 53.1. Exporting a project template.
Visual Studio now asks you to enter some information on the new template, such as the name, description, and optionally an icon image and a preview image. This information will be shown in the New project dialog box. Assign the WpfMenuProject name as the template name and provide a custom description. You can also add images, but this is not mandatory. (Visual Studio will provide a default image for you.) Figure 53.2 shows the dialog box.
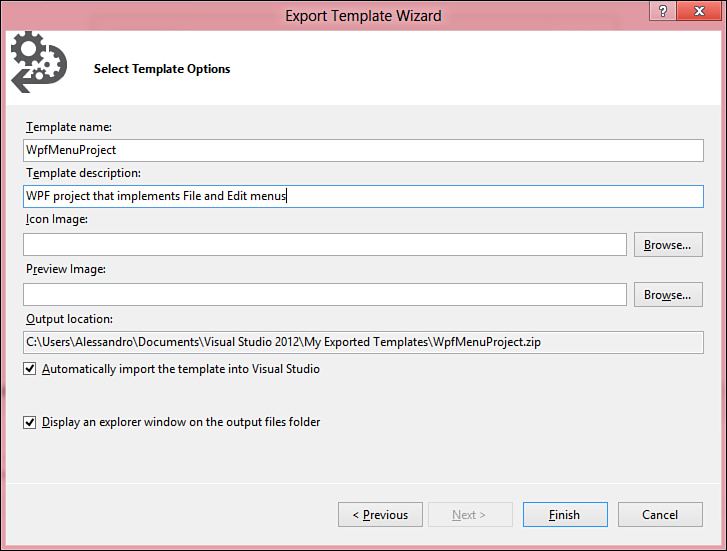
Figure 53.2. Setting information about the new template.
Projects templates are .zip packages containing the project skeleton and an information file named MyTemplate.vstemplate. By default, custom templates are exported to the %UserProfile%DocumentsVisual Studio 2012My Exported Templates folder, and by default they are automatically imported into the IDE (although you can decide to remove this option). When you click Finish, the new template is available in Visual Studio. You can check this out by selecting the File, New Project command. Figure 53.3 shows the new template available in the New Project dialog box.
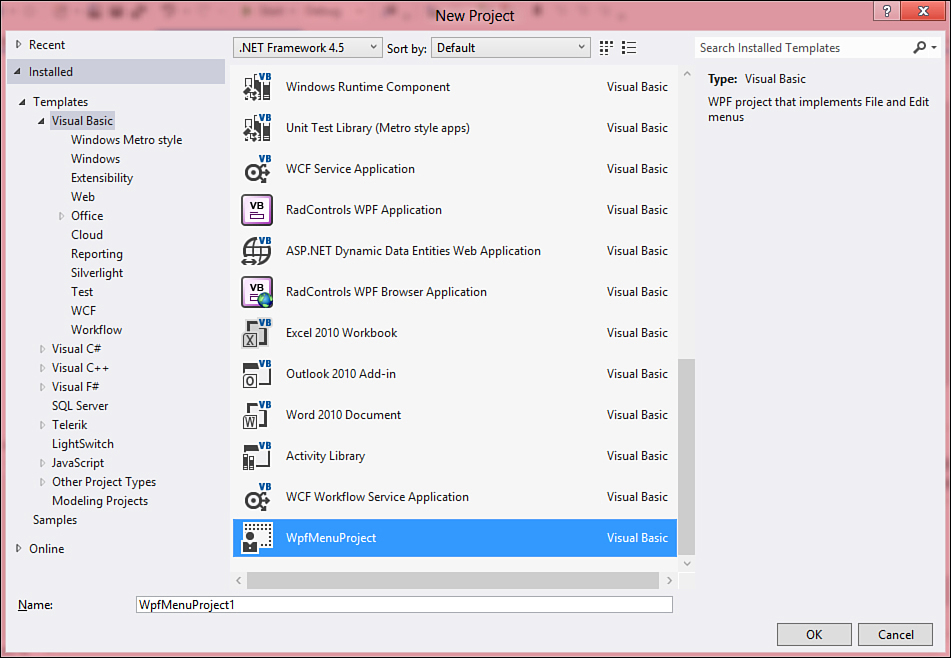
Figure 53.3. The New Project dialog box includes the new template.
Now you can create a new project based on the custom template without the need of rewriting code that is already exposed by the template.
Exporting Item Templates
You can export single items, such as classes or controls, to item templates you can later add to other projects. To see an example, add a new class to the current project and name it as DisposableClass.vb. The goal of the exercise is to provide a template for classes implementing the IDisposable interface. When ready, implement the IDisposable interface in the new class so Visual Studio will add required members. (You should write custom code for implementing the Disposable pattern, but this is not the goal of the exercise; see Chapter 8, “Managing an Object’s Lifetime,” for more information.) Now select again File, Export template. In the first dialog box of the wizard, select the Item template option (as shown in Figure 53.4) and then click Next.
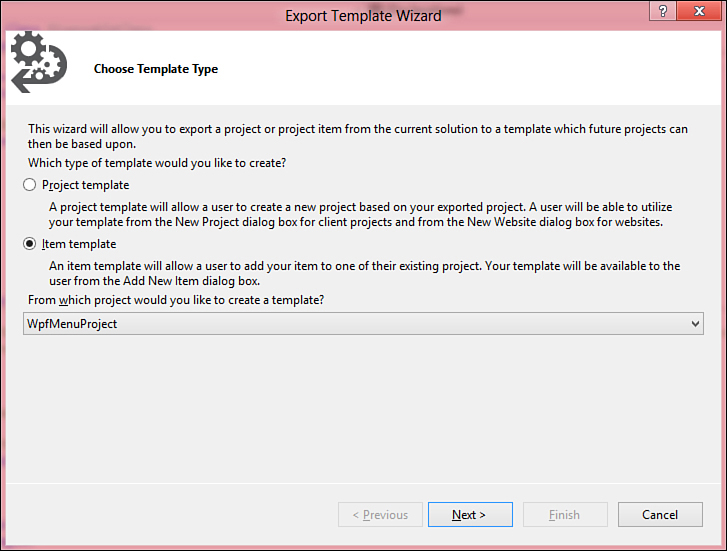
Figure 53.4. Setting the Item template option.
The next step is selecting the item you want to be exported as a reusable template. Notice that you can choose multiple items. Select the DisposableClass.vb item, as shown in Figure 53.5. Then click Next.
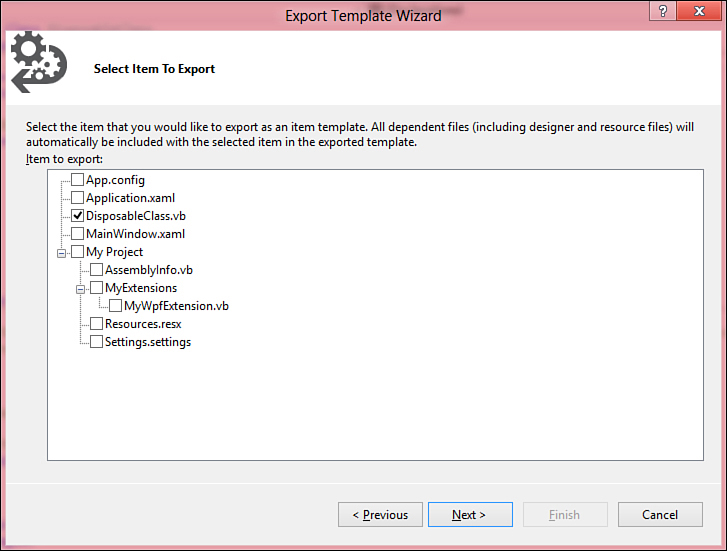
Figure 53.5. Adding an item to the new template.
The next step is selecting required references so that when you add an item based on the new template Visual Studio will reference the necessary assemblies for you. Figure 53.6 shows how the dialog box appears.
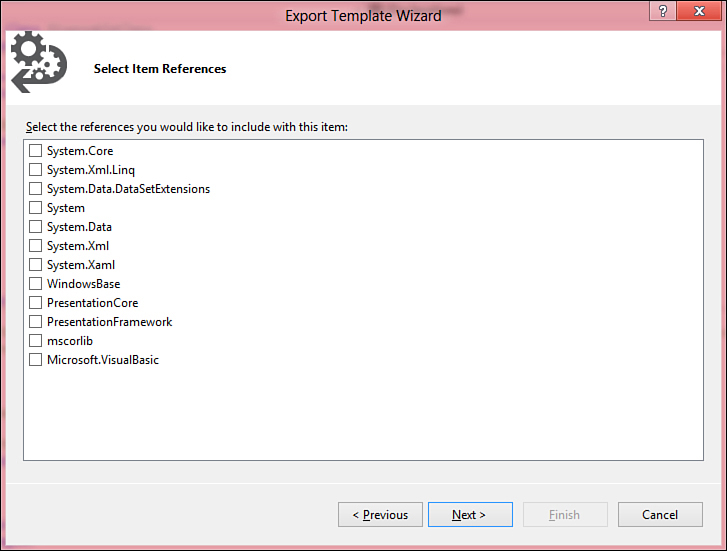
Figure 53.6. Specifying references for the new item template.
In this case, the template requires nothing but default assemblies, so no references are required. The final step is where you provide information to the custom item template. This information is the same as for project templates. Assign Template name with DisposableClass, provide a description (see Figure 53.7 for details), and provide icon and preview images if you want. Finally, click Finish.
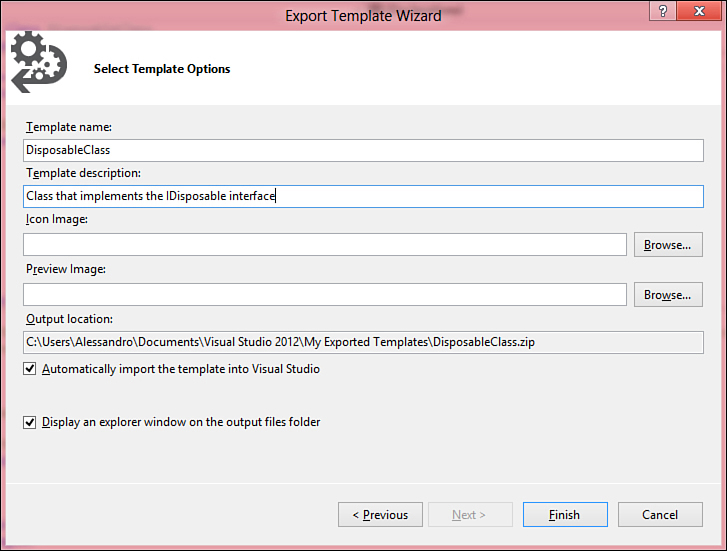
Figure 53.7. Providing custom information to the new item template.
When the export process is completed, the new template is available in Visual Studio. With a project opened, right-click the project name and select Add New Item. When the export process is completed, the new item template is available in Visual Studio 2012, as demonstrated in Figure 53.8.
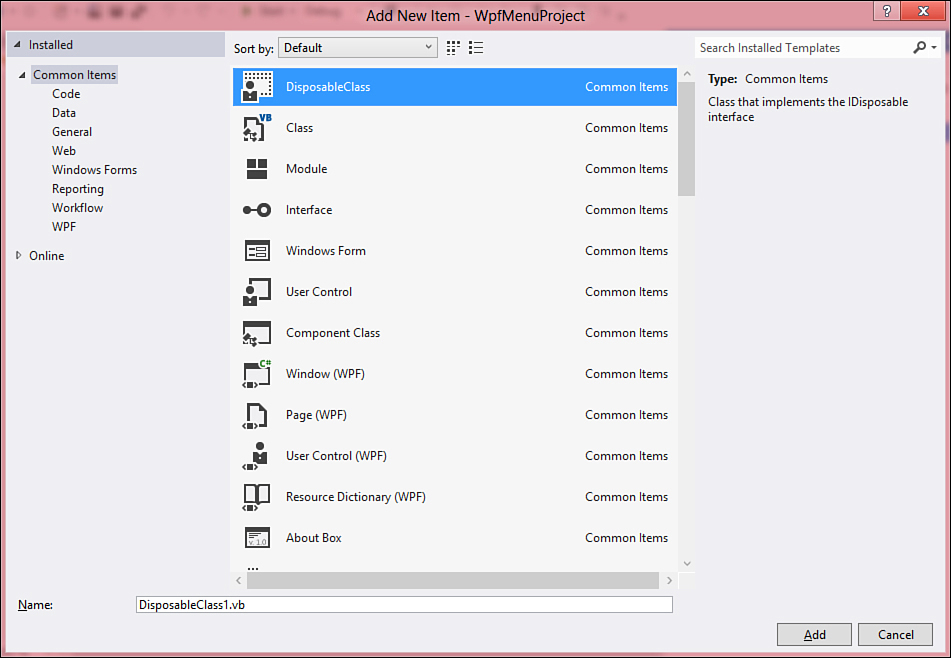
Figure 53.8. The Add New Item dialog box shows the new item template.
With a few steps, you can produce your custom project and item templates, which can help you save time when you repetitively create the same project types.
Customizing Visual Studio 2012
Visual Studio 2012 is a customizable environment. In fact, you can personalize existing features such as the Tools menu, menu commands, and toolbars. In this section, you learn how to customize both the Tools built-in menu and toolbars to add functionalities to the environment.
Customizing the Tools Menu
You can customize the Tools menu by providing additional commands pointing to external executables. This is particularly useful if you need to run an external tool against an element within the solution or project. You provide additional commands by selecting Tools, External tools. This launches the External tools dialog box where you can specify the executable name and parameters. For example, imagine you want to add a custom command for launching the Microsoft IL Disassembler for the executable generated by the current project. If you already have any tools in the list (such as the Dotfuscator tool), the first step is to click the Add button. Then follow these steps:
1. In the Title text box, write IL Disassambler.
2. In the Command text box, write the full path for ILDasm.exe. (It is under the Windows SDK tools directory.)
3. For the Arguments box, click the arrow on the right and select Target Path (the related variable is $(TargetPath)). This variable represents the executable generated by the compilation process.
Figure 53.9 shows the result of this editing. Click OK so the new command will be added to the Tools menu.
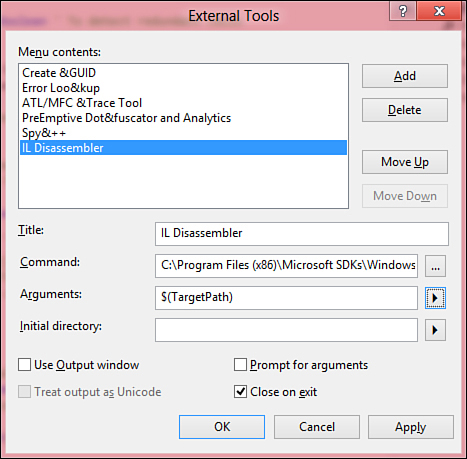
Figure 53.9. Setting command properties in the External Tools dialog box.
Now try to open any existing project and build it. Then select the new Tools, IL Disassembler command. If no errors occur, you will see IL Disassembler run and analyze the executable produced by the current project.
Customizing Commands and Toolbars
Visual Studio lets you customize other aspects of the IDE such as menus (including context menus) and toolbars. The next subsections cover both scenarios with examples.
Customizing an Existing Toolbar
Imagine you want to add another button to the Standard toolbar, such as the Close Solution command. Select Tools, Customize. When the Customize dialog box displays, select the Commands tab. Then select the Toolbar item and from the related combo box pick up the Standard toolbar. The goal is adding a button, so click Add command. This launches the Add command dialog box. Here you just select the menu where the command is located (on the left) and the command itself (on the right). Then, select File on the left and Close Solution on the right. Figure 53.10 shows the result of this step.
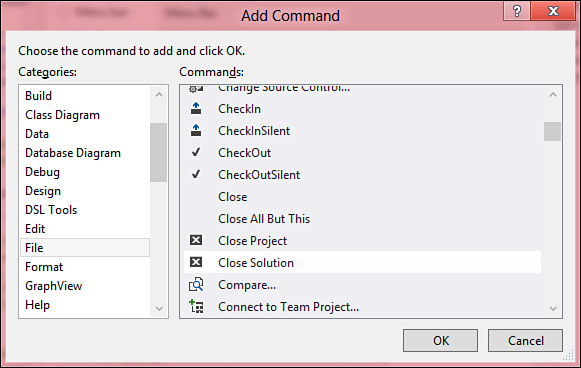
Figure 53.10. Selecting the command to be added to the standard toolbar.
When you click OK, the command is added to the desired toolbar, as demonstrated in Figure 53.11. In the Customize dialog box, click Move Up or Move Down to place the command in the preferred position.

Figure 53.11. Arranging the command position in the toolbar.
Click Close to return to the IDE. You see the command appearing on the Standard toolbar.
Creating a New Custom Toolbar
To create a new custom toolbar, follow these steps:
1. Select Tools, Customize and be sure the Toolbars tab is selected.
2. Click the New button, so the New Toolbar dialog box appears. When ready, type the CustomBar name into the dialog box text box and click OK (see Figure 53.12).
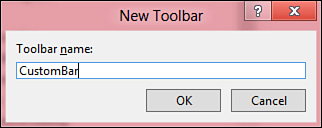
Figure 53.12. Adding a new custom toolbar.
3. Select the Commands tab and in the Toolbar combo box, select the CustomBar toolbar; Figure 53.13 shows how the Customize dialog box looks at this particular point.
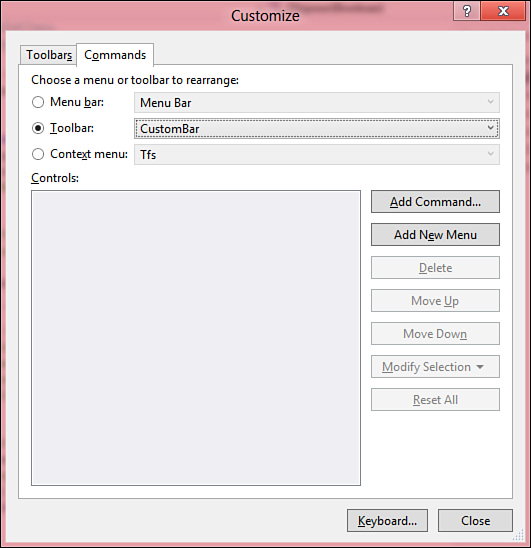
Figure 53.13. Preparing the new toolbar for customization.
4. Click Add command and follow the instruction explained in the previous subsection to add as many commands as you want to the new toolbar. Figure 53.14 shows an example.
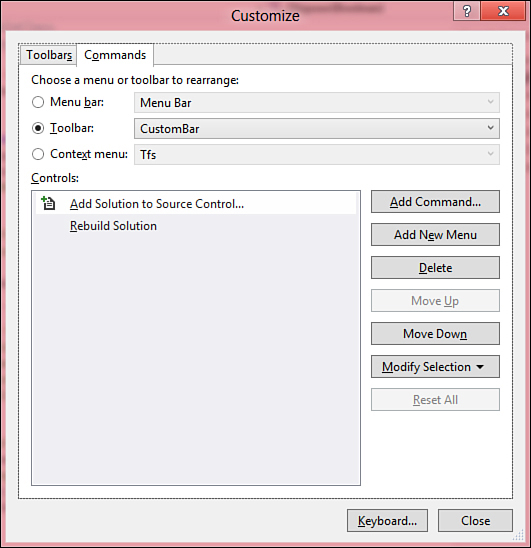
Figure 53.14. Configuring the new custom toolbar.
At this point, the new toolbar is available in the IDE. To remove it, right-click one of the existing toolbars and unselect the new one from the pop-up list.
Managing User Settings
When you run Visual Studio for the first time, you are asked to specify a setting that best suits your needs. You can then customize Visual Studio settings and options to make the IDE the best environment for you. Starting from Visual Studio 2005, the IDE provides the ability of exporting settings to disk into a .VsSettings file as a backup for later reuse. This means you have the ability of importing existing settings into the environment. This section explains how you manage Visual Studio settings.
Exporting Settings
You export Visual Studio settings by selecting the Tools, Import and Export Settings command. This launches the Import and Export Settings Wizard. The first dialog box is shown in Figure 53.15.
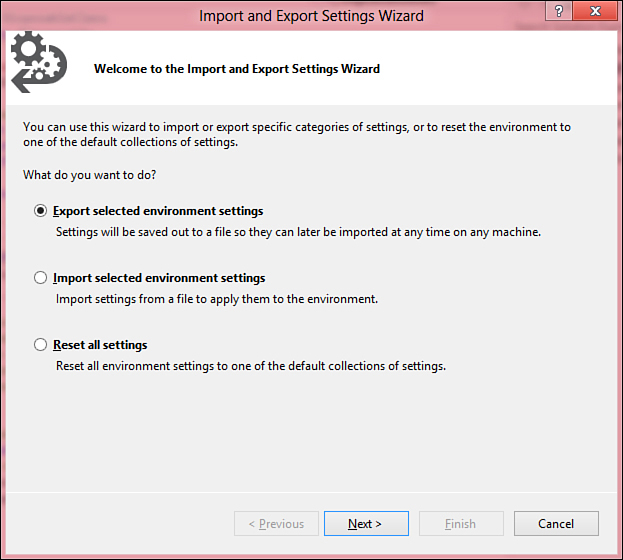
Figure 53.15. Starting the Import and Export Settings Wizard.
From here, you can decide what you want to do. In this case, select Export selected environment settings, which is the default option, and click Next. The second dialog box enables deep selections over the available settings to export. Figure 53.16 shows the full list of available settings.
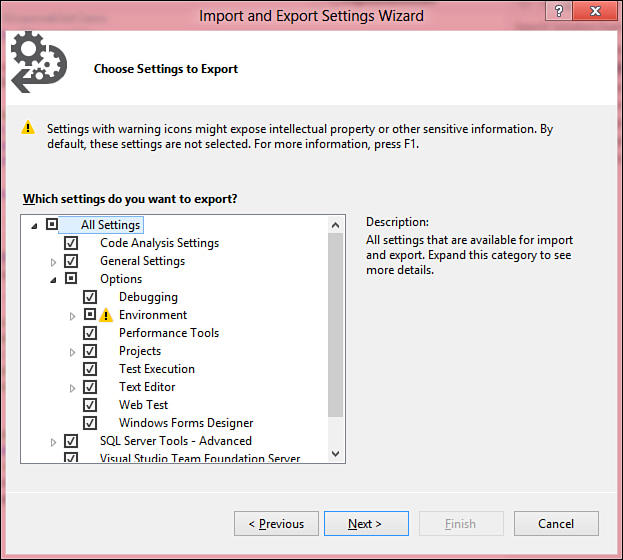
Figure 53.16. Selecting settings to export.
You can export all settings available in the Options dialog box and other settings such as code analysis, database tools, and general development settings. After you select the desired settings, click Next. In the next dialog box, you will be asked to specify a filename and the target folder. By default, Visual Studio 2012 proposes a filename based on the current date/time and the user level settings folder as the target folder, as demonstrated in Figure 53.17.
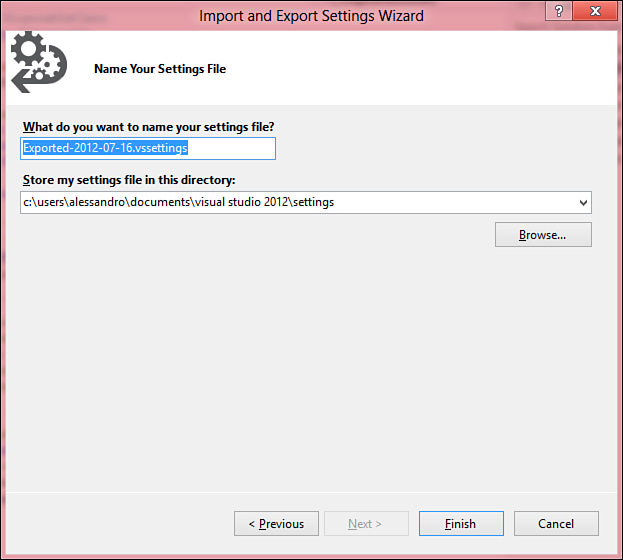
Figure 53.17. Providing a target filename and folder for exporting settings.
At this point, click Finish to save your settings to disk and return to the IDE. For importing saved settings later, read the next subsection.
Importing Settings
To import existing settings, select Tools, Import and Export Settings. When the wizard appears, select Import Selected Environment Settings (see Figure 53.15 for your reference). The second dialog box asks your agreement for backing up the current settings before proceeding (see Figure 53.18). This is your choice. When decided, click Next.
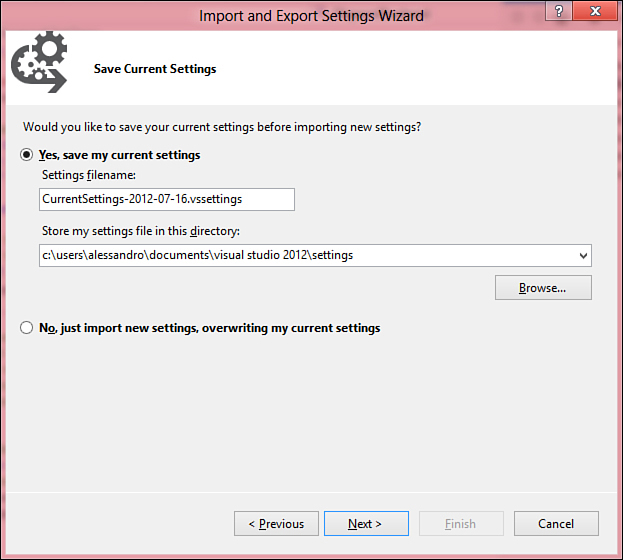
Figure 53.18. The second dialog box of the Wizard enables backing up current settings.
In the final dialog box, the Wizard asks you to select settings to import from the list of available settings. Notice how in the list there is the .vssettings file saved during the example of the last subsection (see Figure 53.19).

Figure 53.19. Selecting settings to be imported into the IDE.
Tip
Notice that you can import only one settings file.
Select the desired settings file and click Finish. At this point, selected settings replace existing ones.
Customizing the Toolbox
Like its predecessors, Visual Studio 2012 lets you customize the toolbox by adding controls that are not listed by default and are included in the .NET Framework or come from third-party assemblies. To customize the toolbox, select Tools, Choose toolbox items or right-click the Toolbox and select Choose Items. This launches the Choose toolbox items dialog box, which is represented in Figure 53.20.
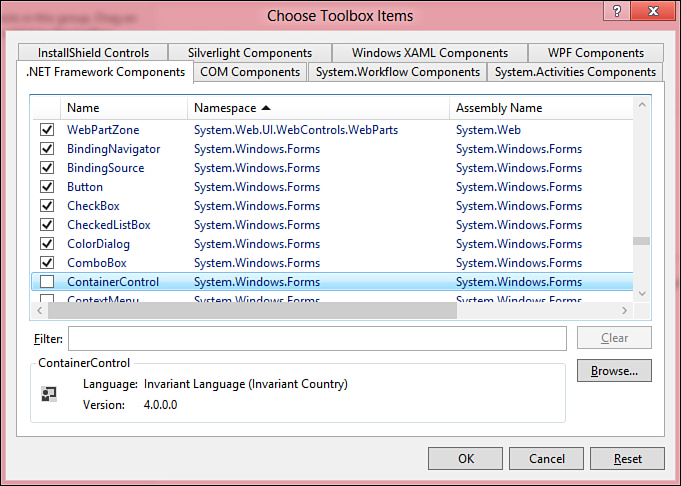
Figure 53.20. Choosing additional items for the toolbox.
There are some improvements in Visual Studio 2012 because now tabs for selecting Windows 8 controls (Windows XAML Components) and InstallShield controls are available. Select the items you want to add to the toolbox, and then click OK.
Using, Creating, and Managing Reusable Code Snippets
Like its predecessors (starting with Visual Studio 2005), Visual Studio 2012 provides support for reusable code snippets. The most important addition to the new version is the support for CSS, JavaScript, and ASP.NET MVC (both versions 3 and 4). The idea is that you can add into the code editor existing code snippets stored in external files with .Snippet extension, reachable from within Visual Studio (and integrated with the IDE) without the need of creating your custom archive. Another huge benefit of code snippets is that they can be shared with other developers allowing you and other friends to increase the code library. Code snippets support is offered in several ways, which are covered in this section.
Visual Studio ships with a large number of code snippets ready for use. To prevent accidental deletions, these code snippets reside in the IDE’s own folder and cannot be removed from the Code Snippets Manager. Later in this chapter, you see how to extend and manage (including removing) code snippets by taking advantage of the user level snippets folder.
Consuming Code Snippets
Adding existing code snippets into your code is an easy task. Just for demo purposes, create a new console project with Visual Basic and, when ready, place the cursor within the Sub Main. Right-click and select the Insert Snippet command. At this point, the IDE shows a list of available snippets categories, as shown in Figure 53.21.
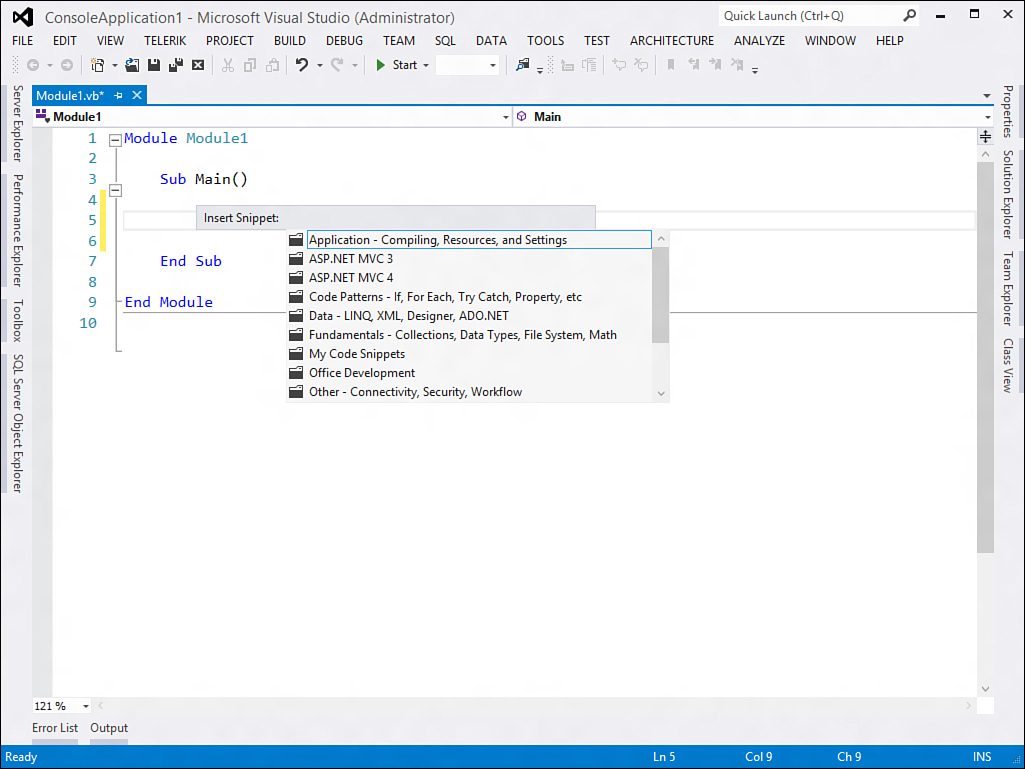
Figure 53.21. The IDE shows a list of available snippets categories.
The first thing to mention is that code snippets files are organized in categories, such as WPF, Code Patterns, Fundamentals, and so on. A category is nothing but a folder containing a number of .snippet files. Double-click the desired category (for example Code Patterns). The IDE shows a list of subcategories. Click Error Handling (Exceptions). Now Visual Studio offers the list of available code snippets within the given category, as shown in Figure 53.22.

Figure 53.22. A list of code snippets.
Double-click the Try..Catch..End Try Statement snippet so that code is added in the code editor. Visual Studio inserts a code snippet for intercepting an exception within a Try..Catch block, as shown in Figure 53.23.

Figure 53.23. The code snippet has been added to the current code.
Notice how, in this specific example, the ArgumentException has been highlighted. Highlights are also known as replacements because they indicate to the developers that they should replace the highlighted code with a more appropriate code block according to their needs. For example, you might want to catch a FileNotFoundException instead of an ArgumentException; therefore, you should make this replacement, but the rest of the code snippet is still valid.
Replacement Information
If you pass with the mouse pointer over replacements, you get information via a tooltip about the replacement.
Code snippets offer lots of information such as the author name, support website, and shortcut. This information is also available in the Code Snippet Manager described in the next subsection.
The Code Snippet Manager
The Code Snippet Manager is an integrated tool for adding, removing, and getting information on code snippets. You bring it up by selecting Tools, Code Snippets Manager. Figure 53.24 shows how this tool window looks.

Figure 53.24. The Code Snippet Manager tool.
You can first select one of the available programming or markup languages from the Language combo box. The tool automatically shows a list of available code snippets related to that specific language. You can browse the snippets tree and select one to get information, such as the Description, Shortcut, and Author. As you can see, code snippets can be organized into subfolders. To create a new subfolder, click Add and provide the folder name. If you want to import existing code snippets, click Import and select the .snippet files you want to add to the current collection. You can also remove code snippets from the collection, but this is not allowed for snippets shipped with Visual Studio, whereas it is allowed on custom code snippets. Note that the Shortcut property for snippets is useful because in the code editor you can add a code snippet by typing its shortcut and then pressing Tab, without the need of performing all steps described in the previous subsection. When you know how to manage snippets, you are ready to learn how to build custom ones.
Creating and Consuming Custom Code Snippets
Code snippets .snippet files are XML files containing the code and information about the snippet. Code snippets have their own XML schema that Visual Studio then uses to correctly identify them within the IDE. To understand how a code snippet is made, consider the following code that is stored in the snippet named Calculate Cosine of an Angle from the Visual Studio snippets library:
Dim radians As Double = 120 * Math.PI / 180
Dim cos As Double = Math.Cos(radians)
If you open the CalculateCosineOfAngle.snippet file with an XML editor (or just with Windows Notepad), the file content looks like the content of Listing 53.1.
Listing 53.1. Examining an Existing Code Snippet
<?xml version="1.0" encoding="utf-8"?>
<CodeSnippets xmlns="http://schemas.microsoft.com/VisualStudio/2005/CodeSnippet">
<CodeSnippet Format="1.0.0">
<Header>
<Title>Calculate the Cosine of a specified Angle</Title>
<Author>Microsoft Corporation</Author>
<Description>Converts an angle from degrees to radians and then calculates
cosine of the angle</Description>
<Shortcut>mathCos</Shortcut>
</Header>
<Snippet>
<Imports>
<Import>
<Namespace>System</Namespace>
</Import>
<Import>
<Namespace>Microsoft.VisualBasic</Namespace>
</Import>
</Imports>
<Declarations>
<Literal>
<ID>Degrees</ID>
<Type>Double</Type>
<ToolTip>Replace with the measurement in degrees.</ToolTip>
<Default>120</Default>
</Literal>
</Declarations>
<Code Language="VB" Kind="method body"><![CDATA[Dim radians As Double =
$Degrees$ * Math.PI / 180
Dim cos As Double = Math.Cos(radians)]]></Code>
</Snippet>
</CodeSnippet>
</CodeSnippets>
Code snippets in Visual Studio 2012 still adhere to the first XML schema introduced with Visual Studio 2005, so there are no changes. A snippet structure is divided into some XML nodes. The Header node provides information on the snippet, whereas the Snippet node contains code, required Imports directives, and assembly references. Notice how the real code is stored inside a CDATA section. As you might know, these kinds of sections can store any kind of characters, and so it is the most appropriate for storing code. Finally, the Declarations node stores information on replacement. The ID element specifies an ID for the replacement, the Type element specifies the data type of the object that should be replaced, ToolTip provides a descriptive tooltip when the user passes the mouse over the replacement, and Default provides a default value. Now imagine you want to create a custom code snippet that will be added to the code snippets library so you can reuse it inside Visual Studio. First, you need a Visual Basic code snippet. As an example, consider the following code that implements an extension method for converting an IEnumerable(Of T) into an ObservableCollection(Of T):
<Extension()> Module Extensions
<Extension()> Function ToObservableCollection(Of T)(ByVal source As _
IEnumerable(Of T)) As ObservableCollection(Of T)
If source IsNot Nothing Then
Return New ObservableCollection(Of T)(source)
Else
Throw New ArgumentNullException("source")
End If
End Function
End Module
Now the goal is building a custom .snippet file to make the preceding code reusable. Thus, you must create an XML file according to the snippet schema. Listing 53.2 shows how to accomplish this. You can use any text editor, such as the Windows Notepad or the Visual Studio’s XML editor.
Listing 53.2. Building a Custom Code Snippet
<?xml version="1.0" encoding="utf-8"?>
<CodeSnippets xmlns="http://schemas.microsoft.com/VisualStudio/2005/CodeSnippet">
<CodeSnippet Format="1.0.0">
<Header>
<Title>ToObservableCollection</Title>
<Author>Alessandro Del Sole</Author>
<Description>Convert an IEnumerable(Of T)
into an ObservableCollection(Of T)
</Description>
<HelpUrl>http://community.visual-basic.it/Alessandro</HelpUrl>
<SnippetTypes />
<Keywords />
<Shortcut>toObs</Shortcut>
</Header>
<Snippet>
<References />
<Imports>
<Import>
<Namespace>System.Runtime.CompilerServices</Namespace>
</Import>
<Import>
<Namespace>System.Collections.ObjectModel</Namespace>
</Import>
</Imports>
<Declarations>
<Literal Editable="true">
<ID>source</ID>
<Type>IEnumerable(Of T)</Type>
<ToolTip>Replace with a different identifier if needed</ToolTip>
<Default>source</Default>
<Function></Function>
</Literal>
</Declarations>
<Code Language="VB" Kind="" Delimiter="$"><![CDATA[<Extension()> Module Extensions
<Extension()> Function ToObservableCollection(Of T)(ByVal $source$ As _
IEnumerable(Of T)) As ObservableCollection(Of T)
If $source$ IsNot Nothing Then
Return New ObservableCollection(Of T)($source$)
Else
Throw New ArgumentNullException("$source$")
End If
End Function
End Module]]></Code>
</Snippet>
</CodeSnippet>
</CodeSnippets>
XML elements are self-explanatory. You need to save the preceding snippet in the C:UsersUserNameMy DocumentsVisual Studio 2012Code SnippetsVisual BasicMy Code Snippets folder. As an example, save it as ToObservableCollection.snippet. Now go back to the Visual Basic code editor, and right-click to insert a snippet until you find the new My Code Snippets|ToObservableCollection element. If you add it, you should get a result similar to the one shown in Figure 53.25.
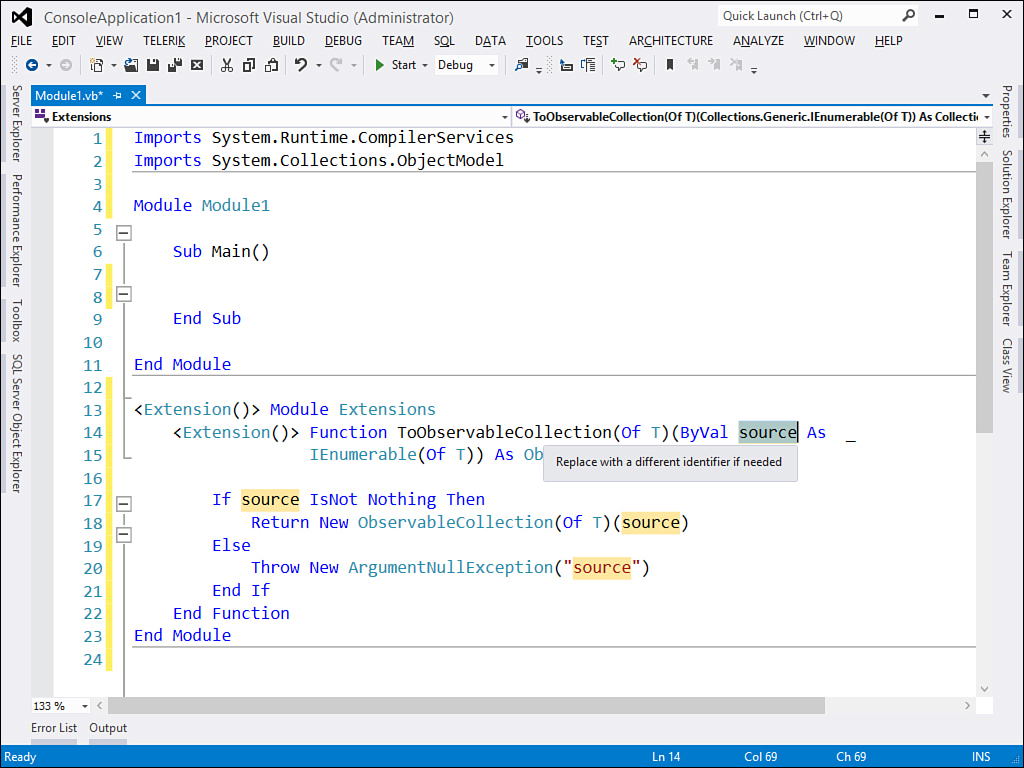
Figure 53.25. Adding the new code snippet in Visual Studio.
Notice how you get information on the replacement via the specified tooltip, when the mouse pointer passes over the replacement.
Tools for Producing Code Snippets
Writing code snippets manually can be annoying. Fortunately, there are many tools (most of them are open source) for generating code snippets via a graphical user interface to make this task easier. See Appendix A, “Useful Resources and Tools for Visual Basic,” for a list of available tools.
Maybe you want to know how to deploy code snippets for sharing with other developers or to create a code snippets database. The most appropriate way for sharing snippets is creating a redistributable .Vsi package based on the Visual Studio Content Installer, a particular engine dedicated to sharing additions for Visual Studio (particularly add-ins and code snippets, the only two additional contents not covered by VSIX packages in Visual Studio 2012). This is appropriate because this engine can install contents into the correct folders so developers will not do this manually. The VSCI is not covered here (read the MSDN documentation at http://msdn.microsoft.com/en-us/library/ms246580(VS.110).aspx). In addition, Appendix A provides tools capable of generating .vsi packages for you. Another way is to create a compressed archive that stores .snippet files you can send to other developers who will just extract the archive content into the snippets folder.
Managing Libraries with NuGet
As a developer, you probably use libraries produced by others in almost all your projects. Often libraries have dependencies, meaning they require other libraries to work correctly. In lots of situations, dependencies are not included with the library you use so you need to perform a manual search and installation and this complicates things if you have to repeat the same steps for multiple projects. To make a developer’s life easier, Microsoft developed an extension for Visual Studio called NuGet (also known as Library Package Manager). Via a repository of packages, NuGet allows you to find, download, and install a project to the desired library and all of its dependencies with just a couple of clicks. Downloaded libraries and their dependencies are also automatically referenced in your project. This avoids the need of remembering each library’s dependencies and of performing a lot of manual steps. In Visual Studio 2010, NuGet was available only as an extension you had to download manually. But in Visual Studio 2012, it is an integrated tool. To understand how it works, create and save a new Console application. Then select Tools, Library Package Manager, Manage NuGet Packages for Solution. This will open the Manage NuGet Packages dialog box, where you can find the libraries you need. Figure 53.26 shows how the dialog box appears.
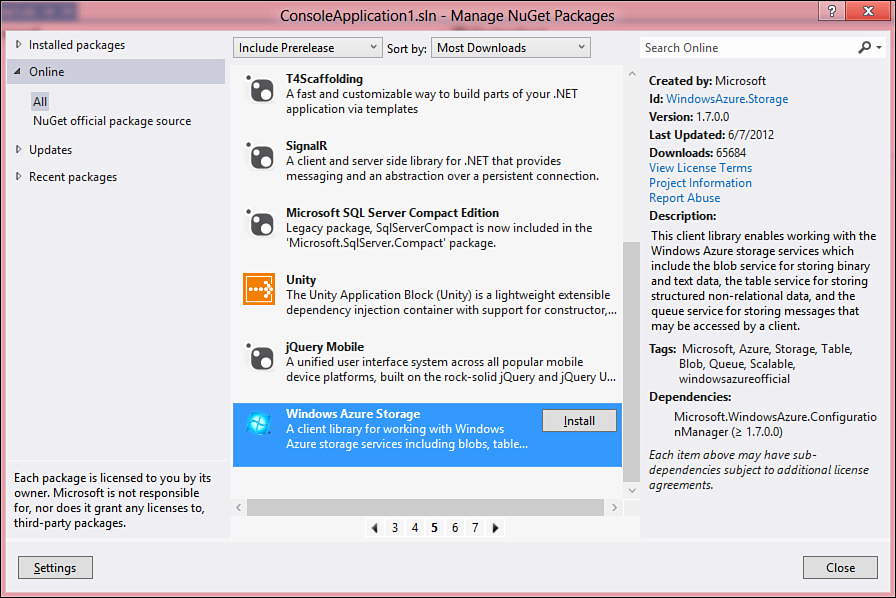
Figure 53.26. Searching for NuGet packages.
The Nuget Console
NuGet also offers a console where you can type commands to interact directly with the NuGet repository. This chapter does not describe the console because this implies remembering a number of commands that perform actions you can easily accomplish within the Manage NuGet Packages dialog box. In case you want to know more about the NuGet console, visit http://docs.nuget.org/docs/start-here/using-the-package-manager-console.
You can browse the list of available packages or just type a library name in the search box. On the left side of the dialog box you can choose to browse the online gallery (which is the default), the installed packages for the solution (so you can use this tool to remove them), the list of available updates for the currently installed packages, and a list of recently used packages. If you select Include Prerelease in the drop-down box at the top of the dialog box, the tool will include beta versions of products. Just as an example, locate and select the Windows Azure Storage package, which includes libraries for working with the Windows Azure storage in a managed way (see Figure 53.26). After you click Install, Visual Studio 2012 will first ask to specify which projects will receive the library and then it will ask you to accept license agreements. As you can see from Figure 53.27, each library in the package has its own license agreement you have to read before installing.
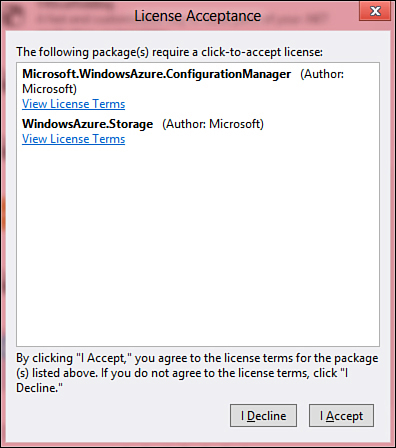
Figure 53.27. Accepting license agreements.
Click I Accept and wait for Visual Studio 2012 to download and install the selected package to your project. After the operation completes, you are ready to use the libraries and the objects they expose exactly as you would do if you manually added references. It is easy to demonstrate that the IDE automatically added a reference to the downloaded package and, most importantly, Visual Studio downloaded not only the selected component, but also other components required by the selected one. In other words, you selected the Microsoft.WindowsAzure.StorageClient library, but it requires the Microsoft.WindowsAzure.Configuration library that has been provided for you. Enable the Show All Files view in Solution Explorer to see references, as demonstrated in Figure 53.28 (for now see only Solution Explorer). You can get a graphical representation of the package hierarchy, where you can see the selected library and all of its dependencies. To accomplish this, select Tools, Library Package Manager, Package Visualizer. This action will generate a new graphic you can see in Visual Studio, as demonstrated in Figure 53.28.
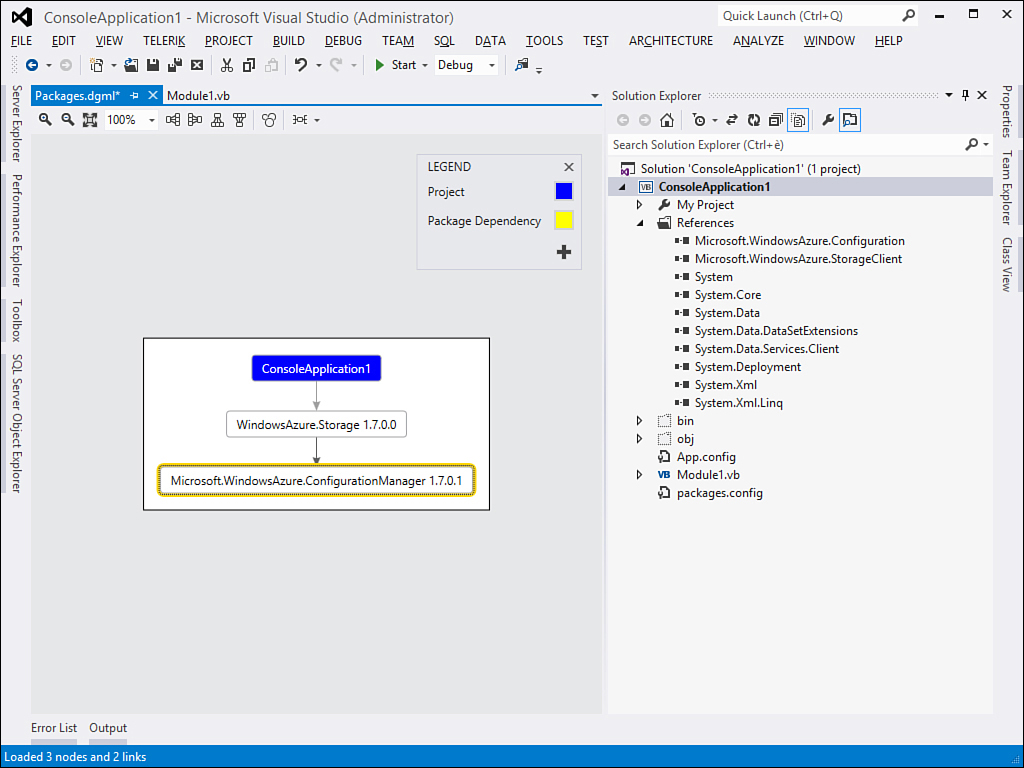
Figure 53.28. Showing package references and dependencies.
If you right-click the gray area of the graphic you will be able to access a number of commands related to how the hierarchical representation is shown and you will be able to export the graphic into an XPS file. Without NuGet, repeating the same steps manually in a number of different projects can be difficult and wastes time. With this way, you can automate the download of required libraries with the warranty that also has all the available required dependencies.
Sharing your Libraries with Nuget
One of the biggest benefits of NuGet is you can share your own libraries through the Library Package Manager and also keep shared libraries up to date. Publishing a package to the NuGet repository is out of the scope of this chapter, but it is an easy task. You can visit http://nuget.org to find all the necessary information to publish your packages so other developers will be able to install them using NuGet.
Summary
This chapter covered some important features about customizing Visual Studio 2012. We started by explaining how to export both projects and items templates, then moved to customizing the IDE by providing additional commands to the Tools menu and customizing existing toolbars or adding new ones. Then we described how you could export and import Visual Studio settings to keep your environment up-to-date with your preferences. Finally, we took an important tour through code snippets seeing how they can improve the way you write code by creating your code library and using the Visual Studio code snippets library.