
Chapter 19. The My Namespace
The great debate is always the same: which is better—Visual Basic or Visual C#? Because of the .NET Framework, the Common Language Runtime (CLR), and the IL language, the languages’ evolution brought both VB and C# to do the same things. Of course, there are some differences, and one language has some features that the other one does not have. One example is void lambdas in C#, which weren’t introduced in VB until this last version, or VB’s XML literals that C# does not have. Differences are obvious. One of the Visual Basic features that does not have commonalities with other managed languages is the My namespace, belonging to VB starting from Visual Basic 2005. In this chapter we examine the My namespace that can write productive code, according to the philosophy of “less code, more productivity.” Keep in mind that what you learn in this chapter does not apply to Metro-style apps for Windows 8; in fact, even if the My namespace still exists in that platform, for Metro it does not expose anything. This is an important clarification and will no longer be repeated through the chapter.
Introducing the My Namespace
The My namespace provides shortcuts for accessing several common objects in .NET development. My exposes classes that wrap existing built-in objects and offers them again in a way that’s easier to use. By using My, you can access lots of development areas and write less code than you would if you used traditional techniques. At a higher level My exposes the following members:
• My.Application, a property exposing members that allows access to other properties of the current application
• My.Computer, a property exposing members that provides shortcuts to common operations with your machine, such as the file system or the Registry
• My.Settings, a property that provides code support for the Settings tab in My Project and that also enables the use of settings from your application
• My.Resources, a namespace that defines several objects providing support for the Resources tab in My Project and allowing handling resources in code
• My.User, a property providing members for getting or setting information about the current user that logged into the operating system
• My.WebServices, a property that enables the retrieval of information on web services consumed by your application
The preceding listed My members are the most general, and you can find them in every kind of Visual Basic application (except for Metro apps, as stated at the beginning of the chapter). There are also specific extensions for the My namespace related to specific applications, such as WPF. (A description is provided at the end of this chapter.) My is interesting because it can be also be extended with custom members providing great flexibility to your applications. If something within My does not satisfy you, you can change it. After all, My is a namespace, meaning that it is implemented in code.
“My” is a Reserved Keyword
Due to its particular role within the Visual Basic programming language, although it just refers to a namespace, My is also a reserved word in Visual Basic.
My.Application
The My.Application properties expose members for retrieving information on the running instance of the application. This information can be divided into three major groups: application information at assembly level, culture for localization and deployment, and environment information. Let’s examine all these features.
Application Framework
In specific kinds of applications, such as Windows Forms and WPF applications, My.Application also provides support for the application framework and application events. This is discussed in the last section of this chapter.
Retrieving Assembly Information
My.Application maps the same-named tab within My Project. Because of this, it provides the ability of investigating in-code assemblies’ information. This can be accomplished via the My.Application.Info property (of type Microsoft.VisualBasic.ApplicationServices.AssemblyInfo) that retrieves information about the current assembly, such as the name, version, company name, copyright, and so on. The following code shows how you can accomplish this:
'Assembly information
Console.WriteLine("Assembly name: {0}",
My.Application.Info.AssemblyName)
Console.WriteLine("Assembly version: {0}",
My.Application.Info.Version)
Console.WriteLine("Company name: {0}",
My.Application.Info.CompanyName)
'Returns the directory where the application is running from
Console.WriteLine("Running from: {0}",
My.Application.Info.DirectoryPath)
Another interesting feature is that you can get information on all referenced assemblies, as shown in the following iteration:
Console.WriteLine("References:")
For Each item In My.Application.Info.LoadedAssemblies
Console.WriteLine(item)
Next
The LoadedAssemblies property is of type ReadonlyCollection(Of System.Reflection.AssemblyInfo), so you become more skilled after reading Chapter 46, “Reflection.”
Working with Cultures
In Chapter 33, “Localizing Applications,” you get more information about localizing applications, but at this particular point of the book, you can get an interesting taste using My. Two cultures are settable for your application: the thread’s culture, which is about string manipulation and formatting, and the user interface culture, which is about adapting resources to the desired culture. You can get information on both by invoking the Culture and UICulture properties from My.Application; then you can set different cultures for both the main culture and UI culture by invoking the ChangeCulture and ChangeUICulture methods. The following code demonstrates this:
Dim culture As CultureInfo = My.Application.Culture
Console.WriteLine("Current culture: {0}", culture.Name)
Dim UICulture As CultureInfo = My.Application.UICulture
Console.WriteLine("Current UI culture: {0}", UICulture.Name)
My.Application.ChangeCulture("it-IT")
My.Application.ChangeUICulture("it-IT")
Console.WriteLine("New settings: {0}, {1}",
My.Application.Culture.Name,
My.Application.UICulture.Name)
First, the code retrieves information about cultures. Such information is of type System.Globalization.CultureInfo. This object provides lots of information on cultures, but in this case we use Name that returns the culture name. Notice how you can change cultures by invoking ChangeCulture and ChangeUICulture just by passing a string representing the culture’s name. On my machine the preceding code produces the following result:
Current culture: en-US
Current UI culture: en-US
New settings: it-IT, it-IT
If you need to pass a custom culture, you should create a new CultureInfo object and then pass the name of the new culture. Typically, you will not remember each culture name, so if you want to investigate available cultures, you can write a simple iteration taking advantage of the shared GetCultureInfo method:
For Each c In CultureInfo.GetCultures(CultureTypes.AllCultures)
Console.WriteLine(c.Name)
Next
Deployment and Environment Information
The My.Application property allows managing the following environment information:
• Getting information on the ClickOnce deployment for the current application
• Retrieving environment variables
• Writing entries to the Windows Applications log
• Retrieving command line arguments
Next you see in detail how you can get/set such information using My.Application.
Deployment Information
It can be useful to get information on the state of the deployment if your application has been installed via the ClickOnce technology (discussed in detail in Chapter 52, “Deploying Applications with ClickOnce”). You might want to provide the ability of downloading files on-demand or to implement additional behaviors according to the updates status. You can use the IsNetworkDeployed property to know if an application has been deployed to a network via ClickOnce and the My.Application.Deployment property (which wraps System.Deployment.Application.ApplicationDeployment) to make other decisions. The following code shows information on the deployment status only if the application has been deployed to a network:
'Deployment and environment information
If My.Application.IsNetworkDeployed = True Then
Console.
WriteLine("Application deployed to a network via ClickOnce")
Console.WriteLine("Current deployment version: {0}",
My.Application.Deployment.CurrentVersion)
Console.WriteLine("The application runs from: {0}",
My.Application.Deployment.ActivationUri)
Console.WriteLine("Is first time run: {0}",
My.Application.Deployment.IsFirstRun)
End If
The CurrentVersion property is useful to understand the current deployment version, while ActivationUri is the address from which the application manifest is invoked. You can also programmatically check for updates invoking specific methods, such as CheckForUpdate, CheckForUpdateAsync, and CheckForUpdateAsyncCancel. The following is an example:
My.Application.Deployment.CheckForUpdate()
Luckily, My.Application.Deployment members’ names are self-explanatory, and with the help of IntelliSense and a little bit of curiosity, you have in your hands all the power of such an object.
Retrieving Environment Variables
There are situations where you need to retrieve the content of the operating system’s environment variables. This can be accomplished by invoking the GetEnvironmentVariable that receives the name of the variable as an argument. The following code shows how to retrieve the content of the PATH environment variable:
Dim PathEnvironmentVariable As String = My.Application.
GetEnvironmentVariable("PATH")
Writing Entries to the Windows’ Applications Log
The .NET Framework provides several ways of interacting with the operating system logs, but the My namespace offers an easy way to write information to the Windows application log. My.Application offers a Log property, of type Microsoft.VisualBasic.Logging.Log, which exposes members for writing information. The following code snippet shows how you can write a message to the application log invoking the WriteEntry method:
My.Application.Log.WriteEntry("Demonstrating My.Application.Log",
TraceEventType.Information)
The first argument is the message, and the second one is a member of the TraceEventType enumeration whose members are self-explanatory, thanks to IntelliSense, and allow specifying the level of your message. Alternatively, you can write the content of an entire exception invoking the WriteException method:
Try
Catch ex As Exception
My.Application.Log.WriteException(ex)
End Try
You can also get control over the listeners and the file used by the .NET Framework by utilizing the TraceSource and DefaultFileLogWriter.
Retrieving Command-Line Arguments
If you need to retrieve command-line arguments for your application, My.Application offers a convenient way. To complete the following demonstration, go to the Debug tab of My Project and set whatever command-line arguments you like in the Command Line Arguments text box. My.Application offers a CommandLineArgs property, which is a ReadOnlyCollection(Of String) that stores such arguments. Each item in the collection represents a command-line argument. The following code shows how you can iterate such collection and check for available command-line arguments:
For Each argument As String In My.Application.CommandLineArgs
Console.WriteLine(argument)
Next
My.Computer
My.Computer provides lots of shortcuts for accessing features on the local system, starting from the clipboard arriving at the Registry, passing through audio capabilities. This is a class exposing several properties, each one related to a computer area. This is a list of My.Computer properties:
• FileSystem—Provides members for accessing files, directories, and other objects on disk
• Clipboard—Provides members for setting data to and getting data from the system clipboard
• Audio—Allows playing audio files
• Mouse—Allows retrieving information on the installed mouse
• Keyboard—Provides members for getting information on the state of keys in the keyboard
• Registry—Provides members for getting and setting information to Windows Registry
• Network—Offers members for performing operations within the network that the computer is connected to
• Ports—Allows retrieving information on the computer’s serial ports
• Screen—Allows retrieving information on the screen properties (Windows Forms only)
• Info—Provides a series of information about the running machine
As usual, IntelliSense provides detailed information on each member from the preceding properties. In the next section you learn to access your machine information with My.Computer, but providing examples for each member is not possible. Because of this, members for the biggest areas are summarized and code examples for the most important members are provided.
Working with the File System
My.Computer provides lots of shortcuts for performing most common operations on files and directories via the FileSystem property. Members are self-explanatory and easy to understand, so you can always take advantage of IntelliSense. To demonstrate how easy it is to work with the file system, let’s go through some examples. The following code copies a directory into another one, then it creates a new directory, and finally it retrieves the current directory:
My.Computer.FileSystem.CopyDirectory("C:Source", "C:Target")
My.Computer.FileSystem.CreateDirectory("C:Temp")
Dim currentDir As String = My.Computer.FileSystem.CurrentDirectory
You can also get information on Windows’ special directories via the SpecialDirectories property as follows:
'Gets My Pictures path
Dim picturesFolder As String =
My.Computer.FileSystem.SpecialDirectories.MyPictures
Working with files is also easy. For example, you can read or create a text file in one line of code:
'Read the content of a text file
Dim content As String =
My.Computer.FileSystem.ReadAllText("C:ADocument.txt")
'Creates a new text file
My.Computer.FileSystem.WriteAllText("C:ADocument.txt", "File content",
append:=False)
This can be useful if you do not need to create a text file dynamically—for example, line by line. For files, you can iterate a directory to get an array of strings storing all filenames as follows:
For Each item As String In My.Computer.FileSystem.GetFiles("C:")
'Do something here
Next
This last example allows extracting the filename of a full path name:
'Returns MyFile.txt
Dim parsedString As String =
My.Computer.FileSystem.GetName("C:TempMyFile.txt")
My.Computer.FileSystem is powerful and simplifies access to the file system resources avoiding the need to write lots of lines of code.
Working with the Clipboard
The My.Computer.Clipboard property provides members for working with the system clipboard. Table 19.1 summarizes the members.
Table 19.1. My.Computer.Clipboard Members
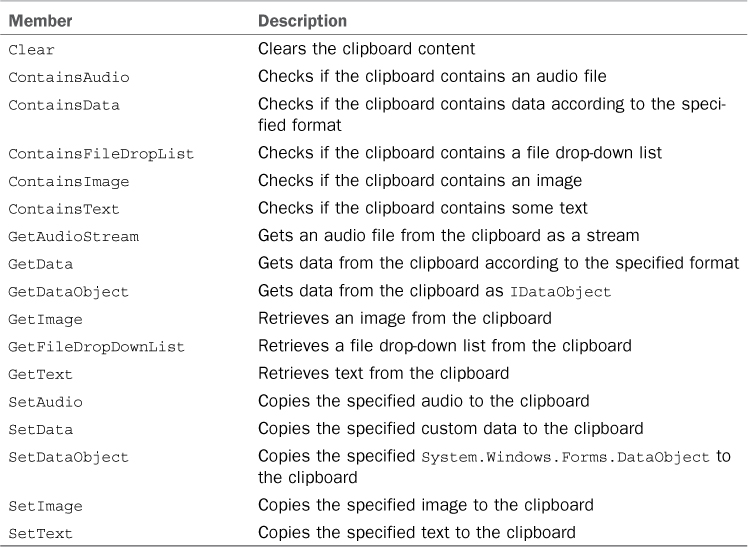
The following code shows how you can clear the clipboard and then copy some text; in the end the code checks if some text is available and, if so, returns the text:
My.Computer.Clipboard.Clear()
My.Computer.Clipboard.SetText("This is some text")
If My.Computer.Clipboard.ContainsText Then
Console.WriteLine(My.Computer.Clipboard.GetText)
End If
Playing Audio Files
My.Computer.Audio provides three methods for audio files reproduction. The first one is Play, which can play a .Wav file. The following is an example:
My.Computer.Audio.Play("C:MySound.Wav", AudioPlayMode.WaitToComplete)
You need to pass at least the filename as the first argument; as an alternative, you can pass the .wav file as a byte array or a FileStream. The AudioPlayMode enumeration enables you to specify how the audio file needs to be played. WaitToComplete means that no other code will be executed until the reproduction ends; Background, which is the default setting, means that the audio is reproduced asynchronously; last, BackgroundLoop means that the audio file is reproduced in the loop until you explicitly invoke the Stop method as follows:
My.Computer.Audio.Play("C:MySound.Wav",
AudioPlayMode.BackgroundLoop)
'Other code...
My.Computer.Audio.Stop()
The last method is PlaySystemSound, whose first argument is the system sound to reproduce, which works like this:
My.Computer.Audio.PlaySystemSound(Media.SystemSounds.Exclamation)
Sounds examples other than Exclamation are Asterisk, Beep, Hand, and Question.
Managing the Keyboard
You can check for the state of some keyboard keys. My.Computer.Keyboard lets you accomplish this via six properties. Three are about the Caps-lock, Num-lock, and Scroll-lock keys, whereas the other three let you get the state (pressed or not) of Alt, Shift, and Ctrl. The following code provides a complete example:
'All Boolean values
Console.WriteLine(My.Computer.Keyboard.AltKeyDown)
Console.WriteLine(My.Computer.Keyboard.CtrlKeyDown)
Console.WriteLine(My.Computer.Keyboard.ShiftKeyDown)
Console.WriteLine(My.Computer.Keyboard.CapsLock)
Console.WriteLine(My.Computer.Keyboard.NumLock)
Console.WriteLine(My.Computer.Keyboard.ScrollLock)
Working with the Registry
My.Computer provides fast access to Windows Registry. It exposes a Registry property wrapping lots of functionalities of Microsoft.Win32.Registry class for faster work. My.Computer.Registry offers some properties, of type Microsoft.Win32.RegistryKey, representing the most important areas of the Registry, such as HKEY_LOCAL_MACHINE (wrapped by the LocalMachine property), HKEY_ USERS (wrapped by Users), HKEY_CURRENT_USER (wrapped by CurrentUser), and HKEY_CLASSES_ROOT (wrapped by ClassesRoot). All of them provide methods for creating subkeys, querying, deleting, and setting values within subkeys. For example, the following code (which requires an Imports Microsoft.Win32 directive) creates a subkey in the HKEY_CURRENT_USERSoftware key, providing a company name and the application name. The code also sets permissions for writing/reading the key and its eventual subkeys:
Dim regKey As RegistryKey = My.Computer.Registry.
CurrentUser.CreateSubKey("SoftwareDelSoleMyApplication",
RegistryKeyPermissionCheck.ReadWriteSubTree,
RegistryOptions.None)
Because the CreateSubKey returns a RegistryKey object, you can invoke instance members from this type. For example, you can add values to the new key by invoking the SetValue method as follows:
'Value-name, actual value
regKey.SetValue("MyValue", 1)
You get the value of the desired subkey by invoking the GetValue method as follows:
'Returns "1"
Dim value As String = CStr(My.Computer.Registry.
GetValue("HKEY_CURRENT_USERSoftwareDelSoleMyApplication",
"MyValue",
Nothing))
Remember that GetValue returns Object, so you need to perform an explicit conversion according to the value type you expect. You also have the ability to determine what kind of value is associated to a value name. This can be accomplished by getting a RegistryValueKind value, such as DWord, Binary, String, and QWord, (which is an enumeration from Microsoft.Win32) via the GetValueKind method so that you can also be more precise when requiring values:
'Returns DWORD
Dim valueKind As RegistryValueKind = regKey.GetValueKind("MyValue")
If valueKind = RegistryValueKind.DWord Then
Dim value2 As Integer = _
CInt(My.Computer.
Registry.
GetValue("HKEY_CURRENT_USERSoftwareDelSoleMyApplication",
"MyValue", Nothing))
End If
In addition, a GetNames method returns an array of strings, each representing a value in the specified subkey if more than one value is stored within the subkey. The following code instead removes the previously created value:
regKey.DeleteValue("MyValue")
Remember to close (and dispose) the Registry key when you do not use it anymore:
regKey.Close()
regKey.Dispose()
Finally, you can delete a subkey by invoking the DeleteSubKey as follows:
My.Computer.Registry.
CurrentUser.DeleteSubKey("SoftwareDelSoleMyApplication",
True)
Other than the mentioned properties about Registry areas, My.Computer.Registry exposes just two interesting methods, SetValue and GetValue, which require you to specify long strings and that usually can be replaced by the same-named methods of the instance of RegistryKey. By the way, with My.Computer.Registry you can perform lots of tasks onto the system Registry writing code easier and faster.
Accessing the Network
If your machine is connected to a network, you can use the My.Computer.Network property that wraps some functionalities of the System.Net namespace. The most interesting members are the IsNetworkAvailable property that returns True if the machine is connected, the DownloadFile method that allows downloading a file from the network, UploadFile that allows uploading a file to the specified target on the network, and Ping that sends a ping to the specified address. The following code checks first for network availability, then sends a ping to my English language blog, and in the end attempts to download a file from the Italian VB Tips & Tricks community (where I’m a team member) passing credentials as strings:
If My.Computer.Network.IsAvailable Then
Try
'2000 is the timeout
Dim available As Boolean = My.Computer.
Network.
Ping("http://community.visual-basic.it/AlessandroEnglish",
2000)
My.Computer.Network.DownloadFile("http://www.visual-basic.it/scarica.asp?ID=1016",
"C:WpfDemo.zip",
"MyUserName",
"MyPassword")
Catch ex As System.Net.WebException
Catch ex As Exception
End Try
End If
Notice how a System.Net.WebException is caught in case there are any network problems, especially with the DownloadFile method. The DownloadFile requires you to specify the source as the first argument and the target file as the second one. You can also specify the source as a System.Uri; the method can also download html contents. UploadFile works similarly, in that it requires the name of the file to be uploaded and the address, also allowing credentials specifications. Both methods offer several overloads that IntelliSense explains in detail. About Ping, the methods returns True if the website is reachable.
Getting Computer Information
My.Computer provides the ability of retrieving information on the current machine. The first information is the machine name, which is available from My.Computer.Name, a property of type String. Second is the My.Computer.Info property of type Microsoft .VisualBasic.Devices.ComputerInfo, which collects information such as the total and available memory, both physical and virtual or the name, platform, and version of the operating system. The following code shows how you can get some information on the system:
Console.WriteLine("Computer name {0}: ", My.Computer.Name)
Console.WriteLine("Total physical memory {0}: ",
My.Computer.Info.TotalPhysicalMemory)
Console.WriteLine("Available physical memory {0}: ",
My.Computer.Info.AvailablePhysicalMemory)
Console.WriteLine("Operating system full name {0}: ",
My.Computer.Info.OSFullName)
Console.WriteLine("Operating system version: {0}",
My.Computer.Info.OSVersion)
Console.WriteLine("Installed User Interface culture: {0}",
My.Computer.Info.InstalledUICulture.Name)
My.Computer also exposes a Clock property that offers three subproperties: GmtTime that returns the local date and time expressed as GMT, LocalTime that returns the local date and time, and TickCount that returns the number of ticks considering the machine timer. This is how you can use it:
Console.WriteLine("GMT Time for local machine: {0}",
My.Computer.Clock.GmtTime.ToString)
You can interact with system hardware with two other properties, Mouse and Screen. The first one allows knowing if your mouse has a wheel, if buttons’ functionalities are swapped, or how many lines the scroll will be each time you move the wheel. This is an example:
Console.WriteLine("Mouse buttons are swapped: {0}",
My.Computer.Mouse.ButtonsSwapped.ToString)
Console.WriteLine("Mouse has wheel: {0}",
My.Computer.Mouse.WheelExists.ToString)
Screen is also interesting because it enables the retrieval of information on your display, such as the resolution, the device name, or the actual working area, but it is only available for Windows Forms applications. The following is an example, assuming you have a form with three Label controls:
Private Sub Form1_Load(sender As Object, e As EventArgs) Handles MyBase.Load
Me.Label1.Text = "Screen resolution: " &
My.Computer.Screen.Bounds.Width.ToString & _
" x " & My.Computer.Screen.Bounds.Height.ToString
Me.Label2.Text = "Bits per pixel: " & _
My.Computer.Screen.BitsPerPixel.ToString
Me.Label3.Text = "Working area: " &
My.Computer.Screen.WorkingArea.Width.ToString & _
" x " & My.Computer.Screen.WorkingArea.Height.ToString
End Sub
Figure 19.1 shows the global result of the preceding code running on my machine.
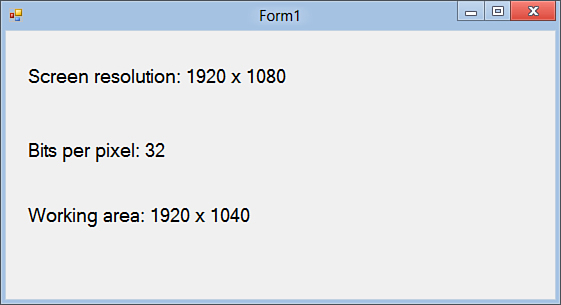
Figure 19.1. Information on the local machine using My.Computer.
You can obtain detailed information about both the computer and the operating system, including localization properties. My.Computer members for retrieving information are always self-explanatory, but you can always take advantage of IntelliSense and the Object Browser tool.
My.Settings
One of the most common requirements for applications is providing the ability of storing user preferences, such as the graphic theme, personal folders, options, and so on. Generally, there are two kinds of settings that the .NET Framework lets you save within the application configuration file: application-level settings and user-level settings. Application-level settings are related to the general behavior of the application, and users will not have the ability of providing modifications. User-level settings are related to each user profile that runs the applications and allows storing and editing preferences. My namespace provides a class named My.Settings, which offers members that easily allow working with settings at both levels, but only user-level settings can be written. At a higher level My.Settings is the code representation of the Settings tab in My Project. Because of this we start discussing My.Settings by talking about the Settings designer and then explaining how you can work with settings in code. Create a new Console project (if not yet done) and open My Project; then click the Settings tab. Figure 19.2 shows the Settings designer.
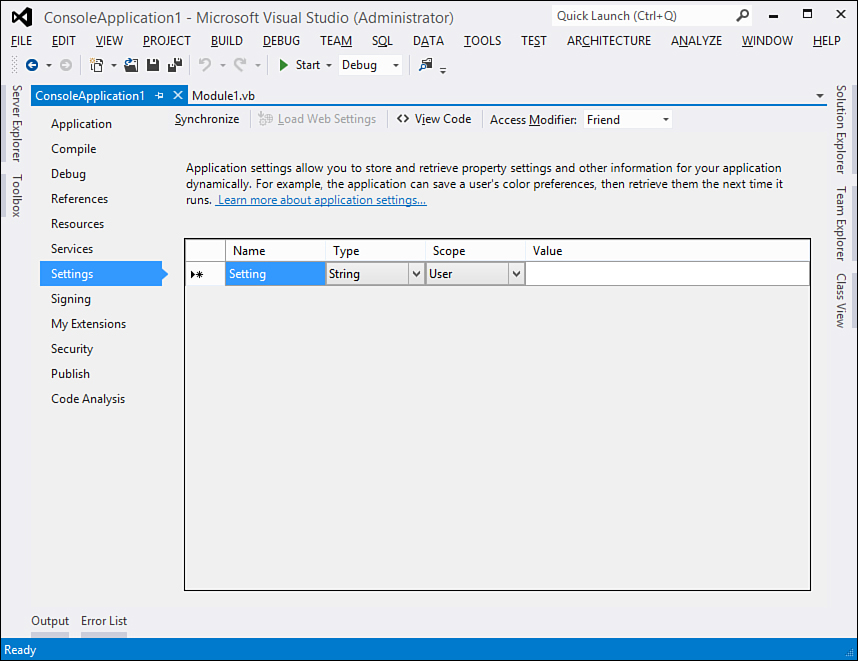
Figure 19.2. Settings designer.
Each setting is represented by a variable that can be of any .NET type (as long as it is marked as serializable) storing the desired value. This variable can be provided at both application level and user level, with the condition that only user-level variables can be also written. You now learn how to design settings and then how to use them in code. Imagine you want to provide a simple way for checking if the application is running for the first time. In the Name column replace the default Settings identifier with IsFirstTimeRun. In the Type column choose the Boolean type from the combo box, and in the Scope column ensure that User is selected. In the Value column choose True from the combo box.
Notice that Visual Studio can provide appropriate values depending on the setting type; for Boolean values, it offers True and False. After this sequence, your Settings Designer looks like Figure 19.3.
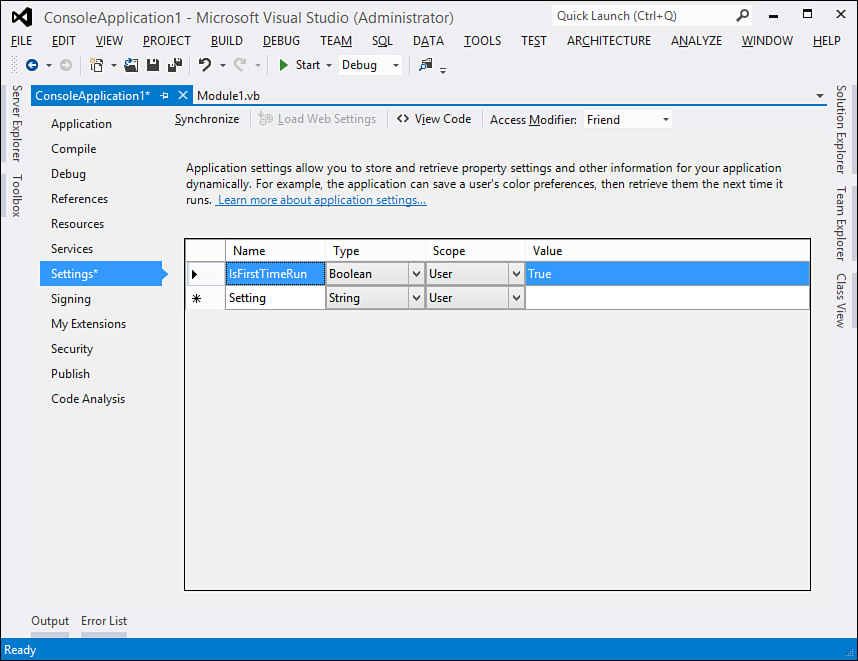
Figure 19.3. Providing a Boolean user-level setting.
You can now write some code to check if the application is running for the first time and, if so, set the IsFirstTimeRun setting to False as follows:
Sub UserSettingsDemo()
If My.Settings.IsFirstTimeRun = True Then
Console.WriteLine("The application is running for the first time")
My.Settings.IsFirstTimeRun = False
My.Settings.Save()
Else
Console.
WriteLine("The application is already familiar with your system!")
End If
End Sub
When you first launch the application, you get the following result:
The application is running for the first time
The code also changed the IsFirstTimeRun setting from True to False; this is possible because it is a user-level setting. If it were an application-level setting, it would be offered as a read-only property.
Application-Level Only Settings
With the Settings Designer you can define different kinds of settings, both at application level and user level. Among these settings, Connection Strings and Web Services URL are only available at application level to avoid modifications in code. In this way, only the appropriate personnel can make the right modifications if needed.
Notice also that you have to invoke the Save method; otherwise changes will not be saved. To check that everything works, rerun the application; you should now get the following message:
The application is already familiar with your system!
With the same technique you can easily define other settings of different types. You are not limited to types shown in the default combo box. You can choose any other .NET type that supports serialization by clicking the Browse command at the bottom of the combo box. This displays the Select a Type window (see Figure 19.4) where you can make your choice.
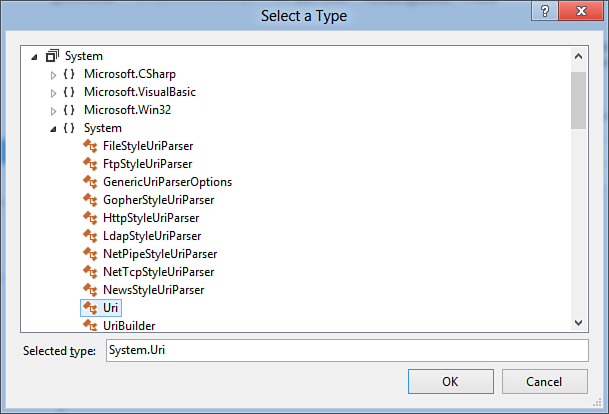
Figure 19.4. Selecting a nondefault .NET type for designing settings.
Settings definitions and default values are stored within the application configuration (app.config) file as XML definition. If your project does not already contain a configuration file, Visual Studio 2012 adds one.
User-level settings are defined within a section named userSettings. The following is an excerpt from the app.config file for the demo project showing the definition of the previously described IsFirstTimeRun setting:
<userSettings>
<MyNamespace.My.MySettings>
<setting name="IsFirstTimeRun" serializeAs="String">
<value>True</value>
</setting>
</MyNamespace.My.MySettings>
</userSettings>
Notice how each setting is defined by a setting node that also defines the setting’s name and way of serialization. (Although serialized as a string, based on its value, the .NET Framework can recognize the setting as Boolean.) Each setting node has a child node named value that stores the default value for the setting.
Configuration File Naming
Your application configuration file is named app.config as long as it is included in your project folder. When the application is built in to the target folder (such as the default Debug and Release subfolders), the configuration file takes the complete name of the executable (for example, MyApplication.exe) plus the .config extension (for example, MyApplication.exe.config).
Similarly, application-level settings are stored within a section named applicationSettings. The following is the excerpt related to the test setting previously shown:
<applicationSettings>
<MyNamespace.My.MySettings>
<setting name="Setting" serializeAs="String">
<value>test</value>
</setting>
</MyNamespace.My.MySettings>
</applicationSettings>
Settings also have a Visual Basic code counterpart. Each setting is mapped to a Visual Basic property. To understand this, click the Show All Files button in Solution Explorer and then expand the My Project folder; double-click the Settings.designer.vb file under Settings.Settings. Among the code that defines My.Settings, you can also find the definition for your custom settings. The IsFirstTimeRun setting defined in the previous example is mapped to a VB property as follows:
<Global.System.Configuration.UserScopedSettingAttribute(), _
Global.System.Diagnostics.DebuggerNonUserCodeAttribute(), _
Global.System.Configuration.DefaultSettingValueAttribute("True")> _
Public Property IsFirstTimeRun() As Boolean
Get
Return CType(Me("IsFirstTimeRun"), Boolean)
End Get
Set(ByVal value As Boolean)
Me("IsFirstTimeRun") = Value
End Set
End Property
The System.Configuration.UserScopedSettingAttribute tells the compiler that the setting has user-level scope, whereas the System.Configuration.DefaultSettingValueAttribute tells the compiler that the default value for the property is True. Notice how an explicit conversion with CType is performed to avoid any problems when deserializing. Now you know how and where settings are defined, but you still probably do not know where they are actually stored when you run the application outside Visual Studio (for example, in production environments). The .NET Framework creates a folder for the application within the AppDataLocal folder in Windows, which has user-level scope. If you consider the current example, named MyNamespace on my machine, the .NET Framework created the following folders structure (on Windows 8, Windows 7, and Windows Vista): C:UsersAlessandroAppDataLocalMyNamespaceMyNamespace.vshost.exe_Url_wizb0ypr4ultyjhh1g1o352espg4ehdd1.0.0.0. This auto-generated folder contains a file named user.config that contains the following, simple markup:
<?xml version="1.0" encoding="utf-8"?>
<configuration>
<userSettings>
<MyNamespace.My.MySettings>
<setting name="IsFirstTimeRun" serializeAs="String">
<value>False</value>
</setting>
</MyNamespace.My.MySettings>
</userSettings>
</configuration>
As you can see, it is the same piece of XML code that was originally defined within the application configuration file, but now it stays as a single file within a user-level folder. This file is the place where changes to an application’s settings are effectively saved. Visual Studio provides a convenient way for restoring such files to the default settings’ value by just clicking the Synchronize button in the Settings Designer.
Bringing Settings Forward to New Versions
It is worth noting that the live applications need to have the Upgrade method called to bring settings forward to new versions. Otherwise each new version will use the default settings again. The flaw is that you only want to call Upgrade when needed to avoid migrating the settings each time, and the best workaround is to set a Boolean setting called, for example, NeedsUpgrade with a default of True, and on startup, when that is true call Upgrade and then set NeedsUpgrade to False. It will only then be true again on the next new version of the assembly.
My.Settings Events
My.Settings provides some interesting events that allow understanding of what is happening behind the scenes. Here are the following four events:
• SettingChanging, which is raised just before a setting value is changed
• PropertyChanged, which is raised just after a setting value has been changed
• SettingsLoaded, which is raised just after settings values are loaded
• SettingsSaving, which is raised just before settings values are persisted to disk
To handle such events you need to double-click the Settings.Designer.vb file in Solution Explorer.
Differences with Visual Studio 2010
In Visual Studio 2010 the IDE generated a partial class definition for the My.Settings class in a separate code file called Settings.vb. In Visual Studio 2012 things change, and both the auto-generated code and settings events reside in the Settings.Designer.vb file.
Creating event handlers is not a difficult task. When the Settings.Designer.vb file is open, select the MySettings events item in the upper-left combo box and select the event you want to handle in the upper right, as shown in Figure 19.5. When selected, Visual Studio 2012 automatically generates an event handler stub.
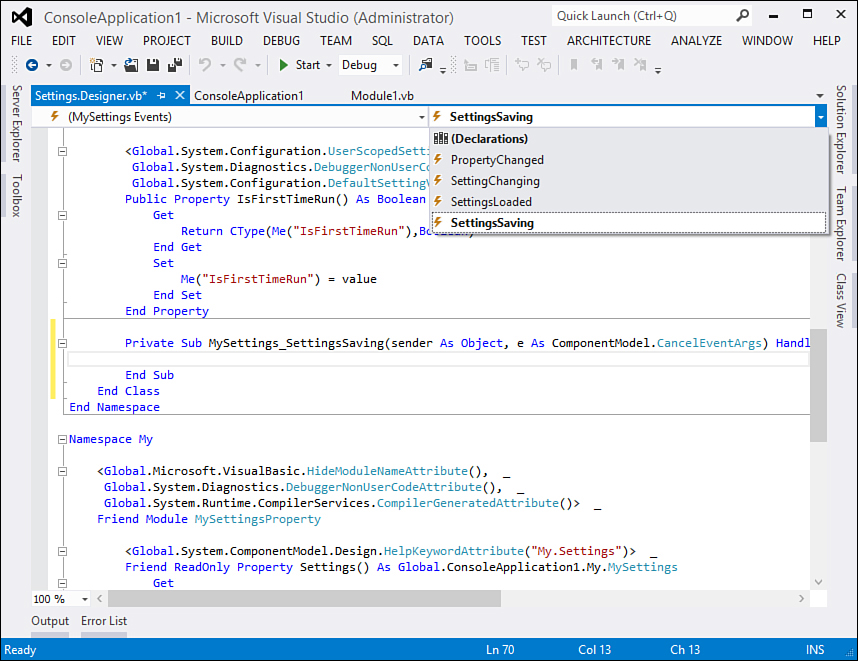
Figure 19.5. Handling My.Settings events.
For example, imagine you want to validate a setting before changes are saved. To accomplish this, add a new String setting in the Settings Designer and name the setting as ValidationTest. The goal is to avoid saving the string value if it is null. The following code accomplishes this:
Private Sub MySettings_SettingsSaving(ByVal sender As Object,
ByVal e As
System.ComponentModel.CancelEventArgs) _
Handles Me.SettingsSaving
If My.Settings.ValidationTest Is Nothing Then
Throw New NullReferenceException("Cannot save a null string")
e.Cancel = True
End If
End Sub
The SettingsSaving event allows performing some checks before values are saved.
The e variable of type System.ComponentModel.CancelEventArgs provides a Cancel property that cancels saving when set to True. The following example shows instead how you can handle the SettingChanging event that is raised before a setting value gets changed:
Private Sub MySettings_SettingChanging(ByVal sender As Object,
ByVal e As _
System.Configuration.
SettingChangingEventArgs) _
Handles Me.SettingChanging
Console.WriteLine("About to change the settings values")
'Waits for one second
System.Threading.Thread.Sleep(1000)
End Sub
My.Settings provides a convenient way for managing user settings in a strongly typed way offering a modern infrastructure that is more efficient than older .ini files.
My.Resources
Visual Studio and the .NET Framework enable you to include resources within your application. Resources are different kinds of information that would usually be available from external files, such as sounds, images, and text. You can embed in your application all resources you want using My.Resources and the Resources Designer.
WPF Resources
Things behave a little differently in WPF, Silverlight (including Phone), and Metro applications. Because of their particular infrastructures, embedding resources using the Resources Designer is a practice that you must avoid. To understand how WPF resources work, take a look at the official page in the MSDN Library: http://msdn.microsoft.com/en-us/library/ms750613(VS.110).aspx. This chapter describes resources with Console and Windows Forms applications for backward compatibility with existing code you might have written in the past.
Differently from other My members, My.Resources is a namespace defining subsequent members that can wrap in code resources that you define in the designer. At this point, you need to open My Project and then select the Resources tab. Figure 19.6 shows the Resources Designer.
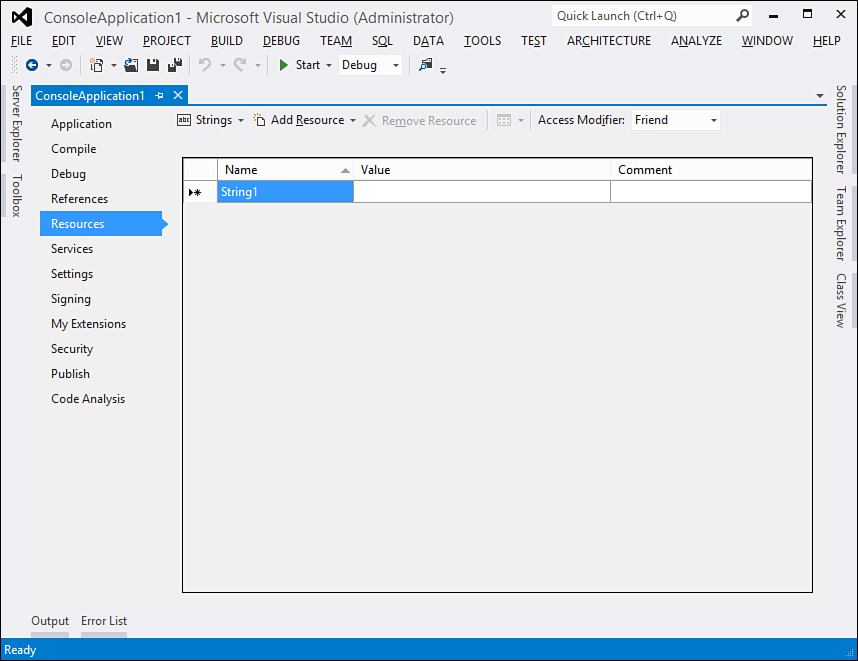
Figure 19.6. The Resources Designer.
Each time you add a new resource, Visual Studio generates a .NET property that provides managed access to the resource itself. For example, in the Name column replace the String1 default identifier with TestString and type Resources demonstration in the Value column. If you like, you can also provide a comment. Visual Studio generates a TestString property of type String and Friend visibility that you can access like any other property, as in the following code:
Console.WriteLine(My.Resources.TestString)
The interesting thing is that the Visual Basic compiler will try to format the string according to the current culture settings. By clicking the Add Resource button, you will be prompted with a series of file types to add as resources. If you add a text file, the file will be represented by a String property. You can add both existing or new files. For example, click the Add Resource button and select the New Image, JPEG Image... command. After you specify the new image name, Visual Studio 2012 shows the image editor where you can leverage your drawing ability. Figure 19.7 shows an editor in action.
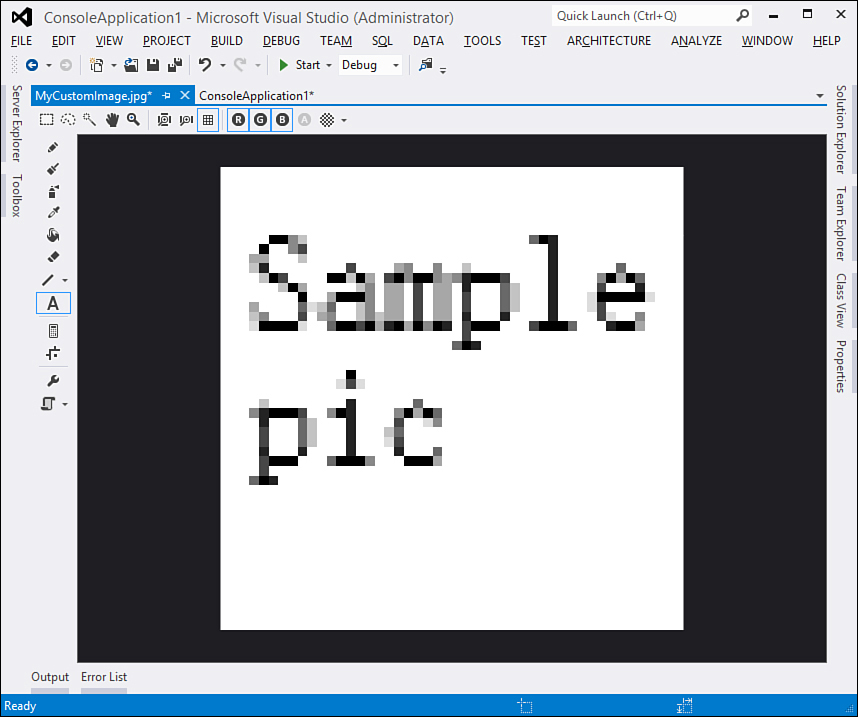
Figure 19.7. The Visual Studio 2012’s built-in image editor.
After you create your image, or even if you add an existing one from disk, the IDE generates a property of type System.Drawing.Bitmap pointing to the image. If you have a Windows Forms application, you could recall your image as follows:
'PictureBox1 is a Windows Forms "PictureBox" control
'MyCustomImage is the name of the new custom image
Me.PictureBox1.Image = My.Resources.MyCustomImage
You can then pick images from resources if you need to populate a PictureBox control at design time by clicking the Browse button from the Properties window to set the Image property. Figure 19.8 shows how you can select an image directly from resources.
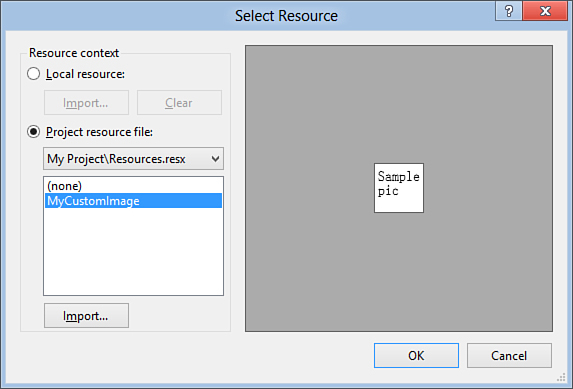
Figure 19.8. Assigning an image to a PictureBox picking from resources.
The same is true for icons—you can create and draw a new icon with the Visual Studio Designer and then assign it to a Windows Forms Icon property. For audio files, you can add only .Wav files to ensure that they are automatically recognized as audio files. Such files are then mapped as System.IO.UnmanagedMemoryStream objects and can be played via My.Computer as follows:
My.Computer.Audio.Play(My.Resources.
AnAudioFile,
AudioPlayMode.WaitToComplete)
You can also add files other than text, pictures, icons, and audio. When Visual Studio cannot recognize a file type, it returns it from resources as byte array (System.Byte()), so you should implement code to analyze the particular resource. Visual Studio also creates a project-level folder named Resources where it stores resource files. Another interesting thing is to understand how resources are defined in code. Each time you add a resource via the designer, the IDE generates a Visual Basic property for it. For example, the following code shows how the new .jpeg image is mapped in code:
Friend ReadOnly Property MyCustomImage() As System.Drawing.Bitmap
Get
Dim obj As Object = ResourceManager.
GetObject("MyCustomImage", resourceCulture)
Return CType(obj, System.Drawing.Bitmap)
End Get
End Property
And this is how the first string resource is mapped:
Friend ReadOnly Property TestString() As String
Get
Return ResourceManager.
GetString("TestString", resourceCulture)
End Get
End Property
The ResourceManager class provides methods for retrieving resources according to the specified culture that by default is the system one. Such properties are available in the Resources.designer.vb file that should never be edited manually.
Getting Resources by Name in Code
Sometimes you need to access resources by name in code. This can be accomplished via the Reflection, which is discussed in Chapter 46. The following code provides an example:
'Returns the specified resource of type String
'usage:
'Dim myRes As String = GetResourceByName("TestString")
Function GetResourceByName(ByVal resourceName As String) As String
'An example for [Application Name].[Resource File]
'is the current app:
'MyNamespace.Resources.resx
Dim rm As New ResourceManager("[Application Name].[Resource File]",
Assembly.GetExecutingAssembly)
Return rm.GetString(resourceName)
End Function
In this case the method returns resources of type String, but you can implement methods that return a different type.
My.User
My.User is a property that allows getting information on the user who logged in to the Windows operating system and that is running the application. Such a property is of type Microsoft.VisualBasic.ApplicationServices.User and is a wrapper of this last mentioned one, meaning that you can invoke both and obtain the same results. Utilizing My.User is straightforward because it offers just a few but easy-to-understand members, as summarized in Table 19.2.
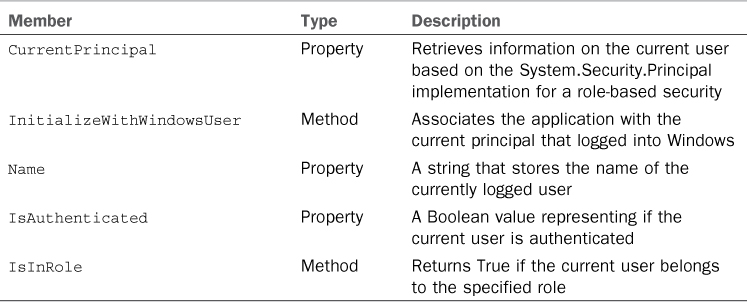
Listing 19.1 shows how you can get information on the current user that runs the application. Notice how an invocation to InitializeWithWindowsUser is required to associate the current user to the application.
Listing 19.1. Using My.User to Get Information on the Current User
Module Module1
Sub Main()
MyUserInformation()
Console.ReadLine()
End Sub
Sub MyUserInformation()
My.User.InitializeWithWindowsUser()
Console.WriteLine("Current user is: {0}", My.User.Name)
Console.WriteLine("User is authenticated: {0}", My.User.IsAuthenticated)
Console.WriteLine("Application is running as Administrator: {0}",
My.User.IsInRole("BUILTINAdministrators"))
Console.WriteLine(My.User.CurrentPrincipal.
Identity.AuthenticationType.ToString)
End Sub
End Module
The code shown in Listing 19.1 produces, on my machine, the following output:
Current user is: DELSOLELAPTOPAlessandro
User is authenticated: True
Application is running as Administrator: False
NTLM
Notice how the username is provided as “Computer nameuser name” and also how the role for the IsInRole method requires the name of the machine. (BUILTIN is a default value for all machines.) The authentication type is determined via the CurrentPrincipal.Identity.AuthenticationType property. Here, Identity is a System.Security.Principal.IIdentity object that provides information about a user, considering the role-based security system in the .NET Framework (for more information, check the MSDN documentation). With a few lines of code, you can get information about the current user without the need of dealing with classes and members from the Microsoft.VisualBasic.ApplicationServices.User object.
My.WebServices
When you have in your application references to web services, you can easily reach members provided by the proxy classes using My.WebServices. For example, if you have a proxy class named DataAccess exposing a GetCustomers method, you can write the following line:
My.WebServices.DataAccess.GetCustomers()
This is a rapid way for invoking members from referenced web services (as long as they are in the same solution of your application).
Extending My
One of the most interesting features of the My namespace is that it is extensible with custom members. You can both extend My at the root level or extend existing members such as Application and Computer. The first goal of this section is to show how you can extend My at the higher level, implementing functionalities for working with collections, such as a property that allows converting from a generic collection into an ObservableCollection(Of T). We need to mimic how Visual Basic 2012 handles the My namespace, so first add a new module to the project and name it MyCollectionsUtils. Each member you want to be added to My must start with the My letters; this is the reason for using the MyCollectionsUtils identifier. The compiler can then distinguish that this member belongs to My if you enclose it within such a namespace. Add a reference to the WindowsBase.dll assembly (not required in WPF applications) and then write the code shown in Listing 19.2.
Listing 19.2. Extending My at Root Level
Imports System.Collections.ObjectModel
Namespace My
<Global.Microsoft.VisualBasic.HideModuleName(),
Global.System.Diagnostics.DebuggerNonUserCode()>
Module MyCollectionsUtils
Private helper As New _
ThreadSafeObjectProvider(Of ObservableCollectionHelper)
Friend ReadOnly Property CollectionsUtils _
As ObservableCollectionHelper
Get
Return helper.GetInstance
helper = Nothing
End Get
End Property
End Module
End Namespace
Class ObservableCollectionHelper
Public Function ConvertToObservableCollection(Of T) _
(ByVal collection As ICollection(Of T)) _
As ObservableCollection(Of T)
Return New ObservableCollection(Of T)(collection)
End Function
End Class
Friend Visibility
Module’s members are marked as Friend to reproduce the default Visual Basic behavior.
There are some tasks to perform after examining Listing 19.2. First, notice how the ObservableCollectionHelper class exposes a public method that effectively converts an ICollection(Of T) into a new ObservableCollection. Also notice how there is the need to explicitly provide a Namespace My..End Namespace declaration, which encloses custom members for My. The MyCollectionsUtils module exposes members that are effectively accessible via My. To replicate the VB default behavior, the module is marked as System.Diagnostics.NonUserCode so that the debugger does not step into such code (if you instead need debugger support, remove this attribute) and as Microsoft.VisualBasic.HideModuleName that prevents the module name to be shown by IntelliSense when invoking your custom members. Then notice how the helper field is of type ThreadSafeObjectProvider(Of T). According to the Microsoft documentation, this is a best practice because it ensures that each thread invoking My.CollectionsUtils has access to a separate instance. The read-only property CollectionsUtils then wraps the ObservableCollectionHelper.ConvertToObservableCollection method being exposed through the GetInstance invocation. When you have created your extension, you can use it in a simple way. The following code shows how you can convert a List(Of Integer) into an ObservableCollection using your custom My.CollectionsUtils member:
Dim someInts As New List(Of Integer) From {1, 2, 3}
Dim obs As ObservableCollection(Of Integer) =
My.CollectionsUtils.ConvertToObservableCollection(someInts)
For Each number As Integer In obs
Console.WriteLine(number)
Next
After seeing how you can extend My at the root level, let’s now see how you can customize existing members.
Extending My.Application and My.Computer
Extending existing members such as Application and Computer is straightforward because both are implemented as partial classes, so you can add your own partial classes without the need of editing auto-generated code. Previous considerations remain unchanged, meaning that your partial classes’ names need to start with My (such as MyApplication and MyComputer) and that both must be enclosed within an explicit declaration of a Namespace My..End Namespace code block. For example, imagine you want to extend My.Application with a method that associates a file extension with your application so that each time you double-click a file with that particular extension it will be opened by your application. Listing 19.3 accomplishes this (notice that if you run Windows Vista, Windows 7, or Windows 8 you need to start Visual Studio with administrative rights).
Listing 19.3. Extending My.Application
Imports Microsoft.Win32
Namespace My
Partial Friend Class MyApplication
Public Function AssociateExtension(ByVal extension As String,
ByVal mimeType As String) As Boolean
Try
'Creates a registry entry for the extension
My.Computer.Registry.ClassesRoot.
CreateSubKey(extension).SetValue("",
mimeType, RegistryValueKind.String)
'Creates a registry entry for the Mime type
'Environment.GetCommandLineArgs(0) returns
'the executable name for Console applications
My.Computer.Registry.ClassesRoot.
CreateSubKey(mimeType & "shellopencommand").
SetValue("", Environment.GetCommandLineArgs(0) & " ""%l"" ",
RegistryValueKind.String)
Return True
Catch ex As Exception
Return False
End Try
End Function
End Class
End Namespace
Notice how the MyApplication class is marked as Partial Friend. This is required to match the definition provided by Visual Basic to My.Application. Now you can use the extension as you normally would do with My.Application. The following is an example:
Dim succeeded As Boolean =
My.Application.AssociateExtension(".ale",
"AlessandroDelSole/document")
Extending My.Computer works similarly. For example, we could implement a property that returns the MIME type for the specified filename. Code in Listing 19.4 demonstrates this.
Listing 19.4. Extending My.Computer
Imports Microsoft.Win32
Namespace My
Partial Friend Class MyComputer
Public ReadOnly Property MimeType(ByVal fileName As String) As String
Get
Return getMimeType(fileName)
End Get
End Property
Private Function getMimeType(ByVal fileName As String) As String
Dim mimeType As String = String.Empty
Dim fileExtension = System.IO.Path.
GetExtension(fileName).ToLower()
Dim registryKey = Registry.ClassesRoot.
OpenSubKey(fileExtension)
If registryKey IsNot Nothing And _
registryKey.GetValue("Content Type") _
IsNot Nothing Then
mimeType = registryKey.
GetValue("Content Type").ToString
Else
mimeType = ""
End If
Return mimeType
End Function
End Class
End Namespace
You still need to mark the class as Partial Friend by enclosing it within the My namespace declaration. At this point, you can use your extension as usual—for example, to retrieve the MIME type of a text file:
Dim mimeType As String = My.Computer.MimeType("Testfile.txt")
Of course, you are not limited to extending Application and Computer; you can also extend Settings and Resources.
Extending My.Resources and My.Settings
Extending My.Resources and My.Settings is also possible, although with a few differences. Resources is a namespace, so you need to declare it as follows:
Namespace My.Resources
Friend Module MyResources
'Your code here
End Module
End Namespace
Generally, you do not need custom extensions to Resources; you could decide to offer alternative localized versions of some contents. Extending My.Settings works more similarly to Application and Computer, but you do not need to provide custom extensions here because the Visual Studio 2012 Designer provides a graphical environment for performing all operations you need and selecting all available .NET types.
My in Different Applications
Now that you know how My can be customized, you can easily understand why different kinds of Visual Basic applications have their own customizations, provided by the IDE. For example, Windows Presentation Foundation applications provide a My.Windows property that allows access to windows’ instances, as follows:
'Get the instance of the Main window
Dim aWindows As Window = My.Windows.MainWindow
This is mainly due to the support offered in code by the My namespace to the Application Framework feature. This feature enables you to execute special tasks at the beginning and at the end of the application lifetime, such as showing splash screens or establishing what form is the main application form normally. In Windows Forms applications the application framework is enabled by default, and you can get in touch with it by opening My Project and selecting the Application tab, as shown in Figure 19.9.
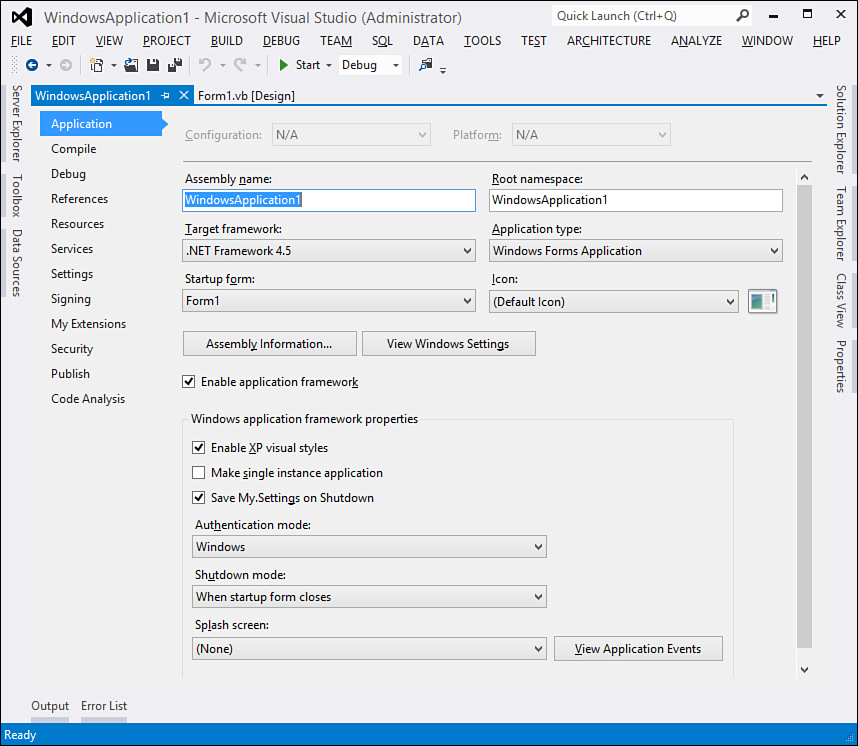
Figure 19.9. The application framework designer for Windows Forms applications.
Enabling the application framework allows you to visually manage features with no lines of code, although you are allowed to customize the related auto-generated code. For example, the following line manually establishes that My.Settings has to be saved when the application shuts down:
My.Application.SaveMySettingsOnExit = True
The following line shows how you instead can set the minimum number of milliseconds for a splash screen to be shown:
My.Application.MinimumSplashScreenDisplayTime = 1000
For WPF applications the application framework is slightly different, as shown in Figure 19.10.
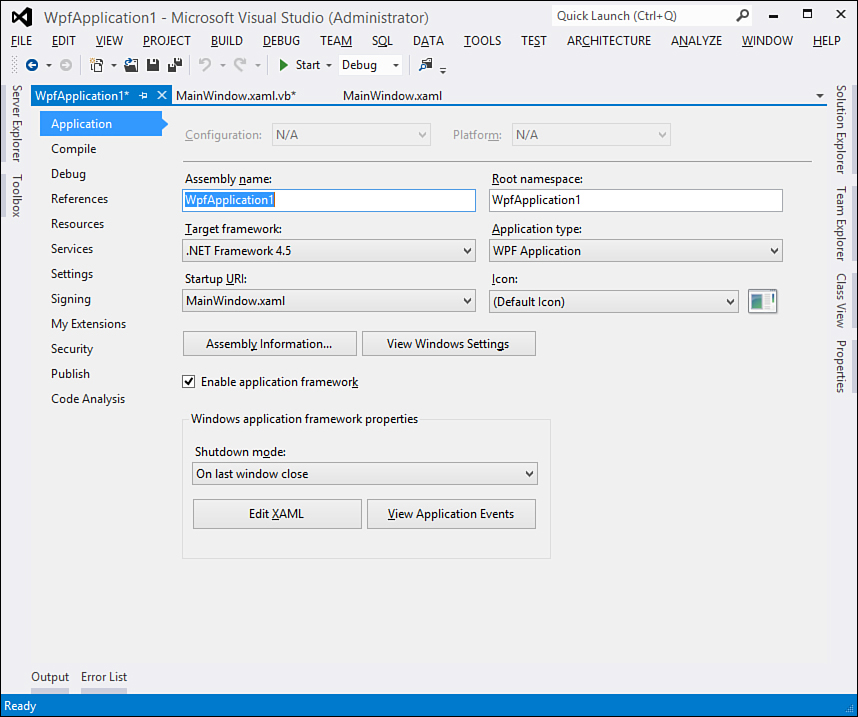
Figure 19.10. The application framework for WPF applications.
The following lines show how you can take advantage of My.Application in WPF to retrieve some information:
'The main Window XAML's uri
Dim startup As String = My.Application.StartupUri.ToString
'Main Window
Dim mainWindow As Window = My.Application.MainWindow
'Application resources
Dim appResources As ResourceDictionary = My.Application.Resources
All members are self-explanatory, so IntelliSense can be a great friend to you in this situation, too. In both Windows Forms and WPF applications, the View Application Events button redirects you to the appropriate file for defining application events (Application.xaml.vb in WPF and Application.Designer.vb in Win Forms). For web applications, Silverlight applications do not support the My namespace, and ASP.NET applications do not offer the My.Application and My.WebServices members; they instead expose the My.Response and My.Request properties that respectively wrap members from System.Web.HttpResponse and System.Web.HttpRequest.
Understanding Application Events
Applications that provide support for the application framework can be also managed with application events. This is the typical case of client applications such as Windows Forms and WPF applications. Windows Forms applications provide the following events:
• NetworkAvailabilityChanged, which is raised when the network becomes available or the connection is no longer available
• ShutDown, which is raised when the application shuts down
• Startup, which is raised when the application starts
• StartupNextInstance, which is raised when another instance of the application starts up
• UnhandledException which is raised when the application encounters an unhandled exception during tasks that involve the application framework
Application events are handled within the code file that implements My.Application customizations, which by default is Application.designer.vb. The following example shows how you can intercept the network state change:
Private Sub MyApplication_NetworkAvailabilityChanged(ByVal sender As Object,
ByVal e As Microsoft.VisualBasic.
Devices.
NetworkAvailableEventArgs) _
Handles
Me.NetworkAvailabilityChanged
If e.IsNetworkAvailable = False Then
'Network no longer available
Else
'Network available
End If
End Sub
In WPF applications you have more events that you can handle. First, application events in WPF are handled in the Application.xaml.vb file. You have the following events available:
• Activated, which is raised when the application gets the foreground focus
• Deactivated, which is raised when the application loses the foreground focus
• DispatcherUnhandledException, which is raised when the Dispatcher object encounters an unhandled exception
• Exit, which is raised when the application shuts down
• LoadCompleted, Navigated, Navigating, NavigationFailed, NavigationProgress, and NavigationStopped, which are raised in case of navigation applications, which is self-explanatory if you think of navigation between pages
• Startup, which is raised when the application starts up and specifies the main UI object
• FragmentNavigation, which is raised when navigating to a specific XAML Uri
• SessionEnding, which is raised when the user logs off from Windows or is shutting down the system
The following example shows how you can intercept the SessionEnding event and decide to back up your work if the e.ReasonSessionEnding property has value ReasonSessionEnding.Shutdown:
Private Sub Application_SessionEnding(ByVal sender As Object,
ByVal e As _
SessionEndingCancelEventArgs) _
Handles Me.SessionEnding
If e.ReasonSessionEnding = ReasonSessionEnding.Shutdown Then
'Backup your files here
End If
End Sub
Application events provide a great way for getting information on what happens behind the scenes of the application lifetime.
Summary
The My namespace is a unique feature of Visual Basic language that offers lots of shortcuts to most common operations. It was first made available in VB 2005. In this chapter you saw how you can interact with your application with My.Application and how you can perform operations on your system with My.Computer, including file operations, Registry operations, and clipboard operations. You then got information about an important feature provided by My.Settings, which has the capability to save and load user preferences using the Visual Studio Designer and managed code; this is a convenient way if compared to old initialization files. Next you saw about My.Resources, a special place for embedding files in your executable—typically for Console and Windows Forms applications. Finally, you got in touch with one of the most important features in My: the ability to extend the namespace with custom members, both at root level and existing members.