
Chapter 38. Building Apps for Windows Phone 7.5
In This Chapter
• Downloading the Developer Tools
• The Windows Phone 7.5 Programming Model
• Creating Apps with Visual Basic
• Setting Properties, Icons, and Splash Screen
• Submitting Apps to the Marketplace
Today people want and need to stay connected even more than in the past; also they do more dynamic jobs and often need to check for work emails, browse the Internet, and run business tools when traveling or when not at the office. Mobile phones have become personal assistants, with calendars, appointments, and applications (also known as apps when referring to mobile phones) that can solve an infinite number of problems, or be used for personal entertainment. The so-called smartphones play a fundamental role in the everyday life for both business and personal purposes. Microsoft’s offer for modern mobile phones is called Windows Phone, and in this chapter you learn how to build applications for version 7.5 of this operating system and see how easy it can be due to the opportunity of reusing existing skills based on WPF and Silverlight. Windows Phone development can be an important business opportunity, and Visual Basic offers all the power you need to build awesome apps.
Introducing Windows Phone
Windows Phone is the operating system from Microsoft for mobile phones of the new generation. Windows Phone was first released in October 2010 under the name of Windows Phone 7; a major upgrade, known as Windows Phone “Mango” (version 7.5) was released in mid-2011. In this chapter we target Windows Phone 7.5 because it is the most recent version.
Expectations for Windows Phone 8
At the time this chapter is being written, Microsoft unveiled Windows Phone 8. From what we know, the company is still working on the new version of the operating system and rumors say that it will share the runtime infrastructure with Windows 8’s kernel. No release date has been announced at the moment, which is why in this book you learn about Windows Phone 7.5. We only know that the future version of the developer tools for Windows Phone 8 will also enable you to create apps for Windows Phone 7.5 with Visual Studio 2012. It makes perfect sense to talk about Windows Phone 7.5 apps in this book because existing devices running this version of the operating system will not be eligible to upgrade to the new version, so you will still be able to build applications for a large number of existing users. Also, apps built for Windows Phone 7.5 will still run on Windows Phone 8 so investments made in these apps are also extended to the new platform.
Windows Phone is specifically designed for devices with touchscreens and that support multiple orientations, position locator (GPS), accelerometer, push notifications, cameras, and sensors. It is particularly innovative for at least two reasons:
• It introduces the Modern style interface (formerly known as Metro), which focuses on people first rather than the device and is a return to simplicity. This interface is important for Microsoft because it empowers Windows Phone and Windows 8 and is an inspiration for styling other recent tools such as Visual Studio 2012.
• It enables you to use apps’ icons to update their contents based on notifications or events, so that the user can be notified of content updates without the need of opening the app, but seeing its icon. This is known as Live Tiles.
Going into the details of this modern design language and principles is beyond the scope of this chapter, so you will get specific information when required. For further details, you can read an interesting explanation available on Wikipedia: http://en.wikipedia.org/wiki/Metro_(design_language)
Developer Registration to the Windows Phone Marketplace
Before you go on reading this chapter and do some work, there is some information that you must be aware of as a developer. To publish your applications to the Windows Phone Marketplace, no matter if they are free or paid, you must be a registered developer. Registering is a paid service unless you have an MSDN Subscription, which entitles you to claim a complimentary developer account. Register only if you are really sure that you will be publishing apps to the Windows Phone Marketplace; otherwise, do not register and use the developer tools for local testing with the device emulator. Detailed information on the registration process and on pricing can be found at http://create.msdn.com/en-US/home/about/developer_registration_walkthrough. This chapter will describe application development based on the device emulator, so that you will not need to register to the Marketplace. Only the last part of this chapter describes the submission process, which requires a developer account, but you can read it without registering.
Downloading the Developer Tools
To provide programmers the best development experience possible, Microsoft created the Windows Phone SDK 7.1 that targets both Windows Phone 7 and Windows Phone 7.5. Internally, Windows Phone 7.5 is version 7.1 of the operating system. This explains the SDK versioning and makes it clear that calling it 7.5 was more for marketing purposes. The Windows Phone SDK includes, among the others, the following tools:
• Visual Studio Express for Windows Phone—A lightweight and free-of-charge edition of the Visual Studio environment specifically designed for building apps for Windows Phone with Visual Basic and Visual C#. This special edition of Visual Studio is also used in this chapter.
• An add-in for Visual Studio 2010 Professional or higher—This includes project templates and tooling for building apps for Windows Phone within major editions of the IDE.
• The XNA Game Studio—A specific environment and set of tools that developers can use to build games for the Windows Phone and Xbox platforms.
• The Device Emulator—A virtual machine representing a device that you use to test your apps on the development machine inside a software environment.
• Application Deployment tool—Enables you to deploy apps to both the device emulator and your physical device.
• Windows Phone Registration tool—Enables you to associate your physical devices to your Windows Live ID.
• Expression Blend for Windows Phone—Expression Blend is the premier environment for designers, and this version has specific tools for Windows Phone.
You can download the Windows Phone SDK 7.1 from the following location: http://www.microsoft.com/en-us/download/details.aspx?id=27570. You can choose to download a web installer or a full ISO image. If you are installing the tools on Windows 8, you must follow these steps:
1. Install the Games for Windows Live client, available at http://www.xbox.com/en-US/LIVE/PC/DownloadClient.
2. Install the Windows Phone SDK 7.1 (see the previous link).
3. Install the Windows Phone SDK 7.1.1 update available from http://www.microsoft.com/en-us/download/details.aspx?id=29233.
Microsoft also released a Community Technology Preview (CTP) of the Async libraries (see Chapter 44, “Asynchronous Programming”), which also target Windows Phone and that is available at http://www.microsoft.com/en-us/download/details.aspx?displaylang=en&id=9983. Note that this is unsupported and is not the same as the final release shipping with .NET 4.5, but with this library you can use both the asynchronous programming patterns and iterators.
Windows Phone 8 SDK Availability
While this chapter is under revision, Microsoft has released the Windows Phone 8 SDK which includes developer tools for building apps for the upcoming Windows Phone 8. These tools are not discussed in this chapter both for timing reasons and because there is no physical device available at the moment that you could use for testing. Moreover, building apps for Windows Phone 8 relies on the Windows Runtime for Windows Phone, not Silverlight so it would be necessary to make an overview of WinRT which is beyond the scope of this book. You can download the Windows Phone 8 SDK for your own testing purposes from http://dev.windowsphone.com/en-us/downloadsdk. Similar to the previous version, this new SDK still includes a free Express edition of Visual Studio for Windows Phone, the Emulator, and deployment tools and also includes an add-on for Visual Studio 2012 that makes it possible to build apps for both Windows Phone 7.5 and Windows Phone 8 with the new version of the IDE.
Training and Learning Resources
Additional learning resources are available for Visual Basic developers on MSDN. In particular, you can download:
• Code Samples for Windows Phone—This covers all the possible areas in developing for this operating system. Such samples are available for free at: http://msdn.microsoft.com/en-us/library/ff431744(VS.92).aspx.
• Windows Phone 7.5 Training Kit—This includes a number of hands-on labs that guide you through the process of creating a complete application and that you can find at http://www.microsoft.com/en-us/download/details.aspx?id=28564.
Also, do not forget to periodically check out the Windows Phone Developer Center, available at http://dev.windowsphone.com/en-us/home, where you can get new samples, tools, and news about the development platform.
The Windows Phone 7.5 Programming Model
The application programming model for Windows Phone 7.5 is based on a specific version of Silverlight 4 for this kind of device, known as Silverlight for Windows Phone. This means that you will still design the user interface with XAML code and the imperative code in Visual Basic. This is a tremendous benefit because most of your existing skills with technologies like WPF and Silverlight will still be valid, with some obvious differences and limitations due to the specific platform. Also, most of .NET programming concepts and the language syntax are totally available. What you actually have to learn is how to interact with devices’ functionalities and how to manage the application lifetime. This chapter cannot cover every possible opportunity in building apps for Windows Phone, but it is a good “get started” guide. The Windows Phone programming model relies on the following elements:
• The Silverlight framework—Enables developers to build rich user interfaces; you already discovered this in Chapter 36, “Building Rich Internet Applications with Silverlight 5.”
• The XNA Framework—Provides a full set of APIs, services, and resources that developers can use to easily and quickly build games for multiple targets including Windows Phone, Xbox, and Zune. In particular, XNA includes specific APIs for sprite generation, 3D graphics, media interaction, and special gestures for games. Silverlight for Windows Phone and XNA can be combined into a single application and enable you to generate high-quality games that leverage all the device’s functionalities.
• Data and I/O—Based on the well-known concept of Isolated Storage, which reserves some space to each application for data storage and file operation, but prevents apps from accessing the operating system’s resources.
• Location services—Enable you to access (with the agreement of the user) the current physical position of the device so you can build apps that provide information of what it is around.
• Push notifications—Enable you to use Internet services to send notifications to the phone and update contents.
• Media—Includes not only the ability of playing animations and drawing complex graphics, but also interaction with videos and pictures on and from the device.
Windows Phone also uses some cloud-based services for tile notifications and other updates and provides a good support for interaction with the Windows Azure platform.
Creating Apps with Visual Basic
What you Find in this Chapter and What you do Not Find
Developing apps for Windows Phone 7.5 is something very exciting and interesting but would require an entire book to explain. For this reason, the goal of this chapter is teaching you how to start building apps with Visual Basic from zero to the submission to the Marketplace, providing information on the most common topics. So here you learn how to create and debug an app, how to write XAML and VB code, how to call built-in apps for common tasks and local storage, and how to customize and prepare an app for publication. You will not find topics like Live Tiles, sensors, push notifications, or location services. After you have the basics provided in this chapter, all these topics will be easier to study through the learning resources suggested previously.
You can create apps for Windows Phone 7.5 with the Visual Basic programming language by launching Visual Studio Express for Windows Phone that is available on your machine after you install the Windows Phone SDK 7.1. As usual, you must first create a new project by selecting File, New Project. The New Project dialog box (see Figure 38.1) shows a number of available project templates and the VB templates are available under Other Languages, Visual Basic. Notice how projects are also divided into two categories: Silverlight for Windows Phone and XNA Game Studio 4.0.
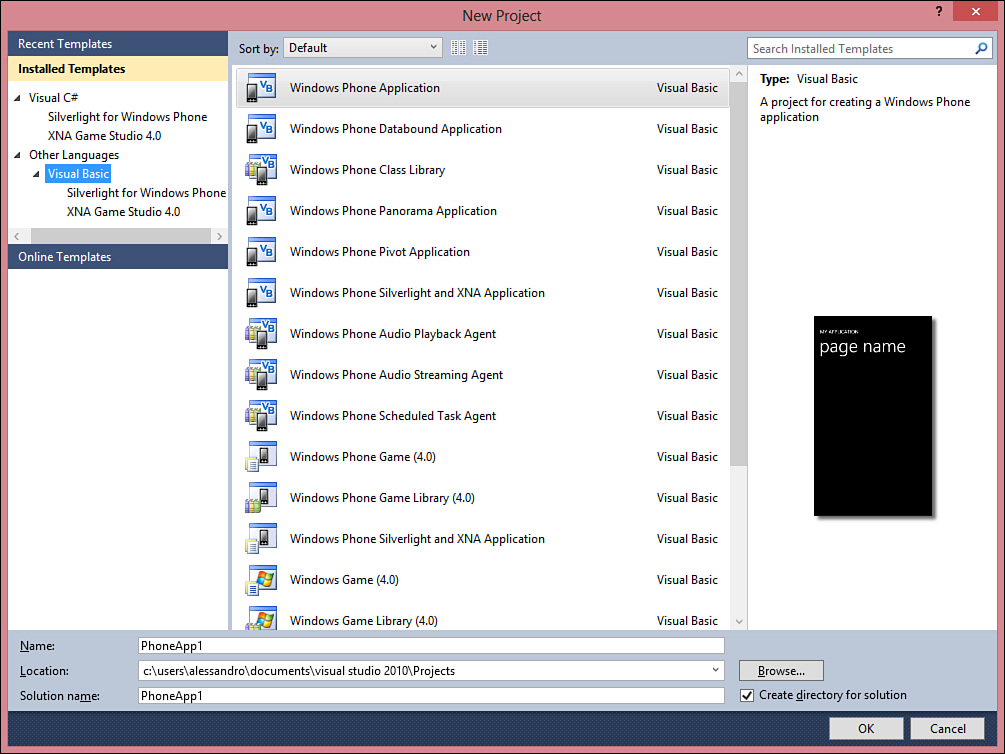
Figure 38.1. Creating a new Windows Phone project.
Agents and Streaming
Windows Phone 7.5 introduced the so-called agents, which enable you to execute tasks in the background and that you can compare to Windows’ services. Agents are used to send notifications to applications or to play media contents in the background. Figure 38.1 shows how Visual Studio offers specific project templates to create agent-enabled applications. The MSDN Library provides information about how to implement such agents.
Let’s start by creating a simple app, so you can understand how the environment works. You can select the Windows Phone Application template and leave the default name for the project unchanged; then click OK. Visual Studio will ask you to specify the operating system version, between 7.0 and 7.1. Notice that version 7.1 reflects the SDK version number, but actually it targets Windows Phone 7.5 so this must be your selection (see Figure 38.2).
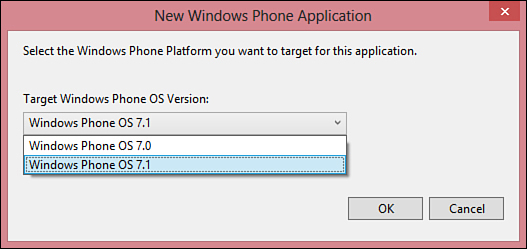
Figure 38.2. Selecting the target version of Windows Phone.
After a few seconds the new project is generated and the IDE shows the Windows Phone designer and the XAML code editor. You should feel at home with this kind of approach because you find the surface where you design the UI and the place where you make adjustments in XAML, exactly as you do in WPF and Silverlight. Figure 38.3 shows the designer and the toolbox with common controls.
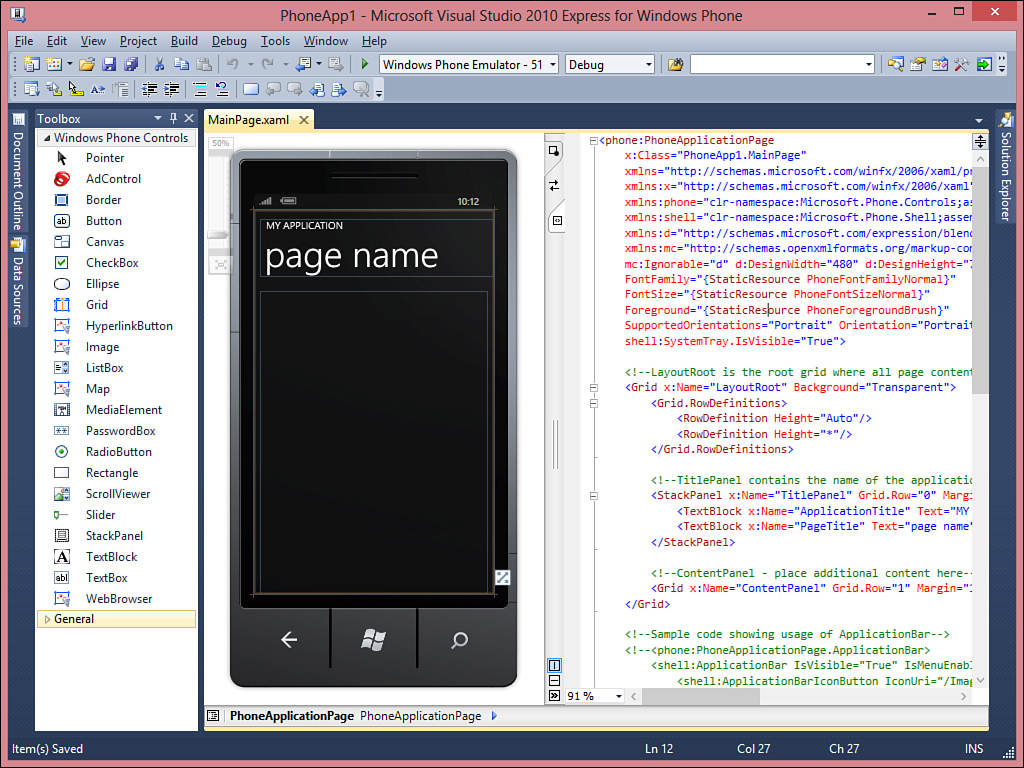
Figure 38.3. The Windows Phone designer in Visual Studio, with the XAML editor.
This first sample app will enable users to enter the URL of a website and view it inside an embedded web browser. As you can see in the XAML editor, two auto-generated TextBlock controls describe the application name and the page name, both contained inside a StackPanel control. They are not mandatory but can be useful to help you understand how the UI works, so replace the Text property for the ApplicationTitle control with WEB SITE VIEWER and the Text property for the PageTitle control with home page. Next, drag from the toolbox onto the device designer the following controls:
• A StackPanel container that stores the following controls
• A TextBlock that contains an informative message
• A TextBox control where users will type the URL of the website
• A Button for launching the action
• A WebBrowser control that will show the desired website
After this, make some edits to the XAML code to adjust controls’ sizing and spacing, like in the following code snippet:
<!--ContentPanel - place additional content here-->
<Grid x:Name="ContentPanel" Grid.Row="1" Margin="12,0,12,0">
<StackPanel>
<TextBlock Text="Type an URL:" Margin="5" />
<TextBox Name="AddressBox" Margin="5"/>
<Button Width="110" Height="80" Name="GoButton" Content="Go!"
Click="GoButton_Click" />
<phone:WebBrowser Name="Browser1" Height="424" />
</StackPanel>
</Grid>
The next step is handling the button’s Click event, where some code will launch the specified website. The Click event also responds to the touch of the user, which is known as a tap. You can double-click the Button in the designer so that Visual Studio will generate a Click event handler you could write as follows:
Private Sub GoButton_Click(sender As System.Object, e As
System.Windows.RoutedEventArgs)
Try
If String.IsNullOrEmpty(Me.AddressBox.Text) = False Then
Me.Browser1.Navigate(New Uri(Me.AddressBox.Text))
End If
Catch ex As Exception
MessageBox.Show(ex.Message)
End Try
End Sub
You can notice how Silverlight for Windows Phone still uses routed events like WPF and Silverlight; also, it is easy to see how normal .NET programming techniques are used. The WebBrowser control exposes a Navigate method that receives an argument of type System.Uri and that will open the specified website. You will now learn how to debug your apps and how to see them in action inside the local device emulator.
Starting and Debugging Windows Phone Apps
All the instrumentation that Visual Studio offers for debugging Visual Basic applications can be used with Windows Phone apps as well—for example, you can use breakpoints, data tips, and tool windows for debugging. Put succinctly, all the notions you learned in Chapter 5, “Debugging Visual Basic 2012 Applications,” are still valid in Windows Phone. The real difference is how you execute apps for debugging and testing. In fact, you can either test and debug your apps on the local device emulator or perform debugging on the physical device. However, if you want to test your app on your device, this must be developer unlocked, which means it can be used for development purposes only if the associated Windows Live ID has been registered as a developer account. The standard toolbar of Visual Studio contains a combo box that enables you to specify the execution environment, as represented in Figure 38.4.
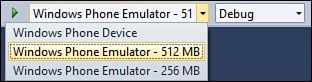
Figure 38.4. Selecting the execution environment for testing Windows Phone apps.
Choosing the Windows Phone Emulator with 512 MB of RAM is an appropriate choice, but you can choose 256 MB as well to see how your app works with less advanced devices. You can also switch between the classic Debug and Release configurations; as usual, you use the latter when the application is going to be released to the public. You can now press F5 so that the application will be compiled into a Silverlight XAP file and deployed to the target environment. The Windows Phone Emulator is actually a virtual machine specific for this kind of operating system; because of this, every time you shut down the emulator and then press F5 again, the operating system is loaded again. You can therefore leave the emulator open during your testing activities because Visual Studio will update the XAP file every time you start debugging. After a few seconds, the Emulator shows the application running, as demonstrated in Figure 38.5.
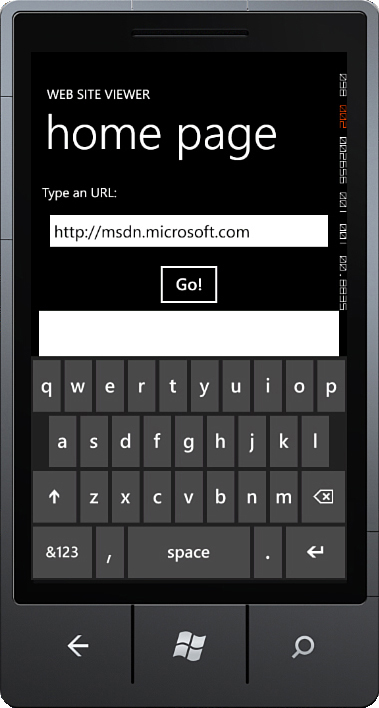
Figure 38.5. The Windows Phone Emulator shows the application running.
The keyboard displays after you enter the TextBox. It is worth mentioning that the Emulator is touch-enabled, so if you have a multitouch display, you can test how the application will work in reality. Enter the URL of a website and then tap the button. Figure 38.6 shows an example of the result of this action.
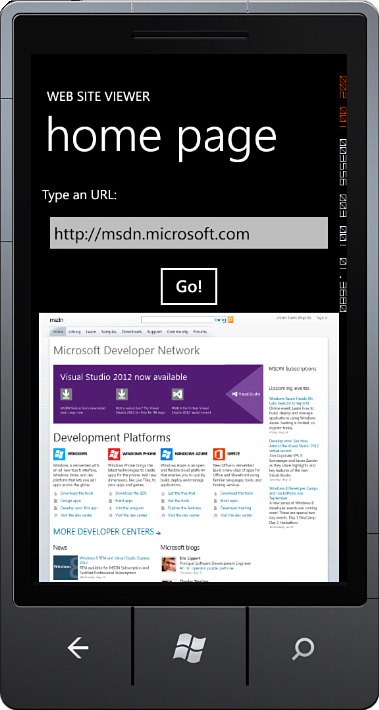
Figure 38.6. The app is showing the specified website.
Understanding Pages, Orientations, and the Navigation Framework
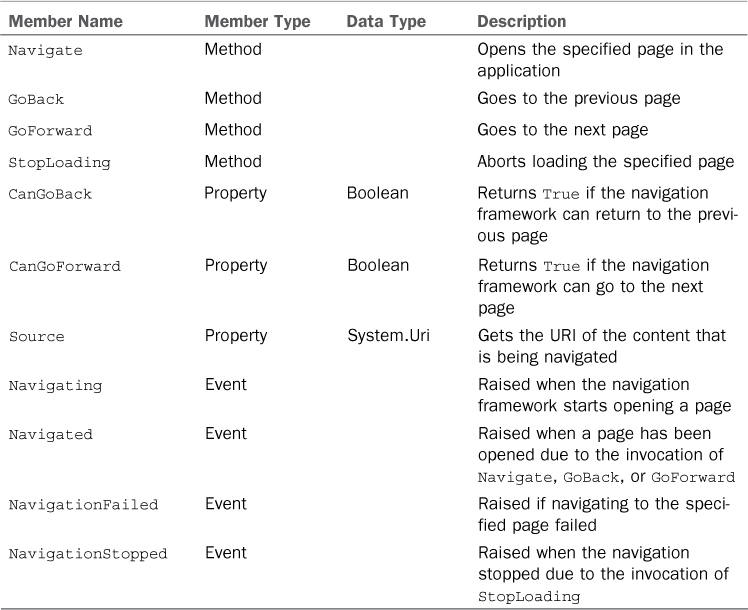
Each Windows Phone app is made of at least one page, like in the previous example. A page is the root container of UI controls that the user interacts with. You can add multiple pages, so that you can show all the contents you need. Every page is an instance of the PhoneApplicationPage class. To browse between pages, Silverlight for Windows Phone offers its own Navigation Framework, which is exposed by shared methods of the NavigationService class. The most important method of this class is Navigate, which enables you to move to the specified page in the application. Table 38.1 summarizes the most important members of this class.
Table 38.1. The Most Important Members of the NavigationService Class
Pages in Windows Phone support two orientations: Portrait and Landscape. This is because of the device’s orientation sensor, which enables you to rotate the content of a page. Typically, pages can also support both orientations, in case your contents can fit well in the available space in both portrait and landscape modes. Orientations are offered by the Microsoft.Phone.Controls.PageOrientation enumeration, and you set the value directly in XAML at design time. To understand all these concepts, select Project, Add New Item. In the Add New Item dialog box, you can see a number of page templates; for the sake of simplicity, select the Windows Phone Portrait Page template. Then name the new item as SecondPage.xaml (see Figure 38.7).
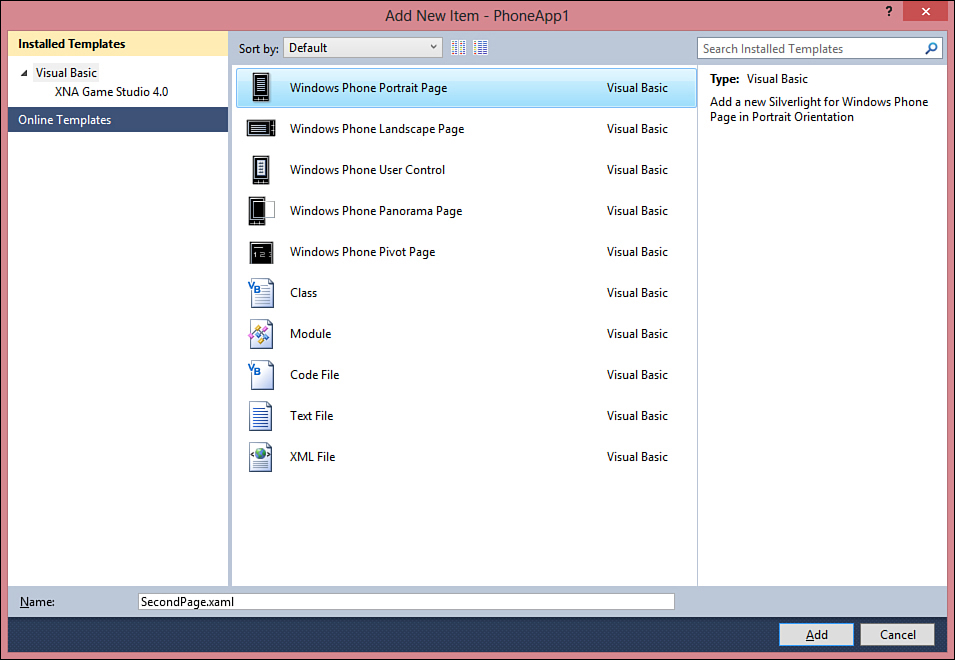
Figure 38.7. Adding a new page.
Visual Studio will add a new page to the project that you will see both in the designer and in Solution Explorer. If you take a look at the page definition, you will notice the availability of the following two lines:
SupportedOrientations="Portrait"
Orientation="Portrait"
So, by default the page is supporting only the portrait orientation. SupportedOrientations enables you to specify which orientations are supported, whereas Orientation establishes which orientation is used when the page is first loaded. You can support both portrait and landscape orientations by changing the first line as follows:
SupportedOrientations="PortraitOrLandscape"
Now drag a Button onto the page and handle its Click event as follows:
Private Sub Button1_Click(sender As System.Object,
e As System.Windows.RoutedEventArgs) _
Handles Button1.Click
If NavigationService.CanGoBack Then
NavigationService.GoBack()
End If
End Sub
This will make the app return to the main page. Now double-click MainPage.xaml in Solution Explorer, and add a new button after the existing one, by typing the following XAML:
<Button Width="110" Height="80" Name="Page2Button" Content="Next"
Click="Page2Button_Click" />
The Click event handler of this button invokes the NavigationService.Navigate method to move to the previously added page:
Private Sub Page2Button_Click(sender As System.Object,
e As System.Windows.RoutedEventArgs)
NavigationService.Navigate(New Uri("/SecondPage.xaml",
UriKind.Relative))
End Sub
The page’s address is a relative URI, so you do not need to specify the full address because the page is inside the application. Instead, you specify the filename of the page. If you now run the application, you can see how moving between pages is easy, by using the built-in navigation framework’s members.
Using System Functionalities with Launchers
More often than not, you will need to create apps that interact with some system’s functionalities such as the email client, the media player, Internet Explorer, or Bing Maps, or you might need to programmatically prepare a phone call or an SMS. In Silverlight for Windows Phone, you can easily access all these features via the launchers. Launchers are represented by classes from the Microsoft.Phone.Tasks namespace; each class enables you to access a specific feature, as summarized in Table 38.2.
Table 38.2. Summary of Launchers in Windows Phone
Every launcher class exposes a Show method that must be invoked after assigning property values. The biggest benefit of using launchers is that you do not need to implement pages or custom controls to use some system features. For a better understanding, create a new blank Windows Phone project like you did in the previous section. You should replace the Grid container named ContentPanel with a ScrollViewer control, which enables you to scroll the page content with the finger if it does not fit the available space and list a number of buttons, each of them starting a specific launcher. So the new ContentPanel element looks like this:
<ScrollViewer x:Name="ContentPanel" Grid.Row="1" Margin="12,0,12,0">
<StackPanel>
<Button Width="250" Margin="5" Name="IEButton"
Click="IEButton_Click">Internet Explorer</Button>
<Button Width="250" Margin="5" Name="MPButton"
Click="MPButton_Click">Media Player</Button>
<Button Width="250" Margin="5" Name="BingButton"
Click="BingButton_Click">Bing Maps</Button>
<Button Width="250" Margin="5" Name="ConnectionButton"
Click="ConnectionButton_Click">Connection</Button>
<Button Width="250" Margin="5" Name="EmailButton"
Click="EmailButton_Click">Email</Button>
<Button Width="250" Margin="5" Name="CallButton"
Click="CallButton_Click">Phone call</Button>
<Button Width="250" Margin="5" Name="SearchButton"
Click="SearchButton_Click">Search</Button>
<Button Width="250" Margin="5" Name="SmsButton"
Click="SmsButton_Click">SMS</Button>
<Button Width="250" Margin="5" Name="StatusButton"
Click="StatusButton_Click">Share Status</Button>
<Button Width="250" Margin="5" Name="LinkButton"
Click="LinkButton_Click">Share Link</Button>
<Button Width="250" Margin="5" Name="MarketButton"
Click="MarketButton_Click">Hub</Button>
</StackPanel>
</ScrollViewer>
Go to the code-behind file so that you can write Visual Basic code to enable launchers.
The WebBrowserTask
The simplest launcher is the WebBrowserTask, which opens an instance of Internet Explorer pointing to the specified URL. You set the Uri property with the web address you want to visit and then invoke Show. The following code provides an example:
Private Sub IEButton_Click(sender As System.Object,
e As System.Windows.RoutedEventArgs)
Dim browserTask As New WebBrowserTask
browserTask.Uri = New Uri("http://www.microsoft.com", UriKind.Absolute)
browserTask.Show()
End Sub
Figure 38.8 shows the result of the previous code. Tap the Back button of the Emulator to go back to the main page.
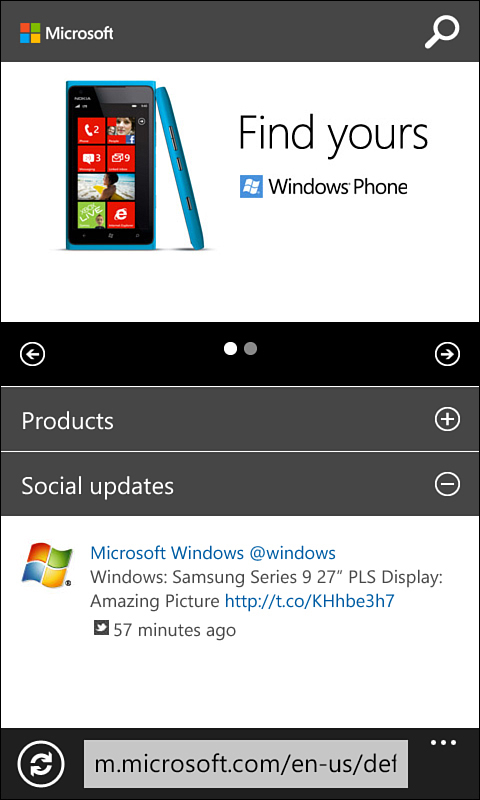
Figure 38.8. Launching Internet Explorer with the WebBrowserTask.
The MediaPlayerLauncher
The MediaPlayerLauncher starts the built-in media player and enables you to stream media contents. You can only stream videos and provide the address under the form of a System.Uri object. The following code provides an example:
Private Sub MPButton_Click(sender As System.Object,
e As System.Windows.RoutedEventArgs)
Dim mediaTask As New MediaPlayerLauncher
mediaTask.Media = New Uri("http://www.mysite.com/myvideo.wmv", UriKind.Absolute)
mediaTask.Show()
End Sub
Windows Phone only supports video codecs specified in the following page of the MSDN Library: http://msdn.microsoft.com/en-us/library/windowsphone/develop/ff462087(v=vs.92).aspx
The BingMapsTask
You use the BingMapsTask to open the built-in Bing Maps app and search for the specified address. The following code demonstrates how to assign the SearchTerm property and the invocation of Show:
Private Sub BingButton_Click(sender As System.Object,
e As System.Windows.RoutedEventArgs)
Dim bingTask As New BingMapsTask
bingTask.SearchTerm = "Redmond, WA, One Microsoft Way"
bingTask.Show()
End Sub
Figure 38.9 shows how the specified address is found with Bing Maps.
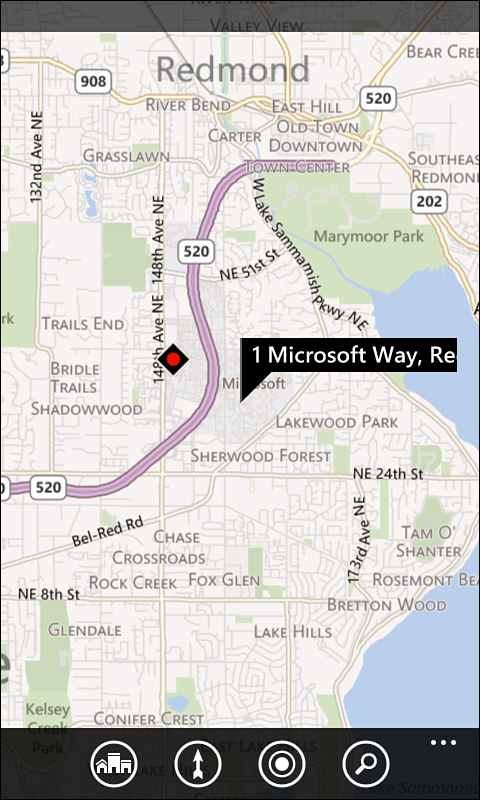
Figure 38.9. Finding an address with Bing Maps and the BingMapsTask.
The ConnectionSettingsTask
The ConnectionSettingsTask launcher allows programmatic access to network connections settings. The following code provides an example:
Private Sub ConnectionButton_Click(sender As System.Object,
e As System.Windows.RoutedEventArgs)
Dim connectionSettingsTask As ConnectionSettingsTask = _
New ConnectionSettingsTask()
connectionSettingsTask.ConnectionSettingsType = ConnectionSettingsType.WiFi
connectionSettingsTask.Show()
End Sub
You have to specify the type of network connection you want to check. This is done by assigning the ConnectionSettingsType property with one value from the Microsoft.Phone.Tasks.ConnectionSettingsType enumeration (WiFi, AirPlane, Cellular, BlueTooth). Figure 38.10 shows the result of the previous code.
Figure 38.10. Programmatic access to network connections settings.
The EmailComposeTask
The EmailComposeTask enables you to create an email message and send it to the built-in email client. The following code provides an example:
Private Sub EmailButton_Click(sender As System.Object,
e As System.Windows.RoutedEventArgs)
Dim emailTask As New EmailComposeTask
emailTask.To = "[email protected]"
emailTask.Subject = "Meeting tomorrow"
emailTask.Cc = "[email protected]"
emailTask.Bcc = "[email protected]"
emailTask.Body = "This is a reminder about our meeting tomorrow at 10 a.m."
emailTask.Show()
End Sub
As you can see, all the properties are self-explanatory and easy to use. The Windows Phone Emulator cannot be configured with a valid email account, so you will only be able to test this code on a physical device.
Making Phone Calls and Sending Messages with PhoneCallTask and SmsComposeTask
You can interact with typical features such as the phone app and the SMS app by using the PhoneCallTask and the SmsComposeTask launchers. The first launcher requires you to specify the phone number to call and a display name. Once started, the app will ask the user to choose whether she want to start the call or cancel the operation. The following code provides an example:
Private Sub CallButton_Click(sender As System.Object,
e As System.Windows.RoutedEventArgs)
Dim callTask As New PhoneCallTask
callTask.PhoneNumber = "+391122333"
callTask.DisplayName = "Technical support"
callTask.Show()
End Sub
For text messaging, you instead specify the message body and the target phone number:
Private Sub SmsButton_Click(sender As System.Object,
e As System.Windows.RoutedEventArgs)
Dim smsTask As New SmsComposeTask
smsTask.To = "+391122333"
smsTask.Body = "Wanna meet tonight?"
smsTask.Show()
End Sub
The text message will not be sent automatically; the user will decide whether to send the message or not.
The SearchTask
Implementing search functionalities is a common need in modern apps. Silverlight for Windows Phone offers the SearchTask launcher, which starts Bing and searches for the specified search term. The following code provides an example:
Private Sub SearchButton_Click(sender As System.Object,
e As System.Windows.RoutedEventArgs)
Dim searchTask As New SearchTask
searchTask.SearchQuery = "visual basic"
searchTask.Show()
End Sub
You need to assign the SearchQuery property with a string containing the search terms. Figure 38.11 shows search results in the Emulator.
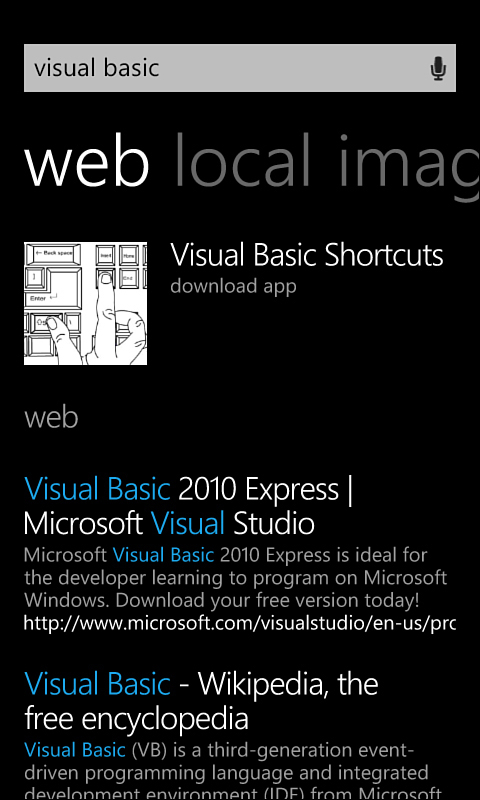
Figure 38.11. Searching with Bing from an app.
Social Networking with ShareStatusTask and ShareLinkTask
The Windows Phone operating system has deep integration with social networking platforms such as Facebook, Windows Live, Twitter, and LinkedIn. To make sharing messages and links easier, Silverlight for Windows Phone offers the ShareStatusTask and ShareLinkTask launchers. The first launcher enables you to share a text message to supported social networks, whereas the second one enables you to share a link. The ShareStatusTask requires you to assign the Status property with a string:
Private Sub StatusButton_Click(sender As System.Object,
e As System.Windows.RoutedEventArgs)
Dim statusTask As New ShareStatusTask
statusTask.Status = "I'm writing a new app for Windows Phone"
statusTask.Show()
End Sub
The ShareLinkTask requires you to set the LinkUri property with the link, the Title property with a title, and the Message property with a description. The following code provides an example:
Private Sub LinkButton_Click(sender As System.Object,
e As System.Windows.RoutedEventArgs)
Dim shareLink As New ShareLinkTask
shareLink.LinkUri = _
New Uri("http://www.informit.com/store/product.aspx?isbn=0672335530",
UriKind.Absolute)
shareLink.Title = _
"Visual Studio LightSwitch Unleashed"
shareLink.Message = _
"Official page for the Visual Studio LightSwitch Unleashed book"
End Sub
Both launchers will not post their content automatically. Instead, the operating system will first ask to which social networks the user wants to publish the content.
Launching the Marketplace with the MarketPlaceHubTask
You have several alternatives to opening the Marketplace in code, but the simplest is using the MarketPlaceHubTask. It enables you to open the store for either apps or music. The following code provides an example:
Private Sub MarketButton_Click(sender As System.Object,
e As System.Windows.RoutedEventArgs)
Dim marketHubTask As New MarketplaceHubTask
marketHubTask.ContentType = MarketplaceContentType.Applications
marketHubTask.Show()
End Sub
You assign the ContentType property with a value from the Microsoft.Phone.Tasks.MarketplaceContentType enumeration, which can be Applications or Music.
Showing Multiple Contents with the Panorama Control
Sometimes applications need to show multiple contents and the physical size of the device’s screen is not enough to contain all the information. Microsoft solved this problem by introducing the Panorama control, which is made of a long horizontal canvas that the user can scroll horizontally to see all the available contents in one page. Visual Studio provides a specific project template for creating panoramic applications, which you can see in Figure 38.12. Create a new project using the Windows Phone Panorama Application template.
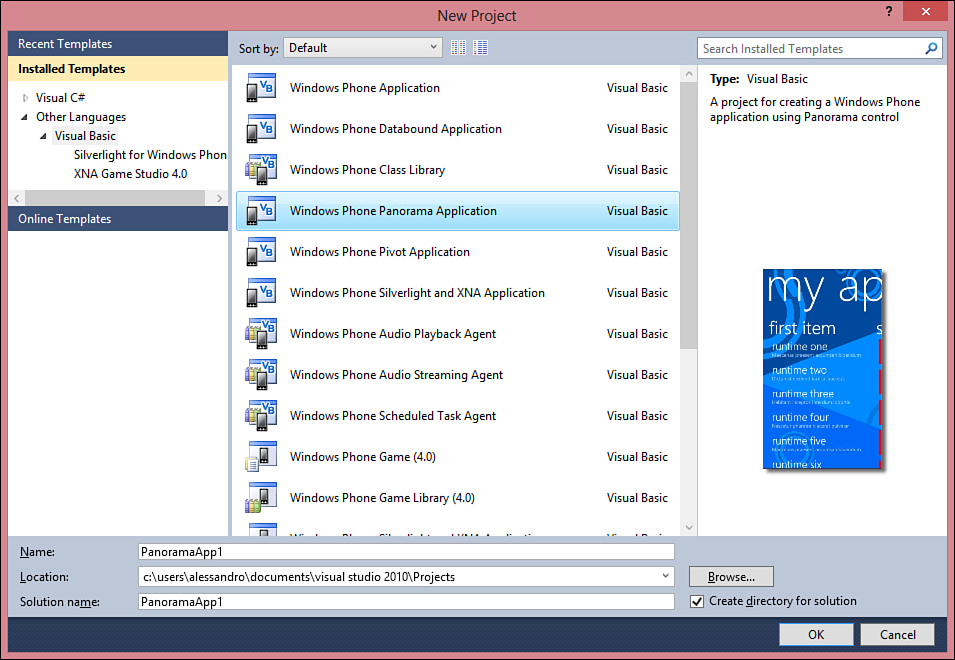
Figure 38.12. Creating a new panoramic application.
Once created, add a reference to the System.Xml.Linq.dll assembly that is required later. The Panorama control presents as many PanoramaItem elements as you want to display. You will now build a sample application that downloads RSS feeds from a couple of websites. The project template implements sample data and a basic UI definition that you do not need at this point. For this reason, remove the following elements from the project:
• In Solution Explorer, the ViewModels and SampleData folders
• In the code-behind file of the main page, the MainPage_Loaded event handler and the DataContext assignment in the constructor
• In the XAML code editor, both the auto-generated PanoramaItem elements
• In the App.xaml.vb file, the _viewModel field and the ViewModel property; also the method body of the Application_Activated event handler
Now imagine you want to display the latest blog posts from the Visual Basic Team at Microsoft and the latest messages on Twitter from the same Team. This is accomplished by downloading the appropriate RSS feeds. In the MainPage.xaml file, add the following two PanoramaItem controls inside the root PanoramaItem:
<controls:PanoramaItem Header="VB Team" Name="VBTeamItem">
<!--Double line list with image placeholder and text wrapping-->
<ListBox Margin="0,0,-12,0"
ItemsSource="{Binding}"
SelectionChanged="ListBox_SelectionChanged">
<ListBox.ItemTemplate>
<DataTemplate>
<StackPanel Margin="0,0,0,17" Width="432">
<TextBlock Tag="{Binding Path=Link}" Foreground="White"
Text="{Binding Path=Title}"
TextWrapping="Wrap"
Style="{StaticResource PhoneTextLargeStyle}"
>
</TextBlock>
<TextBlock Text="{Binding Creator}" Foreground="White"
TextWrapping="Wrap" Margin="12,2,12,0"
Style="{StaticResource
PhoneTextSubtleStyle}"/>
<TextBlock Text="{Binding pubDate}" Foreground="White"
TextWrapping="Wrap" Margin="12,2,12,0"
Style="{StaticResource
PhoneTextSubtleStyle}"/>
</StackPanel>
</DataTemplate>
</ListBox.ItemTemplate>
</ListBox>
</controls:PanoramaItem>
<controls:PanoramaItem Header="VB Tweets" Name="VBTweetsItem">
<!--Double line list with image placeholder and text wrapping-->
<ListBox Margin="0,0,-12,0"
ItemsSource="{Binding}"
SelectionChanged="ListBox_SelectionChanged">
<ListBox.ItemTemplate>
<DataTemplate>
<StackPanel Margin="0,0,0,17" Width="432">
<TextBlock Tag="{Binding Path=Link}" Foreground="White"
Text="{Binding Path=Title}"
TextWrapping="Wrap"
Style="{StaticResource PhoneTextLargeStyle}"
>
</TextBlock>
<TextBlock Text="{Binding Creator}" Foreground="White"
TextWrapping="Wrap" Margin="12,2,12,0"
Style="{StaticResource
PhoneTextSubtleStyle}"/>
<TextBlock Text="{Binding pubDate}" Foreground="White"
TextWrapping="Wrap" Margin="12,2,12,0"
Style="{StaticResource
PhoneTextSubtleStyle}"/>
</StackPanel>
</DataTemplate>
</ListBox.ItemTemplate>
</ListBox>
</controls:PanoramaItem>
Notice how each PanoramaItem contains a ListBox that will present news from RSS feeds. Each item in the ListBox will be displayed via a ListBox.ItemTemplate composed by a number of TextBlock controls, each data-bound to a property of a FeedItem class that will be defined in moments. Also, notice how the ListBox is data-bound to some data that will be passed at runtime (ItemsSource="{Binding}"). Now add a new class to the project, called FeedItem. This class will represent each item retrieved from the RSS feeds and will provide a shared method that loads contents from the specified feed. Listing 38.1 shows the code for this class (comments in the code will make reading easier).
Listing 38.1. Implementing RSS Feed Reading with LINQ
Imports System.Xml.Linq
Imports <xmlns:dc="http://purl.org/dc/elements/1.1/">
Imports System.Windows.Threading
Public Class FeedItem
'Content title
Public Property Title As String
'Date published
Public Property pubDate As String
'Content link
Public Property Link As Uri
'Content creator
Public Property Creator As String
Public Shared Event ErrorThrown()
'Read RSS contents from the given Uri and assign
'the result to the specified PanoramaItem
Public Shared Sub ReadContentsRss(ByVal rssUri As Uri,
ByVal panoramaElement As PanoramaItem)
'The WebClient class enables you to async downloading
Dim wclient As New WebClient()
'The statement lambda is a replacement for AddressOf
AddHandler wclient.OpenReadCompleted, Sub(sender As Object,
e As OpenReadCompletedEventArgs)
If e.Error IsNot Nothing Then
'If e.Error contains some ¡value,
'an error occurred.
MessageBox.Show(e.Error.Message)
RaiseEvent ErrorThrown()
Exit Sub
End If
'Open the XML stream with LINQ
Dim str As IO.Stream = e.Result
Dim xdoc As XDocument =
XDocument.Load(str)
' take results from each item element in the XML feed
Dim rssFeedsItems = (From item In xdoc...<item>
Let tempPublished =
Convert.ToDateTime(item.Element("pubDate").Value)
Let published = "Published " + _
CStr(tempPublished.Day) + "/" + _
CStr(tempPublished.Month) + "/" + _
CStr(tempPublished.Year)
Let title = item.<title>.Value
Let postLink = item.<link>.Value
Let creator = item.<dc:creator>.Value
Select New FeedItem With {.Link = New Uri(postLink,
UriKind.Absolute),
.pubDate = published,
.Creator = creator,
.Title = title}).ToList
' close the stream
str.Close()
' add results to listbox
' an invocation to the Dispatcher
' is required for threading management
Deployment.Current.Dispatcher.
BeginInvoke(Sub() panoramaElement.
DataContext =
rssFeedsItems)
End Sub
wclient.OpenReadAsync(rssUri)
End Sub
End Class
Now that you have a data model for representing feed items and a method that loads RSS contents, you need to invoke this method in the appropriate place and enable users to open the link of the selected content. In the MainPage.xaml.vb file, first handle the ListBox_SelectionChanged event as follows:
Private Sub ListBox_SelectionChanged(sender As System.Object,
e As System.Windows.Controls.
SelectionChangedEventArgs)
If e.AddedItems.Count > 0 Then
Dim item = CType(e.AddedItems(0), FeedItem)
Dim wbt As New WebBrowserTask
wbt.Uri = item.Link
wbt.Show()
End If
End Sub
If at least one item has been added to the selected ListBox, the selected item is converted into an instance of the FeedItem class and then the WebBrowserTask launcher is started to open the content inside Internet Explorer. The next step is writing a method that loads contents from RSS feeds. Consider the following code:
Private Sub LoadData()
System.
Threading.
ThreadPool.
QueueUserWorkItem(Sub()
FeedItem.
ReadContentsRss(New
Uri("http://blogs.msdn.com/b/vbteam/rss.aspx"),
VBTeamItem)
FeedItem.
ReadContentsRss(New
Uri("http://twitter.com/statuses/" _
+ "user_timeline/visualbasicteam.rss"),
VBTweetsItem)
End Sub)
End Sub
The code is running the ReadContentRss method from the FeedItem class in another thread. This will make the application’s user interface responsive when it is loading data. You can still use threading programming techniques from .NET, and a thread pool is available in Windows Phone. More on threading is explained in Chapter 42, “Processes and Multithreading.” The result of the invocation of the method is sent to the appropriate PanoramaItem for data-binding. The invocation of LoadData can be performed in the Loaded event of the page, as follows:
Private Sub MainPage_Loaded(sender As Object,
e As System.Windows.RoutedEventArgs) _
Handles MyBase.Loaded
LoadData()
End Sub
Finally, you have to handle connection lack or latency as required by the certification guidelines. The simplest way is to add some logic in the constructor via the NetworkInformation.NetworkInterface.GetIsNetworkAvailable method:
' Constructor
Public Sub New()
InitializeComponent()
If NetworkInformation.NetworkInterface.
GetIsNetworkAvailable = False Then
'Provide your logic if no connection is available
'This is required by the certification process
End If
End Sub
If you now run the application, other than seeing news from the specified RSS feeds, you will be able to scroll the panoramic view horizontally, as demonstrated in Figure 38.13.
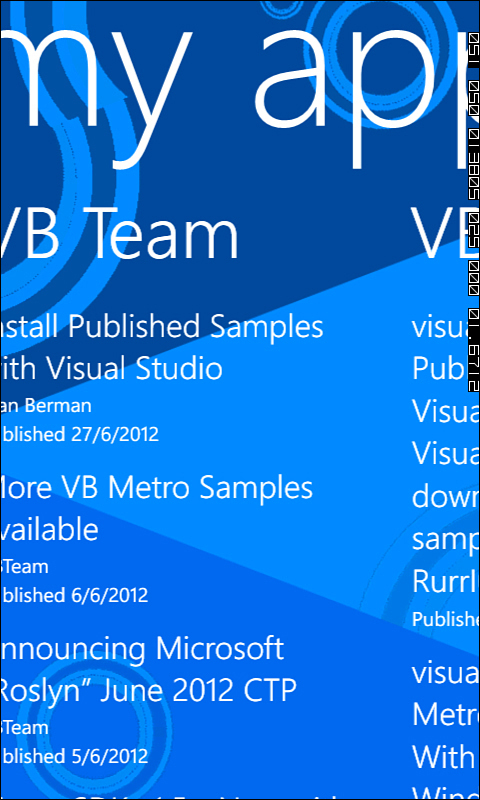
Figure 38.13. Showing Multiple Contents in One Page with the Panorama Control.
Local Data Storage
Windows Phone apps can certainly save and load data that they need to work with. However, for security reasons, they cannot interact with the operating system and with the device’s disk. Because apps run inside a sandboxed environment, they have some reserved space that they can use for their needs, called isolated storage. This is a well-known concept in the .NET development and has been extended to Silverlight for Windows Phone. The isolated storage is offered by the System.IO.IsolatedStorage namespace. In your apps, you first need to get the instance of the app’s isolated storage via the IsolatedStorageFile.GetUserStoreForApplication shared method:
Dim store As IsolatedStorageFile
' Constructor
Public Sub New()
InitializeComponent()
Me.store = IsolatedStorageFile.GetUserStoreForApplication
End Sub
After you have the instance, you use the IsolatedStorageFileStream class for both reading and writing operations. The usage of this stream is similar to others that you already know. For example, the following code demonstrates how to write a string to a text file:
Private Sub WriteToStorage()
Using sf As New IsolatedStorageFileStream("MyInfo.txt",
IO.FileMode.Create, store)
Using sw As New IO.StreamWriter(sf)
sw.WriteLine("Some data")
End Using
End Using
End Sub
A StreamWriter object points to the instance of the IsolatedStorageFileStream class and is used to send information to the file. The following code demonstrates how to read from the isolated storage:
Private Sub ReadFromStorage()
Using sf As New IsolatedStorageFileStream("MyInfo.txt", IO.FileMode.Open, store)
Using sw As New IO.StreamReader(sf)
Dim theData As String = sw.ReadLine
End Using
End Using
End Sub
You still use the IO.FileMode enumeration to establish whether the file must be opened for reading or for writing.
Local Data Access with SQL Server 3.5 Compact Edition
Windows Phone 7.5 introduced support for local databases based on SQL Server 3.5 Compact Edition and LINQ to SQL. This is a more complex topic, so I suggest you read an article I published in the Visual Studio Developer Center at the following address: http://msdn.microsoft.com/en-us/vstudio/hh758260.aspx
Understanding the Application Bar
Every page can offer additional actions through the application bar, represented by the ApplicationBar class. This enables you to store up to four small buttons (represented by ApplicationBarIconButton objects), which are horizontally aligned, and items (represented by ApplicationBarMenuItem objects), which are vertically aligned. Both buttons and items can respond to Click events. Page item templates in Windows Phone provide a basic stub of the application bar, made of commented lines of code, at the bottom of the XAML code editor. The following code extends the autogenerated code, to demonstrate how you can specify an x:Name identifier to buttons and items and how they can respond to Click events:
<phone:PhoneApplicationPage.ApplicationBar>
<shell:ApplicationBar IsVisible="True" IsMenuEnabled="True">
<shell:ApplicationBarIconButton Click="ApplicationBarIconButton_Click"
x:Name="Button1"
IconUri="/Images/appbar_button1.png" Text="Button 1"/>
<shell:ApplicationBarIconButton IconUri="/Images/appbar_button2.png"
Text="Button 2"/>
<shell:ApplicationBar.MenuItems>
<shell:ApplicationBarMenuItem Text="MenuItem 1"
Click="ApplicationBarMenuItem_Click" />
<shell:ApplicationBarMenuItem Text="MenuItem 2"/>
</shell:ApplicationBar.MenuItems>
</shell:ApplicationBar>
</phone:PhoneApplicationPage.ApplicationBar>
You should also provide meaningful icons for buttons and set them via the IconUri property. Figure 38.14 shows an example of the app bar.
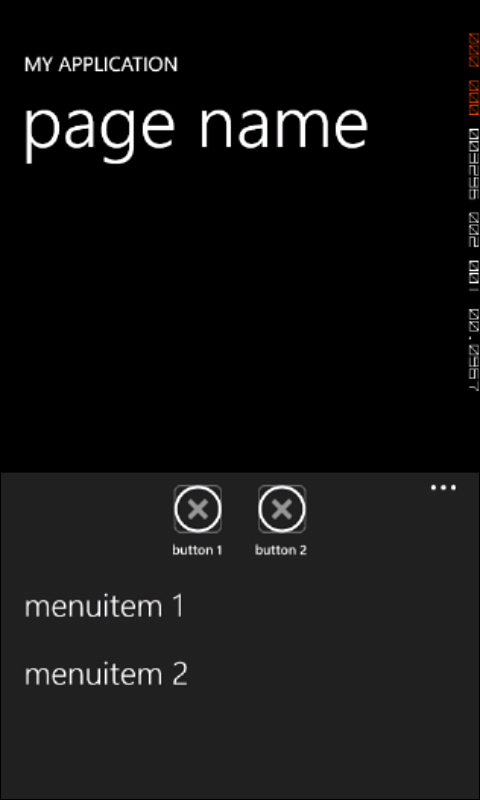
Figure 38.14. The app bar enables you to access additional actions and shortcuts.
Accessing the Pictures Hub
The Pictures Hub in Windows Phone is the place where pictures are stored. It is organized in albums and shows pictures from both linked social network accounts and folders on the device. You can programmatically access the Pictures Hub via a convenient class called Microsoft.Phone.Tasks.PhotoChooserTask. You handle the Completed event of this class, which is raised after the user selects a picture, by getting the instance of the selected picture under the form of a stream that you can elaborate further. For example, imagine you have a new empty project and want to show a picture selected from the hub inside an Image control. Drag an Image control from the toolbox onto the main page of the application. Next, enable the app bar (so that you do not need to add a button to the app’s surface) as follows:
<phone:PhoneApplicationPage.ApplicationBar>
<shell:ApplicationBar IsVisible="True" IsMenuEnabled="True">
<shell:ApplicationBarIconButton x:Name="GetImageButton"
Click="GetImageButton_Click"
IconUri="/Images/appbar_button1.png" Text="Button 1"/>
</shell:ApplicationBar>
</phone:PhoneApplicationPage.ApplicationBar>
Now move to the page’s code-behind file. Listing 38.2 demonstrates how easily you can pick pictures from the hub and assign the result to the Image control.
Listing 38.2. Accessing the Pictures Hub
Imports Microsoft.Phone.Tasks
Imports System.Windows.Media.Imaging
Partial Public Class MainPage
Inherits PhoneApplicationPage
' Constructor
Public Sub New()
InitializeComponent()
End Sub
Private Sub GetImageButton_Click(sender As System.Object,
e As System.EventArgs)
'Open the Pictures Hub
Dim photo As New PhotoChooserTask
AddHandler photo.Completed, AddressOf photo_Completed
'Allow users to take a new
'picture from the camera
photo.ShowCamera = True
'Start the task
photo.Show()
End Sub
Private Sub photo_Completed(Sender As Object,
e As PhotoResult)
'If a picture has been selected
If e.ChosenPhoto IsNot Nothing Then
'Create a new BitmapImage
Dim bmp As New BitmapImage
'Set the image's source with
'the stream representing the picture
bmp.SetSource(e.ChosenPhoto)
'Assign the Image.Source property
Me.Image1.Source = bmp
End If
End Sub
End Class
It is important to understand that you must set the PhotoChooserTask.ShowCamera property as True to allow users to pick a new photo from the camera and how the PhotoResult.ChosenPhoto property contains a reference to the selected picture via a stream.
Understanding the Execution Model
Although Windows Phone 7.5 introduced multitasking support, which is typically used to support agents, the main concept is that only one application at a time can be executed. The App class (available in the App.xaml.vb file) handles events that respond to moments of the application lifetime. The following numbered list provides the series of steps that constitute an app’s execution:
1. The app is selected from the list of installed apps or from Start. From a “not running” state, the app switches to a “running” state. When the app is launching, the Application.Launching event is raised. After the app is brought to the foreground, the Application.Activated event is raised.
2. If the user taps the Back button of the device, the application is closed. At this point, the Application.Closing event is raised. After the app is brought to the background, the Application.Deactivated event is raised.
3. If the user holds the Back button to switch to another app or the user presses Start, the application is brought to the background but is not closed. It is deactivated and put to sleep. The Application.Deactivating event is raised.
As a developer, you are responsible for saving the state of the application when it is put to sleep and for restoring the last state after the application is resumed. This technique is called tombstoning. Because you typically work with pages, to perform tombstoning you override the OnNavigatedFrom and OnNavigatedTo methods. The following code refers to the first sample app and demonstrates how to store the content of the TextBox where the user enters the website address to visit when the application is put to sleep and how the same information is restored after the application is brought to the foreground:
'The app is going to sleep
'Save the content of the TextBox
Protected Overrides Sub OnNavigatedFrom(e As System.Windows.
Navigation.NavigationEventArgs)
Me.State.Add("webSiteAddress", Me.AddressBox.Text)
End Sub
'The app is resumed
'Restore the content of the TextBox
Protected Overrides Sub OnNavigatedTo(e As System.Windows.
Navigation.NavigationEventArgs)
Dim webAddress As Object = Nothing
If Me.State.TryGetValue("webSiteAddress", webAddress) Then
Me.AddressBox.Text = CStr(webAddress)
End If
End Sub
The Page object exposes a State property, which is a Dictionary(Of String, Object). You can store information by providing a key to identify such information; this is done when the app is being put to sleep by invoking the dictionary’s Add method. When the app is resumed, the dictionary is queried via the TryGetValue method to see whether the specified key exists and, if it does, the stored information is converted into the appropriate type and sent to the user interface.
Setting Properties, Icons, and Splash Screen
You can customize your Windows Phone apps by replacing three default images:
• The splash screen—This must be a .jpeg image of size 480 × 800 and is shown when the application is being loaded. In Solution Explorer, you can see a file called SplashScreenImage.jpg, which represents the default splash screen and that you can replace with your own image.
• The application icon—This must be a 62×62 PNG image file and is used to identify the app in the list of installed apps. In Solution Explorer, the default application icon is represented by the ApplicationIcon.png file.
• The background image—This must be a 173×173 PNG image file and is used when you pin the app to the Windows Phone’s Start menu. In Solution Explorer, the default background image is represented by the BackgroundImage.png file.
After you have created your custom images, you can replace the default ones by accessing the project properties, as shown in Figure 38.15.
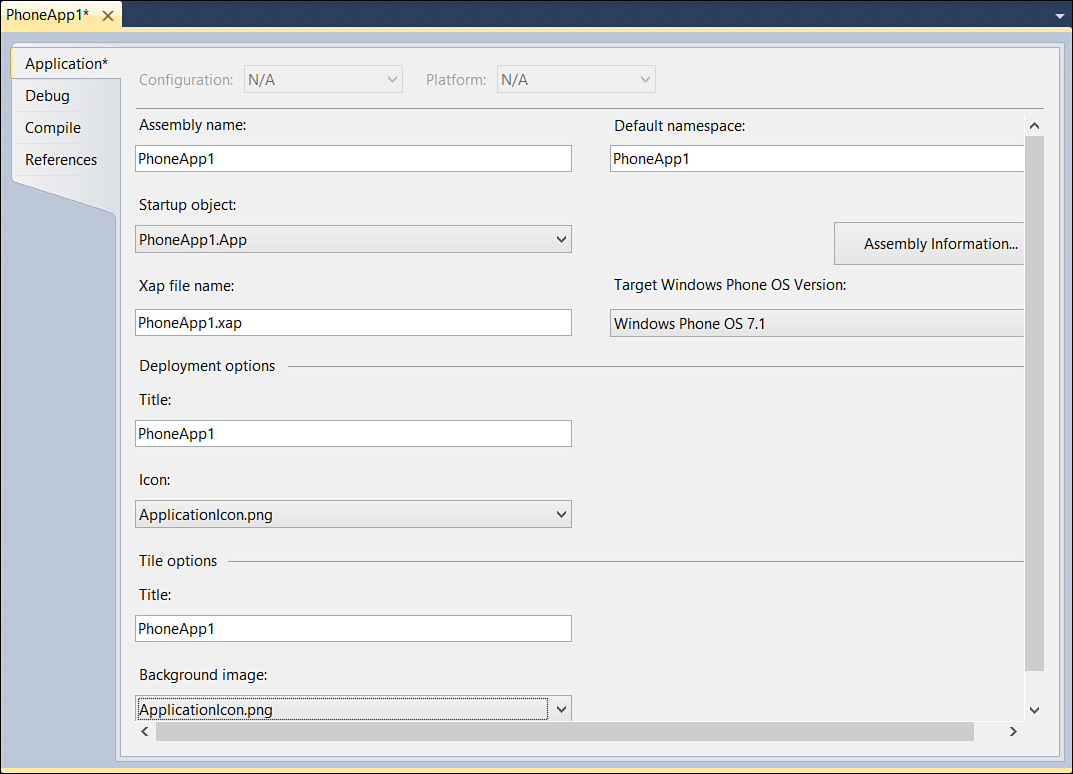
Figure 38.15. Customizing the Windows Phone app’s properties.
Two other properties should be customized:
• The Title field in the Deployment options group—This contains the app name as it will be displayed in the list of installed apps and should represent the full app name.
• The Title field in the Tile options group—This contains text that will be displayed on the app tile when you pin it to the Start menu.
Additionally, you must customize the Assembly Information, as you already know. In particular, be sure you edit both the Company and Copyright fields because by default they contain the Microsoft identifier. This means that if they are not replaced with your information, the application will not pass certification.
Submitting Apps to the Marketplace
Application Certification Requirements
Before you submit your apps to the Windows Phone Marketplace, you must be sure they adhere to the certification policies. For this reason, bookmark the certification requirements page on MSDN because this will be one of your closest friends for avoiding rejections: http://msdn.microsoft.com/en-us/library/windowsphone/develop/hh184843(v=vs.92).aspx
When you have finished developing and testing your app, it is time for the Marketplace submission so that other users will be able to download your app on their devices. To submit an app, you need to access the Windows Phone Dev Center at http://dev.windowsphone.com and sign in with your registered Windows Live ID. After you are signed in, click Dashboard and then Submit App. You will be required to specify some information, such as the app’s XAP file and submission details. Figure 38.16 shows the first step of the submission.
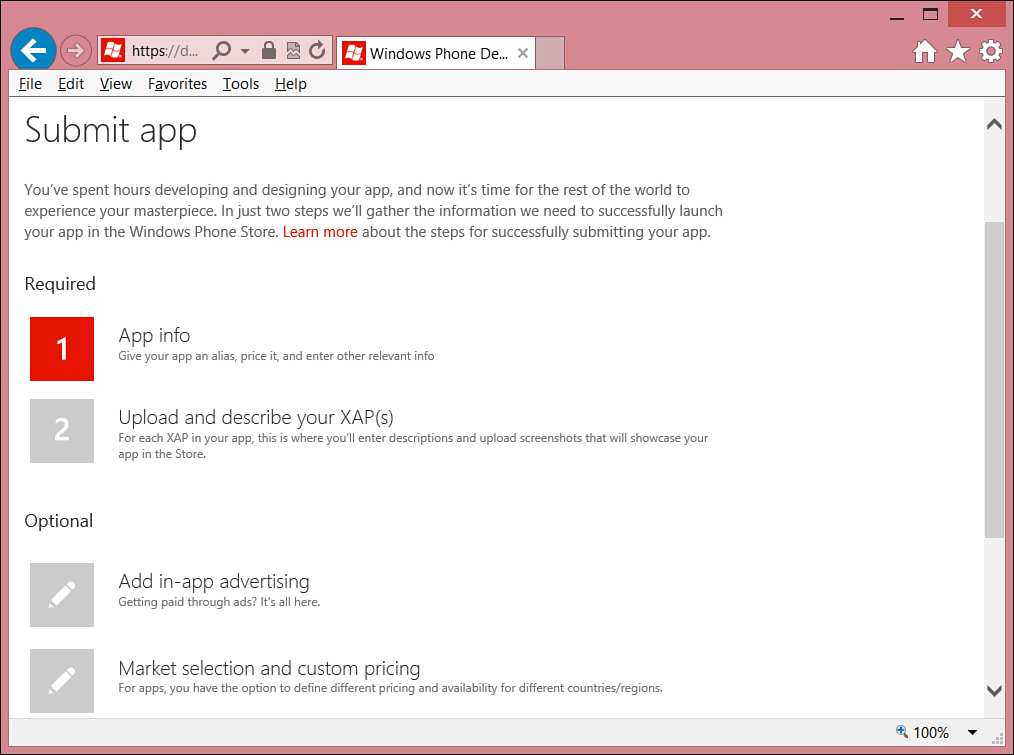
Figure 38.16. Starting the submission process.
If you click 1 – App info, you will be asked to specify the app name, the category, pricing, and worldwide distribution or distribution only to those marketplaces with no restriction rules. Figure 38.17 provides an example.
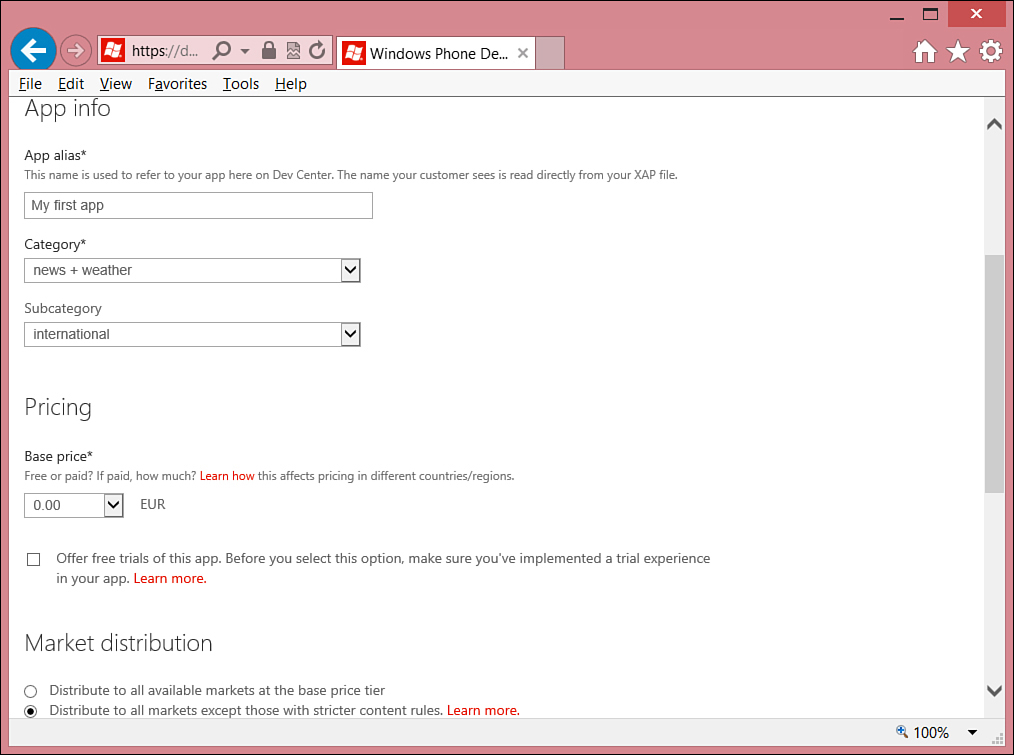
Figure 38.17. Specifying the application’s details.
You can specify the price for your app, which can be 0.00 (free) or paid. Actually, the Windows Phone Marketplace and the development platform support a trial mode. Implementing the trial experience in code is easy, and if you click the appropriate link in the pricing box, you will be redirected to the MSDN documentation that explains how to accomplish this. If you expand More Options, you will have an opportunity to decide whether the app will be published as soon as it passes the certification process. This avoids the need of manually publishing the app later. After completing the first step, you will be asked to upload the XAP file of your app in step 2. Click Browse and locate the app’s XAP file. After the XAP file has been uploaded, you will have a chance to provide additional details such as the version number. This is useful when you release application updates and represents the submission version number, so it is not the same number as the XAP file version number. In the same page, you must also specify the app language and description. The language must match the neutral language information that you supplied in the Assembly Information properties in Visual Studio, and the description will enable users to understand what your app does when they find it in the Marketplace (see Figure 38.18).
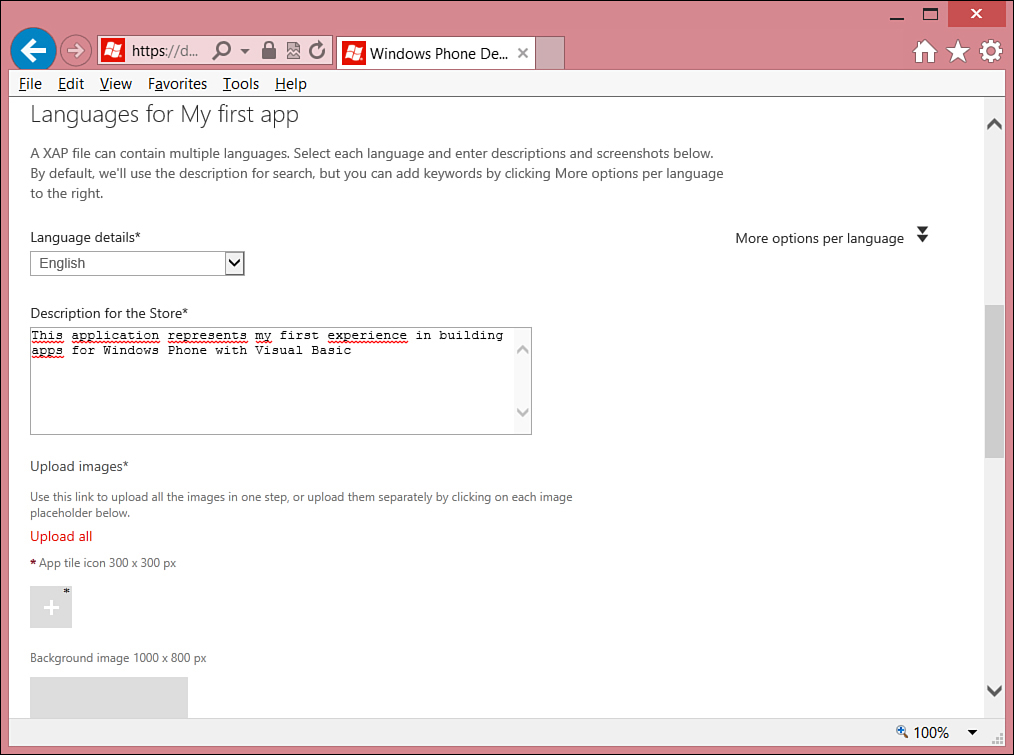
Figure 38.18. Supplying language, details, and images.
This is also the place where you have to specify a number of images that will be used in the Marketplace to identify your app, such as screenshots, app tile icon, and so on. Be sure you respect the required image sizes. When you complete this step, you have an opportunity to customize two additional settings: creating an advertising account so that apps will show advertising in exchange for some money (read the information available on the Dev Center carefully) and of choosing different pricing options for different markets. After you have completed all the required steps, you can submit the app for certification. When Microsoft completes reviewing the app, they will send you an email telling you whether the app was successfully certified and published or if it failed certification. If your app fails, the attached document will help you to identify the problem and how to fix it.
Summary
Windows Phone 7.5 is the most important operating system for mobile phones from Microsoft, and building apps for this platform relies on a special version of Silverlight 4. This makes developing applications easier because you can reuse existing skills on XAML and managed code. This chapter explained how to create a simple app interacting with the XAML and managed code editors. Next, you saw how to enable built-in device functionalities by taking advantage of launchers, which enable you to use Bing Maps, Internet Explorer, the built-in Media Player, the email client, and telephone and messaging apps. You saw how to display multiple contents in one page by implementing the Panorama control. You learned how to leverage the app bar and how to interact with the Pictures Hub. You then learned how the application execution model works and, finally, saw how to customize the application and start the submission process to the Windows Phone Marketplace.