
Chapter 48. Platform Invokes and Interoperability with the COM Architecture
In This Chapter
• Importing and Using COM Objects
• Exposing .NET Objects to the COM World
• P/Invokes and Unmanaged Code
The .NET Framework 4.5 Base Class Library offers tons of objects and methods for covering almost everything in modern application development. In most cases, objects and methods are managed wrappers of the Windows Application Programming Interface (API) so you can use them in the managed environment of the Common Language Runtime (CLR). In some situations you might need to access some operating system functionalities that have not been wrapped yet by the .NET Framework, or you might have legacy code exposed by Component Object Model (COM) objects, such as type libraries. Both the .NET Framework and Visual Basic still enable interoperability with the COM architecture, and in this chapter you see how to reach these objectives.
The Windows 8 Story
As you know, the Windows Runtime (WinRT) in Windows 8 is based on COM and exposes objects in a way that is known to .NET developers, making such objects appear as if they were managed. WinRT is a wrapper of COM objects, so if you want to build applications that use COM interoperability you might consider interacting with WinRT rather than writing using the old model. You will certainly use techniques described in this chapter if your applications will also run on Windows 7 and Windows Vista, not only Windows 8. If you can’t predict the target audience of your application, follow this chapter. If your desktop application will only run on Windows 8, spend a little time getting deeper knowledge of interaction between .NET and WinRT.
Importing and Using COM Objects
The .NET Framework 4.5, like previous versions, offers support for interoperability with the COM architecture via an engine named Runtime Callable Wrapper, which is the infrastructure that provides a communication bridge between .NET and COM. It is also responsible for type marshaling and handling events. Because of this engine, you can import COM objects and use them in your managed applications. You can import two kinds of COM components: type libraries and ActiveX components. Importing COM components is accomplished via two command-line tools: TlbImp.exe, which is required to import a type library, and AxImp.exe, which is required for importing ActiveX controls. This chapter does not discuss how to invoke such tools from the command line, but you do find out how to import COM components from within Visual Studio so that the IDE can do the work for you. The next example shows how to import an ActiveX control into the Visual Studio toolbox and use the control in code.
Importing COM Components into Visual Studio
In this chapter, you learn how to use COM components in a WPF application. The reason you should use WPF is that it is the only technology you should use to create modern desktop applications, even if it requires some more work when compared to Windows Forms. Also, the goal of this chapter is illustrating a very common scenario, which is having the ability of displaying PDF documents. Before going on, make sure you install the Adobe Reader program (www.adobe.com), which includes an ActiveX control to display PDF documents and that will be used in our example. You can replace the Adobe Reader with different software that has an ActiveX control.
At this point, create a new WPF project with Visual Basic. In Windows Forms, you can use COM components directly on Form objects, but in WPF you cannot. So the first thing you have to do is add a new Windows Forms user control to the WPF project; this enables you to host COM objects in WPF. To accomplish this, select Project, Add New Item and select the User Control item template in the Windows Forms category. Name the new user control as PDFControl.vb. Figure 48.1 demonstrates this.
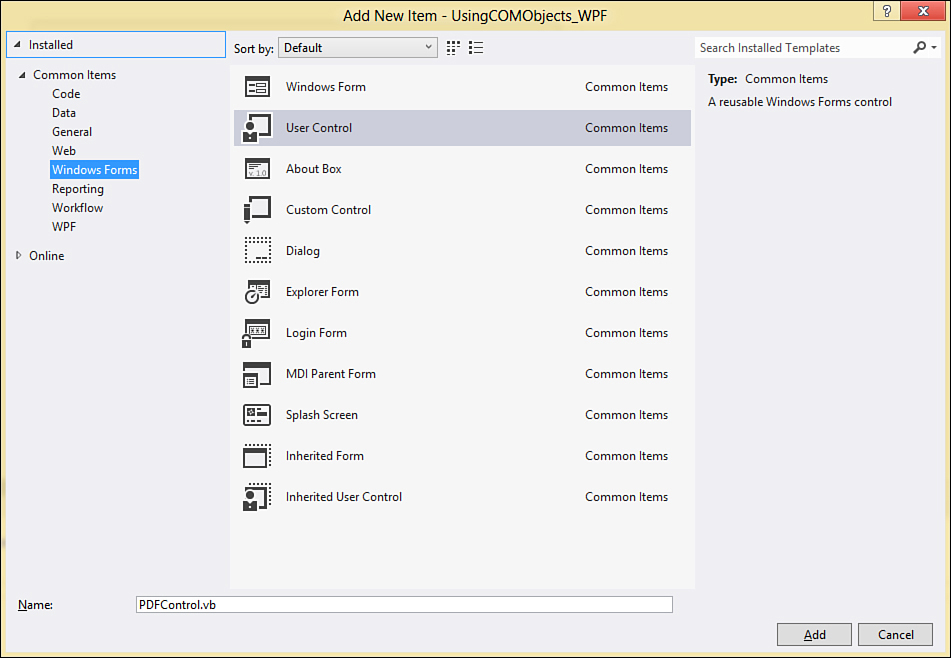
Figure 48.1. Adding a Windows Forms user control to the WPF project.
Ensure the user control is visible in the designer and then open the Visual Studio toolbox. When done, right-click the toolbox and select Choose Items. This launches the same-named dialog box that you already know because of adding .NET controls to the toolbox. Select the COM tab and search for the Adobe PDF Reader item, as shown in Figure 48.2.
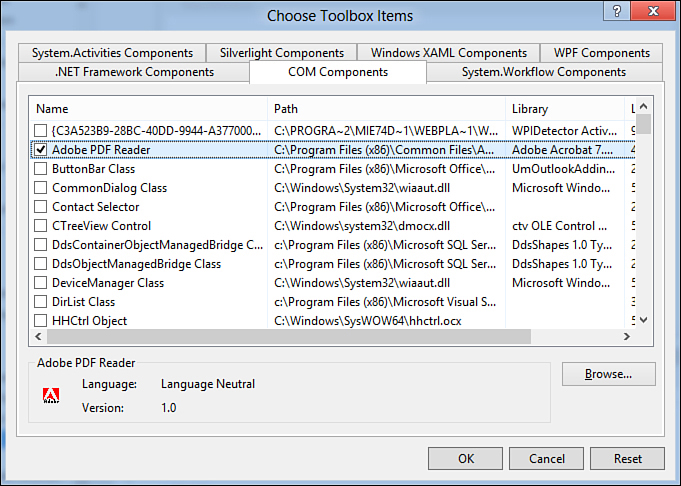
Figure 48.2. Choosing a COM component to add to the toolbox.
When you click OK, Visual Studio generates two files for you:
• Interop.AcroPDFLib.dll—A CLR wrapper for using COM objects exposed by the Adobe Reader type library in a .NET fashion.
• AxInterop.AcroPDFLib.dll—A Windows Forms proxy that provides the infrastructure required for hosting the control in your forms. You now might better understand why you needed a Windows Forms user control to host a COM component.
At this point, the Adobe Reader ActiveX control is available inside the toolbox. Now drag the PDF control over the Windows Forms user control form and resize it as you like. Visual Studio then generates some code for you to declare the control and enables you to use it. If you expand the PDFControl.vb file and double-click the AxAcroPDF1 item, you find the following initialization code for the ActiveX control:
'NOTE: The following procedure is required by the Windows Form Designer
'It can be modified using the Windows Form Designer.
'Do not modify it using the code editor.
<System.Diagnostics.DebuggerStepThrough()> _
Private Sub InitializeComponent()
Dim resources As System.ComponentModel.ComponentResourceManager = _
New System.ComponentModel.ComponentResourceManager(GetType(PDFControl))
Me.AxAcroPDF1 = New AxAcroPDFLib.AxAcroPDF()
CType(Me.AxAcroPDF1, System.ComponentModel.ISupportInitialize).BeginInit()
Me.SuspendLayout()
'
'AxAcroPDF1
'
Me.AxAcroPDF1.Enabled = True
Me.AxAcroPDF1.Location = New System.Drawing.Point(-15, -15)
Me.AxAcroPDF1.Name = "AxAcroPDF1"
Me.AxAcroPDF1.OcxState = CType(resources.GetObject("AxAcroPDF1.OcxState"),
System.Windows.Forms.AxHost.State)
Me.AxAcroPDF1.Size = New System.Drawing.Size(192, 192)
Me.AxAcroPDF1.TabIndex = 0
'
'PDFControl
'
Me.AutoScaleDimensions = New System.Drawing.SizeF(6.0!, 13.0!)
Me.AutoScaleMode = System.Windows.Forms.AutoScaleMode.Font
Me.Controls.Add(Me.AxAcroPDF1)
Me.Name = "PDFControl"
CType(Me.AxAcroPDF1, System.ComponentModel.ISupportInitialize).EndInit()
Me.ResumeLayout(False)
End Sub
Friend WithEvents AxAcroPDF1 As AxAcroPDFLib.AxAcroPDF
AxHost Class
ActiveX controls are wrapped by the System.Windows.Forms.AxHost class that enables you to treat COM components as you would .NET objects.
Now you can work with the ActiveX control in a managed way, as illustrated in the next subsection.
Using COM Objects in Code
When you have an instance of the ActiveX control, or of a type library, you can access its members like any other .NET object, thus invoking methods, assigning properties, or handling events. The following code loads and shows the specified document in the Adobe’s viewer:
Private Sub PDFControl_Load(sender As Object, e As EventArgs) Handles Me.Load
Me.AxAcroPDF1.LoadFile("C:UsersAlessandroDocumentsTestDoc.pdf")
End Sub
You can also handle events if available, as demonstrated by the following code snippet:
Private Sub AxAcroPDF1_OnError(sender As Object, e As EventArgs) Handles AxAcroPDF1.OnError
MessageBox.Show("An error has occurred while loading the document")
End Sub
In this particular case, the OnError event is raised when an error occurs while opening the PDF file. At a more general level, wrapping an ActiveX control enables you to import different kinds of members, including events.
Catching Exceptions
When you implement Try..Catch..End Try blocks, you can intercept and handle only CLS-compliant exceptions—that is, exceptions inheriting from System.Exception. Exceptions wrapped by the COM import tools are not CLS-compliant, so a classic Try block would fail. To intercept exceptions coming from wrapped objects, the .NET Framework offers the System.Runtime.CompilerServices.RuntimeWrappedException. It can be used for error handling when working with wrappers. The following code shows an example:
Try
Me.AxAcroPDF1.LoadFile("C:UsersAlessandroDocumentsTestDoc.pdf")
Catch ex As RuntimeWrappedException
Catch ex As Exception
End Try
Other than the usual exception properties, this class exposes a WrappedException property, of type Object, which represents the problem that occurred.
Releasing COM Objects
You should always explicitly release objects that wrap COM components so that the associated resources are also released. You accomplish this by invoking the System.Runtime.InteropServices.Marshal.ReleaseCOMObject method. It is worth noting that calling this method does not explicitly free all resources but decreases the reference count on the COM object, and when the count hits 0, the resources are freed. Continuing with the previous example, you release the AxAcroPDF1 object as follows:
System.Runtime.InteropServices.Marshal.ReleaseComObject(AxAcroPDF1)
This is important because COM objects treat system resources differently from .NET objects; therefore, an explicit release is required.
Calling COM Objects from WPF
Now that you have completed all the required steps to wrap a COM component into a Windows Forms user control, you need a way to use such a control in WPF. As you learned in Chapter 29, “WPF Common Controls,” you use a WindowsFormsHost control to embed Windows Forms contents inside a WPF window or user control. So, double-click the MainWindow.xaml file in Solution Explorer. Then, when the main window of the application is available in the designer, drag the WindowsFormsHost control from the toolbox onto the window. Remove all autogenerated property values and assign a name, so that the WindowsFormsHost definition looks like this:
<WindowsFormsHost Name="FormsHost1" />
The next step is assigning an instance of the PDFControl user control as the child content of the WindowsFormsHost. This is done in the code-behind file, like in the following code:
Public Sub New()
' This call is required by the designer.
InitializeComponent()
' Add any initialization after the InitializeComponent() call.
Dim pdfViewer As New PDFControl
Me.FormsHost1.Child = pdfViewer
End Sub
If you now run the sample application, you will be able to see how the specified PDF document is shown inside the application’s main window. You do this by using COM interoperability.
Deployment Tips
When you deploy an application that works with COM interop, you must ensure you also include both the autogenerated AxInterop.XXX.dll and the Interop.XXX.dll files. You should also include the ActiveX control or the type library that your application has a reference to, but in some cases this is not possible for copyright reasons. For instance, the sample discussed in this chapter uses the Adobe Reader’s ActiveX control, which is not redistributable. Thus, clients must install the Adobe Reader on their machines and then your application will handle a reference to the ActiveX.
Exposing .NET Objects to the COM World
Although in modern world applications this practice occurs less frequently than in the past, you can expose .NET objects to the COM world. For example, a VB 6 application can consume an object like this. To demonstrate how you accomplish this export, create a new class library and rename Class1.vb to Contact.vb. The first thing you need to do to enable a class to be called from COM is provide COM interoperability support. Now open My Project and select the Compile tab. Flag the Register for COM Interop item at the bottom of the page, as shown in Figure 48.3.
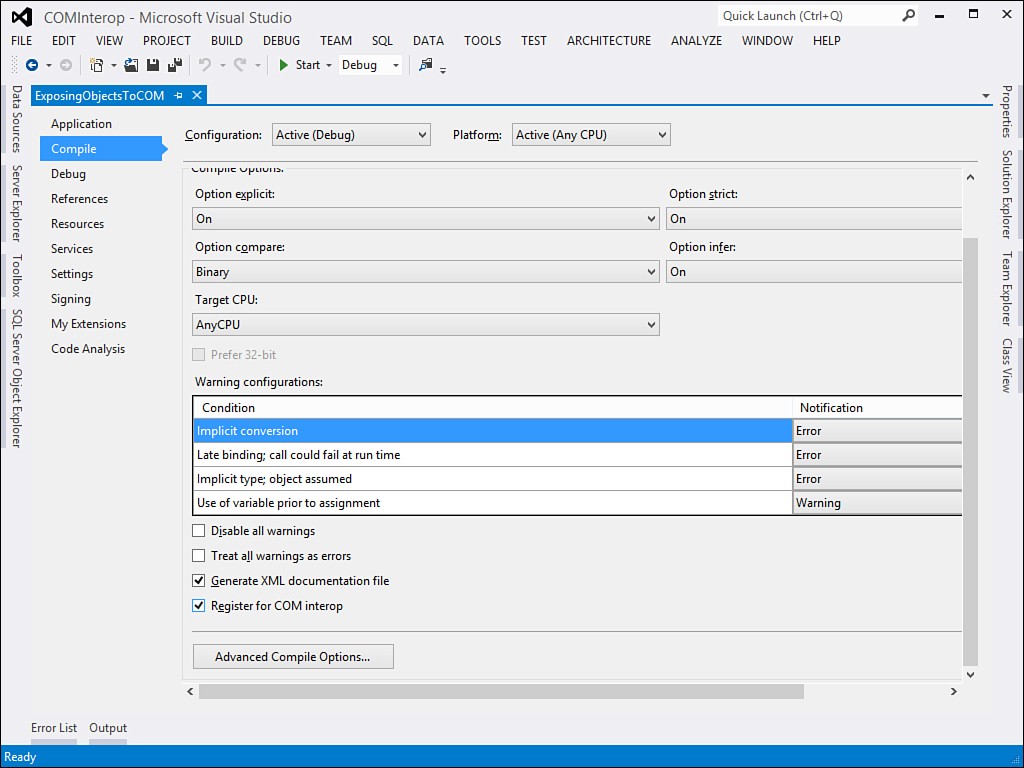
Figure 48.3. Registering an assembly for COM Interoperability.
This operation tells Visual Studio that it needs to register the COM component on build and adds the following line of code in AssemblyInfo.vb so that it makes it visible to COM:
<Assembly: ComVisible(True)>
Class Requirements for COM Exposure
Any class that you want to expose to COM has the following requirements: It must have a public, empty, parameterless constructor; any member, including types, to be exposed must be Public (no other modifiers are allowed) and it cannot include abstract classes. (This is just because they cannot be consumed.)
The ComVisible attribute establishes the visibility level and granularity not only at assembly level, but also for classes and class members. The default for this attribute is True, so you need to explicitly set classes and members for False where you do not want them to be exposed. Next, implement the Contact class as follows:
Public Class COMContact
Public Property FirstName As String
Public Property LastName As String
Public Property Email As String
Public Property BirthDay As Date
Public Sub New()
End Sub
End Class
Now you can decide the visibility level for each member in the class by decorating the class and its members with the System.Runtime.InteropServices.ComVisible attribute. The following code demonstrates how to make COM-visible only some members from the Contact class:
Imports System.Runtime.InteropServices
<ComVisible(True)>
Public Class COMContact
<ComVisible(True)>
Public Property FirstName As String
<ComVisible(True)>
Public Property LastName As String
<ComVisible(False)>
Public Property Email As String
<ComVisible(False)>
Public Property BirthDay As Date
Public Sub New()
End Sub
End Class
A public, empty constructor is required for COM-visible objects. You must mark the class as ComVisible(True) to expose it correctly. The only exception is when the class you marked as false gets inherited into a new class marked as true, then the members in the base class will be exposed through the inherited class unless the individual members of the base class were also marked ComVisible(False). The next step should be to register the COM component after the build process. Fortunately, on the development machine, Visual Studio 2012 does the work for you. (This requires the IDE to be launched with elevated privileges.) Therefore, compile the project to have a class library that is consumable from the COM architecture.
What Happens Behind the Scenes?
When you build a class library exposed to COM, Visual Studio first invokes the Visual Basic compiler (vbc.exe) with the /t switch pointing to the executable name; next it launches the type library exporter utility (TlbExp.exe). The conjunction of both tools can build a COM-enabled library.
P/Invokes and Unmanaged Code
One of the biggest benefits of the .NET Framework is that the technology is a bridge between you and the Windows operating system and is responsible for managing a lot of system features (such as memory management). This reduces the risk of bad system resources management that could lead the system to unwanted crashes or problems. This is the reason (as you might recall from Chapter 1, “Introducing the .NET Framework 4.5”) that .NET programming is also known as managed. The .NET Framework Base Class Library (BCL) exposes managed wrappers for most of the Windows API system so that you do not need to manually handle system resources. It also enables you to reap all the benefits of the CLR. By the way, in some situations you still need to access the Windows API (for example, when there is not a .NET counterpart of an API function), and thus you need to work with unmanaged code. Unmanaged code is all code not controlled by the .NET Framework and that requires you to manually handle system resources. When you work with unmanaged code, you commonly invoke Windows API functions; such invocations are also known as Platform Invokes or, simpler, P/Invokes. In this section I cover both situations, starting with P/Invokes.
Note on Unmanaged Code
You should always avoid unmanaged code. The .NET Framework 4.5 offers an infinite number of managed objects and methods for performing almost everything. Using unmanaged code means working directly against the operating system and its resources, and if your code does not perfectly handle resources, it can lead to problems. Moreover, when performing unmanaged calls, you need to be certain that they work or exist on all versions of the Windows operating system you plan to support for your application. Always search through the Base Class Library to ensure that a .NET counterpart for the Windows API already exists. It probably does.
Understanding P/Invokes
Calls to Windows API functions are known as Platform Invokes or P/Invokes. The Visual Basic programming language offers two ways of performing platform invokes:
• Declare keyword
• System.Runtime.InteropServices.DllImport attribute
The Declare keyword has a behavior similar to what happened in Visual Basic 6, and it has been kept for compatibility; however, you should always use the DllImport attribute because this is the one way recognized by the Common Language Specification. Now you can see how to declare a P/Invoke. The next example considers the PathIsUrl function, from the Shlwapi.dll system library, which checks whether the specified is a URL and returns a value according to the result. This is with the Declare keyword:
Declare Function PathIsUrl Lib "shlwapi.dll" Alias _
"PathIsURLA" (ByVal path As String) As Integer
Matching Numeric Types
Keep in mind the difference in numeric types between the Windows API system and the .NET common types system because Windows APIs return Long; however, when you perform P/Invokes, you must use the .NET counterpart Integer. The same is true for Integer in the Windows API, which is mapped by Short in .NET. Similarly, remember to use the IntPtr structure for declarations that require a handle (or a pointer) of type Integer.
As you can see, the API declaration looks similar to what you used to write in VB 6. The following is how you declare the API function via the DllImport attribute:
'Requires an
'Imports System.Runtime.InteropServices directive
<DllImport("shlwapi.dll", entrypoint:="PathIsURLA")>
Shared Function PathIsURL(ByVal path As String) As System.Int32
End Function
Among its many options, the most important in DllImport are the library name and the entrypoint parameter that indicates the function name. It is important to remember that P/Invokes must be declared as Shared because they cannot be exposed as instance methods; the only exception to this rule is when you declare a function within a module. When declared, you can consume P/Invokes like any other method (always remembering that you are not passing through the CLR), as demonstrated here:
Dim testUrl As String = "http://www.visual-basic.it"
Dim result As Integer = PathIsURL(testUrl)
Both Declare and DllImport lead to the same result, but from now we use only DllImport.
Encapsulating P/Invokes
Encapsulating P/Invokes in classes is a programming best practice and makes your code clearer and more meaningful. Continuing the previous example, you could create a new class and declare inside the class the PathIsUrl function, marking it as Shared so that it can be consumed by other objects. You need to consider one more thing. If you plan to wrap Windows API functions in reusable class libraries, the best approach is to provide CLS-compliant libraries and API calls. For this reason, we now discuss how you can encapsulate P/Invokes following the rules of the Common Language Specification (CLS). The first rule is to create a class that stores only P/Invokes declarations. Such a class must be visible only within the assembly, must implement a private empty constructor, and will expose only shared members. The following is an example related to the PathIsUri function:
Friend Class NativeMethods
<DllImport("shlwapi.dll", entrypoint:="PathIsURLA")>
Shared Function PathIsURL(ByVal path As String) As System.Int32
End Function
Private Sub New()
End Sub
End Class
The class is marked with Friend to make it visible only within the assembly. A CLS-compliant class for exposing P/Invokes declarations can have only one of the following names:
• NativeMethods—Used on the development machine and indicates that the class has no particular security and permissions requirements
• SafeNativeMethods—Used outside the development machine and indicates that the class and methods have no particular security and permissions requirements
• UnsafeNativeMethods—Used to explain to other developers that the caller needs to demand permissions to execute the code (demanding permissions for one of the classes exposed by the System.Security.Permissions namespace)
To expose P/Invokes to the external call, you need a wrapper class. The following class demonstrates how you can expose the NativeMethods.PathIsUrl function in a programmatically correct approach:
Public Class UsefulMethods
Public Shared Function CheckIfPathIsUrl(ByVal path As String) _
As Integer
Return NativeMethods.PathIsURL(path)
End Function
End Class
Finally, you can consume the preceding code as follows (for example, adding a reference to the class library):
Dim testUrl As String = "http://www.visual-basic.it"
Dim result As Integer = UsefulMethods.CheckIfPathIsUrl(testUrl)
Working with unmanaged code is not only performing P/Invokes. There are some other important concepts about error handling and type marshaling, as explained in the next sections.
Converting Types to Unmanaged
When you work with P/Invokes, you might need to pass custom types as function arguments. If such types are .NET types, the most important thing is converting primitives into types that are acceptable by the COM/Win32 architecture. The System.Runtime.InteropServices namespace exposes the MarshalAs attribute that can be applied to fields and method arguments to convert the object into the most appropriate COM counterpart. The following sample implementation of the Person class demonstrates how to apply MarshalAs:
Imports System.Runtime.InteropServices
Public Class Person
<MarshalAs(UnmanagedType.LPStr)>
Private _firstName As String
<MarshalAs(UnmanagedType.SysInt)>
Private _age As Integer
Public Property FirstName As String
Get
Return _firstName
End Get
Set(ByVal value As String)
_firstName = value
End Set
End Property
Public Property Age As Integer
Get
Return _age
End Get
Set(ByVal value As Integer)
_age = value
End Set
End Property
Sub ConvertParameter(<MarshalAs(UnmanagedType.LPStr)> _
ByVal name As String)
End Sub
End Class
The attribute receives a value from the UnmanagedType enumeration. IntelliSense offers great help about members in this enumeration, showing the full members list and explaining what each member is bound to convert. You can check this out as an exercise.
The StructLayout Attribute
An important aspect of unmanaged programming is how you handle types, especially when such types are passed as P/Invoke arguments. Unlike P/Invokes, types representing counterparts from the Windows API pass through the CLR and, as a general rule, you should provide the CLR the best way for handling them to keep performance high. When you write a class or a structure, you give members a particular order that should have a meaning for you. In other words, if the Person class exposes FirstName and Age as properties, keeping this order should have a reason, which is dictated only by some kind of logic. With the System.Runtime.InteropServices.StructLayout attribute, you can tell the CLR how it can handle type members; it enables you to decide if it has to respect a particular order or if it can handle type members the best way it can according to performances. The StructLayout attribute’s constructor offers three alternatives:
• StructLayout.Auto—The CLR handles type members in its preferred order.
• StructLayout.Sequential—The CLR handles type members preserving the order provided by the developer in the type implementation.
• StructLayout.Explicit—The CLR handles type members according to the order established by the developer, using memory offsets.
By default, if StructLayout is not specified, the CLR assumes Auto for reference types and Sequential for structures. For example, consider the COMRECT structure from the Windows API, which represents four points. This is how you write it in Visual Basic, making it available to unmanaged code:
<StructLayout(LayoutKind.Sequential)>
Public Structure COMRECT
Public Left As Integer
Public Top As Integer
Public Right As Integer
Public Bottom As Integer
Shared Sub New()
End Sub
Public Sub New(ByVal left As Integer,
ByVal top As Integer,
ByVal right As Integer,
ByVal bottom As Integer)
Me.Left = left
Me.Top = top
Me.Right = right
Me.Bottom = bottom
End Sub
End Structure
Tips on Default Options
StructLayout must be applied explicitly if your assembly needs to be CLS-compliant. This happens because you have two choices, Sequential and Explicit. For classes, though, this is not necessary because they are always considered as Auto. Because of this, in this section we describe only structures.
This is how you can apply StructLayout.Explicit instead, providing memory offsets:
<StructLayout(LayoutKind.Explicit)>
Public Structure COMRECT
<FieldOffset(0)> Public Left As Integer
<FieldOffset(4)> Public Top As Integer
<FieldOffset(8)> Public Right As Integer
<FieldOffset(12)> Public Bottom As Integer
Shared Sub New()
End Sub
Public Sub New(ByVal left As Integer,
ByVal top As Integer,
ByVal right As Integer,
ByVal bottom As Integer)
Me.Left = left
Me.Top = top
Me.Right = right
Me.Bottom = bottom
End Sub
End Structure
The FieldOffset attribute specifies the memory offset for each field. In this case the structure provides fields of type Integer, so each offset is 4 bytes.
The VBFixedString Attribute
The VBFixedString attribute can be applied to structure members of type String, to delimit the string length because by default string length is variable. Such delimitation is established in bytes instead of characters. This attribute is required in some API calls. The following is an example:
Public Structure Contact
'Both fields are limited to 10 bytes size
<VBFixedString(10)> Public LastName As String
<VBFixedString(10)> Public Email As String
End Structure
Notice that the VBFixedString can be applied to fields but is not valid for properties.
Handling Exceptions
Functions from Windows API return a numeric value as their results (called HRESULT), for telling the caller whether the function succeeded or failed. Prior to .NET 2.0, getting information on functions failures was a difficult task. Starting from .NET 2.0 you can handle exceptions coming from the P/Invokes world with a classic Try..Catch block. The real improvement is that the .NET Framework can wrap unmanaged errors that have a .NET counterpart into managed exceptions. For instance, if a Windows API invocation causes an out-of-memory error, the .NET Framework maps such error as an OutOfMemoryException that you can embrace within a normal Try..Catch block. It is reasonable that not all unmanaged errors can have a managed counterpart, due to differences in COM and .NET architectures. To solve this, .NET provides the System.Runtime.InteropServices.SEHException, in which SEH stands for Structured Exception Handling. It maps all unmanaged exceptions that .NET cannot map. The exception is useful because it exposes an ErrorCode property that stores the HRESULT sent from P/Invokes. You use it like this:
Try
'Add your P/Invoke here..
Catch ex As SEHException
Console.WriteLine(ex.ErrorCode.ToString)
Catch ex As Exception
End Try
Tip
The SEHException does not provide many exception details, unlike managed exceptions, but it is the most appropriate exception for error handling in a Try..Catch block within unmanaged code.
There is also an alternative, which requires some explanation. P/Invokes raise Win32 errors calling themselves the SetLastError native method that is different from how exceptions are thrown in the CLR. In the earlier days, you could call the GetLastError method to retrieve the error code, but this is not the best choice because it can refer to managed exceptions rather than Win32 exceptions. A better, although not the ultimate, approach can be provided by invoking the System.Runtime.InteropServices.Marshal.GetLastWin32Error method, which can intercept the last error coming from a Win32 call. To make this work, first you need to set the SetLastError property in the DllImport attribute as True; then you can invoke the method. The following code shows an example of the Beep function, which returns a numeric value as the result:
<DllImport("kernel32.dll", entrypoint:="Beep", SetLastError:=True)>
Public Shared Function Beep(ByVal frequency As UInteger,
ByVal duration As UInteger) As Integer
End Function
Dim beepResult = NativeMethods.Beep(100, 100)
If beepResult = 0 Then
Console.WriteLine(Marshal.GetLastWin32Error())
End If
Here you need to know first which values can return a particular function. Beep returns zero if it does not succeed. So, after a check on the result value, the Marshal.GetLastWin32Error method is invoked to understand the error code.
References to the Win32 API Calls
Developers can reference the MSDN documentation or the Windows SDK to get detailed information on the Windows API functions and their signatures. The following are resources available on the Internet for your reference:
• MSDN reference: http://msdn.microsoft.com/en-us/library/aa383749(VS.85).aspx
• Windows SDK: http://msdn.microsoft.com/en-us/windows/desktop/hh852363.aspx
• PInvoke.net website: http://www.pinvoke.net
Summary
In this chapter, you learned some concepts on how the .NET technology can interoperate with the COM legacy architecture and components. In the first part of the chapter, you learned how to import COM components into managed applications, understanding how Visual Studio generates .NET wrappers to interact with COM. Next, you learned how to create and expose .NET libraries to COM, utilizing the Visual Studio instrumentation and applying the ComVisible attribute to classes and class members to grant visibility granularity. In the last part of the chapter, you saw how to call and run unmanaged code, with particular regard to Platform Invokes and types conversions for working directly against the Windows operating system.