
Chapter 34. Building ASP.NET Web Applications
In This Chapter
• Introducing the ASP.NET Model
• Understanding State Management
• Creating a Web Application with VB 2012 with Navigation and Data-Binding
• Configuring a Web Application for Security
Many of the most common activities in everyday life are often performed via the Internet and websites. You book a flight via airline companies’ websites; you buy tickets for the theater via ticketing websites; and you can pay your bills via your bank’s website. Also, most companies (and probably yours, too) have local networks running internal web applications for several kinds of purposes, such as office automation, storing data, and so on. Being a complete technology, the .NET Framework offers its own web platform for developing websites based on .NET, which is named ASP.NET. This is an engine for websites running on the server side, which enables building robust web applications using managed code. Even though several technologies came out in the past years for building web applications, including Microsoft platforms, this is still the most valid choice. In this chapter you start with the ASP.NET programming model and build web applications with Visual Basic 2012, also leveraging some of the new features typical of ASP.NET 4.5.
Introducing the ASP.NET Model
So far, we’ve discussed several kinds of client applications, such as Console, Windows Forms, and WPF. For this last technology, the discussion was deeper because WPF is the premier technology for building desktop clients. Developing web applications for ASP.NET with Visual Basic 2012 is different. If you are a web developer, this chapter will probably just be an overview of some new features introduced by .NET 4.5. However, if you are new to ASP.NET, although you can find lots of similarities with the client world in writing managed code and creating applications, the code in the web environment runs differently. So you need to understand where the code is running and why scaling applications is fundamental; therefore, you also need to understand the concept of the stateless nature of the Web so you can handle it in your applications. This is discussed next.
Understanding Page Requests
When you create a web application, the application will be hosted on a web server. This is the place where your Visual Basic compiled code actually resides. When the code is executed, the ASP.NET engine renders it as HTML so it can be consumed on the client side by a web browser such as Internet Explorer or Firefox, which can interpret Hypertext Markup Language (HTML) and display web pages. When you type a website address into your browser, it sends a web page request. This is then translated into an address that searches for the server hosting the requested page. When the server receives the request, the installed web server software catches the request and, if this is about an ASP.NET web page, passes the request to the ASP.NET engine so this can render the result as HTML and return it to the calling browser. Samples of web server software include Internet Information Services (IIS) and the Cassini Web Server. Visual Studio 2012 ships with its own two web servers: IIS Express and the ASP.NET Development Server. Both of these enable you to simulate a web server environment on the development machine for testing applications. The default option is IIS Express, but you can select a different server in the project’s properties.
One key point is that you do not only write HTML markup; instead, you also write Visual Basic code that is compiled into an assembly residing on the server. So the ASP.NET engine sends requests to your code for processing and then returns the processing result as HTML that can be consumed by client browsers. All these operations are fine, but there is a problem: In a desktop environment, you have one user running one instance of the application that works against its set of data and information; even if you have hundreds of database records to load, the application will be responsive in most cases. The same is not true for web applications if you think that one web application hosted on a server could potentially receive hundreds of concurrent requests. Therefore, elaborating hundreds of data requests concurrently can cause a bottleneck with hard performance problems. Fortunately, ASP.NET provides a mechanism for scalability that lets the application solve performance problems the best way possible.
Scalability and Performance
Scalability is the capability of an application to serve requests well without getting too slow or crashing when the amount of work increases. As described before, in a single-user environment such as desktop applications, scalability is a plus but not a requirement. But it is a requirement in a web environment, where multiple requests can come to a web page. Because you do not want your application to get too slow or to crash when a large number of simultaneous requests come in, you instead want requests to be served in a small amount of time. So, you need to be aware of scalability and performance. Luckily, ASP.NET has its own mechanism that serves for application scalability. Think of desktop applications for a moment: in such environment all the work is in memory, when you load data into variables. Variables are instances of managed objects that you release when no more are needed so that the garbage collection process frees up unused resources. In a web environment, this is not possible because the application resides on one server and serving a large number of requests would soon lead to out-of-memory errors. Thus, the mechanism of state management must be necessarily different. The following is the list of operations that occur against the code when ASP.NET receives a request:
1. ASP.NET creates an instance of the Page object, which is the web counterpart of Form and Window.
2. Because Page is a managed object, when ASP.NET processes the request, it releases the reference of the page instance.
3. The Garbage Collection process clears from the managed heap all objects that no longer have any reference, including released Page objects.
This is cool because, when an object completes its work, it is soon removed from memory, and this improves scalability. The problem is that if the object is no longer available, then data exposed by that object is also no longer available. This means that if the same user sends another request to the same page (that is, creating a new instance of the Page object), the page will result empty. This occurs frequently, if you think of web pages that require filling in some fields before they make available other controls that require the page to be reloaded. So, this is the reason ASP.NET needs a different state management, which is provided by the Application and Session state objects that will be discussed later.
Another problem that travels hand-in-hand with scalability is performance. Each time you send a page request, you have to wait a few seconds. This is normal because sending the request takes time and waiting for the server to respond also takes time. Plus, elaborating complex data requires additional time because the number of bytes to transfer is increased. With complex web applications, performance can become a problem, but fortunately ASP.NET 4.5 includes a number of performance improvements such as (but not limited to) the following:
• Multicore JIT compilation—The .NET Framework 4.5 can use all the available processors to compile a website for the Just-In-Time compilation, so that this process becomes faster.
• Optimized garbage collection for website hosting.
• Sharing common assemblies—Multiple websites can share the same helper assemblies so that memory consumption is reduced.
• Support for asynchronous requests based on the new Async/Await pattern—See Chapter 44, “Asynchronous Programming,” for more details.
You will not interact manually with the aforementioned improvements (except for asynchronous programming techniques), so they are not discussed further in this book. You now get started in getting some skills on ASP.NET that will also be useful when talking about Silverlight applications. The first step for acquiring such skills is starting to create your first web project with VB 2012.
Available Project Templates
Visual Studio 2012 offers a number of project templates for building ASP.NET web applications based on different frameworks. This chapter discusses the ASP.NET Web Forms model, which is the most important from a learning perspective. But the IDE also enables you to build applications based on the ASP.NET MVC (Model-View-Controller) framework, ASP.NET Ajax controls, and ASP.NET Dynamic Data Entities projects. It is not possible in this chapter to provide detailed information on each framework because they are all complex. To create web applications, you can either select File, New Project or select File, New Web Site. In the first case, you access the so-called web application templates, whereas in the second case you access website templates. Several differences exist between the two categories, but the major differences follow:
• A website template has no project file, whereas a web application has one. Choosing this second template brings more familiarity for other Visual Studio projects.
• A website template produces no compiled assemblies and requires the source code to be deployed, whereas a web application template allows building a compiled assembly and no source code is required.
• A website is simpler in its structure than a web application project template.
Due to their natures, this chapter shows examples based on the web application template. There are multiple templates for web projects, specific to particular scenarios. They are all available in the web folder of the New Project dialog box, as shown in Figure 34.1.
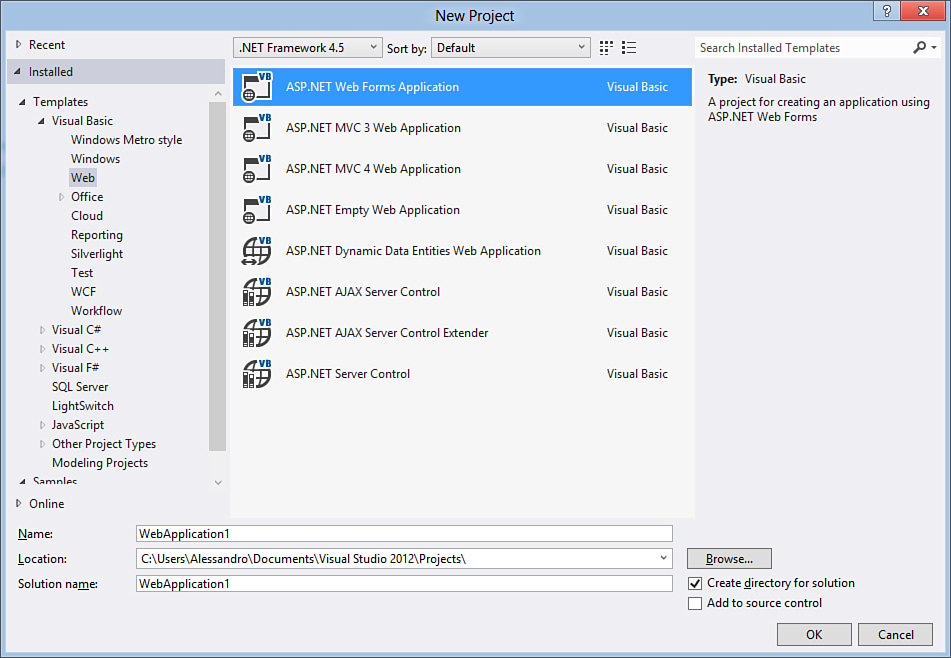
Figure 34.1. Web application project templates available with VB 2012.
The most basic project template is the ASP.NET Web Forms Application one. You can see templates dedicated to ASP.NET MVC and ASP.NET Dynamic Data applications, other than templates for building user controls. When building a complete working example later in this chapter, we use the ASP.NET Web Forms Application template that provides a skeleton of a web application with preconfigured pages. For the first experiments, create a new project based on the ASP.NET Empty Web Application. This generates a new empty project, where the first thing you have to do is add some pages. Pages in ASP.NET are represented by web forms.
Web Forms and Master Pages
ASP.NET web applications are made of pages. These can be standalone pages or ones providing common elements for each page. Standalone pages are known as web forms, while the other kind is known as a master page.
Web Forms
A web form represents a page in ASP.NET (a file with an .aspx extension) and is composed of markup code known as Extensible Hypertext Markup Language (XHTML) and of a code-behind part made of Visual Basic code. (XHTML is intended as an enhancement of classic HTML.) The concept is similar to the WPF development where the XAML code is for the user interface and the Visual Basic code makes the UI alive. The same is true for web forms, but the difference is that the UI is provided via XHTML code. The XHTML code in a web form contains markup for page layout, user controls, and eventually scripts. Each web application needs at least a Default.aspx page, so right-click the project name in Solution Explorer and select Add New Item. In the Add New Item dialog box, select the Web Form template, name it Default.aspx, and then click OK. When ready, the new page is made of some XHTML code. The following is the basic code of a web form, including a Label control for demonstrating some concepts:
<%@ Page Language="vb" AutoEventWireup="false"
CodeBehind="Default.aspx.vb"
Inherits="webApplication1._Default" %>
<!DOCTYPE html PUBLIC "-//W3C//DTD XHTML 1.0 Transitional//EN"
"http://www.w3.org/TR/xhtml1/DTD/xhtml1-transitional.dtd">
<html xmlns="http://www.w3.org/1999/xhtml">
<head runat="server">
<title></title>
</head>
<body>
<form id="form1" runat="server">
<div>
<asp:Label ID="Label1" runat="server" Text="Label"></asp:Label>
</div>
</form>
</body>
</html>
The most important thing you need to remember is that code is executed on the server, so it is fundamentally adding a runat="server" attribute for each control; otherwise, it will not be correctly consumed by client browsers.
Styling Tips
ASP.NET enables you to style and apply themes to web forms via Cascade Style Sheets (CSS) files. A simpler way of styling controls is by selecting the AutoFormat option that’s available when you click the smart tag.
Notice how the markup code contains classic HTML items that will be correctly rendered to client browsers. Each web form has a code-behind file, which you can find in Solution Explorer by enabling the Show All Files view and then expanding the desired web page file. When you double-click the Visual Basic code-behind file on a new web form, you can see that it is nothing but a class providing an event handler for the Page.Load event. As explained in the next subsection, a web form has a lifetime that is established by events.
Page Lifetime and Page Events
Each page has a lifetime that you need to understand so you can ensure changes you made through a postback are not ignored or overwritten. Page lifetime is articulated in events, each of them representing a particular moment. Although starting from ASP.NET 2.0 the Page class offers a bigger number of events, the most important are the following:
• Init, which is where the page initializes controls
• Load, which is when the page is loaded and you can play with controls
• PreRender, which occurs just before the page is rendered as HTML
Cached and Postback Events
Earlier in this chapter you learned that the biggest difference between the ASP.NET programming model and the client one is that in the ASP.NET development you cannot keep objects in memory and that, for scalability purposes, a page is reloaded each time you need to process some data. Reloading a page happens when you interact with controls on the page. Such controls raise events depending on the actions you took on them. These actions are divided into two categories: cached events and postback events. Cached events occur on controls that do not require an immediate page reload. The typical example is the TextBox control in which a TextChanged event is raised every time you edit the text but the page is not reloaded at each edit. Postback events occur on controls that cause an immediate page reload, such as Button and ComboBox. This is convenient because you expect immediate data processing when you click the Button or select a combo box item. Cached events will also be elaborated at the page reload. Reloading a page means destroying the instance of the current page and then creating a new instance of the current page. This is good because you avoid overhead when working with big amounts of data, but the problem is that all objects and values held by the previous instance are lost, so you need a mechanism for restoring the original object values. This mechanism is typically the ViewState object that is covered later in more details; at the moment look at how you store an object value (such as the text stored in a TextBox) inside the ViewState before the page is reloaded at the Button click:
Protected Sub Page_Load(ByVal sender As Object,
ByVal e As System.EventArgs) _
Handles Me.Load
If Not Page.IsPostBack Then
Me.TextBox1.Text = CStr(Me.ViewState("MyText"))
End If
End Sub
Protected Sub Button1_Click(ByVal sender As Object,
ByVal e As EventArgs) _
Handles Button1.Click
Me.ViewState("MyText") = Me.TextBox1.Text
End Sub
The only situation when a postback event does not occur is when you open the website, meaning that the page is loaded for the first time. You can check whether the page is being loaded for the first time in the Page_Load event handler, where you read the value of the Page.IsPostBack property. If true, you can retrieve the content of the ViewState property to restore the original values.
Tip
If you use the ComboBox control, remember to set its AutoPostBack property as True so that it will cause a postback each time you select an item, when such behavior is desired.
Considering cached and postback events, the following is the updated list for the page lifetime:
1. Init
2. Load
3. Cached events
4. Postback events
5. PreRender
ASP.NET Controls
ASP.NET offers both server and HTML controls. Server controls run on the server side and emulate or are built upon existing HTML tags, but they provide more advanced features and usability. They also are object-oriented controls and support events, whereas HTML controls don’t. Generally, HTML controls are more and more limited if compared to ASP.NET controls, although they can be still processed on the server by adding the usual runat="server" tag. The next sections list the most common controls from both types.
Server Controls
Server controls are typically user interface objects that users can use when running a web application on clients. You can notice that in most cases, ASP.NET server controls are counterparts of HTML controls but provide a fully object-oriented development environment and full support for managed code. Table 34.1 summarizes the most common server controls.
Table 34.1. Most Common Server Controls
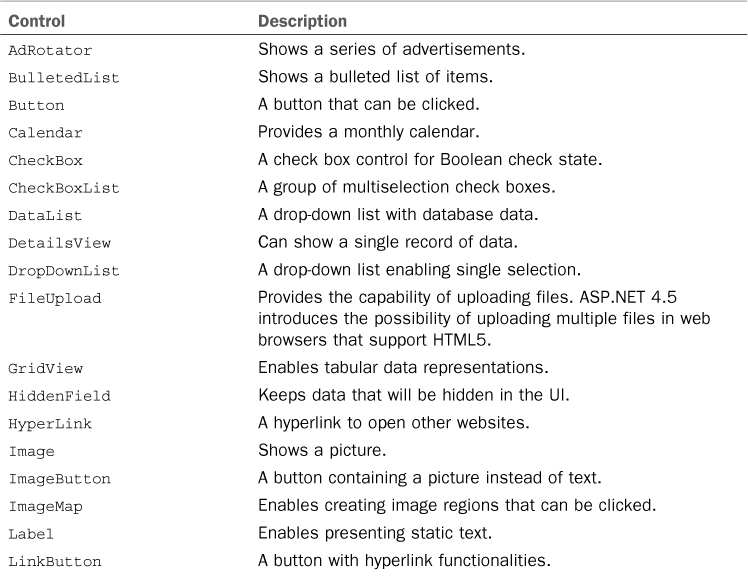
All controls in Table 34.1 are then rendered as their HTML equivalent so they can be consumed by web browsers.
Note
Server controls are not the only ones available. If you take a look at the Visual Studio toolbox, you notice the presence of different tabs. Remaining controls are typically data controls used for data-binding or navigation, validation, and login controls that will not necessarily be placed on the user interface.
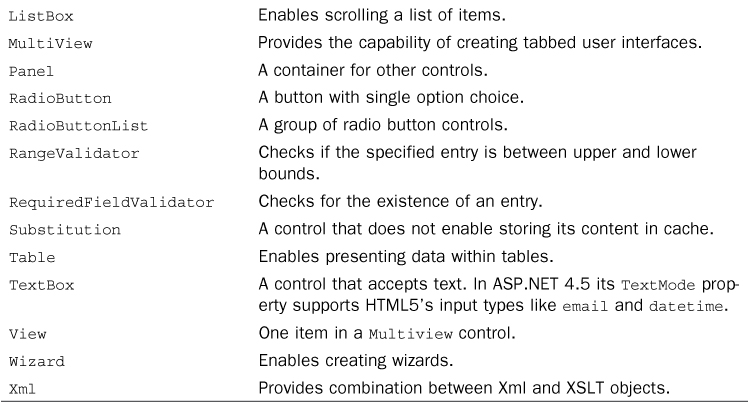
HTML Controls
HTML controls in ASP.NET are representations of their classic HTML. Also, ASP.NET 4.5 introduces improvements to some controls for better HTML5 support. Table 34.2 summarizes the most common among available HTML controls.
What is HTML5?
You have probably heard a lot about HTML5 during the last couple of years, so you might be wondering what HTML5 actually is. It is the fifth version of the standard specifications of HTML, and it introduces some new rules that browsers will respect with particular regard to videos, audios, geolocation, JavaScript support for animation, media contents, and an information storage system called Web Storage that enables the local storing of more information than with cookies. Visual Studio 2012 and ASP.NET 4.5 support HTML5 in a number of ways, including IntelliSense improvements for JavaScript code and control enhancements. Your approach as a web developer will not change; you will only have new features and more powerful applications as web browsers will fully support the new HTML standard. Take a look at the World Wide Web Consortium (W3C) for updates about the HTML5 standard at http://www.w3.org/html.
The main difference between HTML controls and their ASP.NET counterparts is that ASP.NET versions can be accessed on the server side with managed code by adding an ID attribute and the runat="server" attribute, although HTML controls actually work on the server side. It is worth mentioning that, with ASP.NET 4.5, those HTML controls having a URL property now support runat="server".
Handling Events
Due to the code-behind logic, handling events in ASP.NET applications looks similar to what you saw with WPF. This means that a user control is implemented on the XHTML side and an event handler in the Visual Basic side.
Handling Events Tip
If you need to catch events from objects that are not user controls, such as business objects or collections, you just write the event handler in Visual Basic code the usual way.
For example, consider the following XHTML code that provides a Button and a Label:
<form id="form1" runat="server">
<div>
<asp:Button ID="Button1" runat="server" Text="Button"/>
<asp:Label ID="Label1" runat="server"></asp:Label>
</div>
</form>
You can handle the Button.Click as usual—for example, with the following code that writes a message to the Label:
Protected Sub Button1_Click(ByVal sender As Object,
ByVal e As EventArgs) Handles Button1.Click
Me.Label1.Text = "You clicked!"
End Sub
Notice that you can also specify the event handler in the XHTML code, avoiding the Handles clause on the VB side, exactly as in WPF. The Click event handler is specified with the OnClick attribute:
<asp:Button ID="Button1" runat="server" Text="Button"
OnClick="Button1_Click" />
And then you write the event handler without Handles:
Protected Sub Button1_Click(ByVal sender As Object,
ByVal e As EventArgs)
Me.Label1.Text = "You clicked!"
End Sub
Understanding State Management
As I told you at the beginning of this chapter, ASP.NET applications have to manage their states in a different way than client applications. State is managed via some special objects: Application, Cache, Context, Session, and ViewState. All of them work with the Object type, and you use them like dictionaries because they accept key/value pairs. The next subsections explain this and provide examples.
The Application State
One of the most common situations with websites is that you have many people using the website concurrently. If you want to hold shared information across all the application instances, you use the Application state. The following is an example:
Application("SharedKey") = "Shared value"
Dim sharedString As String = CStr(Application("SharedKey"))
Notice the key/value semantics and how you need to perform an explicit conversion from Object to String. You will not use Application often because each application instance runs on a separate thread that could modify the information and therefore could corrupt the values, too.
The Cache State
The ASP.NET Cache has the same scope of Application, meaning that both can be accessed by all page requests. The primary difference is that Cache enables holding information in memory, which avoids the need of re-creating and retrieving objects. This is good if you want to maintain updatable objects but could cause overhead (always considering that the bigger the amount of data to transfer, the lower the performance) because it requires memory. So, it should be used only when needed or when you ensure that performance is acceptable. The following is an example of storing and retrieving information with Cache:
Cache("MyUpdatableDataKey") = "My updatable data"
Dim myUpdatableData As String = CStr(Cache("MyUpdatableDataKey"))
In addition, an alternative way for adding objects to the cache is the Cache.Add method. It provides the ability of setting advanced settings for the object, as demonstrated in this code:
Protected Sub Page_Load(ByVal sender As Object,
ByVal e As System.EventArgs) _
Handles Me.Load
Dim callBack As New CacheItemRemovedCallback( _
AddressOf Cache_ItemRemoved)
'Sets the key, adds the data, sets the CacheDependency,
'sets the expiration mode, expiration time, priority
'and delegate to invoke when the item is removed
Cache.Add("MyUpdatableDataKey", "My updatable data", Nothing,
Cache.NoAbsoluteExpiration, New TimeSpan(0, 0, 45),
CacheItemPriority.High, callBack)
'Removes the item
Cache.Remove("MyUpdatableDataKey")
End Sub
Private Sub Cache_ItemRemoved(ByVal key As String,
ByVal item As Object,
ByVal reason As CacheItemRemovedReason)
'The item has been removed
End Sub
The most interesting settings are the expiration mode and the priority. The first one can be Cache.NoAbsoluteExpiration (like in the preceding code), which means that the data will always be available during the page lifetime Cache.SlidingExpiration, on the other hand, means that the data will be removed after it is not accessed for the specified amount of time. Priority is also important in case you have lots of objects in memory and ASP.NET is about to encounter out-of-memory problems. At this point, ASP.NET begins evicting items according to their priority. (An object with lower priority is evicted before another one with high priority.)
The Context State
You use the Context state when you want to hold state only for the lifetime of a single request. This is useful when you need to have information in memory for a long period of time and need to ensure that keeping such information does not affect scalability. This is an example:
Context.Items("MyStringKey") = "My string value"
Dim contextString As String = CStr(Context.Items("MyStringKey"))
The context information is accessed at the page level and will not be available again on the next request.
Using Cookies for Saving Information
Cookies are pieces of information that a user’s browser can hold and that can have a maximum size of 4 Kbytes. Each time the browser opens your web application, it recalls all cookies provided by the website. The following are examples of writing and reading cookies:
'Write a cookie
Dim aCookie As New HttpCookie("MyCookie")
aCookie.Value = "Information to store"
aCookie.Expires = New DateTime(10, 10, 2010)
Response.Cookies.Add(aCookie)
'Read a cookie
Dim getCookie As HttpCookie = Request.Cookies("MyCookie")
Dim cookieVale As String = getCookie.Value
Notice that the Expires property of type Date is required to specify that the cookie information will no longer be valid after that date, whereas the Value property is of type String so that you can store information without conversions.
The Session State
ASP.NET provides the ability of holding per-user information via the Session object. When a user opens the website, ASP.NET creates a cookie with a session identifier and then manages the session for that user based on the ID. The only issue is that you have no way of knowing when the user leaves the website, so a Session state expires after 20 minutes as a default. The following is an example:
Session("MyKey") = "User level information"
Dim userInfo As String = CStr(Session("MyKey"))
The ViewState State
To provide support for the work that a page needs to do in its lifetime, ASP.NET provides a mechanism known as ViewState. It provides the infrastructure that serializes values for each control in the page. For example, when a page is rendered, a control has a particular value. When this value changes, and such change raises an event, ASP.NET makes a comparison between the ViewState and form variables so that it can update the control value. (The TextBox control with its TextChanged event is the most common example.) Such a mechanism is available behind the scenes, but you can also use the ViewState by yourself. The following is an example that makes an object available at page level:
ViewState("MyPageDataKey") = "Page-level information"
Dim myPageData As String = CStr(ViewState("MyPageDataKey"))
Making this information available at the page level means also making it available when the page is posted back, but that decreases performance because the size of bytes to transfer is bigger. Excluding the user controls necessary to your web form, you should use ViewState for your needs with care.
Creating a Web Application with VB 2012 with Navigation and Data-Binding
Visual Basic 2012 makes it easy to create web applications with navigation capabilities because the Web Forms Application project template provides a master page implementation with default pages and designer tools for adding further elements. If you want to create a data-centric web application, the .NET Framework 4.5 offers specific controls that enable you to supply a data source and data-binding capabilities with a few mouse clicks. This section shows you how to reach this objective. Select File, New Project and from the web projects folder, select the ASP.NET Web Forms Application template; name the new project NorthwindOrders, and then click OK. When the project is available in Solution Explorer, notice the presence of some web pages (Default.aspx and About.aspx) and of the master page (the Site.Master file). Now click the Site.Master file. You now see the simplest example of a master page, as shown in Figure 34.2.
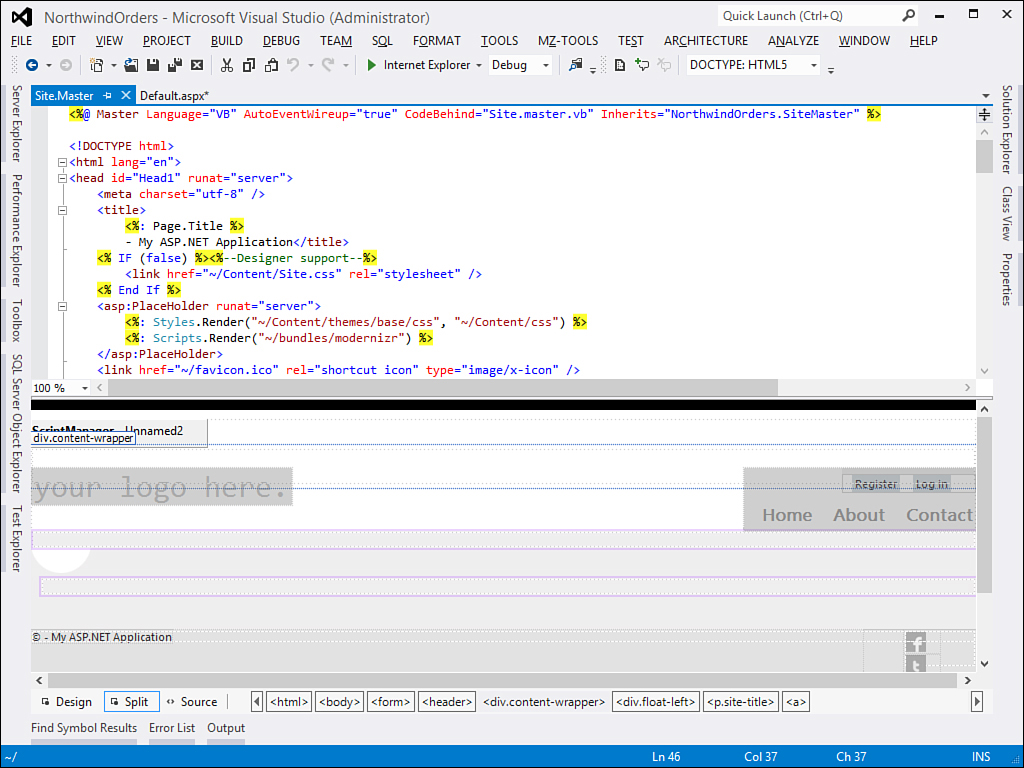
Figure 34.2. The default master page for the new web application.
Master Pages
A master page is a special page with .master extension, which provides a template containing a set of common elements for each page in the application. A master page typically contains elements such as headers, footers, and navigation elements so that you can implement a number of elements that each page can contain all at once. Visual Studio provides a specific item template for creating a master page, but the simplest way to understand how it works is to examine a basic one. When you create a new project using the ASP.NET Web Forms Application template, such as in the current example, the IDE adds a master page for you. As you can see, Visual Studio implements by default a couple of links for navigating between pages, such as Home and About. Both links have related web pages in the project, which are Default.aspx and About.aspx. Also notice the Login link that points to a Login.aspx page stored in the Account folder, which also contains other autogenerated pages for registering to the web application and for password management. The most basic code for designing a master page is the following:
<%@ Master Language="VB" AutoEventWireup="true" CodeBehind="Site.master.vb"
Inherits="NorthwindOrders.SiteMaster" %>
<!DOCTYPE html>
<html lang="en">
<head id="Head1" runat="server">
<meta charset="utf-8" />
<title>
<%: Page.Title %>
- My ASP.NET Application</title>
<% IF (false) %><%--Designer support--%>
<link href="~/Content/Site.css" rel="stylesheet" />
<% End If %>
<asp:PlaceHolder runat="server">
<%: Styles.Render("~/Content/themes/base/css", "~/Content/css") %>
<%: Scripts.Render("~/bundles/modernizr") %>
</asp:PlaceHolder>
<link href="~/favicon.ico" rel="shortcut icon" type="image/x-icon" />
<meta name="viewport" content="width=device-width" />
<asp:ContentPlaceHolder runat="server" ID="HeadContent" />
</head>
<body>
<form runat="server">
<asp:ScriptManager runat="server" AjaxFrameworkMode="Explicit">
<Scripts>
<asp:ScriptReference Name="MsAjaxBundle" />
<asp:ScriptReference Name="jquery" />
<asp:ScriptReference Name="jquery.ui.combined" />
<asp:ScriptReference Name="webForms.js" Assembly="System.web" Path="~/Scripts/webForms/webForms.js" />
<asp:ScriptReference Name="webUIValidation.js" Assembly="System.web" Path="~/Scripts/webForms/webUIValidation.js" />
<asp:ScriptReference Name="MenuStandards.js" Assembly="System.web" Path="~/Scripts/webForms/MenuStandards.js" />
<asp:ScriptReference Name="GridView.js" Assembly="System.web" Path="~/Scripts/webForms/GridView.js" />
<asp:ScriptReference Name="DetailsView.js" Assembly="System.web" Path="~/Scripts/webForms/DetailsView.js" />
<asp:ScriptReference Name="TreeView.js" Assembly="System.web" Path="~/Scripts/webForms/TreeView.js" />
<asp:ScriptReference Name="webParts.js" Assembly="System.web" Path="~/Scripts/webForms/webParts.js" />
<asp:ScriptReference Name="Focus.js" Assembly="System.web" Path="~/Scripts/webForms/Focus.js" />
<asp:ScriptReference Name="webFormsBundle" />
</Scripts>
</asp:ScriptManager>
<header>
<div class="content-wrapper">
<div class="float-left">
<p class="site-title">
<a runat="server" href="~/">your logo here.</a></p>
</div>
<div class="float-right">
<section id="login">
<asp:LoginView runat="server" ViewStateMode="Disabled">
<AnonymousTemplate>
<ul>
<li><a id="registerLink" runat="server" href="~/Account/Register.aspx">Register</a></li>
<li><a id="loginLink" runat="server" href="~/Account/Login.aspx">Log in</a></li>
</ul>
</AnonymousTemplate>
<LoggedInTemplate>
<p>
Hello, <a runat="server" class="username" href="~/Account/ChangePassword.aspx" title="Change password">
<asp:LoginName runat="server"CssClass="username" />
</a>!
<asp:LoginStatus runat="server"LogoutAction="Redirect" LogoutText="Log off" LogoutPageUrl="~/" />
</p>
</LoggedInTemplate>
</asp:LoginView>
</section>
<nav>
<ul id="menu">
<li><a runat="server" href="~/">Home</a></li>
<li><a runat="server" href="~/About.aspx">About</a></li>
<li><a runat="server" href="~/Contact.aspx">Contact</a></li>
</ul>
</nav>
</div>
</div>
</header>
<div id="body">
<asp:ContentPlaceHolder runat="server" ID="FeaturedContent" />
<section class="content-wrapper main-content clear-fix">
<asp:ContentPlaceHolder runat="server" ID="MainContent" />
</section>
</div>
<footer>
<div class="content-wrapper">
<div class="float-left">
<p>
©
<%: DateTime.Now.Year %>
- My ASP.NET Application
</p>
</div>
<div class="float-right">
<ul id="social">
<li><a href="http://facebook.com" class="facebook">Facebook</a></li>
<li><a href="http://twitter.com" class="twitter">Twitter</a></li>
</ul>
</div>
</div>
</footer>
</form>
</body>
</html>
Notice how, unlike in the past, the template now includes shortcuts to social networks such as Twitter and Facebook, which you will want to replace with links to your (or your company’s) online profiles. The goal of the sample application is fetching the list of orders from the Northwind database, showing the list in a GridView control (with editing capabilities), and adding navigation features to the master page. So, in the next section you see how to add the data source and data-bound controls. ASP.NET 4.5 introduces new, interesting features to work with data, so at the end of this discussion you will also get some hints about strongly typed data controls and model binding.
Adding the Data Model
The first thing to add in the web project is the data source. This can be of different kinds—for example, both LINQ to SQL classes and Entity Data Models are supported. The example will be based on the Entity Framework, thus you should add a new entity data model named Northwind.edmx and add to the model the Orders table from the database. Such steps have been described a lot of times in this book (refer to Chapter 26, “Introducing ADO.NET Entity Framework,” for a full discussion), so we will not show them again in detail. When you have the data, you need a place for presenting and editing the data, so you need a new web form.
Adding a New Web Form
To add a new web form to the project, right-click the project name in Solution Explorer and select Add New Item. When the same-named dialog box appears, click the Web folder. Among all available items, you see options to add a Web Form (which is just a web page) or a Web Form Using Master Page. This second template is useful if you want to show the new page within a master page, unlike the first template which is instead for free pages. Select the second template so that we can link the new page to the master page, and name the new page Orders.aspx (see Figure 34.3); then click OK.
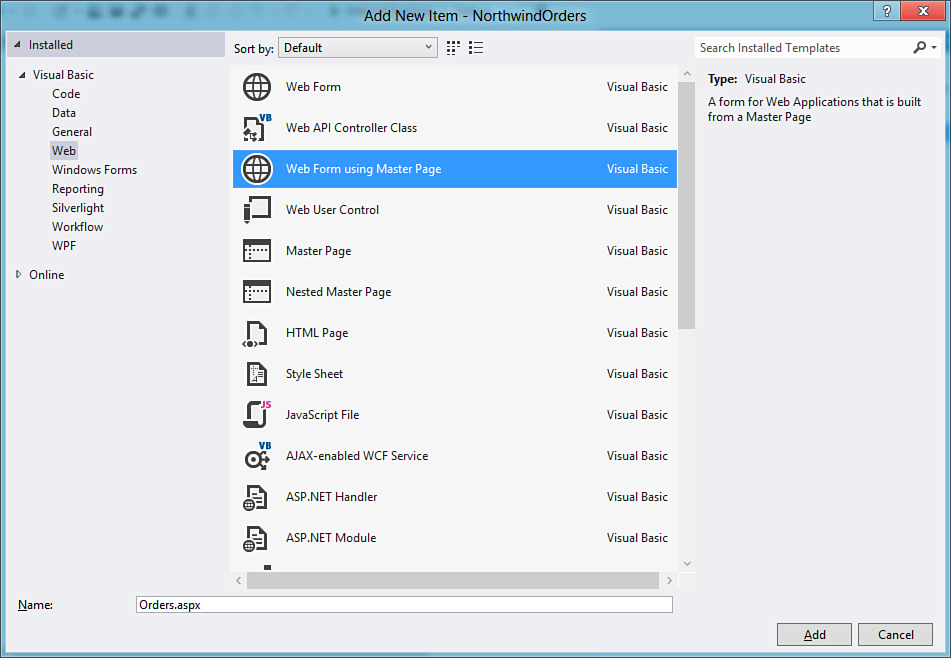
Figure 34.3. Adding a new web form using a master page.
At this point, Visual Studio asks you to indicate a master page from the project to link the new web form. In our case only one master page is available, so select it on the right side of the dialog box, as shown in Figure 34.4.
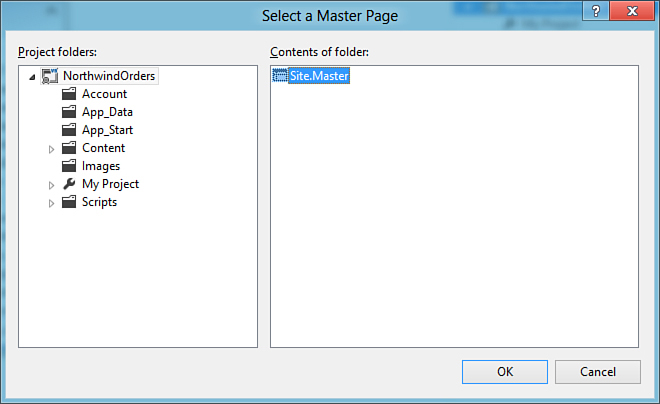
Figure 34.4. Specifying the master page to be associated to the new web form.
If you now double-click the Orders.aspx page, you get a new empty page linked to the master page, thus having navigation features. Now that we have a page, we can bind it to the data source.
Adding Data Controls
ASP.NET 4.5 offers a number of data controls that can be used to bind a data source to user controls and that act like a bridge. In particular, a control called EntityDataSource enables binding an entity data model to a graphic control.
Enabling the Designer
By default, Visual Studio shows the HTML code for the pages. To enable the Visual Studio designer, click the Design button for switching to the full designer view or the Split button to get both the designer and the HTML code on the same view.
In the toolbox, expand the Data tab and drag the EntityDataSource control onto the Orders page until you get the result shown in Figure 34.5.
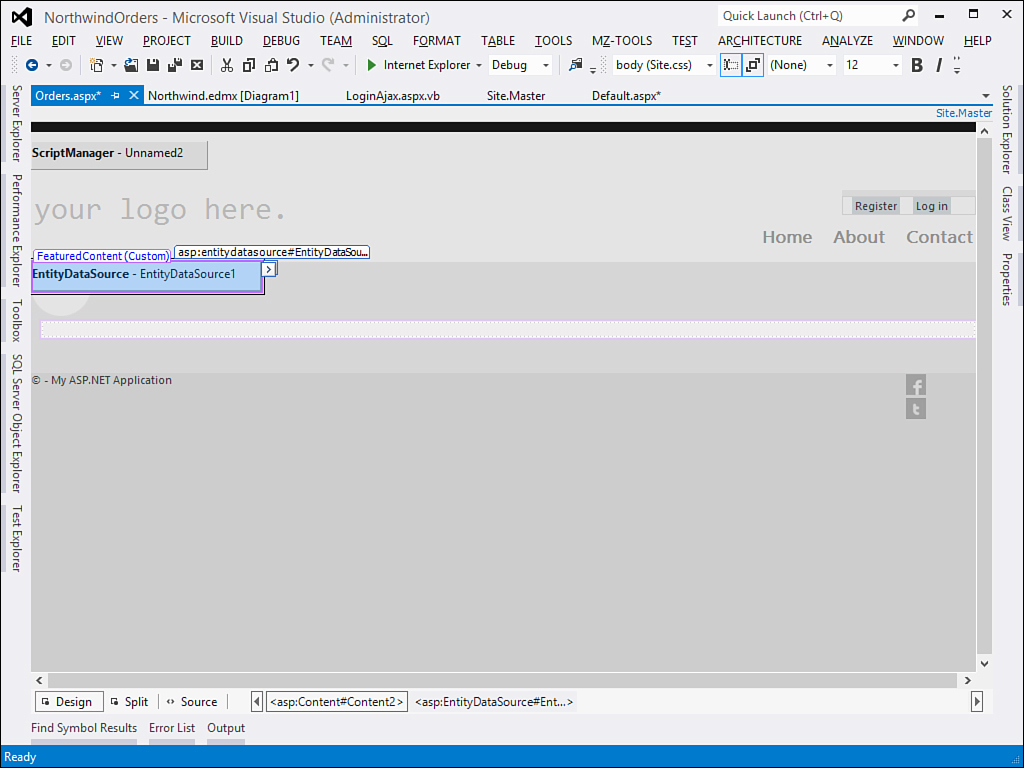
Figure 34.5. Adding an EntityDataSource control to the page.
The good news is that you can configure the control and bind it to a data source without writing a single line of code. Build the project so that all data references are updated, and then click the right arrow on the EntityDataSource. Next, click the Configure data-source item. This launches the Configure Data Source Wizard, whose first dialog box is shown in Figure 34.6. You need to specify the source entity data model in the first combo box and then the container name you want to associate to the data control in the lower combo box; then click Next to access the second dialog box of the wizard.

Figure 34.6. Associating the entity data model to the EntityDataSource control.
In the second dialog box, you can select the entity you want to be mapped into the EntityDataSource. There you can select only a desired number of columns or all columns, as shown in Figure 34.7.
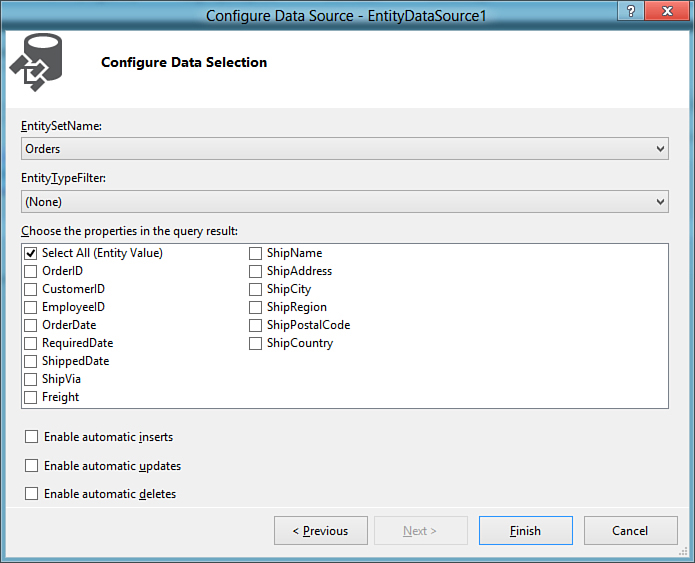
Figure 34.7. Choosing entity and entity columns for mapping into the EntityDataSource.
This is all you need to configure the data source. Now a control for viewing and editing data is necessary. In the toolbox, double-click a GridView control so that it will be added to the page under the EntityDataSource. When ready, click the right arrow to access configuration properties. This shows the GridView Tasks pop-up window; here you specify the EntityDataSource1 control in the Choose Data Source field to enable data-binding. Also select the Enable Paging, Enable Sorting, and Enable Selection check boxes. Figure 34.8 provides a graphical representation of this series of operations.
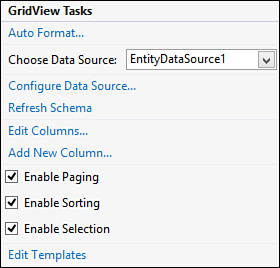
Figure 34.8. Applying data-binding and data options in the GridView Tasks pop-up.
With a few mouse clicks, you configured your new web form to present and edit data without writing a single line of Visual Basic code. If you take a look at the XHTML code for the page, you will notice that Visual Studio 2012 automatically configured the data source and generated columns for the GridView control:
<asp:EntityDataSource ID="EntityDataSource1" runat="server"
ConnectionString="name=NorthwindEntities" DefaultContainerName="NorthwindEntities"
EnableFlattening="False" EntitySetName="Orders">
</asp:EntityDataSource>
<asp:GridView ID="GridView1" runat="server" AllowPaging="True" AllowSorting="True"
AutoGenerateColumns="False"
DataKeyNames="OrderID" DataSourceID="EntityDataSource1">
<Columns>
<asp:CommandField ShowSelectButton="True" />
<asp:BoundField DataField="OrderID" HeaderText="OrderID" ReadOnly="True"
SortExpression="OrderID" />
<asp:BoundField DataField="CustomerID" HeaderText="CustomerID"
SortExpression="CustomerID" />
<asp:BoundField DataField="EmployeeID" HeaderText="EmployeeID"
SortExpression="EmployeeID" />
<asp:BoundField DataField="OrderDate" HeaderText="OrderDate"
SortExpression="OrderDate" />
<asp:BoundField DataField="RequiredDate" HeaderText="RequiredDate"
SortExpression="RequiredDate" />
<asp:BoundField DataField="ShippedDate" HeaderText="ShippedDate"
SortExpression="ShippedDate" />
<asp:BoundField DataField="ShipVia" HeaderText="ShipVia"
SortExpression="ShipVia" />
<asp:BoundField DataField="Freight" HeaderText="Freight"
SortExpression="Freight" />
<asp:BoundField DataField="ShipName" HeaderText="ShipName"
SortExpression="ShipName" />
<asp:BoundField DataField="ShipAddress" HeaderText="ShipAddress"
SortExpression="ShipAddress" />
<asp:BoundField DataField="ShipCity" HeaderText="ShipCity"
SortExpression="ShipCity" />
<asp:BoundField DataField="ShipRegion" HeaderText="ShipRegion"
SortExpression="ShipRegion" />
<asp:BoundField DataField="ShipPostalCode" HeaderText="ShipPostalCode"
SortExpression="ShipPostalCode" />
<asp:BoundField DataField="ShipCountry" HeaderText="ShipCountry"
SortExpression="ShipCountry" />
</Columns>
</asp:GridView>
This is possible because the ASP.NET data controls implement all functionalities required to access and edit data by assigning some properties. Our page is ready for showing and editing orders from the database. I want to show you another couple of features for filtering data that can also help you understand how powerful ASP.NET is.
Runtime Data-Binding Tip
Most of ASP.NET data controls expose a DataSource property that can be assigned at runtime with a custom data source, such as a List(Of T). When assigned this property, you invoke the control’s DataBind method to perform the binding.
Adding Filtering Capabilities
It would be interesting having filtering capabilities—for example, we could implement a filter that enables fetching all orders with the ShipCity property value that starts with the specified text. Thus, in the toolbox double-click a TextBox and a Button. These controls will be automatically placed onto the page (they will be placed at the top if that is where the cursor is in the designer). Now replace the Name property value of the TextBox with FilterTextBox. In the Button properties, change the Name value with FilterButton and the Text property with Filter. To provide filtering capabilities over the data source, ASP.NET offers the QueryExtender control that you can find within data controls in the toolbox. Add it to the page and then assign its TargetControlID property with EntityDataSource1, which is the name of the data control to be queried or filtered. Now you need to specify an expression for filtering; these kinds of expressions are known as search expressions. ASP.NET offers more than one search expression, but the simplest and most appropriate for our purposes is SearchExpression. This object requires the specification of the search type and of the columns to be interrogated, but this is not sufficient. A ControlParameter element needs to be nested so you can specify the control where the search criteria are inserted (in our case the textbox) and the .NET type involved in the expression. Talking in code terms, you need to manually write the following code inside the QueryExtender:
<asp:QueryExtender ID="QueryExtender1" runat="server"
TargetControlID="EntityDataSource1">
<asp:SearchExpression DataFields="ShipCity" SearchType="StartsWith">
<asp:ControlParameter ControlID="FilterTextBox" Type="String" />
</asp:SearchExpression>
</asp:QueryExtender>
The only Visual Basic code we need to write is the event handler for the Page.Loaded event to check the PostBack state. This is accomplished by writing the following code in the Orders.aspx.vb code file:
Protected Sub Page_Load(ByVal sender As Object,
ByVal e As System.EventArgs) _
Handles Me.Load
If Not Page.IsPostBack Then
FilterTextBox.Text = ""
End If
End Sub
This is all we need, no other code. Before running the sample web application, let’s make the new web form reachable from the master page.
Adding Navigation Controls
Open the master page in the designer. You see the availability of two buttons named Home and About. These are menu items inside a Menu control that point to the associated web form. If you split the view so that the source code is visible, you can easily add menu items inside the nav element. The following XHTML code demonstrates how to add a new button pointing to the Orders.aspx page, after the existing buttons:
<nav>
<ul id="menu">
<li><a runat="server" href="~/">Home</a></li>
<li><a runat="server" href="~/About.aspx">About</a></li>
<li><a runat="server" href="~/Contact.aspx">Contact</a></li>
<li><a runat="server" href="~/Orders.aspx">Orders</a></li>
</ul>
</nav>
As you can see, the href tag holds a relative URI that points to the page, while the a element contains the description of the button. Now in the master page you can see a new Orders button associated to the same-named web page.
Running the Application
You can run the demo application by pressing F5. Figure 34.9 shows the Orders page, with a list of orders filtered according to the given search criteria. Also notice how paging features have been correctly implemented. Finally, try clicking the page buttons that provide navigation capabilities.
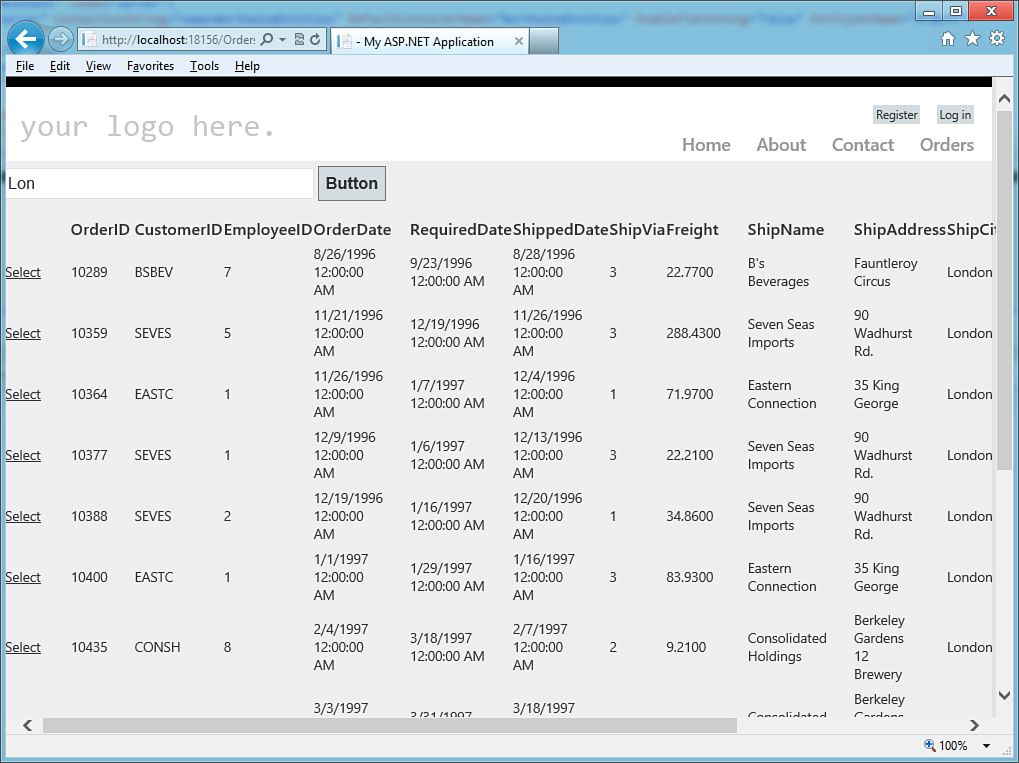
Figure 34.9. The sample web application running.
New in ASP.NET 4.5: Strongly Typed Data Controls and Model Binding
The previous code example demonstrated how to data-bind a collection of objects to a control of the user interface only using design tools and writing no code. In the real world, you will often need to write some code to perform data-binding. For example, if you have a GridView control like in the previous sample application, you can perform runtime binding by assigning the DataSource property and then invoking the DataBind method explicitly like this:
Me.GridView1.DataSource = northwind.Orders
Me.GridView1.DataBind()
ASP.NET 4.5 has some new goodies to help you write both declarative and runtime data-binding code, offering strongly typed data controls and model binding.
Strongly Typed Data Controls
In the previous versions of the .NET Framework, to bind data at runtime you needed to use an Eval expression for one-way binding and a Bind expression for two-ways binding. Listings 34.1 and 34.2 show an example of one-way and two-ways bindings, respectively, the old way. They use a FormView control which allows representing details of an object.
Listing 34.1. One-way Binding in ASP.NET Prior to Version 4.5
<asp:FormView ID="FormView1" runat="server">
<ItemTemplate>
<li>
Order ID: <%# Eval("OrderID")%><br />
Ship City: <%# Eval("ShipCity")%><br />
</li>
</ItemTemplate>
</asp:FormView>
Listing 34.2. Two-way Binding in ASP.NET Prior to Version 4.5
<asp:FormView ID="FormView1" runat="server">
<EditItemTemplate>
<div>
<asp:Label ID="Label1" runat="server" AssociatedControlID="firstName">
First Name:</asp:Label>
<asp:TextBox ID="firstName" runat="server"
Text='<%#Bind("FirstName") %>' />
</div>
<div>
<asp:Label ID="Label2" runat="server" AssociatedControlID="lastName">
First Name:</asp:Label>
<asp:TextBox ID="lastName" runat="server"
Text='<%#Bind("LastName") %>' />
<asp:Button ID="Button1" runat="server" CommandName="Update"/>
</EditItemTemplate>
</asp:FormView>
This kind of approach works fine but has two limitations: it necessarily invokes Reflection at runtime to determine the data-bound object’s properties and has no support for IntelliSense or background compilation. So if you are writing bad property names, you will get no errors until you run the application. To solve both problems, in Visual Studio 2012 you can use a new feature called Strongly Typed Data Controls, which lets you declare the type of the data to which the control is bound. This can be done by assigning the new ItemType property with the data type (notice that, during the assignment, IntelliSense will help you choose among the available types with a convenient drop-down list). Next, you use an Item expression like in the following code:
<asp:FormView ID="FormView1" runat="server" ItemType="NorthwindOrders.Order">
<ItemTemplate>
<li>
Order ID: <%# Item.OrderID%><br />
Ship City: <%# Item.ShipCity%><br />
</li>
</ItemTemplate>
</asp:FormView>
When you type the dot after Item, you will see that IntelliSense lists all available members from the selected object type. This will avoid a lot of runtime errors due to bad writing and will use both IntelliSense and the background compiler so that errors will be immediately shown in the Errors tool window at compile time.
Model Binding
ASP.NET 4.5 extends web forms data controls with the model binding, which enables you to work with code-focused models like EDMs or Code First. You assign the SelectMethod property of data controls with the name of a method that returns a collection of objects, so you will no longer need to invoke DataBind explicitly. Let’s see an example with a GridView that shows a reduced number of columns from the Orders table from the Northwind database:
<asp:GridView ID="GridView1" runat="server" AutoGenerateColumns="false"
ItemType="NorthwindOrders.Order" SelectMethod="GetOrders">
<Columns>
<asp:BoundField DataField="OrderDate" HeaderText="OrderDate"
SortExpression="OrderDate" />
<asp:BoundField DataField="RequiredDate" HeaderText="RequiredDate"
SortExpression="RequiredDate" />
<asp:BoundField DataField="ShippedDate" HeaderText="ShippedDate"
SortExpression="ShippedDate" />
<asp:BoundField DataField="ShipVia" HeaderText="ShipVia"
SortExpression="ShipVia" />
<asp:BoundField DataField="Freight" HeaderText="Freight"
SortExpression="Freight" />
</Columns>
</asp:GridView>
You first use the strongly typed approach described previously by assigning the ItemType property. Then you specify a query method that returns the collection of data for the SelectMethod property. This method must be defined in the page’s code-behind and must return an IQueryable or IQueryable(Of T). In our case, the method can be defined as follows:
Public Function GetOrders() As IQueryable(Of Order)
'Where 'northwind' is an instance of the EDM
Return northwind.Orders
End Function
Because query methods return IQueryable or its generic flavor, you can either write LINQ queries or set the GridView’s properties (or other data controls’ properties) to allow filtering and sorting options. The following imperative code demonstrates how to execute a LINQ query to return a filtered and ordered collection of orders:
Public Function GetOrders() As IQueryable(Of Order)
'Where 'northwind' is an instance of the EDM
Dim query = From ord In northwind.Orders
Where ord.OrderDate < Date.Today
Order By ord.ShipCity
Select ord
Return query
End Function
With this code, the GridView will hold data-binding to the filtered and sorted collection without the need of invoking DataBind explicitly. Similarly, you can work directly on the XHTML code. The following snippet demonstrates how to enable paging and sorting directly on the GridView definition:
<asp:GridView ID="GridView1" runat="server" AutoGenerateColumns="false"
ItemType="NorthwindOrders.Order" DataKeyNames="OrderID"
AllowPaging="true" PageSize="100" AllowSorting="true"
SelectMethod="GetOrders">
<Columns>
<asp:BoundField DataField="OrderDate" HeaderText="OrderDate"
SortExpression="OrderDate" />
<asp:BoundField DataField="RequiredDate" HeaderText="RequiredDate"
SortExpression="RequiredDate" />
<asp:BoundField DataField="ShippedDate" HeaderText="ShippedDate"
SortExpression="ShippedDate" />
<asp:BoundField DataField="ShipVia" HeaderText="ShipVia"
SortExpression="ShipVia" />
<asp:BoundField DataField="Freight" HeaderText="Freight"
SortExpression="Freight" />
</Columns>
</asp:GridView>
Notice how you enable paging by setting AllowPaging with true and by specifying the number of items per page with PageSize. Sorting is enabled by setting AllowSorting with true and with DataKeyNames, which contains the column(s) name used for sorting. Model binding also enables you to update data other than read-only query operations. For this purpose, you assign the UpdateMethod property on the data control. If you do not create a method first and choose the option to generate a new method via IntelliSense, Visual Studio will create a method stub (with a lot of useful comments) that you will have to change to make your changes to the selected object. For example, the following method has been generated by choosing the new method option with IntelliSense and demonstrates how to retrieve the instance of the selected order and how to send changes to the data source:
' The id parameter name should match the DataKeyNames value set on the control
Public Sub GridView1_UpdateItem(ByVal id As Integer)
Dim item As NorthwindOrders.Order = northwind.Orders.
FirstOrDefault(Function(o) o.OrderID = id)
' Load the item here, e.g. item = MyDataLayer.Find(id)
If item Is Nothing Then
' The item wasn't found
ModelState.AddModelError("",
String.Format("Item with id {0} was not found", id))
Return
End If
'Make your changes:
item.ShipVia = 1
'Update your model:
TryUpdateModel(item)
If ModelState.IsValid Then
' Save changes here, e.g. MyDataLayer.SaveChanges()
northwind.SaveChanges()
End If
End Sub
If you now assign UpdateMethod="GridView1_UpdateItem" on the GridView, this will always use the specified method to perform edits on the selected object.
Configuring a Web Application for Security
The sample web application that was illustrated in the previous section has one important limitation: It can be accessed by anonymous users who can access important data. If your application just presents information, anonymous access is typically fine. But if your application has the purpose of managing data or restricted information, you need to force users to log in with their own credentials, such as a username and password. ASP.NET provides a convenient and easy way for configuring web applications to require login credentials by storing user information inside a SQL Server database and using roles and registration; another interesting thing is that Visual Studio 2012 generates a login page for you when creating the project. To start configuring security for your web application, select Project, ASP.NET Configuration. This runs the ASP.NET Web Site Administration Tool, a web application executed in your web browser (see Figure 34.10).

Figure 34.10. The ASP.NET Administration Tool.
This tool enables the configuring of different parts in the web application, but for the current example just click the Security tab. When you click this tab, you can access different security options, including setting users and roles. You can also utilize a guided procedure to configure the application security; thus, click the Use the Security Setup Wizard to Configure Security Step by Step hyperlink. You’ll need to complete seven steps, but the first one is just a welcome message, so you can click Next. Starting from the second step, execute the following tasks:
1. Specify the access method by selecting either From the Internet and From a Local Area Network. The first option is more restrictive and requires users to register with their credentials, such as a username and password. This is particularly useful when you do not know who will access the website and want a user to log in with credentials. Moreover, if a website is available on the Internet, it can be reached by non-Windows environments and therefore Windows authentication is not appropriate. Instead, the local intranet option should be used only when the web application runs only inside of your company because it relies on Windows and domain authentication only, although this simplifies your work because you will not have to configure users. For the current example, where user administration is also covered, select the Internet security and then click Next.
2. Click Next at step 3 because you do not need to change storage information (such as the database provider).
3. Click the Enable Roles for This website check box, and then click Next. This is important because securing the web application requires at least one role. Typically, a website includes at least an administration role, so in the New Role Name textbox, type Administrator and then click Add Role. The new role will be added to the roles list, so click Next.
4. Sign up for a new account by providing required information. This is important because the web application requires at least one user who later will be associated to the role. When ready, click Create User. You will be told that adding the new user was successful, so click Next.
5. Specify access rules to the web application by allowing or denying access permissions to specific roles or users. You can allow all registered users and roles to access the whole application, but you can create custom rules granting permissions to selected users/roles. For example, you can select a folder of the application by first expanding the root folder on the left and then selecting the permission (Allow or Deny) for the users or roles in the Rules Applies To item. When this is set, click Next. Figure 34.11 shows an example.

Figure 34.11. Configuring rules for users and roles for folder permissions.
6. In the last step, click Finish.
When you configure users or when users register to claim access to the web application, the user information is stored inside a default SQL Server database that Visual Studio generates for you. If you want to use a SQL Server database different from the default one, use the Aspnet_regsql.exe command-line tool that creates the appropriate tables.
With a few steps, you quickly configured your application for requesting registration and login. The last step before running the application is associating the main user to the Administrator role. To accomplish this, click Manage Users and then Edit User. When the user administration page appears, click the check box for Administrator. Finally, click Save. Now close the configuration tool, run the application, and try to open the Orders page. As you see, you cannot view the requested page until you log in with the previously created user’s credentials. When you log in, you can browse the application. The really cool thing is that the Login page generated for you by Visual Studio 2012 is bound to the SQL Server database where user information is stored, so you do not need to write code to check whether a user has permissions to access. This is performed for you behind the scenes by the application that takes advantage of autogenerated elements.
Summary
In this chapter, we made an overview of the ASP.NET technology and of how you can build websites based on the technology. You read about important concepts on the ASP.NET model and how it maintains the application state; then you learned how to create a web application with Visual Basic 2012. For this, you first learned what web forms are and how the logic is divided into XHTML code for the user interface side and into Visual Basic code for performing executive tasks. You took a look at available user controls, both server and HTML controls; then you put your hands on a sample web application to manage data exposed from an Entity Data Model. Finally, you learned the steps necessary to configure security for websites implementing login credentials.